A well-known pattern for phones is the list or the recycler view that show you some details when you click on any of the rows. On a small screen, the app will navigate you to a different view. This pattern simply exists because of the lack of space on the screen of a phone. If you run the same app on a device that has sufficient space, we can show the list on the left-hand side of the screen and the details on the right-hand side.
Multiple layouts are what we need, combined with multiple fragments. If we do this, we can reduce the amount of code we need to write. We just do not want to repeat ourselves, do we?
Fragments are a powerful but also an often misunderstood component of Android development. Fragments are (little) pieces of functionality and most of the time do have their own layouts. Using fragment containers, a fragment may reside in multiple places and on multiple activity-related layouts. This is how we can reuse functionality and layouts.
Fragments should be used carefully though. Without a proper strategy, an app that uses fragments can cause you a lot of trouble. Code within a fragment frequently refers to an activity. While this code may still be running, the fragment may be detached from the activity in between (for example, because the user has pressed the back button). This could result in a crash of your app.
To go through this recipe, you need to have Android Studio up and running, and a phone, phablet, and/or tablet device (physical ones are recommended as always; however, you can use Genymotion to create virtual ones).
Since we will be using the YouTube Android API, you need to have the latest YouTube Android app installed on your device as well. Check on your device whether it is there, or install or update it using the Google Play app in case it is not on your device or an update for it is available.
Finally, you need to have a developer's account. In case you do not have one yet, you need to create one first from http://developer.android.com/distribute/googleplay/start.html.
In addition to buying this book, getting yourself a developer's account is a very good investment, and I strongly recommend you to get one. You will need one in order to be able to submit your app to the Google Play store anyway!
Let's see how we can create our own wearable app and make it run on a device:
- Start a new Android Studio project. Name your application
YouTubeMediaAppand enterpackt.comin the Company Domain field. Click on the Next button. - In the following dialog, only check the Phone and Tablet option and click on the Next button.
- In the next dialog, choose Blank activity and click on the Next button.
- In the Customize the Activity dialog, click on the Finish button.
- Android Studio will create the new project for you. From the Project view on the left-hand side of Android Studio, locate
build.gradlewithin theappfolder and open it. - Open the
build.gradlefile within theappfolder and add a dependency to thedependenciessection for the YouTube services API. We are going to use this API to search for videos on YouTube:compile 'com.google.apis:google-api-services-youtube:v3-rev120-1.19.0'
- Synchronize the project (click on the Sync now link or use the Sync project with Gradle files button from the toolbar).
- Open the
activity_main.xmllayout. Create a frame layout that will act as a container for the fragment that we want to display here later. We will give it a nice background color for demonstration purposes. Let's pick orange:<?xml version="1.0" encoding="utf-8"?> <FrameLayout xmlns:android= "http://schemas.android.com/apk/res/android" android:layout_width="match_parent" android:layout_height="match_parent" android:background="@android:color/holo_orange_light" android:id="@+id/main_container_for_list_fragment"> </FrameLayout>
- Add a new layout and name it
fragment_list.xml. Create a list view within a container. This list will contain the title and other information about the videos that we will find on YouTube:<?xml version="1.0" encoding="utf-8"?> <FrameLayout xmlns:android="http://schemas.android.com/apk/res/android" android:orientation="vertical" android:layout_width="match_parent" android:layout_height="match_parent"> <ListView android:id="@+id/main_video_list_view" android:visibility="visible" android:padding="6dp" android:layout_marginTop="0dp" android:layout_width="match_parent" android:layout_height="match_parent"> </ListView> </FrameLayout> - Add a new Java class, name it
ListFragment, and click on the OK button to continue. - Make the new class a
Fragmentdescendant and override theonCreatemethod. Create a private member for the list view and add a reference to the list view in the layout as shown in the following code:public class ListFragment extends Fragment { private ListView mListView; @Override public View onCreateView(LayoutInflater inflater, ViewGroup container, Bundle savedInstanceState) final View view= inflater.inflate( R.layout.fragment_list, container, false); mListView = (ListView)view.findViewById( R.id.main_video_list_view); return view; } } - While adding the correct import statements (using the Alt + Enter shortcut or otherwise) you will be able to choose which package to import. You can choose between the
android.app.Fragmentandandroid.support.v4.app.Fragmentpackages. The last one is for backward compatibility purposes only. Since we will be using the latest SDK for our app, choose this import statement if asked:import android.app.Fragment;
- Add another private member for YouTube and a YouTube list and create a method named
loadVideos. First, we will initialize the YouTube member:private YouTube mYoutube; private YouTube.Search.List mYouTubeList; private void loadVideos(String queryString){ mYoutube = new YouTube.Builder(new NetHttpTransport(), new JacksonFactory(), new HttpRequestInitializer() { @Override public void initialize(HttpRequest hr) throws IOException {} }).setApplicationName( getString(R.string.app_name)).build(); } - Next, we will tell YouTube what we are looking for and what information we want the API to return. We need to wrap our code in a try catch construction as we do not know in advance whether we will be able to connect to YouTube. Add this to the end of the
loadVideosmethod:try{ mYouTubeList = mYoutube.search().list("id,snippet"); mYouTubeList.setType("video"); mYouTubeList.setFields( "items(id/videoId,snippet/title,snippet/ description,snippet/thumbnails/default/url)"); } catch (IOException e) { Log.d(this.getClass().toString(), "Could not initialize: " + e); } - To use the YouTube API, you must register your app first. To do so, navigate your browser to https://console.developers.google.com/project.
- Click on the Create a project button. Enter
YouTubeAppas the project name and click on the Create button. - Once the project is created, the dashboard will be shown on the webpage. On the left-hand side, expand APIs and auth and click on APIs.
- On the right-hand side of the page, click on YouTube Data API. Click on the Enable API button.
- On the left-hand side again, click on Credentials just after APIs. Under Public API access, click on the Create new Key button.
- On the Create new key popup dialog box, click on the Android key button.
- Since this app is for demo purposes only, we do not need to look up the requested SHA1 value. Just click on the Create button.
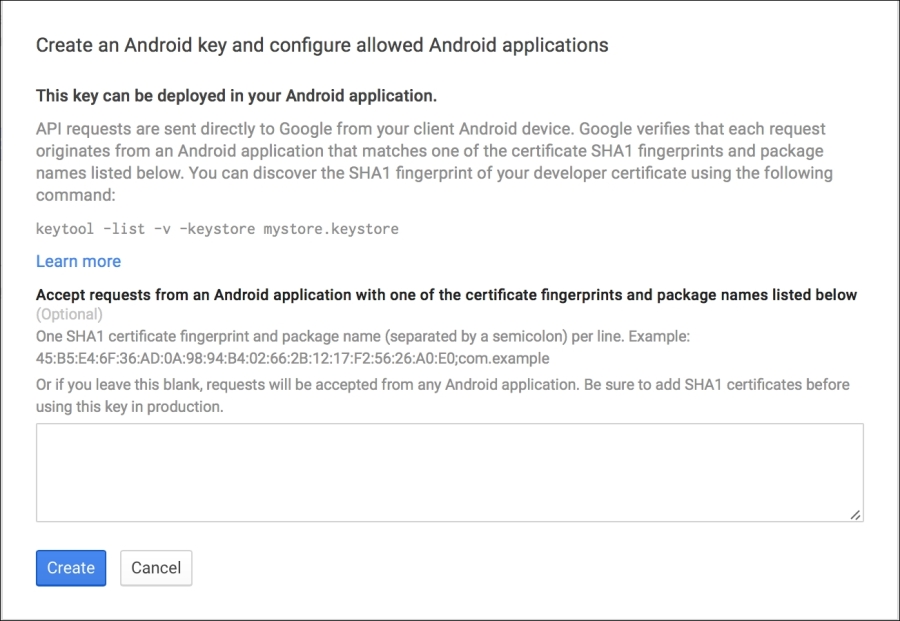
- Now, an API key will be created for you. Copy the value for API key.
- In the
AndroidManifest.xmlfile, add a permission to access the Internet:android:name="android.permission.INTERNET"/>
- Now back in the
ListFragmentclass, tell the API about your key that is just next to thesearchcall on the YouTube object:mYouTubeList.setKey("Your API key goes here"); - Create a new
VideoItemclass and add members to hold the requested information for each video. Note that we are using getters and setters here:private String title; private String description; private String thumbnailURL; private String id; public String getId() { return id; } public void setId(String id) { this.id = id; } public String getTitle() { return title; } public void setTitle(String title) { this.title = title; } public String getDescription() { return description; } public void setDescription(String description) { this.description = description; } public String getThumbnailURL() { return thumbnailURL; } public void setThumbnailURL(String thumbnail) { this.thumbnailURL = thumbnail; } - Create a new layout and name it
adapter_video.xml. Then, add text views to display the video information:<?xml version="1.0" encoding="utf-8"?> <LinearLayout android:layout_width="match_parent" android:layout_height="wrap_content" android:orientation="vertical" xmlns:android= "http://schemas.android.com/apk/res/android" android:padding="6dp"> <TextView android:id="@+id/adapter_video_id"android:textSize="14sp"android:textStyle="bold"android:layout_width="match_parent"android:layout_height="wrap_content" /> <TextView android:id="@+id/adapter_video_title"android:textSize="20sp"android:layout_marginTop="2dp"android:layout_width="match_parent"android:layout_height="wrap_content" /></LinearLayout> - Create a new
VideoAdapterclass and make it anArrayAdapterdescendant that will be holding entries of theVideoItemtype. A view holder will help us fill the text views with the properties of the listedVideoItemobject:public class VideoAdapter extends ArrayAdapter<VideoItem> { private Context mContext; private int mAdapterResourceId; public ArrayList<VideoItem>mVideos = null; static class ViewHolder{ TextView videoId; TextView videoTitle; } @Override public int getCount(){ super.getCount(); int count = mVideos !=null ? mVideos.size() : 0; return count; } public VideoAdapter (Context context, int adapterResourceId, ArrayList<VideoItem> items) { super(context, adapterResourceId, items); this.mVideos = items; this.mContext = context; this.mAdapterResourceId = adapterResourceId; } @Override public View getView(int position, View convertView, ViewGroup parent) { View v = convertView; if (v == null){LayoutInflater vi = (LayoutInflater)this.getContext().getSystemService( Context.LAYOUT_INFLATER_SERVICE); v = vi.inflate(mAdapterResourceId, null); ViewHolder holder = new ViewHolder(); holder.videoId = (TextView) v.findViewById(R.id.adapter_video_id); holder.videoTitle = (TextView) v.findViewById(R.id.adapter_video_title); v.setTag(holder); } final VideoItem item = mVideos.get(position); if(item != null){ final ViewHolder holder = (ViewHolder)v.getTag(); holder.videoId.setText(item.getId()); holder.videoTitle.setText( item.getTitle()); } return v; } - Now back to the
ListFragmentclass. Add two more private members in it, one for the list of videos that we have found and one for the adapter that we have just created:private List<VideoItem>mVideos; private VideoAdapter mAdapter;
- Add a
searchmethod to theListFragmentclass:public List<VideoItem> search(String keywords){ mYouTubeList.setQ(keywords); try{ SearchListResponse response = mYouTubeList.execute(); List<SearchResult> results = response.getItems(); List<VideoItem> items = new ArrayList<VideoItem>(); for(SearchResult result:results){ VideoItem item = new VideoItem(); item.setTitle(result.getSnippet().getTitle()); item.setDescription(result.getSnippet(). getDescription()); item.setThumbnailURL(result.getSnippet(). getThumbnails().getDefault().getUrl()); item.setId(result.getId().getVideoId()); items.add(item); } return items; } catch(IOException e){ Log.d("TEST", "Could not search: " + e); } } - Toward the end of the
loadVideosmethod, add the implementation to call thesearchmethod and initialize the adapter:mVideos =search(queryString§); mAdapter = new VideoAdapter(getActivity(), R.layout.adapter_video, (ArrayList<VideoItem>) mVideos);
- Tell the list view about the adapter and call the
notifyDataSetChangedmethod of the adapter to inform that new entries are available to be shown. For this, we will use aRunnableinstance that will be running on the UI thread:getActivity().runOnUiThread(new Runnable() { public void run() { mListView.setAdapter(mAdapter); mAdapter.notifyDataSetChanged(); } }); - Now we will load the video information asynchronously, as we do want the app to be responsive while getting data from the Internet. Create a new thread and call
loadVideosinside within therunmethod. Let's assume we want to look at Android development videos:@Override public void onActivityCreated(Bundle bundle){ super.onActivityCreated(bundle); new Thread(new Runnable() { public void run(){ loadVideos("Android development"); } }).start(); } - Create a new layout and name it
fragment_details.xml. In this fragment, we will display a thumbnail and the description of a video that the user has selected from the list. Since we are here anyway, let's add a play button as well. We will need it in the next recipe:<?xml version="1.0" encoding="utf-8"?> <LinearLayout xmlns:android= "http://schemas.android.com/apk/res/android" android:orientation="vertical" android:layout_width="match_parent"android:layout_height="match_parent"> <Button android:id="@+id/detail_button_play"android:text="@string/play"android:layout_width="match_parent"android:layout_height="wrap_content" /> <ImageView android:id="@+id/detail_image"android:layout_width="match_parent"android:layout_height="wrap_content"android:src="@android:drawable/gallery_thumb"/> <TextView android:layout_marginTop="16dp"android:id="@+id/detail_text"android:minHeight="200dp" android:layout_width="match_parent" android:layout_height="wrap_content" /> </LinearLayout>
- Create the
DetailsFragmentclass:public class DetailsFragment extends Fragment { @Override public View onCreateView(LayoutInflater inflater, ViewGroup container, Bundle savedInstanceState) { final View view= inflater.inflate( R.layout.fragment_details, container, false); return view; } } - Add the
showDetailsprivate method toDetailsFragmentclass. In this method, we will set the text for the description and create a new runnable instance to load the thumbnail for the video. Also, add thesetVideomethod and override theonResumemethod:private void showDetails(){ if (getView()!=null &&mVideo != null) { TextView tv = (TextView) getView().findViewById(R.id.detail_text); final ImageView iv = (ImageView) getView().findViewById(R.id.detail_image); tv.setText(mVideo.getDescription()); new Thread(new Runnable() { public void run() { loadThumbnail(mVideo, iv); } }).start(); } } public void setVideo(VideoItem video) { mVideo = video; showDetails(); } @Override public void onResume(){ super.onResume(); showDetails(); } - Now, add the
loadThumbnailmethod toDetailsFragmentclass and the implementation to load the thumbnail image from the given URL:private void loadThumbnail(VideoItem video,final ImageView iv){ try { URL url = new URL(video.getThumbnailURL()); final Bitmap bmp = BitmapFactory.decodeStream( url.openConnection().getInputStream()); getActivity().runOnUiThread(new Runnable() { public void run() { iv.setImageBitmap(bmp); } }); } catch (Exception ex){ Log.d(this.getClass().toString(), ex.getMessage()); } } - If the user selects an item from the list view in the
ListFragmentclass, we need to tellDetailFragmentto display the corresponding details. In theonCreateViewmethod of theListFragmentclass, add the onItemClick handler:mListView.setOnItemClickListener(new AdapterView.OnItemClickListener() { @Override public void onItemClick(AdapterView<?> adapterView, View view, int i, long l) { VideoItem video = mVideos.get(i); onVideoClicked(video); } }); return view; - In the
MainActivityclass, add two static members that will represent the tags for both theListFragmentandDetailsFragmentclasses:public static String TAG_LIST_FRAGMENT = "LIST"; public static String TAG_DETAILS_FRAGMENT = "DETAILS";
Create the
onVideoClickedmethod in theListFragmentclass. IfDetailsFragmentexists (there is a fragment out there with theDETAILStag), it will call theshowDetailsmethod ofDetailsFragment:private void onVideoClicked(VideoItem video) { DetailFragment detailsFragment = (DetailFragment) getFragmentManager().findFragmentByTag( MainActivity.TAG_DETAILS_FRAGMENT); if (detailsFragment != null) { detailsFragment.setVideo(video);} } - We are almost done. In the
activity_main.xmllayout, we created a container for our fragment. Now we will add some code to show the content forListFragmentin that container. In theMainActivityclass, add two private members for both the fragments:private DetailFragment mDetailsFragment; private ListFragment mListFragment;
- Create
ListFragmentand add it to the container:mListFragment = new ListFragment(); FragmentTransaction ft = getFragmentManager().beginTransaction(); ft.add(R.id.main_container_for_list_fragment, mListFragment, TAG_LIST_FRAGMENT); ft.commit();
- Let's create another layout for the main activity but this time it will be one for the large screens, let's say tablets. To the
resfolder, add a new Android resource directory by right-clicking on theresitem. Choose layout for resource type, name the directorylayout-large, and click on the To button. - Within the new
layout-largedirectory, add a new layout and name itactivity_mainas well. A tablet device is big enough to hold both our fragments so for this layout, we will create two containers: one for the list and one for the details:<?xml version="1.0" encoding="utf-8"?><FrameLayout xmlns:android= "http://schemas.android.com/apk/res/android" android:layout_width="match_parent"android:layout_height="match_parent"android:id="@+id/main_container"> <FrameLayout xmlns:android="http://schemas.android.com/apk/res/android"android:layout_width="300dp" android:layout_height="match_parent" android:background="@android:color/holo_orange_light" android:id="@+id/main_container_for_list_fragment"> </FrameLayout> <FrameLayout android:id="@+id/main_container_for_detail_fragment"android:background="@android:color/holo_blue_light" android:layout_marginLeft="300dp" android:layout_width="match_parent" android:layout_height="match_parent"> </FrameLayout> </FrameLayout>
- Modify the
onCreateimplementation forMainActivity. If the container is available, we will load the details fragment as well. Move thecommitcall to the end:mListFragment = new ListFragment(); FragmentTransaction ft = getFragmentManager().beginTransaction(); ft.add(R.id.main_container_for_list_fragment, mListFragment, TAG_LIST_FRAGMENT); if (findViewById( R.id.main_container_for_detail_fragment)!= null){ mDetailsFragment = new DetailFragment();ft.add(R.id.main_container_for_detail_fragment, mDetailsFragment, TAG_DETAILS_FRAGMENT); } ft.commit(); - One more thing, if you'll allow me to explain. Well, a couple of things actually. If the app is running on a phone, we need to have some kind of navigation from the list fragment view to the details fragment view. Modify the
onVideoClickedmethod in theMainActivityfile so that in case it does not exist yet, the detail fragment will be created there:private void onVideoClicked(VideoItem video) { DetailFragment detailsFragment = (DetailFragment) getFragmentManager().findFragmentByTag( MainActivity.TAG_DETAILS_FRAGMENT); if (detailsFragment != null) { detailsFragment.setVideo(video); } else { FragmentTransaction ft = getFragmentManager().beginTransaction(); detailsFragment = new DetailFragment(); ft.add(R.id.main_container_for_list_fragment, detailsFragment, MainActivity.TAG_DETAILS_FRAGMENT); ft.addToBackStack(MainActivity.TAG_DETAILS_FRAGMENT); ft.commit(); detailsFragment.setVideo(video); } } - The call to
addToBackStackthat we added in the previous step informs the fragment manager about all fragments being on stack, so we can provide a way of navigation. We need to tell our activity how to behave in case the back button is being pressed: do we want to leave the activity or do we want to pop a fragment from stack? We will override theonBackPressedmethod of theMainActivity, just like this:@Override public void onBackPressed() { if (getFragmentManager().getBackStackEntryCount()>0){ getFragmentManager().popBackStack(); } else { this.finish(); } }
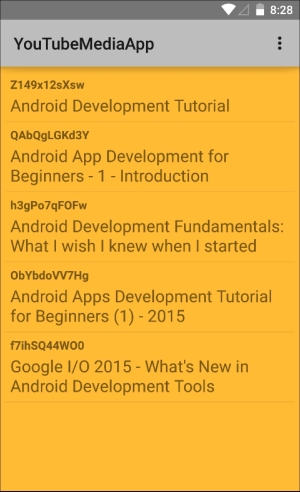
And we are done! We had some work to do but now we have got an app that will work on a phone with navigation and that will display both the fragments if there is sufficient space as is the case with a tablet.
To see the differences, run the app on a smart phone and on a tablet as well. On a phone, it will look similar to the following screenshot. On a tablet (you can use Genymotion for that if you do not have one available) both the list and details are shown in a single view: