
Android Wear is somewhat different from apps running on phones or tablets. Instead of icons and lists, Android Wear uses cards, which is something we saw already in the recipes that introduced us to the basic concepts of material design.
According to the context and only at a relevant moment, a card is added to the stream of cards once a new notification arrives. This is known as the context stream, and it does contain various interesting pieces of information. Think of them as incoming emails, the weather, the number of steps you took today, your heart beat rate, and other events or reminders.
Remember the water app from the previous chapter? For example, we could create a notification to remind us to drink water more often and to add a new card for it. This would be a nice feature to have.
This recipe requires Android Studio and the latest SDKs, including the wear SDK, installed. Check out the previous recipe for more information.
You also need a handheld device running on Android Lollipop or above that has the Android Wear app installed and a wearable device that is connected to your handheld device through Bluetooth.
Let's see how notifications can be triggered and how to display them nicely on a smartwatch:
- Create a new project in Android Studio. Name it
WaterNowNotificationand click on the Next button. - Choose Phone and Tablet as smartwatch platform. Do not check the Wear option. Click on the Next button.
- Select Blank Activity and click on the Next button.
- Name your activity
WaterNowActivityand click on the Finish button. - Open the
build.gradlefile in your app. Add this to the dependencies section and apply the appropriate version for it:compile 'com.android.support:support-v4:22.0+'
- Click on the Sync project with Gradle files button that you can find on the toolbar.
- Open the
activity_water_now.xmlfile and change it to the Text mode using the tab at the bottom of Android Studio. - Create a layout with a button that we will use to send a test notification:
<LinearLayout
xmlns:android="http://schemas.android.com/apk/res/android"xmlns:tools="http://schemas.android.com/tools"
android:layout_width="match_parent"
android:layout_height="match_parent"
android:orientation="vertical"
tools:context=".WaterNowActivity">
<Button
android:layout_width="wrap_content"
android:layout_height="wrap_content"
android:text="Drink water now!"
android:id="@+id/water_now_button"
android:layout_gravity="center" />
</LinearLayout>
- In the
onCreatemethod of theWaterNowActivityclass, add anonClickhandler for the button that we just created. Use the Alt + Enter shortcut to add import statements as needed:Button waterNowButton = (Button)findViewById(R.id.water_now_button); waterNowButton.setOnClickListener(new View.OnClickListener() { @Override public void onClick(View v) { sendNotification(); } }); - Create the
sendNotificationmethod:private void sendNotification(){ NotificationCompat.Builder notificationBuilder = new NotificationCompat.Builder( WaterNowActivity.this) .setContentTitle("Water app!") .setSmallIcon(R.drawable.icon) .setContentText("Hey there! Drink water now!"); NotificationManagerCompat notificationManager =NotificationManagerCompat.from( WaterNowActivity.this); notificationManager.notify(1 , notificationBuilder.build()); } - Notifications do require an icon, so create one in the
res/drawablefolder. Create a drawableicon.xmlfile and add the implementation to create a nice blue circle:<?xml version="1.0" encoding="utf-8"?> <shape xmlns:android= "http://schemas.android.com/apk/res/android"android:shape="oval"> <corners android:radius="10dip"/> <stroke android:color="#0000FF" android:width="15dip"/> <solid android:color="#0000FF"/> </shape>
- Connect your handheld device; make sure that the wearable device is connected (use the
Android wearapp to check this) and run the app. You will see the output similar to the following screenshot: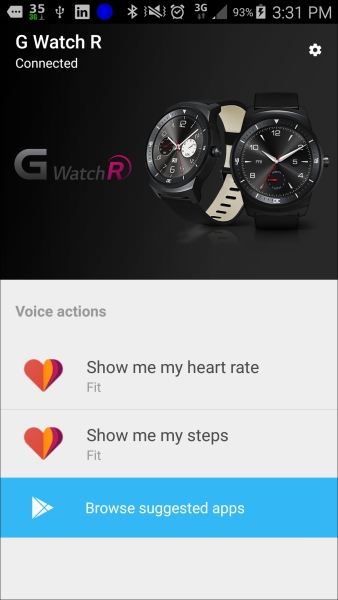
- Click on the Drink water now button within your app.
- A notification will be shown on your phone similar to the following screenshot. If it does not appear right away, there will be some indicator at the top of the screen. In this case, open the notification center to see it.

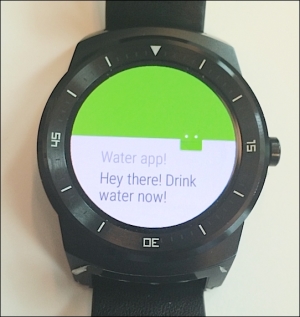
- If all is up and running and configured correctly, the same notification appears on the wearable device, shown as follows:
- If notifications are shown on your phone but do not appear on your wearable, then verify the Notification access settings. Open the Settings app and choose Sound and messages. Next, choose Notification access and check whether the Android Wear option has been checked.
For other Android versions or for particular brands (customized Android versions), the setting you are looking for may be located elsewhere and/or may have a different name.
Where to go from here? You can combine this notification recipe with the Water app from the recipes within the Chapter 3, Material Design and create something cooler or you can check whether you can find a way to customize the notification.
Smartwatches, phones, phablets, and tablets come with screens of all sizes and shapes. How can we benefit from a larger screen or how can we provide smart navigations for smaller screens and maintain the same functionality and code within one app?
Different layouts for different Android versions? Multiple layouts are what we need combined with multiple fragments. This is where the recipes in the next chapter come in.