
While workflows define and model business processes, there still needs to be a way to tell JIRA the situations in which to apply the workflows. As with other configurations in JIRA, this is achieved through the use of schemes. As we have seen in the previous chapters, schemes act as self-contained, re-usable configuration units that associate specific configuration options with projects and optionally issue types.
A workflow scheme establishes the association between workflows and issue types. The scheme can then be applied to multiple projects. Once applied, the workflows within the scheme become active.
To view and manage workflow schemes, perform the following steps:
- Log in JIRA as a JIRA Administrator.
- Click on Administration from the top menu bar.
- Select Workflow Schemes under the Workflows section to bring up the Workflow Schemes page as shown in the following screenshot:

The Workflow Schemes page shows each scheme's workflow association. For example, in the previous screenshot, we can see that for Development Workflow Scheme, the issue type Bug is assigned with Bug Workflow, while the issue type New Feature is assigned New Feature Workflow. It also shows if the workflow scheme is active, that is, if it is being used by a project.
JIRA allows you to create new workflow schemes to associate workflows to issue types. This allows you to group all your associations into a single re-usable unit (a scheme) that can be applied to multiple projects:
- Browse to the Workflow Schemes page.
- Click on the Add workflow scheme button. This will take you to the Add Workflow Scheme dialog.
- Provide a meaningful name for the new workflow scheme. For example, you can choose to name your workflow after the project/issue type it will be applied to.
- Provide an optional description.
- Click on the Add button to create the workflow scheme.
You will be taken back to the Workflow Schemes page once the new scheme has been created, and it will be listed in the table of available workflow schemes.
When you first create a new workflow scheme, the scheme is empty. This means it contains no associations of workflows and issue types. What you need to do next is to configure the associations by assigning workflows to issue types.
Workflow schemes contain associations between issue types and workflows. After you have created a workflow scheme, you need to configure and maintain the associations as your requirements change. For example, when a new issue type is added to the projects using the workflow scheme, you may need to add an explicit association for the new issue type.
To configure a workflow scheme, perform the following steps:
- Browse to the Workflow Schemes page.
- Click on the Assign link for the workflow scheme you wish to configure. This will take you to the Assign Workflows & Issue Types page as shown in the following screenshot:

From this page, you will be able to see a list of existing associations, create new associations for issue types, and delete associations that are no longer relevant.
Issue type and workflow have a many-to-one relationship. This means each issue type can be associated with one, and only one workflow. One workflow can be associated with multiple issue types. This rule is applied on a per workflow scheme basis, so you can have a different association of the same issue type in a different workflow scheme.
When you add a new association, JIRA will present you with a list of issue types that have no associations and a list of all available workflows. Once you have assigned a workflow to the issue type, it will not appear in the list again until you remove the original association.
Among the list of issue types, there is an option called All Unassigned Issue Types. This option acts as a catch-all option for issue types that do not have an explicit association. This is a very handy feature if all issue types in your project are to have the same workflow; instead of mapping them out manually one by one, you can simply assign the workflow to all with this option. This option is also important as new issue types are added and assigned to a project; they will automatically be assigned to the catch all workflow. If you do not have an All Unassigned Issue Types association, new or unassigned issue types will be assigned to use the default basic jira workflow. As with normal issue types, you can have only one catch-all association.
To associate an issue type to a workflow, perform the following steps:
- Browse to the Assign Workflow & Issue Type page for the workflow you wish to configure.
- Click on the Associate an Issue Type with a Workflow button. This will bring up the Assign Workflow to Scheme dialog.
- Select the issue type to add an association for.
- Select the workflow to associate to the issue type.
- Click on the Assign button to create the association as shown in the following screenshot:

Once an association has been added, you will be taken back to the Configure Workflows for Scheme page, and the new association will be listed in the table of associations.
Once you have associated an issue type to a workflow in a scheme, you cannot add a new association for the same issue type. There is also no edit option to change the association. What you need to do is to delete the existing association and create a new one using the following steps:
- Browse to the Assign Workflow & Issue Type page for the workflow you wish to configure.
- Click on the Delete link for the association you wish to remove. You will be prompted if you want to delete the association.
- Click on the Delete button to confirm the removal.
Once an association is deleted, you will be able to create a new one for the issue type. If you do not assign a new workflow to the issue type, it will be given either the catch-all workflow (if present), or use the default jira workflow.
You can maintain your workflow scheme's details by updating its name and description. Often a name that makes sense at one time may not a few months later:
Unused workflows schemes can be deleted from JIRA. Workflow schemes can only be deleted if they are not being used by projects. You cannot delete workflow schemes if they are being used by one or more projects:
- Browse to the Workflow Schemes page.
- Click on the Delete link for the workflow scheme you wish to update. You will be prompted to confirm.
- Click on the Delete button to remove the workflow scheme.
When you delete a workflow scheme, you are removing the associations from the system. The issue types and workflows are not affected.
You can also make copies of existing workflow schemes. When you make a copy, all of the original scheme's associations will be copied over. Once copied, both copies exist as separate entities:
- Browse to the Workflow Schemes page.
- Click on the Copy link for the workflow scheme you wish to copy.
Unlike most other copy operations in JIRA, you will not be prompted with a copy page asking for a new name and description of the new workflow scheme. Instead, JIRA will create a copy of the workflow scheme immediately, with a predefined name. For example, if you copied the workflow named "jira", the copy would be called "Copy of jira".
Copying workflow schemes can become really handy when you need to make configuration changes. As we have seen, you cannot configure or edit existing workflow schemes if they are active. Normally, this means you have to remove all the associations between projects and the workflow scheme one by one, before you can make your changes. As we will see later in the chapter, changing workflow associations can sometimes be rather disruptive.
So a better approach is to first make a copy of the workflow scheme you wish to change, and apply your changes to the copy first. You then update the projects to use the new workflow scheme. This approach still requires you to update the projects one by one, but it offers the following advantages:
- Less disruption to the users as the projects are not modified until the workflow scheme changes are ready
- An easier transition when updating projects to the new workflow scheme (as we will see later in this chapter)
- It provides you with a sandbox to experiment without the risk of breaking the existing configurations
- It allows you to have a versioning system with the old and new workflow scheme (for example, the copied scheme can be named as
Development Workflow Scheme 2.0), letting you easily find and roll back to the old scheme
Workflow schemes are inactive by default, after they are created. This means there are no projects in JIRA using the workflow scheme. To activate a workflow scheme, you need to select the scheme and apply it to the project.
When assigning a workflow scheme to a project, you need to follow the three basic steps:
- Select the project that will be using the workflow scheme.
- Select the workflow scheme to apply
- Map any differences between the old and new workflow, and apply the change.
When associating workflow schemes to projects, you have to do it at the project level, from the Workflows tab of the project's administration page. JIRA 5 has made many changes to this page. They are as follows:
- The first change is you will be able to see, both in the diagram mode and the text mode, each workflow and the issue type association of the currently applied workflow scheme.
- The second change is you will be able to work with the workflows and the workflow scheme directly. For example, you will be able to edit the workflow directly by clicking on the Edit button, or add a new workflow issue type association by clicking on the Add Workflow button. Note that you are not actually creating a new workflow, but rather, just associating issue types to an existing workflow.
These changes make it so much easier for administrators to quickly work out how everything is being tied together without having to go back and forth between different configuration pages:

After you have reviewed and decided that you need to apply a new workflow scheme, you should:
- Click on the Switch Scheme button.
- Select the workflow scheme to use.
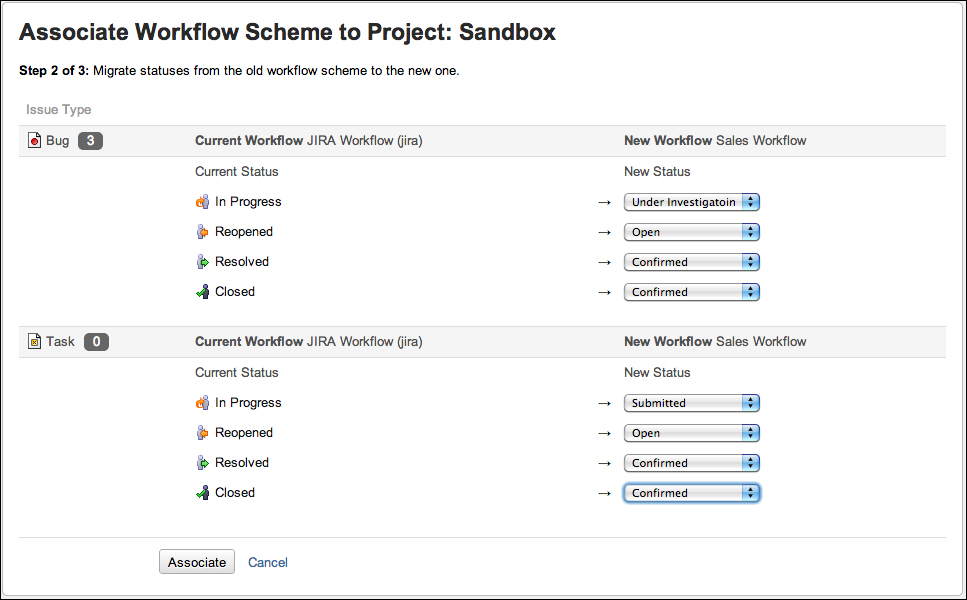
On the confirmation page, depending on the differences between the current and new workflow, you will be prompted to make migration decisions for existing issues. For example, if the current workflow has a step called Reopened and the new workflow does not (or it has something equivalent but with a different ID), you need to specify the new step to place the issues that are currently in the Reopened step. Once mapped, JIRA will start migrating existing issues to the new step using the following steps:
- Select new workflow steps for the existing issues that are in steps that do not exist in the new workflow.
- Click on the Associate button to start the migration as shown in the following screenshot:
Once the migration starts, JIRA will display a progress bar showing you the progress. Depending on the number of issues that need to be migrated, this process may take some time. It is recommended to allocate a time frame to perform this task as it can be quite resource intensive for large instances.