
Chapter 10 Hacking Google Services
Solutions in this chapter:
 AJAX Search API
- Calendar
- Blogger and Google’s Blog Search
- Signaling Alerts
- Google Co-op
- Google Code
AJAX Search API
AJAX Search API is one of the leading Google services on the AJAX front. This service is meant as a replacement of the older SOAP search service which support was discontinued some time ago. AJAX Search API is considered to be more powerful then the SOAP service and easier to work with. The primary goal of the service is to enable external websites to host Google supplied gadgets which provide searching facilities within or outside of the hosting website and also among video clips, maps, blogs, custom search engines, etc.
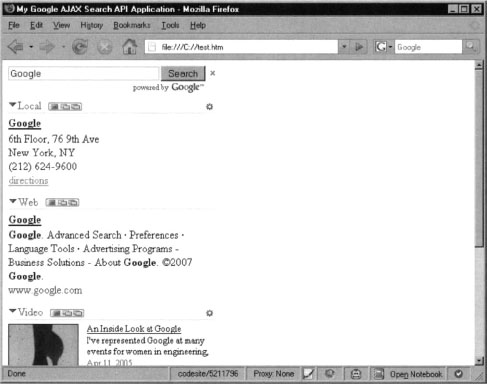
The default interface of the service looks like as shown on Figure 10.1.
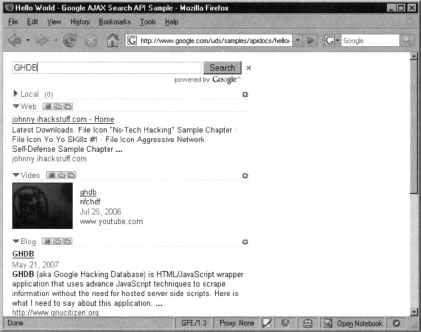
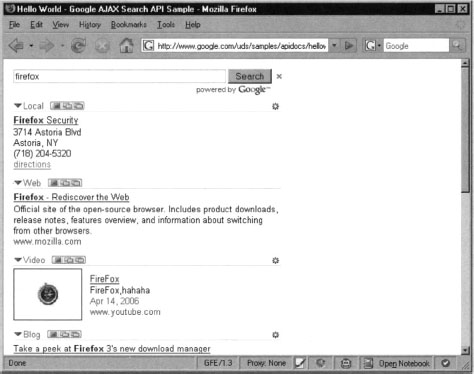
The search dialog in Figure 10.1 is divided into several sections. Each section represents a search category: Local, Web, Video, Blog, News and Book. Having all results on a single place in particular is very useful since we can perform interesting queries and get instant feedback across the entire Google platform. This is where the Search API shines best. Let’s try a query fir firefox, as shown in Figure 10.2.
Simply visit http://www.google.com/uds/samples/apidocs/helloworld.html demonstration application and type the query.
Notice that the AJAX API result set contains also Image search section with the most relevant results. In the following section we are going to have more detailed look at the AJAX API Search service.
Embedding Google AJAX Search API
The Google AJAX Search API was designed to be embedded within external pages. This makes the service rather useful, since we can construct custom interfaces for better accessing the Google infrastructure. In order to start using the AJAX Search API you need to have some understanding of JavaScript and AJAX programming and an API key which you can generate yourself. Assuming basic understanding of AJAX, we will concentrate on the interesting stuff around the service itself.
In order to generate an API key, simply Visit the AJAX Search API Home page at http://code.google.com/apis/ajaxsearch. After clicking Start using the Google AJAX Search API, you will be presented with a page similar to the one shown in Figure 10.3.
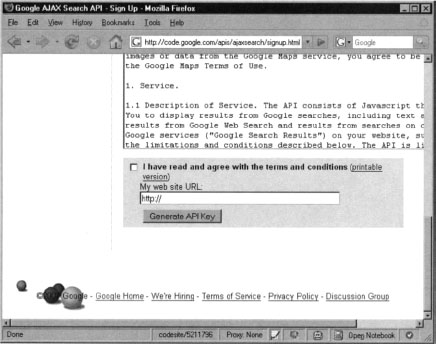
You need to provide a URL where the service will be accessed from. If you are planning to host the application from a simple page on your desktop, you can input just about anything you choose. In fact, this option seems to be largely irrelevant. For the purpose of this demonstration, we will use http://dummy as this URL. Most applications work with the internal Google key which is used across all API demo applications.
After accepting Google’s term and conditions you will be provided a page that will present you with the actual Google API key which is specifically generated for the previously supplied URL. This page also gives you an example of how to use the AJAX Search box. This is the code was generated for us:

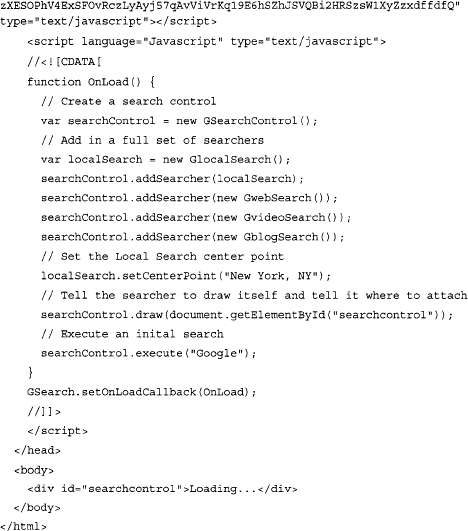
Copy the code and paste it inside a new file named test.html, for example. Now open the file in your browser. You should be able to see a page similar to the one shown in Figure 10.4.
Let’s take a look at what we have done so far. The generated HTML code reveals some of the basic characteristics of the API. First, the code loads the AJAX Search API default style sheet (CSS), followed by a JavaScript script reference:

This script loads a couple of JavaScript wrapper classes, which are used as a more convenient way to access the API. As we are going to learn from the following sections, we don’t really need them since we can access the API directly (i.e. raw accesses).
Next, another script block is defined, which initializes the environment and configures the AJAX Search control box. This is done within the OnLoad function which is called after Google finishes with loading all dependencies required to render the graphical environment:

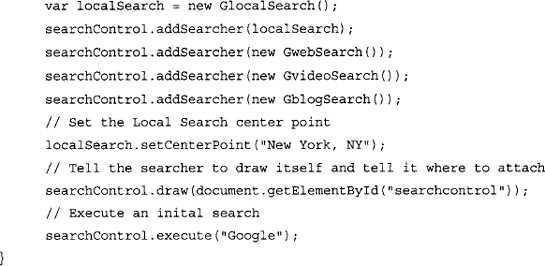
The second line in the OnLoad function initializes a Google Search control object. The search control object can reference as many search engines as we need. We can even define our own, but in this example we will set the default ones which are GwebSearch, GvideoSearch, GblogSearch and the GlobalSearch (i.e. Google Local Search). At the end of this block, the controller is rendered on the current page with the draw function, which takes as a parameter an element from the DOM tree which will hold the Search box.
This search box can be customized in many different ways. For example, we can change the colors, re-order the search section and even supply custom search engines which we will discuss later in this chapter.
For more basic information refer to the Google AJAX Search API documentation which can be found from the following URL http://code.google.com/apis/ajaxsearch.
Deeper into the AJAX Search
Now that we have seen how to embed the AJAX Search box, it is time to come up with something more interesting. As you probably noticed, the AJAX Search form is a good place to start with experimenting with the service but it does not provide the level of flexibility hackers usually work with. For that reason we need to dig deeper into the AJAX Search API and discover the more interesting characteristics of the service. For the next step we are going to make use of a HTTP request listener. We are going to use Firefox as our primary tool for development.
There are a couple of prerequisites. Most of all you’ll need Firefox, which can be downloaded from www.mozilla.com/firefox. We’ll also make use of a Firefox Extension known as “LiveHTTP Headers", which can be downloaded from https://addons.mozilla.org/en-US/firefox/addon/3829. After installing the extension, restart Firefox.
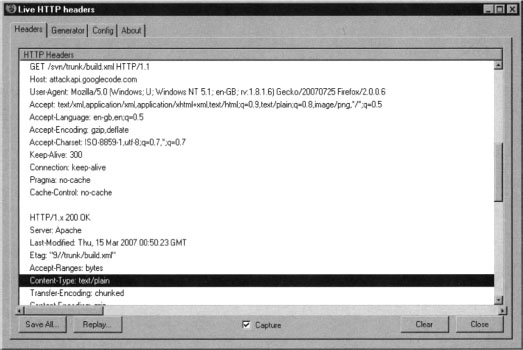
The LiveHTTPHeaders extension allows us to analyze and replay HTTP requests. In case you want to monitor traffic, you can simply open the extension window in your browser sidebar by selecting View | Sidebar | LiveHTTPHeaders. On the other hand, in case you need to use the request reply feature you may want to open it in a separate window, by selecting Tools | LiveHTTPHeaders, as shown in Figure 10.5.

Traffic monitoring tools such as the LiveHTTPHeaders extension are essential to web application security testers. Theses tools reveal what is happing in the background and provide features for disassembling and reassembling the generated requests, easily exposing fundamental application vulnerabilities and insights of the tested application inner workings.
Once the environment is ready, we are able to start with hacking into the AJAX search logic. The plan is to set the LiveHTTP Headers extension to listen for all the traffic, while we are making subsequent queries to the service. Then we are going to look at the generated output and figure out what request needs to be made in order to mimic the AJAX form behavior. We are going to use that in the next section of this chapter where are going to talk about writing custom search engines for good or malicious purposes. But first, let’s dig.
From within Firefox, enable the LiveHTTPHeaders extension and visit a page that contains an AJAX Search dialog, such as www.google.com/uds/samples/apidocs/helloworld.html. After submitting a query, LiveHTTPHeaders will reveal what happens behind the scenes. From within the results page, be sure to enable the show all results button located at the right of each section as shown on Figure 10.6. It is essential to do that for the Web section so we get the complete query. Notice that many of the results point to .jpg, .gif or png images. There are quite a few going to the Ad Indicator service provided by Google, but the most interesting ones are those that point to GwebSearch service. Figure 10.7 shows what the live capture might look like.

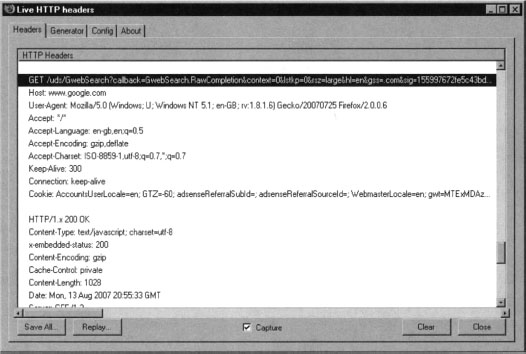
Figure 10.7 shows the format of the URL that is used to retrieve the queries. Here is an example:
Table 10.1 lists each of the GET parameters and describes what they do.

As an exercise, we can build a URL from these parameters, providing different values that we think are suitable for the task. For example:
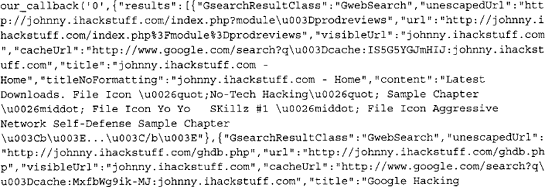
Notice that we have changed the callback parameter from “GwebSearch.Raw Completion” to “our_callback", and we are executing a search for GHDB. Executing this URL inside your browser will result in a JavaScript return call. This technique is also known as JavaScript on Demand or JavaScript remoting, and the results of this are shown below.


Hacking into the AJAX Search Engine
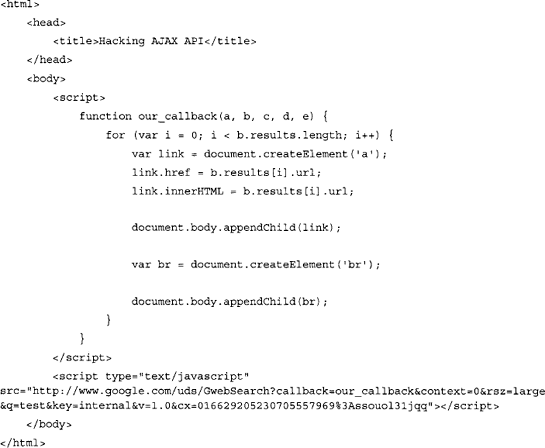
Now that we know how to query Google through their AJAX interface, let’s see how we can access the data. We will begin with the following HTML, which can be pasted into a blank html file and opened with a browser:

This code will make submit a request for GHDB to Google’s GwebSearch service. Notice that the callback parameter points back to our_callback, which is defined early in the code. The function simply grabs that data and presents it inside the page DOM (Document Object Model) in the form of links.
Although this looks interesting, there is a lot more that we can do. Let’s have a look at the following example which dynamically grabs all entries from a particular category from the Google Hacking Database, performs test queries and lists the results within a single page:
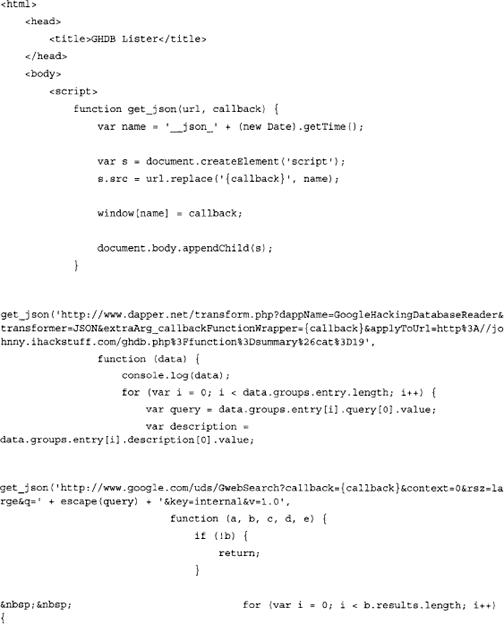

After running the example, you will be provided with a page similar to the one shown on Figure 10.8.
Let’s examine the file. As you can see the page has only one script block. This block is responsible for obtaining a list of queries from the GHDB via the Dapper (http://dapper.net) screen scraping service. We scrape the URL http://johnny.ihackstuff.com/ghdb.php?function=summary&cat=19 which corresponds to GHDB entry 19 also known as “Advisories and Vulnerabilities”. The scraper obtains several other interesting things that we are not interested for now.
Using Dapper to screen scrape various security related databases and using the information as part of a well planned client-side oriented attack vector was discussed for the first time in OWASP, Italy 2007 by the author, Petko D. Petkov, also known as pdp (architect). For more information on the topic you can visit http://www.gnucttizen.org and http://www.gnucitizen.org/projects/6th-owasp-conference.
Once the list is retrieved, we enumerate each entry and build the custom Google AJAX API queries:
As you can see, instead of a static string, we actually supply a query that is taken from the information obtained from GHDB. The subsequent request to Google AJAX Search API will retrieve the sample results and the callback functions will render them inside the page DOM.
It is important to understand the purpose of the function get_json. This function is just a helper that saves us a lot of time writing the same procedures over and over again. The get_json function simply generates a unique name for the callback parameter and assigns it at the global scope. Then, it supplies the name to the callback field marked with the placeholder {callback} and calls the external script.
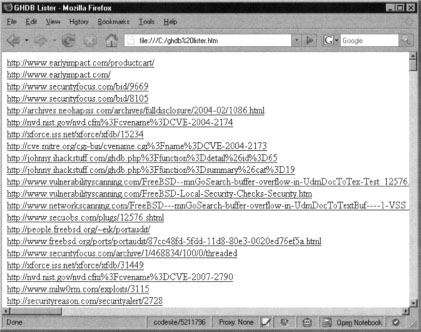
This technique was successfully implemented as part of the GHDB Proof of Concept application hosted at http://www.gnucitizen.org/ghdb (Figure 10.9).
The application scrapes all the information from Johnny Long’s Google Hacking Database at http://johnny.ihackstuff.com, dynamically and presents it to the user in a nice graphical form. You can browse through each vector by selecting a category and then selecting the query that you are interested in. Notice that the application provides a live feedback every time we select a query. The bottom part of the window contains the top searches, obtained by Google’s AJAX Search API interface.
This technique can be implemented by XSS/AJAX worms to locate targets and exploit them, thus ensuring future generations. XSS/AJAX worms usually propagate within the domain of origin. This is due to inability of JavaScript to perform cross-site requests. The technique presented in this chapter allows worms to bypass the JavaScript restrictions and access other resources on-line. For more information on the subject please check the following resources: http://www.gnucitizen.org/blog/google-search-api-worms, http://www.gnucitizen.org/projects/ghdb and http://www.gnucitizen.org/blog/the-web-has-betrayed-us.
Calendar
Google Calendar is powerful calendar management application which supports features like calendar sharing, creation of invitations, search and calendar publishing. The service is also integrated with Google Mail (GMail) and can be accessed via a Mobile device. All in all, Google Calendar is very useful addition to our day-to-day work.
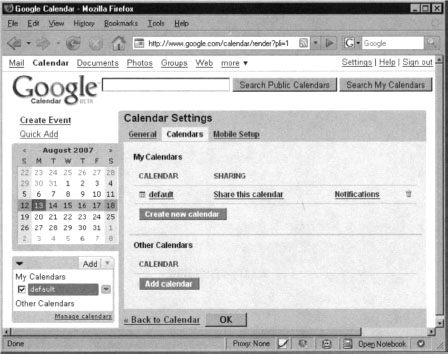
Calendar sharing in particular is a very useful feature since individual users can maintain event lists and calendars to which others may be interested in as well. Usually in order to share a calendar you have to explicitly do so from the calendar management interface as shown in Figure 10.10.
Once the calendar is shared, everyone will be able to look at it or even subscribe to the events that are inside. This can be done via the Calendar application or any RSS feed reader.
As a security expert, these shared calendars are especially interesting. Very often, even when performing the most basic searches, it is entirely possible to stumble across sensitive information that can be used for malicious purposes. For example, logging into Calendar and searching for the term “password” returns many results as shown in Figure 10.11.
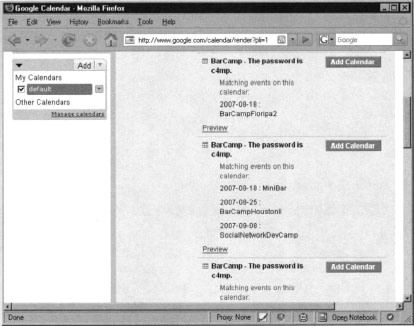
As you can see, there are several calendar entries that meet our search criteria. Among them, there are a few that are quite interesting and worth our attention. Another interesting query that brings a lot of juicy information is “passcode", as shown in Figure 10.12.
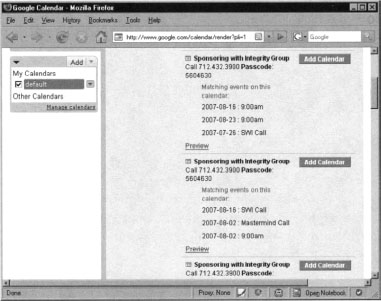
Figure 10.12 reveals several scheduled telephone conferences. Notice that the conference phone number and access code are also listed. An attacker could easily join the telephone conference at the scheduled time and silently eavesdrop on the conference. Mission accomplished. There is a lot attackers can learn from the conversation, like corporate secrets, technical details about systems in operations, etc.
Of course we can try variations of the above quires and even space them up with more keywords so we can get a better picture. For example the query “username password” returns results about people who may stored sensitive login information within their calendar, as shown in Figure 10.13.

This is just the beginning though, how about looking for birthdays, pet’s names, etc. As you probably know, a lot of password reminder facilities have a secret question. The secrets answer is usually something that we choose from our daily life so there is no chance that we can forget. However, the Calendar application may also contain our daily activities. When we mash both, we might be able to crack into the targeted user account by simply reading their calendar.
There are many different ways; the Calendar service can be abused. The main and most important security consideration that we, as users, need to make is whether the information that is enclosed within the Google’s shiny event cells is sensitive and can be used to harm us.
Blogger and Google’s Blog Search
Blogger is Google’s blogging software hosted at blogger.com and blogspot.com. Blogger is one of the most widely used blogging platforms. It allows almost instant creations of multiple blogs and has some great features for collaborating with others and preventing comment and trackback spam.
When speaking about blogs, there are a several points that we need to take into consideration. The first and most important one is that blogs are public and are meant to be read by the Internet community. Saying that, it is important that you do not publish information about yourself which later may have serious consequences on your life. What is born on the Web stays on the web. Blog feeds are aggregated by numerous online services. It is almost impossible to remove what you once have said. The information on your blog will most probably be used by your future employer as part of the standard background checks (See Figure 10.14), when applying for a job. We have already proved that a few simple queries can reveal a lot of interesting information. Google simplifies to a great extent the process of looking into interesting information in blogs. Meat Google’s Blog Search (see Figure 10.14).

Despite the fact that Google’s Blogger service effectively blocks content and trackback SPAM, there’s one loophole: what happens when SPAM originates from blogs posts themselves?
Enter the SPLOG. Splogs, or Spam Blogs, are normal blogs that reflect content consumed/aggregated from external entities but also provide additional information to accommodate their owner’s purpose.
There are a number of reasons why splogs are interesting to malicious minds. The first reason is that attackers do not have to write the blog, a task that is very time consuming, and yet make people subscribe or attend their content. As a splog’s search engine ranking increases, it attracts more visitors. If an attacker stands up an exploit on the splog’s page targeted at popular web browsers he may be able to take over hundreds of machines in mere moments.
In addition, splogs may contain ads which can generate income for the owner. The more popular the splog is, the more money it will make. If a single splog can make $20 a day, multiple splogs can make much more. Splogging is a 24/7 business that earns big money.
No matter whether malicious minds will use splogging techniques to attract victims or make money, it is interesting to see what’s behind the scenes. In the following section we are going to take a detailed look at how splogging works. We will examine a splog generation script which makes use of Google’s Blogger service.
Google Splogger
Google has excellent application programming interfaces (APIs). One of the most famous Google Services is known as GData, from Google Data. GData allows developers to perform programmatic operations on Google’s services. For example, GData can be used to programmatically update Google Calendar instances. GData can also be used to create, delete and manage Blogger entries and also manage our submissions to Google Base. The stage then seems to be set for Google’s blogging service to be used as a base for splogging. In this section we’ll show how this could be accomplished, but please note that we’re not in the business of educating criminals. If you intend to use this information for malicious purposes, be advised that Google has every right to block your access to their service. They may even have the right to pursue legal action if you persist in performing malicious actions using their services.
In the following example we are going to make use of GData’s Blogger interface. The following script allows us to programmatically login into Blogger and submit a new post. Effectively we can use a similar approach to automatically harvest RSS feeds and then upload them to a particular Blogger account which could then be used for splogging purposes.
GoogleSplogger.py requires the presence of Google’s GData API library for Python. The library can be obtained from the following URL: http://code.google.eom/p/gdata-python-client/. Once the library is downloaded, extract the content of the archive and enter into that folder via the command line. Make sure that you have the permissions required to install Python module and type: python setup.py.
The setup.py script should install the rest of the API without any problems.
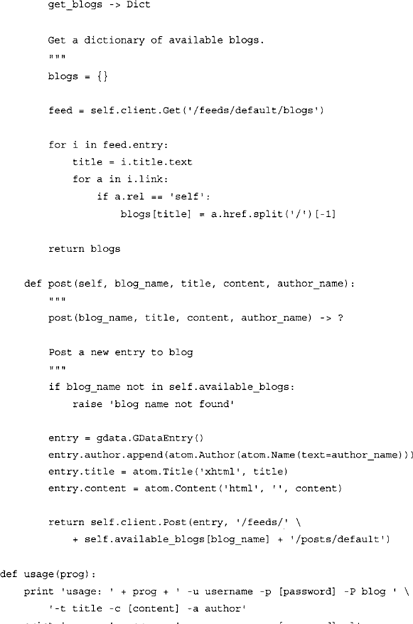
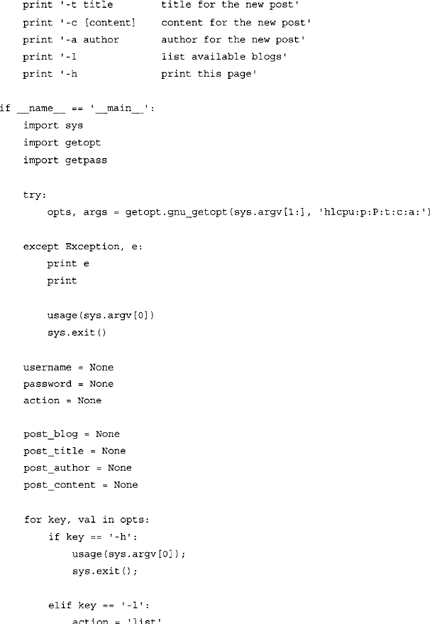
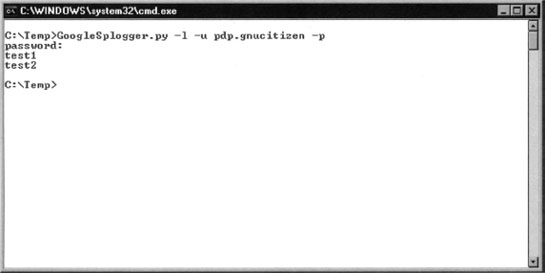
There are several ways you can run the script that we’ve listed here. For example, in order to list the names of the blogs that are currently registered under our profile, type the following command:
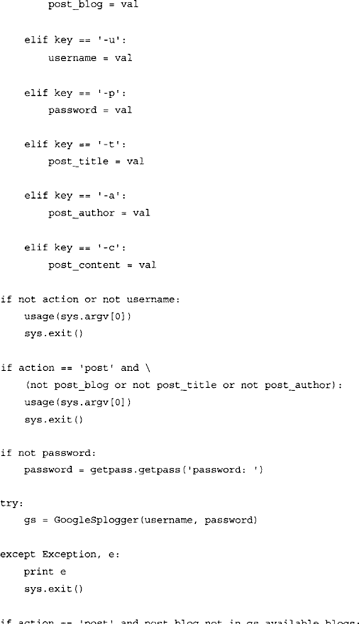
Keep in mind that if you do not provide the value for the -p (password) flag, you will be asked to enter it at run time. This method is preferred since you may not want to leave traces of your password in the system and command log files. Sample output from the command is shown on Figure 10.15.
Once we have the blog names, we can post to them. For example:
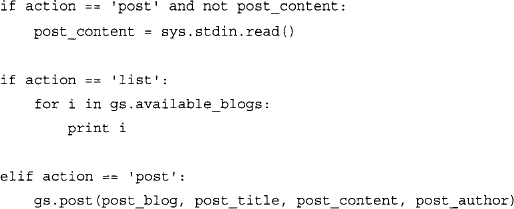
After executing the command you will be asked to enter your password, followed by the post content. When you are done entering the post, simply terminate the input by pressing CTRL+Z within Windows or CTRL+D from within Unix. See Figure 10.16.
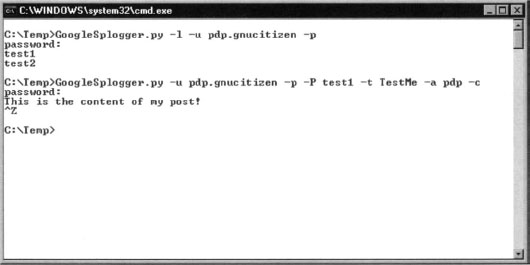

This is simple enough, but the process can be streamlined further. Here’s another way to post a new blog entry, this time with the password inline:
Once you are done writing the post type EOF on a new line. A post can also be submitted from a file:
Programmatically inserting new posts into Blogger is not that useful. But the following example shows how easy it is to grab someone else’s blog data and inject it into our blog. For that purpose, we are going to need another python utility which is based on a library called FeedParser from http://cheeseshop.python.Org/pypi/FeedParser/4.1. The installation procedure for this package is the one used for all python packages.
Start python from the command line and make sure that the GoogleSplogger.py script is within your current working directory. Type the following commands:

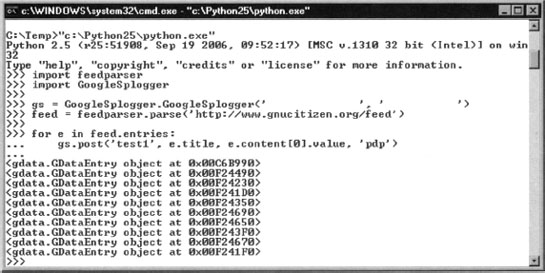
This script, entered as shown in Figure 10.18, will import all feed entries from GNUCITIZEN’s blog into your blog, effectively creating a spam blog as shown in Figure 10.19.

Notice how quickly we created a new blog with content.
There are completely different set of strategies that can be undertaken to make the splog achieve its purposes however due to the size of this topic we can’t really cover all of them in this book. It is important to understand the security and ethical implications that are related to splogging. Again, remember that spamming Google or any other service is totally prohibited by the terms of service. You can potentially damage your account and all data that it holds.
Signaling Alerts
Very often we need to track changes in Google’s result set. For example, let’s say that we want to monitor a certain site for vulnerabilities. How can we do that? We can simply run scanners every once in a while but this is a noisy exercise and will definitely take loads of time. Instead, being dedicated Google hackers, we can use Google itself and use a few powerful Google dorks to locate the things that we are interested in without the need for automated scanning software. Then we can setup a cron task to monitor the results returned by Google and when a change is detected email us the result.
Then again, we could simply use Google Alerts as shown in see Figure 10.20.

Google Alerts is a powerful system that detects when a query’s result set changes. The system can be modified to send updates once a day, once a week, or as they happen. Keep in mind that only the first 10 entries (the first page) are taken into consideration. Nevertheless, the Alert system does a good job when optimized.
This is a great tool, but it can be used for more interesting purposes. Let’s say that we know that a target is using MsSQL as database backend. We could use Google alerts to poll the target, searching for error messages as they pop up. That search might look something like this:
For the type of alert select Web, usually default option. Select the frequency of the alert, and your email address and click Create Alert.
Notice that the query that we use for this alert is domain restricted (sitetexample.com). Also pay attention to the actual Google dork. Obviously we look for messages that look like being generated failures in the SQL queries sent to backend. These types of messages are sign for SQL Injection vulnerable resources.
A malicious user can use this service to alert whenever a vulnerability or interesting message appears on a target site. This is very low-profile, and does not alert the target; the transaction happens between the user and Google. An attacker could even enter alerts for every entry in the Google Hacking Database. Although this would be overkill, some of the entries in the database reveal extremely sensitive information, which could be harvested with very little further effort.
Google Co-op
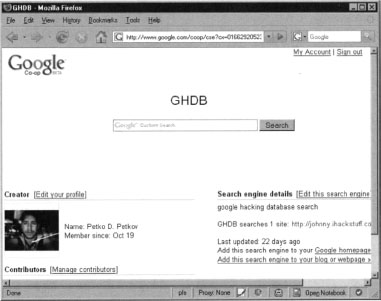
Google Co-op (www.google.com/coop) is a powerful service that allows you to create powerful custom search engines. You do not need to be registered Google user in order to use the service but if you want to create an engine, it is required. In the following section, we’ll guide you through some of the most interesting features of this service and we’ll show you how to create your own search engines.
Let’s start with the simplest of search engines. Browse the Google Go-op page and click Create a Custom Search Engine, or simply browse to www.google.com/coop/cse. From the Custom Engine configuration page (Figure 10.21), we need define the characteristics we need.
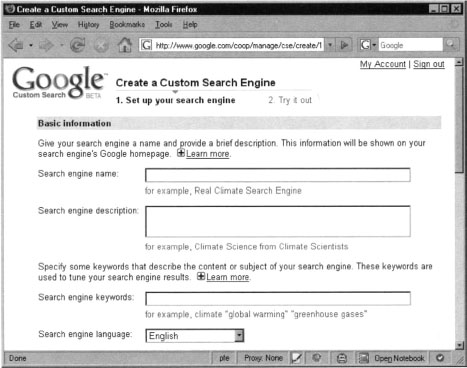
First enter a search engine name. We’ll call ours the “Google Hacking Database Search”. Enter a description and some basic search keywords, both of which are optional. The keywords are primary used by Google to find the most relevant results. This means that our query will be mingled with these keywords. For now, we’ll leave this alone. Moving forward, to the field titled What do you want to search, we will define the scope of the search queries. For this example, we are going to use the default option entitled Only sites that I select.
Now, the interesting part- we need to supply the URLs Google will look into when performing the queries. Since our search engine will do stuff around the Google Hacking Database located at http://johnny.ihackstuff.com/ghdb.php, we’ll simply drop that URL into this field. We’ll customize this entry option further with the use of wildcards, in order to search URLs that match a specific syntax. Here are a few examples taken from Cop-op’s documentation:

For our example, the main page is located at http://johnny.ihackstuff.com/ghdb.php, but in order to make Co-op go a couple of levels down from that location, we must change the site URL to http://johnny.ihackstuff.com/ghdb.php* (note the star at the end). This is because the URL for an individual database entry contains parameters tacked onto the data after the name of the ghdb.php script the following format:
The rest of the options from the Go-op Custom engine creation page are irrelevant at this point. Agree to Google’s terms of service and click on the next button. You must see something similar to Figure 10.22.

No we’ll test how the search engine works. Type a few queries like “index” or “secret", and you’ll see some sample results. If everything works as expected, click finish, and the custom search engine will be displayed as shown in Figure 10.23.
The purpose of our search engine is find interesting queries within Johnny Long’s excellent Google dorks collection which does not (at the time of this writing) support searching. For example, a query for passwd will return results similar to those in Figure 10.24.

It’s simple to create other customized search engines as well. For example, we could search Phenoelit’s database of default passwords found at www.phenoelit-us.org/dpl/dpl.html. It normally takes ages to load the file and most browsers cannot handle its enormous size. Let’s create a custom search engine to search this excellent page.
Following the same process as before, we will use a site restriction of www.phenoelit-us.org/dpl/dpl.htmlinstead of http://johnny.ihackstuff.com/ghdb.php*. Bake the engine and give it a try. Figure 10.25 shows the result of query for cisco.
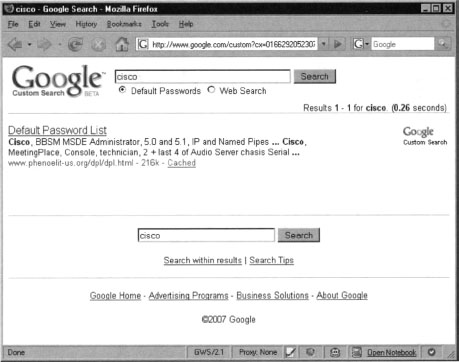
Notice that the resulting page contains all the details that we need, including the default username and password. We can improve this engine by adding more default password lists.
The GNUCITIZEN group http://www.gnucitizen.org has discovered that Google’s Custom Search Engine platform can be used for many other useful things such as fingerprinting and enumerating hidden web servers. It is well known fact that not all Web resources are exposed to the Internet. We call that part of the network the Hidden Web. By using Custom Search Engines we can recover them and enumerate their content. Among the gathered information, we may find Intranet interfaces, Administrative panels and other types of sensitive information.
Google AJAX Search API Integration
Earlier in this chapter we discussed how to use the AJAX API to embed search engine facilities in your own applications and even do automated queries. Here we will do the same but this time we are going to use the Google Hacking Database custom search engine that we have created.
The first most important thing is to locate the unique identifier of your search engine. Just access the engine page and have a look at the URL bar. It should be similar to the following:
The cx parameter is the unique identifier for that engine. Remember that value and substitute it for the placeholder in the following example:
There are tones of interesting and quite valuable things that can be accomplished with the AJAX Search API and Google Co-op. It is just a matter of imagination, something that hackers and computer security experts has quite a lot.
Google Code
Google Code is an offering to the open source community allowing for free-for-all project hosting. Feature-wise, the service is very much like the well the known Sourceforge. Developers are provided with a Wiki for hosting the project documentation, Bug tracking system and version control through SVN. At the time of this writing, each user is restricted by the number of projects they can spawn. However, this logical restriction can be easily bypassed.
Google Code is more then just a development environment — it is a free hosting provider. We can use the system to stash all sorts of stuff in there.
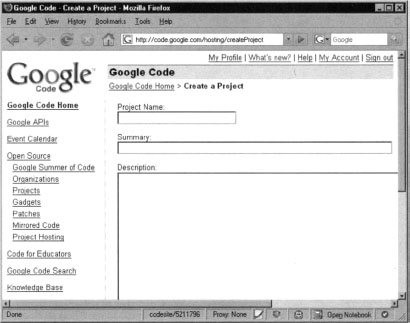
In order to open a Google Code project, you’ll first need a Google account. Simply visit http://code.google.com/hosting/createProject, fill in the necessary details and you are ready to upload your content as shown in Figure 10.26.
As we mentioned earlier, Google Code operates on the top of SVN (Subversion). In order to upload content, you will need the svn client which comes bundled with most Linux/Unix distributions. Windows users can obtain the svn client from http://tortoisesvn.net/downloads or by installing Cygwin (www.cygwin.com) and selecting the svn package. For the rest of this section, we are going to operate from the console via the command line svn util.
Brief Introduction to SVN
Before we continue, let’s take a brief look at the subversion version management system.
Once you are ready to release your project, log into Google Code and click on the Source tab. You will be taken to your project source page. This page displays instructions on how to checkout your project folder as shown in Figure 10.27.
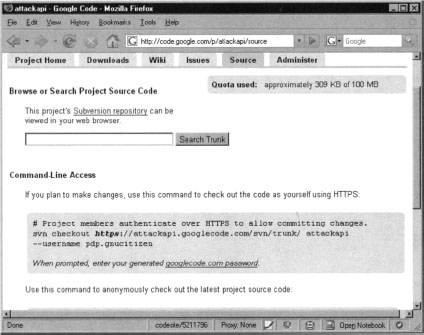
The following svn command will checkout a project:
Substitute projectname and username placeholders with your project name and your Google username. You will be prompted for your Google Code password (which is different than your Google account password). Your Google Code password can be found at http://code.google.com/hosting/settings.
This svn command will create a new folder within your current working directory with the name of your project. To add files, change to the project directory and create a file. Get back to command line mode and add the file in the repository like this:
Once you are happy with all changes and new file additions, you need to commit the project. This is achieved via the following line:
Supply a different message (-m) for the commit message — something that is more descriptive and outlines the changes that you’ve made.
Getting the files online
Once your project is committed into the source repository, you can access its content online. Your project is available at http://projectname.googlecode.com/svn/trunk. Keep in mind that the committed files are served as Content-type text/plain or Content-Type application/octet-stream (see Figure 10.28) which prevents them from being rendered within the browser. This means that in theory you should not be able to see/preview uploaded image or html files.
Despite this, an attacker could still host malicious scripts which could exploit vulnerable browsers, allowing them system control of a visitor’s browser. This is where we start to see the true potentials of the Google Code development platform. There is nothing that prevents attackers from hosting their malicious files online and using them to attack their victims. This type of scenario is quite concerning since ISPs (Internet Service Providers) cannot simply block Google in order to stop a malware propagation, for example. Many users will stay unhappy.
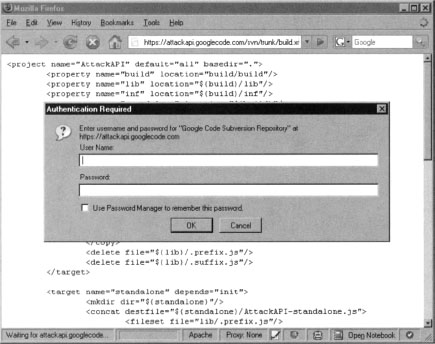
Those familiar with IDS (Intrusion Detection Systems) and IPS (Intrusion Prevention Systems) may object that malware can be also detected by using signatures as the ones found in popular firewall products and open source projects such as Snort. Although, this is true, an attack may stay undetected for most its time, due to Google Code’s encryption options. As we all know, encrypted traffic ensures privacy. Google provides SSL connection for hosted projects. Here is an example:
By substituting https for http within the URL, we engage the https protocol which encrypts our session, hiding the data in that session from the gaze of IDS and IPS systems. Because the https interface was meant to be used by developers, Google will prompt for authentication as shown in Figure 10.29.
This is not the best scenario for an attacker wanting to host browser exploitation code, but a bit of HTTP trickery will help resolve that. The following URL will pre-supply the credentials:
Once the attack is discovered, anyone can use the supplied credentials to enter the subversion repository and revert the files back to a non-malicious state. However, given the fact that most of today’s AJAX/XSS worms spread across millions of users within a couple of hours, the proposed setup is a compromise that most attackers will be willing to make.
Keep in mind that all files stored within the source code repository will be in the public domain. Do not store any files that may contain sensitive information.
Searching the Code
So far in this book, we’ve learned a few good tricks how to recover interesting information from Google’s vast indexes. We’ve also seen that the search facility is quite fuzzy and we often need to refine our queries in order to get better results. Wouldn’t it be nice to be able to use regular expressions to find those pieces of information that are most interesting to us? Although Google Search cannot provide us with that, Google Code can. Enter Google’s Code Search service http://www.google.com/codesearch (Figure 10.30).

Code search is extremely useful in situations where we want to look for code snippets to borrow or just enumerate common vulnerabilities. Let’s see how.
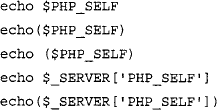
Open the Google Code Search interface and type of the following query:
Notice that the syntax is a bit different from what we usually see. This is known as a regular expression (regex) which you can learn more about from the following URL: http://en.wikipedia.org/wiki/Regular_expression. This regex search returns results similar to those found in Figure 10.31.

Let’s take a closer look at what the regex does. The first part of the query looks for the keyword echo. Then we specify that there may or may not be a couple of spaces (s*). The part that follows specify that we are looking for an undefined number of characters until we reach the final delimiter (.*?). At the end we finish with the keyword PHP_SELF. Notice the special parameter lang. We specify that we are looking for PHP scripts only. In general, the query looks for something that may look like the following:
The improper use of PHP_SELF results in a very well known XSS (Cross-site scripting) hole. This mistake is quite common in PHP applications. Most developers assume that PHP_SELF is not controlled by the user. In fact, it is controlled by the user and can be very easily exploited. Here is an example:
Notice that we append additional path to script.php which contains the characters “><script>alert(‘xss’)</script><!—. Due to the fact that PHP_SELF is usually used to find the URL of the current script, it is very likely that it is going to be used as part of an element attribute. This is the reason why we use “> character combination, to break out of the enclosed element. We end with <!—, to fix whatever it is left broken.
Let’s try another query but this time, we are going too look for SQL Injection holes (SQLI):
The result of this query is as shown in Figure 10.32.
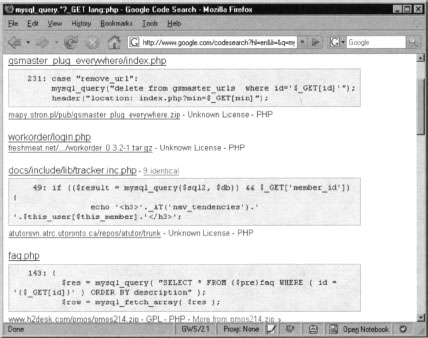
The query starts with the keyword mysql_query which is a standard function in PHP. Then we look for undefined number of characters with the sequence .*?. Finally, we look for the keyword _GET which denotes HTTP GET parameter. In general, we are looking for SQL queries that can be controlled by $_GET. A similar tactic can be applied to $_POST based SQL Injection attacks. Keep in mind that the examples shown in this chapter are just a few of the many variations that we can try. Google Code Search is a very useful tool that can be used to locate vulnerabilities in many languages.
We can use Google Code Search to locate strings within our own projects. If we have a large dataset to analyze, we can simply upload it to code and wait until the Google crawler finds it out. Then we can use standard regular expression queries to locate the data that we are most interested in.