In Chapter 4, you learned that you can create a small help menu with the order form using buttons that hide and show. However, if you need your text to be more detailed, this method might not always be the best solution. Luckily, in Acrobat there are a few other methods you can use that can assist you with creating help for your client.
Note
If you want to work along in this lesson or review the final result, download the Chapter 9 files from www.apress.com/9781484228920 . The file with the label “Start” is the file without the code and the file with the label “End” is the final result. You will also find a folder containing the original scripts if you would like to add them to your own PDF forms.
If you are creating your form from an original PDF, refer to the “Forms Review” section in Chapter 1.
Remember that to view the properties of a field you must select the Prepare Form tool; only then can you right-click or double-click a field to review its properties.
The Rollover Method
Let’s look at the rollover method first. Refer here to Figure 9-1.

Figure 9-1. When you roll over a text field , different information appears in the red text box to give your client a hint
In this example (see the Rollover End PDF), you can see that when a client moves over a field, the red box in the upper corner of the form provides a helpful hint so that they know what to type if they’re not sure. This is very useful when a client needs to know how to type in the correct date format. A hint is always welcomed.
As the client moves out of the field, it becomes blank again until the next field is rolled over. The client now knows what to type and errors are avoided when the form is returned to you.
In this example, the following fields are all controlled by a JavaScript globally and within the fields:
Customer Full Name
Date
Order Code
Customers Company Name
The red help box, txtHelp, has no JavaScript internally; however, it is referenced globally by all fields.
First, let’s take a look at the global or document JavaScripts. In the JavaScript tool, select Document JavaScripts. Refer to Figures 9-2 and 9-3.

Figure 9-2. The JavaScript tool

Figure 9-3. Document JavaScripts
You can see there are two document JavaScripts.
HelpExit is a global function that controls those fields that will be accessing the red stroked help field, txtHelp.
As the user exits the field, it returns to a blank state.
function HelpExit(){var helpText = this.getField("txtHelp");helpText.value ="";}
The other JavaScript is helpText; this function contains an array.
var gHelpText = [ // Create a variable, gHelpText"What’s your full name?", //String#0"mm/dd/yyyy", //String#1"Your customer code is on the form that was emailed to you.", //String#2"What’s your Company Name?" //String#3]
An array is written with the [] brackets, which you will see more of later. It contains multiple variables or strings within itself. These variable strings can then be accessed by other fields.
Note
JavaScript seems to support the three types of arrays: indexed, objects (a.k.a. associative arrays), and nested (in the sense that they can hold an array within an array). In this chapter, you have been looking at the basic index type which, even though no actual numbers are in the array, based on the order you can still call on a number or string reference from 0-3. In Chapter 12 and 13, you will see examples of more complex associative arrays or objects which deal with words rather than numbers to do the indexing; these array/objects will be nested.
Now let’s take a look at one of the fields that needs help: Customer’s Full Name.
In the case of the four fields that are showing “help” in the red stroked box, they all have the following two JavaScripts. Refer to Figure 9-4.

Figure 9-4. Run a JavaScript on Mouse Enter and Mouse Exit
When the mouse or cursor enters, run a JavaScript.
When the mouse or cursor exits, run a JavaScript.
Mouse Enter
var helpText = this.getField("txtHelp");helpText.value =gHelpText[0];
As the mouse enters the field, JavaScript is asked to access some text from the document JavaScript helpText function array gHelpText. With arrays, the number 0 always represents the first item in an array, like so:
0= "What's your full name?"1= "mm/dd/yyyy"2= "Your customer code is on the form that was emailed to you."3= "What's your Company Name?"
And so on, if there were more items in the array.
In the case of the Date field, you can see it is the same except for the number in the array you accessed. This time the Mouse Enter setting is 1. For the Order Code field, it’s 2, and for the Customer’s Company Name field, it’s 3.
var helpText = this.getField("txtHelp");helpText.value =gHelpText[1];
Mouse Exit
HelpExit();In the case of the mouse exit portion, all actions will be the same for all four fields. When the mouse or cursor exits the red stroked help box, it becomes blank.
Writing global document JavaScript like this can be helpful if for some reason you need to change some code inside this function. Any field that had this function attached would now do the new action rather than you having to go manually through and change each one.
Extra Non-Custom JavaScript Check Box Example
As in the form in Chapter 4, there are the examples of the Shipping Address hide and show text fields. Review this area if you can’t remember how it works. However, this area contains no custom JavaScript, so we’ll continue to the next example. Refer to Figure 9-5.

Figure 9-5. Review of Shipping Address check box and button examples
The Default Text Method
The rollover is a good method for some forms, but on others it may not work well, such as when fields are near the bottom of the page or forms that are two pages or more. As with forms on the Internet, the default text is sometimes found within the actual field. You can add default text to a field in the Options tab. However, when the user clicks that field, the text does not disappear; it remains. You have to select the text first and then delete it. This can become awkward and frustrating to the client who just wants to start typing. Refer to Figure 9-6. Add this to blank text field and test it.

Figure 9-6. Adding default text to the Text field in the Options tab
Instead of adding the default text here, you can create a custom format in the Format tab with this script. Refer here to Figures 9-7 and 9-8.

Figure 9-7. Adding a custom script to the Format tab

Figure 9-8. Custom default text (top) and the text entered (bottom)
See the Text End PDF file for this exercise.
// Custom Format scriptif (!event.value){event.value = "What is your full name?";event.target.textColor = color.gray;}else{event.target.textColor = color.black;}
Figure 9-8 shows the difference.
In this example, the default text is grey as long as nothing is in the field and will disappear when the field is clicked and the new text is typed in. The new text will be black. You can apply this same code to the Customer’s Company Name field. No global or JavaScript actions need to be applied.
For some text boxes this is a good method. However, for other boxes that have explanations longer than the field or must also be formatted as a date or number, using this custom format may not be ideal. Let’s look at another option for those instances.
Note
if (!event.value) becomes a type of Boolean or a true and false statement (if not) when you add the exclamation point. In this case of default text, if there is no value entered in the text field, here is what you should fill it with. Without this exclamation point, the default text will not fill in.
The Alert Method
Is there some other way that the message can move along with the client as they enter fields down the form? Yes, it can be done with alert boxes. Another cool feature of alert boxes is if you set them up correctly, you can enter text into them and the text will then be transferred to the correct form field. Refer to Figure 9-9.

Figure 9-9. Text is entered into an alert box and is then entered into the field once the user clicks OK and then tabs out of that field
In this example (see the Alert End PDF file), there is no global document JavaScript so we can skip that area for now.
Again there are four text fields:
Customer’s Full Name
Date
Order Code
Customer’s Company Name
This time there is no red-stroked txtHelp field; you will use the alert boxes to do that work.
Customer’s Full Name
This time you will only run one JavaScript per field. Do not worry about an exit function because the alert box will take care of that for you, as you shall see. In this case, use On Focus, which activates when anyone clicks into the box. Refer to Figure 9-10.

Figure 9-10. Run a JavaScript in the Actions tab
This is the code:
var t = event.target; // the target fieldvar cResponse = app.response({cQuestion: "Type your name First, Last",cTitle: "Name",cDefault: "Name not added",cLabel: "Type your name"});{if (cResponse == null){ // if Cancel is selectedapp.alert ("You cancelled adding your name.");cResponse = "";}else{app.alert("You typed your name as: ""+cResponse+"" Tab out of the field to register your name",3);}}t.value = cResponse; // places the data from the dialog to the target field
In Figure 9-11, you can see that the Alert creates a description and a space for the user to type their name as requested.
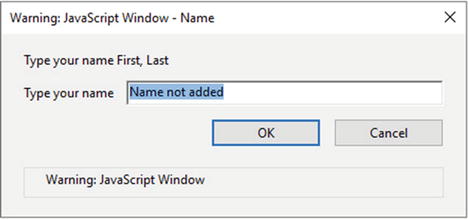
Figure 9-11. The JavaScript help message
If the user hits cancel, the warning they will get is “You cancelled adding your name.” And the text field will go back to blank. Refer to Figure 9-12.

Figure 9-12. The JavaScript warning when the user hits cancel
If the user types in their name, they get “You typed your name as: [client name]”. Once the client tabs out of that field, their name is confirmed. Refer to Figure 9-13.

Figure 9-13. The JavaScript confirmation after the user clicks OK
Let’s move to the next field. Notice how again you use the if/else condition to get two possible answers.
Date
The Date field behaves in a similar fashion. However, remember to make sure this field is formatted to a date that matches the text. Refer to Figure 9-14.

Figure 9-14. The Date Options menu in the Format tab
Now go to the Actions tab and use the same setting as with the Customer’s Full Name, altering the text to suit your needs. Refer to Figures 9-15 and 9-16.

Figure 9-15. Run a JavaScript for the Date field

Figure 9-16. JavaScript help message for the Date field
The code:
var t = event.target; // the target fieldvar cResponse = app.response({cQuestion: "Type the Date mm / dd / yyyy",cTitle: "Date",cDefault: "Date not added",cLabel: "Type the Date"});{if ( cResponse == null){ // if Cancel is selectedapp.alert ("You cancelled adding the date.");cResponse = "";}else{app.alert("You typed the date as: ""+cResponse+"" Tab out of the field to register the date",3);}}t.value = cResponse; // places the data from the dialog to the target field
Customer Order Code
You will construct the customer order code in the same way as the date, only the code will be different. Refer to Figure 9-17 to see the result.

Figure 9-17. JavaScript help message for customer order code and confirmation message
The customer order code functions similarly and you could have set the format to number. However, you may want letters and numbers in your code, so leave the formatting to None.
// Customer Code or Credit Card Examplevar t = event.target; // the target fieldvar cResponse = app.response({cQuestion: "Type your Customer Order Code number using numbers/letters only and without dashes",cTitle: "Customer Order Code",cLabel: "Type your 16 digit code number"});{if ( cResponse == null){ // if Cancel is selectedapp.alert ("You cancelled adding your code.");cResponse = "";}else {if (cResponse.length != 16){app.alert("Type the complete number/letters without dashes or there may be more or less than 16 digits.");cResponse = "";}else{app.alert("You typed your Order Code number as: ""+cResponse+"" Tab out of the field to register the card number",3);}}}t.value = cResponse; // places the data from the dialog to the target field
Notice how the outer else statement does its own conditional check to make sure that there are 16 characters inside the field. If there are not, the alert might remind you to type without dashes or that there are not 16 characters typed in, if you decide to adjust the message.
Customer’s Company Name
This code is similar to the Customer’s Full Name field. Refer to Figure 9-18.

Figure 9-18. JavaScript help message for company name and the confirmation message
// Company namevar t = event.target; // the target fieldvar cResponse = app.response({cQuestion: "Type your Company’s Name",cTitle: "Company Name",cDefault: "Company Name not added",cLabel: "Type your Company name"});{if ( cResponse == null){ // if Cancel is selectedapp.alert ("You cancelled adding your Company’s name.");cResponse = "";}else{app.alert("You typed your Company name as: ""+cResponse+"" Tab out of the field to register your name",3);}}t.value = cResponse; // places the data from the dialog to the target field
Final Thoughts
As you can see, there are several ways that you can help your customers fill out forms. Not all fields must offer help. Some are unmistakable and self-explanatory. However, if your client is not familiar with a word or maybe needs a translation because their English is not the best, this might be a possible workaround. If your form is one page, a rollover may be just fine. However, on forms with two pages or more where the help is spread out, I recommend the alert method.
Note
Recently Adobe Acrobat DC added the Popup menu for Date. So adding the alert method to the Date is optional since when the user chooses a date, it formats itself automatically. In this case, you may choose to alter or remove the alert altogether. Refer to Figure 9-19.

Figure 9-19. The new Date Popup menu that appears in the latest version of Acrobat
Summary
In this chapter, you learned about three possible methods for creating help for your clients when they work with text fields. You also saw how to reuse document JavaScript in many fields and how you can apply custom formatting to text fields.
In the next chapter, you are going to see what other options you have to alter the text within your fields depending upon the numbers that are entered.