The last main type of form field you are going to explore is list boxes. In my experience, list boxes are the most underused of form fields. While they may not be as compact as dropdowns, they are great for helping organize a list of priorities. Refer to Figure 13-1.

Figure 13-1. List Box Priory project with buttons and a custom form field with a button that allows you to add your own priority to the final list
Note
If you want to work along in this lesson or review the final result, download the Chapter 13 files from www.apress.com/9781484228920 . The file with the label “Start” is the file without the code and the file with the label “End” is the final result. You will also find folders with original MS Word and PDF files if you would like to edit them and a folder containing the original scripts if you would like to add them to your own PDF forms.
If you are creating your form from an original PDF that contains no form fields, refer to the “Forms Review” section in Chapter 1.
Remember that to view the properties of a field you must select the Prepare Form tool; only then can you right-click or double-click a field to review its properties.
List Box Priority List with Control Buttons
Figure 13-1 shows list boxes (see the Priority List End PDF file). As you can see, there are list boxes and five buttons. I’ll discuss the lower text field and button later.
The Add button transfers the selected phrase one at a time over to the right list box. The Delete button deletes a selected phrase from the right list. The Clear button resets the whole form. The Up and Down buttons reorder the selected phrase either up or down. You have complete control over your list of priorities.
Here’s how it works. You start with some global document JavaScript. Refer to Figure 13-2.
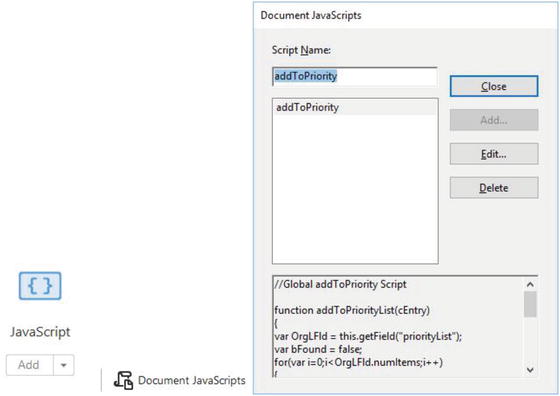
Figure 13-2. The document JavaScript added to the PDF project
This JavaScript is called addToPriority:
//Global addToPriority Scriptfunction addToPriorityList(cEntry){var OrgLFld = this.getField("priorityList");var bFound = false;for(var i=0;i<OrgLFld.numItems;i++){if(OrgLFld.getItemAt(i,false) == cEntry){bFound = true;break;}}if(!bFound){OrgLFld.insertItemAt({cName:cEntry, nIdx:-1});}}
In this addToPriorityList function you are selecting items from the qualityList list box form field and using the buttons to move those items over to the priorityList list box form field. Notice that you are using a for loop to loop through all of the object literals found with the associative syntax (see Chapters 9 and 12) that are found in the qualityList . When an item is found that will be added by the Add button, it will be broken out and inserted into the priorityList but only once. You can see this with the variable bfound; it’s set to true and then false if an attempt is made to enter it again. You can only enter it again if it is cleared or deleted from the priorityList.
The qualityList list box form field has been set up like this. No script is directly applied to it; it is only called upon. The same is true for the priorityList; it, however, contains no entries. Refer here to Figures 13-3, 13-4, and 13-5.

Figure 13-3. List boxes and buttons in the Prepare Form view
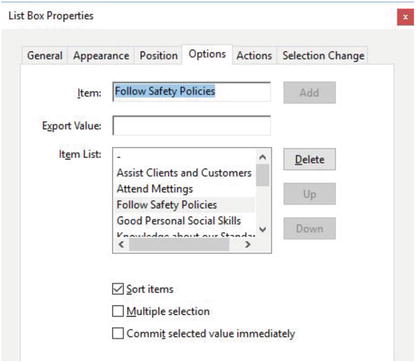
Figure 13-4. The list box properties in the Options tab for qualityList

Figure 13-5. The list box properties in the Options tab for priorityList
Only the buttons contain the actions . Refer to Figure 13-6.

Figure 13-6. The list box properties in the Actions tab for buttons and how the buttons appear in the Prepare Form view and normally
The Add Button
Refer to Figure 13-7.
Figure 13-7. The Add button
// Add Buttonvar OrgLFld = this.getField("qualityList");if(OrgLFld){var cEntry = OrgLFld.getItemAt(OrgLFld.currentValueIndices,false);addToPriorityList(cEntry);}
Notice how it calls on the function addToPriorityList and gets the items from the qualityList and adds the item to the priorityList field only once .
The Delete Button
Refer to Figure 13-8.
Figure 13-8. The Delete button deletes list items from the priority list
// Delete Buttonvar OrgLFld = this.getField("priorityList");var prev = OrgLFld.currentValueIndices;if(OrgLFld.currentValueIndices > -1){OrgLFld.deleteItemAt(OrgLFld.currentValueIndices);if(OrgLFld.numItems > prev){OrgLFld.currentValueIndices = prev;}else if(OrgLFld.numItems > 0){OrgLFld.currentValueIndices = prev-1;}}
The Delete button’s script looks at what was previously added or just selected. Whatever is currently selected when the delete button is pressed is removed from the priortyList list box form field.
The Clear or Reset Button
Refer to Figure 13-9.
Figure 13-9. The Clear Button resets/clears the priority list
You could have simply used your actions to reset the form with no code. However, sometimes you just want to clear a specific list, and reset alone is not enough.
// Clear Buttonthis.getField("priorityList").clearItems();
The .clearItems() acts as a reset for the priortyList .
The Up Button
The Up button moves items up in the list. Refer to Figure 13-10.

Figure 13-10. The Up button moves an item up in the list
//Up ButtonOrgLFld = this.getField("priorityList");if(OrgLFld){var prevIdx = OrgLFld.currentValueIndices;if(prevIdx > 0){var curValue = OrgLFld.getItemAt(prevIdx);OrgLFld.deleteItemAt(prevIdx);OrgLFld.insertItemAt({cName:curValue, nIdx:prevIdx-1});OrgLFld.currentValueIndices = prevIdx - 1;}}
It acts like an organizer or index. For instance, in an array or associative syntax, the first item or object literal is 0, then 1, then 2, and so on. In order for an item that is a 2 rank in the list to move upwards, it must become rank 1 or the highest rank, which is 0. By using prevIdx - 1 you are telling the button to move this item one back or one higher .
The Down Button
The Down button works in reverse, moving items down the list. Refer to Figure 13-11.
Figure 13-11. The Down button moves a priority down in the list
//Down ButtonOrgLFld = this.getField("priorityList");if(OrgLFld){var prevIdx = OrgLFld.currentValueIndices;if( (prevIdx >= 0) && (prevIdx < (OrgLFld.numItems -1)) ){var curValue = OrgLFld.getItemAt(prevIdx);OrgLFld.deleteItemAt(prevIdx);OrgLFld.insertItemAt({cName:curValue, nIdx:prevIdx+1});OrgLFld.currentValueIndices = prevIdx + 1;}}
This time , if an item is a rank of 2, it will become a rank 3 if that is possible. In the if conditional statement, a check is made: is the item greater (>) or equal (=) to zero, and (&&) is it less than (<) but not already the last item. By using prevIdx + 1, you are telling the button to move this item one forward or one lower in the priorityList list box.
The Add New Priority button allows the user to add a custom priority that might not be on the original list. Unlike dropdown menus, you cannot add text directly to a list box. Like any list item, it can be deleted. Noticed that, as in earlier lessons like Chapter 9, you can add a default text format to the text field so that it will always be filled. The same word will not enter twice. The button has the following code and resets the text field after an addition. Refer to Figure 13-12.
Figure 13-12. This text field allows you to enter a new priority and the Add New Priority button allows you to add that priority to the list
var textValue = this.getField("customAdd").value;var listField = this.getField("priorityList");if (textValue) {listField.insertItemAt(textValue, textValue, -1);}
List boxes are useful and creative way to organize priorities. You will improve upon this list later in the chapter.
Check Box, Dropdown, and List Box Example 1
A single list box can be used in combination with other form field items as well. See the TMC Free Newsletter End Option 1 file. Refer to Figure 13-13.

Figure 13-13. This project allows you to chose a free newsletter after making a selection from the dropdown menu. The menu only appears if you check the check box.
This example uses a check box to reveal a dropdown menu. When an item in the dropdown is selected, it reveals a secondary choice in the list box. Refer to Figure 13-14.

Figure 13-14. Choice of a free newsletter fields in the Prepare Form view
Here you begin with a global document JavaScript called SetTitleEntries. Refer to Figure 13-15.

Figure 13-15. The document JavaScript for the newsletter PDF file
Enter the following code :
//Set Title Enteriesvar oArray = {Investment: [ ["-"], ["How to Make a Million in Mining"],["Investing Wisely in Jade"], ["Playing the Market with Lead"],["Investing in Bonds and Silver"]],Mining: [ ["-"], ["Gold Today"], ["Silver Futures"], ["Copper Watch"],["Stake the Claim"]],Gold: [ ["-"], ["Global Annual Gold Festival"],["Gold Watch"], ["All that Glitters"],["Fool's Gold"]],"Tourmaline Mining": [ ["-"], ["Tourmaline Queen"],["Waltermelon Gem"], ["Pick and Shovel"],["Rocks and Gems"]],};function SetTitleEntries(){if(event.willCommit){var list = oArray[event.value];if( (list != null) && (list.length > 0) ){this.getField("ListTitles").setItems(list);}else{this.getField("ListTitles").clearItems();}}}
Notice how, as in the previous dropdown examples, you are using an associative syntax/object called oArray to contain all your dropdown items in the cboNewsletters dropdown field and subitems that will go into the list box field called ListTiles . Different subselection items appear in the list box based the selection made in the dropdown. It’s important that the names in the associative syntax match the names in the dropdown; otherwise, errors can result and these fields will not work correctly. Always double-check your work for errors. When you have a name in your associative syntax that is two words, always put quotes around it, like "Tourmaline Mining"; if it is one word, it needs no quotes , like Mining. If no item is selected in the dropdown, the list box is cleared.
The check box has a script applied to it to show and hide fields. You could have used the no script action to show and hide as well. However, in some cases you need to write JavaScript to confirm you are getting the results you want when doing on and off actions. Refer to Figure 13-16.

Figure 13-16. The Check Box Properties screen showing the Actions tab
//Check Box JavaScriptvar topicFld = this.getField("cboNewsletters");var clistT = this.getField("ListTitles");if (event.target.value == "Yes"){topicFld.display = display.visible;clistT.display = display.visible;}else {topicFld.display = display.hidden;clistT.display = display.hidden;}
For the dropdown menu, make sure to check “Commit selected value immediately” in the Options tab so that the items for the list box will appear once the selection is made.
The final part of the script is called in the dropdown in the Format area as a custom script. Refer to Figure 13-17.
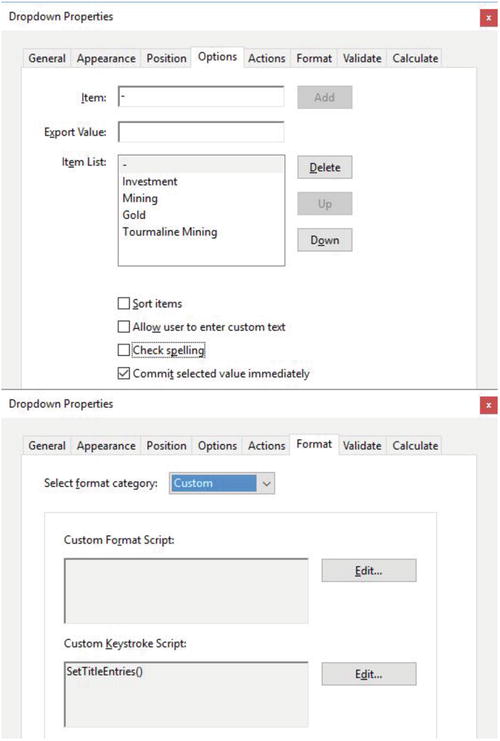
Figure 13-17. The dropdown menu properties in the Options and Format tabs
//dropdown script custom format scriptSetTitleEntries()
Here it calls upon the document JavaScript to help it populate the list box correctly.
Until called upon, the list box will remain blank. Also, no script is applied to the list box; it is only called upon when required. Refer to Figure 13-18.

Figure 13-18. The properties in the Options tab are blank
Important Note
Prior to 2006 if you wanted to show or hide a field you would write.
genreFld.hidden = false;
genreFld.hidden = true;
This method has been deprecated and should be written as shown in the following examples. Refer also to Figure 13-30.
genreFld.display = display.visible;genreFld.display = display.hidden;a.display = display.noPrint //field text visible on screen, but does not printa.display = display.noView // field text hidden on screen, but prints
Check Box, List Box, and Multi-Dropdown Example 2
For a variation on this theme, you could try it in reverse order. Previously, you started off with a dropdown menu, so now start with a list box. The list box, depending upon which selection is made, reveals various dropdown menus that contain selections. You may prefer one option over the other so I am showing both. See the TMC Free Newsletter Option 2 PDF file. Refer to Figure 13-19.

Figure 13-19. The list box and dropdown menu options for the second free newsletter project
This time there is no document JavaScript, based on the way that I set up the file. Refer to Figure 13-20.

Figure 13-20. This project contains no document JavaScript
The check box contains this script to show and hide items. Refer to Figure 13-21.
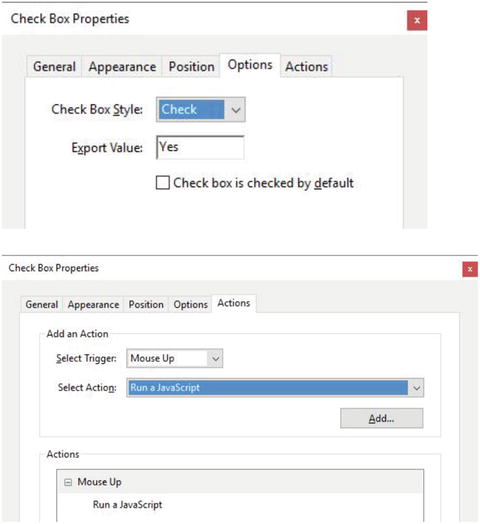
Figure 13-21. The check box properties in the Options and Actions tabs
//Check Box JavaScriptvar listT = this.getField("ListTitle");var investments = this.getField("Investments");var mining = this.getField("Mining");var gold = this.getField("Gold");if (event.target.value == "Yes"){listT.display = display.visible;}else {listT.display = display.hidden;investments.display = display.hidden;mining.display = display.hidden;gold.display = display.hidden;}
Notice how there are more items to show or hide depending upon what is happening. You can choose what you want to see or hide using the if/else conditional statements. See Part 2 of this book if you need to review if/else statements.
Now let’s move on to the list box field.
Unlike the earlier dropdown , the items in the list box named ListTitle do have export values, as you’ll see shortly. Refer to Figures 13-22 and 13-23.

Figure 13-22. The Options tab in the List Box Properties dialog box

Figure 13-23. The Selection Change tab in the List Box Properties dialog box
This time the script is added to a different tab. It is controlled in the Selection Change tab .
List boxes do not have a Format tab and a setting of Custom is not an option; they must be controlled here.
Execute this script :
// Combo Box Selection Change Text Examplevar investments = this.getField("Investments");var mining = this.getField("Mining");var gold = this.getField("Gold");if (event.changeEx == "IV"){investments.display = display.visible;mining.display = display.hidden;gold.display = display.hidden;}else if (event.changeEx == "MN"){investments.display = display.hidden;mining.display = display.visible;gold.display = display.hidden;}else if (event.changeEx == "GD"){investments.display = display.hidden;mining.display = display.hidden;gold.display = display.visible;}else if (event.changeEx == "None"){investments.display = display.hidden;mining.display = display.hidden;gold.display = display.hidden;}
Once again, you add more if/else conditional statements . Notice how this code is all about the hiding or showing of dropdowns based on their value in the list box and the dropdown menu’s name. Refer to Figure 13-24.

Figure 13-24. The list box properties in the Options tab compared to the dropdown properties in the Options tab
This time the dropdown menus have no actions applied to them; they are only called upon. However, rather than using a document JavaScript and creating an associative syntax , they do contain their items with no values preset, only referenced by the selection change of the list box.
Button Slide Show Variation
This last example could also be used with buttons that contain images if you want to create a type of slide show for a client. You can find a sample of this in the extra slide show project folder called Mineral Identifier. Explore this file further on your own and format it to suit your needs. For long lists, the order of the JavaScript variables should always match the same order as the options in the Options tab from top to bottom; otherwise, errors are likely to occur.
Extra Example Priority List Improved
Now that you’ve discovered a few things about list boxes, let’s look at how you can improve the priority list earlier in this project. You can see how this interaction might work and you can add a text box below for an added description of a speaker’s topic to assist your organization. To see the full code, go to the Priority List End Guest Speaker PDF file. Refer to Figure 13-25.

Figure 13-25. A list box project with guest speakers and text fields containing their topics below
The buttons’ code will remain the same except for the names of the list boxes; speakerList replaces qualityList, and orderTalkList replaces priorityList. However, the document JavaScript will be altered. Now it is called talkExport. Refer to Figure 13-26.

Figure 13-26. Document JavaScript added to the PDF file
function addToTalkList (cEntry){// Acquire the Distribution List Fieldvar OrgLFld = this.getField("orderTalkList");// Make sure entry does not already exist// by comparing it to all of the existing entriesvar bFound = false;for(var i=0;i<OrgLFld.numItems;i++){if(OrgLFld.getItemAt(i,false) == cEntry){bFound = true;break;}}if(!bFound){// Insert entry at end of listOrgLFld.insertItemAt({cName:cEntry, nIdx:-1});}}function GetMasterExport (cEntry){// Acquire the Master List Fieldvar OrgLFld = this.getField("speakerList");for(var i=0;i<OrgLFld.numItems;i++){ // If item matches, then return the export valueif(OrgLFld.getItemAt(i,false) == cEntry){return OrgLFld.getItemAt(i,true);}}return null;}
You add an extra script to deal with values that will act as the speakers’ topics. You want to transfer this information as well to the right, so you add the GetMasterExport function which, if everything is correct or true, will help display the value or speaker topic. Otherwise, it will not display.
Figure 13-27 shows what this looks like in the left list box. Notice how each name has a value.
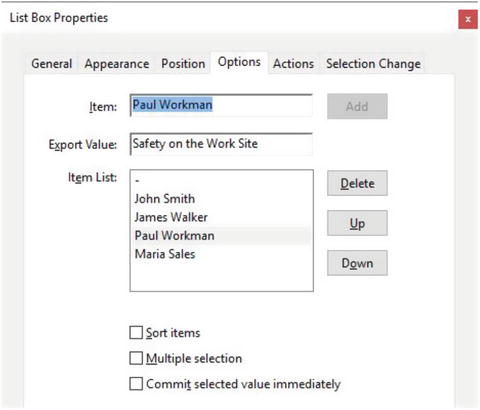
Figure 13-27. The list box properties in the Options tab for the left list box
The list box on the right should remain blank. However, only here make sure to check “Commit selected value immediately” in the Options tab or the values will not commit properly in the text box below. Refer to Figure 13-28.

Figure 13-28. The list box properties in the Options tab on the right list box
The final script is this time found in the list boxes in the Selection Change tab .
For the left list box:
//Selection Change for First List boxif(event.willCommit){addToTalkList(event.value, this.cLastValEx);this.cLastValEx = null;}else{this.getField("Topic1").value = event.changeEx;}
This adds the value as text to text field Topic1.
For the right list box:
//Selection Change for Second List Boxif(event.willCommit){if(event.value){this.getField("Topic2").value = GetMasterExport(event.value);}else{this.getField("Topic2").value = "";}}
This adds the value as text to text field Topic2 after it has been exported over to the left.
In the extra example, you also add a text field and buttons to this file in case the user wants to add a last-minute guest speaker with their topic. See the Guestspeakers Extra PDF file for details. Refer to Figure 13-29.

Figure 13-29. Adding a guest speaker and their topic to the left list box and text field, which can later be added to the right list box and text field and then reordered
Final Thoughts
As you can see, there is no right or wrong way to organize your list boxes. You can also use them to interact with text boxes or even in combination with check boxes or radio buttons. Depending upon the form, one way or another will help you accomplish your goal.
Hidden Fields
Note
For those of you who are more familiar with JavaScript, buttons and text fields can also be used as a hidden object field if an extra calculation in a form needs a hidden function. While there are no examples in this chapter, things like double-clicking on a list item to transfer it or a complex calculation that you don’t want the client to see (see the Invoice Form in an earlier lesson), those fields can be set to hidden in the General tab or set or no color in the Appearance tab to avoid form clutter for the client. Refer to Figure 13-30.

Figure 13-30. A hidden button can have a fill and border color of none in the Appearance tab or set to Hidden in the General tab
Using List Boxes for Number Rating
It is possible to use two or more list boxes to add values together in a final text field. However, I find this method to be buggy and it does not allow for multiple selection values to be added together. List boxes, as mentioned earlier, do not contain a Format tab so the final text field can only control the calculation output of the value as a true number. When working with specific multiple number selections, a dropdown menu or text field should be used instead of a list box .
Summary
As you can see, list boxes can be used in combination with other types of form fields. You can use them to transfer information from one list box to another or to a dropdown menu or a text field. You can even use them with buttons to create a slide show of images.
In the next chapter, you are going to look at a type of dropdown menu that you might not have heard of before in Acrobat: the popup menu.