
The JavaScript becomes more complex as multiple form fields work in tandem.
As you’ve seen in past examples, to avoid errors you need to create warnings or alerts so clients will enter the correct information.
Text boxes are not the only field item that alerts or choices can be applied to. You can also use radio buttons.
Note
If you want to work along in this lesson or review the final result, download the Chapter 11 files from www.apress.com/9781484228920 . The file with the label “Start” is the file without the code and the file with the label “End” is the final result. You will also find folders with original MS Word and PDF files if you would like to edit them and a folder containing the original scripts if you would like to add them to your own PDF forms.
If you are creating your form from an original PDF, refer to the “Forms Review” section in Chapter 1.
Remember that to view the properties of a field you must select the Prepare Form tool; only then can you right-click or double-click a field to review its properties.
Money Transfer Example
The money transfer example is a wonderful way to see how validation can be applied to fields that do not have the Validate tab in their Properties dialog box. Refer to Figure 11-1.

Figure 11-1. In this money transfer example you can choose to transfer your money to another account
Sometimes you may want to transfer an amount of money into another type of account. See the TMC Account Transfer End PDF file. Refer to Figures 11-1, 11-2, and 11-3.

Figure 11-2. Checking to Savings or Money Market Pro is a possible transfer

Figure 11-3. Savings to Savings account transfer with warning
The choice in Figure 11-2 gives you no warning, because you are transferring money from Checking to Savings . However, if you want to transfer from Savings to Savings , you would get a warning; see Figure 11-3.
This type of transfer gives you a warning.
You would also get a warning if you transferred from Checking to Checking and Money Market Pro to Money Market Pro.
Figure 11-4 shows how the buttons are set up in the Form Edit mode.
Figure 11-4. Radio button layout : the left is the From group and the right is the To group
As mentioned earlier, radio buttons must always be grouped to work together. They can have different values/choices but they need to be part of the same group. Refer here to Figure 11-5.

Figure 11-5. The Form tool shows the grouping of the radio buttons
Here you can see the setup for the from.group radio buttons. In this case, I have selected just the one with the choice of checking so that you can see its properties. If you choose savings or mm, the only difference would be the choice in the Options tab. Refer here to Figure 11-6.

Figure 11-6. Settings for the radio buttons in the from.group in the General, Options, and Actions tabs. The only difference is the radio button choice.
On the left-hand side, the from.group radio buttons contain no actions.
However, the to.group radio buttons do contain an action because they are the second choice that may or may not trigger a warning based on whether its choice matches the first choice. Refer here to Figure 11-7.

Figure 11-7. Settings for the radio buttons in the to.group Actions tab . The code is for a transfer from Checking to Checking account.
//to.group radio button 1 checkingvar rfrom = this.getField("from.group");var rtrans = event.target;var msg = "You cannot transfer funds from Checking to Checking";if (rfrom.value == "checking"){app.alert(msg);rfrom.value = "";rtrans.value = "";}
Here you have two variables : rfrom and rtrans. The first variable, var rfrom, represents the whole radio button group from.group. The second variable, var rtrans, represents the current field, which is part of to.group and has a choice of checking. An alert message is written and appears if the two choices do match exactly:
var msg = "You cannot transfer funds from Checking to Checking";Once the alert's OK button is pressed, the if statement also resets the two variables.
rfrom.value = "";rtrans.value = "";
They become blank as if never checked.
Similar code can be written for the savings and money market pro radio buttons :
Savings Code
//to.group radio button 2 savingsvar rfrom = this.getField("from.group");var rtrans = event.target;var msg = "You cannot transfer funds from Savings to Savings";if (rfrom.value == "savings"){app.alert(msg);rfrom.value = "";rtrans.value = "";}
Money Market Pro Code
//to.group radio button 3 mmvar rfrom = this.getField("from.group");var rtrans = event.target;var msg = "You cannot transfer funds from Money Market Pro to Money Market Pro";if (rfrom.value == "mm"){app.alert(msg);rfrom.value = "";rtrans.value = "";}
As you can see, when two fields' choices match, an alert can be triggered .
Changing the Shipping Price Using Radio Buttons
As you’ve seen in past projects, check boxes and radio buttons can be used to adjust numbers in text boxes . Let’s look at another example of how this can be done with prices. See the Invoice Form Shipping Change End PDF file. Refer here to Figure 11-8.

Figure 11-8. Invoice form for adjusting the shipping price using radio buttons
These numbers will vary depending on what you input. If you choose a different company like FedEx , the shipping charge changes again.
How does this work?
Most of this form is set up like most invoice forms, which use a combination of Value and simplified field notation (SFN) and very little JavaScript. However, this example contains a new field called discount and the radio buttons to the lower left.
The field called discount is just formatted as a number and has no action applied to it. However, you are going to call upon it once you start using the radio buttons. The buttons are as one group, each with their own choices. Refer here to Figure 11-9.

Figure 11-9. Radio button properties in the Options tab
The panel on the left of the Prepare Form tool shows how the buttons are grouped. Then you add a JavaScript to each radio button. Refer here to Figure 11-10.

Figure 11-10. The Radio Button Properties screen in the Actions tab, with the action of “Run a JavaScript”
This is similar code for each radio button:
//Shipping Price Chargevar oShip = this.getField("Shipping");var oSub = this.getField("Total");var oDiscount = this.getField("discount");if(oSub.value <200)var oRate = (oSub.value - oDiscount.value)*.25;elsevar oRate =0;oShip.value = oRate;
The code says that if the subtotal before or after the discount is under or less than $200, then add a shipping (that is the Total Price *.25) to get the shipping price. However, if the price is over $200 even with the discount (else statement), the shipping is 0 dollars, or free.
As you can see, you can apply this function to other couriers like this:
var oShip = this.getField("Shipping");var oSub = this.getField("Total");var oDiscount = this.getField("discount");if(oSub.value <200)var oRate = (oSub.value - oDiscount.value)*.17;elsevar oRate =0;oShip.value = oRate;
You could change the price from
var oRate = (oSub.value - oDiscount.value)*.17;to
(oSub.value - oDiscount.value)*.13;Or you could change the dollar limit from
if (oSub.value <200)to
if (oSub.value <300)depending on the preferences of the courier company .
Note
You could have written the conditional part of the code with the added brackets ({}).
if(oSub.value <200){var oRate = (oSub.value - oDiscount.value)*.17;}else{var oRate =0;oShip.value = oRate;}
Note
In this case, it was a very small and uncomplicated conditional script and I left some brackets sets out. JavaScript will sometimes let you do that to make code less complicated. However, in other cases, if you leave them out, you may get an error warning or the script will not function correctly. If you are unsure or want to keep the code accurate, I recommend leaving the brackets in complex examples in order to avoid confusion.
One final item you add to each radio button is the ability to reset/refresh the shipping when you click the radio button again rather than having click another radio button (On Mouse Down ➤ Reset form). Check off only for the Shipping field. Refer here to Figure 11-11.

Figure 11-11. Radio button settings in the Actions tab to refresh the shipping
Text Field Validation with Regular Expressions
Another feature to try in this form (see the Invoice Form Shipping Change End r2 PDF file) is a telephone validation script . Refer here to Figure 11-12.

Figure 11-12. Telephone text field validation in the Validate tab and the alert that is produced when the input is incorrect
If the client does not type in the text field the correct way, an alert will happen. The correct format is displayed in Figure 11-13.

Figure 11-13. Top: Incorrectly entered information appears red. Bottom: Correctly entered information in the Telephone text field.
After the OK button in the alert is clicked, the text in the text field turns red and will not change back to black until the user types in the correct format.
Telephone Validation
Here is the JavaScript :
var rgexTele = /^[(]{0,1}[0-9]{3}[)]{0,1}[-s.]{0,1}[0-9]{3}[-s.]{0,1}[0-9]{4}$/;if(rgexTele.test(event.value)){event.target.textColor = color.black; //Change text to black{else{event.target.textColor = ["RGB",1,0,0]; //Change text to redapp.alert("Invalid Telephone Number");}
In order to accomplish this, you use a form of JavaScript called a regular expression . You saw a very simple example of this when you created your multi-line button using , the new line, and you created a metacharacter in Chapter 10. When you combine more than one metacharacter you create a pattern and this combination of characters creates a regular expression. This time you are going to use a more complex regular expression.
/^[(]{0,1}[0-9]{3}[)]{0,1}[-s.]{0,1}[0-9]{3}[-s.]{0,1}[0-9]{4}$/This portion of the expression is saying that the code must be
Three digits ranging within parenthesis from 0 to 9 in the first section that can be separated by either a dash, space, or dot
Three digits ranging from 0 to 9 in the second section that can be separated by either a dash, space, or dot
Four digits ranging from 0 to 9 in the last section
The following examples are acceptable:
(123) 456-7890
123-456-7890
123.456.7890
123 456 7890
1234567890
Anything more or less than 10 digits is unacceptable .
You could have used the format Special Phone Number or Arbitrary Mask if you did not want to write this. Refer to Figure 11-14.

Figure 11-14. The Special Phone Number format can only format as one option
However, doing so would not have given you the custom number and color formatting , used to show the difference between correct and incorrect. So, leave format as None and enter the following code into the Validate tab:
if(rgexTele.test(event.value)){event.target.textColor = color.black;//Change text to black}else{event.target.textColor = ["RGB",1,0,0]; //Change text to redapp.alert("Invalid Telephone Number"); }
If the text matches the regular expression format, leave it as black. If not (else), send out a warning and change the text to red until it is corrected and matches the regular expression.
There are a lot of good regular expressions that can be used and I recommend exploring them.
Note
According to Adobe documentation, the format of Special Arbitrary Mask will allow you to use some basic regular expressions such as
A: Accepts only letters (A-Z, a-z)
X: Accepts spaces and printable characters, including all characters available on a standard keyboard and ANSI characters in the ranges of 32-126 and 128-255
O: Letter accepts alphanumeric characters (A-Z, a-z, and 0-9)
9: Accepts only numeric characters (0-9)
For example, a mask setting AAA- –q#999 accepts the input of BRT- -q#123 and OOO@XXX accepts the input of v12@2up. However, as you’ll see, regular expressions with JavaScript offer a wider range of possibilities.
See the Text Field Validation End PDF file . Refer here to Figure 11-15.

Figure 11-15. Text field examples to which you can add regular expressions
Name Validation
Use this script if you want to have a first and last name in the same field. Refer here to Figure 11-16.

Figure 11-16. Running a custom validation script
// Custom Validation of Namevar re = /^[A-Z][a-z]+ [A-Z][a-z]+$/if(event.value !=""){if (re.test(event.value)== false){app.alert("That does not appear to be a valid name. I need a first and last name.");event.rc = false;}}
Note
The following are basic examples of regular expression metacharacters :
[abc]: Find any character between the brackets
[A-Z]: Any character from uppercase A to uppercase Z
[a-z]: Any character from lowercase a to lowercase z
[A-z]: Any character from uppercase A to lowercase z
[0-9]: Find any digit between the brackets
.: Find a single character, except newline or line terminator
d: Find a digit
: Find a newline character
s: Find a whitespace character
w: Find a word character
For more detailed information on regular expressions, visit www.w3schools.com/jsref/jsref_obj_regexp.asp .
In this field, the name needs a first and last name that contains uppercase and lowercase letters, like John Smith. If the user types in JS or just J, they will get the error alert “That does not appear to be a valid name. I need a first and last name.” When they click the OK button on the error alert, the field returns to blank (event.rc = false;) and they must try again and no further information is processed.
Account Number Validation
Use this script if you want to create a field where a person must enter a special account number or serial number. Refer to Figures 11-15 and 11-16 for where to enter the code.
//account number//A6BF-479X-2139var re = /^[A-Z]d[A-Z]{2}-d{3}[A-Z]-d{4}$///prevent alert if field is blankif(event.value !=""){if (re.test(event.value)== false){app.alert("I’m sorry. That is not a valid account number.");event.rc = false;}}
In this field, the code must be uppercase letter, number digit, two uppercase letters, then a dash, three number digits, uppercase letter, then another dash, four number digits. This must be correct or an error alert will happen and the field will be returned to blank .
Email and URL Validation
Use the following script if you want to create a field where a person must enter an email or a URL. Refer to Figures 11-15 and 11-16 for where to enter the code.
var re = /^w+([.-]?w+)*@w+([.-]?w+)*(.w{2,3})+$/;//prevent alert if field is blankif(event.value !=""){if (re.test(event.value)== false){app.alert("I’m sorry. That is not a valid email address.");event.rc = false;}}
As you can see, the code is like the others except that this time you need to use the following format to check for the email names and the @ symbol. So [email protected] would be correct, but excluding the @ symbol would trigger an alert. If you were creating a validation for a URL website, you would need to adjust the code to perhaps something like this:
var re = /^(http://www.|https://www.|http://|https://)[a-z0-9]+([-.]{1}[a-z0-9]+)*.[a-z]{2,5}(:[0-9]{1,5})?(/.*)?$/;And then you could add an alert to reflect if there was an error (example: http://www.mysite.com ).
app.alert("I’m sorry. That is not a valid URL address."); Another Phone and Date Example with Two Variables
Use this script if you want to create a field where a person must enter a phone number or date with two options. Refer to Figures 11-15 and 11-16 for where to enter the code. For the alert warning message, see Figure 11-17.

Figure 11-17. The alert warning when a telephone number is added incorrectly
//phone validation alertvar re7Digits = /^(d{3})-(d{4})$/;var re10Digits = /^(d{3})-(d{3})-(d{4})$/;//prevent alert if field is blankif(event.value !=""){if (re7Digits.test(event.value)== false && re10Digits.test(event.value)== false){app.alert("I’m sorry. That is not a valid 7 or 10 digit phone number. ");event.rc = false;}}
This final example deals with the option to enter a 7-digit or 10-digit code. While not as complex as the first phone example, it does show how to have two formatting options inside one validation. By using the && you are asking for two conditions to be false or true. If true, no alert warning will happen; if false, the alert will happen and the fields will be set back to blank .
You could also use this example with a Date text field, if you set the variables to something like this:
var re6Date = /^(d{1,2})/(d{1,2})/(d{2})$/;var re8Date = /^(d{1,2})/(d{1,2})/(d{4})$/;
Make a few adjustments to the variable names in the conditional statement so they match. You would have two options (12/31/05 or 12/31/2005) for date formats for a person to enter. However, be aware that if this is something that is going into the database, it might cause errors, so check with the people who oversee the database before you set an alternate date entry .
Note
With the update of Acrobat DC you can alternately set your formatting of the date field to Date to access the popup menu. Refer to Chapter 1 if you need to see a screen shot. However, when you have two alternate date options, you must set the Format tab to None and place the code in the Validate tab. Doing this does not give you access to the popup menu.
Final Thoughts
As you can see, errors in typing and selection can be avoided if you have the correct warnings and validations in place. You can assist yourself and your clients when you take the guesswork out of a form.
If you are planning to work with the gray default text method from Chapter 9 and combine it with the regular expression examples from this chapter, it can easily be done by adding this custom format under the Format tab. (See the Invoice Form Shipping Change End r2 PDF and Field Validations End files). Refer here to Figure 11-18.

Figure 11-18. A custom format script can be added if you want default text
if (!event.value){ event.value = "What is your First and Last Name?";event.target.textColor = color.gray;}else{event.target.textColor = color.black;}
Remember to use the validation code for each field from earlier in this chapter if it is not already applied. Refer here to Figure 11-19.
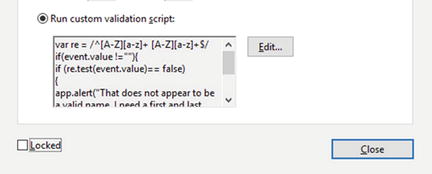
Figure 11-19. Run the custom validation script
However, for the telephone validation in this file, a minor adjustment needs to be made to the custom format script to work with three colors rather than two and still get an alert message. Refer here to Figure 11-20.

Figure 11-20. Changing the custom format script
The code:
var rgexTele = /^[(]{0,1}[0-9]{3}[)]{0,1}[-s.]{0,1}[0-9]{3}[-s.]{0,1}[0-9]{4}$/;if (!event.value){event.value = "Example: 999-999-9999";event.target.textColor = color.gray;}else if(rgexTele.test(event.value)){event.target.textColor = color.black;}else{event.target.textColor = ["RGB",1,0,0]; //Change text to red}
Note
Be cautious using this method with the phone number with two variables because it could cause an issue and may not display correctly. Also, don’t use default text when a field is formatted to Date, to avoid errors and warnings in Acrobat; when a field is formatted to Date, it cannot accept any other text.
Summary
In this chapter, you learned several ways to add validation to radio buttons and text fields. You also saw a variety of ways to use the validation in combination with formatting to create fields that will alert clients when they chose or typed incorrect information into a field.
Besides warning clients, radio buttons can be used to adjust shipping rates when used in an invoice or order form. They can also be used to refresh or reset a value so your client sees the correct information.
Finally, you also explored a variety of regular expressions which can be used in the Text Field Properties Format and Validation tabs rather than just relying on the formatting that comes with Acrobat, such as Special.
In the next chapter, you will be working with dropdown menus. You’ll see how they can interact with text fields and other dropdown menus.