
Printing Spreadsheets
In Numbers, Apple chose to completely ignore its own interface for printing documents, and the result is a limited, non-intuitive, annoying setup. This is a very short chapter, but I may have spent more time on it than was spent on developing Numbers’ printing options. I shall henceforth refrain, as best I can, from complaining about what’s not available when it comes to printing a spreadsheet (except for the spoiler alert below), and show you how to use, and make the most of, available options. After taking a look at them, we’re on to Handling Headers and Footers.
Spoiler alert: There’s no way to set page breaks for tables or other elements in your document. They happen where they happen.
The Print Process
The simplicity of printing from Numbers is the very thing that constrains you from really controlling your output. Here’s how to print your sheet:
- Choose File > Print. Numbers switches into a preview mode, showing (very large) thumbnails of a sheet’s pages (Figure 185) and opening the Print Setup pane.
Each sheet in your document gets a tab in the preview; the active one is the sheet you were working on.
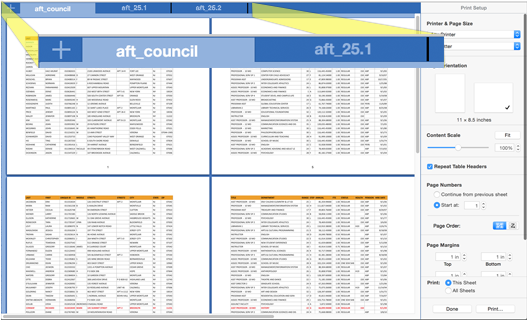
Figure 185: A multi-page sheet in preview mode for printing. The tabs along the top are for other sheets in the document; the Add button at the left is non-functional. - Set the margins, paper size, orientation, and other basics in the Print Setup pane; these options are wonderfully self explanatory. (For help with fitting things on a page, read the sidebar Make It Fit, just ahead.)
- Set up a header and/or footer with automatic text such as a page number or date. For the most part, you can add content to headers and footers from the Insert menu. The Page Number, Page Count, and Date & Time commands insert smart field information and are covered ahead, in Handling Headers and Footers.
Format any header or footer text: if you click in a header or footer, the Text pane appears at the right, allowing you to format the text.
- To print more than one sheet, go to the other tabs to set options for them—including separate headers and footers—and select the All Sheets button at the bottom of the Print Setup pane. (To print multiple, but not all sheets, you must print each one separately.)
- Click the Print button at the bottom of the pane, or choose File > Print again. (To cancel preview mode, without printing, click the Done button at the bottom of the pane or press Esc.)
- Select options in the Print dialog that appears, and click Print. Options such as a page range and number of copies are standard in Print dialogs, but other specifics depend on your printer.
Handling Headers and Footers
The header and footer areas appear in preview mode when you hover over the top or bottom of a page (Figure 186). Each has three fields that look like wide table cells, but they don’t behave like cells: you can’t resize them by sliding their dividers, nor can you tab from one to another.

Add header or footer content by clicking where you want the content to go and then typing, or by inserting smart fields for page numbers, dates, and times:
- Add page numbers: Choose Insert > Page Number. (You can remove the default page number at the bottom of the page by clicking in that segment and then deleting it as you would any other text.)
- Add total pages: For an “x of y” construct (1 of 10, for instance), choose Insert > Page Number and Insert > Page Count and intersperse these smart fields with the words you want.
-
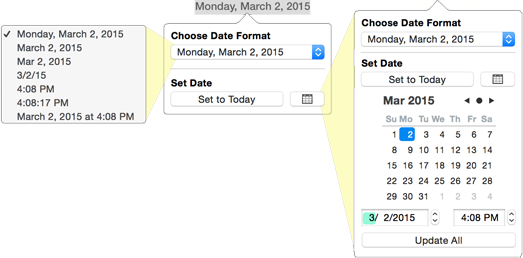
Add and format the date (and time): Choose Insert > Date & Time; the default is the current date. Format how you want the date displayed, or add the time, by clicking the inserted date and choosing from the Date Format menu in its popover.
Reset the date and/or the time later by clicking the calendar icon in the popover to expand it, choosing your options, and clicking Update All (Figure 187).
To access the controls for formatting header or footer text, click in any header or footer field to see the Text pane. You must specifically select the text you want to format—clicking in the field is not enough.