
Tackling Text
Numbers are the reason we need spreadsheets, but spreadsheets also need text—for labels, and sometimes for larger blocks of explanatory information.
I don’t cover standard text formatting in Numbers, as it’s basically the same as in other Mac apps (and is covered in Take Control of Pages). But it is important to know how to handle text inside and outside a table, starting with the “text container” concept. Then we can tour the Text Pane, look at Text in Shapes and Text Boxes (a text box is different from a square shape that holds text), explore Bullets and Lists, and, most importantly, learn about Paragraph and Character Styles.
Text vs. Container
In Numbers, text is always inside something; the thing that holds the text is a container. Sometimes this is obvious, as with a text box or a shape you’ve filled with text. But elements of various objects are text containers, too: a table’s name and each of its cells, for instance, or a chart’s name, legend, and labels.
Why does this concept even matter? Because you can format text by selecting the container or the text inside it. When you select the container, the formatting applies to everything in it. (Although some specialized formats—such as superscripting—can be applied only to text you’ve selected; they’ll be dimmed if a container is selected.) When you select text, only the selection is affected by formatting (so you can, for instance, italicize or bold a word or phrase).
You’re familiar with working with selected text, so you know that if you type something, it replaces the selection. This applies to containers, too: if a shape or a cell is selected and you start typing, you replace the current contents. This can be a blessing or a curse, depending on what you meant to do.
Text Pane
I’m going to give you a Cook’s tour of the Text pane because even ebooks have limits as to page count, and we have more important things than text formats to cover. The Format Inspector’s ![]() Text pane, with its Style and Layout tabs, is available whenever you’ve selected text or a text container.
Text pane, with its Style and Layout tabs, is available whenever you’ve selected text or a text container.
Style Tab
The Style tab is where you access general text-formatting options, as well as some—such as vertical alignment—that are specific to cells or certain other containers. I cover three of the more advanced aspects of using the Style tab later in this chapter:
- Paragraph styles: The top of the pane provides a popover of paragraph styles, described in Paragraph and Character Styles.
- Character styles: The Character Styles popover, at the bottom of the Font section, is also covered in Paragraph and Character Styles.
- Bullets & Lists: The Bullets & Lists section at the bottom of the pane is deceptively rich in options, including creating your own list styles and leader characters. I cover this in Bullets and Lists.
Layout Tab
The Layout tab provides, as it proclaims, layout options. Only one of them—Text Inset—is an important basic option, because you’ll need it sooner or later for table cells. These items need a bit of supporting information.
Columns
Work here to set up columns for text in a shape (this option isn’t available for table cells). You can define the number of columns and their width, and the width of the gutter—the space between the columns.
Set the number of columns by typing or using the arrows next to the field, and then:
- Check or uncheck Equal Column Width.
- To set the size of a column, double-click its measurement in the Column column (!) and type the new one (Figure 160). If you’ve checked Equal Column Width, all the columns’ measurements change to match.
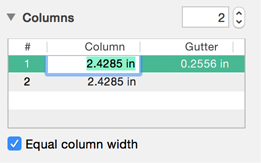
Figure 160: Edit column and gutter sizes in the Layout tab. - Set the gutter size (the space between the columns) by double-clicking its default size and typing the new one. If you have multiple gutters, you can set their widths separately.
Text Inset
The text inset controls how far away text is from the borders of its container—and for this option, that includes table cells. Cells default to a 4-point inset on all sides, but it’s good to know that when, for instance, you absolutely must fit one more character into a cell header without wrapping the text, you can shave that inset down a few points.
Borders & Rules
In layout terms, a border goes completely around a paragraph, while a rule is a horizontal-only line for the top or bottom (or both). You can specify the relative positions of text and rules with the Offset setting in this section. The borders and rules you apply from the Layout tab affect the text inside objects, not the object (a cell, text box, or shape).
Background Color
This odd format puts a color highlight behind a selected paragraph. This is different from both any background color you’ve applied to the container and the Character Fill Color (a text-highlighting option in the Advanced Options popover accessed from the Action ![]() menu in the Font section of the Style tab).
menu in the Font section of the Style tab).
If you are moved to use all three color options, you’ll find a logical hierarchy no matter in what order you apply them: the container color is at the back, the background color (for a paragraph) is next, and the text fill color is on top of that.
Text in Shapes and Text Boxes
Any shape from the Shape ![]() menu that has an “inside” (everything but lines) can act as a text container; a text box, available with a click on the Text
menu that has an “inside” (everything but lines) can act as a text container; a text box, available with a click on the Text ![]() button, can do nothing else. These two kinds of containers have most capabilities in common, so we’ll look at those before we cover their differences.
button, can do nothing else. These two kinds of containers have most capabilities in common, so we’ll look at those before we cover their differences.
Shape and Text Box Commonalities
Rather than repeat “shapes and/or text boxes” ad nauseam, I’ll use the more generic “container” when I mean both of them. Here’s a roundup of what you can do with both, and how to do it:
-
Edit text: When a container is selected, typing replaces its contents. (You may recall that a table cell behaves this way, too.) This is handy for replacing a text box’s placeholder text, but can be either convenient or dangerous in other situations. Typing when an empty container is selected enters the text in the container—you don’t have to click inside the container first.
To edit existing text, you need two clicks: one click to select the container, and the next click to place the insertion point. You can, however, select a single word or a complete paragraph more directly, skipping the initial selection of the container itself: a double-click on a word both activates the container and selects the word, while a triple-click selects a paragraph.
- Format the text: To format all the text in a container, select the container and then select options in the Text pane. To format words or paragraphs separately—to italicize something, for instance—select the target text. You can even apply Paragraph and Character Styles to either everything in the container or to selected text.
- Format the container: Select the container and use the options in the Format Inspector’s Style pane to set fill, border, shadow, reflection, and opacity options.
Shape and Text Box Differences
Shapes and text boxes are significantly different in two areas: resizing and setting up default formatting.
Resize a Container
When it comes to resizing text containers, I find text boxes annoyingly designed. A selected text box has resize handles only at the centers of its left and right sides. When you need to resize a text box for more than just a bit of a width adjustment, you’ll see the problem.
A shape, on the other hand, has eight resize handles on its bounding rectangle: one at each corner, and one at the center of each side.
The difference in reshaping capabilities is rooted, to some extent, in their different approaches to overflow text. A text box never overflows: keep typing and the box expands to accommodate it. It never “underflows” either: delete text and the box shrinks. A text box shows its text—nothing more, nothing less. Narrow or widen the box (your only choices with its side handles), and the height changes to keep empty space at bay.
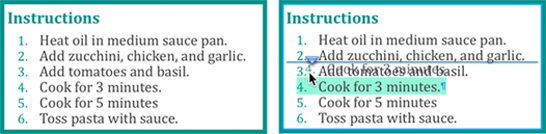
A shape, however, can be opened past its text content; it also can close down past its content, hiding some of it. A special clipping indicator (a highfalutin name for a plus sign in a box) appears at the bottom of a selected shape when text is out of sight (Figure 161). It looks similar to an interface feature used in other programs, but you can’t use it to link text to another box, as you can in a page-layout app: it’s there only to signal a text overflow.
Define a Default Text Box
You can take a perfectly formatted text box and make it the default text box for the entire document.
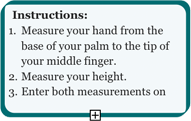
Format an existing text box (or any shape) and, while the container or its contents are selected, choose Format > Advanced > Set as Default Text Box Appearance. The new default includes the formatting for both the container (such as background color and border) and its text; it doesn’t include any text except the placeholder Text. (If you define the default from a shape, the text box will still be just a rectangle.)
Bullets and Lists
The illogically named Bullets & Lists category in the Style tab of the Format Inspector’s ![]() Text pane (a bullet list is a list!) refers to unordered and ordered lists. The former uses preset bullet characters (see Text Bullets) or images (see Image Bullets) to introduce its points; the latter uses numbers or letters (see Numbered Lists).
Text pane (a bullet list is a list!) refers to unordered and ordered lists. The former uses preset bullet characters (see Text Bullets) or images (see Image Bullets) to introduce its points; the latter uses numbers or letters (see Numbered Lists).
No matter what kind of list you make, you can use these techniques to enter info, set up a list hierarchy, and move within the list:
- Move to the next line: After you type a list item, press Return. The leader character appears automatically.
- Stop list-making mode: When you’ve just started a new line, press Return or Delete. Numbers removes the leader character.
- Indent a line: Press Tab—whether at the beginning or within a line. Depending on the list, renumbering might start for the indented level.
- Outdent a line: Press Shift-tab. The current line goes back to the previous heading level.
- Move a list item: Click-and-hold the leader character until the line highlights, and then drag it up, down, in, or out. A blue line and arrowhead help you position it before you let go. You can try this in Numbers’ Recipe template, which I used in Figure 162.
Text Bullets
A bullet list isn’t restricted to the actual bullet (•) character. There are 11 preset characters, and you can use any character from any font (although you can’t predict what might be substituted for a non-standard font if the document is opened on another Mac or device).
To specify a bullet:
- Select the text or its container.
- In the Format Inspector’s Bullets & Lists section, set the first pop-up menu to None so that styles aren’t involved (see List Styles if you do want them involved).
- Choose Text Bullets from the pop-up menu beneath the Bullets & Lists label (Figure 163). The upper menu changes to None*—the asterisk means something besides None is going on, but it can’t be identified as a defined style. (When a style name is asterisked, that means the selected text had the style applied but you’ve changed some of the formatting since.)
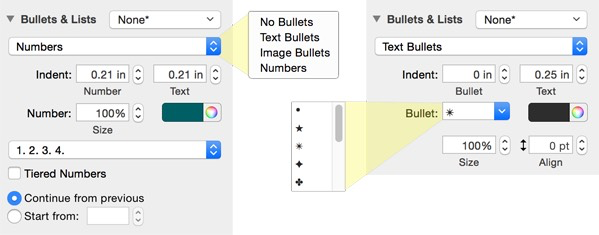
Figure 163: Left: Options in the Bullets & List section change based on your choice from the second pop-up menu. Right: The Bullet menu has 11 bullet-worthy characters but you can insert your own. - Choose a bullet character from the Bullet field’s pop-up menu.
- Choose a color for the bullet if it’s not to match the text color.
- Use the Size and Align fields to adjust the relationship between your bullet character and your text; characters from different fonts don’t always go together well without some tweaking.
- Go back to the Indent fields to set the indent for the bullet itself, and then from the bullet to the text. It’s a waste of time to do this before adjusting the size and alignment, since good indent spacing will depend on the bullet-versus-text size (Figure 164).
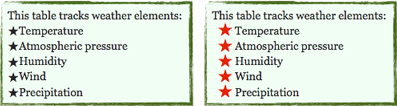
Image Bullets
The procedure for setting up an image for use as a bullet is the same as that for Text Bullets, with these changes to Steps 3 and 4: choose Image Bullets instead of Text Bullets, and click the Current Image sample for a popover of choices (Figure 165). If the wide selection isn’t sufficient, click Custom Image in the popover to import your own.

Numbered Lists
Just as “bullet” doesn’t mean bullet characters, “Numbered” doesn’t mean plain old numbers. It means that the list will be an ordered list, with numbers, Roman numerals, or letters, with upper- or lowercase for the latter two. Figure 166 shows the wide array of punctuation options available for your list in the Format Inspector’s Text pane.
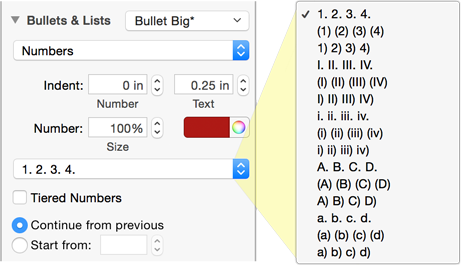
Note that you can pick the number a list begins with. To have the numbering continue from a list earlier in the container, select Continue from Previous. Otherwise, to set a starting number (probably 1), select Start From and enter the number.
The Tiered Numbers option affects sublists (indented lists beneath a list item). Normally, each sublist starts its own numbering, from 1 to whatever. A tiered sublist, on the other hand, gives you 3.1, 3.2, and 3.3 beneath the third item in the main list; under 3.1, it has 3.1.1, 3.1.2, and so on. (If your main list is lettered, a sublist would be A.1 and A.2.)
List Styles
As with so many Numbers elements, you don’t have to recreate a superbly designed list format every time you want to use it. Instead, you can use a built-in style or create one of your own that will be available for every sheet in your document.
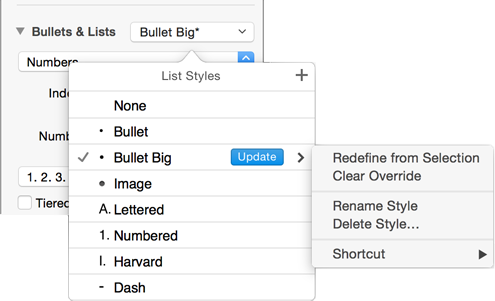
The List Styles popover, which starts with several plain-vanilla options, is in the Format Inspector’s Text pane, in the Style tab; it opens from the topmost pop-up menu in the Bullets & Lists section. To work with a list style, hover over it in the popover and click the menu arrow that appears (Figure 167).
Here’s how to handle list styles:
- Apply a style: Select the text or its container, and choose one from the List Styles popover.
-
Create a new style:
- Start with text that’s formatted as a list (with or without an existing style applied), and change any of the options in the Bullets & List section of the Text pane.
- With the text or its container selected, open the List Styles popover, click the Add
 button, and name the new style. (If the Add button is dimmed, you’ve probably selected text with multiple list formats, which can’t be saved as a single style).
- Redefine a style: Apply a style, and edit it with the Bullets & Lists options. With the text or its container selected, open the style’s submenu and choose Redefine from Selection; or, click the style’s blue Update button.
- Reset from edits: If you’ve edited a list with Bullets & Lists options and want to return to what’s defined by the list style, select the text or its container and choose Clear Override from the style’s submenu.
- Rename a style: Choose Rename from a style’s submenu.
- Delete a style: Choose Delete from a style’s submenu. The resulting dialog not only confirms the deletion, but also asks what style should replace it for any text where it was applied.
- Add a keyboard shortcut for a style: The Shortcut menu in a style’s submenu is a fairly useless list of keys that you can assign to the style; your only choices are the function keys (F1, F2, and so on), which are far better put to other uses.
Paragraph and Character Styles
Working with paragraph and character styles not only speeds the process of formatting the text on your sheet (inside and outside of tables), it gives your spreadsheets a cohesive, more professional look. Define the styles in one place and use them in other places—applying identical, multiple formats in one step. And then, if you change the components of a style (from blue to green and centered instead of left-aligned, for instance), all text formatted with that style instantly updates to match the new definition.
While a paragraph style includes text formatting (font, size, and so on), you can also create character styles separately to use anywhere, including within a styled paragraph to override its text-level formatting for selected words or phrases.
Paragraph and character styles—like table, chart, shape, and list styles—are available to all the sheets in a document.
Paragraph Styles
When you’re applying, creating, or editing paragraph styles, you must first “select” a paragraph so Numbers knows what you want formatted. A paragraph is considered selected when:
- The entire paragraph is selected.
- Any part of the paragraph is selected. If your selection spans more than one paragraph, they’re both, or all, selected.
- The blinking insertion point is inside the paragraph.
- The paragraph’s container is selected.
A paragraph style includes the formatting you can apply from the Format Inspector’s Text pane, except:
-
Style tab:
- In the Alignment section, the Left/Center/Right alignment option is part of the style definition, but neither the left and right indents, nor the vertical alignment options are included.
- Bullets & Lists are not part of paragraph styles.
- Layout tab: Neither columns nor text inset are included.
Using paragraph styles in Numbers can be frustrating. Creation and editing are awkward and unreliable, and have silly strictures. In fact, Numbers 3.5 quit unexpectedly many times as I worked with them. The descriptions here are the way it’s supposed to work, but YMMV (your mileage may vary).
Apply a style:
- Select the paragraph(s).
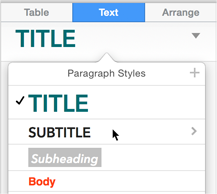
- Click anywhere in the top section of the Text pane (where the current style is identified) for a popover, and choose a style from the list (Figure 168).
Numbers applies the style to the selection.
Create a new style:
- Select the paragraph(s) that you want to format. Even this basic procedure is erratically available for various text elements:
- The text must already have a paragraph style applied to it, and the entire selection must be the same style. This becomes an issue when you’ve selected multiple paragraphs with different styles: you must first apply a single paragraph style to the selection before you can proceed.
- While selecting a table cell lets you format the text in it, that doesn’t let you create a style; you must select the text inside the cell to create a style.
- You can apply a style to a table’s name (whether you’ve selected its container or the text) but you can’t create a style from it.
- Text elements for charts can’t have paragraph (or character) styles applied. This is not just odd, it’s practically criminal.
- Format the text—both the characters (with bold, italic, color, and so on) and the paragraph (margins, alignment, rules, and more)—in the Style and Layout tabs of the Format Inspector’s Text pane.
When you change any component of an applied style, an asterisk appears next to the style’s name at the top of the Text pane and an Update button appears (Figure 169); ignore the button when you’re creating a new style.

Figure 169: Changes to styled text result in an asterisked style name and an Update button in the Text pane. - Click anywhere in the top section of the pane, where the style is identified, to open the Paragraph Styles popover.
- Click the Add button at the top of the popover.
If the button is dimmed, it won’t work; this is usually because of an issue listed in Step 1.
- A new style appears in the popover, immediately below the one you started with; it’s selected so you can name it.
Edit a style:
-
Redefine the style: Select a styled paragraph, make your changes, and then click the Update button that appears at the top of the Text pane.
Alternatively, open the Paragraph Styles popover and go to the current style (it’s checked in the list); click the arrow that appears to open the style’s submenu, and choose Redefine from Selection (Figure 170). This is, however, a multi-step waste of time—unless you find, as I have on occasion, that the Update button doesn’t appear.

- Rename a style: With any paragraph selected (not necessarily text with the to-be-renamed style applied), open the Paragraph Styles popover, open the style’s submenu, and choose Rename Style.
- Remove manual formats applied to a styled paragraph or text within it: The official way is to select the paragraph (not the container), and choose Clear Override from that style’s submenu inside the Paragraph Styles popover. The easier way is to simply select the paragraph, and click the style name in the main popover.
- Delete a style: With any text selected (not necessarily of the style you want to delete—you must select something to make the Text pane available), open the Paragraph Styles popover, open a style’s submenu and choose Delete Style. You are given a chance to designate another style to be applied to any paragraph using the style you’re deleting. In fact, Numbers insists you choose another style—you must do so or cancel the deletion.
- Reorder the styles in the popover: Drag them to new positions.
Character Styles
Using character styles in Numbers is much like using paragraph styles, except a little more awkward.
As with paragraph styles, you can’t create a style unless you start from an existing style. But when it comes to character styles, there’s actually a None “style”: that is, unlike with paragraph styles, text can exist without a character style applied. (This makes sense when you realize that character formatting is included with paragraph styles anyway.)
Character styles are defined in the Format Inspector’s Text pane, in the Style tab’s Font section. Handle them the same way you do paragraph styles—except that you’ll find the Update button inside the Character Styles popover rather than next to the current style’s name (Figure 171).
