
Getting in Shapes
You can use shapes—not just what you think of as geometric or freeform shapes, but also lines and arrows—to enhance a document and make it more cluttered… I mean, understandable. And let that be a lesson: it’s easy to slip from understandability to clutter. So, don’t get carried away. Toward that end, I shall avoid getting carried away in my coverage, which is difficult because working with shapes is so creatively satisfying.
In this chapter, I’ll show you how to add shapes to your sheet and format them, and then how to do Basic Shape Editing; that’s followed by an introduction to Advanced Shape Editing. Finally, we’ll pay special attention to the options for creating arrows (and other endpoints) for lines in All about Arrows.
Add and Edit Shapes
As with the Table and Chart popovers from the toolbar, the popover you get when you click the Shape ![]() button comprises several pages (Figure 155).
button comprises several pages (Figure 155).

To see the pages, click the dots at the bottom of the popover, the arrows on its sides, or swipe. But each page offers the same dozen shapes sandwiched between a row of lines and a Draw with Pen button; the pages merely offer different styles for the same objects.
To add a shape or line to the sheet, simply click the one you want in the popover. To draw with the pen, click the button and follow the onscreen directions, which explain how and when to click and/or drag to draw a freeform shape.
Basic Shape Editing
To edit a shape:
- Change the outline or fill: Select the shape, go to the Format Inspector’s Style pane and use the controls in the Fill and Border sections. (See Color Controls for help with that.)
- Resize a shape: Select it and then drag any resize handle that appears around the perimeter. To resize the length and width proportionately, press Shift while dragging a corner handle.
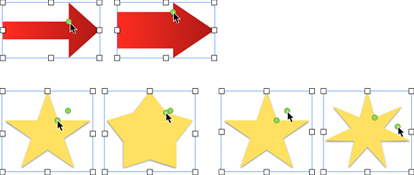
- Change a shape’s features: Select it and drag a green reshape handle. What you can adjust depends on the shape: reshaping can, for instance, change the proportion of an arrowhead to its shaft, a tail to its speech bubble, or the angle and number of a star’s points (Figure 156).
- Change other options: Select the object and use the options at the bottom of the Style pane, which vary somewhat based on the shape; most can have shadows and reflections.
- Reorient a shape: You’re not stuck with arrows that point only east, or squares that either sit flat on a horizontal line or look like diamonds, sitting on one of their points. Use the Rotate section of the Arrange pane to adjust any object’s orientation.
Advanced Shape Editing
There’s actually a quite advanced drawing program buried in Numbers. Here’s how to dig out its basic features:
- Select a text box or shape.
- Choose Format > Shapes and Lines > Make Editable.
- Drag any of the red edit points that appear to change the shape. (You can drag more than one point at a time by Shift-clicking to select multiple points.)
- Point to the shape’s edge between two edit points to see a suggested new edit point for your dragging pleasure; click it to make it real.
A new point shows up midway between two existing points; you can drag it along the shape’s edge to a different spot.
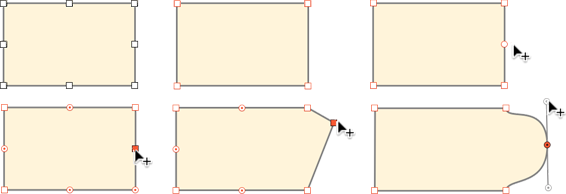
- Double-click an edit point to toggle it between dragging lines and dragging curves. A line edit point is square; a curve edit point is round (Figure 157).
To delete an edit point, click to select it and then press Delete; you can select multiple points for deletion by Shift-clicking on them. Any distortion you created by dragging a deleted point disappears with it.
All about Arrows
Arrow construction in Numbers is a perfect combination of ease of use and a wide variety of formatting options (Figure 158). But it’s important to realize that a Numbers arrow is just a line—albeit one with special endpoints. That means you can turn any line—including a curved line or anything you draw with the pen—into an arrow. It also means that when you store an “arrow” style (as described at the end of this section) it’s actually a line style that you store, and you’ll have to add the desired endpoints to it when you need them.
To make an arrow, begin by clicking the Shape ![]() button and selecting one of the three line shapes from the top of the popover (line, arrow, or curved line), or click the Draw with Pen button at the bottom.
button and selecting one of the three line shapes from the top of the popover (line, arrow, or curved line), or click the Draw with Pen button at the bottom.
Numbers adds the type of line you selected to your sheet. (This can be hard to get used to if you use apps where you click a tool and then draw with it.)
If the object you’ve inserted looks like the arrow you want, you’re finished—but that’s unlikely. Go to the Format Inspector’s Style pane, where you might find what you want in the Line Styles section at the top of the pane—it shows only lines, but choosing one doesn’t delete the arrow’s head if it already has one.
Still, unless you’ve created those styles yourself, you’ll probably want to use the options in the Style pane’s Stroke section to design your arrows (Figure 159). If there’s only a single menu there—it would show No Stroke as the selection—choose Line from it, and then select formatting options:
- Do instant formatting with the menu in the upper right of the Stroke section. It offers six choices—three basic strokes and three sets of endpoints—based on other settings (such as color and line width) in the section.
- Choose the stroke style from the Stroke pop-up menu.
- Select a color from the Color Well.
- Set the line thickness by typing a number in the field or clicking the arrows next to it.
- Use the Endpoints pop-up menus to specify an endpoint style for either or both ends of the line. The arrowhead matches the line style that you’ve chosen, and will be resized with any change to the line thickness.
