
C H A P T E R 18
![]()
Working with Servlets and Applets
The Java language provides a rich infrastructure for creation of web-based applications. Developing Java applications for the Web has become more popular throughout the years. The servlet was one of the first technologies that allowed developers to create dynamic content for the Web. Applets first appeared in the early days of Java development and they changed the concept of web development forever. These two technologies have been around for the majority of the lifetime of the Java language itself, and they are both still going strong.
Although the direct usage of the Java servlet API has decreased over time, it still remains the base for most of the web application development frameworks that are widely used today. Application frameworks such as Java Server Pages (JSP) and Java Server Faces (JSF) are built upon servlet technology. Applets have also evolved over the years from using the Abstract Windowing Toolkit (AWT) to including Java Swing, and most recently JavaFX for deploying solid Java-based applications over the Web.
This chapter will get you started developing both servlets and applets. The recipes within this chapter will teach you the basics for developing on each of these technologies, and they touch upon some of the most important concepts of each.
18-1. Setting Up a Servlet Environment
Problem
You would like to create a set up a development environment for testing and running Java Servlets using Java SE 7.
Solution
Download and install Apache Tomcat from the Tomcat web site. The version used for this book is 7.0.20, and it can be downloaded from http://tomcat.apache.org/. Select the .zip or tar.gz download format, and decompress the downloaded files within a directory on your workstation. We will refer to that directory as /JAVA_DEV/Tomcat. Set the JAVA_HOME environment variable to point to your Java runtime. Once you have unzipped the contents of the download, you are ready to start developing servlet applications.
How It Works
You can use any Java servlet container for working with Java servlets, as long as you are using the correct JDK version for that container. For the purposes of this chapter, we will utilize one of the most commonly used containers: Apache Tomcat. The Apache Tomcat 7.0.20 release is compatible with Java 1.6 (JDK 6) and up, so it works just fine with Java SE 7.
You have a couple of options in order to set up your environment for running the examples within this chapter:
- You can install an IDE such as NetBeans or Eclipse; then install Tomcat 7.0.20 separately and register it with the IDE. Please see the IDE documentation for more details.
- You can install Tomcat 7.0.20 and set up your examples manually. This involves creating directories by hand, compiling using the
javaccommand via the command line and copying files to the correct deployment directories for testing.
Because we will not cover any specific IDE in this chapter, we will default to using the second option. In order to install Tomcat 7.0.20, please download from the Tomcat site http://tomcat.apache.org. Once you have obtained the .zip or .tar file, unzip it to the location on your machine that you want to install Tomcat; otherwise known as /JAVA_DEV/Tomcat for this chapter. Next, set the JAVA_HOME environment variable equal to the location where Java SE 7 is installed.
![]() Note If you are running OS X, you may need to set the environment variable equal to the location in which OpenJDK is installed if Java 7 is not yet available on that platform.
Note If you are running OS X, you may need to set the environment variable equal to the location in which OpenJDK is installed if Java 7 is not yet available on that platform.
After you perform these steps listed, you are ready to start using Tomcat. However, it is important that you configure the users by opening the /JAVA_DEV/Tomcat/conf/tomcat-users.xml file and create an administrative user account. To do so, enter a user account similar to the following (just be sure to include manager-gui and admin-gui as roles for the user you create):
<user username="your_username” password="your_password” roles="manager-gui, admin-gui"/>
Adding this line to the tomcat-users.xml configuration file will allow access to the web-based utilities that can be used for managing applications that you deploy. Just be sure to keep this file safe as all passwords are in clear text.
Last, open a command line and traverse into the /JAVA_DEV/Tomcat/bin directory; then execute the startup.sh or startup.bat file according to the platform on which you are running. This will cause the server to start, and once it is ready, you can open up a browser and point to http://localhost:8080 to see the default Tomcat home page. This page gives you the ability to open up various management pages to help manage the Tomcat applications and environment.
If you have been successful in configuring the Tomcat environment and starting the server, you are ready to start developing Java servlets and applets.
18-2. Developing a Servlet
Problem
You would like to create a web page that will serve some dynamic content.
Solution
Develop a Java servlet class, and compile it to run within a Java servlet container. In the following example, a simple servlet is created that will display some dynamic content to the web page. The first listing is the servlet code that contains the functionality for the servlet:
package org.java7recipes.chapter18.recipe18_02;


import java.io.IOException;

import java.io.PrintWriter;

import java.util.Date;


import javax.servlet.*;

import javax.servlet.http.*;


public class SimpleServlet extends HttpServlet {


        public void doGet(HttpServletRequest req, HttpServletResponse res)

                throws IOException, ServletException {


                res.setContentType("text/html");


                PrintWriter out = res.getWriter();


                /* Display some response to the user */


                out.println("<html><head>");

                out.println("<title>First Servlet</title>");

                out.println("	<style>body { font-family: 'Lucida Grande', " +

                        "'Lucida Sans Unicode';font-size: 13px; }</style>");

                out.println("</head>");

                out.println("<body>");

                out.println("<p>This is a simple servlet!</p>");
out.println("</body></html>");
out.close();
}
}
Next, the web deployment descriptor is listed. This file is required for application deployment to a servlet container. It contains servlet configuration and mapping that maps the servlet to a URL. In recipe 18-4 you will learn how to omit the servlet configuration and mapping from web.xml to make servlet development, deployment, and maintenance easier.
<?xml version="1.0"?>
<web-app xmlns="http://java.sun.com/xml/ns/javaee"
xmlns:xsi="http://www.w3.org/2001/XMLSchema-instance"
xsi:schemaLocation="http://java.sun.com/xml/ns/javaee
http://java.sun.com/xml/ns/javaee/web-app_3_0.xsd"
version="3.0">
<servlet>
<servlet-name>SimpleServlet</servlet-name>
<servlet-class>org.java7recipes.chapter18.recipe18_02.SimpleServlet</servlet-class>
</servlet>
<servlet-mapping>
<servlet-name>SimpleServlet</servlet-name>
<url-pattern>/SimpleServlet</url-pattern>
</servlet-mapping>
<welcome-file-list>
<welcome-file> /SimpleServlet </welcome-file>
</welcome-file-list>
</web-app>
To compile the Java servlet, use the javac command line utility. The following line was excerpted from the command line and it compiles the SimpleServlet.java file into a class file. First, traverse into the directory containing the SimpleServlet.java file and then execute the following:
javac -cp /JAVA_DEV/Tomcat/lib/servlet-api.jar SimpleServlet.java
Once the servlet code has been compiled into a Java class file, it is ready to package for deployment.
How It Works
Java servlets provide developers the flexibility to design applications using a request-response programming model. Servlets play a key role in development of service-oriented and web application development on the Java platform. There are different types of servlets that can be created, and each of them is geared toward providing different functionality. The first type is the GenericServlet, which provides services and functionality. The second type, HttpServlet, is a subclass of GenericServlet, and servlets of this type provide functionality and a response that uses HTTP. The solution to this recipe demonstrates the latter type of servlet as it displays a result for the user to see within a web browser.
Servlets conform to a life cycle for processing requests and posting results. First, the Java servlet container calls the servlet's constructor. The constructor of every servlet must take no arguments. Next, the container calls the servlet init() method, which is responsible for initializing the servlet. Once the servlet has been initialized, it is ready for use. At that point the servlet can begin processing. Each servlet contains a service() method that does not have to be implemented, which handles the requests being made and dispatches them to the appropriate methods for request handling. Finally, the container calls the servlet's destroy() method, which takes care of finalizing the servlet and taking it out of service.
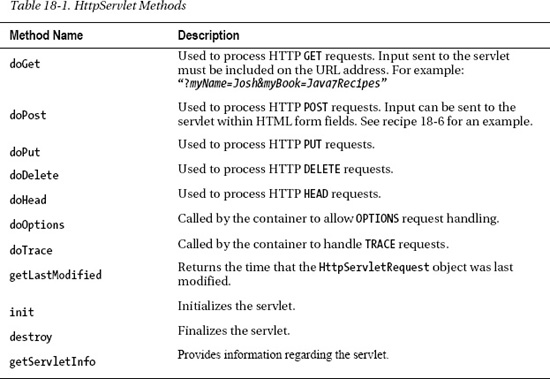
Every servlet class must implement the javax.servlet.Servlet interface or extend another class that does. In the solution to this recipe, the servlet named SimpleServlet extends the HttpServlet class, which provides methods for handling HTTP processes. In this scenario, a request is sent from the container to the servlet; then the servlet service() method dispatches the HttpServletRequest object and dispatches it to the appropriate method provided by HttpServlet. Namely, the HttpServlet class provides the doGet(), doPut(), doPost(), and doDelete() methods for working with am HTTP request. The HttpServlet class is abstract, so it must be subclassed and then an implementation can be provided for its methods. In the solution to this recipe, the doGet() method is implemented, and a response is written to the browser using the PrintWriter. Table 18-1 describes each of the methods available to an HttpServlet.
A servlet generally performs some processing within the implementation of its methods and then returns a response to the client. The HttpServletRequest object can be used to process arguments that are sent via the request. For instance, if an HTML form contains some input fields that are sent to the server, those fields would be contained within the HttpServletRequest object. To learn more about sending arguments to a servlet, please refer to recipe 18-6. The HttpServletResponse object is used to send responses to the client browser. In the solution to this recipe, you can see that the HttpServletResponse object is used to set the content type of the response and to obtain a handle on the PrintWriter object. The following lines of code show how this is done, assuming that the argument name of the HttpServletResponse object is res:
res.setContentType("text/html");
PrintWriter out = res.getWriter();
A GenericServlet can be used for providing services to web applications. This type of servlet is often used for logging events because it implements the log() method. A GenericServlet implements both the Servlet and ServletConfig interfaces, and to write a generic servlet only the service() method must be overridden.
18-3. Packaging, Compiling, and Deploying a Servlet
Problem
You have written a Java servlet and would now like to package it and deploy it for use.
Solution
Compile the sources, set up a deployable application, and copy the contents into the Tomcat deployment directory. From the command line, use the javac command to compile the sources:
javac -cp /JAVA_DEV/Tomcat/servlet-api.jar SimpleServlet.java
After the class has been compiled, deploy it along with the web.xml deployment descriptor conforming to the appropriate directory structure.
QUICK START
How It Works
In order to compile the sources, you can use your favorite Java IDE such as NetBeans or Eclipse, or you can use the command line. For the purposes of this recipe, we will use the command line. If using the command line, you must ensure that you are using the javac command that is associated with the same Java release that you will be using to run your servlet container. In this example, we will say that the location of Java SE 7 installation is in the following path:
/Library/Java/JavaVirtualMachines/1.7.0.jdk/Contents/Home
This path may differ in your environment if you are using a different operating system and/or installation location. To ensure that the Tomcat servlet container is running under the Java runtime that is located at this path, set the JAVA_HOME environment variable equal to this path. On OS X and *nix operating systems, the environment variable can be set by opening the terminal and typing the following:
export JAVA_HOME=/Library/Java/JavaVirtualMachines/1.7.0.jdk/Contents/Home
If you are using Windows, use the SET command within the command line to set up the JAVA_HOME environment variable:
set JAVA_HOME=C:your-java-se-path
Next, compile your Java servlet sources and be sure to include the servlet-api.jar that is packaged with your servlet container in your CLASSPATH. You can set the CLASSPATH by using the –cp flag of the javac command. The following command should be executed at the command line from within the same directory as the sources are located. In this case, the source file is named SimpleServlet.java.
javac -cp /JAVA_DEV/Tomcat/servlet-api.jar SimpleServlet.java
Next, package your application by creating a directory and naming it after your application. In this case, create a directory and name it SimpleServlet. Within that directory, create another directory named WEB-INF. Traverse into the WEB-INF directory and create another directory named classes. Last, create directories within the classes directory in order to replicate your Java servlet package structure. For this recipe, the SimpleServlet.java class resides within the Java package org.java7recipes.chapter18.recipe18_02, so create a directory for each of those packages within the classes directory. Create another directory within WEB-INF and name it lib, any .jar files containing external libraries should be placed within the lib directory. In the end, your directory structure should resemble the following:
SimpleServlet
|_WEB-INF
|_classes
|_org
|_java7recipes
|_chapter18
|_recipe18_02
|_lib
Place your web.xml deployment descriptor within the WEB-INF directory, and place the compiled SimpleServlet.class file within the recipe18_02 directory. The entire contents of the SimpleServlet directory can now be copied within the /JAVA_DEV/Tomcat/webapps directory to deploy the application. Restart the application server and visit http://localhost:8080/SimpleServlet/SimpleServlet to see the servlet in action.
18-4. Registering Servlets without WEB-XML
Problem
Registering servlets in the web.xml file is cumbersome, and you would like to deploy servlets without the need to modify web.xml at all.
Solution
Make use of the @WebServlet annotation to register the servlet, and omit the web.xml registration. This will alleviate the need to modify the web.xml each time a servlet is added to your application. The following adaptation of the SimpleServlet class that has been used in recipe 18-2 includes the @WebServlet annotation and demonstrates its use:
package org.java7recipes.chapter18.recipe18_04;
import java.io.IOException;
import java.io.PrintWriter;
import javax.servlet.*;
import javax.servlet.annotation.WebInitParam;
import javax.servlet.annotation.WebServlet;
import javax.servlet.http.*;
@WebServlet(name="SimpleServlet2", urlPatterns={"/SimpleServlet2"})
public class SimpleServlet2 extends HttpServlet {
@Override
public void doGet(HttpServletRequest req, HttpServletResponse res)
throws IOException, ServletException {
res.setContentType("text/html");
PrintWriter out = res.getWriter();
/* Display some response to the user */
out.println("<html><head>");
out.println("<title>Simple Servlet 2</title>");
out.println(" <style>body { font-family: 'Lucida Grande', " +
"'Lucida Sans Unicode';font-size: 13px; }</style>");
out.println("</head>");
out.println("<body>"); out.println("<p>This is another simple servlet to show you how "
+ "to deploy without listing the servlet within the "
+ "web-xml configuration file.</p>");
                out.println("</body></html>");


                out.close();

        }

}
![]() Note To display this servlet within the same application that you created in recipes 18-2 and 18-3, you will need to temporarily rename
Note To display this servlet within the same application that you created in recipes 18-2 and 18-3, you will need to temporarily rename WEB.XML to something that will not be recognized by Tomcat. For instance, rename the file to old-web.xml, and then you can run the servlet using @WebServlet.
How It Works
There are a couple of different ways to register servlets with a web container. The first way is to register them using the web.xml deployment descriptor as demonstrated in recipe 18-2. The second way to register them is to use the @WebServlet annotation. The servlet 3.0 API introduced the @WebServlet annotation, which provides an easier technique to use for mapping a servlet to a URL. The @WebServlet annotation is placed before the declaration of a class, and it accepts the elements listed in Table 18-2.

In the solution to this recipe, the @WebServlet annotation maps the servlet class named SimpleServlet to the URL pattern of /SimpleServlet2, and it also names the servlet SimpleServlet2.
@WebServlet(name="SimpleServlet2", urlPatterns={"/SimpleServlet2"})
The new @WebServlet can be used rather than altering the web.xml to register each servlet in an application. This provides ease of development and manageability. However, in some cases, it may make sense to continue using the deployment descriptor for servlet registration (for example, if you do not want to recompile sources when a URL pattern changes). If you look at the web.xml listing in recipe 18-2, you can see the following lines of XML, which map the servlet to a given URL, and provide a name for the servlet. These lines of XML perform essentially the same function as the @WebServlet annotation in this recipe:
<servlet>
<servlet-name>SimpleServlet2</servlet-name>
<servlet-class>org.java7recipes.chapter18.recipe18_04.SimpleServlet2</servlet-class>
</servlet>
<servlet-mapping>
<servlet-name>SimpleServlet2</servlet-name>
<url-pattern>/SimpleServlet2</url-pattern>
</servlet-mapping>
![]() Note It is possible for you to use the same application packaging for each recipe pertaining to servlets within this chapter. That is, use the same directory structure you created within recipe 18-3, and append to it with each recipe you try. The servlet package, name, and URL pattern are different in each recipe. This makes each servlet unique, so each servlet can be mapped separately within the
Note It is possible for you to use the same application packaging for each recipe pertaining to servlets within this chapter. That is, use the same directory structure you created within recipe 18-3, and append to it with each recipe you try. The servlet package, name, and URL pattern are different in each recipe. This makes each servlet unique, so each servlet can be mapped separately within the WEB.XML or as individual servlets with the @WebServlet annotation.
18-5. Setting Initialization Parameters
Problem
A servlet you are writing requires the ability to accept one or more parameters to be set upon initialization.
Solution 1
Set the servlet initialization parameters using the @WebInitParam annotation. The following code listing sets an initialization parameter that is equal to a String value:
package org.java7recipes.chapter18.recipe18_05;import java.io.IOException;
import java.io.PrintWriter;
import javax.servlet.*;
import javax.servlet.annotation.WebInitParam;
import javax.servlet.annotation.WebServlet;
import javax.servlet.http.*;
@WebServlet(name="SimpleServlet3", urlPatterns={"/SimpleServlet3"},
initParams={ @WebInitParam(name="name", value="Duke") })
public class SimpleServlet3 extends HttpServlet {
@Override
public void doGet(HttpServletRequest req, HttpServletResponse res)
throws IOException, ServletException {
res.setContentType("text/html");

PrintWriter out = res.getWriter();
/* Display some response to the user */
out.println("<html><head>");
out.println("<title>Simple Servlet 3</title>");
out.println(" <style>body { font-family: 'Lucida Grande', " +
"'Lucida Sans Unicode';font-size: 13px; }</style>");
out.println("</head>");
out.println("<body>");
out.println("<p>This is a simple servlet! Hello "
+ getServletConfig().getInitParameter("name") + "</p>");
out.println("</body></html>");
out.close();
}
}
The resulting web page will display the following text:
This is a simple servlet! Hello Duke
Solution 2
Place the init parameters inside of the web.xml deployment descriptor file. The following lines are excerpted from the web.xml deployment descriptor for the SimpleServlet application. They include the initialization parameter names and values:
<web-app>

<servlet>

<servlet-name>SimpleServlet3</servlet-name>

<servlet-class>org.java7recipes.chapter18.recipe18_05.SimpleServlet3</servlet-class>


<init-param>

<param-name>name</param-name>

<param-value>Duke</param-value>

</init-param>

    ...

</servlet>

    ...

</web-app>
How It Works
Often, there is a requirement to set initialization parameters for a servlet in order to initialize certain values. Servlets can accept any number of initialization parameters, and there are a couple of ways in which they can be set. The first solution is to annotate the servlet class with the @WebInitParam annotation as demonstrated in solution 1, and the second way to set an initialization parameter is to declare the parameter within the web.xml deployment descriptor, as demonstrated in solution 2. Either way will work, but the solution using @WebInitParam is based upon the newer Java servlet API 3.0. Therefore, solution 1 is the more contemporary approach, and solution 2 remains valid for following an older model or using an older Java servlet release.
In order to make use the @WebInitParam annotation, it must be embedded within the @WebServlet annotation. Therefore, the servlet must be registered with the web application via the @WebServlet annotation rather than within the web.xml file. For more information on registering a servlet via the @WebServlet annotation, see recipe 18-4.
The @WebInitParam annotation accepts a name/value pair as an initialization parameter. In the solution to this recipe, the parameter name is "name" and the value is "Duke".
@WebInitParam(name="name", value="Duke")
Once set, the parameter can be used within code by calling getServletConfig().getInitialiationParameter() and passing the name of the parameter, as seen in the following line of code:
out.println("<p>This is a simple servlet! Hello "

                                 + getServletConfig().getInitParameter("name") + "</p>");
The annotations have the benefit of providing ease of development and also make it easier to maintain servlets as a single package rather than jumping back and forth between the servlet and the deployment descriptor. However, those benefits come at the cost of compilation because in order to change the value of an initialization parameter using the @WebInitParam annotation, you must recompile the code. Such is not the case when using the web.xml deployment descriptor. It is best to evaluate your application circumstances before committing to a standard for naming initialization parameters.
18-6. Handling Requests and Responses
Problem
You would like to create a web form that accepts user input and supply a response based upon the input that has been received.
Solution
Create a standard HTML–based web form, and when the submit button is pressed invoke a servlet to process the end-user input and post a response. In order to examine this technique, we will look at two different pieces of code. The first code below is HTML that is used to generate the input form. Pay particular attention to the <form> and <input> tags. You will see that the action lists a servlet name, MathServlet.
<html>

        <head>

        <title>Simple Math Servlet</title>

        </head>

        <body>

                <h1>This is a simple Math Servlet</h1>

                <form method="POST" action="MathServlet">

                <label for="numa">Enter Number A: </label>

                <input type="text" id="numa" name="numa"/><br><br>

<label for="numb">Enter Number B: </label>

<input type="text" id="numb" name="numb"/><br/><br/>

                <input type="submit" value="Submit Form"/>

                <input type="reset" value="Reset Form"/>

                </form>

        </body>

</html>
Next, take a look at the code for a servlet named MathServlet. This is the Java code that receives the input from the HTML code that is listed previously, processes it accordingly, and posts a response:
package org.java7recipes.chapter18.recipe18_06;


import java.io.IOException;

import java.io.PrintWriter;

import java.util.Date;


import javax.servlet.*;

import javax.servlet.http.*;


/**

 * Simple Servlet that accepts two input parameters as Strings,

 * converts them to int values, and adds them together.

*/

public class MathServlet extends HttpServlet {


        public void doPost(HttpServletRequest req, HttpServletResponse res)

                throws IOException, ServletException {


                res.setContentType("text/html");


                // Store the input parameter values into Strings

                String numA = req.getParameter("numa");

                String numB = req.getParameter("numb");


                int solution = Integer.valueOf(numA) + Integer.valueOf(numB);


                PrintWriter out = res.getWriter();


                /* Display some response to the user */


                out.println("<html><head>");

                out.println("<title>Test Math Servlet</title>");

                out.println("	<style>body { font-family: 'Lucida Grande', " +

                        "'Lucida Sans Unicode';font-size: 13px; }</style>");

                out.println("</head>");

                out.println("<body>");


                out.println("<p>Solution: " +

                        numA + " + " + numB + " = " + solution + "</p>");

out.println("<br/><br/>");

out.println("<a href='index.html'>Add Two More Numbers</a>");

                out.println("</body></html>");


                out.close();

        }

}
![]() Note To run the example using the same application that you created in recipe 18-3, copy the
Note To run the example using the same application that you created in recipe 18-3, copy the index.html file into the SimpleServlet root directory, copy the <servlet> and <servlet-mapping> sections from the web.xml file that is within the recipe18_06 directory into the web.xml that is contained within the SimpleServlet application directory. After following these steps, if the application is deployed in the Tomcat/webapps directory, you should be able to browse to http://localhost:8080/SimpleServlet/index.html to see the results if Tomcat is running.
How It Works
Servlets make it easy to create web applications that adhere to a request and response life cycle. They have the capability to provide HTTP responses and also process business logic within the same body of code. The capability to process business logic makes servlets much more powerful than standard HTML code. The solution to this recipe demonstrates a standard servlet structure for processing requests and sending responses. An HTML web form contains parameters that are sent to a servlet. The servlet then processes those parameters in some fashion and then publishes a response that can be seen by the client. In the case of an HttpServlet object, the client is a web browser, and the response is a web page.
Values can be obtained from an HTML form by using HTML <input> tags embedded within an HTML <form>. In the solution to this recipe, two values are accepted as input and they are referenced by their id attributes as numa and numb. There are two more <input> tags within the form; one of them is used to submit the values to the form action, and the other is used to reset the form fields to blank. The form action is the name of the servlet that the form values will be passed to as parameters. In this case, the action is MathServlet. The <form> tag also accepts a form processing method, either GET or POST. In the example, the POST method is used because form data is being sent to the action; in this case, data is being sent to MathServlet. You could, of course, create an HTML form as detailed as you would like and then have that data sent to any servlet in the same manner. This example is relatively basic just to give you an understanding of how the processing is performed.
The <form> action attribute states that the MathServlet should be used to process the values that are contained within the form. The MathServlet name is mapped back to the MathServlet class via the web.xml deployment descriptor or the @WebServlet annotation. Looking at the MathServlet code, you can see that a doPost() method is implemented to handle the processing of the POST form values. The doPost() method accepts HttpServletRequest and HttpServletResponse objects as arguments. The values contained with the HTML form are embodied within the HttpServletRequest object. In order to obtain those values, call the request object's getParameter() method, passing the id of the input parameter that you want to obtain. In the solution to this recipe, those values are obtained and stored within local String fields.
String numA = req.getParameter("numa");

String numB = req.getParameter("numb");
Once the values are obtained, they can be processed as needed. In this case, those String value are converted into int values and then they are added together to generate a sum and stored into an int field. That field is then presented as a response on a resulting web page.
int solution = Integer.valueOf(numA) + Integer.valueOf(numB);
As mentioned previously, the HTML form could be much more complex, containing any number of <input> fields. Likewise, the servlet could perform more complex processing of those field values. This example is merely the tip of the iceberg, and the possibilities are without bounds. Servlet-based web frameworks such as JSP and JSF hide many of the complexities of passing form values to a servlet and processing a response. However, the same basic framework is used behind the scenes.
18-7. Setting Application-Wide Parameters
Problem
You would like to enable all servlets within your application to have the capability to communicate with the servlet container to obtain the same set of information. Furthermore, you'd like to set up some initialization parameters that can be shared by every servlet within the application.
Solution
Use a ServletContext object in order to allow each servlet within the application to communicate with the servlet container. Because each application has only one ServletContext, every servlet within the application will see the same ServletContext, so this is the ideal location to place initialization parameters that are intended for application-wide use. In the example that follows, application-wide parameters are set up to store an organization's e-mail address and SMTP host for sending mail. Those parameters are then used within a servlet in order to send e-mail to the organization.
The code below defines a servlet named MailServlet that is used for processing form values that were passed from an HTML form that is used by a client to submit feedback to an organization. The servlet sends an e-mail to the organization that contains the user feedback.
package org.java7recipes.chapter18.recipe18_07;


import java.io.IOException;

import java.io.PrintWriter;


import java.util.Enumeration;

import java.util.Properties;

import javax.mail.Message;

import javax.mail.Session;

import javax.mail.Transport;

import javax.mail.internet.AddressException;

import javax.mail.internet.InternetAddress;

import javax.mail.internet.MimeMessage;

import javax.servlet.*;

import javax.servlet.http.*;


/**

 * This servlet accepts input from a web form in order to send email to
* the servlet's owner.
*
* @author juneau
*/
public class MailServlet extends HttpServlet {
public void doPost(HttpServletRequest req, HttpServletResponse res)
throws IOException, ServletException {
res.setContentType("text/html");
String email = req.getParameter("email");
String fname = req.getParameter("fname");
String lname = req.getParameter("lname");
String feedback = req.getParameter("feedback");
PrintWriter out = res.getWriter();
/* Display some response to the user */
out.println("<html><head>");
out.println("<title>Company Feedback</title>");
out.println(" <style>body { font-family: 'Lucida Grande', "
+ "'Lucida Sans Unicode';font-size: 13px; }</style>");
out.println("</head>");
out.println("<body>");
if (sendMail(email, fname, lname, feedback)) {
out.println("<p>Email sent, expect a response soon!</p>");
} else {
out.println("<p>There was an issue with the email, please try again.</p>");
}
out.println("</body></html>");
out.close();
}
private boolean sendMail(String email, String fname, String lname, String feedback) {
boolean result = false;
try {
// Send email here
// servlet configuration initialization parameters
String contextEmail =
getServletConfig().getInitParameter("emailAddress"); String contextSmtp =
getServletConfig().getInitParameter("smtpAddress");
//Set the host smtp address
Properties props = new Properties();
props.put("mail.smtp.host", contextSmtp);
// create some properties and get the default Session
Session session = Session.getDefaultInstance(props, null);
session.setDebug(false);
// create a message
Message msg = new MimeMessage(session);
// set the from and to address
InternetAddress addressFrom = new InternetAddress(email);
msg.setFrom(addressFrom);
InternetAddress[] address = new InternetAddress[1];
address[0] = new InternetAddress(email);
msg.setRecipients(Message.RecipientType.TO, address);
msg.setSubject("***Customer Feedback ***");
// Append Footer
msg.setContent(feedback, "text/plain");
// Uncomment for production
Transport.send(msg);
result = true;
} catch (javax.mail.MessagingException ex) {
ex.printStackTrace();
result = false;
}
return result;
}
}
The next code example demonstrates the HTML code that may be used to generate the web form for capturing the user feedback. Notice that the <form> action is the MailServlet.
<html>

        <head>

        <title>Send Us Feedback</title>

        </head>

        <body>

                <h1>Welcome to My Company's Feedback Form</h1>


<p>Please fill in all fields on the form below to send feedback to my company.
</p>
<form method="POST" action="MailServlet">
<label for="email"> Email Address: </label>
<input type="text" id="email" name="email"/><br><br>
<<label for="fname">First Name: </label>
<<input type="text" id="fname" name="fname"/><br/><br/>
<<label for="lname">Last Name: </label>
<<input type="text" id="lname" name="lname"/><br/><br/>
<<label for="feedback">Feedback: </label>
<<br/>
<<textarea cols="100" rows="20"
<id="feedback" name="feedback">
<</textarea>
<<br/><br/>
<input type="submit" value="Submit Form"/>
<input type="reset" value="Reset Form"/>
</form>
</body>
</html>
Finally, a look at the web.xml file, which declares the context parameters that can be utilized by any of the servlets within the application. Stop and restart Tomcat to pick up the changes in context parameter strings.
<?xml version="1.0" encoding="UTF-8"?>

<web-app version="2.5" xmlns="http://java.sun.com/xml/ns/javaee" xmlns:xsi="http://www.w3.org/2001/XMLSchema-instance" xsi:schemaLocation="http://java.sun.com/xml/ns/javaee   http://java.sun.com/xml/ns/javaee/web-

app_2_5.xsd">

<context-param>

<param-name>emailAddress</param-name>

<param-value>[email protected]</param-value>

</context-param>

<context-param>

<param-name>smtpAddress</param-name>

<param-value>smtp.yourcompany.com</param-value>

</context-param>

<servlet>

<servlet-name>MailServlet</servlet-name>

<servlet-class>org.java7recipes.chapter18.recipe18_07.MailServlet</servlet-class>

</servlet>

<servlet-mapping>

<servlet-name>MailServlet</servlet-name>
<url-pattern>/MailServlet</url-pattern>
</servlet-mapping>
<welcome-file-list>
<welcome-file> /math.html </welcome-file>
</welcome-file-list>
</web-app>
The user feedback form will look something like the one shown in Figure 18-1.

Figure 18-1. User feedback form
How It Works
Some applications require the use of application-wide parameters that can be accessed from any servlet. The solution to this recipe demonstrates this concept by setting up an organization's e-mail address and SMTP host address as parameters. Application-wide parameters must be configured within the web.xml deployment descriptor. They are set up using the <context-param> XML tag. Each <context-param> must contain a <param-name> and <param-value> pair, which represent the name/value pair for each parameter. In the solution to this recipe, the two parameters are set up as follows:
<context-param>

<param-name>emailAddress</param-name>

<param-value>[email protected]</param-value>

</context-param>
<context-param>
<param-name>smtpAddress</param-name>
<param-value>smtp.yourcompany.com</param-value>
</context-param>
Once configured within the deployment descriptor, these initialization parameters can be used by any of the servlets within an application by calling the servlet configuration's getInitParameter() method and passing the name of the parameter that you want to obtain:
String contextSmtp =getServletConfig().getInitParameter("smtpAddress");
18-8. Filtering Web Requests
Problem
You would like to invoke certain processing if a specified URL is used to access your application. For instance, if a specific URL is used to access your application, you would like to log the user's IP address.
Solution
Create a servlet filter that will be processed when the specified URL format is used to access the application. In this example, the filter will be executed when a URL conforming to the format of “/*” is used. This format pertains to any URL in the application. Therefore, any page will cause the servlet to be invoked.
package org.java7recipes.chapter18.recipe18_08;


import java.io.IOException;

import java.io.PrintWriter;

import java.util.Date;


import javax.servlet.*;

import javax.servlet.annotation.WebFilter;

import javax.servlet.http.*;


/**

 * Recipe 18-8

 * This filter obtains the IP address of the remote host and logs it.

 *

 * @author juneau

 */

@WebFilter("/*")

public class LoggingFilter implements Filter {
private FilterConfig filterConf = null;
public void init(FilterConfig filterConf) {
this.filterConf = filterConf;
}
public void doFilter(ServletRequest request,
ServletResponse response,
FilterChain chain)
throws IOException, ServletException {
String userAddy = request.getRemoteHost();
filterConf.getServletContext().log("Vistor User IP: " + userAddy);
chain.doFilter(request, response);
}
public void destroy() {
}
}
The servlet could contain any processing; the important thing to note is that this servlet is processed when a specified URL is used to access the application.
How It Works
Web filters are useful for preprocessing requests and invoking certain functionality when a given URL is visited. Rather than invoking a servlet that exists at a given URL directly, any filter that contains the same URL pattern will be invoked prior to the servlet. This can be helpful in many situations, perhaps the most useful for performing logging, authentication, or other services that occur in the background without user interaction.
Filters must implement the javax.servlet.Filter interface. Methods contained within this interface include init(), destroy(), and doFilter(). The init() and destroy() methods are invoked by the container. The doFilter() method is used to implement tasks for the filter class. As you can see from the solution to this recipe, the filter class has access to the ServletRequest and ServletResponse objects. This means that the request can be captured and information can be obtained from it. This also means that the response can be modified if need be. For example, including the username in the request after an authentication filter has been used.
If you want to chain filters, or if more than one filter exists for a given URL pattern, they will be invoked in the order in which they are configured in the web.xml deployment descriptor. It is best to manually configure the filters if you are using more than one per URL pattern rather than using the @WebFilter annotation. In order to manually configure the web.xml file to include a filter, use the <filter> and <filter-mapping> XML elements along with their associated child element tags. The following excerpt from a web.xml configuration file shows how the filter that has been created for this recipe may be manually configured within the web.xml:
<filter>

<filter-name>LoggingFilter</filter-name>

<filter-class>LoggingFilter</filter-class>

</filter>

<filter-mapping>

<filter-name>LogingFilter</filter-name>

<url-pattern>/*</url-pattern>

</filter-mapping>
Of course, the @WebFilter annotation takes care of the configuration for us, so in this case the manual configuration is not required.
18-9. Forwarding Requests to Other Web Resources
Problem
You need to redirect the browser to another URL when a specific URL within your application is visited.
Solution
Use the HttpServletResponse object's sendRedirect() method to redirect from the servlet to another URL. In the following example, when a URL that matches the /redirect pattern is used, the servlet will redirect the browser to another site:
import java.io.IOException;

import javax.servlet.*;

import javax.servlet.annotation.WebServlet;

import javax.servlet.http.*;


@WebServlet(name="RedirectServlet", urlPatterns={"/redirect"})

public class RedirectServlet extends HttpServlet {


@Override

        public void doGet(HttpServletRequest req, HttpServletResponse res)

                throws IOException, ServletException {

                String site = "http://www.java.net";


                res.sendRedirect(site);

        }

}
In this example, the servlet will redirect to the http://www.java.net web site.
How It Works
There are some cases in which a web application needs to redirect traffic to another site or URL within the same application. For such cases, the HttpServletResponse's sendRedirect() method can be of use. The sendRedirect() method accepts a URL in String format and then redirects the web browser to the given URL. Given the fact that sendRedirect() accepts a String-based URL makes it easy to build dynamic URLs as well. For instance, some applications may redirect to a different URL based upon certain parameters that are passed from a user. Dynamic generation of a URL in such cases may look something like the following:
String redirectUrl = null;

If(parameter.equals("SOME STRING")

    redirectUrl = “/” + urlPathA;

else

    redirectUrl = “/” + urlPathB;

res.sendRedirect(redirectUrl);
The sendRedirect() method can also come in handy for creating the control for web menus and other page items that can send web traffic to different locations.
![]() Note This simple redirect, as opposed to servlet chaining, does not pass the
Note This simple redirect, as opposed to servlet chaining, does not pass the HttpRequest object along to the target address.
18-10. Listening for Servlet Container Events
Problem
You would like to have the ability to listen for application startup and shutdown events.
Solution
Create a servlet context event listener to alert when the application has started up or when it has been shut down. The following solution demonstrates the code for a context listener, which will log application startup and shutdown events and send e-mail alerting of such events:
package org.java7recipes.chapter18.recipe18_10;


import javax.servlet.ServletContextListener;
import javax.servlet.ServletContextEvent;
import javax.servlet.annotation.WebListener;
@WebListener
public class StartupShutdownListener implements ServletContextListener{
public void contextInitialized(ServletContextEvent event) {
System.out.println("Servlet startup...");
System.out.println(event.getServletContext().getServerInfo());
System.out.println(System.currentTimeMillis());
sendEmail();
}
public void contextDestroyed(ServletContextEvent event) {
System.out.println("Servlet shutdown...");
System.out.println(event.getServletContext().getServerInfo());
System.out.println(System.currentTimeMillis());
sendEmail();
}
private void sendEmail(){
// Email implementation
}}
}
How It Works
Sometimes it is useful to know when certain events occur within the application server container. This concept can be useful under many different circumstances, but most often it would likely be used for initializing an application upon startup or cleaning up after an application upon shutdown. A servlet listener can be registered with an application to indicate when it is started up or shut down. Therefore, by listening for such events, the servlet has the opportunity to perform some actions when they occur.
To create a listener that performs actions based upon a container event, one must develop a servlet that implements the ServletContextListener interface. The methods that need to be implemented are contextInitialized() and contextDestroyed(). Both of the methods accept a ServletContextEvent as an argument, and they are automatically called each time the servlet container is initialized or shut down, respectively. To register the listener with the container, you can use the @WebListener annotation as demonstrated by the solution to this recipe, register the listener within the web.xml application deployment descriptor, or use the addListener() methods defined on ServletContext. For example, to register this listener within the web.xml, the following lines of XML would need to be added:
<listener>

<listener-class>org.java7recipes.chapter18.recipe18_10.StartupShutdownListener</listener-

class>

</listener>
One way is not better than the other. The only time that listener registration within the application deployment descriptor (web.xml) would be more helpful is if you had the need to disable the listener in some cases. To disable a listener when it is registered using @WebListener, you must remove the annotation and recompile the code. Altering the web deployment descriptor does not require any code to be recompiled.
There are many different listener types, and the interface that the class implements is what determines the listener type. For instance, in the solution to this recipe, the class implements the ServletContextListener interface. Doing so creates a listener for servlet context events. If, however, the class implements HttpSessionListener, it would be a listener for HTTP session events. Table 18-2 shows the complete listing of listener interfaces.
It is also possible to create a listener that implements multiple listener interfaces. To learn more about listening for different situations, read recipes 18-11 and 18-12.
18-11. Listening for Attribute Changes
Problem
You want to be notified when an attribute has been set within a given application session.
Solution
Generate an attribute listener servlet to listen for such events as attributes being added, removed, or modified. The following class demonstrates this technique as it creates an HttpSessionAttributeListener and listens for attributes that are added, removed, or replaced within the HTTP session:
package org.java7recipes.chapter18.recipe18_11;


import javax.servlet.ServletContext;

import javax.servlet.ServletContextEvent;

import javax.servlet.ServletContextListener;

import javax.servlet.annotation.WebListener;

import javax.servlet.http.HttpSession;

import javax.servlet.http.HttpSessionAttributeListener;

import javax.servlet.http.HttpSessionBindingEvent;

import javax.servlet.http.HttpSessionEvent;

import javax.servlet.http.HttpSessionListener;


@WebListener

public final class AttributeListener implements ServletContextListener,

        HttpSessionAttributeListener {


    private ServletContext context = null;


    public void attributeAdded(HttpSessionBindingEvent se) {


        HttpSession session = se.getSession();

        String id = session.getId();

        String name = se.getName();

        String value = (String) se.getValue();

        String message = new StringBuffer("New attribute has been added to session:
")

                .append("Attribute Name: ").append(name).append("
")

                .append("Attribute Value:").append(value).toString();

        log(message);

    }


    public void attributeRemoved(HttpSessionBindingEvent se) {


        HttpSession session = se.getSession();

        String id = session.getId();

        String name = se.getName();

        if (name == null) {

            name = "Unknown";

        }

        String value = (String) se.getValue();

        String message = new StringBuffer("Attribute has been removed:
")

                .append("Attribute Name: ").append(name).append("
")

                .append("Attribute Value: ").append(value).toString();

        System.out.println(message);

    }
public void attributeReplaced(HttpSessionBindingEvent se) {
String name = se.getName();
if (name == null) {
name = "Unknown";
}
String value = (String) se.getValue();
String message = new StringBuffer("Attribute has been replaced:
")
.append(name).toString();
System.out.println(message);
}
private void log(String message) {
if (context != null) {
context.log("SessionListener: " + message);
} else {
System.out.println("SessionListener: " + message);
}
}
@Override
public void contextInitialized(ServletContextEvent event) {
this.context = event.getServletContext();
log("contextInitialized()");
}
@Override
public void contextDestroyed(ServletContextEvent event) {
// Do something
}
}
Messages will be displayed within the server log file indicating when attributes have been added, removed, or replaced.
How It Works
In some situations it can be useful to know when an attribute has been set or what an attribute value has been set to. The solution to this recipe demonstrates how to create an attribute listener in order to determine this information. To create a servlet listener, you must implement one or more of the listener interfaces. To listen for HTTP session attribute changes, implement HttpSessionAttributeListener. In doing so, the listener will implement the attributeAdded(), attributeRemoved(), and attributeReplaced() methods. Each of these methods accepts HttpSessionBindingEvent as an argument, and their implementation defines what will occur when an HTTP session attribute is added, removed, or changed, respectively.
In the solution to this recipe, you can see that each of the three methods listed in the previous paragraph contains a similar implementation. Within each method, the HttpSessionBindingEvent is interrogated and broken down into String values, which represent the id, name, and value of the attribute that caused the listener to react. For instance, in the attributeAdded() method, the Session is obtained from HttpSessionBindingEvent, and then the session ID is retrieved from that via the use of getSession(). The attribute information can be obtained directly from the HttpSessionBindingEvent using the getId() and getName() methods.
HttpSession session = se.getSession();

String id = session.getId();

String name = se.getName();

String value = (String) se.getValue();
After these values are obtained, the application can do whatever it needs to do with them. In this recipe, the attribute ID, name, and session ID are simply logged and printed:
String message = new StringBuffer("New attribute has been added to session:
")

        .append("Attribute Name: ").append(name).append("
")

        .append("Attribute Value:").append(value).toString();

log(message);
The body of the attributeReplaced() and attributeRemoved() methods contain similar functionality. In the end, the same routine is used within each to obtain the attribute name and value, and then something is done with those values.
There are a few different options that can be used to register the listener with the container. The @WebListener annotation is the easiest way to do so, and the only downfall to using it is that you will need to recompile code in order to remove the listener annotation if you ever need to do so. The listener can be registered within the web deployment descriptor, or it can be registered using one of the addListener() methods contained in ServletContext.
Although the example in the recipe does not perform any life-changing events, it does demonstrate how to create and use an attribute listener. In the real world, such a listener could become handy if an application needed to capture the username of everyone who logs in, or to send an e-mail whenever a specified attribute is set.
![]() Note This listener can be used in the same application that has been used since recipe 18-2 without any need for change in the
Note This listener can be used in the same application that has been used since recipe 18-2 without any need for change in the web.xml deployment descriptor.
18-12. Managing Session Information
Problem
You would like to maintain some information regarding an individual session on a per-session basis when a user visits your site.
Solution
Make use of session attributes to retain session-based information. In order to do so, use the HttpServletRequest object to obtain access to the session and then use the getAttribute() and setAttribute() methods accordingly. In the following scenario, an HTML page is used to capture a user's e-mail address, and then the e-mail address is placed into a session attribute. The attribute is then used by Java servlets across different pages of the application in order to maintain state.
The following code demonstrates what the HTML form might look like in this scenario:
<html>

<head>

<title></title>

<meta http-equiv="Content-Type" content="text/html; charset=UTF-8">

</head>

<body>

<h1>Provide an email address to use with this transaction</h1>

<br/>

<form method="POST" action="sessionServlet">

<input type="text" id="email" name="email"/>

<br/>

<input type="submit" value="Submit"/>

</form>

</body>

</html>
Next, the Java servlet with named SessionServlet using a URL pattern of /sessionServlet is initiated when the form is submitted. Any form input values are passed to SessionServlet and processed accordingly.
package org.java7recipes.chapter18.recipe18_12;


import java.io.*;

import javax.servlet.*;

import javax.servlet.annotation.WebServlet;

import javax.servlet.http.*;


@WebServlet(name="SessionServlet", urlPatterns={"/sessionServlet"})
public class SessionServlet extends HttpServlet {
public void doPost (HttpServletRequest req, HttpServletResponse res)
throws ServletException, IOException {
// Obtain he Session object
HttpSession session = req.getSession(true);
// Set up a session attribute
String email = (String)
session.getAttribute ("session.email");
if (email == null) {
email = req.getParameter("email");
session.setAttribute ("session.email", email);
}
String sessionId = session.getId();
res.setContentType("text/html");
PrintWriter out = res.getWriter();
out.println("<html>");
out.println("<head><title>Working with sessions</title></head>");
out.println("<body>");
out.println("<h1>Session Test</h1>");
out.println ("Your email address is: " + email + "<br/><br/>");
out.println ("Your session id: " + sessionId);
out.println("<br/><br/><a href=sessionServletTwo>Go To Second Page</a>");
out.println("</body></html>");
}
}
The final code is an example of a second servlet that could be invoked by the first. This servlet also makes use of the same HTTP session attribute to show that state has been maintained:
package org.java7recipes.chapter18.recipe18_12;


import java.io.*;

import javax.servlet.*;

import javax.servlet.annotation.WebServlet;

import javax.servlet.http.*;


@WebServlet(name="SessionServletTwo", urlPatterns={"/sessionServletTwo"})

public class SessionServletTwo extends HttpServlet {

  public void doGet (HttpServletRequest req, HttpServletResponse res)

       throws ServletException, IOException {
// Obtain the Session object
HttpSession session = req.getSession(true);
// Obtain session attribute
String email = (String)
session.getAttribute ("session.email");
String sessionId = session.getId() ;
res.setContentType("text/html");
PrintWriter out = res.getWriter();
out.println("<html>");
out.println("<head><title>Working with sessions</title></head>");
out.println("<body>");
out.println("<h1>Session Test</h1>");
out.println ("Still remembers...tracking the session...<br/><br/> " +
"Your email address is: " + email + "<br/><br/>");
out.println ("Your session id: " + sessionId);
out.println("</body></html>");
}
}
In the end, the e-mail address that was entered within the original HTML form was captured and used throughout the different pages in the application.
How It Works
Since the beginning of web development, session attributes have been used to retain important information regarding a user's session. This concept holds true when developing using Java servlets as well, and servlets make it easy to set and get the attribute values. All HttpServlet classes must implement doGet() or doPost() methods in order to process web application events. In doing so, these methods have access to the HttpServletRequest object as it is passed to them as an argument. An HttpSession object can be gleaned from the HttpServletRequest, so it can be used to retrieve and set attributes as needed.
In the solution to this recipe, an HttpSession attribute is used to store an e-mail address. That address is then used throughout the application within different servlet classes by obtaining the session object and then retrieving the attribute value.
   // Obtain the Session object


      HttpSession session = req.getSession(true);


   // Set up a session attribute


      String email = (String)


      session.getAttribute ("session.email");
if (email == null) {
email = req.getParameter("email");
session.setAttribute ("session.email", email);
}
Any attributes will remain in the HttpSession object as long as the session remains valid. The session ID will remain consistent when traversing between pages. You can see that the solution to this recipe obtains and prints the current session ID for reference. Using attributes in the HttpSession is a good way to pass data around to maintain a session's state.
18-13. Finalization of a Servlet
Problem
There are some resources that you'd like to have your servlet clean up once the servlet is no longer in use.
Solution
The solution to the problem is twofold. First, provide code for doing any cleanup within the servlet destroy() method. Second, when there are potentially long-running methods, code them so that will become aware of a shutdown and, if necessary, halt and return so that the servlet can shut down cleanly. The following code excerpt is a small example of a destroy() method. In this code, it is being used to initialize local variables and setting the beingDestroyed boolean value to indicate that the servlet is shutting down.
…

/**

     * Used to finalize the servlet

     */

    public void destroy() {

        // Tell the servlet it is shutting down

setBeingDestroyed(true);

        // Perform any cleanup

        thisString = null;


    }


…
The code within the destroy() method may successfully achieve a full cleanup of the servlet, but if there is a long-running task, it must be notified of a shutdown. The following excerpt is a block of code that signifies a long-running task. The task should stop processing after the shutdown is indicated by the beingDestroyed value becoming true.
How It Works
Finalization of a servlet can be very important, especially if the servlet is using some resources that may lead to a memory leak, making use of a reusable resource such as a database connection, or in order to persist some values for another session. In such cases, it is a good idea to perform cleanup within the servlet destroy() method. Every servlet contains a destroy() method (which may be implemented to overload default behavior) that is initiated once the servlet container determines that a servlet should be taken out of service.
The destroy() method is called once all the servlet's service methods have stopped running. However, if there is a long-running service method, a server grace period can be set, which would cause any running service to be shut down when the grace period is reached. As mentioned earlier, the destroy() method is the perfect place to clean up resources and it is also good place to help clean up after long-running services. Cleanup can be done by setting a servlet–specific local variable to indicate that the servlet is being destroyed, and having the long-running service check the state of that variable periodically. If the variable indicates that the destroy() method has been called, it should stop executing.
18-14. Creating an Applet
Problem
You are interested in developing an application that can be accessed from a browser but contains the functionality that can be found within a desktop application.
Solution
Develop a Java applet application. Doing so will enable you to run the application within a web browser and also allow the application to be run on the client desktop so that it has similar abilities of a standard desktop application. The following code is that of a Java applet class. This applet consists of a button and a label of text. When the user presses the button, the text changes. It is a simple example just to show you how to make a very basic applet.
package org.java7recipes.chapter18.recipe18_15;


import java.applet.*;

import java.awt.*;

import java.awt.event.*;


public class FirstApplet extends Applet implements ActionListener {
Label buttonLabel;
Button messageButton;
public void init() {
// Construct the button
messageButton = new Button("Button");
buttonLabel = new Label("Press Button");
// Set the layout

this.setLayout(new FlowLayout());


// Add button to layout

this.add(messageButton);

// Add label to layout

this.add(buttonLabel);
// Set the action event equal to this class since it
// implements ActionListener
messageButton.addActionListener(this);
this.setVisible(true);
}
/**
* Action method for this applet. This method will be called when this
* class is set as an action listener.
*
* @param e
*/
public void actionPerformed(ActionEvent e) {
if (this.buttonLabel.getText().equals("Press Button")) {
this.buttonLabel.setText("Hello Java 7!");
} else {
this.buttonLabel.setText("Press Button");
}
repaint();
}
}
The applet shown in Figure 18-2 will result. When you press the button, the text will change.

Figure 18-2. Applet with Button and Label
How It Works
Applets have been around since the beginning of Java. Some would argue that they are the cornerstones of the language itself. Although applets are not as popular now as they were in the beginning of Java, they still play an important role in the ecosystem. They are usually bound to a web page, yet they execute using the client Java runtime. Therefore, although they are a web-based technology, they make use of local resources. Applets are easy to make, and you can do a lot with them. This recipe will cover only the basics of applet development, and if you are interested in learning more, there are plenty of excellent resources about Applets to read.
Applets must either extend the abstract Applet class or the abstract JApplet class. This recipe will focus on a standard applet, which extends java.applet.Applet. As you can see from the example, FirstApplet is a subclass of java.applet.Applet. The JApplet is used for creating applets that will include Swing components. If you are interested in learning about JApplet, please see recipe 18-19.
Lots of functionality is obtained by subclassing the Applet or JApplet class. Specifically, all the code that coordinates the browser/Java interaction occurs behind the scenes within these abstract classes. This allows applet developers to focus on the applet design rather than how it functions within the browser and on the client machine. Applets have a life-cycle that can be traced by overriding four methods, those being: init(), start(), stop(), and destroy(). When an applet is invoked, the init() method is used to initialize the applet layout and components. The init() method is usually overridden and implemented, as demonstrated in the solution to this recipe. Looking at the example, you can see that the init() method contains the code necessary for building the user interface. A Button is constructed along with a Label. These two widgets are part of the AWT API, and their constructors accept a String representing the text that is displayed on the widget upon startup. The AWT API, Java's original user interface toolkit, provides graphics, windowing, and widgets that can be used to build user interfaces for Java applications. Standard applets use AWT, whereas JApplets use Swing for construction of their user interface.
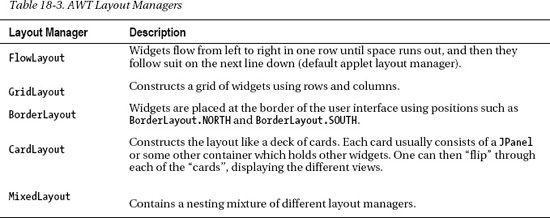
Following the declaration of the Button and Label widgets, the layout for the applet is set. There are many different applet layouts to choose from, and the class you use for the layout will determine how the user interface widgets are organized within the applet. This example uses the FlowLayout, which is arguably the easiest to work with. All widgets within a FlowLayout will be placed next to one another horizontally until room runs out, and then they will continue to be laid out on the following line of the user interface. Thus, they flow onto the applet in a horizontal manner. Each of the different layouts is listed in Table 18-3, along with a brief description of how they work.
The layout manager that you chose for your applet will determine how it looks and possibly even how functional it is. Layout managers are an important topic in Java user interface development. As you can see from the solution, the layout is set against a variable named this. The variable this refers to the class itself, and it is often the case that a small Java applet will be contained within one class, so you can refer to it using the this keyword. Next, because the layout has been set, widgets are then added to this, constructing the user interface:
// Set the layout
this.setLayout(new FlowLayout());
// Add button to layout
this.add(messageButton);
// Add label to layout
this.add(buttonLabel);
You may remember that the applet in the solution not only extends java.applet.Applet but also implements java.awt.event.ActionListener. Doing so allows the applet to handle user interface interactions such as button clicks. The method actionPerformed() must be implemented, adding functionality to the applet. In the solution to this recipe, the button sets the applet itself as the action listener because it implements the ActionListener interface. However, it is possible to set a separate ActionListener class to handle action events for the applet. By setting the action on the button to the applet itself, it means that when the button is clicked, the actionPerformed() method will be invoked.
Any number of things can occur within the actionPerformed() method; in this example, the Label text is changed. All actionPerformed() methods accept an ActionEvent argument. This ActionEvent represents the event that has triggered the call to this method. Within the implementation in this example, Label widgets are altered, but the ActionEvent argument could have been used to gain access to the event.
Last, the applet's setVisible() method is called passing a TRUE value. This will make sure that the user interface becomes visible for the user to see.
18-15. Packaging an Applet and Embedding into a Web Page
Problem
You want to embed a Java applet into a web page.
Solution 1
Compile your Java code and package it into a .jar file. Then create an HTML page that will be used to display the applet using the Invoke Deployment Toolkit (deployJava.js). Lastly, place the .jar file in the same path that is listed in the HTML <script> attributes, and then open up the HTML page to view the running applet.
When compiling your applet, include all images and other resources in a separate directory. To make things easier, use an IDE such as NetBeans to keep your applet project organized correctly. Once compiled, package the applet project within a .jar file by traversing into the base directory of your project's packages, and issuing the following command. In this case, let's call the .jar file FirstApplet.jar, and let's assume our applet code resides within a directory named projectCode, and our images and other resources reside within a directory named imagesAndResources:
jar cvf FirstApplet.jar projectCode imagesAndResources
Next, create the HTML page with embedded script references to deploy the applet:
<!DOCTYPE HTML PUBLIC "-//W3C//DTD HTML 4.01 Transitional//EN">

<html>

<head>

<title>Test page for launching the applet via deployJava.js</title>

</head>

<body>

<h3>Test page for launching the applet via deployJava.js</h3>

<script src="http://java.com/js/deployJava.js"></script>

<script>

            var attributes = {

codebase:   'PATH_TO_JAR',

                code:       'org.java7recipes.chapter18.recipe18_15.FirstApplet.class',

                archive:    'PATH_TO_JAR/JarFile.jar',

                width:      300,

                height:     300

            };

            var parameters = {fontSize:16}; <!-- Applet Parameters -->

            var version = "1.6"; <!-- Required Java Version -->
deployJava.runApplet(attributes, parameters, version);
</script>
</body>
</html>
![]() Note
Note PATH_TO_JAR is a placeholder for the URI path to the .jar file in your application or HTML docbase. If your application .jar file is in the root directory of y our application, it will simply be /.
Visiting the HTML page will initiate the Java runtime on your desktop to run the applet.
Solution 2
Compile your Java code and package it into a .jar file. Then create an HTML page that will be used to display the applet using the <applet> tag. Looking at solution 1, you can see how to compile and package the applet and its resources into a .jar file. The difference with this solution is that it uses the <applet> tag within an HTML page instead of using the Invoke Deployment Toolkit to run the applet. The following HTML code demonstrates an example using the <applet> tag to invoke an applet named FirstApplet that is contained within a .jar file named FirstApplet.jar:
<!DOCTYPE HTML PUBLIC "-//W3C//DTD HTML 4.01 Transitional//EN">
<html>
<head>
<title>Test page for launching the applet via the applet tag</title>
</head>
<body>
<h3>Test page for launching the applet via the applet tag</h3>
<applet code="org.java7recipes.chapter18.recipe18_15.FirstApplet.class"
archive="/PATH_TO_JAR/FirstApplet.jar"
width=460 height=160>
</applet>
</body>
</html>
How It Works
When it comes to embedding an applet within an HTML page, there are a few different options. This recipe demonstrates two of those options: using the Invoke Deployment Toolkit, and using the <applet> tag for deployment. The same steps are necessary for compilation and packaging of an applet using each tactic. The only difference is how the applet is actually embedded within the HTML.
In order to run an applet, you first need to compile and package it appropriately. Compilation of the applet involves ensuring that any external libraries that are used by your applet are within the CLASSPATH. For more information regarding setting the CLASSPATH and compiling Java code from the command line, please refer to recipes 1-2, and 1-4. It also helps to use an IDE such as NetBeans or Eclipse to help package the applet and manage dependencies. Usually, an IDE will take care of compilation and .jar creation behind the scenes so that the developer does not have to worry about it. If you are working from the command line, the next step after compilation of the applet is to package it within a .jar file. You can do this by issuing the JDK's jar command. To package an applet, the code needs to be placed within a directory separate from any images or resources used by the applet. The jar command takes both of those directories and wraps them together into a single .jar file that can be deployed for use. In the solution to this recipe, you can see that the jar command assumes that the compiled code resides within a directory named projectCode, and the images and resources reside within a directory named imagesAndResources:
jar cvf FirstApplet.jar org projectCode imagesAndResources
Once the code has been packaged into a .jar file, it is ready for deployment. However, if your applet depends on any external libraries, their requisite .jar files will also need to be added to the HTML. Please see recipe 18-17 for more details on adding external libraries. As mentioned previously, there are a couple of options for embedding an applet within an HTML page. The first solution to this recipe shows how to make use of the Invoke Deployment Toolkit. This is essentially a JavaScript library that is used to load and run the applet. This toolkit has been around since Java 6, and it allows for deployment across many different browsers. To use this technique, first load the JavaScript file named deployJava.js, which is hosted by Oracle. It is important to note that in order to use deployJava.js, the client browser must have access to the Internet. The following line of code shows how to do this:
<script src="http://java.com/js/deployJava.js"></script>
Next, set up any attributes, parameters, and a Java version that will need to be passed to the deployJava.js script. This can be done within the <script></script> tags. The attributes will be passed as a list of values, using a name/value format. Attributes that must be set are codebase, code, archive, width, and height. You can see how this is done within the following code excerpt:
var attributes = {
codebase: 'PATH_TO_JAR',
code: 'org.java7recipes.chapter18.recipe18_15.FirstApplet.class',
archive: 'PATH_TO_JAR/JarFile.jar',
width: 300,
height: 300
};
The parameters are set up the same way as the attributes, within a list of name/value pairs. There may be zero or more parameters, and in solution 1 there is one:
var parameters = {fontSize:16};
Finally, set the Java runtime version that you want to use into the version variable in solution 1. Once you've done that, then you can pass the attributes, parameters, and version to the deployJava.js script.
deployJava.runApplet(attributes, parameters, version);
It should be noted that you could also use a JNLP file to deploy an applet along with the Invoke Deployment Toolkit. JNLP files are usually used to initiate Java WebStart applications or desktop Java applications that can be initiated from a web browser. In order to reference a JNLP, include the jnlp_href parameter within the parameter list. A JNLP file for the applet in the solution to this recipe may look something like the following:
<?xml version="1.0" encoding="UTF-8"?>
<jnlp spec="1.0+" codebase="" href="">
<information>
<title>First Applet</title>
<vendor>Java 7 Recipes Team</vendor>
</information>
<resources>
<!-- Application Resources -->
<j2se version="1.6+"
href="http://java.sun.com/products/autodl/j2se" />
<jar href="FirstApplet.jar" main="true" />
</resources>
<applet-desc
name="First Applet"
main-class="org.java7recipes.chapter18.recipe18_15.FirstApplet.class"
width="300"
height="300">
</applet-desc>
<update check="background"/>
</jnlp>
Consider that the JNLP file referenced here was named FirstApplet.jnlp, it could then be referenced by the deployJava.js script by passing it as a parameter. You could then leave out the codebase and archive attributes, and use something like the following to initiate the applet via HTML:
<script src="http://java.com/js/deployJava.js"></script>
<script>
var attributes = {
code: 'org.java7recipes.chapter18.recipe18_15.FirstApplet.class',
width: 300,
height: 300
};
var parameters = {fontSize:16, jnlp_href: 'FirstApplet.jnlp'}; <!-- Applet Parameters -->
var version = "1.6"; <!-- Required Java Version -->
deployJava.runApplet(attributes, parameters, version);
</script>
Use of the <applet> tag is not as universal as the Invoke Deployment Toolkit because all browsers do not recognize the <applet> tag. However, if you are working within an environment in which you know that the browser recognizes this tag, it is a viable option. The <applet> tag takes fewer configurations than using deployJava.js, so many people like to use it. The only required attributes for using the <applet> tag are code, archive, width, and height. Of course, you can also embed parameters into the <applet> tag to have them passed to the applet. The following code excerpt shows how to use the <applet> tag to achieve the same embedded applet result as using the deployJava.js script.
<applet code="org.java7recipes.chapter18.recipe18_15.FirstApplet.class"
archive="/PATH_TO_JAR/FirstApplet.jar"
width=460 height=160>
</applet>
Either option that you choose, embedding applets into web pages is quite trivial. The more complicated piece of the puzzle tends to be the packaging of the applet itself.
18-16. Creating Draggable Applets
Problem
Rather than having an applet run within a web browser, you'd like to make an applet that can be dragged off the page and run in its own window.
Solution 1
Pass the draggable parameter to the deployJava.js script. In this HTML code, you can see that the draggable:true parameter is passed to the deployJava.runApplet script:
<html>
<head>
<title>Test page for launching the applet via deployJava.js</title>
</head>
<body>
<h3>Test page for launching the applet via deployJava.js</h3>
<script src="http://java.com/js/deployJava.js"></script>
<script>
var attributes = {
codebase: 'PATH_TO_JAR',
code: 'org.java7recipes.chapter18.recipe18_15.FirstApplet.class',
archive: '/PATH_TO_JAR/FirstApplet.jar',
width: 300,
height: 300
};
var parameters = {fontSize:16, draggable:true}; <!-- Applet Parameters -->
var version = "1.6"; <!-- Required Java Version -->
deployJava.runApplet(attributes, parameters, version);</script>
</body>
</html>
Solution 2
Pass the draggable parameter to the <applet> tag. In this HTML code, you can see that the <param name="draggable” value="true"/> is embedded within the <applet> tag:
<html>
<head>
<title>Test page for launching the applet via applet tag</title>
</head>
<body>
<h3>Test page for launching the applet via Applet Tag</h3>
<applet code="org.java7recipes.chapter18.recipe18_15.FirstApplet.class"
archive="/PATH_TO_JAR/FirstApplet.jar"
width=460 height=160>
<param name="draggable" value="true"/>
</applet>
</body>
</html>
After using either of the previous solutions, visit the HTML page that was created to initiate the applet. The applet can be dragged from within the browser to the desktop by holding down the Alt key while dragging the applet using the left mouse button.
How It Works
Java 6 Update 10 introduced support for draggable applets. This allows an applet to run within its own process so that it can be dragged from the browser to the desktop. Configuration for making an applet draggable is minimal; you need to pass an extra parameter via the deployJava.js script or the <applet> tag. In the solutions to this recipe, you can see that the parameter name is draggable and the value must be set to true. However, the draggable applet may not work with every browser, so it is important to test and ensure that a compliant browser is used if this feature is required.
It is also possible to override some methods within the Applet class in order to perform activities when applets are dragged from the browser. The following methods can be overridden in order to create customized functionality within an applet:
public boolean isAppletDragStart(MouseEvent e);
public void appletDragStarted();
public void appletDragFinished();
public void setAppletCloseListener(ActionListener l);
public void appletRestored();
For more information regarding custom development for draggable applets, please reference online materials.
18-17. Loading External Libraries for an Applet
Problem
You would like to load Java libraries from an external .jar for use within your applet.
Solution
If necessary, sign the .jar files and then use a comma-separated list of values for the archive attribute to include the necessary .jar files for the external libraries that the applet requires. In this example, an applet is created that generates a simple e-mail form. When the send button is pressed, an e-mail message is sent using the JavaMail API. As such, external libraries for JavaMail must be included with the applet when downloaded to the client. The following code is the applet code that is used to create the e-mail form:
package org.java7recipes.chapter18.recipe18_17;
import java.applet.*;
import java.awt.*;
import java.awt.event.*;
import java.util.Properties;
import javax.mail.Message;
import javax.mail.Session;
import javax.mail.Transport;
import javax.mail.internet.InternetAddress;
import javax.mail.internet.MimeMessage;
public class MailApplet extends Applet implements ActionListener {
TextField from;
TextField to;
TextField smtp;
TextArea message;
Label mailLabel;
Label fromLabel;
Label toLabel;
Label smtpLabel;
Label blank;
Label messageLabel;
Button messageButton;public void init() {
// Construct the widgets
messageButton = new Button("Send");
mailLabel = new Label("Please fill out the form below to send email.");
fromLabel = new Label("From:");
from = new TextField();
toLabel = new Label("To:");
to = new TextField();
smtpLabel = new Label("SMTP Host:");
smtp = new TextField();
messageLabel = new Label("Message:");
message = new TextArea(null,10,30);
blank = new Label();
// Set the layout
this.setLayout(new GridLayout(11,2));
// Add widgets to layout
this.add(mailLabel);
this.add(fromLabel);
this.add(from);
this.add(toLabel);
this.add(to);
this.add(smtpLabel);
this.add(smtp);
this.add(messageLabel);
this.add(message);
this.add(messageButton);
// Set the action event equal to this class since it
// implements ActionListener
messageButton.addActionListener(this);
this.setSize(300, 500);
this.setVisible(true);
}
/** * Action method for this applet. This method will be called when this
* class is set as an action listener.
*
* @param e
*/
public void actionPerformed(ActionEvent e) {
sendMail();
this.mailLabel.setText("Message successfully sent");
this.mailLabel.setForeground(Color.GREEN);
repaint();
}
private boolean sendMail() {
boolean result = false;
try {
// Send email here
String from = this.from.getText();
System.out.println(from);
String to = this.to.getText();
String smtp = this.smtp.getText();
String message = this.message.getText();
//Set the host smtp address
Properties props = new Properties();
props.put("mail.smtp.host", smtp);
// create some properties and get the default Session
Session session = Session.getDefaultInstance(props, null);
session.setDebug(false);
// create a message
Message msg = new MimeMessage(session);
// set the from and to address
InternetAddress addressFrom = new InternetAddress(from);
msg.setFrom(addressFrom);
InternetAddress[] address = new InternetAddress[1];
address[0] = new InternetAddress(to);
msg.setRecipients(Message.RecipientType.TO, address);
msg.setSubject("*** Applet Email ***");
// Append Footer
msg.setContent(message, "text/plain");
Transport.send(msg); result = true;
} catch (javax.mail.MessagingException ex) {
ex.printStackTrace();
result = false;
}
return result;
}
}
Next is the HTML named mailApplet.html that is used to embed the applet. Notice that there is more than one .jar file listed in the parameters section. This is one way to include external .jar files with your applet.
<html>
<head>
<title>Test page for launching the applet via deployJava.js</title>
</head>
<body>
<h3>Test page for launching the applet via deployJava.js</h3>
<script src="http://java.com/js/deployJava.js"></script>
<script>
var attributes = {
codebase: '/PATH_TO_CODEBASE/',
code: 'org.java7recipes.chapter18.recipe18_17.MailApplet.class',
archive: '/PATH_TO_JAR/MailApplet.jar, /PATH_TO_JAR/mail.jar',
width: 300,
height: 300
};
var parameters = {fontSize:16}; <!-- Applet Parameters -->
var version = "1.6"; <!-- Required Java Version -->
            deployJava.runApplet(attributes, parameters, version);

</script>

</body>

</html>
When the page is visited, the simplistic e-mail applet will appear and the appropriate .jar files will be loaded into the local Java runtime.
How It Works
Almost any substantial applet will require the use of external libraries. As such, those external libraries will have to be included with the Java applet in order to run on a client machine. As with many other solutions in the industry, there is more than one way to include external libraries within an applet. In the solution to this recipe, the HTML code that is used to embed the applet is modified to contain a reference to any external .jar files that are required to run the code. This solution includes a reference to the mail.jar external .jar. Referencing the .jar will make it download to the client machine along with the applet .jar file. If using the <applet> tag, you can also include multipe .jar files by adding them using a comma-separated list to the archive attribute.
![]() Note In order to run this applet, the
Note In order to run this applet, the mail.jar file should be copied into the root directory of your application (for example, webapps/SimpleServlet) or a deeper HTML directory).
18-18. Using Swing Components Within an Applet
Problem
Your application requires the use of Swing, a highly adopted Java component library, in order to contain the GUI that is required.
Solution
Use Swing components within your applet application by extending the javax.swing.JApplet class rather than the standard java.applet.Applet class. The following applet class demonstrates this functionality by using Swing components rather than AWT widgets for constructing the user interface of the MailApplet that was introduced in recipe 18-17. This solution is composed of two classes. The first class that is shown contains the actual Java Swing component code that is used to build the user interface. It extends the JPanel component and implements ActionListener for button functionality:
package org.java7recipes.chapter18.recipe18_18;
import java.awt.Color;
import java.awt.GridLayout;
import java.awt.event.ActionEvent;
import java.awt.event.ActionListener;
import java.util.Properties;
import javax.mail.Message;
import javax.mail.Session;
import javax.mail.Transport;
import javax.mail.internet.InternetAddress;
import javax.mail.internet.MimeMessage;
import javax.swing.JPanel;
import javax.swing.JScrollPane;
/** * Recipe 18_18
*
* This is the panel that contains the Swing components for the mail applet
*
* @author juneau
*/
public class SwingMailPanel extends JPanel implements ActionListener {
javax.swing.JTextField from;
javax.swing.JTextField to;
javax.swing.JTextField smtp;
javax.swing.JTextArea message;
javax.swing.JLabel mailLabel;
javax.swing.JLabel fromLabel;
javax.swing.JLabel toLabel;
javax.swing.JLabel smtpLabel;
javax.swing.JLabel blank;
javax.swing.JLabel messageLabel;
javax.swing.JButton messageButton;
javax.swing.JScrollPane scrollpane;
public SwingMailPanel(){
messageButton = new javax.swing.JButton("Send");
mailLabel = new javax.swing.JLabel("Please fill out the form below to send email.");
fromLabel = new javax.swing.JLabel("From:");
from = new javax.swing.JTextField();
toLabel = new javax.swing.JLabel("To:");
to = new javax.swing.JTextField();
smtpLabel = new javax.swing.JLabel("SMTP Host:");
smtp = new javax.swing.JTextField();
messageLabel = new javax.swing.JLabel("Message:");
message = new javax.swing.JTextArea(5,20);
message.setLineWrap(true);
message.setWrapStyleWord(true);
scrollpane = new JScrollPane(message);
blank = new javax.swing.JLabel();
// Set the layout
this.setLayout(new GridLayout(11,2));
// Add button to layout
this.add(mailLabel); this.add(fromLabel);
this.add(from);
this.add(toLabel);
this.add(to);
this.add(smtpLabel);
this.add(smtp);
this.add(messageLabel);
this.add(scrollpane);
this.add(messageButton);
// Set the action event equal to this class since it
// implements ActionListener
messageButton.addActionListener(this);
this.setSize(300, 500);
this.setVisible(true);
}
/**
* Action method for this applet. This method will be called when this
* class is set as an action listener.
*
* @param e
*/
public void actionPerformed(ActionEvent e) {
sendMail();
this.mailLabel.setText("Message successfully sent");
this.mailLabel.setForeground(Color.GREEN);
repaint();
}
private boolean sendMail() {
boolean result = false;
try {
// Send email here
// servlet configuration initialization parameters String from = this.from.getText();
System.out.println(from);
String to = this.to.getText();
String smtp = this.smtp.getText();
String message = this.message.getText();
//Set the host smtp address
Properties props = new Properties();
props.put("mail.smtp.host", smtp);
// create some properties and get the default Session
Session session = Session.getDefaultInstance(props, null);
session.setDebug(false);
// create a message
Message msg = new MimeMessage(session);
// set the from and to address
InternetAddress addressFrom = new InternetAddress(from);
msg.setFrom(addressFrom);
InternetAddress[] address = new InternetAddress[1];
address[0] = new InternetAddress(to);
msg.setRecipients(Message.RecipientType.TO, address);
msg.setSubject("*** Applet Email ***");
// Append Footer
msg.setContent(message, "text/plain");
/e/ Uncomment for production
Transport.send(msg);
            result = true;

            } catch (javax.mail.MessagingException ex) {

            ex.printStackTrace();

            result = false;

        }

        return result;


    }

}
The second class lists the acutal JApplet code itself. The JApplet creates a new Runnable() that calls the class that was previously shown to instantiate the SwingMailPanel:
package org.java7recipes.chapter18.recipe18_18;


import javax.swing.*;
/**
* Recipe 18-18
*
* Creates a JApplet
*
* @author juneau
*/
public class SwingMailApplet extends JApplet {
public void init() {
try{
SwingUtilities.invokeAndWait(new Runnable() {
public void run() {
createGUI();
}
});
} catch (Exception e) {
System.err.println("createGUI didn't complete successfully");
}
}
private void createGUI() {
//Create and set up the content pane.
SwingMailPanel mailPanel = new SwingMailPanel();
// Make mailPanel visible
mailPanel.setOpaque(true);
// Set the content of the JApplet to mailPanel
setContentPane(mailPanel);
}
}
The resulting applet will look similar to the image shown in Figure 18-3.
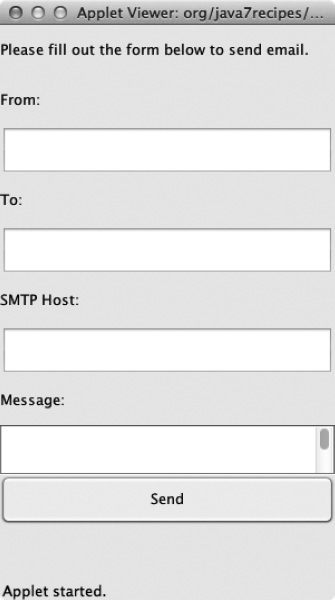
Figure 18-3. Applet composed of Swing components
How It Works
Developing applets that contain Swing components is a bit different from development using AWT because Swing components should be handled a bit differently from AWT. Swing code should always be manipulated on the event-dispatching thread. However, applets do not run on the event-dispatching thread. For this reason, they should always invoke any Swing code using the SwingUtilities.invokeAndWait method. Doing so will ensure that the Swing code is executed on the appropriate thread. Because the init() method of an applet is used to set up the layout, this is where the invokeAndWait method should be placed. Using this technique, a new Runnable() will be created, which then executes a given block of code on the event-dispatching thread. Typically, a separate method will be written to perform the invocation of another class that houses the Swing code. In the solution to this recipe, a class named SwingMailPanel subclasses the JPanel component and implements ActionListener. The code within the SwingMailPanel class is very similar to the code that was used within recipe 18-17, except the GUI is constructed using Swing components rather than AWT.
In the SwingMailPanel class, the first lines of code are declared and set up the Swing components that make up the user interface. Because the class implements the ActionListener interface, the button calls the class itself in order to perform its task. When the button is pressed, it will invoke the actionPerformed() method, which contains the code that calls the sendMail() method, changes the JLabel to display a different message, and repaints the GUI.
As mentioned previously, the most interesting code for creating the applet takes place within the SwingMailApplet class. As you can see from the solution, this class subclasses the JApplet. The SwingUtilities.invokeAndWait block ultimately initiates the code that instantiates the SwingMailPanel class to construct the user interface.
Using Swing components to construct an applet interface can significantly improve the look and feel. Although Java Swing components could be added directly to the init() method of an applet, it can cause issues, so it is always best to perform any Swing manipulation on the event-dispatching thread. In fact, it is possible to run entire Java Swing applications within the context of a JApplet. To learn more about constructing Swing applications, please refer to Chapter 14.