
C H A P T E R 19
![]()
Intro to Android
The Android mobile operating system has become one of the hottest mobile platforms in use. Developers of Android applications can create applications and distribute them within the Android marketplace. Android application development makes use of the Java platform, along with an Android development environment. This is a great benefit for the Android platform as it allows Android applications to make use of the wide variety of features and functionality that comes along with the Java platform.
The topic of developing Android applications can be daunting because there are a great many aspects to deal with. From the creation of the user interface screens to handling application events, Android application development is very comparable to Java Swing development or web application development. However, becoming an expert Android developer is only a matter of learning the different components that comprise an application and how to tie them together in order to make them work. This chapter will show you how to get started developing applications for the Android platform. You will learn how to set up an environment for developing applications and testing them. You will learn the basic components that are required to build an application, and you will create a nontrivial application that features some advanced layout and user interface widgets. In the end, you will have enough knowledge to begin developing applications for the Android platform, as this chapter will cover a broad aspect of Android application development.
19-1. Setting Up a Development Environment with Eclipse
Problem
You would like to develop an application for the Android mobile operating system and you need to set up a development environment.
Solution
Download and install the Eclipse IDE along with the Android Development Toolkit (ADT) plug-in. Follow these instructions:
- Download a suitable version of Eclipse for your operating system and install it according to the instructions. To find a download that will work for you, go to
http://www.eclipse.org/downloads/. If possible, install either the Eclipse Classic or Eclipse IDE for Java Developers package. - Install the Android software development kit (SDK). Grab the latest Android SDK by visiting
http://developer.android.com/sdk/index.html. Make sure you take note of the name and location of the SDK installation directory because you may need to refer to it later. - Download and install the ADT plug-in for Eclipse according to the documentation that can be found at
http://developer.android.com/sdk/eclipse-adt.html#installing. - Install the Android SDK, platform, and Android virtual device (AVD; emulator) using Eclipse's Android SDK and AVD Manager.
After following these steps to install and configure your development environment, you will be ready to develop your first Android mobile application and test it using an AVD.
How It Works
Before you can begin to develop applications for Android, you will need to set up a development environment. There are several options to choose from depending upon the IDE you want to use and the Android device that you are developing against. For the sake of maintaining an easy-to-use environment, this recipe discusses how to install the Eclipse IDE and ADT. Eclipse is the preferred IDE for beginning Android developers because it is the best-documented and arguably includes the most tools.
To begin, determine which version of Eclipse will work best for your operating system and needs, and then download a package. The preferred packages are the Eclipse Classic or the Eclipse IDE for Java Developers because they are preconfigured to be the best suited for Android development. However, just about any Eclipse package will work if configured correctly. Once downloaded, follow the installation instructions that come with the Eclipse package.
The next step is to install the Android SDK. It is best to download the latest version of the SDK to ensure that you have access to the most recent new features. To download the SDK, visit the SDK download page at http://developer.android.com/sdk/index.html and choose the correct package for your platform. Either unzip it into a directory on your machine if you are using a non-Windows environment or run the Windows installer if you are using that platform.
In order to install the ADT plug-in for Eclipse, use the Update Manager feature of the Eclipse IDE. Follow these steps to install the plug-in:
- To begin, start Eclipse; then go to the Help menu and select Install New Software.
- Next, click Add in the upper corner to open the Add Repository dialog box. Once it appears, add a new repository by entering ADT Plugin for the Name and
https://dl-ssl.google.com/android/eclipse/for the Location; then click OK. The software that is available at the new repository will appear in the next dialog box. - In the Available Software dialog box, choose Developer Tools and click Next.
- Read the software licensing form and then click Finish when complete.
- Restart Eclipse.
Once you've successfully installed the plug-in, it will need to be configured so that it points to the SDK that you downloaded previously. To do this, open the Eclipse Preferences panel and select Android from the left panel. In the right panel, click Browse to browse to the Android SDK you downloaded. Once you have found it, click Open to populate the SDK Location.
The final steps to complete your Eclipse Android development environment are to add the components, add the platforms that you want to develop for, and create an AVD for each of the chosen platforms. You can do these things from within the Android SDK and ADT Manager, which can be found within the Eclipse Window menu option. Once the dialog box is open, you can add components that you will need for development. To do so, select Available Packages on the left menu; then expand the Android Repository option within the Packages available for download list. The Third Party Add-Ons repository can be used at some point in the future to add external libraries that can be used for development of your applications. To get started, it is recommended that you download the following components:
- SDK Tools: Download the most current
- SDK Platform-Tools: Download the most current
- SDK Platform: Download the platform that you want to develop against
- Documentation
- Samples
Configure an AVD for each SDK platform that you downloaded. You will use the AVDs that are configured for testing applications. To create an AVD, select the Virtual Devices menu option in the left menu within the Android SDK and ADT Manager. Click the New button in the right menu to open the Create New Android Virtual Device (AVD) dialog box. Enter a name and select a target from the pull-down list. The target list will contain the list of platforms that you have installed to develop against. Once you've entered these two fields, click the Create AVD button. You should now see the AVD that you created within the list of available AVDs. You are now ready to develop!
19-2. Creating a Basic Application
Problem
You are interested in developing a basic Android application. For example, you'd like to begin with one that will display the current date.
Solution
Create a new Android project within Eclipse. Once created, modify the Java code within the Activity file, named todaysDate.java, which Eclipse has generated for you. The code within todaysDate.java should be modified to look like the following:
package org.java7recipes;


import java.util.Date;


import android.app.Activity;

import android.os.Bundle;

import android.widget.LinearLayout;

import android.widget.TextView;

import android.widget.LinearLayout.LayoutParams;


public class todaysDate extends Activity {

private TextView tv;

private LinearLayout layout;

    /** Called when the activity is first created. */

    @Override

    public void onCreate(Bundle savedInstanceState) {

        super.onCreate(savedInstanceState);

        doWork();

        layout = new LinearLayout(this);

        layout.setLayoutParams(new LayoutParams(LayoutParams.FILL_PARENT,

        LayoutParams.FILL_PARENT));

        layout.setOrientation(LinearLayout.VERTICAL);

        layout.addView(tv);

        setContentView(layout);

    }


        public void doWork(){

        Date todaysDate = new Date();

        tv = new TextView(this);

        tv.setText("The current date is: " + todaysDate);

    }

}
After you have modified the activity code to resemble this code, your Android application is ready to compile and deploy for testing. To learn more about compiling and deploying an application for testing, please see recipe 19-3.
How It Works
To create a new Android project within Eclipse, select the File menu, and then select the New and Other option. This will open the Select a Wizard dialog box, in which you should make the Android Folder and Android Project selection; then click Next. This will open up the New Android Project dialog box. In this dialog box, you need to fill in the Project Name and choose a build target; then enter an Application name, a package name (such as org.java7recipes), and finally the name for the activity to be created. Once all those fields are filled in, click Next button. To skip the Create Test screen, click Finish instead. In Figure 19-1, an application named Todays Date is being created.

Figure 19-1. Creating a new Android project in Eclipse
After you've gone through the initial setup of an Android project, the IDE will automatically generate a Hello World view for your application, along with all the files that are required to make your application work. If you are using the Eclipse Java layout, on the left side of the Eclipse window you will see the TodaysDate project, along with all its files. Expand the project so that you can see the sources that are contained within the src folder. Also, expand the res folder and the layout folder within it so that you can see the file named main.xml. Your view should resemble that of Figure 19-2.

Figure 19-2. Expanded Android project within Eclipse
These todaysDate.java and main.xml files are very important. The todaysDate.java file contains the Java code that is used to create the activity, or view, of the application. This application will only contain a single activity, and it will display a line of text that will show the current date and time. The second file, main.xml, is used to build the view layout. It contains a series of XML tags that correspond to the different activities of the application, which will produce the user interface. Because there is only one activity, todaysDate.java, there is only one corresponding layout XML file.
As mentioned in the solution to this recipe, you should open up the todaysDate.java file and modify the code so that it resembles the one shown in the solution. This file contains the code for an activity within the application. An activity represents one screen within the user interface. Activities and user interface screens go hand in hand. An Activity class is implemented as a subclass of android.app.Activity. To learn more specific details regarding implementing activities, please refer to recipe 19-4. The important changes that are made to the code for this example include the addition of two global variables: one of which corresponds to a widget known as a TextView, and the other corresponds to the layout. The layout managers within Android applications are somewhat similar to those that are used in Swing development. As you can see, a new LinearLayout is created and configured within a couple of lines of code and then the TextView, tv, is added to the layout.
Finally, the layout is set as the content view, which means that it will be displayed on the screen:
layout = new LinearLayout(this);

layout.setLayoutParams(new LayoutParams(LayoutParams.FILL_PARENT,

                LayoutParams.FILL_PARENT));

layout.setOrientation(LinearLayout.VERTICAL);

layout.addView(tv);

setContentView(layout);
Next, add the doWork() method. This method contains the implementation of the activity. It creates a new java.util.Date object and then creates a new TextView widget. The text of the widget is then set to display the current date that is obtained from java.util.Date:
Date todaysDate = new Date();

tv = new TextView(this);

tv.setText("The current date is: " + todaysDate);
The custom code is now complete, and the content layout that was set in the todaysDate activity will be used to populate the view that has been laid out within the main.xml file. Those two files go hand in hand, and if you add more Activities in other applications, each one that contains a view will include a corresponding XML layout.
19-3. Compiling and Testing in an Emulator
Problem
You have developed an application for the Android mobile operating system and need to compile it and test it in your development environment.
Solution
Use the Eclipse IDE to build and compile your Android project, and then deploy the application to the emulator.
How It Works
To compile an Android project, right-click the Android project within Eclipse and choose the Run As menu option, followed by the Android Application menu option. This will compile and build a deployable Android .apk file for your application. It will then start up the corresponding AVD and deploy your application to it for testing. Once the AVD boots and loads the application, a screen that resembles Figure 19-3 will appear.

Figure 19-3. Android Todays Date application screen running within AVD
![]() Note Be sure that you are using an emulator target platform that is compatible with the SDK version that is configured within
Note Be sure that you are using an emulator target platform that is compatible with the SDK version that is configured within AndroidManifest.xml. You will also need to ensure that the Android project properties are set to use the same SDK as the emulator target platform.
19-4. Constructing a User Interface with XML Layout
Problem
You are interested in building a nontrivial user interface for an Android application using an XML file for the layout. The application interface will contain a text box for user entry, a drop-down list that will allow a selection of text, and a button to submit the values that have been entered.
Solution
Develop the application screen, which is composed of views for each of the user interface components. The screen will consist of an Activity class to handle the business logic and a corresponding layout XML file to define the layout. The code for the screen's Activity class is shown here:
package org.java7recipes;


import android.app.Activity;

import android.os.Bundle;
import android.view.View;
import android.widget.ArrayAdapter;
import android.widget.Spinner;
publicclass EnterInformation extends Activity {
private Spinner spinner;
/** Called when the activity is first created. */
@Override
publicvoid onCreate(Bundle savedInstanceState) {
super.onCreate(savedInstanceState);
setContentView(R.layout.enterinformation);
spinner = (Spinner) this.findViewById(R.id.spinner);
ArrayAdapter<CharSequence> adapter = ArrayAdapter.createFromResource(
this, R.array.levels_array,
android.R.layout.simple_spinner_item);
adapter.setDropDownViewResource(android.R.layout.simple_spinner_dropdown_item);
spinner.setAdapter(adapter);
}
publicvoid performAction(View view) {
// Perform button action here
}
}
As mentioned previously, the screen will also use an XML file to compose the overall layout. The layout XML file will look like the following:
<?xml version="1.0" encoding="utf-8"?>

<LinearLayout xmlns:android="http://schemas.android.com/apk/res/android"

    android:orientation="vertical"

    android:layout_width="fill_parent"

    android:layout_height="fill_parent"

>

        <EditText

            android:id="@+id/edittext"

            android:layout_width="fill_parent"

            android:layout_height="wrap_content"

            android:text="@string/entertext"/>

        <Spinner

            android:id="@+id/spinner"

            android:layout_width="fill_parent"
android:layout_height="wrap_content"
android:prompt="@string/levels_prompt"/>
<Button
android:layout_height="wrap_content"
android:layout_width="wrap_content"
android:text="@string/button"
android:onClick="performAction" />
</LinearLayout>
![]() Note This recipe discusses construction of the user interface only. For information on handling events such as button clicks, please see recipe 19-6.
Note This recipe discusses construction of the user interface only. For information on handling events such as button clicks, please see recipe 19-6.
![]() Note In order to run this and the remaining examples in this chapter, merge the
Note In order to run this and the remaining examples in this chapter, merge the src and res folders from the book sources for Chapter 19 into your existing TodaysDate project. Once you've done that, then you'll only need to modify AndroidManifest.xml to modify the Activity name tag according to the example Activity class you want to run.
How It Works
Android user interfaces are constructed using a series of files that corresponds to different application screens. An application can consist of one or more different application screens, and a user will only interact with one screen at a time. A screen consists of a hierarchy of view objects. Views are drawable objects and they are the building blocks of a user interface. For instance, all user interface widgets are views; therefore, a button is a view, a text area is a view, and any other widget that is used within a screen is a view. A single screen can contain many views. Each screen within an Android application consists of a single class known as an activity that is used to construct the views that will be used on that screen. Hopefully by this point you are beginning to see that Android applications are constructed in a very logical and uniform fashion. Each application screen has an Activity class that contains its application logic. In order to build a user screen, you must create an Activity, which pertains to a single focused task that the user can perform. An Activity can be stand-alone or embedded inside other activities.
The first step to creating an activity is to create a new Java class that will become a subclass of android.app.Activity. In the solution to this recipe, the Activity class is called EnterInformation, and its corresponding Java file is named EnterInformation.java. As you can see, the class extends android.app.Activity, and by doing so, it inherits a number of methods. Two of the most important methods include onCreate(Bundle) and onPause(). Every Android activity must override the onCreate(Bundle) method; it initializes the activity because it is the first method that is called when the Activity class is constructed. The onCreate(Bundle) method is typically used to perform any necessary setup for building the layout of the screen that is associated with the activity. As you can see in solution 1, the onCreate() method accepts a Bundle argument, which pertains to the saved instance state of the activity. The first line within the onCreate() method should be a call to the Activity superclass, passing the Bundle as follows:
super.onCreate(savedInstanceState);
The initialization code that is contained within onCreate should call setContentView(int) to create the activity's user interface. In the solution you can see that a strange looking object is passed to the setContentView method. That object pertains to an Android layout XML file; in this case the file is named R.layout.enterinformation. You may be wondering where the R came from because this class is not listed in the imports. The R class is automatically generated when the application is compiled, and it contains the resource IDs for all the resources that are contained within the application's res directory. All resource IDs are stored within the R class, which can be used to retrieve the resource. If you look at the setContentView call within the solution, you can see that the static integer that corresponds to R.layout.enterinformation is passed to it.
![]() Note You should never have to manually access or change the
Note You should never have to manually access or change the R class. The Android build process will take care of automatically generating the R class for you. The R class contains the resource IDs, which are automatically generated for each resource. The resource ID is always composed of the resource type and the resource name.
APPLICATION RESOURCES
If you are using an XML file to construct the layout for the activity's user interface, you do not need to write any more code within the Activity class unless you need to construct views or handle events. In the solution to this recipe, a layout XML file is used, so no further coding is required to build the layout. However, a widget called a Spinner is constructed within the activity as well. The android.widget.Spinner widget is used to represent a drop-down list of values within the user interface. The drop-down list of values can be constructed programmatically, and the strings that are contained within the drop-down list are defined within an XML resource file. This Spinner was added to the user interface to provide a brief introduction to working with views within Android activities. First, the Spinner widget is referenced using the R.id.spinner static integer, which corresponds to the Spinner tag that is located within the XML layout file (as seen in the second code listing within the solution). This reference binds the XML tag to the code.
![]() Note You can reference any widget that is defined within an XML layout programmatically by using the
Note You can reference any widget that is defined within an XML layout programmatically by using the findViewById(int) method, and passing the resource ID for the widget you are using.
An array is then constructed using the externally defined Strings to build the drop-down list of values. It is worth noting that Android provides predefined templates for use with widgets, and often developers can make use of those templates in order to help reduce development time. Such predefined templates are used to setup the drop ArrayAdapter for the Spinner view. The complete construction of the Spinner view can be seen in the following code excerpt:
spinner = (Spinner) this.findViewById(R.id.spinner);

ArrayAdapter<CharSequence> adapter = ArrayAdapter.createFromResource(

this, R.array.levels_array,

android.R.layout.simple_spinner_item);

adapter.setDropDownViewResource(android.R.layout.simple_spinner_dropdown_item);

spinner.setAdapter(adapter);
The next step after creating the Activity class is to construct a layout XML file. An Activity class can have an optional corresponding layout XML file that is used to construct the layout in a visual manner. An XML file that is used for the layout is not mandatory (this will be discussed more in recipe 19-5). The layout XML file is used to organize the widgets that will be used to construct the user interface. In the solution to this recipe, there are four subviews within the XML layout. One of them is a layout object, which is used to define the manner in which its child views are positioned on the screen. The solution uses a LinearLayout, which aligns all children in a single direction. The orientation that is set for the layout determines in which direction the children will be aligned. The solution aligns the children vertically, which means that each child will stack one on top of the other. One can also set a width and height for the layout using the android:layout_width and android:layout_height attributes, respectively.
<LinearLayout xmlns:android="http://schemas.android.com/apk/res/android"

    android:orientation="vertical"

    android:layout_width="fill_parent"

    android:layout_height="fill_parent"

>
![]() Note There are several layout objects that can be used within Android application screens. To see a full list of layout objects along with details regarding usage, please refer to the documentation that is available at
Note There are several layout objects that can be used within Android application screens. To see a full list of layout objects along with details regarding usage, please refer to the documentation that is available at http://developer.android.com/guide/topics/ui/layout-objects.html.
The tags contained within the opening and closing tags of the LinearLayout tag define the children; in this case they are widgets that will be displayed on the screen. Those widgets are EditView, Spinner, and Button, respectively. Each of these XML tags contains attributes that are used to define the widget's appearance and behavior. As you can see, each of the tags, with the exception of the <Button>, contains an android:id attribute. This declares the ID that can be referenced via the Activity class using the R.id.idnumber syntax. The <Spinner> tag contains the attribute android:prompt="@string/levels_prompt", which refers to a string element that is contained within the strings.xml resource file. The <Button> tag contains the attributes android:text="@string/button" and android:onClick="performAction". Similar to the <Spinner> tag's android:prompt attribute, the android:text attribute refers to a string element that is contained within the strings.xml resource file. The android:onClick attribute specifies a method, in this case performAction, that is implemented within the corresponding Activity class that will be used as a listener for the button click. For more information regarding listeners and event handling, please refer to recipe 19-6.
The XML layout contains references to strings that have been declared within the strings.xml file for the application. Assuming that this activity is being added to the Android project, which was created in recipe 19-2, the strings.xml file should look like the following:
<?xml version="1.0" encoding="utf-8"?>

<resources>

<string name="hello">Hello World, todaysDate!</string>

<string name="app_name">Todays Date</string>

<string name="button">Press Me</string>

<string name="entertext">Enter Your Name</string>

<string name="levels_prompt">Choose a level</string>

<string-array name="levels_array">

<item>Beginner</item>

<item>Intermediate</item>

<item>Advanced</item>

</string-array>

</resources>
As you can see, each string element contains a name and a value, and the array element contains a list of String items. The string names can then be used within layout XML or programmatically as demonstrated in this solution.
Lastly, the Activity class must be registered with the application within the AndroidManifest.xml. To learn more about registering an activity, please see recipe 19-6. The resulting user interface screen will look similar to Figure 19-4.

Figure 19-4. Android user interface example
![]() Note The name of the application is “Today's Date” because this chapter assumes that you will build onto the project created in recipe 19-2. If you want to create a new Android project, please follow the steps within recipe 19-2. You could also change the string that is mapped to
Note The name of the application is “Today's Date” because this chapter assumes that you will build onto the project created in recipe 19-2. If you want to create a new Android project, please follow the steps within recipe 19-2. You could also change the string that is mapped to app_name within strings.xml, so a different name is displayed.
19-5. Constructing a User Interface Programmatically
Problem
You are interested in building a non-trivial user interface for an Android application without using an XML file for the layout. The application interface will contain a text box for user entry, a drop-down list that will allow a selection of text, and a button to submit the values that have been entered, just like the user interface that was developed in recipe 19-4.
Solution
Develop the user interface entirely within the Activity class, and do not create an XML file for the layout. The following code demonstrates how to construct the same user interface screen, which was built in recipe 19-4 by programmatically using a layout view and organizing subviews within it programmatically.
package org.java7recipes;


import android.app.Activity;

import android.content.Intent;

import android.os.Bundle;

import android.view.View;

import android.widget.ArrayAdapter;

import android.widget.Button;

import android.widget.EditText;

import android.widget.LinearLayout;

import android.widget.Spinner;


publicclass EnterInformationProgrammatically extends Activity {


private LinearLayout layout;

private Button button;

private Spinner spinner;

private EditText editText;
/** Called when the activity is first created. */
@Override
publicvoid onCreate(Bundle savedInstanceState) {
super.onCreate(savedInstanceState);
layout = new LinearLayout(this);

layout.setOrientation(android.widget.LinearLayout.VERTICAL);
button = new Button(this);

button.setText("Press Me");
editText = new EditText(this);

editText.setText("Enter your name");
spinner = new Spinner(this);

ArrayAdapter<CharSequence> adapter = ArrayAdapter.createFromResource(

        this, R.array.levels_array,

        android.R.layout.simple_spinner_item);

adapter.setDropDownViewResource(android.R.layout.simple_spinner_dropdown_item);

spinner.setAdapter(adapter);
// Add views to the layout
layout.addView(editText);

layout.addView(spinner);

layout.addView(button);

setContentView(layout);
}
}
![]() Note This recipe discusses construction of the user interface only. For information on handling events such as button clicks, please see recipe 19-6.
Note This recipe discusses construction of the user interface only. For information on handling events such as button clicks, please see recipe 19-6.
How It Works
It is possible to construct a user interface entirely within Java code without the need for a corresponding XML layout file. Why would you be interested in using this technique? Although defining an XML layout has the advantages of being easy to maintain and more readable, developing a layout entirely in code can provide more flexibility if the need arises. To create a user interface without XML, you need to instantiate and configure the layout programmatically within the Activity class. If using a layout object, that must be programmatically defined and each of its children must be added to it manually. If you like Java Swing, the programmatic approach may be for you because there are some close similarities between the programmatic development of Android user interfaces and the construction of a Java Swing user interface.
Looking at the code contained within the solution, you can see that EnterInformationProgrammatically.java resembles the Activity class that was defined within recipe 19-4, except there are several more lines of code. The class extends android.app.Activity, and each of the widgets that will be used within the user interface is declared as private. The obligatory onCreate(Bundle) method is where the user interface construction takes place. The first line within the method is a call to the super class's onCreate() method, passing a Bundle that contains the saved instance state for the activity. Next, a new LinearLayout instance is created, passing the Activity class as an argument via the this keyword. After the layout is declared, its orientation is set by calling the layout's setOrientation(int), passing a static constant int value representing the type of orientation. In this case, it is android.widget.LinearLayout.VERTICAL:
layout = new LinearLayout(this);
layout.setOrientation(android.widget.LinearLayout.VERTICAL);
Next, the child views that will go within the layout are constructed. That is, each widget is now instantiated, and attributes are set accordingly. The widgets can be defined and configured in any order. First, the Button is instantiated, and its text is set.
button = new Button(this);
button.setText("Press Me");
Second, the EditText widget is instantiated, and its text is set.
editText = new EditText(this);
editText.setText("Enter your name");
Finally, the Spinner widget is instantiated and configured accordingly. If you read through recipe 19-4, you will notice that instead of passing a resource ID to the Spinner when instantiating it, the this keyword is passed. Because there is no corresponding XML layout, there is no resource ID to pass. The following code shows how the 4 is instantiated and constructed:
spinner = new Spinner(this);
ArrayAdapter<CharSequence> adapter = ArrayAdapter.createFromResource(
this, R.array.levels_array,
android.R.layout.simple_spinner_item);
adapter.setDropDownViewResource(android.R.layout.simple_spinner_dropdown_item);
spinner.setAdapter(adapter);
The final thing that needs to be completed is to add each of the widgets to the layout. While adding widgets to the layout, the ordering is important. The first widget that is added will be placed in the first position of the layout, and the others will follow suit according to the position in which they are added. Finally, the layout itself is passed to the setContentView() method. If you fail to do this, the user interface will be blank.
layout.addView(editText);
layout.addView(spinner);
layout.addView(button);
setContentView(layout);
That completes the programmatic construction of the user interface. The next step is to register the Activity class within the AndroidManifest.xml, which is covered in recipe 19-7. It is also important to note that the button will not do anything at this time. To learn more about adding listeners to buttons and handling events, please see recipe 19-6.
19-6. Handling Application Events and Activity Changes
Problem
You have developed an Android application user interface and would like to add some functionality to it. For instance, you created a screen that includes a button and you would like to open another application screen when that button is clicked, passing information that was obtained from the original screen.
Solution 1
Develop a listener for the button by mapping the layout XML tag to an event handling method that resides within the corresponding activity. To use this technique, your user interface must be composed of a layout XML file along with an associated Activity class. Once the listener is invoked, use an Intent to pass data to the Activity class for another screen. The following code excerpt shows what the XML within the layout would look like for the button:
…

<Button

android:layout_height="wrap_content"

android:layout_width="wrap_content"

android:text="@string/button"

android:onClick="performAction" />

…
In this case, a method named performAction() that resides within the Activity class will be triggered when the button is pressed. The code for the performAction() is as follows:
publicvoid performAction(View view) {

        // Perform button action here

        editText = (EditText) this.findViewById(R.id.edittext);

        Intent i = new Intent(EnterInformation.this, DisplayInformation.class);

        Bundle b = new Bundle();

        b.putString("name", editText.getText().toString());

        b.putString("level", spinner.getSelectedItem().toString());


        i.putExtra("android.intent.extra.INTENT", b);

        startActivity(i);

}
Solution 2
Programmatically add an event listener to a button that is contained within the screen. Using this technique, the button functionality takes place within the screen's Activity class using Swing-like action listeners. The following code can be used within the Activity class to programmatically add an event listener to the Button:
button.setOnClickListener(new View.OnClickListener() {

publicvoid onClick(View v) {

       performAction();

    }

});
The performAction() method that is invoked within onClick() uses an Intent to pass data to a different Activity class. The code for performAction() is as follows:
public void performAction() {

        // Perform button action here

        Intent i = new Intent(EnterInformationProgramatically.this, DisplayInformation.class);

        Bundle b = new Bundle();

        b.putString("name", editText.getText().toString());

        b.putString("level", spinner.getSelectedItem().toString());


        i.putExtra("android.intent.extra.INTENT", b);

        startActivity(i);

}
![]() Note In order to run this code, add the following lines to the AndroidManifest.xml file from recipe 19-6:
Note In order to run this code, add the following lines to the AndroidManifest.xml file from recipe 19-6:
<activity android:name=".DisplayInformation"


android:label="@string/app_name">


</activity>
Refer to recipe 19-7 for more information.
How It Works
Once again, there are two different ways to handle view events for a specified screen. Using the technique specified in solution 1, you can choose to use a layout XML file to configure the layout for the screen, and use the XML tag attributes to assign listeners. Note that the tag lists an android:onClick attribute with a listener method by the name of performAction. This method resides within the Activity class for the screen. When the button is clicked, the method is invoked and performs some work.
Using a programmatic approach, the listener can be added using the Button class's setOnClickListener(OnClickListener) method. The standard approach for adding a listener to a button in this manner is to use an anonymous inner class to use as the listener. As you can see in solution 2, a new View.OnClickListener class is created, and the onClick(View) method is implemented within it in order to perform the required activity.
What can you do within a listener method? You can do just about anything that is required to handle your event. In the performAction method for this recipe, the text from within the widgets on the screen is sent to another screen using an Intent, which is a runtime binding between the code and different classes within the application. They can be used to perform a number of operations, including starting a new activity, starting a service, and broadcasting. In this case, the Intent is used to start a new activity, passing data along with it. Each of the solutions in the recipe has a slightly different implementation of the performAction() method. In the first solution, the resource ID for each widget is used to obtain the text that has been entered into the EditView or selected on the Spinner. The second solution uses fields of the class to obtain the text from each widget. All the other functionality is the same between the two methods.
To start a new activity, instantiate a new Intent, passing the current Activity class and the Activity class that you want to start:
Intent i = new Intent(EnterInformation.this, DisplayInformation.class);
![]() Note
Note Intents play an important role in Android application development. To learn more, please see the online documentation available at http://developer.android.com/reference/android/content/Intent.html.
ACTIVITY PROCESS LIFE CYCLE
Next, create a new Bundle to pass the data to the new activity. The Bundle can contain any number of values, and in the solution to this recipe the text from both the EditView and Spinner widgets is added to the Bundle. The Bundle is then added to the Intent by calling the Intent class's putExtra() method. Last, the startActivity(Intent) method is called, passing the Intent.
i.putExtra("android.intent.extra.INTENT", b);

startActivity(i);
Once the screen that pertains to the EnterInformation activity has been filled out, and the button has been clicked, the DisplayInformation activity will be activated. The DisplayInformation activity is not very complex; it only displays a message that includes some content taken from the user in the previous screen. It uses a TextView widget to display the text. The code for DisplayInformation.java looks like the following:
package org.java7recipes;


import android.app.Activity;

import android.content.Intent;


import android.os.Bundle;


import android.widget.TextView;
public class DisplayInformation extends Activity {
private TextView textView;
/** Called when the activity is first created. */
@Override
public void onCreate(Bundle savedInstanceState) {
String displayText = null;
super.onCreate(savedInstanceState);
setContentView(R.layout.displayinformation);
Intent startingIntent = getIntent();
if (startingIntent != null){
Bundle b = startingIntent
.getBundleExtra("android.intent.extra.INTENT");
if (b == null) {
displayText = "No data.";
} else {
displayText = b.getString("name") + ",
";
displayText += "You are a " + b.getString("level") + "
";
displayText += "Android developer.
";
}
} else {
displayText = "Information Not Found.";
}
textView = (TextView) this.findViewById(R.id.displaytext);
textView.setText(displayText);
}
}
The corresponding layout XML file is named displayInformation.xml, and it looks like the following:
<?xml version="1.0" encoding="utf-8"?>

<LinearLayout xmlns:android="http://schemas.android.com/apk/res/android"

    android:orientation="vertical"

    android:layout_width="fill_parent"

    android:layout_height="fill_parent"

>

<TextView

android:id="@+id/displaytext"

android:layout_width="fill_parent"

android:layout_height="wrap_content" />

</LinearLayout>
In the end, the resulting screen will look like Figure 19-5.

Figure 19-5. Screen corresponding to the DisplayInformation activity
This recipe only covers a small portion of what can be done with events and Intents on Android. This is a very important topic, and there is a wealth of information on them that can be found online. Please refer to the online documentation that can be found at http://developer.android.com/reference/android/content/Intent.html for more details.
19-7. Tying All Application Components Together
Problem
An activity has been created for your application and you would like to register it to be loaded when the application is started.
Solution
Register the activity within the AndroidManifest.xml file. If you'd like for the activity to be loaded at application startup, indicate that within the manifest as well. The following excerpt has been taken from the AndroidManifest.xml file that was created for the project from recipe 19-2. The activity being registered was created within recipe 19-4.
<activity android:name=".EnterInformation"

          android:label="@string/app_name">

<intent-filter>

<action android:name="android.intent.action.MAIN" />

<category android:name="android.intent.category.LAUNCHER" />

</intent-filter>

</activity>
How It Works
Every Android application must have an AndroidManifest.xml file. The file must be located in the root directory of the application. It includes information regarding the application's components, processes, permissions, and more. The manifest is read before any of the application's code is executed. As a matter of fact, the manifest is used to register Activity classes and determine which class is executed first when the application is started up.
All application Activity classes must be registered within the AndroidManifest.xml. In order to register an activity, embed a new <activity> tag within the <application> element of the manifest. The required android:name attribute should be set to the name of the class that corresponds to the activity. The tag's android:label attribute can be used to label the activity screen. In the solution to this recipe, the android:label attribute is set to @string/app_name, which corresponds to a string element named app_name that is declared within the strings.xml file. For normal activity registration, the <activity> tag is all that is required. However, if you want to register an activity as the main activity that will be launched upon application startup, an intent filter must be registered. This can be done by embedding the <intent-filter> tags within the <activity> tag, and passing the following action and category:
<action android:name="android.intent.action.MAIN" />

<category android:name="android.intent.category.LAUNCHER" />
![]() Note The
Note The <activity> tag is quite involved, and contains a great many options. For more details on using the <activity> tag, please see the online documentation available at: http://developer.android.com/guide/topics/manifest/activity-element.html.
As mentioned previously, the manifest is used for much more than registering activities. To learn more about registering application permissions, please see recipe 19-11. To learn more about what is possible with the AndroidManifest.xml file, please refer to the online documentation that can be found at http://developer.android.com/guide/topics/manifest/manifest-intro.html.
19-8. Handling Incoming Call Events
Problem
When your users receive a phone call, the application you have written does not pause to allow the user to answer the call. You would like to make your application pause and fall into the background when a call comes in.
Solution
Create a broadcast receiver to handle the incoming phone calls. A broadcast receiver consists of two things: a BroadcastReceiver class, and configuration within the AndroidManifest.xml file. The following code demonstrates a BroadcastReceiver class that handles incoming phone calls:
package org.java7recipes;


import android.content.BroadcastReceiver;

import android.content.Context;

import android.content.Intent;

import android.os.Bundle;

import android.telephony.TelephonyManager;

import android.util.Log;


publicclass PhoneReceiver extends BroadcastReceiver {


        private PhoneReceiver application;


        @Override

        publicvoid onReceive(Context context, Intent intent) {

                Bundle extras = intent.getExtras();

                if (extras != null) {

                String state = extras.getString(TelephonyManager.EXTRA_STATE);

                if (state.equals(TelephonyManager.EXTRA_STATE_RINGING)) {

                        String phoneNumber = extras

                        .getString(TelephonyManager.EXTRA_INCOMING_NUMBER);

                }

                }

        }

}
Register the receiver within the AndroidManifest.xml file. The following excerpt from the AndroidManifest.xml demonstrates how to register the receiver. These tags should be nested within the <application> tags. Please refer to the source files for a full example.
…

<receiver android:name=".PhoneReceiver">

<intent-filter>

<action android:name="android.intent.action.PHONE_STATE" />

<action android:name="android.provider.Telephony.SMS_RECEIVED" />

</intent-filter>

</receiver>

…
When the application is started, it should now be paused when an incoming call event occurs. If a Short Message Service (SMS) message is received, it will be displayed within the top menu bar while the application is running.
How It Works
Your application is the most important piece of software running on an Android device. Well, you may think that is the case, but unfortunately it is not. The most important software running on the device may not have any interaction with your application at all. Of course, we are talking about the capability for the Android device to communicate via phone or SMS services. Ultimately, mobile devices are most useful for communication, and applications that do not pause or allow the user to exit and take action upon a received phone call or SMS message are usually frowned upon. It is important to build your application so that it is aware of any incoming phone calls or messages and takes the appropriate action to allow users to act upon them.
The solution to this issue is the broadcast receiver. Broadcast receivers are components that respond to system-wide announcements. They have no user interface; instead they act as a transparent gateway for other components to perform tasks. For instance, the system may broadcast any number of announcements. They may include an incoming phone call or SMS message, low battery, or a screen being turned off. Any broadcast receivers will be notified of such announcements, and then they can perform a task such as pausing an application to allow the user to take a phone call.
TYPES OF BROADCASTS
Broadcasts are delivered as Intent objects, and a Broadcast Receiver acts as a listener for those Intents. In order to create a broadcast receiver class, you must extend the android.content.BroadcastReceiver class. The onReceive (Context, Intent) method must be implemented within a BroadcastReceiver class. Its purpose is to receive any broadcasts and act upon them accordingly. In the solution to this recipe, the receiver's main objective is to listen for incoming phone calls or SMS messages. When a call comes in, the broadcast receiver's onReceive() method is called and the Intent is passed into it. The first line of the method gets the broadcasted announcement by calling the Intent's getExtras() method, and a Bundle is obtained. The Bundle can then be interrogated to determine the type of broadcast that has been made. To check for broadcasts pertaining to telephony, the TelephonyManager.EXTRA_STATE state is parsed. If the state equals TelephonyManager.EXTRA_STATE_RINGING, a task is performed. In the solution, the incoming phone number is captured. All this can be seen within the following code excerpt taken from the solution's onReceive() method:
Bundle extras = intent.getExtras();

if (extras != null) {

String state = extras.getString(TelephonyManager.EXTRA_STATE);

if (state.equals(TelephonyManager.EXTRA_STATE_RINGING)) {

        String phoneNumber = extras

                        .getString(TelephonyManager.EXTRA_INCOMING_NUMBER);

}

}
![]() Note Although broadcasts to the system use
Note Although broadcasts to the system use Intent objects, they are separate from those Intent objects that are used for starting activities.
Just like an Activity class, a BroadcastReceiver class must be registered in the AndroidManifext.xml file. A <receiver> tag is used to register a broadcast receiver, and each Intent action that the receiver will be listening for is embedded within the <intent-filter> tag. In the solution, the android:name attribute of the <receiver> tag specifies the name of the corresponding receiver class. Two Intent actions are filtered with the receiver: phone calls and SMS. The corresponding action names are android.intent.action.PHONE_STATE and android.provider.Telephony.SMS_RECEIVED, respectively.
The topic of broadcast receivers is immense, and entire chapters can be written on the topic. This recipe only covers a small aspect of what broadcast receivers are capable of doing. To learn more about broadcast receivers, please see the online documentation that can be found at http://developer.android.com/reference/android/content/BroadcastReceiver.html.
19-9. Building a Tabbed User Interface
Problem
You would like to design a user interface that can make it easy to switch between two or more application screens.
Solution
Develop a tabbed user interface and designate a tab for each application screen. To do so, create a new Activity class that extends the android.app.TabActivity class. This activity will be used to construct the tabbed user interface. For this example, a tabbed interface will be developed for the application that has been created using the previous recipes in this chapter. The following code is from the TabContainer.java file, which is the implementation for the TabActivity class named TabContainer:
package org.java7recipes;


import android.app.TabActivity;

import android.content.Intent;

import android.content.res.Resources;

import android.os.Bundle;

import android.widget.TabHost;


public class TabContainer extends TabActivity {

    /** Called when the activity is first created. */

    @Override

    public void onCreate(Bundle savedInstanceState) {

        super.onCreate(savedInstanceState);

        setupTabs();

    }


    private void setupTabs(){

        setContentView(R.layout.tabs);


        Resources res = getResources(); // Resource object for obtaining drawables

        TabHost tabHost = getTabHost();

        TabHost.TabSpec spec;

        Intent intent;


        // Create an Intent to launch an Activity for the tab

        intent = new Intent().setClass(this, EnterInformation.class);


        // Initialize a TabSpec for each tab, and then add to tabhost

        spec = tabHost.newTabSpec("enterInformation").setIndicator("Information",

                                res.getDrawable(R.drawable.enterinformation))

                      .setContent(intent);
tabHost.addTab(spec);
intent = new Intent().setClass(this, todaysDate.class);
spec = tabHost.newTabSpec("todaysDate").setIndicator("Todays Date",
res.getDrawable(R.drawable.main))
.setContent(intent);
tabHost.addTab(spec);
intent = new Intent().setClass(this, VisitSite.class);
spec = tabHost.newTabSpec("visitSite").setIndicator("Visit java.net",
res.getDrawable(R.drawable.visitsite))
.setContent(intent);
tabHost.addTab(spec);
tabHost.setCurrentTab(0);
}
}
The next step is to provide a new drawable XML file for each of the activities for which you want to create a tab. These drawable XML files must reside within the res/drawable/ directory in the application. The following code shows what one of these XML files will look like. One should be created for each activity that is going to be contained within a tab. The following code is contained within a file named enterinformation.XML, which resides within the res/drawable/ directory:
<?xml version="1.0" encoding="utf-8"?>

<selector xmlns:android="http://schemas.android.com/apk/res/android">

<!-- When selected, use grey -->

<item android:drawable="@drawable/group-selected"

          android:state_selected="true" />

<!-- When not selected, use white-->

<item android:drawable="@drawable/group-deselected" />

</selector>
After creating a new drawable XML file for each tab, create the main tab layout XML file within the res/layout/ directory. This file will be used to construct the XML layout for the tabbed user interface. The following code is taken from a file named tabs.xml which resides within the res/layout/ directory:
<?xml version="1.0" encoding="utf-8"?>

<TabHost xmlns:android="http://schemas.android.com/apk/res/android"

    android:id="@android:id/tabhost"

    android:layout_width="fill_parent"

    android:layout_height="fill_parent">

<LinearLayout

        android:orientation="vertical"

        android:layout_width="fill_parent"

        android:layout_height="fill_parent"

        android:padding="5dp">

<TabWidget

            android:id="@android:id/tabs"

            android:layout_width="fill_parent"

            android:layout_height="wrap_content" />

<FrameLayout

            android:id="@android:id/tabcontent"

            android:layout_width="fill_parent"

            android:layout_height="fill_parent"

            android:padding="5dp" />

</LinearLayout>

</TabHost>
Lastly, register the new TabActivity class within the AndroidManifest.xml file. After doing so, the complete manifest file should look as follows:
<?xml version="1.0" encoding="utf-8"?>

<manifest xmlns:android="http://schemas.android.com/apk/res/android"

        package="org.java7recipes" android:versionCode="1" android:versionName="1.0">


        <application android:icon="@drawable/icon" android:label="@string/app_name">

                <activity android:name=".TabContainer" android:label="@string/app_name"

                        android:configChanges="keyboardHidden|orientation"

                                           android.theme="@android:style/Theme.NoTitleBar"

                        android:launchMode="singleTop">

                        <intent-filter>

                                <action android:name="android.intent.action.MAIN" />

                                <category android:name="android.intent.category.LAUNCHER" />

                        </intent-filter>

                </activity>

                <activity android:name=".todaysDate" android:label="@string/app_name">


                </activity>

                <activity android:name=".EnterInformation"

                        android:label="@string/app_name">

                </activity>

                <activity android:name=".VisitSite"

                        android:label="@string/app_name">

                </activity>

                <activity android:name=".EnterInformationProgrammatically"

                        android:label="@string/app_name">


                </activity>

                <activity android:name=".DisplayInformation" android:label="@string/app_name">


                </activity>

                <receiver android:name=".PhoneReceiver">

                        <intent-filter>

                        <action android:name="android.intent.action.PHONE_STATE" />

                        <action android:name="android.provider.Telephony.SMS_RECEIVED" />

                        </intent-filter>

                </receiver>

        </application>

        <uses-permission android:name="android.permission.READ_PHONE_STATE" />

        <uses-permission android:name="android.permission.INTERNET" />

</manifest>
The resulting tabbed interface should resemble that shown in Figure 19-6.
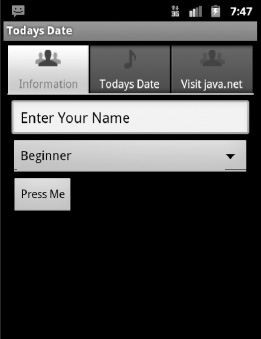
Figure 19-6. Tabbed user interface
How It Works
Tabbed user interfaces make it easy to navigate applications, especially on devices with smaller screens because the tabs do not take a lot of real estate. Developing a tabbed user interface is an easy task, but it does require the manipulation of a few different files. The tabbed interface itself must have its own Activity class and corresponding layout XML file. Each activity that is going to reside within a tab must also have its own corresponding drawable XML file.
To begin implementing the tabbed user interface, create a drawable XML file for each activity that you want to load into a tab. These files are known as a state-list drawables. A state-list drawable is an object that is defined in XML, which uses different images to represent the same graphic, depending upon the state of the corresponding object. In other words, these drawable files represent the tabs along with the images and text to load onto each tab. Intricate applications load different images on tabs depending if they are the currently selected tab or not. In the solution to this recipe, the drawable XML for the EnterInformation Activity class is shown, and you can see that different images are referenced depending upon the selection state of the tab. The excerpt below shows the lines of XML that enable this functionality:
<!-- When selected, use grey -->

<item android:drawable="@drawable/group-selected"

          android:state_selected="true" />

<!-- When not selected, use white-->

<item android:drawable="@drawable/group-deselected" />
The android:drawable attributes of the <item> tags are set equal to a drawable element correlating to an image that is located in the res/drawable/ directory. Images with the names of group-selected.png and group-deselected.png reside within the res/drawable/ directory, and the android:drawable attribute maps the tab state to those images. Designate one of the images as selected by adding the android:state_selected="true" attribute and value to it.
An Activity class that will be used for creating a tab container must extend the android.app.TabActivity class. The resulting Activity class will contain the onCreate(Bundle) method just like every other activity. Per the specification, the onCreate() method will be initiated prior to loading the user interface on the screen, and it is used to build the elements of the user interface. In the solution to this recipe, another method named setupTabs() is called within the onCreate() method. The tab builder implementation takes place within setupTabs(). Taking a look at the code, the layout XML which corresponds to the tab view is loaded within the first line of the setupTabs() method. Next, a Resources instance is obtained for working with the resource files that correspond to the different activities, which will be placed within the tabs. A TabHost instance is also obtained for working with the tabs. A couple of other variables are also declared for later use:
setContentView(R.layout.tabs);


Resources res = getResources();

TabHost tabHost = getTabHost();

TabHost.TabSpec spec;

Intent intent;
For the creation of each tab, a new Intent is created; passing the class of the corresponding activity that is to be loaded into the tab. In this excerpt, an Intent is created for the EnterInformation activity that was developed in recipe 19-4:
intent = new Intent().setClass(this, EnterInformation.class);
Next, a TabSpec object is initialized for each tab. The TabSpec is created to define the different properties for each tab. When creating the TabSpec, pass a string value, which can be used to identify the tab. The text and icon for the tab are set next by calling the setIndicator(CharSequence, Drawable) method, passing a CharSequence of text that will be displayed on the tab, as well as the resource ID for the drawable that was created for the activity. Finally, set the content of the tab by passing the Intent that was created previously. Once these steps have been taken, the TabSpec can be added to the TabHost. Although this seems like a lot of steps to complete, it is done within two lines of code. The following code excerpt sets up the TabSpec for the EnterInformation activity and adds it to the TabHost:
spec = tabHost.newTabSpec("enterInformation").setIndicator("Information",

               res.getDrawable(R.drawable.enterinformation))

               .setContent(intent);

tabHost.addTab(spec);
Follow these steps for each tab that you want to create. The last line of the setupTabs() method sets the index for the tab that will be loaded first:
tabHost.setCurrentTab(0);
Similar to other activities, the TabActivity class must have a corresponding layout XML file. This file should be placed within the res/layout/ directory and it is responsible for defining the layout structure of the tab interface. In the solution to this recipe, a file named tabs.xml is created for this purpose. A <TabHost> container is at the root of all tabbed user interfaces, and the actual layout for the individual tabs should be nested within it. The tab layout in the solution to this recipe uses a LinearLayout to organize the content of the tabbed user interface. Within the <LinearLayout> tags, a <TabWidget> tag is used to represent the actual tabs that will be pressed by the user to navigate between activities, and a <FrameLayout> tag is used to represent the content of the tabs.
After all the XML files and the TabActivity class have been created, the tabbed user interface is just about ready. The last piece of the puzzle is to add the Activity class to the manifest. The TabContainer activity has a couple of additional attributes specified within the <activity> tag. Particularly, the android:configChanges attribute lists the configuration changes that you would like for the activity to handle itself. This attribute allows you to override the default system configuration changes such as the screen orientation change. In the solution, this attribute is set to android:configChanges="keyboardHidden|orientation", which specifies that the activity will handle the keyboard accessibility and also what happens when the user rotates the device. This attribute allows for customization, and it can be used with any activity. The other attribute that we have not yet discussed in this chapter is android:launchMode. For the TabController activity, it is set to a value of "singleTop". This attribute handles the way in which the activity is launched. Specifying "singleTop", which basically allows only one instance of the activity to be created. This is important with the TabController activity because you do not want more than one set of tabs on the screen. To see other useful attributes that can be used with the <activity> tag, please refer to the online documentation that can be found at: http://developer.android.com/guide/topics/manifest/activity-element.html.
After the tabbed interface has been configured and registered in the manifest, the application is ready to run. There are more interfaces that can be useful for laying out application user interfaces, including the Grid Layout and Table Layout. For a list of the others, as well as examples, please see the online documentation at: http://developer.android.com/resources/tutorials/views/index.html.
19-10. Embedding Web Pages into an Application View
Problem
You would like to embed an active web page to your application.
Solution
Develop an activity that creates a WebView, and load the web page into it. The following Java class contains an activity that instantiates a WebView:
package org.java7recipes;


import android.app.Activity;

import android.os.Bundle;

import android.view.Window;

import android.webkit.WebChromeClient;

import android.webkit.WebView;

import android.webkit.WebViewClient;

import android.widget.Toast;
publicclass VisitSite extends Activity {
private WebView webview;
/** Called when the activity is first created. */
@Override
publicvoid onCreate(Bundle savedInstanceState) {
super.onCreate(savedInstanceState);
webview = new WebView(this);
// Add progress bar
getWindow().requestFeature(Window.FEATURE_PROGRESS);
// Enable Javascript
webview.getSettings().setJavaScriptEnabled(true);
final Activity activity = this;

webview.setWebChromeClient(new WebChromeClient() {

publicvoid onProgressChanged(WebView view, int progress) {

        activity.setProgress(progress * 1000);

}

});
webview.setWebViewClient(new WebViewClient() {
// Handle errors accordingly
publicvoid onReceivedError(WebView view, int errorCode,
String description, String failingUrl) {
Toast.makeText(activity, "Error Received:" + description,Toast.LENGTH_SHORT).show();
}
});
webview.loadUrl("http://www.java.net");
setContentView(webview);
}
}
After adding this activity to the AndroidManifest.xml, the window would look similar to Figure 19-7.

Figure 19-7. WebView within a TabLayout
How It Works
A WebView is an Android view that displays web pages. It uses WebKit for rendering and includes the functionality to navigate the web. By default, the WebView does not enable any browser-like widgets, and functionality such as JavaScript is turned off. When you use a vanilla WebView, it will load a web page and display it, and that is all. However, the WebView is very customizable and can be adjusted to create a fully capable web browser if needed.
In the solution to this recipe, a standard WebView is created within an Activity class named ViewSite, which will include no browser-like widgets such as the back and forward buttons. A progress bar is added to the activity by obtaining a handle on the window and then setting the Window.FEATURE_PROGRESS feature. This will overlay the WebView.
getWindow().requestFeature(Window.FEATURE_PROGRESS);
Next, JavaScript is enabled on the WebView by obtaining the WebSettings class for the view by calling the getSettings() method and passing true to the setJavaScriptEnabled() method. There are many other useful settings that can be set within the WebSettings class. For complete documentation regarding the WebSettings class, please see the online documentation available at http://developer.android.com/reference/android/webkit/WebSettings.html. The code to enable JavaScript within the WebView is as follows:
webview.getSettings().setJavaScriptEnabled(true);
Next, a WebChromeClient subclass is created and set. A WebChromeClient subclass is used when an event occurs that may impact the browser UI. In this case, when loading the specified web page, the progress bar is updated to reflect the progress:
final Activity activity = this;
webview.setWebChromeClient(new WebChromeClient() {
publicvoid onProgressChanged(WebView view, int progress) {
activity.setProgress(progress * 1000);
}
});
![]() Note Creating and setting a
Note Creating and setting a WebChromeClient can take care of providing specified functionality when browser specific events occur. For more information on using the WebChromeClient class, please see the online documentation available at http://developer.android.com/reference/android/webkit/WebChromeClient.html.
The next code block creates and sets a WebViewClient, which is called when events occur that could impact the loading of a specified web page, such as JavaScript errors. You can customize the functionality of a WebViewClient by implementing specific methods depending upon the events you are trying to handle. In the solution, we want to display a message when errors occur, so the onReceivedError(WebView, int, String, String) method is implemented, and text is created within the method implementation for displaying the message. After the text is created, it is displayed to the user within a Toast object. A Toast is a view for displaying a message to a user. For more information pertaining to using Toasts, please see the online documentation that can be found at http://developer.android.com/reference/android/widget/Toast.html.
webview.setWebViewClient(new WebViewClient() {

// Handle errors accordingly

publicvoid onReceivedError(WebView view, int errorCode,

                                String description, String failingUrl) {

        Toast.makeText(activity, "Error Received:" + description, Toast.LENGTH_SHORT).show();

}

});
![]() Note Creating and setting a
Note Creating and setting a WebViewClient can take care of handling events that impact the loading of web pages. There are a great number of events that can be handled using a WebViewClient such as a malformed URL or a failed SSL handshake. For complete details on using a WebViewClient, please see the online documentation available at http://developer.android.com/reference/android/webkit/WebViewClient.html.
Finally, the activity loads the URL for the WebView to display and sets the content view. In this case, the URL is http://www.java.net.
webview.loadUrl("http://www.java.net");

setContentView(webview);
The last thing that needs to be done to enable a WebView to access the Internet is to grant permissions to your application for doing so. If you fail to grant permissions to your application for accessing the Internet, your WebView will be unable to display any web content. For information regarding granting these permissions to your application, please see the next recipe, 19-11.
Quite a bit is going on here that has not yet been discussed within the context of this chapter. The WebView class is complex because it enables the developer to customize WebView instances in many different ways. This recipe barely scratches the surface of what can be achieved by using a WebView within your Android application. For complete documentation on using WebViews, please see the online documentation available at http://developer.android.com/reference/android/webkit/WebView.html.
19-11. Granting Application Device Permissions
Problem
You need to grant your application-specific privileges on a mobile device. For instance, you want to embed a web browser into your application and you need to provide the ability for your application to access the Internet.
Solution
Add the appropriate permissions to the AndroidManifest.xml file. For instance, if you want to allow your application the ability to access the Internet, add the following tag to the manifest:
<uses-permission android:name="android.permission.INTERNET" />
How It Works
Upon creation, a basic Android application has no permissions granted to it. This is a safety feature so that the application will be unable to do anything that may adversely affect the user experience or the device on which the application is running. Permissions can be added to the AndroidManifest.xml file to enable protected features on a per-application basis. To specify permissions for an application, a series of one or more <uses-permission> tags can be added to the manifest declaring the permissions that the application requires. The package installer then grants the requested permissions to the application at install time. There are no security checks that will be displayed to the user at application runtime. Either the application is granted the permissions at install time, or it is not. If a permission failure occurs, a java.lang.SecurityException will be thrown.
![]() Note You can view the permissions that Android has granted to your application by going to the Settings->Applications screen on an Android device and selecting an application.
Note You can view the permissions that Android has granted to your application by going to the Settings->Applications screen on an Android device and selecting an application.
Any number of permissions can be specified within the manifest in order to provide more functionality to an application. However, it is important that only the permissions required for the application to run normally are specified. Specifying more permissions than are needed can cause a device run in an unsecured state, allowing bad things to happen.
![]() Note For a complete set of permissions that can be used within an Android application, please see the online documentation available at
Note For a complete set of permissions that can be used within an Android application, please see the online documentation available at http://developer.android.com/reference/android/Manifest.permission.html.