
C H A P T E R 17
![]()
Media with JavaFX
JavaFX provides a media-rich API capable of playing audio and video. The Media API allows developers to incorporate audio and video into their RIAs. One of the main benefits of the Media API is its cross-platform abilities when distributing media content via the Web. With a range of devices (tablet, music player, TV, and so on) that need to play multimedia content, the need for a cross-platform API is essential.
Imagine a not-so-distant future where your TV or wall is capable of interacting with you in ways that you've never dreamed possible. For instance, while viewing a movie you could select items or clothing used in the movie to be immediately purchased, all from the comfort of your home. With this future in mind, developers seek to enhance the interactive qualities of their media-based applications.
In this chapter you will learn how to play audio and video in an interactive way. Find your seats for Act III of JavaFX as audio and video take center stage as depicted in Figure 17-1.
Figure 17-1. Audio and video
17-1. Playing Audio
Problem
You want to listen to music and become entertained with a graphical visualization.
Solution
Create an MP3 player by utilizing the following classes:
javafx.scene.media.Mediajavafx.scene.media.MediaPlayerjavafx.scene.media.AudioSpectrumListener
The following source code is an implementation a of simple MP3 player:
package java7recipeschap17.org.java7recipes.chapter17.recipe17_01;


import java.io.File;

import java.util.Random;

import javafx.application.*;

import javafx.event.EventHandler;

import javafx.geometry.Point2D;

import javafx.scene.*;

import javafx.scene.input.*;

import javafx.scene.media.*;

import javafx.scene.paint.Color;

import javafx.scene.shape.*;

import javafx.scene.text.Text;

import javafx.stage.*;


/**

 * Playing Audio

 * @author cdea

 */

public class PlayingAudio extends Application {

    private MediaPlayer mediaPlayer;

    private Point2D anchorPt;

    private Point2D previousLocation;


    /**

     * @param args the command line arguments

     */

    public static void main(String[] args) {

        Application.launch(args);

    }
    @Override

    public void start(final Stage primaryStage) {

        primaryStage.setTitle("Chapter 17-1 Playing Audio");

        primaryStage.centerOnScreen();

        primaryStage.initStyle(StageStyle.TRANSPARENT);


        Group root = new Group();

        Scene scene = new Scene(root, 551, 270, Color.rgb(0, 0, 0, 0));


        // application area

        Rectangle applicationArea = RectangleBuilder.create()

                .arcWidth(20)

                .arcHeight(20)

                .fill(Color.rgb(0, 0, 0, .80))

                .x(0)

                .y(0)

                .strokeWidth(2)

                .stroke(Color.rgb(255, 255, 255, .70))

                .build();

        root.getChildren().add(applicationArea);

        applicationArea.widthProperty().bind(scene.widthProperty());

        applicationArea.heightProperty().bind(scene.heightProperty());


        final Group phaseNodes = new Group();

        root.getChildren().add(phaseNodes);


        // starting initial anchor point

        scene.setOnMousePressed(new EventHandler<MouseEvent>() {

            public void handle(MouseEvent event){

                anchorPt = new Point2D(event.getScreenX(), event.getScreenY());

            }

        });


        // dragging the entire stage

        scene.setOnMouseDragged(new EventHandler<MouseEvent>() {

            public void handle(MouseEvent event){

                if (anchorPt != null && previousLocation != null) {

                    primaryStage.setX(previousLocation.getX() + event.getScreenX() -

anchorPt.getX());

                    primaryStage.setY(previousLocation.getY() + event.getScreenY() -

anchorPt.getY());

                }

            }

        });


        // set the current location

        scene.setOnMouseReleased(new EventHandler<MouseEvent>() {

            public void handle(MouseEvent event){

                previousLocation = new Point2D(primaryStage.getX(), primaryStage.getY());

            }

        });
        // Dragging over surface

        scene.setOnDragOver(new EventHandler<DragEvent>() {

            @Override

            public void handle(DragEvent event) {

                Dragboard db = event.getDragboard();

                if (db.hasFiles()) {

                    event.acceptTransferModes(TransferMode.COPY);

                } else {

                    event.consume();

                }

            }

        });


        // Dropping over surface

        scene.setOnDragDropped(new EventHandler<DragEvent>() {


            @Override

            public void handle(DragEvent event) {

                Dragboard db = event.getDragboard();

                boolean success = false;

                if (db.hasFiles()) {

                    success = true;

                    String filePath = null;

                    for (File file:db.getFiles()) {

                        filePath = file.getAbsolutePath();

                        System.out.println(filePath);

                    }

                    // play file

                    Media media = new Media(new File(filePath).toURI().toString());


                    if (mediaPlayer != null) {

                        mediaPlayer.stop();

                    }


                    mediaPlayer = MediaPlayerBuilder.create()

                            .media(media)

                            .audioSpectrumListener(new AudioSpectrumListener() {

                        @Override

                        public void spectrumDataUpdate(double timestamp, double duration,

float[] magnitudes, float[] phases) {

                            phaseNodes.getChildren().clear();

                            int i = 0;

                            int x = 10;

                            int y = 150;

                            final Random rand = new Random(System.currentTimeMillis());

                            for(float phase:phases) {

                                int red = rand.nextInt(255);

                                int green = rand.nextInt(255);
                                int blue = rand.nextInt(255);


                                Circle circle = new Circle(10);

                                circle.setCenterX(x + i);

                                circle.setCenterY(y + (phase * 100));

                                circle.setFill(Color.rgb(red, green, blue, .70));

                                phaseNodes.getChildren().add(circle);

                                i+=5;

                            }

                        }

                    })

                    .build();


                    mediaPlayer.setOnReady(new Runnable() {

                        @Override

                        public void run() {

                            mediaPlayer.play();

                        }

                    });

                }


                event.setDropCompleted(success);

                event.consume();

            }

        }); // end of setOnDragDropped


        // create slide controls

        final Group buttonGroup = new Group();


        // rounded rect

        Rectangle buttonArea = RectangleBuilder.create()

                .arcWidth(15)

                .arcHeight(20)

                .fill(new Color(0, 0, 0, .55))

                .x(0)

                .y(0)

                .width(60)

                .height(30)

                .stroke(Color.rgb(255, 255, 255, .70))

                .build();


        buttonGroup.getChildren().add(buttonArea);

        // stop audio control

        Node stopButton = RectangleBuilder.create()

                .arcWidth(5)

                .arcHeight(5)

                .fill(Color.rgb(255, 255, 255, .80))

                .x(0)

                .y(0)

                .width(10)

                .height(10)
                .translateX(15)

                .translateY(10)

                .stroke(Color.rgb(255, 255, 255, .70))

                .build();


        stopButton.setOnMousePressed(new EventHandler<MouseEvent>() {

            public void handle(MouseEvent me) {

               if (mediaPlayer!= null) {

                mediaPlayer.stop();

               }

            }

        });

        buttonGroup.getChildren().add(stopButton);


        // play control

        final Node playButton = ArcBuilder.create()

                .type(ArcType.ROUND)

                .centerX(12)

                .centerY(16)

                .radiusX(15)

                .radiusY(15)

                .startAngle(180-30)

                .length(60)

                .fill(new Color(1,1,1, .90))

                .translateX(40)

                .build();

        playButton.setOnMousePressed(new EventHandler<MouseEvent>() {

            public void handle(MouseEvent me) {

                mediaPlayer.play();

            }

        });


        // pause control

        final Group pause = new Group();

        final Node pauseButton = CircleBuilder.create()

                .centerX(12)

                .centerY(16)

                .radius(10)

                .stroke(new Color(1,1,1, .90))

                .translateX(30)

                .build();

        final Node firstLine = LineBuilder.create()

                .startX(6)

                .startY(16 - 10)

                .endX(6)

                .endY(16 - 2)

                .strokeWidth(3)

                .translateX(34)

                .translateY(6)

                .stroke(new Color(1,1,1, .90))

                .build();
        final Node secondLine = LineBuilder.create()

                .startX(6)

                .startY(16 - 10)

                .endX(6)

                .endY(16 - 2)

                .strokeWidth(3)

                .translateX(38)

                .translateY(6)

                .stroke(new Color(1,1,1, .90))

                .build();

        pause.getChildren().addAll(pauseButton, firstLine, secondLine);


        pause.setOnMousePressed(new EventHandler<MouseEvent>() {

            public void handle(MouseEvent me) {

                if (mediaPlayer!=null) {

                    buttonGroup.getChildren().remove(pause);

                    buttonGroup.getChildren().add(playButton);

                    mediaPlayer.pause();

                }

            }

        });


        playButton.setOnMousePressed(new EventHandler<MouseEvent>() {

            public void handle(MouseEvent me) {

                if (mediaPlayer != null) {

                    buttonGroup.getChildren().remove(playButton);

                    buttonGroup.getChildren().add(pause);

                    mediaPlayer.play();

                }

            }

        });


        buttonGroup.getChildren().add(pause);

        // move button group when scene is resized

buttonGroup.translateXProperty().bind(scene.widthProperty().subtract(buttonArea.getWidth() +

6));


buttonGroup.translateYProperty().bind(scene.heightProperty().subtract(buttonArea.getHeight()

+ 6));

        root.getChildren().add(buttonGroup);


        // close button

        final Group closeApp = new Group();

        Node closeButton = CircleBuilder.create()

                .centerX(5)

                .centerY(0)

                .radius(7)

                .fill(Color.rgb(255, 255, 255, .80))

                .build();

        Node closeXmark = new Text(2, 4, "X");
        closeApp.translateXProperty().bind(scene.widthProperty().subtract(15));

        closeApp.setTranslateY(10);

        closeApp.getChildren().addAll(closeButton, closeXmark);

        closeApp.setOnMouseClicked(new EventHandler<MouseEvent>() {

            @Override

            public void handle(MouseEvent event) {

                Platform.exit();

            }

        });


        root.getChildren().add(closeApp);


        primaryStage.setScene(scene);

        primaryStage.show();

        previousLocation = new Point2D(primaryStage.getX(), primaryStage.getY());


    }

}
Figure 17-2 shows a JavaFX MP3 player with visualizations.
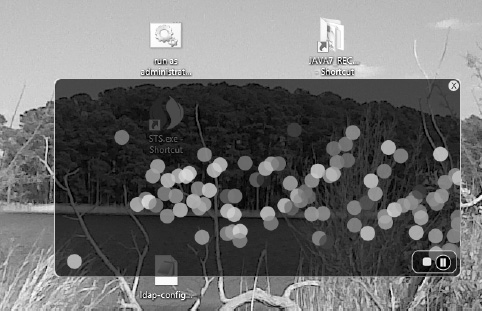
Figure 17-2. JavaFX MP3 player
How It Works
Before we get started, let's discuss the instructions on how to operate our MP3 player. A user will be able to drag and drop an audio file into the application area to be subsequently played. Located on the lower right of the application are buttons to stop, pause, and resume play of audio media. (The button controls are shown in Figure 17-2.) As the music is playing, the user will also notice randomly colored balls bouncing around to the music. Once the user is done with listening to music, he/she can quit the application by clicking the white rounded close button located in the upper-right corner.
It is similar to recipe 16-1, in which you learned how to use the drag-and-drop desktop metaphor to load files into a JavaFX application. Instead of image files, however, the user will be using audio files. To load audio files JavaFX currently supports the following file formats: .mp3, .wav, and .aiff.
Following the same look and feel, you will use the same style as recipe 16-1. In this recipe, I modified the button controls to resemble buttons, similar to many media player applications. When the pause button is pressed, it will pause the audio media from playing and toggle to the play button control, thus allowing the user to resume. As an added bonus, the MP3 player will appear as an irregular shaped, semitransparent window without borders that can also be dragged around the desktop using the mouse. Now that you know how to operate the music player, let's walk through the code.
First, you will create instance variables that will maintain state information for the lifetime of the application. Table 17-1 describes all instance variables used in our music player application. The first variable is a reference to a media player (MediaPlayer) object that will be created in conjunction with a Media object containing an audio file. Next, you will create an anchorPt variable used to save the starting coordinate of a mouse press when the user begins to drag the window across the screen. When calculating the upper-left bounds of the application window during a mouse-dragged operation, the previousLocation variable will contain the previous window's screen X and Y coordinates.
Table 17-1 lists the MP3 player application's instance variables:

In previous chapters relating to GUIs, you saw that GUI applications normally contain a title bar and windowed borders surrounding the Scene. Here, I wanted to raise the bar a little by showing you how to create irregularly shaped semitransparent windows, thus making things look more hip or modern. As you begin to create the media player, you'll notice in the start() method that we prepare the Stage object by initializing the style using StageStyle.TRANSPARENT. After we initialize the style to StageStyle.TRANSPARENT, the window will be undecorated, with the entire window area opaque set to zero (invisible). The following code shows how to create a transparent window without a title bar or windowed borders:
primaryStage.initStyle(StageStyle.TRANSPARENT);
With the invisible stage you will create a rounded rectangular region that will be the applications surface, or main content area. Next, you will notice the width and height of the rectangle bound to the scene object in case the window is resized. Because the window isn't going to be resized, the bind isn't necessary (it will be needed, however in recipe 17-2, when you get a chance to enlarge your video screen to take on a full screen mode).
After creating a black, semitransparent, rounded, rectangular area (applicationArea), you'll be creating a simple Group object to hold all the randomly colored Circle nodes that will show off graphical visualizations while the audio is being played. Later, you will see how the phaseNodes (Group) variable is updated based on sound information using an AudioSpectrumListener.
Next, you will be adding EventHandler<MouseEvent> instances to the Scene object to monitor mouse events as the user drags the window around the screen. The first event in this scenario is a mouse press, which will save the cursor's current (X, Y) coordinates to the variable anchorPt. The following code is adding an EventHandler to the mouse pressed property of the Scene:
        // starting initial anchor point

        scene.setOnMousePressed(new EventHandler<MouseEvent>() {

            public void handle(MouseEvent event){

                anchorPt = new Point2D(event.getScreenX(), event.getScreenY());

            }

        });
After implementing the mouse press event handler, you can create an EventHandler to the Scene's mouse-dragged property. The mouse–dragged event handler will update and position the application window (Stage) dynamically, based on the previous window's location (upper-left corner) along with the anchorPt variable. Shown here is an event handler responsible for the mouse-dragged event on the Scene object:
        // dragging the entire stage

        scene.setOnMouseDragged(new EventHandler<MouseEvent>() {

            public void handle(MouseEvent event){

                if (anchorPt != null && previousLocation != null) {

                    primaryStage.setX(previousLocation.getX() + event.getScreenX() -

anchorPt.getX());

                    primaryStage.setY(previousLocation.getY() + event.getScreenY() -

anchorPt.getY());

                }

            }

        });
You will want to handle the mouse-released event. Once the mouse is released, the event handler will update the previousLocation variable for subsequent mouse-dragged events to move the application window about the screen. The following code snippet updates the previousLocation variable:
        // set the current location

        scene.setOnMouseReleased(new EventHandler<MouseEvent>() {

            public void handle(MouseEvent event){

                previousLocation = new Point2D(primaryStage.getX(), primaryStage.getY());

            }

        });
Next, you will be implementing the drag-and-drop scenario to load the audio file from the file system (File manager). When handling a drag-and-drop scenario, it is similar to recipe 16-1, in which you created an EventHandler to handle DragEvents. Instead of loading image files we will be loading audio files from the host file system. For brevity, I will simply mention the code lines of the drag-and-dropped event handler. Once the audio file is available, you will create a Media object by passing in the file as a URI. The following code snippet is how to create a Media object:
Media media = new Media(new File(filePath).toURI().toString());
Once you have created a Media object you will have to create an instance of a MediaPlayer in order to play the sound file. Both the Media and MediaPlayer objects are immutable, which is why new instances of each will be created every time the user drags a file into the application. Next, you will check the instance variable mediaPlayer for a previous instance to make sure it is stopped before creating a new MediaPlayer instance. The following code checks for a prior media player to be stopped:
  if (mediaPlayer != null) {

    mediaPlayer.stop();

  }
So, here is where we create a MediaPlayer instance. For ease of coding you will be turning to the MediaPlayer's builder class MediaPlayerBuilder. A MediaPlayer object is responsible for controlling the playing of media objects. Notice that a MediaPlayer will treat sound or video media the same in terms of playing, pausing, and stopping media. When creating a media player using the MediaPlayerBuilder class, you will be specifying the media and audioSpectrumListener attribute methods. Setting the autoPlay attribute to true will play the audio media immediately after it has been loaded. The last thing to specify on the MediaPlayer instance is an AudioSpectrumListener. So, what exactly is this type of listener, you say? Well, according to the Javadocs, it states that it is an observer receiving periodic updates of the audio spectrum. In layman's terms, it is the audio media's sound data such as volume and tempo, and so on. To create an instance of an AudioSpectrumListener you will create an inner class overriding the method spectrumDataUpdate(). Table 17-2 lists all inbound parameters for the audio spectrum listener's method. For more details refer to the Javadocs at http://download.oracle.com/javafx/2.0/api/javafx/scene/media/AudioSpectrumListener.html.

Here, you will be creating randomly colored circle nodes to be positioned and placed on the scene based on the variable phases (array of floats). To draw each colored circle, you will be incrementing the circle's center X by 5 pixels and adding the circle's center Y with each phase value multiplied by 100. Shown here is the code snippet that plots each randomly colored circle:
        circle.setCenterX(x + i);

        circle.setCenterY(y + (phase * 100));

        ... // setting the circle

        i+=5;
Here is an inner class implementation of an AudioSpectrumListener:
        new AudioSpectrumListener() {

            @Override

            public void spectrumDataUpdate(double timestamp, double duration, float[]

magnitudes, float[] phases) {


               phaseNodes.getChildren().clear();
               int i = 0;

               int x = 10;

               int y = 150;

               final Random rand = new Random(System.currentTimeMillis());

               for(float phase:phases) {

                 int red = rand.nextInt(255);

                 int green = rand.nextInt(255);

                 int blue = rand.nextInt(255);


                 Circle circle = new Circle(10);

                 circle.setCenterX(x + i);

                 circle.setCenterY(y + (phase * 100));

                 circle.setFill(Color.rgb(red, green, blue, .70));

                 phaseNodes.getChildren().add(circle);

                 i+=5;

              }


           }

         };
Once the media player is created, you will create a java.lang.Runnable to be set into the onReady attribute to be invoked when the media is in a ready state. Once the ready event is realized the run() method will call the media player object's play() method to begin the audio. With the dragged-drop sequence completed, we appropriately notify the drag-and-drop system by invoking the event's setDropCompleted() method with a value of true. The following code snippet implements a Runnable to begin the media player as soon as the media player is in a ready state:
mediaPlayer.setOnReady(new Runnable() {

   @Override

   public void run() {

      mediaPlayer.play();

   }

});
Finally you will be creating buttons with JavaFX shapes to represent the stop, play, pause, and close buttons. When creating shapes or custom nodes, you can add event handlers to nodes in order to respond to mouse clicks. Although there are advanced ways to build custom controls in JavaFX, I chose to build my own button icons from simple rectangles, arcs, circles and lines. To see more-advanced ways to create custom controls, refer to the Javadocs on the Skinnable API or recipe 16-5. To attach event handlers for a mouse press, simply call the setOnMousePress() method by passing in an EventHandler<MouseEvent> instance. The following code demonstrates adding an EventHandler to respond to mouse press on the stopButton node:
        stopButton.setOnMousePressed(new EventHandler<MouseEvent>() {

            public void handle(MouseEvent me) {

               if (mediaPlayer!= null) {

                 mediaPlayer.stop();

               }

            }

        });
Because all the buttons use the same preceding code snippet, I will only list the method calls that each button will perform on the media player. The last button, Close, isn't related to the media player, but it is how to exit the MP3 player application. The following actions are responsible for stopping, pausing, playing, and exiting the MP3 player application:
Stop - mediaPlayer.stop();

Pause - mediaPlayer.pause();

Play - mediaPlayer.play();

Close - Platform.exit();
17-2. Playing Video
Problem
You want to view a video file complete with controls to play, pause, stop, and seek.
Solution
Create a video media player by utilizing the following classes:
javafx.scene.media.Mediajavafx.scene.media.MediaPlayerjavafx.scene.media.MediaView
The following code is an implementation of a JavaFX basic video player:
public void start(final Stage primaryStage) {

    primaryStage.setTitle("Chapter 17-2 Playing Video");

    ... setting up the stage


    // rounded rectangle with slightly transparent

    Node applicationArea = createBackground(scene);

    root.getChildren().add(applicationArea);


    // allow the user to drag window on the desktop

    attachMouseEvents(scene, primaryStage);


    // allows the user to see the progress of the video playing

    progressSlider = createSlider(scene);

    root.getChildren().add(progressSlider);


    // Dragging over surface

    scene.setOnDragOver(… Drag Over code );


    // update slider as video is progressing (later removal)

    progressListener = new ChangeListener<Duration>() {
        public void changed(ObservableValue<? extends Duration> observable, Duration

oldValue, Duration newValue) {

            progressSlider.setValue(newValue.toSeconds());

        }

    };


    // Dropping over surface

    scene.setOnDragDropped(new EventHandler<DragEvent>() {


        @Override

        public void handle(DragEvent event) {

            Dragboard db = event.getDragboard();

            boolean success = false;

            URI resourceUrlOrFile = null;


            … // detect and obtain media file


            // load media

            Media media = new Media(resourceUrlOrFile.toString());


            // stop previous media player and clean up

            if (mediaPlayer != null) {

                mediaPlayer.stop();

                mediaPlayer.currentTimeProperty().removeListener(progressListener);

                mediaPlayer.setOnPaused(null);

                mediaPlayer.setOnPlaying(null);

                mediaPlayer.setOnReady(null);

            }


            // create a new media player

            mediaPlayer = MediaPlayerBuilder.create()

                    .media(media)

                    .build();


            // as the media is playing move the slider for progress

            mediaPlayer.currentTimeProperty().addListener(progressListener);


            // play video when ready status

            mediaPlayer.setOnReady(new Runnable() {

                @Override

                public void run() {

                   progressSlider.setValue(1);

progressSlider.setMax(mediaPlayer.getMedia().getDuration().toMillis()/1000);

                   mediaPlayer.play();

                }

            });


            // Lazy init media viewer

            if (mediaView == null) {
                mediaView = MediaViewBuilder.create()

                        .mediaPlayer(mediaPlayer)

                        .x(4)

                        .y(4)

                        .preserveRatio(true)

                        .opacity(.85)

                        .smooth(true)

                        .build();


mediaView.fitWidthProperty().bind(scene.widthProperty().subtract(220));

mediaView.fitHeightProperty().bind(scene.heightProperty().subtract(30));


                // make media view as the second node on the scene.

                root.getChildren().add(1, mediaView);

            }


            // sometimes loading errors occur

            mediaView.setOnError(new EventHandler<MediaErrorEvent>() {

                public void handle(MediaErrorEvent event) {

                    event.getMediaError().printStackTrace();

                }

            });


            mediaView.setMediaPlayer(mediaPlayer);


            event.setDropCompleted(success);

            event.consume();

        }

    });


    // rectangular area holding buttons

    final Group buttonArea = createButtonArea(scene);


    // stop button will stop and rewind the media

    Node stopButton = createStopControl();


    // play button can resume or start a media

    final Node playButton = createPlayControl();


    // pauses media play

    final Node pauseButton = createPauseControl();


    stopButton.setOnMousePressed(new EventHandler<MouseEvent>() {

        public void handle(MouseEvent me) {

            if (mediaPlayer!= null) {

                buttonArea.getChildren().removeAll(pauseButton, playButton);

                buttonArea.getChildren().add(playButton);

                mediaPlayer.stop();

            }

        }

    });
    // pause media and swap button with play button

    pauseButton.setOnMousePressed(new EventHandler<MouseEvent>() {

        public void handle(MouseEvent me) {

            if (mediaPlayer!=null) {

                buttonArea.getChildren().removeAll(pauseButton, playButton);

                buttonArea.getChildren().add(playButton);

                mediaPlayer.pause();

                paused = true;

            }

        }

    });


    // play media and swap button with pause button

    playButton.setOnMousePressed(new EventHandler<MouseEvent>() {

        public void handle(MouseEvent me) {

            if (mediaPlayer != null) {

                buttonArea.getChildren().removeAll(pauseButton, playButton);

                buttonArea.getChildren().add(pauseButton);

                paused = false;

                mediaPlayer.play();

            }

        }

    });


    // add stop button to button area

    buttonArea.getChildren().add(stopButton);


    // set pause button as default

    buttonArea.getChildren().add(pauseButton);


    // add buttons

    root.getChildren().add(buttonArea);


    // create a close button

    Node closeButton= createCloseButton(scene);

    root.getChildren().add(closeButton);


    primaryStage.setOnShown(new EventHandler<WindowEvent>() {

        public void handle(WindowEvent we) {

            previousLocation = new Point2D(primaryStage.getX(),

primaryStage.getY());

        }

    });


    primaryStage.setScene(scene);

    primaryStage.show();


}
Following is our attachMouseEvents() method that adds an EventHandler to the Scene to provide the ability to make the video player go into full screen mode.
    private void attachMouseEvents(Scene scene, final Stage primaryStage) {


        // Full screen toggle

        scene.setOnMouseClicked(new EventHandler<MouseEvent>() {

            public void handle(MouseEvent event){

                if (event.getClickCount() == 2) {

                    primaryStage.setFullScreen(!primaryStage.isFullScreen());

                }

            }

        });

        ... // the rest of the EventHandlers

    }
The following code is a method that creates a slider control with a ChangeListener to enable the user to seek backward and forward through the video:
    private Slider createSlider(Scene scene) {

        Slider slider = SliderBuilder.create()

                .min(0)

                .max(100)

                .value(1)

                .showTickLabels(true)

                .showTickMarks(true)

                .build();


        slider.valueProperty().addListener(new ChangeListener<Number>() {

            public void changed(ObservableValue<? extends Number> observable, Number

oldValue, Number newValue) {

                if (paused) {

                    long dur = newValue.intValue() * 1000;

                    mediaPlayer.seek(new Duration(dur));

                }

            }

        });

        slider.translateYProperty().bind(scene.heightProperty().subtract(30));

        return slider;

    }
Figure 17-3 depicts a JavaFX basic video player with a slider control.
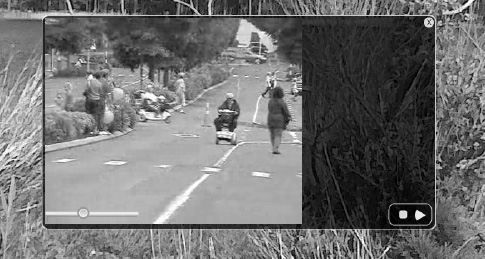
Figure 17-3. JavaFX basic video player
How It Works
To create a video player you will model the application similar to recipe 17-1 by reusing the same application features such as drag-and-drop files, media button controls, and so on. For the sake of clarity, I took the previous recipe and moved much of the UI code into convenience functions so you will be able to focus on the Media APIs without getting lost in the UI code. The rest of the recipes in this chapter consist of adding simple features to the JavaFX basic media player created in this recipe. This being said, the code snippets in the following recipes will be brief, consisting of the necessary code needed for each new desired feature.
Before we begin, I want to talk about media formats. As of the writing of this book. JavaFX 2.0 supports a cross-platform video format called VP6 with a file extension of .flv (which stands for the popular Adobe Flash Video format). The actual encoder and decoder (Codec) to create VP6 and .flv files are licensed through a company called On2. In 2009, On2 was acquired by Google to build VP7 and VP8 to be open and free to advance HTML5. I don't want to confuse you with the drama, but it is difficult to see how things will unfold as media formats become favored or considered obsolete. Because JavaFX's goal is to be cross-platform, it would seem logical to use the most popular codec on the Net, but you will be forced to obtain a license to encode your videos into the VP6 .flv file format. So the bottom line is that JavaFX currently can only play video files that are encoded in VP6. (I try to keep in mind that this is the state of media formats today, so don't channel any frustrations toward the JavaFX SDK.) Please refer to the Javadoc API for more details on the formats to be used. A word to the wise: beware of web sites claiming to be able to convert videos for free. As of this writing, the only encoders capable of encoding video to VP6 legally are the commercial converters from Adobe and Wildform (http://www.wildform.com).
Now, that you know what is the acceptable file format you are probably wondering how to obtain such a file of this type if you don't have encoding software. If you don't have an .flv file lying around, you can obtain one from one of my favorite sites called the Media College (http://www.mediacollege.com). From photography to movies, Media College provides forums, tutorials, and resources that help guide you into the world of media. There you will obtain a particular media file to be used in the remaining recipes in this chapter. To obtain the .flv file you will navigate to the following URL: http://www.mediacollege.com/adobe/flash/video/tutorial/example-flv.html.
Next, you will locate the link entitled Windy 50s Mobility Scooter Race that points to our .flv media file (20051210-w50s.flv). In order to download a link consisting of a file, right-click to select “Save target as” or “Save link as”. Once you have saved the file locally on your file system, you can drag the file into the media player application to begin the demo.
![]() Note As of the writing of this book, the JavaFX media player API currently supports the video format VP6 using an
Note As of the writing of this book, the JavaFX media player API currently supports the video format VP6 using an .flv container.
Just like the audio player created in the last recipe, our JavaFX basic video player has the same basic media controls, including stop, pause, and play. In addition to these simple controls we have added new capabilities such as seeking and full screen mode.
When playing a video you'll need a view area (javafx.scene.media.MediaView) to show the video. You will also be creating a slider control to monitor the progress of the video, which is located at the lower left of the application shown in Figure 17-3. The slider control allows the user to seek backward and forward through the video. The ability to seek will work only if the video is paused. One last bonus feature is making the video become full screen by double-clicking the application window. To restore the window, repeat the double click or press Escape.
To quickly get started, let's jump into the code. After setting up the stage in the start() method, you will create a black semitransparent background by calling the createBackground() method (applicationArea). Next, you will be invoking the attachMouseEvents() method to wire up all the EventHandlers into the scene that will enable the user to drag the application window about the desktop. Another EventHandler to be attached to the Scene will allow the user to switch to full screen mode. To make a window turn into full screen mode, you will create a conditional to check for the double click of the application window. Once the double-click is performed you will call the Stage's method setFullScreen() with a Boolean value opposite of the currently set value. Shown here is how to make a window go to full screen mode:
        // Full screen toggle

        scene.setOnMouseClicked(new EventHandler<MouseEvent>() {

            public void handle(MouseEvent event){

                if (event.getClickCount() == 2) {

                    primaryStage.setFullScreen(!primaryStage.isFullScreen());

                }

            }

        });
As we continue our steps inside the start() method, you will create a slider control by calling the convenience method createSlider(). The createSlider() method will instantiate a Slider control and add a ChangeListener to move the slider as the video is playing. The ChangeListener's changed() method is invoked any time the slider's value changes. Once the changed() method is invoked you will have an opportunity to see the old value and the new value. The following code creates a ChangeListener to update the slider as the video is being played:
    // update slider as video is progressing (later removal)

    progressListener = new ChangeListener<Duration>() {
        public void changed(ObservableValue<? extends Duration> observable, Duration

oldValue, Duration newValue) {

            progressSlider.setValue(newValue.toSeconds());

        }

    };
After creating the progress listener (progressListener), you will be creating the dragged-dropped EventHandler on the Scene.
The goal is to determine whether the pause button was pressed before the user can move the slider. Once a paused flag is determined, you will obtain the new value to be converted to milliseconds. The dur variable is used to move the mediaPlayer to seek the position into the video as the user slides the control left or right. The ChangeListener's changed() method is invoked any time the slider's value changes. The following code is responsible for moving the seek position into the video based on the user moving the slider.
slider.valueProperty().addListener(new ChangeListener<Number>() {

   public void changed(ObservableValue<? extends Number> observable, Number oldValue, Number

newValue) {

                if (paused) {

                    long dur = newValue.intValue() * 1000;

                    mediaPlayer.seek(new Duration(dur));

                }

            }

        });
Moving right along, you will be implementing a drag-dropped EventHandler to handle the .flv media file being dropped into the application window area. Here you'll first check to see whether there was a previous mediaPlayer. If so, you will stop the previous mediaPlayer object and do some cleanup:
        // stop previous media player and clean up

        if (mediaPlayer != null) {

           mediaPlayer.stop();

           mediaPlayer.currentTimeProperty().removeListener(progressListener);

           mediaPlayer.setOnPaused(null);

           mediaPlayer.setOnPlaying(null);

           mediaPlayer.setOnReady(null);

        }


        // play video when ready status

        mediaPlayer.setOnReady(new Runnable() {

            @Override

            public void run() {

               progressSlider.setValue(1);


        progressSlider.setMax(mediaPlayer.getMedia().getDuration().toMillis()/1000);

           mediaPlayer.play();

        }

    }); // setOnReady()
As with the audio player, we create a Runnable instance to be run when the media player is in a ready state. You'll notice also that the progressSlider control being set up to use values in seconds.
Once the media player object is in a ready state you will be creating a MediaView instance to display the media. Shown following is the creation of a MediaView object to be put into the scene graph to display video content:
            // Lazy init media viewer

            if (mediaView == null) {

                mediaView = MediaViewBuilder.create()

                        .mediaPlayer(mediaPlayer)

                        .x(4)

                        .y(4)

                        .preserveRatio(true)

                        .opacity(.85)

                        .build();


                mediaView.fitWidthProperty().bind(scene.widthProperty().subtract(220));


                mediaView.fitHeightProperty().bind(scene.heightProperty().subtract(30));


                        // make media view as the second node on the scene.

                        root.getChildren().add(1, mediaView);

                    }


                   // sometimes loading errors occur

                   mediaView.setOnError(new EventHandler<MediaErrorEvent>() {

                       public void handle(MediaErrorEvent event) {

                           event.getMediaError().printStackTrace();

                       }

                   });


                   mediaView.setMediaPlayer(mediaPlayer);

                   event.setDropCompleted(success);

                   event.consume();

                }

            });
Whew! We are finally finished with our drag-dropped EventHandler for our Scene. Up next is pretty much the rest of the media button controls similar to the end of recipe 17-1. The only thing different is a single instance variable named paused of type boolean that denotes whether the video was paused. This paused flag when set to true will allow the slider control to seek forward or backward through the video; otherwise false. Following is the pauseButton and playButton controlling the mediaPlayer object and setting the paused flag accordingly:
// pause media and swap button with play button

pauseButton.setOnMousePressed(new EventHandler<MouseEvent>() {

    public void handle(MouseEvent me) {

        if (mediaPlayer!=null) {

            buttonArea.getChildren().removeAll(pauseButton, playButton);

            buttonArea.getChildren().add(playButton);
            mediaPlayer.pause();

            paused = true;

        }

    }

});


// play media and swap button with pause button

playButton.setOnMousePressed(new EventHandler<MouseEvent>() {

    public void handle(MouseEvent me) {

        if (mediaPlayer != null) {

            buttonArea.getChildren().removeAll(pauseButton, playButton);

            buttonArea.getChildren().add(pauseButton);

            paused = false;

            mediaPlayer.play();

        }

    }

});
So that is how to create a video media player. In the next recipe, you will be able to listen to media events and invoke actions.
17-3. Controlling Media Actions and Events
Problem
You want the media player to provide feedback in response to certain events. An example is displaying the text “Paused” on the screen when the media player's paused event is triggered.
Solution
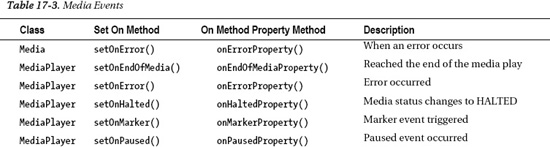
You can use many media event handler methods. Shown in Table 17-3 are all the possible media events that are raised to allow the developer to attach EventHandlers or Runnables.

The following code will present to the user a text “Paused” with “Duration” with a decimal of milliseconds which is overlaid on top of the video when the user clicks the pause button (see Figure 17-4):
   // when paused event display pause message

   mediaPlayer.setOnPaused(new Runnable() {

     @Override

     public void run() {

        pauseMessage.setText("Paused
Duration: " +

mediaPlayer.currentTimeProperty().getValue().toMillis());

        pauseMessage.setOpacity(.90);


    }

  });
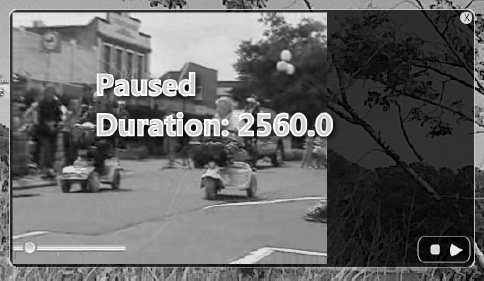
Figure 17-4. Paused event
How It Works
An event driven architecture (EDA) is a prominent architectural pattern used to model loosely coupled components and services that pass messages asynchronously. The JavaFX team has designed the Media API to be event driven. This recipe will demonstrate how to implement in response to media events.
With event-based programming in mind, you will discover nonblocking or callback behaviors when invoking functions. In this recipe you will implement the display of text in response to an onPaused event instead of placing your code into the pause button. Instead of tying code directly to a button via an EventHandler, you will be implementing code that will respond to the media player's onPaused event being triggered. When responding to media events, you will be implementing java.lang.Runnables.
You'll be happy to know that you've been using event properties and implementing Runnables all along. Hopefully you noticed this in all the recipes in this chapter. When the media player is in a ready state, the Runnable code will be invoked. Why is this correct? Well, when the media player is finished loading the media, the onReady property will be notified. That way you can be sure you can invoke the MediaPlayer's play() method. I trust that you will get used to event style programming. The following code snippet demonstrates the setting of a Runnable instance into a media player object's OnReady property:
    mediaPlayer.setOnReady(new Runnable() {

        @Override

        public void run() {

            mediaPlayer.play();

        }

    });
You will be taking steps similar to the onReady property. Once a Paused event has been triggered, the run() method will be invoked to present to the user a message containing a Text node with the word Paused and a duration showing the time in milliseconds into the video. Once displayed, you might want to write down the duration as markers (as you'll learn recipe 17-4). The following code snippet shows an attached Runnable instance, which is responsible for displaying a paused message and duration in milliseconds at the point in which it was paused in the video:
  // when paused event display pause message

  mediaPlayer.setOnPaused(new Runnable() {

     @Override

     public void run() {

        pauseMessage.setText("Paused
Duration: " + mediaPlayer.currentTimeProperty().getValue().toMillis());

        pauseMessage.setOpacity(.90);


    }

  });
17-4. Marking a Position in a Video
Problem
You want to provide closed caption text while playing a video in the media player.
Solution
Begin by applying recipe 17-3. By obtaining the marked durations (in milliseconds) from the previous recipe you will create media marker events at points into the video. With each media marker you will associate text that will be displayed as closed captions. When a marker comes to pass, a text will be shown to the upper-right side.
The following code snippet demonstrates media marker events being handled in the onDragDropped event property of the Scene object:
... // inside the start() method


final VBox messageArea = createClosedCaptionArea(scene);

root.getChildren().add(messageArea);


// Dropping over surface

scene.setOnDragDropped(new EventHandler<DragEvent>() {


    @Override

    public void handle(DragEvent event) {

        Dragboard db = event.getDragboard();


        ... // drag dropped code goes here


        // load media

        Media media = new Media(resourceUrlOrFile.toString());


        ... // clean up media player


        // create a new media player

        mediaPlayer = MediaPlayerBuilder.create()

                .media(media)

                .build();


        ...// Set media 'onXXX' event properties


        mediaView.setMediaPlayer(mediaPlayer);


        media.getMarkers().put("Starting race", Duration.millis(1959.183673));

        media.getMarkers().put("He is begining
to get ahead",

Duration.millis(3395.918367));

        media.getMarkers().put("They are turning
the corner",

Duration.millis(6060.408163));

        media.getMarkers().put("The crowds cheer", Duration.millis(9064.489795));

        media.getMarkers().put("He makes the
finish line", Duration.millis(11546.122448));


        // display closed captions

        mediaPlayer.setOnMarker(new EventHandler<MediaMarkerEvent> (){

            public void handle(MediaMarkerEvent event){

                closedCaption.setText(event.getMarker().getKey());
            }

        });


        event.setDropCompleted(success);

        event.consume();

    }

}); // end of setOnDragDropped()
Shown following is a factory method that returns an area that will contain the closed caption to be displayed to the right of the video:
    private VBox createClosedCaptionArea(final Scene scene) {

        // create message area

        final VBox messageArea = new VBox(3);

        messageArea.setTranslateY(30);

        messageArea.translateXProperty().bind(scene.widthProperty().subtract(152) );

        messageArea.setTranslateY(20);

        closedCaption = TextBuilder.create()

            .stroke(Color.WHITE)

            .fill(Color.YELLOW)

            .font(new Font(15))

            .build();

        messageArea.getChildren().add(closedCaption);

        return messageArea;

    }
Figure 17-5 depicts the video media player displaying closed caption text.

Figure 17-5. Closed caption text
How It Works
The Media API has many event properties that the developer can attach EventHanders or Runnables instances so they can respond when the events are triggered. Here you focus on the OnMarker event property. The Marker property is responsible for receiving marker events (MediaMarkerEvent).
Let's begin by adding markers into our Media object. It contains a method getMarkers() that returns an javafx.collections.ObservableMap<String, Duration>. With an observable map, you can add key value pairs that represent each marker. Adding keys should be a unique identifier, and the value is an instance of Duration. For simplicity I used the closed caption text as the key for each media marker. The marker durations are those written down as you press the pause button at points in the video from recipe 17-3. Please be advised that I don't recommend doing this in production code. You may want to use a parallel Map.
After adding markers you will be setting an EventHandler into the MediaPlayer object's OnMarker property using the setOnMarker() method. Next, you will create the EventHandler instance to handle MediaMarkerEvents that are raised. Once an event has been received, obtain the key representing the text to be used in the closed caption. The instance variable closedCaption (javafx.scene.text.Text node) will simply be shown by calling the setText() method with the key or string associated to a marker.
That's it for media markers. That goes to show you how you can coordinate special effects, animations, and so on during a video quite easily.
17-5. Synchronizing Animation and Media
Problem
You want to incorporate animated effects in your media display such as scrolling text “The End” after the video is finished playing.
Solution
Use recipe 17-3 together with recipe 16-2. In recipe 17-3 response to media events and recipe 16-2 demonstrates how to use translate transition to animate text.
The following code demonstrates an attached action when an end of a media event is triggered:
mediaPlayer.setOnEndOfMedia(new Runnable() {

   @Override

   public void run() {

      closedCaption.setText("");

      animateTheEnd.getNode().setOpacity(.90);

      animateTheEnd.playFromStart();

   }

});
Shown here is a method that creates a translateTransition of a Text node containing the string “The End” that animates after an end of media event is triggered:
    public TranslateTransition createTheEnd(Scene scene) {

        Text theEnd = TextBuilder.create()
           .text("The End")

           .font(new Font(40))

           .strokeWidth(3)

           .fill(Color.WHITE)

           .stroke(Color.WHITE)

           .x(75)

           .build();


        TranslateTransition scrollUp = TranslateTransitionBuilder.create()

            .node(theEnd)

            .duration(Duration.seconds(1))

            .interpolator(Interpolator.EASE_IN)

            .fromY(scene.getHeight() + 40)

            .toY(scene.getHeight()/2)

            .build();

        return scrollUp;

    }
Figure 17-6 depicts the text node “The End” scrolling up after the OnEndOfMedia event is triggered.
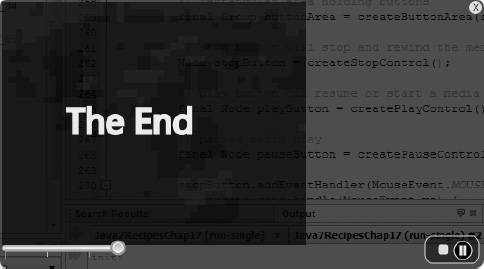
Figure 17-6. Animate The End
How It Works
In this recipe you will be able to synchronize events to animated effects. In other words, when the video reaches the end, an OnEndOfMedia property event will initiate a Runnable instance. Once initiated, a TranslateTransition animation is performed by scrolling a Text node upward with the string “The End”.
So, let me describe the setOnEndOfMedia() method associated with the MediaPlayer object. Just like recipe 17-3, we simply call the setOnEndOfMedia() method by passing in a Runnable that contains our code that will invoke an animation. If you don't know how animation works, please refer to recipe 16-2. Once the event occurs, you will see the text scroll upward. The following code snippet is from inside the scene.setOnDragDropped() method:
   mediaPlayer.setOnEndOfMedia(new Runnable() {

      @Override

      public void run() {

         closedCaption.setText("");

         animateTheEnd.getNode().setOpacity(.90);

         animateTheEnd.playFromStart();

      }

   });
For the sake of space, I trust you know where the code block would reside. If not, you may refer to recipe 17-3, in which you will notice other OnXXX properties methods. To see the entire code listing, visit the book's web site to download the source code.
To animate the text “The End” you will create a convenience createTheEnd() method to create an instance of a Text node and return a TranslateTransition object to the caller. The TranslateTransition returned will do the following: wait a second before playing video. Next is the interpolator in which I used the Interpolator.EASE_IN to move the Text node by easing in before a full stop. Last is setting up the Y property of the node to move from the bottom to the center of the Media view area.
The following code is an animation to scroll a node in an upward motion:
TranslateTransition scrollUp = TranslateTransitionBuilder.create()

            .node(theEnd)

            .duration(Duration.seconds(1))

            .interpolator(Interpolator.EASE_IN)

            .fromY(scene.getHeight() + 40)

            .toY(scene.getHeight()/2)

            .build();