
C H A P T E R 12
![]()
Java 2D Graphics
To put things simply, Java 2D is an API to render two-dimensional graphics on surfaces such as computer screens, printers, and devices. This powerful API allows you to do things such as drawing geometric shapes, image processing, alpha compositing (combining images), text font rendering, antialiasing, clipping, creating transformations, stroking, filling, and printing.
Breaking news! When giving news I'm sure you've heard people say, “I've got good news and bad news". Well, in the case of Java 2D, it is good news and more good news. First, the Java 2D API has virtually been unchanged since its major release (Java 2), which is a testament to good design. Now for more good news, new to Java 7 is that the 2D API is getting a new graphics pipeline called XRender. XRender will have access to hardware accelerated features on systems with modern graphics processing units (GPUs). This is great news to many existing Java applications that use Java 2D already because they will gain excellent rendering performance without changing any code. Things can only get better as the major players get onboard with the Open JDK initiative.
Helper Class for This Chapter
This chapter will familiarize you with recipes pertaining to Java's 2D APIs. Regarding the 2D API, you will notice that most recipes will rely on a utility helper class to launch an application window to display the examples. Shown below is the utility helper class SimpleAppLauncher.java which will utilize a javax.swing.JComponent object as a drawing surface to be displayed in an application window (javax.swing.JFrame).
![]() Note For more on the latest Java 7 features including XRender, see OpenJDK
Note For more on the latest Java 7 features including XRender, see OpenJDK http://openjdk.java.net/projects/jdk7/features (Oracle Corporation, 2011).
package org.java7recipes.chapter12;


import java.awt.BorderLayout;

import java.awt.Component;

import java.awt.Dimension;

import java.awt.Toolkit;

import java.awt.event.ComponentAdapter;
import java.awt.event.ComponentEvent;

import javax.swing.JComponent;

import javax.swing.JFrame;

import javax.swing.SwingUtilities;


/**

 * SimpleAppLauncher will create a window and display a component and

 * abide by the event dispatch thread rules.

 *

 * @author cdea

 */

public class SimpleAppLauncher {

    /**

     * @param title the Chapter and recipe.

     * @param canvas the drawing surface.

     */

    protected static void displayGUI(final String title, final JComponent component) {


        // create window with title

        final JFrame frame = new JFrame(title);

        if (component instanceof AppSetup) {

            AppSetup ms = (AppSetup) component;

            ms.apply(frame);

        }


        // set window's close button to exit application

        frame.setDefaultCloseOperation(JFrame.EXIT_ON_CLOSE);


        component.addComponentListener(new ComponentAdapter() {

            // This method is called after the component's size changes

            public void componentResized(ComponentEvent evt) {

               Component c = (Component)evt.getSource();


               // Get new size

               Dimension newSize = c.getSize();

               System.out.println("component size w,h = " + newSize.getWidth() + ", " +

               newSize.getHeight());

            }

        });


        // place component in the center using BorderLayout

        frame.getContentPane().add(component, BorderLayout.CENTER);


        // size window based on layout

        frame.pack();


        // center window

        Dimension scrnSize = Toolkit.getDefaultToolkit().getScreenSize();

        int scrnWidth = frame.getSize().width;

        int scrnHeight = frame.getSize().height;
        int x = (scrnSize.width - scrnWidth) / 2;

        int y = (scrnSize.height - scrnHeight) / 2;


        // Move the window

        frame.setLocation(x, y);


        // display

        frame.setVisible(true);

    }


    public static void launch(final String title, final JComponent component) {


        SwingUtilities.invokeLater(new Runnable() {

            public void run() {

                displayGUI(title, component);

            }

        });// invokeLater()

    }// launch()

} // SimpleAppLauncher
This helper class allows you to focus on the actual recipe solution without having to see the application's launching and displaying details. All recipes are individual Java applications with a main() method and most will call out to the helper class (SimpleAppLauncher) to display its graphics in a window (javax.swing.JFrame) while adhering to thread safety. Here is an example of launching a Chapter 12 recipe 2 within its main() method:
    DrawLines c = new DrawLines();

    c.setPreferredSize(new Dimension(272, 227));

    SimpleAppLauncher.launch("Chapter 12-2 Draw Lines", c);
Most of the recipes in this chapter extend the JComponent class and also containing a main() method that calls out to the SimpleAppLauncher.launch() method. The launch() method will then call displayGUI() via Java Swing's SwingUtilities.invokeLater() method. This ensures that graphics rendering will happen on the event dispatching thread. This code will display your GUI in a threadsafe manner using Swing's invokeLater():
    SwingUtilities.invokeLater(new Runnable() {

       public void run() {

          displayGUI(title, component);

       }

    });
The SimpleAppLauncher class uses Java's Swing API, a lightweight windowing toolkit (see Chapter 14). Most recipes here will use many graphics primitives to draw on Swing's javax.swing.JComponent component. The javax.swing.JComponent class contains a method called paintComponent(Graphics graphics), which is where all the painting happens (actually where all the drawing happens). The method is triggered every time something obscures the drawing surface or when the window (javax.swing.JFrame) containing the component is resized.
The Graphics object (system generated) that is passed into the paintComponent() method is the heart of Java 2D API and Swing API. It is the workhorse responsible for rendering all the pixels that we see on the screen today. (To learn more about how to create GUIs or run Swing-based applications, please see recipes 14-1 and 14-2. To learn how to execute a Java program with passed-in arguments via the command line or terminal, please see recipe 1-4.)
Next, you will be looking at recipes that will help you understand the Java 2D API basics such as creating points, drawing lines, drawing shapes, and painting colors.
![]() Note For more on painting using Java's Swing, see the web article Painting in AWT and Swing, by Amy Fowler at
Note For more on painting using Java's Swing, see the web article Painting in AWT and Swing, by Amy Fowler at http://java.sun.com/products/jfc/tsc/articles/painting (Oracle Corporation, 1999)
12-1. Creating Points
Problem
You want to create points that are similar to points on a Cartesian coordinate system.
Solution
Use Java's java.awt.geom.Point2D class to represent an ordered pair (x, y).The x denotes a positive or negative number on the x-axis and the y denotes a positive or negative number on the y-axis. In Java there are three subclasses that can represent points: Point2D.Double, Point2D.Float, and java.awt.Point classes. All three extend from the class java.awt.geom.Point2D. By using the correct constructor your points can maintain different number types with integer or decimal precision. Following is the source code that uses the three Point2D subclasses:
package org.java7recipes.chapter12.recipe12_01;


import java.awt.Point;

import java.awt.geom.Point2D;


public class CreatePoints {

    public static void main(String[] args) {

        Point2D pointA = new Point2D.Double(2.555555555555555, 3.7777777777777777);

        Point2D.Float pointB = new Point2D.Float(11.555555555555555555555555555f, 10.2f);

        Point pointC = new Point(100, 100);


        System.out.println("pointA = " + pointA.getX() + ", " + pointA.getY());

        System.out.println("pointB = " + pointB.x      + ", " + pointB.y);

        System.out.println("pointC = " + pointC.x      + ", " + pointC.y);

    }

}
Shown below is the output from the program above:
pointA = 2.555555555555555, 3.7777777777777777

pointB = 11.555555, 10.2

pointC = 100, 100
How It Works
When using any of the three Point2D subclasses, keep in mind that the methods getX() and getY() in all cases will return a double precision number. The derived class Point2D.Float will allow the user of the API to access public instance variables x and y that will hold values of type float; while the java.awt.Point class will also have public instance variables, but hold values of type int. When looking at pointB, you'll notice that its class is declared oddly (with a dot between two types), that's because Point2D.Float is an inner class owned by Point2D. Shown following are the three Point2D subclasses:
   Point2D.Double(double x, double y)

   Point2D.Float(double x, float y)

   Point(int x, int y)
You may be wondering why the variable "pointC" (an instance of java.awt.Point) does not begin with java.awt.geom.*. Well, a long time ago before the 2D API, the class was part of the original Java 1.0 AWT API, which only stored values as integers. Keep in mind that the values can be positive or negative in order to represent points in a Cartesian coordinate system also called user space.
Now that you know what kind of values are able to be stored you will want to plot or use points to draw lines, shapes, and so on. It is important to know how to draw on a computer screen (also known as the device space). The device space is the physical surface in which drawing will take place. Figure 12-1 shows the device space and the output from this recipe's code.
You may be wondering how to plot things onto the surface using points similar to a Cartesian graph or user space. Because many devices vary in size, the 2D API is set up where the origin at coordinate (0, 0) is located at the far upper-left corner of the screen. The x-coordinate values on the x-axis are positive values that increase from zero to the width of the device (as in user space). However, the y-coordinate is different from a Cartesian system. The coordinate's values are also positive, but increase in a downward direction to the bottom of the screen (opposite of user space). In other words, all visible pixels on the device surface are positive values, including zero for (x, y) in device space. Your x and y values can be negative values, but those pixels won't be displayed on the screen. Shown in Figure 12-1 are shapes drawn on the device space.

Figure 12-1. Device space
Since these objects represent points similar to Euclidean geometry, the 2D API also has other methods such as determining the distance between two points. See java.awt.geom.Point2D in the Javadoc for more details.
![]() Note A point is not a pixel. Points represent x- and y-coordinates in user space. By definition, points do not have size nor color, so Java does not have a method such as
Note A point is not a pixel. Points represent x- and y-coordinates in user space. By definition, points do not have size nor color, so Java does not have a method such as drawPoint(). To draw a pixel, you can use the java.awt.Graphics class and its drawLine(int x1, int y1, int x2, int y2) method with a starting and ending point being the same coordinates; for example, drawLine(10,15,10,15). See DrawPixels.java.
12-2. Drawing Lines
Problem
You want to draw lines on the computer screen.
Solution
Use the Java java.awt.Graphics2D class's drawLine() or draw() methods. Also use other graphic primitives such as stroke (java.awt.BasicStroke) and setting color (java.awt.Color) when drawing on the graphics surface. The code for recipe 12-2 is shown here:
package org.java7recipes.chapter12.recipe12_02;


import java.awt.BasicStroke;

import org.java7recipes.chapter12.SimpleAppLauncher;

import java.awt.Color;

import java.awt.Dimension;

import java.awt.Graphics;

import java.awt.Graphics2D;

import java.awt.RenderingHints;

import java.awt.Stroke;

import java.awt.geom.Line2D;

import java.awt.geom.Point2D;

import javax.swing.JComponent;


/**

 * Draws lines. Lines are colored Red, White and Blue.

 * @author cdea

 */

public class DrawLines extends JComponent {


    @Override

    protected void paintComponent(Graphics g) {

        super.paintComponent(g);
        Graphics2D g2d = (Graphics2D) g;

        g2d.setBackground(Color.LIGHT_GRAY);

        g2d.clearRect(0, 0, getParent().getWidth(), getParent().getHeight());


        // Red line

        g2d.setPaint(Color.RED);

        // 5 visible, 5 invisible

        final float dash[] = {5, 5};


        // 10 thick, end lines with no cap,

        // any joins make round, miter limit,

        // dash array, dash phase

        final BasicStroke dashed = new BasicStroke(10, BasicStroke.CAP_BUTT,

                BasicStroke.JOIN_ROUND, 0, dash, 0);


        g2d.setStroke(dashed);

        g2d.drawLine(100, 10, 10, 110);


        // White line

        g2d.setPaint(Color.WHITE);

        g2d.setStroke(new BasicStroke(10.0f));

        g2d.draw(new Line2D.Float(150, 10, 10, 160));


        // Blue line

        g2d.setPaint(Color.BLUE);

        Stroke solidStroke = new BasicStroke(10, BasicStroke.CAP_ROUND,

                BasicStroke.JOIN_ROUND);

        g2d.setStroke(solidStroke);

        g2d.draw(new Line2D.Float(new Point2D.Float(200, 10),

                new Point2D.Double(10, 210)));

    }


    public static void main(String[] args) {

        final DrawLines c = new DrawLines();

        c.setPreferredSize(new Dimension(272, 227));

        SimpleAppLauncher.launch("Chapter 12-2 Draw Lines", c);

    }

}
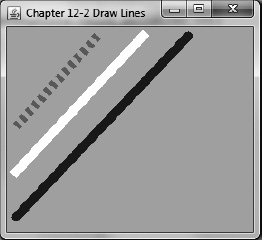
Figure 12-2 shows the output from this code example.
How It Works
Although the code in the recipe solution looks simple, there is a lot of magic going on behind the scenes, and I would like to share with you some of the fundamentals. Once you get the fundamentals down, the rest of the recipes will be easier to digest and understand.
There are three basic steps when drawing lines or shapes: painting, stroking, and drawing. There are actually more steps, but for brevity I'll be using the 80/20 rule (Pareto principle), which means that 80 percent of the timelines or shapes will be drawn using those three steps, and 20 percent of the time you'll take additional steps.
I would like to explain the code block right before you get to the code that actually draws lines. The first method call is a call to super.paintComponent(g) and its job is to paint other components owned by the parent class. In this case, the call isn't necessary because our DrawLine class is directly extending from the JComponent class (which is the base class of all Java Swing components and therefore doesn't have any descendents to draw). Shown here is the DrawLines class that extends from the JComponent class and overrides the paintComponent() method:
public class DrawLines extends JComponent {


    @Override

    protected void paintComponent(Graphics g) {

        super.paintComponent(g);


        // drawing code below

        ...

    }


    // other methods

    ...

}
The call to super.paintComponent(g) does nothing for now, but when dealing with Swing components that have a UI delegate with descendents such as JButton, JCheckBox, JPanel, and so on, it will make the call to super.paintComponent(g) necessary. Moreover, it is a good habit, so keep the call to super.paintComponent(g) in your code because you will see more of it in Chapter 14 when you work with borders and panes. The call to super.paintComponent(g) will simply update the UI delegate's descendents to be rendered on the graphics surface; otherwise, certain things won't appear.
Next is Graphics2D g2d = (Graphics2D) g; where g is down casted from a java.awt.Graphics object to a java.awt.Graphics2D object, which exposes methods to enable you to do more advanced graphics operations while still being able to access the methods on the Graphics class. Shown here is the Graphics object cast into a Graphics2D:
Graphics2D g2d = (Graphics2D) g;
Finally, you will be painting the background with a color of light gray. Here you will set the background color using the call to g2d.setBackground(Color.LIGHT_GRAY) and g2d.clearRect(0, 0, getParent().getWidth(), getParent().getHeight()), which will clear a rectangular area with the background color. The width and height are derived from the parent container (in this case, the JFrame). Because the paintComponent() method will be called during a resizing of the window, the clearRect() method will dynamically fill the background to gray as we resize the window. For example, this code is clearing the background based on the dimensions of the parent container (JComponent):
    g2d.setBackground(Color.lightGray);

    g2d.clearRect(0, 0, getParent().getWidth(), getParent().getHeight());
Now let's talk about drawing lines. The first step in drawing a line is setting the paint color. To draw a red line, you will set the Graphics object's paint color with a java.awt.Color.RED object via setPaint(Color.RED) before you begin to draw. The Color class has many predefined colors to choose from, but also there are many ways to construct a custom color (see recipe 12-4). Shown here is how to set the graphic context with the predefined color red:
g2d.setPaint(Color.RED)
On to the second step: stroking. Notice that the red line has a dashed pattern and is somewhat thick, That's because right before you are about to draw on the graphics surface you have an opportunity to set the stroke (java.awt.Stroke) using the method setStroke() on the Graphics2D object. (A stroke is synonymous with an artist's paintbrush or a pencil, except you are using virtual ink to draw shapes.) By creating Stroke objects you will be able to influence a shape's appearance such as its thickness, endpoint style, join point style, and dashed pattern. The only known concrete class implementing the interface java.awt.Stroke is the java.awt.BasicStroke class. I chose the BasicStroke constructor with the larger number of parameters in order for us to discuss all the ways you can create a stroke. First, you will create an array to represent a dashed pattern by simply using two values, 5.0f and 5.0f, which are the width of the stroke to display and the width of the stroke to not display, respectively. The dashed pattern represented an array of floats that is passed into the BasicStroke's constructor. Here's an example of creating an instance of a BasicStroke:
    public BasicStroke(float width, int cap, int join, float miterLimit,

                   float dash[], float dashPhase);
Table 12-1 shows the available parameters when using one of the BasicStroke's constructors. This class is used to assist in drawing all shapes.

Shown here is a code snippet on how to set the Graphics2D stroke by using a java .awt.BasicStroke instance:
   // 5 visible, 5 invisible

   final float dash[] = {5, 5};


   // 10 thick, end lines with no cap,

   // any joins make round, miter limit,

   // dash array, dash phase

   final BasicStroke dashed = new BasicStroke(10, BasicStroke.CAP_BUTT,

       BasicStroke.JOIN_ROUND, 0, dash, 0);


   g2d.setStroke(dashed);
Now that you understand how to set the stroke, the final step is to actually draw lines using the drawLine() method. Fundamentally, lines in a Cartesian system are created using a starting point and an ending point. In Java's drawLine() method, it also needs a starting point and an ending point. Looking at the source code for drawing the red line, you'll notice it uses the standard drawLine() method, but the white and blue lines are drawn using the draw() method. So, what is exactly the difference? The drawLine() method only draws lines using integer values for start- and endpoints, and the draw() method accepts any object of type java.awt.Shape. Since a Line2D is a shape, the draw() method will accept Line2D objects and, of course, other kinds of shapes. In the source code, the white line (center) is instantiated using the java.awt.Line2D.Double class, which is a subclass of java.awt.Shape. The Line2D.Double class allows you to specify (x, y) coordinates for the start- and endpoints of a line with values with precision of type Double. The 2D API also has a java.awt.Line2D.Float class that allows you to draw lines using values with a float precision.
Here are two code statement examples that can be used to draw lines. The drawLine() and draw() methods are shown here:
   g2d.drawLine(100, 10, 10, 110);

   g2d.draw(new Line2D.Double(150, 10, 10, 160));
Since Line2D objects represent lines similar to Euclidean geometry (the math of 2D and 3D shapes), the Line2D API has methods that determine distances and other relationships between points and lines. See java.awt.geom.Line2D in the Javadocs for more details.
![]() Note The
Note The BasicStroke object has three types of join styles: JOIN_BEVEL, JOIN_MITER, and JOIN_ROUND. When shapes or lines join (or meet together), they can appear flat, pointed, or round, respectively. As a reminder when using the constructor that has the parameter for miter limit, it will be ignored if the join style is not using JOIN_MITER. Since you aren't using the JOIN_MITER in this example, the miter parameters are set to zero. See the Javadocs on java.awt.BasicStroke for details.
12-3. Drawing Shapes
Problem
You want to draw shapes on the computer screen.
Solution
Use Java's many common shape classes that implement the java.awt.Shape interface. Here are the most common subclasses that implement java.awt.Shape:
Arc2DCubicCurve2DEllipse2DLine2DPath2DQuadCurve2DRectangle2DRoundRectangle2D
This code recipe will draw shapes using Arc2D, Ellipse2D, Rectangle2D, and RoundRectangle2D. All others (CubicCurve2D, Path2D, and QuadCurve2D) from the preceding list (excluding Line2D) will be discussed in recipe 12-7. (For more details on Line2D, refer to recipe 12-2.)
Shown next is an example of drawing simple shapes such as an arc, ellipse, rectangle, and rounded rectangle:
package org.java7recipes.chapter12.recipe12_03;


import java.awt.BasicStroke;

import org.java7recipes.chapter12.SimpleAppLauncher;

import java.awt.Color;

import java.awt.Dimension;

import java.awt.Graphics;

import java.awt.Graphics2D;

import java.awt.RenderingHints;

import java.awt.geom.AffineTransform;

import java.awt.geom.Arc2D;

import java.awt.geom.Ellipse2D;

import java.awt.geom.Rectangle2D;

import java.awt.geom.RoundRectangle2D;

import javax.swing.JComponent;


/**

 * Draw a ellipse, rectangle, rounded rectangle.

 *

 * @author cdea

 */

public class DrawShapes extends JComponent {


    @Override

    protected void paintComponent(Graphics g) {

        super.paintComponent(g);


        Graphics2D g2d = (Graphics2D) g;

        g2d.setBackground(Color.WHITE);

        g2d.clearRect(0, 0, getParent().getWidth(), getParent().getHeight());

        // antialising

        g2d.setRenderingHint(RenderingHints.KEY_ANTIALIASING, RenderingHints.VALUE_ANTIALIAS_ON);


        // save current transform

        AffineTransform origTransform = g2d.getTransform();


        // paint black

        g2d.setPaint(Color.BLACK);


        // 3 thickness

        g2d.setStroke(new BasicStroke(3));

        // Arc with open type
Arc2D arc = new Arc2D.Float(50, // x coordinate
                50,                     // y coordinate

                100,                    // bounds width

                100,                    // bounds height

                45,                     // start angle in degrees

                270,                    // degrees plus start angle

                Arc2D.OPEN              // Open type arc

        );

        g2d.draw(arc);

        //drawArc(int x, int y, int width, int height,

        //        int startAngle, int arcAngle);

        // Arc with chord type

        Arc2D arc2 = new Arc2D.Float(50, // x coordinate

                50,                      // y coordinate

                100,                     // bounds width

                100,                     // bounds height

                45,                      // start angle in degrees

                270,                     // degrees plus start angle

                Arc2D.CHORD              // Chord type arc

        );


        g2d.translate(arc.getBounds().width + 10, 0);

        g2d.draw(arc2);


        // Arc with Pie type (PacMan)

        Arc2D arc3 = new Arc2D.Float(50, // x coordinate

                50,                      // y coordinate

                100,                     // bounds width

                100,                     // bounds height

                45,                      // start angle in degrees

                270,                     // degrees plus start angle

                Arc2D.PIE                // pie type arc

        );

        g2d.translate(arc2.getBounds().width + 10, 0);

        g2d.draw(arc3);


        // reset transform

        g2d.setTransform(origTransform);

        g2d.translate(0, arc3.getHeight() + 10);


        //Ellipse2D

        Ellipse2D ellipse = new Ellipse2D.Float(50, 50, 100, 70);

        g2d.draw(ellipse);

        // g.drawOval(50, 50, 100, 70);


        g2d.translate(0, ellipse.getBounds().getHeight() + 10);


        //Rectangle2D

        Rectangle2D rectangle = new Rectangle2D.Float(50, 50, 100, 70);
        g2d.draw(rectangle);

        // g.drawRect(50, 50, 100, 70);


        g2d.translate(0, rectangle.getBounds().getHeight() + 10);


        //RoundRectangle2D

        RoundRectangle2D roundRect = new RoundRectangle2D.Float(50, 50, 100, 70, 20, 20);

        g2d.draw(roundRect);

        // g.drawRoundRect(50, 50, 100, 70, 20, 20);


    }


    public static void main(String[] args) {

        final DrawShapes c = new DrawShapes();

        c.setPreferredSize(new Dimension(374, 415));

        SimpleAppLauncher.launch("Chapter 12-3 Draw Shapes", c);

    }

}
Figure 12-3 shows the output of the DrawShapes recipe that draws simple shapes such as arcs, rectangles, and an ellipse.
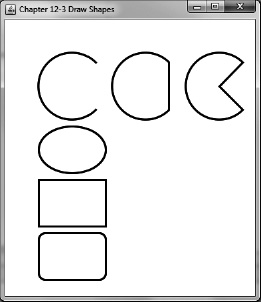
Figure 12-3. Drawing shapes
How It Works
The recipe starts by clearing the background to the color white (java.awt.Color.White) and turns antialiasing on. Antialiasing is an excellent technique to smooth out the jaggies or pixelation when shapes are drawn using the default rendering algorithms. In recipe 12-2, the lines didn't appear straight or smooth. The Graphics2D object's method setRenderingHints() is responsible for telling (hinting) the graphics engine to choose the appropriate algorithm for the right rendering job. This often depends on accuracy (quality) versus speed when rendering artifacts. To see more ways to give a hint to the graphics engine, look for java.awt.RenderingHints in the Javadoc. Set a rendering hint for antialiasing as follows:
g2d.setRenderingHint(RenderingHints.KEY_ANTIALIASING, RenderingHints.VALUE_ANTIALIAS_ON);
The next step is obtaining the current transform to assist in placement of shapes on the drawing surface. Transforms will be discussed in recipe 12-6, but suffice it to say that transforms enable the developer to position (translate), scale, rotate, and shear shapes. Throughout the recipes you will use a common transform called translate to move the shape using its bounding box's upper-left (x, y) coordinate. For each shape you will set the upper-left location (translate) so that the shapes won't overlap one another when they are drawn. For example, the second arc will be positioned to the right of the previous arc by translating its x-coordinate. In the recipe code, the second arc is positioned 10 pixels to the right of the first arc. Later, you will reset the Graphics object's transform so that drawing can begin on the upper left with a coordinate of (0, 0). Shown here is the code snippet used to save the original transform for later reset:
    // save current transform

    AffineTransform origTransform = g2d.getTransform();
Before you draw shapes, you will first set the paint to the color black (java.awt.Color.Black) and the thickness of the stroke to 3.
    g2d.setPaint(Color.BLACK);

    g2d.setStroke(new BasicStroke(3));
At the top of the window there are three types of arcs shown consecutively. Each arc is drawn using the Arc2D.Float class. The Java 2D API also has an Arc2D.Double class and a standard drawArc() method to draw arcs. You should notice a common pattern emerging when creating shapes. There seems to be three ways to create the same kind of shape, and these types of shapes are based on using number values of type float, double, and int precision. When using the Arc2D.Float and Arc2D.Double classes, you'll notice they are of decimal type precision for shapes and when using the method drawArc()'s parameters you will have int (integer) number type precision.
Table 12-2 shows one of the Arc2D.Float constructors:

The following is an Arc2D constructor using a float precision:
Arc2D.Float(float x, float y, float w, float h, float start, float extent, int type)
When drawing an arc you will specify a bounding box similar to building a rectangle by specifying the upper-left corner using (x, y) coordinates, then the width and height of the rectangle. Once the bounding box is defined, you can think of it as an invisible ellipse inscribed in the bounding box. Next, is defining the starting angle that is where to start drawing or tracing the ellipse. After the start angle is specified, you will set the extent. The extent is the angle in degrees plus the start angle to indicate where the stroking or tracing of the ellipse stops. Finally, the arc type parameter is how the arc opening should connect. The arc can appear open, a straight line (chord), or a shape of a pie wedge. Figure 12-4 describes properties of a Java2D arc.
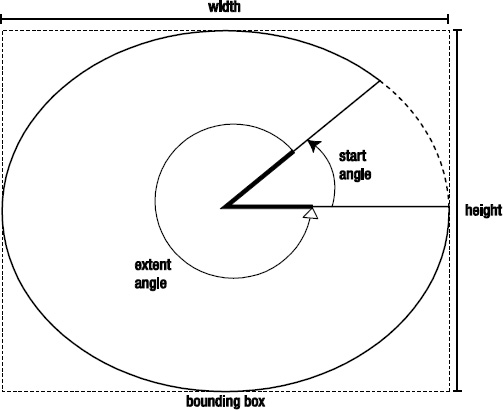
Figure 12-4. Defining an Arc2D.Float instance
Figure 12-5 shows the three types of arcs: open, chord, and pie.

Figure 12-5. Arc types: open, chord, and pie
Later in this chapter, you will learn about transforms and how to use the translate() method, I will briefly explain how the shapes are drawn and positioned. First, the open arc is drawn onto the graphics surface, starting with its upper-left bounding box coordinate at (50, 50) with the width and height both set to 100. Next is drawing the chord type arc offset to the right of the previous open arc shape. Here you will position the chord arc to the right of the previous open arc by translating its x-coordinate based on the width of the open arc's bounding box plus 10 pixels for additional spacing. Finally, you will repeat the steps to draw the pie-shaped arc. Once the three types of arcs are drawn, you will reset the current transform to the saved transform in order to draw the ellipse shape underneath the first arc shape (open arc).
Next, is drawing an ellipse using the Ellipse2D class. Similar to the Arc2D shape, you will imagine drawing an invisible rectangle or a bounding box where the x, y coordinate is the upper-left corner and the width and height is specified to inscribe an ellipse by using the giving stroke. The following code statements are the three ways to create an ellipse:
   Ellipse2D.Float(float x, float y, float w, float h)

   Ellipse2D.Double(double x, double y, double w, double h)

   Graphics.drawOval(int x, int y, int w, int h);
After drawing the ellipse, you will be drawing a rectangle using the Rectangle2D class. In the example, you will use the Rectangle2D.Float by first setting its x-coordinate to 50 and y-coordinate to 50. Second, you will set its width to 100 and height to 70. Next you will draw the shape on the graphics surface with the Graphics2D object's draw() method. Shown here is how to draw a rectangle:
   Rectangle2D rectangle = new Rectangle2D.Float(50, 50, 100, 70);

   g2d.draw(rectangle);
…Finally, you will be drawing a round rectangle shape. As you can see the last shape in the Figure 12-3 how similar it is with a Rectangle2D shape, except that its corners are nice and round. To make the corners rounded, you would specify the arc width and height. When dealing with the arc width or height when the value is zero, it is identical to a regular rectangle, but as the value increases the arc becomes more curved moving away from the corner. The following is the code to draw a rounded rectangle with 20 as its arc width and height:
RoundRectangle2D roundRect = new RoundRectangle2D.Float(50, 50, 100, 70, 20, 20);

    g2d.draw(roundRect);
12-4. Filling Shapes
Problem
You want to fill shapes with color paints and display them on the computer screen.
Solution
After drawing shapes, you will want to call the Graphics2D setPaint() method by passing in a color (java.awt.Color) that you want to fill the shape with. Next, you will actual fill the shape with the paint color using the fill() method on the Graphics object and passing in the shape. The following code sets paint color and fills an ellipse shape:
   g2d.setPaint(Color.RED);

   g2d.fill(ellipse);

    …
Shown here is the code recipe on filling shapes with colors:
package org.java7recipes.chapter12.recipe12_04;


import java.awt.*;

import java.awt.geom.*;

import javax.swing.JComponent;

import org.java7recipes.chapter12.SimpleAppLauncher;


/**

 * Draws lines. Lines are colored Red, White and Blue.

 * @author cdea

 */

public class FillColorShapes extends JComponent {


    @Override

    protected void paintComponent(Graphics g) {


        Graphics2D g2d = (Graphics2D) g;

        g2d.setBackground(Color.WHITE);

        g2d.clearRect(0, 0, getParent().getWidth(), getParent().getHeight());

        g2d.setRenderingHint(RenderingHints.KEY_ANTIALIASING, RenderingHints.VALUE_ANTIALIAS_ON);


        g2d.setPaint(Color.BLACK);

        g2d.setStroke(new BasicStroke(3));


//Ellipse2D

        Ellipse2D ellipse = new Ellipse2D.Float(50, 50, 100, 70);

g2d.draw(ellipse);

        g2d.setPaint(Color.RED);

        g2d.fill(ellipse);


        g2d.translate(0, ellipse.getBounds().getHeight() + 10);


        Stroke defaultStroke = g2d.getStroke();

        // Draw black line

        Line2D blackLine = new Line2D.Float(170, 30, 20, 140);

        g2d.setPaint(Color.BLACK);

        g2d.setStroke(new BasicStroke(10.0f));

        g2d.draw(blackLine);

        // set stroke back to normal

        g2d.setStroke(defaultStroke);


        //Rectangle2D

        Rectangle2D rectangle = new Rectangle2D.Float(50, 50, 100, 70);

        g2d.setPaint(Color.BLACK);

        g2d.draw(rectangle);

g2d.setPaint(new Color(255, 200, 0, 200));


        g2d.fill(rectangle);


        g2d.translate(0, rectangle.getBounds().getHeight() + 10);


        //RoundRectangle2D
        RoundRectangle2D roundRect = new RoundRectangle2D.Float(50, 50, 100, 70, 20, 20);

        g2d.setPaint(Color.BLACK);

        g2d.draw(roundRect);

        g2d.setPaint(Color.GREEN);

        g2d.fill(roundRect);


    }


    public static void main(String[] args) {

        final FillColorShapes c = new FillColorShapes();

        c.setPreferredSize(new Dimension(340, 320));

        SimpleAppLauncher.launch("Chapter 12-4 Filling Shapes with Colors", c);

    }

}
Figure 12-6 displays the various types of colorized fills that can be applied onto shapes. A solid black line (as depicted in Figure 12-6) also appears in the recipe to demonstrate the transparency of the shape's color.

Figure 12-6. Filling shapes with color
How It Works
The recipe first clears the background to white and sets antialiasing on (smooth rendering). Next, it sets the stroke thickness and color (java.awt.Color.BLACK). The color black is used when drawing the ellipse outline.
After the ellipse is drawn, you will use the Graphics2D's method fill() to fill the interior of the ellipse with the color red. The order of drawing a shape prior to filling a shape can matter depending on the desired effect you are trying to achieve. In our current example you will draw an ellipse with a thickness of 3 and then fill it with the color red. Imagine if you will, an ellipse that is drawn with three pencils held together where the center pencil is the outline of the actual ellipse shape and some of the inner outline is considered inside (interior) of the ellipse, and the outer outline is the outside area surrounding the ellipse. Knowing this, you will see that the red paint fills the ellipse and therefore overwrites the inner part of the ellipse including some of the inner outline. This will leave the outer part of the outline black. Figure 12-7 shown below depicts a shapes's stroke:
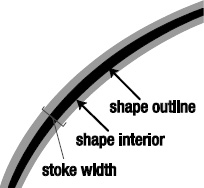
Figure 12-7. Shape's stroke width
Let's talk more about color. In Java there are common primary colors that are predefined to be used easily when filling shapes such as java.awt.Color.BLUE, java.awt.Color.RED, and so on.
Colors can be defined with four components: red, green, blue, and alpha channel. Although there are many ways to create colors, a common method is representing each component as an integer value range of 0–255. The red, green, and blue (RGB) components will mix colors based a web standard color model. When all three color components are zeroes (0, 0, 0), they will yield the color black. When all the color components have the value 255, they will yield the color white (255, 255, 255). A fourth component is the alpha channel, which controls the opacity level from 0 (fully transparent) to 255 (fully opaque). See the Javadocs on java.awt.Color for more details. Shown following is a Color constructor using alpha channel:
Color(int r, int g, int b, int a)
![]() Note For more on color standards, see A Standard Default Color Space for the Internet?sRGB (
Note For more on color standards, see A Standard Default Color Space for the Internet?sRGB (http://www.w3.org/Graphics/Color/sRGB.html by Michael Stokes (Hewlett-Packard), Matthew Anderson (Microsoft), Srinivasan Chandrasekar (Microsoft), Ricardo Motta (Hewlett-Packard), Version 1.10, November 5, 1996.
Next is filling the rectangle shape with the color orange and having the alpha channel set to be partially transparent. Shown here is filling a rectangle with paint:
Finally, you will use the predefined color green to fill the round rectangle shown here:
    g2d.setPaint(Color.GREEN);

    g2d.fill(roundRect);
12-5. Gradients
Problem
You want to fill shapes by using color gradients to be displayed on the computer screen.
Solution
Use the following classes when applying gradient paint:
java.awt.GradientPaintjava.awt.LinearGradientPaintjava.awt.RadialGradientPaint
To use gradient paint, you will be setting the Graphics2D setPaint() method by passing in a gradient paint (java.awt.GradientPaint) object. Next, you will actually fill the shape with the paint color using the fill() method on the Graphics object and passing in the shape. This code creates a gradient paint and fills the shape:
    GradientPaint gradient = new GradientPaint(100, 50, Color.RED, 100, 150, Color.BLACK);

    g2d.setPaint(gradient);

    g2d.fill(myShape);

    ...
The following code uses the preceding classes to add radial and linear gradient colors as well as transparent (alpha channel level) colors to the shapes. You will be using an ellipse, rectangle, and rounded rectangle in this recipe. A solid black line (as depicted in Figure 12-8) also appears in the recipe to demonstrate the transparency of the shape's color.
package org.java7recipes.chapter12.recipe12_05;


import java.awt.*;

import org.java7recipes.chapter12.SimpleAppLauncher;

import java.awt.geom.*;

import javax.swing.JComponent;


/**

 * Draw a ellipse, rectangle, rounded rectangle.

 *
 * @author cdea

 */

public class Gradients extends JComponent {


    @Override

    protected void paintComponent(Graphics g) {

        super.paintComponent(g);


        Graphics2D g2d = (Graphics2D) g;

        g2d.setBackground(new Color(255, 255, 255, 200));

        g2d.clearRect(0, 0, getParent().getWidth(), getParent().getHeight());

        g2d.setRenderingHint(RenderingHints.KEY_ANTIALIASING, RenderingHints.VALUE_ANTIALIAS_ON);


        //Ellipse2D

        Ellipse2D ellipse = new Ellipse2D.Float(50, 50, 100, 70);


        float[] dists = { .3f, 1.0f};

        Color[] colors = {Color.RED, Color.BLACK};

        RadialGradientPaint gradient1 = new RadialGradientPaint(50, 50, 100, dists, colors);

        g2d.setPaint(gradient1);

        g2d.fill(ellipse);


        g2d.translate(0, ellipse.getBounds().getHeight() + 10);


        Stroke defaultStroke = g2d.getStroke();

        // Draw black line

        Line2D blackLine = new Line2D.Float(170, 30, 20, 140);

        g2d.setPaint(Color.BLACK);

        g2d.setStroke(new BasicStroke(10.0f));

        g2d.draw(blackLine);

        // set stroke back to normal

        g2d.setStroke(defaultStroke);


        //Rectangle2D

        Rectangle2D rectangle = new Rectangle2D.Float(50, 50, 100, 70);

        float[] dists2 = { .1f, 1.0f};

        Color[] colors2 = {new Color(255, 200, 0, 200), new Color(0, 0, 0, 200)};

        LinearGradientPaint gradient2 = new LinearGradientPaint(100, 50, 100, 150, dists2, colors2);


        g2d.setPaint(gradient2);

        g2d.fill(rectangle);


        g2d.translate(0, rectangle.getBounds().getHeight() + 10);


        //RoundRectangle2D

        RoundRectangle2D roundRect = new RoundRectangle2D.Float(50, 50, 100, 70, 20, 20);

        GradientPaint gradient3 = new GradientPaint(50, 50, Color.GREEN, 70,70, Color.BLACK, true);

        g2d.setPaint(gradient3);

        g2d.fill(roundRect);

    }
    public static void main(String[] args) {

        final Gradients c = new Gradients();

        c.setPreferredSize(new Dimension(287, 320));

        SimpleAppLauncher.launch("Chapter 12-5 Gradients", c);

    }

}
Figure 12-8 displays the various types of gradient fills that can be applied onto shapes.
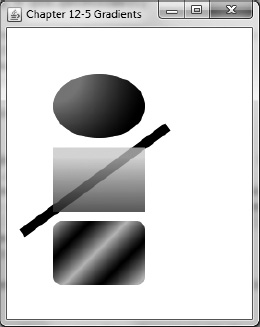
Figure 12-8. Adding gradient paints to shapes
How It Works
Similar to past recipes, you will clear the background and set antialiasing on before you begin to draw onto the graphics surface. This recipe is the same as recipe 12-4, but instead of using simple solid colors to fill shapes, you will be using gradient paint. Gradients provide a way to fill shapes by interpolating between two or more colors. For example, when using a starting color of white and an end color as black, the gradient color will gradually go from light to dark with varying shades of gray in between. The pattern is a smooth transition from one color to another in a linear fashion.
Running the example code, you will see three main shapes filled with a gradient color. The first shape is an ellipse using a radial gradient from red to black. You'll notice the ellipse looks almost 3D as if there were a light source coming from the upper left. Shown here is a constructor for a RadialGradientPaint class:
To create a RadialGradientPaint you can imagine a tiny circle positioned on a shape that expands with a circular gradient. To define the center of the gradient, you pass in the cx and cy parameters. The center of the gradient can be positioned anywhere within the ellipse, allowing you to give the illusion of changing the light source angle onto the shape. The radius parameter specifies the end of the gradient. The fractions array (floats) denotes the distribution of colors when moving from the center out to the perimeter. An array of colors specifies the start and end colors used when painting the gradient. The following code paints a radial gradient onto an ellipse shape (Red Ellipse):
    float[] dists = { .3f, 1.0f};

    Color[] colors = {Color.RED, Color.BLACK};

    RadialGradientPaint gradient1 = new RadialGradientPaint(50, 50, 100, dists, colors);

    g2d.setPaint(gradient1);

    g2d.fill(ellipse);
The second shape is a rectangle filled with a transparent linear gradient using yellow and black with a transparency alpha value of 200.The following is a constructor for the LinearGradientPaint class:
LinearGradientPaint(float startX, float startY, float endX, float endY, float[] fractions, Color[] colors)
To create a linear gradient paint, you will specify startX, startY, endX, and endY for the start- and endpoints. The start- and endpoint coordinates denote where the gradient pattern begins and stops. The fractions array is the amount of distribution as it interpolates over a color. Again, similar to the RadialGradientPaint, the colors array specifies the different colors to be used in the gradient. This code instantiates a yellow, semitransparent, linear gradient paint object that fills a rectangle:
    float[] dists2 = { .1f, 1.0f};

    Color[] colors2 = {new Color(255, 200, 0, 200), new Color(0, 0, 0, 200)};

    LinearGradientPaint gradient2 = new LinearGradientPaint(100, 50, 100, 150, dists2, colors2);

g2d.setPaint(gradient2);
Notice a rounded rectangle with a repeating pattern of a gradient using green and black in a diagonal direction. This is a simple gradient paint that is the same as the LinearGradientPaint, except it allows only two colors, and startX, startY, endX, and endY are set in a diagonal line position. The cycle parameter is set to true, which will cause the gradient pattern to repeat or cycle between the colors giving the illusion of glowing bars or pipes.
This code draws a RoundRectangle2D object with a cyclic pattern:
RoundRectangle2D roundRect = new RoundRectangle2D.Float(50, 50, 100, 70, 20, 20);

GradientPaint gradient3 = new GradientPaint(50, 50, Color.GREEN, 70,70, Color.BLACK, true);

g2d.setPaint(gradient3);

g2d.fill(roundRect);
12-6. Transforming Shapes
Problem
You want to shear, rotate, scale, and translate shapes on the screen.
Solution
Use the java.awt.geom.AffineTransform class to transform shapes. Shown here is the recipe that will transform a square by shearing, rotating, scaling, and translating:
package org.java7recipes.chapter12.recipe12_06;


import java.awt.*;

import java.awt.geom.*;

import javax.swing.JComponent;

import org.java7recipes.chapter12.SimpleAppLauncher;


/**

 * Transforming shapes.

 *

 * @author cdea

 */

public class TransformingShapes extends JComponent {


    @Override

    protected void paintComponent(Graphics g) {

super.paintComponent(g);


        Graphics2D g2d = (Graphics2D) g;

        // clear background

        g2d.setBackground(Color.WHITE);

        g2d.clearRect(0, 0, getParent().getWidth(), getParent().getHeight());


        // turn on antialiasing

        g2d.setRenderingHint(RenderingHints.KEY_ANTIALIASING, RenderingHints.VALUE_ANTIALIAS_ON);


        // save transform

        AffineTransform origTransform = g2d.getTransform();


        g2d.setPaint(Color.BLACK);

        g2d.setStroke(new BasicStroke(3f));


        //Rectangle2D (original)

        Rectangle2D rectangle = new Rectangle2D.Float(50, 50, 50, 50);

        g2d.draw(rectangle);


        // Shearing
        AffineTransform shear = new AffineTransform();


        // move to upper right

        shear.translate(rectangle.getX() + rectangle.getWidth() + 50, 0);


        shear.shear(-.5, 0);


        g2d.transform(shear);

        g2d.draw(rectangle);


        g2d.setTransform(origTransform);


        // rotate

        AffineTransform rotate = new AffineTransform();


        // move to bottom left

        rotate.translate(0, rectangle.getY() + rectangle.getHeight());


        rotate.rotate(Math.PI/4, rectangle.getCenterX() , rectangle.getCenterY());


        g2d.transform(rotate);

        g2d.draw(rectangle);


g2d.setTransform(origTransform);


        // scale

        AffineTransform scale = new AffineTransform();


// move to bottom right

        scale.translate(rectangle.getX() + 30, rectangle.getY());


        // scale

        scale.scale(1.5, 1.5);


        g2d.transform(scale);

        g2d.draw(rectangle);


    }


    public static void main(String[] args) {

        final TransformingShapes c = new TransformingShapes();

        c.setPreferredSize(new Dimension(317, 246));

        SimpleAppLauncher.launch("Chapter 12-6 Transforming Shapes", c);

    }

}
Figure 12-9 shows four squares that demonstrate the different transforms. The top-left square is the original that has no transforms applied to it and serves as our reference shape.

How It Works
Pictured in the output are four squares (rectangles) transformed. Starting from left to right and top to bottom, you will have a square, rhombus, diamond, and a larger square. The square is considered the original object without any transforms applied. The following are transforms used in this recipe:
ShearRotateScale
You'll notice an initial translate operation right before the desired transform. The translate transform will move and position the shape (relative to the preceding shape) on the graphics surface, making it appear as if it occupies one of four quadrants. An AffineTransform allows you to perform compound transform operations. An example of the translate operation before the desired transform follows:
    // Shearing

    AffineTransform shear = new AffineTransform();

    // move to upper right

    shear.translate(rectangle.getX() + rectangle.getWidth() + 50, 0);

    // desired transform

    shear.shear(-.5, 0);
You will begin by clearing the background with white and setting antialiasing on. Next, you will save the current transform. This allows you to save the original state of the Graphics2D object before you begin moving or transforming shapes. Before you start drawing, you will set the paint to black and the stroke thickness to 3f (float) using the java.awt.BasicStroke class. (To see more on stroking, refer to recipe 12-2.)
The first shape drawn is a 50-by-50 square using the Rectangle2D class. This shape will be called the original with its position starting at (x, y) coordinate at (50, 50). This shape is reused to transform the other three shapes described earlier. That is, you will draw the shape four times, transforming it each time, and translating (placing) it relative to the preceding shape. The following code draws the original square (rectangle) shape:
    //Rectangle2D (original)

    Rectangle2D rectangle = new Rectangle2D.Float(50, 50, 50, 50);

    g2d.draw(rectangle);
Next, you will shear the shape by instantiating an AffineTransform and invoking the shear() method. Here's an example of shearing using AffineTransform:
    AffineTransform shear = new AffineTransform();

    shear.shear(-.5, 0);
Compared to the original square shape, you will notice the shape forms as a parallelogram or a rhombus. The (x, y) coordinates are transformed using these equivalent equations:
    x = x + (shearX * y)

    y = y + (shearY * x)
After drawing the rhombus, you will draw a rectangle using the original shape to then position it beneath the original and rotating it (diamond shape). By using the rotate() method, you pass in a radian angle and a point on the shape to rotate around. This code moves and rotates the square displayed below the original square:
        AffineTransform rotate = new AffineTransform();

        rotate.translate(0, rectangle.getY() + rectangle.getHeight());

        rotate.rotate(Math.PI/4, rectangle.getCenterX() , rectangle.getCenterY());
Finally, you will scale the original rectangle by a scaling by a factor of 1.5 along the x-axis and y-axis direction. The stroke thickness is even sized by the factor given. A neat is to use negative values that will flip the shape along the x- and y-axis. The following code snippet scales a rectangle shape by increasing its size:
    AffineTransform scale = new AffineTransform();

    scale.scale(1.5, 1.5);
![]() NOTE For more on
NOTE For more on AffineTransforms go to the Javadoc at http://download.oracle.com/javase/7/docs/api/index.html?java/awt/geom/AffineTransform.html.
12-7. Making Complex Shapes
Problem
You want to draw complex shapes on the screen.
Solution
Use Java 2D's CubicCurve2D, Path2D, and QuadCurve2D classes. You can also build new shapes by using constructive area geometry via the java.awt.geom.Area class.
The following code draws various complex shapes. The first complex shape involves a cubic curve drawn in the shape of a sine wave. The next shape, which I call the ice cream cone, uses the Path2D class. The third shape is a quadratic Bézier curve (QuadCurve2D) forming a smile. The final shape is a scrumptious donut. You will create this donut shape by subtracting two ellipses (one smaller and one larger):
package org.java7recipes.chapter12.recipe12_07;


import java.awt.*;

import java.awt.geom.*;

import javax.swing.JComponent;

import org.java7recipes.chapter12.SimpleAppLauncher;


/**

 * Draws Complex shapes.

 * @author cdea

 */

public class DrawComplexShapes extends JComponent {


    @Override

    protected void paintComponent(Graphics g) {

        super.paintComponent(g);


        Graphics2D g2d = (Graphics2D) g;

        g2d.setBackground(Color.WHITE);

        g2d.clearRect(0, 0, getParent().getWidth(), getParent().getHeight());

        g2d.setRenderingHint(RenderingHints.KEY_ANTIALIASING, RenderingHints.VALUE_ANTIALIAS_ON);


        // set color and thickness of stroke

        g2d.setPaint(Color.BLACK);

        g2d.setStroke(new BasicStroke(3));


        //CubicCurve2D

        CubicCurve2D cubicCurve = new CubicCurve2D.Float(

                50, 75,            // start pt (x1,y1)

                50+30, 75-100,     // control pt1

                50+60, 75+100,     // control pt2

                50+90, 75          // end pt (x2,y2)

        );


        g2d.draw(cubicCurve);


        // move below previous shape

        g2d.translate(0, cubicCurve.getBounds().y + 50);


        //Path2D (IceCream shape)
        Path2D path = new Path2D.Float();

path.moveTo(50, 150);

        path.quadTo(100, 50, 150, 150);

        path.lineTo(50, 150);

path.lineTo(100, 150 + 125);

        path.lineTo(150, 150);

        path.closePath();


        g2d.draw(path);


        // move below previous shape

        g2d.translate(0, path.getBounds().height + 50);


        //QuadCurve2D

        QuadCurve2D quadCurve = new QuadCurve2D.Float(50, 50,

                125, 150,

                150, 50

        );


        g2d.draw(quadCurve);


        // move below previous shape

        g2d.translate(0, quadCurve.getBounds().y + 50);


        // donut

        g2d.setStroke(new BasicStroke(1));

        Ellipse2D bigCircle = new Ellipse2D.Float(50, 50, 100, 75);

        Ellipse2D smallCircle = new Ellipse2D.Float(80, 75, 35, 25);

        Area donut = new Area(bigCircle);

        Area donutHole = new Area(smallCircle);

        donut.subtract(donutHole);


        // drop shadow

        GradientPaint gradient2 = new GradientPaint(150 +1, 50+75 +1,

                new Color(255, 255, 255, 200),

                55, 55,

                new Color(0, 0, 0, 200)

        );

        // gradient fill

        g2d.setPaint(gradient2);

        g2d.fill(donut);

        g2d.draw(donut);


        // draw orange donut

        g2d.translate(-3, -3);

        g2d.setPaint(Color.ORANGE);

        g2d.fill(donut);


        // outline the donut

        g2d.setPaint(Color.BLACK);

        g2d.draw(donut);

    }


    public static void main(String[] args) {

        final DrawComplexShapes c = new DrawComplexShapes();

        c.setPreferredSize(new Dimension(409, 726));

        SimpleAppLauncher.launch("Chapter 12-7 Draw Complex Shapes", c);

    }

}
Figure 12-10 displays the sine wave, ice cream cone, smile, and donut shapes that we have created using Java2D.
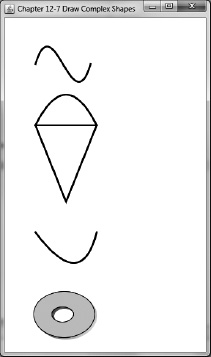
Figure 12-10. Draw complex shapes
How It Works
If you have gotten this far, you will notice we have done the same thing as before in previous recipes; you will clear the graphics surface and turn antialiasing on. Displayed in the output window are four shapes: sine wave (CubicCurve2D), ice cream cone (Path2D), smile (QuadCurve2D), and a donut (Area). Before you begin, you'll notice code statements that employ the translate() method, which repositions shapes. Most recipes often use the translate operation, via the AffineTransform class, to move shapes, so I will not go into great detail about the translate operation (refer to recipe 12-6 to see more). Let's dive into the shapes and see how they are drawn.
First, you will create a CubicCurve2D object by instantiating a CubicCurve2D.Float. Shown here is a CubicCurve2D.Float constructor:
CubicCurve2D.Float(float x1, float y1, float ctrlx1, float ctrly1, float ctrlx2, float ctrly2, float x2, float y2)
The x1, y1, x2, y2 parameters are the starting point and ending point of a curve. The ctrlx1, ctrly1, ctrlx2, ctrly2 are control point 1 and control point 2. A control point is a point that pulls the curve toward it. In this example, you will simply have a control point 1 above to pull the curve upward to form a hill and control point 2 below to pull the curve downward to form a valley. Figure 12-11 depicts a cubic curve with two control points positioned above and below the start point and end point, respectively.
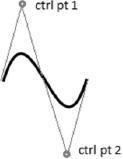
Figure 12-11. Cubic curve
Next, you will create a complex shape such as an ice cream cone using the java.awt.geom.Path2D class. When using the Path2D class, you will be using it like a pencil on a piece of graph paper moving from point to point. Between any points you can decide to draw the following: line, quadratic curve or cubic curve. Once you have finished the drawing, the last point can close the path forming a shape using the closePath() method. The following code creates the path shape forming an ice cream cone:
        //Path2D (IceCream shape)

        Path2D path = new Path2D.Float();

        path.moveTo(50, 150);

        path.quadTo(100, 50, 150, 150);

        path.lineTo(50, 150);

        path.lineTo(100, 150 + 125);

        path.lineTo(150, 150);

        path.closePath();


        g2d.draw(path);
Third, you will be drawing a quadratic parametric curve using the (QuadCurve2D) class. Shown here is a QuadCurve2D constructor used in this example to form a smile:
QuadCurve2D.Float(float x1, float y1, float ctrlx, float ctrly, float x2, float y2)
This is similar to the cubic curve example, but instead of two control points you have only one control point. Figure 12-12 shows a QuadCurve2D with a control point below its starting and ending points:

Last, you have a created a shape that looks like a tasty donut. This shape was created with constructive area geometry using Java's java.awt.geom.Area class. This class provides many ways to combine shapes. Here are the operations to combine shape areas:
Add (union)SubtractIntersectExclusive Or
We aren't going into all the operations, which are beyond the scope this book. To see more, refer to the Javadoc API on java.awt.geom.Area. For now, we will be discussing the subtract operation. In this example, you will simply create a big ellipse representing the whole donut and a smaller ellipse representing the hole of the donut to subtract. This code creates a donut shape by using the area's subtract() method:
    Ellipse2D bigCircle = new Ellipse2D.Float(50, 50, 100, 75);

    Ellipse2D smallCircle = new Ellipse2D.Float(80, 75, 35, 25);

    Area donut = new Area(bigCircle);

    Area donutHole = new Area(smallCircle);

    donut.subtract(donutHole);
You can finish the donut area like any other shape, such as filling it in with a color. You will create a gradient fill to make a drop shadow effect. Then reuse the shape by shifting it diagonally to the upper left by three pixels and fill it with a solid orange color. You can then outline the donut to give it a cartoonish look.
12-8. Creating Interactive Shapes
Problem
You want to interact with a shape by manipulating its points with the mouse pointer.
Solution
Implement a MouseListener and a MouseMotionListener interface, and use an AffineTransform class to size and move the shape. The major classes or interfaces used in this recipe are these:
The shape you will be interacting with is a java.awt.geom.QuadCurve2D object using a mouse pointer. (To know more about how to draw a QuadCurve2D shape, refer to recipe 12-7.) Interacting with the shape via the mouse pointer will dynamically change or move the shape about the screen, thus transforming it. For the sake of brevity, I will not be discussing transforms in detail. (For more about how to use transforms, refer to recipe 12-6).
Shown here is the recipe that creates an application to allow the user to manipulate a cubic curve shape by using the mouse pointer to move positioning handles:
package org.java7recipes.chapter12.recipe12_08;


import java.awt.*;

import java.awt.event.*;

import java.awt.geom.*;

import javax.swing.JComponent;

import org.java7recipes.chapter12.SimpleAppLauncher;


/**

 * Interactive shapes.

 * @author cdea

 */

public class InteractiveShapes extends JComponent implements MouseListener,

        MouseMotionListener {


    private boolean selectedShape;

    private boolean hoveredShape;

    private QuadCurve2D s;

    private Point2D translatePt;

    private Point2D anchorPt;

    private AffineTransform moveTranslate = new AffineTransform();

    private int moveType = -1;

    public static final int START_PT = 1;

    public static final int CNTRL_PT = 2;

    public static final int END_PT = 3;

    public static final int MOVE_RECT = 4;


    public InteractiveShapes() {

        s = new QuadCurve2D.Float(50, 50,

                125, 150,

                150, 50);

    }


    @Override

    protected void paintComponent(Graphics g) {
        super.paintComponent(g);


        Graphics2D g2d = (Graphics2D) g;

        g2d.setBackground(Color.WHITE);

        g2d.clearRect(0, 0, getParent().getWidth(), getParent().getHeight());

        g2d.setRenderingHint(RenderingHints.KEY_ANTIALIASING,

                RenderingHints.VALUE_ANTIALIAS_ON);


        g2d.drawString("Bounded Rectangle " + s.getBounds2D().getX() + ", " +

                s.getBounds2D().getY(), 10, 10);

        AffineTransform origTransform = g2d.getTransform();


        // selected and move shape

        if (selectedShape && translatePt != null && moveType == MOVE_RECT) {


            // move the shape

            moveTranslate.setToTranslation(translatePt.getX() - anchorPt.getX(),

                    translatePt.getY() - anchorPt.getY());

            g2d.setTransform(moveTranslate);


        }


        // set color and thickness of stroke

        g2d.setPaint(Color.BLACK);

        g2d.setStroke(new BasicStroke(3));


        // Draw the quad curve shape

        g2d.draw(s);


        // hovering over shape (gray dotted box)

        if (hoveredShape) {

            g2d.setColor(Color.LIGHT_GRAY);

            final float dash[] = {2, 2};

            g2d.setStroke(new BasicStroke(2, BasicStroke.CAP_BUTT,

                    BasicStroke.JOIN_BEVEL, 0, dash, 0));

            g2d.draw(s.getBounds2D());


        }


        // selected shape

        if (selectedShape) {

            // draw red dotted box

            g2d.setColor(Color.RED);

            final float dash[] = {2, 2};

            g2d.setStroke(new BasicStroke(2, BasicStroke.CAP_BUTT,

                    BasicStroke.JOIN_BEVEL, 0, dash, 2));

            g2d.draw(s.getBounds2D());

            // draw ctrl point rect

            g2d.setPaint(Color.BLACK);

            g2d.setStroke(new BasicStroke(1));

            Rectangle2D ctrl1Rect = new Rectangle2D.Double(

                    s.getCtrlPt().getX() - 2, s.getCtrlY() - 2, 5, 5);

            g2d.draw(ctrl1Rect);
            // draw starting point rect

            Rectangle2D startPtRect = new Rectangle2D.Double(

                    s.getX1() - 2, s.getY1() - 2, 5, 5);

            g2d.setPaint(Color.WHITE);

            g2d.fill(startPtRect);

            g2d.setPaint(Color.BLACK);

            g2d.draw(startPtRect);

            // draw end point rect

            Rectangle2D endPtRect = new Rectangle2D.Double(

                    s.getX2() - 2, s.getY2() - 2, 5, 5);

            g2d.setPaint(Color.WHITE);

            g2d.fill(endPtRect);

            g2d.setPaint(Color.BLACK);

            g2d.draw(endPtRect);

        }

        // reset

        g2d.setTransform(origTransform);

    }

    public static void main(String[] args) {

        final InteractiveShapes c = new InteractiveShapes();

        c.addMouseListener(c);

        c.addMouseMotionListener(c);

        c.setPreferredSize(new Dimension(409, 726));

        SimpleAppLauncher.launch("Chapter 12-8 Interactive Shapes", c);

    }

    @Override

    public void mouseClicked(MouseEvent e) {

    }

    @Override

    public void mousePressed(MouseEvent e) {

        boolean anySelected = false;

        if (selectedShape) {

            // is control point position handle selected?

            Rectangle2D ctrl1Rect = new Rectangle2D.Double(

                    s.getCtrlX() - 2, s.getCtrlY() - 2, 5, 5);

            if (ctrl1Rect.contains(e.getPoint())) {

                moveType = CNTRL_PT;

                repaint();

                return;

            }

            // is start point position handle selected?
            Rectangle2D startRect = new Rectangle2D.Double(

                    s.getX1() - 2, s.getY1() - 2, 5, 5);

            if (startRect.contains(e.getPoint())) {

                moveType = START_PT;

                repaint();

                return;

            }


            // is end point position handle selected?

            Rectangle2D endRect = new Rectangle2D.Double(

                    s.getX2() - 2,

                    s.getY2() - 2, 5, 5);

            if (endRect.contains(e.getPoint())) {

                moveType = END_PT;

                repaint();

                return;

            }


            // is mouse inside shape

            if (s.contains(e.getPoint())) {

                moveType = MOVE_RECT;

                anchorPt = (Point2D) e.getPoint().clone();

                repaint();

                return;

            }

        }


        // select shape

        if (s.contains(e.getPoint()) && !selectedShape) {

            selectedShape = true;

            anySelected = true;

        }


        if (!anySelected) {

            selectedShape = false;

        }


        repaint();

    }


    @Override

    public void mouseReleased(final MouseEvent e) {

        moveType = -1;

        if (anchorPt != null) {

            double dx = e.getPoint().getX() - anchorPt.getX();

            double dy = e.getPoint().getY() - anchorPt.getY();


            // update all points in shape

            s.setCurve(s.getX1() + dx,

                    s.getY1() + dy,

                    s.getCtrlX() + dx,

                    s.getCtrlY() + dy,
                    s.getX2() + dx,

                    s.getY2() + dy);


            // reset for subsequent drag operation

            anchorPt = null;

            translatePt = null;

        }

        repaint();

    }


    @Override

    public void mouseEntered(MouseEvent e) {

    }


    @Override

    public void mouseExited(MouseEvent e) {

    }


    @Override

    public void mouseDragged(MouseEvent e) {

        if (selectedShape) {

            switch (moveType) {

                case START_PT:

                    s.setCurve(e.getPoint(), s.getCtrlPt(), s.getP2());

                    break;

                case CNTRL_PT:

                    s.setCurve(s.getP1(), e.getPoint(), s.getP2());

                    break;

                case END_PT:

                    s.setCurve(s.getP1(), s.getCtrlPt(), e.getPoint());

                    break;

                case MOVE_RECT:

                    translatePt = e.getPoint();

                    break;

            }

        }


        repaint();

    }


    @Override

    public void mouseMoved(MouseEvent e) {

        // move over shape

        if (s.contains(e.getPoint()) && !hoveredShape) {

            hoveredShape = true;

        }


        // move away from shape

        if (!s.contains(e.getPoint()) && hoveredShape) {

            hoveredShape = false;

        }

        repaint();

    }

}
Figure 12-13 depicts the application interacting with a cubic curve shape.
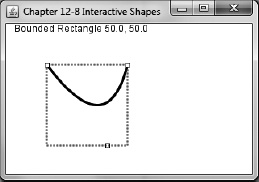
Figure 12-13. Interactive shape
How It Works
This recipe involves using your mouse pointer to interact with a shape on the graphics surface. Let's start with some instructions on how to interact with the shape being displayed. Before explaining the commands of the application, I'll give a quick description of the positioning handles for the QuadCurve2D shown in Figure 12-14.

Figure 12-14. Positioning handles
Here are the commands to interact with a quadratic curve shape:
Hover: Move the mouse pointer over the shape to create a gray dotted bounding box region around the shapeSelect shape: Click the mouse button to select the shape. This creates a red dotted bounding box region around the shape with positioning handles on the starting, ending, and control points (QuadCurve2Dattributes).Move shape: Press the mouse button inside the shape's region while dragging the shape across the screen.Change starting point: While the shape is selected with a mouse press, hold and drag the positioning handle (situated at the start of the curve) to stretch or squeeze the curve's length.Change ending point: While the shape is selected with a mouse press, hold and drag the positioning handle (situated at the end of the curve) to stretch or squeeze the curve's length.Change control point: While the shape is selected with a mouse press, hold and drag the positioning handle (control point) of a quadratic curve (bottom center).
Our class begins by implementing both the MouseListener and MouseMotionListener interfaces. The MouseListener interface contains methods that are responsible for mouse events such as pressing, releasing, clicking, entering, and exiting a component. In our case, the whole graphics surface is a component (JComponent), and you are only focusing on the mousePressed() and mouseReleased() methods. The rest of the methods are empty or no-op. You also are implementing the MouseMotionListener interface, in which methods are responsible for catching mouse events such as dragging and moving. The mouseDragged() and mouseMoved() methods are implemented, respectively.
The mousePressed() method basically determines when the shape is selected and what positioning handle was selected before a drag operation is performed. The mouseReleased() method is responsible for when the user releases the mouse after a drag operation. Also, it will reset the transform on the shape for subsequent mouse events.
Next, when implementing the MouseMotionListener interface, the mouseDragged() method is responsible for moving the whole shape or repositioning the positioning handles. The mouseMoved() method is basically responsible for bringing focus to the shape by creating a gray dotted bounding box region. When moving away from the shape, the gray box disappears.
In the class InteractiveShapes there are instance variables that maintain the state of the user's actions and the shape's information while being modified. Table 12-3 lists the instance variables used in this recipe to maintain the state of the shape to be manipulated:

The key to this recipe is to understand the order or workflow of events occurring before the shape is actually rendered. When a user uses the mouse, the various methods are being invoked by listening to mouse events. The methods that handle these mouse events will update state information (instance variables) and call the component's repaint() method. This will call the paintComponent() method to render the shape on the graphics surface.
12-9. Changing Text Font
Problem
You want to change the default text font to be used to draw on the graphics surface.
Solution
Before drawing text, set the graphics context to a new font style by using the java.awt.Font class and the Graphics object's setFont() method.
The code recipe here prints the book's title in four different font styles, including a drop shadow effect:
package org.java7recipes.chapter12.recipe12_09;


import java.awt.*;

import javax.swing.JComponent;

import org.java7recipes.chapter12.SimpleAppLauncher;


/**

 * Changing the text font.

 *

 * @author cdea

 */

public class ChangeTextFont extends JComponent {


    @Override

    protected void paintComponent(Graphics g) {

        super.paintComponent(g);


        Graphics2D g2d = (Graphics2D) g;

        g2d.setBackground(Color.WHITE);

        g2d.clearRect(0, 0, getParent().getWidth(), getParent().getHeight());

        // antialising
        g2d.setRenderingHint(RenderingHints.KEY_ANTIALIASING, RenderingHints.VALUE_ANTIALIAS_ON);


        // Serif with drop shadow

        Font serif = new Font("Serif", Font.PLAIN, 30);

        g2d.setFont(serif);

        g2d.setPaint(new Color(50,50,50,150));

        g2d.drawString("Java 7 Recipes", 52, 52);

        // paint red

        g2d.setPaint(Color.RED);

        g2d.drawString("Java 7 Recipes", 50, 50);


        // SanSerif

        g2d.setPaint(Color.BLUE);

        Font sanSerif = new Font("SanSerif", Font.PLAIN, 30);

        g2d.setFont(sanSerif);

        g2d.drawString("Java 7 Recipes", 50, 100);


        // Dialog

        g2d.setPaint(Color.GREEN);

        Font dialog = new Font("Dialog", Font.PLAIN, 30);

        g2d.setFont(dialog);

        g2d.drawString("Java 7 Recipes", 50, 150);


        // Monospaced

        g2d.setPaint(Color.BLACK);

        Font monospaced = new Font("Monospaced", Font.PLAIN, 30);

        g2d.setFont(monospaced);

        g2d.drawString("Java 7 Recipes", 50, 200);


    }


    public static void main(String[] args) {

        final ChangeTextFont c = new ChangeTextFont();

        c.setPreferredSize(new Dimension(330, 217));

        SimpleAppLauncher.launch("Chapter 12-9 Changing Text Font", c);

    }

}
Figure 12-15 displays the book title in four font styles with varying colors.
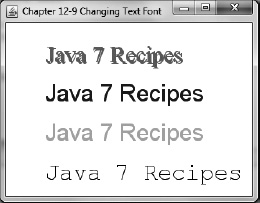
Figure 12-15. Changing text font
How It Works
The recipe begins by clearing the background to white and turning antialiasing on. The first text string rendered is the title of the book, Java 7 Recipes, in red with a drop shadow. Actually, this is a trick. What's really happening are two calls to the drawstring() method, which first draws the text lettering in gray and then applies the red lettering on top. When drawing the drop shadow, you will create a gray, semitransparent, 30-point, plain serif font. Next, you will use the same font style in the color red and invoke the drawstring() method. Positioning the text string just 2 pixels diagonally to the upper left gives the appearance of a drop shadow adding depth to the text. Shown here is how you will set the font with a Serif font:
    // Serif with drop shadow

    Font serif = new Font("Serif", Font.PLAIN, 30);

    g2d.setFont(serif);
The rest of the text font renderings are the same as the previous code snippet. I trust you get the idea!
12-10. Adding Attributes to Text
Problem
You want to add different attributes to text. For example, you want to set the color on an individual or a range of characters. Some of the types of attributes are color, bold, italic, strikethrough, and font style.
Solution
Combining the java.text.AttributedString and java.awt.font.TextAttribute classes enables you to set attributes on text. Following is a code example to specify various attributes onto your text to be displayed on the graphics surface:
package org.java7recipes.chapter12.recipe12_10;


import java.awt.*;

import java.awt.font.*;

import java.text.AttributedString;

import javax.swing.JComponent;

import org.java7recipes.chapter12.SimpleAppLauncher;


/**

 * Adding Attributes to Text.

 *

 * @author cdea

 */

public class AddingAttributesToText extends JComponent {


    @Override

    protected void paintComponent(Graphics g) {

        super.paintComponent(g);


        Graphics2D g2d = (Graphics2D) g;

        g2d.setBackground(Color.WHITE);

        g2d.clearRect(0, 0, getParent().getWidth(), getParent().getHeight());

        // antialising

        g2d.setRenderingHint(RenderingHints.KEY_ANTIALIASING, RenderingHints.VALUE_ANTIALIAS_ON);


        AttributedString attrStr = new AttributedString("Java7Recipes");


        // Serif, plain 'Java'

        Font serif = new Font(Font.SERIF, Font.PLAIN, 50);

        attrStr.addAttribute(TextAttribute.FONT, serif, 0, 4);


        // Underline 'Java'

        attrStr.addAttribute(TextAttribute.UNDERLINE, TextAttribute.UNDERLINE_ON, 0, 4);


        // Background black for 'Java'

        attrStr.addAttribute(TextAttribute.BACKGROUND, Color.BLACK, 0, 4);


        // SanSerif, Bold, Italic ‘7’ – ‘|’ or will make font bold and italic

        Font sanSerif = new Font(Font.SANS_SERIF, Font.BOLD | Font.ITALIC, 50);

        attrStr.addAttribute(TextAttribute.FONT, sanSerif, 4, 5);


        // Make a rainbow colors on 'Java7Re'

        // Roy G. Biv (red, orange, yellow, green, blue, indigo, violet)

        Paint[] rainbow = new Color[] {Color.RED, Color.ORANGE, Color.YELLOW,

            Color.GREEN,

            Color.BLUE, new Color(75, 0, 130), new Color(127, 0, 255)

        };


        for (int i=0; i<rainbow.length; i++) {
            attrStr.addAttribute(TextAttribute.FOREGROUND, rainbow[i], i, i+1);

        }


        // MonoSpaced, Bold 'Recipes'

        Font monoSpaced = new Font(Font.MONOSPACED, Font.BOLD, 50);

        attrStr.addAttribute(TextAttribute.FONT, monoSpaced, 5, 12);


        // Strike through 'Recipes'

        attrStr.addAttribute(TextAttribute.STRIKETHROUGH, Boolean.TRUE, 5, 12);

        g2d.drawString(attrStr.getIterator(), 50, 100);


    }


    public static void main(String[] args) {

        final AddingAttributesToText c = new AddingAttributesToText();

        c.setPreferredSize(new Dimension(410, 148));

        SimpleAppLauncher.launch("Chapter 12-10 Adding Attributes To Text", c);

    }

}
Figure 12-16 shows various attribute types applied to the text.
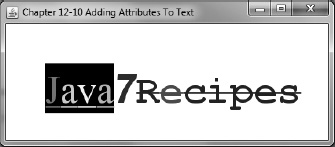
Figure 12-16. Adding attributes to text
How It Works
I was trying to be creative by adding different attributes to different parts of the title of the book “Java 7 Recipes.” Here is a rundown of the requirements:
- ‘Java’ should be a 50-point, plain, serif font.
- ‘Java’ should be underlined.
- ‘Java’ background should be black.
- ‘7’ should be a 50-point, italic, sans serif font
- ‘Java7Re’ should be a rainbow.
- ‘Recipes’ should be a 50-point, bold, monospace font.
- ‘Recipes’ should be strikethrough (crossed out).
The first thing you do is to instantiate an instance of the AttributedString with the text you want to add attributes to. AttributedString instance:
AttributedString attrStr = new AttributedString("Java7Recipes");
Second, start adding attributes using the addAttribute() method:
addAttribute(AttributedCharacterIterator.Attribute attribute, Object value, int beginIndex, int endIndex)
The attribute parameter is an instance of an AttributedCharacterIterator.Attribute, and in our example you are using TextAttribute instances, which are subclasses of AttributedCharacterIterator.Attribute class. TextAttribute has many attribute types that can be applied to text. To see all the available options and values, refer to the Javadoc on java.awt.font.TextAttribute. Shown here is an example of adding strikethough to the text string 'Recipes' with a start index of 5 and an end index of 12:
    // Strike through ‘Recipes’

    attrStr.addAttribute(TextAttribute.STRIKETHROUGH, Boolean.TRUE, 5, 12);

    g2d.drawString(attrStr.getIterator(), 50, 100);
12-11. Measuring Text
Problem
You want to align text to display left-, center-, or right-justified on the display area like a word processor would shift a sentence.
Solution
Create an application that will demonstrate text drawn to be positioned left-, center-, or right-justified. Also allow the user to select menu options to justify the lines of text. You will be using the java.awt.FontMetrics and java.awt.font.FontRenderContext classes to determine the width and height of text to dynamically display it on the canvas.
Shown here is the code recipe that creates an application that will allow the user to choose left, center, or right justification of the current text on the graphics surface. Currently, there are two lines of text being displayed that contain the phrases “The quick brown fox jumped” and “over the lazy dog.” When the user has selected the menu option “left,” the two phrases will be aligned to the left margin of the display area. When selecting the “right” menu option, the two phrases will be aligned to the right margin. The center menu option when selected will align the text phrases between the left and right margins.
package org.java7recipes.chapter12.recipe12_11;


import java.awt.*;

import java.awt.event.ActionEvent;
import java.awt.font.FontRenderContext;

import java.awt.geom.Rectangle2D;

import javax.swing.*;

import org.java7recipes.chapter12.AppSetup;

import org.java7recipes.chapter12.SimpleAppLauncher;


/**

 * Measuring Text.

 *

 * @author cdea

 */

public class MeasuringText extends JComponent implements AppSetup {

    public static final String LEFT = "left";

    public static final String CENTER = "center";

    public static final String RIGHT = "right";


    private String justifyText = "left";


    public String getJustification() {

        return justifyText;

    }


    public void setJustification(String justify) {

        justifyText = justify.toLowerCase();

    }


    @Override

    protected void paintComponent(Graphics g) {

        super.paintComponent(g);


        Graphics2D g2d = (Graphics2D) g;

        g2d.setBackground(Color.WHITE);

        g2d.clearRect(0, 0, getParent().getWidth(), getParent().getHeight());

        // antialising

        g2d.setRenderingHint(RenderingHints.KEY_ANTIALIASING,

                RenderingHints.VALUE_ANTIALIAS_ON);


        // SanSerif

        g2d.setPaint(Color.BLUE);

Font serif = new Font(Font.SERIF, Font.PLAIN, 30);

g2d.setFont(serif);


        String sentence1 = "The quick brown fox jumped";

        String sentence2 = "over the lazy dog.";


FontRenderContext fontRenderCtx = g2d.getFontRenderContext();

        Rectangle2D bounds1 = serif.getStringBounds(sentence1, fontRenderCtx);

        Rectangle2D bounds2 = serif.getStringBounds(sentence2, fontRenderCtx);


        int y = 50;
        int x = 0;

        FontMetrics fm = g2d.getFontMetrics();

        int spaceRow = fm.getDescent() + fm.getLeading() + fm.getAscent();


String justify = getJustification();

        switch(justify) {

            case CENTER:

                x = (getParent().getWidth() - (int)bounds1.getWidth())/2;

                g2d.drawString(sentence1, x, y);

                x = (getParent().getWidth() - (int)bounds2.getWidth())/2;

                g2d.drawString(sentence2, x, y + spaceRow);

                break;

            case RIGHT:

                x = (getParent().getWidth() - (int) bounds1.getWidth());

                g2d.drawString(sentence1, x, y);

                x = (getParent().getWidth() - (int) bounds2.getWidth());

                g2d.drawString(sentence2, x, y + spaceRow);

                break;

            case LEFT:

            default:

                g2d.drawString(sentence1, x, y);

                g2d.drawString(sentence2, x, y + spaceRow);

                break;

        }

    }


    @Override

    public void apply(JFrame frame) {


JMenuBar menuBar = new JMenuBar();

        JMenu menu = new JMenu("Justification");

menuBar.add(menu);


        JMenuItem leftMenuItem = new JMenuItem("Left");

        menu.add(leftMenuItem);

        leftMenuItem.addActionListener(

                new JustificationAction(leftMenuItem.getText(), this));


        JMenuItem centerMenuItem = new JMenuItem("Center");

        menu.add(centerMenuItem);

        centerMenuItem.addActionListener(

                new JustificationAction(centerMenuItem.getText(), this));


        JMenuItem rightMenuItem = new JMenuItem("Right");

        menu.add(rightMenuItem);

        rightMenuItem.addActionListener(

                new JustificationAction(rightMenuItem.getText(), this));


        frame.setJMenuBar(menuBar);

    }


    public static void main(String[] args) {
        final MeasuringText c = new MeasuringText();

        c.setPreferredSize(new Dimension(391, 114));

        SimpleAppLauncher.launch("Chapter 12-11 Measuring Text", c);

    }

}


/**

 * Action to set the justification.

 */

class JustificationAction extends AbstractAction {

    private MeasuringText component;


    public JustificationAction(String command, MeasuringText component) {

        super(command);

        this.component = component;

    }


    @Override

    public void actionPerformed(ActionEvent e) {

        String command = e.getActionCommand().toLowerCase();

        component.setJustification(command);

        component.repaint();

    }

}
Figure 12-17 shows the application displaying the text phrases with a center justification.
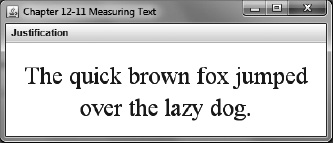
Figure 12-17. Measuring text
How It Works
Before going about creating this recipe example, you will notice the MeasuringText class that implements the AppSetup interface. This interface is co-located with the SimpleAppLauncher class from the very first recipe. The AppSetup interface has only one method: the apply() method. This method is a way for the SimpleAppLauncher class to invoke the apply() method. This allows SimpleAppLauncher to apply changes to the UI. As you saw in the first recipe example in this chapter, the SimpleAppLauncher class is responsible for creating the main application window or, in this case, a new JFrame. In this recipe, you will implement the apply() method to add menus to the main JFrame window. This provides a simple facility to allow (you) the developer to wire up menus and allow the application launcher to launch the window in a threadsafe way. Shown here is the code section used in the SimpleAppLauncher's displayGUI() method that calls the apply() method:
    protected static void displayGUI(final String title, final JComponent component) {


        // create window with title

        final JFrame frame = new JFrame(title);

        if (component instanceof AppSetup) {

            AppSetup ms = (AppSetup) component;

            ms.apply(frame);

        }

        ...// the rest of displayGUI

    } // end of displayGUI
Did you ever wonder how to justify text similar to word processors? Here is an example in which you can left-, center-, and right-justify text on the graphics surface. Before you begin to determine the size or bounding box of text, you must obtain the font that will be used in the rendering of text. Once you have a font instance, you can obtain the Graphics2D's font render context (java.awt.font.FontRenderContext). To obtain the font render context:
FontRenderContext fontRenderCtx = g2d.getFontRenderContext();
Next, with the desired font you will invoke getStringBounds(). Here you will pass in the string that will be rendered and FontRenderContext, which will return an instance of a Rectangle2D representing the bounding box containing the width and height of the text. To obtain the bounding box:
Rectangle2D bounds1 = serif.getStringBounds(sentence1, fontRenderCtx);
Finally, you can use FontMetrics to determine the low-level parts of the font such as ascent, descent, and leading. These parts make up the height measurements of a text font character. The first thing to know about font metrics is where the baseline is located. The baseline is an invisible line that the characters will sit on top of (similar to primary school handwriting paper). When using the drawString() method, you will specify the x and y, which is where the baseline will begin. The ascent is the distance from the top of the character to the baseline. The descent is the distance of how far parts of a character font will extend below the baseline, such as the lowercase letters g or j. Last is the leading that is used when characters are positioned beneath another character to provide proper spacing so they won't appear to be touching. The code snippet here determines the space needed for the second row of text:
    FontMetrics fm = g2d.getFontMetrics();


    int spaceRow = fm.getDescent() + fm.getLeading() + fm.getAscent();
When the user chooses the justification through the menu selection option, I used the Java 7 nifty string switch statement. Another nice feature from Project Coin, which is new to Java 7. Here, I use simple math to move the x coordinates to position the sentences based on the width of the JComponent. The code here uses the bounds width to calculate the center justification of text (center justify):
    x = (getParent().getWidth() - (int)bounds1.getWidth())/2;

    g2d.drawString(sentence1, x, y);

    x = (getParent().getWidth() - (int)bounds2.getWidth())/2;

    g2d.drawString(sentence2, x, y + spaceRow);
Next up is how to display large text passages having multiple lines that will word wrap text as the user resizes the window area.
12-12. Display Multiple Lines of Text
Problem
You want to fit large passages of text into your window area. In other words, you want to word wrap the text when the sentence runs beyond the right edge of the window area.
Solution
Create an application that allows the user to view text with the ability to word wrap when the user resizes the window. The main classes used in this recipe are these:
AttributedStringAttributedCharacterIteratorLineBreakMeasurer
Shown here is the code recipe to display a large text passage having the ability to word wrap based on the window's width:
package org.java7recipes.chapter12.recipe12_12;


import java.awt.*;

import java.awt.font.*;

import java.text.*;

import javax.swing.JComponent;

import org.java7recipes.chapter12.SimpleAppLauncher;


/**

 * Changing the text font.

 *

 * @author cdea

 */

public class MultipleLinesOfText extends JComponent {


    @Override

    protected void paintComponent(Graphics g) {

        super.paintComponent(g);


        Graphics2D g2d = (Graphics2D) g;

        g2d.setBackground(Color.BLACK);

        g2d.clearRect(0, 0, getParent().getWidth(), getParent().getHeight());

        // antialising

        g2d.setRenderingHint(RenderingHints.KEY_ANTIALIASING,
                RenderingHints.VALUE_ANTIALIAS_ON);


        // Serif bold

        Font serif = new Font("Serif", Font.BOLD, 22);

        g2d.setFont(serif);

        g2d.setPaint(Color.WHITE);

String latinText = "parvulus enim natus est nobis filius datus est "

                + "nobis et factus est principatus super umerum eius et "

                + "vocabitur nomen eius Admirabilis consiliarius Deus "

                + "fortis Pater futuri saeculi Princeps pacis";


        AttributedString attrStr = new AttributedString(latinText);

        attrStr.addAttribute(TextAttribute.FONT, serif);

        AttributedCharacterIterator attrCharIter = attrStr.getIterator();

        FontRenderContext fontRenderCtx = g2d.getFontRenderContext();

        LineBreakMeasurer lineBreakMeasurer =

new LineBreakMeasurer(attrCharIter, fontRenderCtx);

        float wrapWidth = getParent().getWidth();

        float x = 0;

        float y = 0;

        while (lineBreakMeasurer.getPosition() < attrCharIter.getEndIndex()) {

            TextLayout textLayout = lineBreakMeasurer.nextLayout(wrapWidth);

            y += textLayout.getAscent();

            textLayout.draw(g2d, x, y);

            y += textLayout.getDescent() + textLayout.getLeading();

        }

    }

    public static void main(String[] args) {

        final MultipleLinesOfText c = new MultipleLinesOfText();

        c.setPreferredSize(new Dimension(330, 217));

        SimpleAppLauncher.launch("Chapter 12-12 Multiple Lines of Text", c);

    }

}
Figure 12-18 depicts an application containing a large text passage wrapping words based on the width of the window.

Figure 12-18. Multiple lines of text
How It Works
Most word processors and even simple editors have a word wrap feature. Long text strings go beyond the width of the window and move to the next line as if someone were hitting the carriage return key. To perform this behavior, you will first obtain the font to be added as an attribute to the text by using the AttributedString class. The following code snippet adds the serif font style as an attribute on the attributed text (AttributedString):
    Font serif = new Font("Serif", Font.BOLD, 22);

    AttributedString attrStr = new AttributedString(latinText);

    attrStr.addAttribute(TextAttribute.FONT, serif);
Next, you will see the magic of the LineBreakerMeasurer class, in which it determines each character's position and text layout. From an AttributedString you will obtain an iterator (AttributedCharacterIterator) to be passed in along with the FontRenderContext object in order for you to create an instance of a LineBreakMeasurer object. An instance of a LineBreakMeasurer:
    AttributedCharacterIterator attrCharIter = attrStr.getIterator();

    FontRenderContext fontRenderCtx = g2d.getFontRenderContext();

    LineBreakMeasurer lineBreakMeasurer = new LineBreakMeasurer(attrCharIter, fontRenderCtx);
By determining the width of the JComponent or visible graphics surface area, you can then use that width to help determine where to perform a line break. In this case, it is a matter of moving the text down the y-axis according to the ascent and leading height. The following code iterates through each text layout, based on a wrap width and height calculation to determine its y-coordinate to position words to the next line:
    while (lineBreakMeasurer.getPosition() < attrCharIter.getEndIndex()) {

          TextLayout textLayout = lineBreakMeasurer.nextLayout(wrapWidth);

          y += textLayout.getAscent();

          textLayout.draw(g2d, x, y);

          y += textLayout.getDescent() + textLayout.getLeading();

}
For more on measuring text, refer to recipe 12-11.
12-13. Adding Shadows to Drawings
Problem
You want to create a drop shadow effect when drawing shapes on the graphics surface.
Solution
Use a simple technique by drawing two congruent shapes on top of one another except one shape is slightly offset relative to the other, and the bottom shape is filled with a dark color that appears as a drop shadow.
The following code recipe is an application that will display a donut shape appearing with a drop shadow effect.
package org.java7recipes.chapter12.recipe12_13;


import java.awt.*;

import java.awt.geom.*;

import java.awt.image.*;

import javax.swing.JComponent;

import org.java7recipes.chapter12.SimpleAppLauncher;


/**

 * Adding Shadows on Shapes

 * @author cdea

 */

public class AddingShadows extends JComponent {


    private void createDropShadow(Graphics g, Shape s) {


        int margin = 10;

        int padding = 5;

        int width = s.getBounds().width + padding + margin;

        int height = s.getBounds().height + padding + margin;

        Graphics2D g2d = (Graphics2D) g;

        GraphicsConfiguration gc = g2d.getDeviceConfiguration();

        BufferedImage srcImg = gc.createCompatibleImage(width, height, Transparency.TRANSLUCENT);

        BufferedImage destImg = gc.createCompatibleImage(width, height, Transparency.TRANSLUCENT);

        Graphics2D g2 = srcImg.createGraphics();


        g2.setComposite(AlphaComposite.Clear);

        g2.fillRect(0, 0, width, height);


        g2.setComposite(AlphaComposite.Src);

        g2.setRenderingHint(RenderingHints.KEY_ANTIALIASING, RenderingHints.VALUE_ANTIALIAS_ON);

        g2.setStroke(new BasicStroke(3.0f));

        g2.setPaint(Color.BLACK);

        g2.translate(-s.getBounds().x, -s.getBounds().y);

        int centerX = (width - s.getBounds().width ) / 2;

        int centerY = (height - s.getBounds().height ) / 2;

        g2.translate(centerX, centerY);


        g2.draw(s);

        float blurValue = 1.0f / 49.0f;
        float data[] = new float[49];

        for (int i=0; i<49; i++) {

            data[i] = blurValue;

        }


        Kernel kernel = new Kernel(7, 7, data);

        ConvolveOp convolve = new ConvolveOp(kernel, ConvolveOp.EDGE_ZERO_FILL,

null);

        convolve.filter(srcImg, destImg);


        g2.dispose();


        g2d.drawImage(destImg, s.getBounds().y -padding, s.getBounds().x -padding, null);


}


    @Override

    protected void paintComponent(Graphics g) {

        super.paintComponent(g);


        Graphics2D g2d = (Graphics2D) g;

        g2d.setBackground(Color.WHITE);

        g2d.clearRect(0, 0, getParent().getWidth(), getParent().getHeight());

        g2d.setRenderingHint(RenderingHints.KEY_ANTIALIASING, RenderingHints.VALUE_ANTIALIAS_ON);


        // set color and thickness of stroke

        g2d.setPaint(Color.BLACK);

        g2d.setStroke(new BasicStroke(2));


        // donut

        //g2d.setStroke(new BasicStroke(2));

        Ellipse2D bigCircle = new Ellipse2D.Float(50, 50, 100, 75);

        Ellipse2D smallCircle = new Ellipse2D.Float(80, 75, 35, 25);

        Area donut = new Area(bigCircle);

        Area donutHole = new Area(smallCircle);

        donut.subtract(donutHole);


        // draw drop shadow

        createDropShadow(g2d, donut);


        // draw orange donut

        g2d.setPaint(Color.ORANGE);

        g2d.fill(donut);


        // outline the donut

        g2d.setPaint(Color.BLACK);

        g2d.draw(donut);
    }


    public static void main(String[] args) {

        final AddingShadows c = new AddingShadows();

        c.setPreferredSize(new Dimension(334, 174));

        SimpleAppLauncher.launch("Chapter 12-13 Adding Shadows", c);

    }

}
Figure 12-19 displays a donut shape with an applied drop shadow effect.
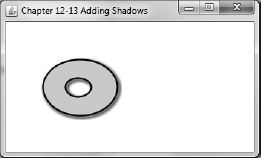
Figure 12-19. Adding shadows
How It Works
Amazingly, there are numerous ways to produce the drop shadow effect on shapes and images when rendering things on the canvas. To simply create a drop shadow effect, draw the shape a little offset with the color black. Then draw the shape again with a different color over the top of the previous shape (black shadow). Repeating the last strategy using gradient paint instead of black provides another simple way to produce a shadow. (The gradient drop shadow technique was used in recipe 12-7.) Of course, you'll notice that this tasty donut looks vaguely familiar because it's the same shape also used in recipe 12-7. Interestingly enough, I went the extra mile and decided to use yet another strategy to produce a cool-looking drop shadow effect. You will be using the ConvolveOp class to blur pixels, which gives the shadow a misty appearance.
When using the ConvolveOp class, you will need to create a source and a resultant (destination) image. You can think of the ConvolveOp as a filter that takes the source image as input and converts the pixels onto the resultant image. The following code creates a source and destination image for you to perform the convolve operation:
    Graphics2D g2d = (Graphics2D) g;

    GraphicsConfiguration gc = g2d.getDeviceConfiguration();

    BufferedImage srcImg = gc.createCompatibleImage(width, height, Transparency.TRANSLUCENT);

    BufferedImage destImg = gc.createCompatibleImage(width, height, Transparency.TRANSLUCENT);
To blur an image using the Java2D API, you will need to use a Kernel class, which represents a matrix consisting of values that are used to affect a destination pixel color value. You will first create a 7x7 matrix with each value set to 1/49. For less blur, use a smaller matrix. The total matrix value will determine the destination pixel value. When adding all values of this matrix together, the total matrix value equals 1. In order to blur an image, the total matrix value must equal 1. Shown here is the code used to create a 7x7 matrix or kernel to blur an image:
    float blurValue = 1.0f / 49.0f;

    float data[] = new float[49];

    for (int i=0; i<49; i++) {

        data[i] = blurValue;

    }

Kernel kernel = new Kernel(7, 7, data);
Once you create an instance of a ConvolveOp, you can perform the filter() method that makes the mysterious shadowy donut. The following code creates an instance of a ConvolveOp used to apply a blur filter:
    ConvolveOp convolve = new ConvolveOp(kernel, ConvolveOp.EDGE_ZERO_FILL,null);

    convolve.filter(srcImg, destImg);
To know many more filter operations, see the Javadoc on ConvolveOp.
12-14. Printing Documents
Problem
You want to print the graphics surface onto a printer.
Solution
Create an application allowing the user to print the graphic surface using the following classes:
java.awt.print.PrinterJobjava.awt.print.Printable
The code recipe here generates an application similar to recipe 12-9 that displays the book title with varied font styles. Although it is quite similar, this recipe will allow the user to print the graphics surface.
package org.java7recipes.chapter12.recipe12_14;


import java.awt.*;

import java.awt.event.*;

import java.awt.print.*;

import javax.swing.*;

import org.java7recipes.chapter12.AppSetup;

import org.java7recipes.chapter12.SimpleAppLauncher;


/**

 * Printing Documents.

 *

 * @author cdea

 */
public class PrintingDocuments extends JComponent implements AppSetup, Printable {


    @Override

    protected void paintComponent(Graphics g) {

        super.paintComponent(g);

        draw(g);

}


    private void draw(Graphics g) {

        Graphics2D g2d = (Graphics2D) g;

        g2d.setBackground(Color.WHITE);

        g2d.clearRect(0, 0, getParent().getWidth(), getParent().getHeight());


        // antialising

        g2d.setRenderingHint(RenderingHints.KEY_ANTIALIASING, RenderingHints.VALUE_ANTIALIAS_ON);


        // Serif with drop shadow

        Font serif = new Font("Serif", Font.PLAIN, 30);

        g2d.setFont(serif);

        g2d.setPaint(new Color(50, 50, 50, 150));

        g2d.drawString("Java 7 Recipes", 52, 52);

        // paint red

        g2d.setPaint(Color.RED);

        g2d.drawString("Java 7 Recipes", 50, 50);


        // SanSerif

        g2d.setPaint(Color.BLUE);

Font sanSerif = new Font("SanSerif", Font.PLAIN, 30);

        g2d.setFont(sanSerif);

        g2d.drawString("Java 7 Recipes", 50, 100);


        // Dialog

        g2d.setPaint(Color.GREEN);

        Font dialog = new Font("Dialog", Font.PLAIN, 30);

        g2d.setFont(dialog);

        g2d.drawString("Java 7 Recipes", 50, 150);


        // Monospaced

        g2d.setPaint(Color.BLACK);

        Font monospaced = new Font("Monospaced", Font.PLAIN, 30);

        g2d.setFont(monospaced);

        g2d.drawString("Java 7 Recipes", 50, 200);

    }


    @Override

    public int print(Graphics g, PageFormat pgFormat, int page) throws

            PrinterException {
        if (page > 0) {

            return Printable.NO_SUCH_PAGE;

        }


        Graphics2D g2d = (Graphics2D) g;


        g2d.translate(pgFormat.getImageableX(), pgFormat.getImageableY());


        draw(g2d);


        return Printable.PAGE_EXISTS;

    }


    public void apply(JFrame frame) {

        JMenuBar menuBar = new JMenuBar();

        JMenu menu = new JMenu("File");

        JMenuItem printMenuItem = new JMenuItem("Print...");

        final Printable printSurface = this;

        printMenuItem.addActionListener(new ActionListener() {

            @Override

            public void actionPerformed(ActionEvent e) {

                PrinterJob job = PrinterJob.getPrinterJob();

                job.setPrintable(printSurface);

                boolean ok = job.printDialog();

                if (ok) {

                 try {

                      job.print();

                 } catch (PrinterException ex) {

                     ex.printStackTrace();

                 }

                }

            }

        });

        menu.add(printMenuItem);

        menuBar.add(menu);

        frame.setJMenuBar(menuBar);

    }

    public static void main(String[] args) {

        final PrintingDocuments c = new PrintingDocuments();

        c.setPreferredSize(new Dimension(330, 217));

        SimpleAppLauncher.launch("Chapter 12-10 Printing Documents", c);

    }

}
Figure 12-20 shows the Print dialog box that is launched after the user selects Print.
Figure 12-20. Print dialog box
How It Works
While this chapter goes into great detail about drawing onto the 2D surface, wouldn't it be nice to actually send your drawings to the printer? In the Java 2D API (as discussed in recipe 12-1), the device surface is a screen. However, in this recipe, the device space will be your printer.
Let's begin with the main application class that implements the (Printable) interface. The (Printable) interface has a method called print(), which is the code that interacts with the PrinterJob object (aka “the printer”). The following code statement is the print() method on the (Printable) interface:
public int print(Graphics g, PageFormat pgFormat, int page) throws PrinterException
This recipe is a refactored version of recipe 12-9. If you remember, it displays the book title Java 7 Recipes in various font styles. So, what actually got refactored? Well, I moved all the drawing code from the paintComponent() method into another method called draw(). By doing this, the paintComponent() and print() methods can call the draw() method. This allows us to see and print the graphics surface at the same time.
This recipe is assembled using Java Swing API to create menu options for the user to select and print the display. You will notice the apply() method creates a JMenuItem instance with an inner class definition containing an actionPerformed() method. The actionPerformed() method is responsible for presenting the Print dialog box to the user. Shown here is the code snippet to launch the Print dialog box :
    PrinterJob job = PrinterJob.getPrinterJob();

    job.setPrintable(printSurface);

    boolean ok = job.printDialog();
Once the user clicks OK, the print() method is invoked on the PrinterJob object. Next, the Printable object's print() method is called. Finally, walk over to the printer and…voilà!
12-15. Loading and Drawing an Image
Problem
You have digital images on the file system that you want to load and display in your application.
Solution
Create an application that will allow you to provide a file chooser to select a file to load and display. The following are the main classes used in this recipe:
- javax.swing.SwingWorker
- javax.imageio.ImageIO
The following code listing is an application that loads and displays image from the file system:
package org.java7recipes.chapter12.recipe12_15;


import java.awt.*;

import java.awt.event.*;

import java.awt.image.*;

import java.io.*;

import javax.imageio.*;

import javax.swing.*;

import org.java7recipes.chapter12.AppSetup;

import org.java7recipes.chapter12.SimpleAppLauncher;


/**

 * Load and draw image.

 *

 * @author cdea

 */

public class LoadingAnImage extends JComponent implements AppSetup {


    private static BufferedImage image = null;


    @Override

    protected void paintComponent(Graphics g) {

        super.paintComponent(g);


        Graphics2D g2d = (Graphics2D) g;
g2d.setBackground(Color.WHITE);
        g2d.clearRect(0, 0, getParent().getWidth(), getParent().getHeight());

        if (image != null) {

          g2d.drawImage(image, 0, 0, image.getWidth(), image.getHeight(), null);

        }

    }


    @Override

    public void apply(JFrame frame) {

        JMenuBar menuBar = new JMenuBar();

        JMenu menu = new JMenu("File");

        JMenuItem printMenuItem = new JMenuItem("Load Image...");


        printMenuItem.addActionListener(new ActionListener() {

            @Override

            public void actionPerformed(ActionEvent e) {

                final FileDialog loadImageDlg = new FileDialog((JFrame) null);

                loadImageDlg.setVisible(true);

                if (loadImageDlg.getFile() != null) {

                    SwingWorker<BufferedImage, Void> worker = new SwingWorker<>() {

                        @Override

                        protected BufferedImage doInBackground() throws Exception {

                            try {

                                File imageFile = new File(loadImageDlg.getDirectory() + File.separator + loadImageDlg.getFile());

                                image = ImageIO.read(imageFile);

                            } catch (IOException e1) {

                                e1.printStackTrace();

                            }

                            return image;

                        }


                        @Override

                        protected void done() {

                            try {

                                image = get();

                            } catch (Exception ex) {

                                ex.printStackTrace();

                            }

                            repaint();

                        }

                    };

                    worker.execute();

                }

            }

        });

        menu.add(printMenuItem);

        menuBar.add(menu);

        frame.setJMenuBar(menuBar);


    }


    public static void main(String[] args) {
        final LoadingAnImage c = new LoadingAnImage();

        c.setPreferredSize(new Dimension(374, 415));

        SimpleAppLauncher.launch("Chapter 12-15 Loading Image", c);

    }

}
Figure 12-21 depicts an open dialog box to load an image file.

Figure 12-21. Open dialog box
Figure 12-22 displays the image after it was loaded.
Figure 12-22. Loading image
How It Works
Every time you see an advertisement on a new camera being sold you seem to immediately pay attention to the number of megapixels or the other cool features. Of course, you know that the higher the megapixels the better the image quality. With the increase in the number of megapixels, viewing and loading images can often make applications appear quite sluggish. When developing Swing GUI applications, it is imperative to understand how to effectively interact with its event dispatching thread (EDT). The EDT is responsible for rendering graphics. Things such as disk I/O should not be included in the same transaction (method call). The key is to delegate work to another thread (worker thread). Because the EDT is single threaded, it is important to offload work onto a separate thread so it doesn't block. When blocking occurs, the application will freeze the GUI window, and users will become upset. Because of this common scenario, the guys and gals on the Java client/UI team have included a SwingWorker class in Java 6 that provides the callback behavior that you are looking for. The following code lines are two ways to instantiate the SwingWorker class:
    SwingWorker<T, V> worker = new SwingWorker<>()


    SwingWorker<BufferedImage, Void>imageLoadWorker = new SwingWorker<>();
The SwingWorker class uses generics to enable the user of the API to specify types of result objects returned during and after the worker thread task is completed. When instantiating an instance of a SwingWorker, the T (Type) is the result object after the doInBackground() method has been called. Once the doInBackground() method is complete, it returns the image object and hands off the control to the done() method (on the EDT). While inside the done() method you will encounter the get() method that returns the image object from the doInBackground() method (non-EDT).
The SwingWorker's V (Value) is an intermediate object that is updated and used by publish() and process() methods. The V is used often when displaying progress indicators. In our example, you only care about the loaded image, and V is declared Void. You'll also notice a shortcut notation whenever you are instantiating objects with generics by using the less-than and greater-than symbol: <>. To cut down on verbosity, new to Java 7 is what is known as the diamond operator. It isn't really an operator; it's a type inference notation for constructors. Either way you look at it, on the productivity side of things there is less to type and your code is a lot easier to read. Another thing to note is when using the diamond notation make sure your IDE has its Source/Binary format set to JDK 7, or else your code won't compile. Shown here is the before and after using the diamond operator notation:
SwingWorker<BufferedImage, Void> imageLoadWorker = new SwingWorker<BufferedImage, Void >();
Shown here is applying the diamond operator notation:
SwingWorker<BufferedImage, Void> imageLoadWorker = new SwingWorker<>();
![]() NOTE An excellent article on using the SwingWorker class is “Improve Application Performance with SwingWorker in Java SE 6” by John O'Conner, January 2007:
NOTE An excellent article on using the SwingWorker class is “Improve Application Performance with SwingWorker in Java SE 6” by John O'Conner, January 2007: http://java.sun.com/developer/technicalArticles/javase/swingworker
Loading an image is pretty simple: you basically invoke the ImageIO.read() method by passing in a File object representing the image file on the file system. You can also load an image via a URL by using the following code snippet:
    URL url = new URL(getCodeBase(), "myFamily.png");

    BufferedImage image = ImageIO.read(url);
Java can currently load .jpg, .gif, and .png image formats. In this example, I used a FileDialog class to allow the user to find a picture to load.
Last but not least, drawing an image is very much like drawing a rectangular shape using an (x, y), width, and height. There are many overloaded drawImage() methods on the Graphics object used to draw images. Here, I've only provided the most common method signature to render an image on the graphics surface. One of the many overloaded drawImage() methods you can use is shown here:
    public abstract boolean drawImage(Image img,

                    int x,

                    int y,

                    int width,

                    int height,

                    ImageObserver observer)
Keep in mind that the underlying Graphics object is a Graphics2D class that contains even more overloaded drawImage() methods. You might want to explore the interesting effects that can be applied to images. To learn more about Graphics2D's drawImage() methods, please see the Javadoc for details. Because you aren't monitoring the process of the image loading, I passed in a null into the parameter observer. When drawing on the graphics surface, you will use the drawImage() method as shown here:
    Graphics2D g2d = (Graphics2D) g;

    g2d.drawImage(image, 50, 50, image.getWidth(), image.getHeight(), null);
12-16. Altering an Image
Problem
After loading an image, you want to simulate a special effect similar to night vision goggles.
Solution
Alter the image's underlying pixel information by removing the red and blue component of each pixel in the image. When altering an image, you will be using java.awt.image.BufferedImage's methods getRGB() and setRGB():
package org.java7recipes.chapter12.recipe12_16;


import java.awt.*;

import java.awt.event.*;

import java.awt.image.BufferedImage;
import java.io.*;

import javax.imageio.ImageIO;

import javax.swing.*;

import org.java7recipes.chapter12.AppSetup;

import org.java7recipes.chapter12.SimpleAppLauncher;


/**

 * Altering an Image.

 * requires sdk 7

 * @author cdea

 */

public class AlteringAnImage extends JComponent implements AppSetup {

    private static BufferedImage image = null;


    @Override

    protected void paintComponent(Graphics g) {

        super.paintComponent(g);


        Graphics2D g2d = (Graphics2D) g;

        g2d.setBackground(Color.WHITE);

        g2d.clearRect(0, 0, getParent().getWidth(), getParent().getHeight());

        if (image != null) {

            g2d.drawImage(image, 0, 0, image.getWidth(), image.getHeight(), null);

        } // end of if

    } // end of paintComponent()


    public void alterImage(BufferedImage image) {

        int width = image.getWidth(null);

        int height = image.getHeight(null);


        int[] argbData; // Array holding the ARGB data


        // Prepare the ARGB array

        argbData = new int[width * height];


        // Grab the ARGB data

        image.getRGB(0, 0, width, height, argbData, 0, width);


        // Loop through each pixel in the array

        for (int i = 0 ; i < argbData.length ; i++) {

           argbData[i] = (argbData[i] & 0xFF00FF00);

        }

        //  Set the return Bitmap to use this altered ARGB array

        image.setRGB(0, 0, width, height, argbData, 0, width);

    }

    @Override

    public void apply(JFrame frame) {

        JMenuBar menuBar = new JMenuBar();

        JMenu menu = new JMenu("File");
        JMenuItem loadMenuItem = new JMenuItem("Load Image...");


        loadMenuItem.addActionListener(new ActionListener() {

            @Override

            public void actionPerformed(ActionEvent e) {

                final FileDialog loadImageDlg = new FileDialog((JFrame) null);

                loadImageDlg.setVisible(true);

                if (loadImageDlg.getFile() != null) {

                    SwingWorker<BufferedImage, Void> worker = new SwingWorker<>() {

                        @Override

                        protected BufferedImage doInBackground() throws Exception {

                            try {

                                File imageFile = new File(loadImageDlg.getDirectory() + File.separator + loadImageDlg.getFile());

                                image = ImageIO.read(imageFile);

                            } catch (IOException e1) {

                                e1.printStackTrace();

                            }

                            alterImage(image);

                            return image;

                        } // end of doInBackground()


                        @Override

                        protected void done() {

                            try {

                                image = get();

                            } catch (Exception ex) {

                                ex.printStackTrace();

                            }

                            repaint();

                        } // end of done()

                    }; // end of SwingWorker


                    worker.execute();


                } // end of if

            } // end of actionPerformed()

        }); // end of addActionListener()

        menu.add(loadMenuItem);

        menuBar.add(menu);

        frame.setJMenuBar(menuBar);


    }

    public static void main(String[] args) {

        final AlteringAnImage c = new AlteringAnImage();

        c.setPreferredSize(new Dimension(374, 415));

        SimpleAppLauncher.launch("Chapter 12-16 Altering an Image", c);

    }

}
Figure 12-23 displays a picture altered by removing the red and blue components of image data.

Figure 12-23. Altering an image
How It Works
To make things a little more interesting, I wanted to simulate night vision goggles similar to the ones used by Navy Seal teams. I thought it would be easy to just remove the red and blue components from each colored pixel from the image and leave the green and alpha components alone.
When manipulating an image (BufferedImage), you have the opportunity to get color information detailing each pixel. The default getRGB() method returns an int (integer) value representing the four components(alpha, red, green, and blue) of a pixel. Of course, in Java the data type int (integer)is composed of 4 bytes, and in the RGB color space each byte represents a color component making each value with an 8-bit precision. Although the default is an 8-bit precision, you may want to dig deeper into the image data by exploring the Javadoc on details relating to the java.awt.image.ColorModel and java.awt.image.Raster API.
If you understand the RGB color space, you will be moving right along. (However, if you do not understand it, refer to recipe 12-4.) The first step is to obtain pixel data for examination and to invoke the setRGB() method that updates the pixel information, thus altering the image.
Instead of returning a single pixel at a time by using the getRGB(x, y) method, I used the overloaded getRGB() method that returns an array of int (integer) values. The code here shows the BufferedImage's getRGB() method that returns an array of ints:
When calling the getRGB() method to return an array of ints, you can do one of two things. Either you can construct an integer array to be populated or you can pass in a null into the rgbArray parameter. In our example, I created an array of ints to be populated:
    int[] argbData;

    // Prepare the ARGB array

    argbData = new int[width * height];


// Grab the ARGB data

image.getRGB(0, 0, width, height, argbData, 0, width);
Finally, the pixel data will be manipulated by using the setRGB() method. In a simple for loop, I simply mask each int in the array by making the red and blue components to zero. In other words when you perform a bitwise AND any byte and F Hex (bitwise one) is itself; any byte and 0 (bitwise 0) is 0. Here is the code to create a loop to alter an image's pixel data:
    // Loop through each pixel in the array

    for (int i = 0 ; i < argbData.length ; i++) {

    argbData[i] = (argbData[i] & 0xFF00FF00);

}


//  Set the return Bitmap to use this altered ARGB array

image.setRGB(0, 0, width, height, argbData, 0, width);
12-17. Storing an Image
Problem
You want to load an image and save it to your file system as another file name.
Solution
Create an application that will load your image into memory to be later saved as another file name onto your file system. You will use the java.awt.image.BufferedImage class and javax.imageio.ImageIO.write() method to write an image from memory onto the file system.
The code listed here creates an image loader application that has the ability to save an image file to the file system:
package org.java7recipes.chapter12.recipe12_17;


import org.java7recipes.chapter12.AppSetup;

import org.java7recipes.chapter12.SimpleAppLauncher;

import java.awt.*;

import java.awt.event.*;

import java.awt.image.BufferedImage;
import java.io.*;

import javax.imageio.ImageIO;

import javax.swing.*;


/**

 * Saving an Image.

 *

 * @author cdea

 */

public class SavingAnImage extends JComponent implements AppSetup {


    private static BufferedImage image = null;


    @Override

    protected void paintComponent(Graphics g) {

        super.paintComponent(g);


        Graphics2D g2d = (Graphics2D) g;

        g2d.setBackground(Color.WHITE);

        g2d.clearRect(0, 0, getParent().getWidth(), getParent().getHeight());

        if (image != null) {

            g2d.drawImage(image, 0, 0, image.getWidth(), image.getHeight(), null);

        }

    }


    @Override

    public void apply(final JFrame frame) {

        JMenuBar menuBar = new JMenuBar();

        JMenu menu = new JMenu("File");

        menuBar.add(menu);


        JMenuItem loadMenuItem = new JMenuItem("Load Image...");


        loadMenuItem.addActionListener(new ActionListener() {


            @Override

            public void actionPerformed(ActionEvent e) {

                final FileDialog loadImageDlg = new FileDialog((JFrame) null);

                loadImageDlg.setVisible(true);

                if (loadImageDlg.getFile() != null) {

                    SwingWorker<BufferedImage, Void> worker = new SwingWorker<>() {

                        @Override

                        protected BufferedImage doInBackground() throws Exception {

                            try {

                                File imageFile = new File(loadImageDlg.getDirectory() + File.separator + loadImageDlg.getFile());

                                image = ImageIO.read(imageFile);

                            } catch (IOException e1) {

                                e1.printStackTrace();

                            }

                            return image;
                        }


                        @Override

                        protected void done() {

                            try {

                                image = get();

                            } catch (Exception ex) {

                                ex.printStackTrace();

                            }

                            repaint();

                        }

                    };

                    worker.execute();

                }

            }

        });

        menu.add(loadMenuItem);


        JMenuItem saveAsMenuItem = new JMenuItem("Save Image As...");

        saveAsMenuItem.addActionListener(new ActionListener() {


            @Override

            public void actionPerformed(ActionEvent e) {

                final JFileChooser saveImageDlg = new JFileChooser(new File(System.getProperty("user.home")));

                int response = saveImageDlg.showSaveDialog(frame);


                if (response == JFileChooser.APPROVE_OPTION) {

                    File fileToSaveAs = saveImageDlg.getSelectedFile();

                    String fileName = fileToSaveAs.getName();

                    String fileType = null;

                    if (fileName.indexOf(".") > 0) {

                        fileType = fileName.substring(fileName.lastIndexOf(".")).toLowerCase();

                    }

                    if (fileType != null && fileType.length() == 4 && image != null) {

                        try {

                            BufferedImage bi = image; // retrieve image

                            switch(fileType){

                                case ".jpg":

                                case ".png":

                                case ".gif":

                                    ImageIO.write(bi, fileType.substring(1), fileToSaveAs);

                                    break;

                            }

                        } catch (IOException e2) {

                            e2.printStackTrace();

                        }

                    } else {

                        // error

                        JOptionPane.showMessageDialog(frame, "Sorry couldn't save.
Try loading an image and saving with a file name using extension as: .gif .jpg or .png");

                    }

                }

            }

        });

        menu.add(saveAsMenuItem);

        frame.setJMenuBar(menuBar);

    }


    public static void main(String[] args) {

        final SavingAnImage c = new SavingAnImage();

        c.setPreferredSize(new Dimension(374, 415));

        SimpleAppLauncher.launch("Chapter 12-17 Saving an Image", c);

    }

}
Figure 12-24 shows the image loader application with an image loaded and displayed onto the screen:
Figure 12-24. Saving an image
Figure 12-25 depicts the Save dialog box that allows the user to save the image to the file system with a specified file name. Notice the file extension is .png, which is one of the supported image file formats.
Figure 12-25. Save As dialog box
How It Works
Before we discuss saving an image, I want to remind you that the recipe application requires the user to load an image first. Because loading and drawing an image onto the graphics surface is discussed in earlier recipes, I need not go into those details any further. Once an image is loaded and displayed in the application, the user can select the menu option Save Image As to save the image as a file onto the file system.
The Save dialog box application expects the user to select or type in a file name with a valid graphic format file extension. The valid graphics format file extensions are .jpg, .gif and .png. In this example I am saving the file as a .png image file format. The user will receive an alert dialog box if the file name is not valid. Figure 12-26 shows a warning dialog message letting the user know that the file has an invalid file extension:

Figure 12-26. Warning message
Assuming that the user has entered a valid file name and clicked the Save button in the Save dialog box, the application will convert and save the image into a valid graphics file format. The ImageIO.write() method needs to know the type of graphics format to save the image file as. Here is the code used to save a BufferedImage image:
    BufferedImage bi = …

    ImageIO.write(bi, “png", “/home/cdea/myimages/coolpict.png");
Notice that the Save Image As dialog code is rather bare where the code performs the ImageIO.write() statement. Why is this such a bad thing? Well, saving an image could take longer than 250 milliseconds making your GUI application appear frozen (while the user clenches his jaw). To fix this problem, surround the code with a SwingWorker class. In order to do this, place the call ImageIO.write() inside of the doBackground() method, thus deferring work off of the EDT. (To see more on SwingWorker, see recipes 12-15 and 14-7.)