
Chapter 33
A Taste of Cocoa Development
In the previous chapter, you got a quick look at Xcode along with many of the other tools Apple provides for development. Learning about the tools is important, but it's all for naught if you don't know how to use them; after all, it would be cool to have a jet plane but less so if you don't know how to fly. With that in mind, in this chapter you will do the following:
- Build a simple Cocoa application in Xcode
- Discover what you still need to know to do real Cocoa programming
- Look at where to go to learn more
While this chapter won't earn you your wings, it will get you off the ground.
NOTE: Cocoa is one of Apple's primary application programming interfaces (APIs) for Mac OS development. Often mistakenly referred to as a framework, Cocoa is actually two separate frameworks: Foundation Kit and Application Kit (or App Kit for short). These two frameworks provide a wide range of prebuilt functions, utilities, and UI elements that can be used in any Cocoa application to simplify the development process. In this chapter, you will rely 100 percent on available frameworks to build your sample application.
Building a Cocoa Application
The best way to learn something is to just do it. So, let's get started by building a little application in Cocoa called SimpleWeb (Figure 33–1). Don't worry if you have never programmed before; you can do this.
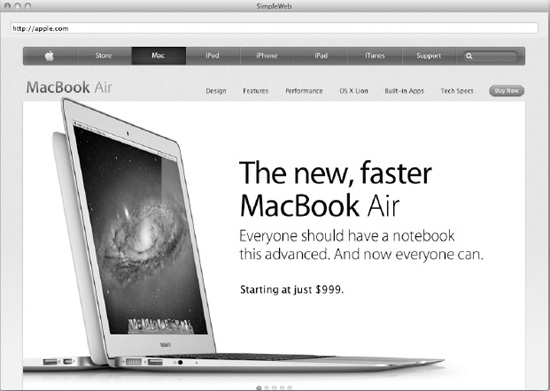
Figure 33–1. SimpleWeb is a very simple but fully usable web browser.
Creating Your Project in Xcode
To begin with, you must first create your project in Xcode, so open Xcode; in the Welcome to Xcode window, select “Create a new Xcode project” (Figure 33–2).
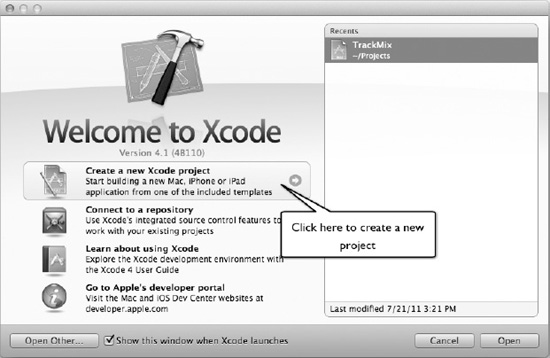
Figure 33–2. To get started, create a new project in Xcode.
NOTE: If Xcode is already open or the Welcome screen doesn't appear, you can start a new project by selecting File > New > New Project... from the menu bar.
When you choose to select a new project in Xcode, a new workspace will open with project template dialog. In the dialog, select Mac OS X Application in the left column and select the Cocoa Application template (Figure 33–3); then click Next.
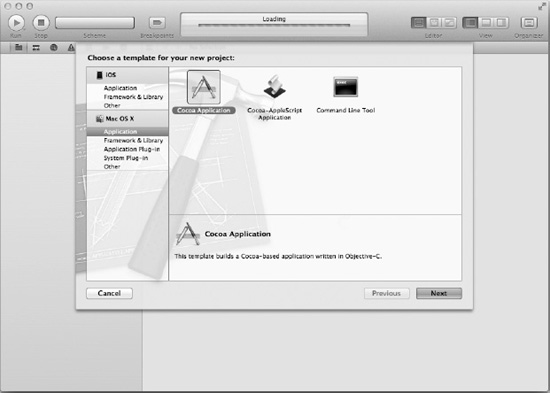
Figure 33–3. You will start your project with the Mac OS X Cocoa Application template.
After you choose your template and click Next, the dialog will prompt us for some important project options (Figure 33–4). In the Product Name text field, enter SimpleWeb (or whatever you would like to call your final program). The company identifier is a unique name to represent you or your company; traditionally, this is you or your company's Internet domain name with the top-level domain (TLD) first (i.e., com.mydomain). All other fields and check boxes should be left blank or unchecked (though if you'd like, you can select the App Store category, which in this case would be Productivity. When you are done, click Next.
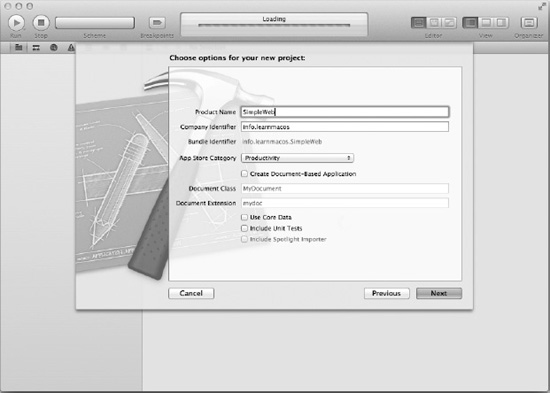
Figure 33–4. After you select your project template, you must fill in some additional information about your project.
NOTE: The App Store category determines how your application will be classified in Apple's App Store. While some of the categories are fairly specific, others are quite vague. Categories like Productivity, Life Style, Business, and Entertainment tend to be catchalls where a more specific category is not available.
When you click Next, you will be asked for a location to save your project file. Any suitable location will be fine; a common location is your Documents folder, or occasionally developers will create a separate Projects folder in their home directory. When you've chosen a location, click Create to create your project. Once you've created your project, the dialog box will disappear, revealing the workspace with your project open and ready (Figure 33–5).

Figure 33–5. Once you've successfully created your project, it will open in the workspace window.
Building Your Application's Interface
When your project is first created, the project will be selected in the Project navigator, and a summary of your project will appear in the editor. Feel free to look around, but for now don't change any of your project's settings here. Rather, turn your attention to the Project navigator, where you will see a number of folders listed under your SimpleWeb project. The item that you are initially concerned with is in the SimpleWeb folder: MainMenu.xib. MainMenu.xib holds your application's interface, and it is in this file that you are going to do almost all of your work.
Select MainMenu.xip from the Project navigator, and the editor should switch into its Interface Builder mode with placeholders and objects along the left side of the editor view and just a toolbar in the main editor area (Figure 33–6).
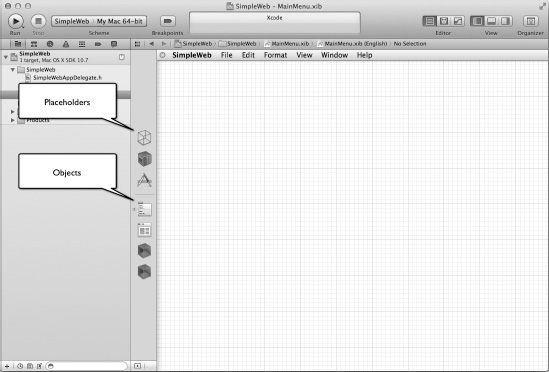
Figure 33–6. Your first look at MainMenu.xib in Xcode
To build your interface, you need to select the Window object from the Object list in the editor and open your Object Library in the utilities area of Xcode (Figure 33–7). Once you have everything open, you are ready to build your interface.
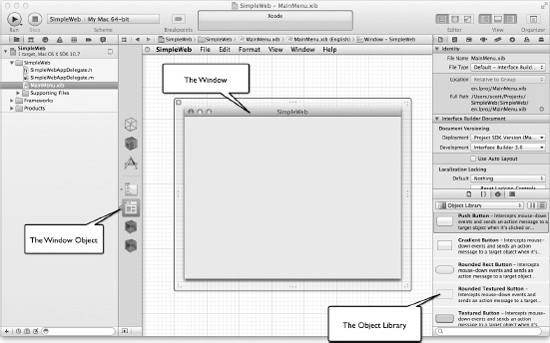
Figure 33–7. With your Window object selected and your Object Library open, you are ready to build your interface.
Adding Objects to Your Window
Your SimpleWeb application needs at least two things to be effective. It needs a way for to tell it what web page to display, and it needs a way to display them.
Taking a look through your Object Library, you may get a few ideas on how to get a web address into your application, but the most flexible one is the Text Field option, which is actually an NSTextField object (just like the “n” in nib, NS stands for NeXTSTEP). To add a text field to your window, simply select Text Field from the Object Library and drag it to your window. In building your application, you'd like your Text Field to start in the top-left corner, so drag your Text Field there until blue guidelines appear, letting you know you have reached the ideal location for your object (Figure 33–8). The blue guidelines appear as you position elements to help size and locate them in your windows with spacing consistent with Mac OS X Human Interface Guidelines.
NOTE: The Mac OS X Human Interface Guidelines provide advice for building a great user experience in a manner consistent with Mac OS X and other great Mac OS X applications. If you open the Documentation in Xcode's Organizer window, you can browse to Mac OS X 10.7 Core Library > User Experience >Apple Human Interface Guidelines to read the guidelines in full.

Figure 33–8. As you drag objects into your interface, blue guidelines will appear to help you position them ideally.
Once you have your Text Field positioned, position your cursor over the right edge of the selected text field until the pointer changes to a horizontal size cursor (a vertical line with small arrows pointing out to each side), click and drag to resize the Text Field across the width of the window until the guidelines show up on the right side of the window (Figure 33–9).

Figure 33–9. Once the text filed is placed, you can resize it so it goes across the top of your window.
Now that you have your Text Field, you need something that can display a web page. It just so happens that your Object Library contains the perfect object. Scroll all the down to the bottom of the Object Library until you reach the Web View and then drag the Web View onto your window and resize it to fill all of the window below your Text Field. Pay attention to the guidelines to leave a nice space between the bottom of the Text Fieldand the top of your Web View; you can also choose whether to pay attention to the guidelines to leave a border around the sides and bottom on the Web View or to extend it to the edge of the window. I prefer to extend the Web View all the way to left, right, and bottom edges, which is just how the Web View object is positioned in Safari. When you are finished, you have a very simple interface (Figure 33–10).

Figure 33–10. Your window's interface in Xcode with a Text Field and a Web View
Testing and Tweaking Your Interface
To see how your interface will look in the finished application, you can simulate your layout by selecting Editor > Simulate Document from Xcode's menu. This will open your layout in its own window so you can see how the elements appear. When your window first opens, everything looks like you expected, but if you resize your window, things start looking ugly real fast (Figure 33–11). What you neglected to do is configure your objects to resize along with the window, so let's go back and do that.
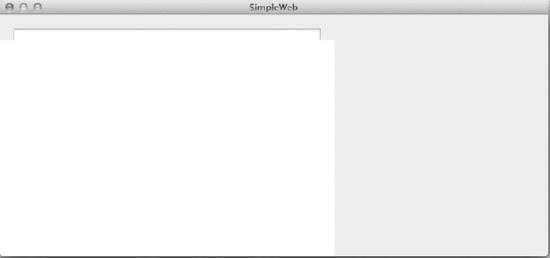
Figure 33–11. Not configuring your objects to resize when the window size changes gives us undesired results.
To set up your object to resize with the window, you need to select each object and configure it in the Size inspector (Figure 33–12). In the Size inspector, you will use the Autosizing control to control how your object resizes.
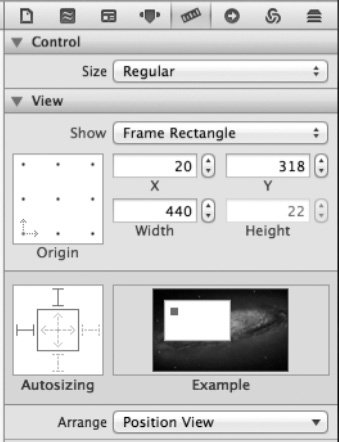
Figure 33–12. You can adjust the sizing properties of your object using the Size inspector.
The Autosizing control has two concentric squares. The outer square determines what sides the object is pinned to. The object will seem to “stick” to the sides it's pinned to when its container is resized. The inner square determines vertical and horizontal resizing of the object in proportion to the size of the container it's placed in. The red “I” bars in the outer square determine what sides an object is pinned to. Clicking one side on the outer square will toggle the pinning on that side.
NOTE: When pinning, objects the left and bottom sides have precedence. That is, if you have an object pinned to the top and bottom, if the object needs to choose, it will stick to the bottom.
NOTE: I referred to containers rather than windows, while in your application a Window is your primary container. If I were to add other NSView objects inside of my window (such as a Box), the size and location of any items placed in it would be relative to the size and location of the NSView object it's contained in.
With this in mind, select your Text Field and pin it to the top, left, and right and set it to resize horizontally. This will cause your Text Field to stretch across the top of your window when it is resized.
NOTE: To see the effect your selections have, take a look at the example animation to the right of the Autosizing control.
NOTE: Your Text Field object cannot be resized vertically. This is because the Text Field object you chose is always one line high. If you wanted a flexible text area, you could have used a Wrapping Text Field.
Turning to your Web View, let's pin it to all sides and have it resize both vertically and horizontally. Once you have made the appropriate selections, simulate your document again and make sure everything is scaling correctly.
Connecting Your Objects
Right now you have a perfectly good interface that does nothing other than display a couple of objects in a window. If you were to successfully build your application now (ignoring that it would currently result in an error), you could enter text in the Text Field and resize the window, but do little else. What you need to do now is connect your objects so they can communicate with each other. Specifically, you want to connect your Text Field to your Web View so that when you enter a web address in your Text Field and hit Return, the web address is sent to the Web View where the address will be opened. Luckily, your objects come equipped with all the underlying code to accomplish this already self-contained, so all you need to do is make the proper connection.
To make the connection, select your text field object; then, while holding the Control key, click and drag from the Text Field to the Web View. As you drag, a faint blue connection line will follow your mouse movement. When the line is complete between the Text Field and the Web View, release the button, and a menu will pop up asking you which action you want to make the connection to (Figure 33–13). Select takeStringURLFrom: from the menu and—presto—your connection is made.

Figure 33–13. When you make a connection from one object to another in Xcode's Interface Builder, a menu of available connections will appear. Select the desired action to complete the connection.
Looking through the list of available actions that you can connect to in your Web View should give you some ideas for other options you could add to your application without much trouble (i.e., connecting a Button object to goBack:), but for now you are going to stop and see whether your application in its current state works.
NOTE: You may be curious about the two SimpleWebAppDelegate files in your project. To provide an example with the minimum of complexity, your sample application doesn't require us to write any code, so you really don't need to deal with these files. This doesn't mean these files don't do anything; in fact, they do.These two files form the basis of your application's delegate object. Delegation is an important concept in Cocoa programming that allows a single delegate object to keep events happening in the interface in sync with events happening within the rest of the program including other interface elements. The applicationDidFinishLaunching method in the SimpleWebAppDelegate.m file is a good example of how this works. This method receives a message from your interface when it is finished launching, allowing a developer to run any code at startup. Without delegation, you could still inject code into the startup, but you may have no way of knowing when all aspects of your program have successfully loaded.
Building and Debugging Your Application
The process of building and testing an application is quite easy if everything goes according to plan. To build and test an application, save all of your files and click the Run button in Xcode's toolbar. This will cause all of the files to start compiling, and if everything is successful, your application will launch.
In your case, if you attempt to build and run your application, while everything seems to build OK, your application will not run; rather, the debugger will open up with all sorts of cryptic errors and stack dumps (Figure 33–14). Most of this probably isn't very helpful, but delving through the debugger console for something you can understand does reveal this: cannot decode object of class (WebView). While this in and of itself may not provide the specific answer to your problem, it at least gets us looking in the right direction.
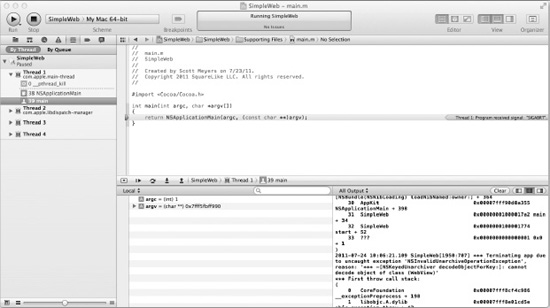
Figure 33–14. Your first attempt at building and running your application failed. While much of the information in the debugger may be cryptic, there could still be clues to what went wrong.
To help figure out what went wrong, let's take another look at the Web View object in your Object Library (Figure 33–15). Reading the description, you should notice that the WebView class is part of the Web Kit Framework. Looking back at your project summary, you notice the only linked framework in your project is the Cocoa.framework, so maybe your solution is to add the Web Kit Framework.

Figure 33–15. The summary of the Web View object indicates it belongs to a framework that currently isn't included in your project.
To add a framework to your project, go back to the project summary view in Xcode (by clicking the root project item in the Project navigator), and under the Linked Frameworks and Libraries area, click the + button to add a framework to your project. When you click the + button, a dialog will appear, providing us with a list of all libraries and frameworks that Xcode can detect on your system (Figure 33–16). Scrolling down, you can select WebKit.framework to add it to your project.
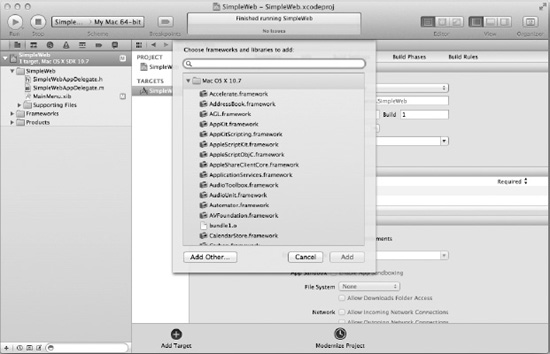
Figure 33–16. In your project summary, you can choose from a list of any additional frameworks or libraries you need for your project.
Now that you added the Web Kit Framework when you try to build and run your application, everything should work splendidly. Type a URL in the Text Field and hit Return to load a web page in your new app.
NOTE: Remember to stop any versions of your app you already have running before you try running the app again. If you don't, you will be prompted to do so.
Archiving and Distributing Your Application
Now, your SimpleWeb application isn't going to win any “great app of the year” awards as is, so at this point, if you were creating anything other than an example app, you'd probably want to go back and continue development. Supposing your app was finished, though—and by finished, I mean it builds, it runs, you've checked it for memory leaks and performance issues in Instruments, and so on—you now want to share it with the world. To get you app out of Xcode, the first step is to archive it, which is done by selecting Product > Archive from Xcode's menu. Once archived, the app should appear on the Archives tab in Xcode's Organizer (Figure 33–17).
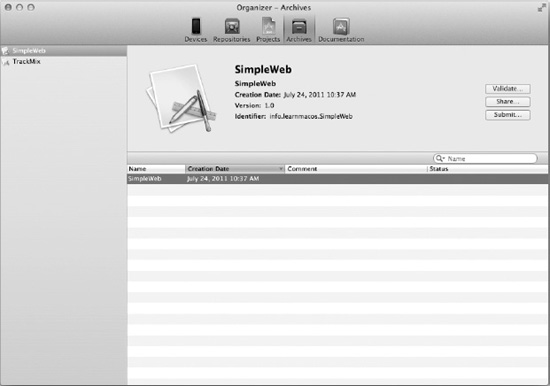
Figure 33–17. From the Archives tab in Xcode's Organizer, you can prepare and submit your app to the Mac OS X App Store or share your app by other means.
The easiest way to share your application with others once you have archived your app is to click the Share... button. This will bring up a dialog asking you how you'd like to share your application. The options are as follows:
- Mac OS X App Store Package (.pkg) will create a package that allows a simple double-click install of your app.
- Application will just export the final application itself, which can be double-clicked to launch right away.
- Archive will create an archive of your actual project that can be shared with other developers.
To distribute your app on the Mac App Store, you have to go through a number of additional steps, the first being you need to be a registered member of the Mac Developer Program. You can find more information about Apple's developer programs on the http://developer.apple.com web site.
NOTE: Since the developer tools are free to download, there is no urgent reason to run out and join one of Apple's developer programs as you are learning to develop. Once you've reached a level where you think you have an application worth sharing, it's definitely a worthwhile endeavor, though. The Mac and iOS developer programs each cost $99 to join (that's $198 for both); they allow you to sell you apps via the respective App Stores and give you access to many other features including access to prerelease software and additional developer support options.
What You Still Need to Know
Building your application should have helped with a few things. First, it should have helped you familiarize yourself with Xcode a bit more by actually walking you through using the tools rather than just looking at them. Second, it should have illustrated that with the available frameworks and libraries, you get a lot of features built in for free, making it easier and faster to create a great application. Finally, you should have realized, wait a second, there has to be more to it than this, and of course there is.
To be a great Cocoa developer, you will need to learn a whole lot more than what I discussed here. Let's look at just few things.
Objective-C
Objective-C, Cocoa's native programming language, is sort of a mash-up of C and Smalltalk into a single language. Technically Objective-C is a superset of C with additional Smalltalk-inspired syntax added to it to allow object-oriented programming features. The bond between C and Objective-C is such that if I wanted to provide a valid “Hello World!” example written in Objective-C, I could refer to the original “Hello World!” program written in Kernighan & Ritchie's The C Programming Language.
NOTE: The C Programming Language is often referred to as just the K&R book. It is one of the best programming books ever written. While there are some great books that start right off teaching you Objective-C that may be better suited to novice Mac and iOS developers, starting with K&R will do nothing but help you.
For a quick introduction to Objective-C, Apple provides both a short Learning Objective-C: A Primer document as well as a longer The Objective-C Programming Language document. The first is suitable for developers already familiar with C, and the latter is a more in-depth introduction to Objective-C. Each of these documents is included with Xcode's developer documentation.
Some other excellent resources for learning Objective-C that may be more suitable than Apple's documentation for some include Learn Objective-C on the Mac by Mark Dalrymple and Scott Knaster (Apress, ISBN 978-1430218159) and Programming in Objective-C, 3rd Edition by Stephen Kochan (Addison-Wesley, ISBN 978-0321711397).
Cocoa Programming
We barely scratched the surface of Cocoa and didn't even begin to go into many of the important topics necessary to build more interesting Cocoa applications.
Many useful documents to help explain Cocoa programming are included with Xcode's documentation. Some good documents to start with include Your First Mac Application and the Mac OS X Application Programming Guide.
There are also a number of books available to help you learn Cocoa, including Learn Cocoa on the Mac by David Mark, Jeff LaMarche, and Jack Nutting (Apress, ISBN 978-1430218593), as well as Cocoa Programming for Mac OS X, 4th Edition by Arron Hillegass and Adam Preble (Addison-Wesley ISBN 978-0321774088).
NOTE: Many introductory books on Cocoa programming also include some basic introduction to Xcode and Objective-C, thus making them a good place to start.
Frameworks and Technologies
Once you've learned the basics of how to program in Cocoa, it pays to start delving into the various frameworks available for Cocoa development. Besides the all-important AppKit framework, there are a host of other frameworks to make your life as a developer simpler. Some standouts include the CoreData, WebKit, Quartz, and Foundation frameworks, but there are many more that are important and useful.
NOTE: The Cocoa framework is an umbrella framework that includes the AppKit, CoreData, and Foundation frameworks, so by including the Cocoa framework in an application, you gain access to each of these frameworks automatically.
You will find many of the most common features of the most common frameworks covered in many general Cocoa and Mac OS X programming books, with a few minor exceptions, but the best place to find up-to-date information about the various frameworks is Apple's developer documentation.
NOTE: One additional thing that developers should take into account when writing applications is security. This is a topic with growing importance, especially as more applications share resources and work over the Internet. One of the best security resources for Cocoa developers currently available is Professional Cocoa Application Security by Graham Lee (Wrox, ISBN 978-0470525951).
Summary
With this chapter you got a taste of Mac OS X development. You also learned that while Mac development is relatively easy, there is a lot of information you need to absorb to become a competent programmer. The difference between a competent programmer and a great programmer is the ideas you bring to the table.