
Chapter 15
iPhoto
iPhoto has always been one of the best consumer photo management tools available on any computer platform. Unlike simple photo editors, iPhotois a complete photo workflow tool, allowing you to import and organize your photos, edit them, and then export and share them in a number of ways. In this chapter we will
- Introduce iPhoto
- Explore iPhoto's image management features
- Discuss how to edit images in iPhoto
- Share and print photos with iPhoto
Photo Management
When you connect a digital camera to your computer and launch iPhoto (you can set iPhoto to launch automatically when you connect a digital camera in iPhoto's general preferences), your camera will show up as a device in iPhoto and give you a number of import options (Figure 15–1). By default, iPhoto will import all the images into a single event (an event in iPhoto is one method of categorizing photo collections, sort of like folders; we'll give more details next). However, if you select the Split Events option, iPhoto will autosplit your images into separate events based on the date and time they were taken. If you are undecided, don't worry, you can rearrange your photos into different events at any time.
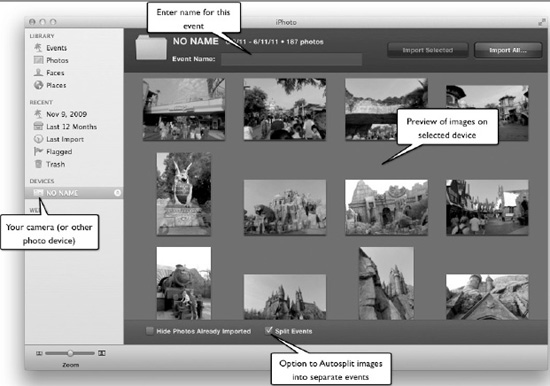
Figure 15–1. One of the first things you'll want to do is import images into iPhoto. By selecting the device or location where your images are, you can choose which images to import.
NOTE: The exact method iPhoto will use to autosplit events is set with the Autosplit into Events menu in iPhoto's general preferences.
Events are the primary way that iPhoto divides and organizes your photos. Upon import, each image is stored in an event. Once imported, you can move images from one event to another by dragging and dropping an image from one event to another. An image can only be in one event at a time. If you would like to create a new event, select the images you want to put in a new event and drag them onto the Events Library item. A new untitled event will then be created with the selected images.
While events provide one way to organize photos, iPhoto offers many others, including the standard methods of creating albums and slideshows, as well as using Places and Faces.
TIP: While an image can only belong to a single event, a singe image can appear in multiple albums.
Places
Places organizes your photos by the location that the picture was taken, using GPS data embedded in a photo's metadata or location data you enter manually. A wave of new cameras that include GPS systems (including, of course, many mobile phone cameras) can add this GPS data automatically. If your images aren't geotagged—that is, embedded with the location data—out of your camera, then you can add the location data automatically from within iPhoto.
Just select a photo (or select a collection of photos) and open the info column by clicking the info tool button that appears in the lower-right corner of iPhoto.
At the bottom of the Information view, Click the Assign a Place… text field and start typing in the location you wish to assign to the photo. As you type, the Location area will expand and possible suggestions will begin to appear. Your previous locations will appear first followed by suggestions derived from Google Maps. Once you have typed in your location, if it is a previous location or identified by Google Maps it will appear on a map (Figure 15–2).
If the location is not known (or mislocated), you can add or move the pin on the map to assign a specific location.
Any geotagged photos from a defined location will be added to that location automatically.
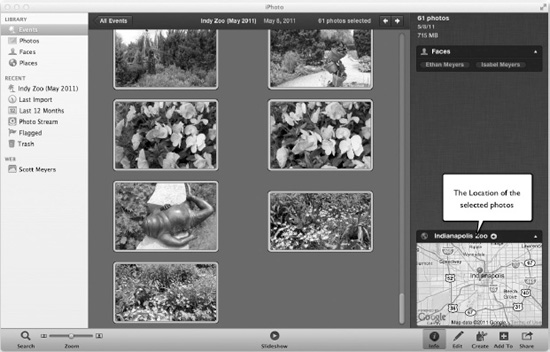
Figure 15–2. The location of any selected photos will be shown in the info view. You can add locations to photos here as well.
Once you have locations assigned to your photos you can view photos based on location by selecting a location on a map presented when Places is selected under Library in the Library column (Figure 15–3).

Figure 15–3. Places will allow you to view photos based on their location.
NOTE: You can manage your selected places and add custom locations from the window presented when you select Window > Manage My Places.
Faces
Faces is another great feature to help you organize your photos based on the people captured in your photos. To take advantage of this, first select the photo or photos that you wish to add names to, open the Info view, and click the Faces area. When the Faces area is selected, any detected faces will appear on the photo (Figure 15–4). If iPhoto thinks it already knows the name of the people in the photo, it will make a suggestion; otherwise, it will identify the faces as “unnamed.” Clicking the unnamed face text makes it editable for you to enter the name of the person. (A list of possible matches shows up in a drop-down menu as you type. If the person you are identifying is listed here, you should select their name from the list so iPhoto knows this is the same person.)

Figure 15–4.i Photo's Faces feature allows you to identify people's faces in photos. iPhoto then tries to find all the photos in its library that belong to that person.
Once you've identified a face or two in iPhoto, iPhoto automatically attempts to find the identified faces in every photo in your library. When you are viewing an individual in the Faces view, if iPhoto thinks that there may be additional photos of the person that have been unverified, it will let you know (Figure 15–5).
NOTE: The Faces feature is quite sophisticated in identifying people's faces in your library. However, it's not foolproof and often misses a number of photos of an identified person. It also occasionally identifies the wrong face as an identified person (with occasionally bizarre and often entertaining results).

Figure 15–5. The faces view allows you to view all the photos of a specific individual. Additionally, iPhoto can help identify photos that may contain the selected individual automatically.
TIP: When you first begin identifying faces, you may want to start by selecting Faces in the Library column and then selecting the Find Faces button from the tools in the lower-right corner of iPhoto. This will bring up an interface that will quickly identify all the detected faces in all of your photos and allow you to assign a name to them (a few at a time).
Other Ways to Manage Photos
Albums and smart albums provide another way to organize your photos. While every image is stored in a particular event, Albums provides you with another way to manually organize photos. For example, if your events are organized by days, and you went on vacation to Florida for three days, you could collect all of the photos from all three events into a single album. Additionally, you may want albums for all pictures of family members in a “Family” album.
TIP: Folders are created to organize albums. For example, if we, as suggested above, created an album for our Florida 2011 vacation, then we may want to keep that album in a folder called Vacations.
Another feature included in iPhoto is the ability to tag individual photos with titles, ratings, and keywords. Titles allow you to provide easily recognizable names to images without renaming the actual image file. This is very useful for those who use specific naming schemes for files (such as time and date information) that may not be very descriptive of the image content. Ratings simply allow you to quickly rate your photos from zero to five stars, allowing you to find your very best (four- or five-star) photos quickly at a later time. (You could even create a smart album that would automatically contain all your five-star images.) Keywords allow you to add searchable words that help describe your images; they can range from very specific names to general categories.
KEYWORD TIPS
iPhoto keeps track of all your keywords. To view them, open the Keyword window (Shift-Command-K). You can use this window to add keywords to selected photos by clicking the keyword. You can even set up common keywords with their own keyboard shortcut to apply them quickly to any photo. This not only makes adding popular keywords easy, but is also a good way to keep keywords consistent.
Once all the data (titles, ratings, and keywords) is set up for your images, you can really take advantage of the search and smart album tools in iPhoto to find just the right image or images you are looking for.
Photo Editing
iPhoto includes a range of easy-to-use image-editing tools. To switch into edit mode, select an image to edit and click the Edit icon in the lower-right corner of iPhoto. iPhoto provides three sets of tools for editing photos:
- Quick Fix
- Effects
- Adjust
Quick Fix
The Quick Fix tools provide image correction tools that are both quite easy and commonly used. The Quick Fix tools include:
- Rotate: Rotates the image 90 degrees counterclockwise (or clockwise if you hold the Option key). You may need to use this more than one time to rotate an image that needs it.
- Enhance: Provides some automatic image adjustments to attempt to improve the image.
- Fix Red-Eye: Provides a tool that can help eliminate red-eye in photos. When the autofix red-eye option is selected, iPhoto will attempt to automatically remove red-eye.
- Straighten: Allows you to slightly rotate a photo where the subject is slightly skewed.
- Crop: Allows you to select and crop an image.
- Retouch: Provides tools that can help mask blemishes or strange anomalies in photos (including dust specks).
Effects
The Effects tools provide a number of filter effects you can apply to you images. Each of these effects are cumulative, so each time you click an effect it will increase the effect on the image. The options include:
- Lighten: Will lighten the entire image
- Darken: Will darken the image
- Contrast: Will add contrast to the image (note that using the Levels feature in Adjust is much more effective)
- Warmer: Will add a reddish tint to the image
- Cooler: Will add a bluish tint to the image
- Saturate: Will increase the color saturation of the image
- B&W: Will create a black-and-white image from your photo
- Sepia: Will create a sepia-toned image from your photo
- Antique: Will create an interesting “antique” color effect
- Matte: Will create a white circular matte around your image
- Vignette: Will create a dark circular vignette around you image
- Edge Blur: Will blur the edges of you image
- Fade: Will cause the colors to appear faded
- Boost: Will boost the colors and contrast
- None: Will remove effects
TIP: If you find you have horribly ruined your image, you can always use the Revert to Original button to remove all editing effects.
Adjust
The Adjust tools(Figure 15–6) provide a number of very high-quality image enhancement tools that give you precise control over levels, contrast, exposure, color, sharpening, and other sophisticated image-editing features.
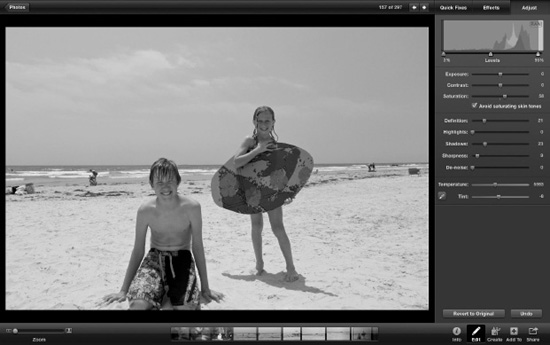
Figure 15–6. The image-editing tools in iPhoto are easily accessible in full-screen mode, which provides an uncluttered way to view and edit your images.
Printing and Sharing Your Photos
Taking and organizing your photos is nice, but ultimately you'll likely want to share them with others, and iPhoto provides a number of ways to do this, both digitally and physically.
If you just want to share some photos with a minimum of fuss, you can select the desired images in your library and e-mail them to the desired recipients, print them from your own printer, or order professional prints directly from within iPhoto.
NOTE: The first time you order prints, you will need to set up an account for yourself. This is fairly easy, as iPhoto will walk you through the process.
For those who wish to share photos with a bit more flair, iPhoto has a number of ways to satisfy this desire. Using the Share button, you can publish photos directly to your MobileMe web galleries (while they last), your Facebook account, or your Flickr account. Also, your iPhoto library is accessible from many other applications, including iWeb and iMovie; they provide a number of other ways to view and share your photos.
For those who wish to add a bit more flair to your photo presentation you can use the Create button to create slideshows that can be exported in QuickTime format or if you prefer a non-digital interesting hard copy of your images, you can create an order amazing photo books, cards, and even calendars from your photos.
PHOTO STREAM
Summary
iPhoto seems to strike that perfect balance between ease of use and power, while providing powerful editing tools that most professionals would be happy with. It also provides a simple method to manage all you digital photos. In the next chapter we will look at iMovie, Apple's attempt to do for video what iPhoto has done for photos.