
Chapter 22
Mac OS X Security
Besides protecting your data from hardware failure and accidents, in today's world, where computers tend to be always connected, it's also important to protect your data from other users—both on your computer and outside of it. This chapter deals with security, including the following topics:
- Passwords and keychains
- Data encryption and FileVault
- Other security features
Passwords and Keychains
Passwords are used time and time again on your computer: logging in to your account, checking your e-mail, visiting certain web sites, logging in to connected servers, and more. You probably have so many passwords that it becomes a chore to keep track of them all. To help manage all your passwords, security certificates, and encryption keys, OS X includes a keychain feature to keep track of all this information.
The Keychain Feature
Whenever you enter a password into an application that takes advantage of the OS X keychain, you will be asked whether you want to save the username-password combination in your keychain. If you select yes, then the next time you log in, rather than getting a prompt to enter your username and password, the application will automatically use what's already saved in your keychain. Now, your keychain will use the passwords stored in it only under certain circumstances:
- The keychain will use data saved in the logged-in user's keychain only, so your keychain is protected from all other users (excepting shared keychains).
- By default, passwords associated with a particular application allow only that application to access the password item in your keychain. Often when you update your application and attempt to use it, you will be prompted to update the key to work with the updated application (you will need to authorize the update).
- The key in the keychain is valid and unexpired. Although this usually isn't a big problem for passwords, security certificates and encryption keys (which are also stored in the keychain) are generally set to expire after a certain amount of time.
The keychain data itself is stored in a number of keychain files located in various Library folders. For example, the System Roots keychain files (mostly security certificates for common root certificate authorities) are stored in /System/Library/Keychains, and the actual System Keychain (which stores common system level passwords and certificates) is stored in the /Library/Keychains folder. The login keychain, the keychain file of most interest to you as a user, is stored in your ~/Library/Keychains folder. It's in your personal keychain file that all of your sensitive data is stored in (safely encrypted from prying eyes). Should you ever need to view your keychain (or other keychains you have access to), Mac OS X includes the Keychain Access utility (in Launchpad's Utilities folder). The Keychain Access utility (Figure 22-1) provides a way for you to view, edit, and configure individual entries stored in your keychain.
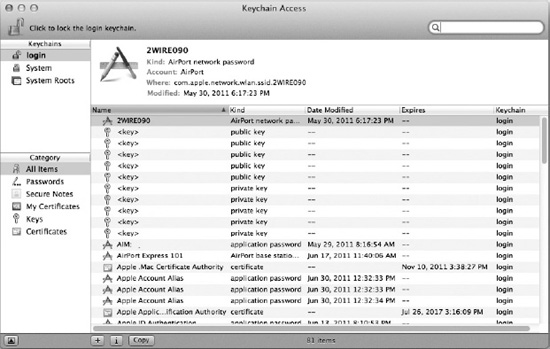
Figure 22-1. The Keychain Access utility provides a way to view and alter your keychain items.
The Keychain Access utility provides a column on the left where you can select the keychain you'd like to view (any available keychains will be listed there; your default keychain is the login keychain). Below the list of keychains is a list of categories of items that are stored in the keychain. Table 22-1 describes the categories and their descriptions. On the right side is the view area, where, at the bottom, the individual items stored in the keychain are listed. Above that is a view that provides some basic information about the selected item.
NOTE: Cryptography and encryption are very big, complicated topics. A great book that does a good job of introducing them, including keys and certificates, is Cryptography Decrypted by H. X. Mel and Doris Baker (Addison-Wesley Professional, 2000).
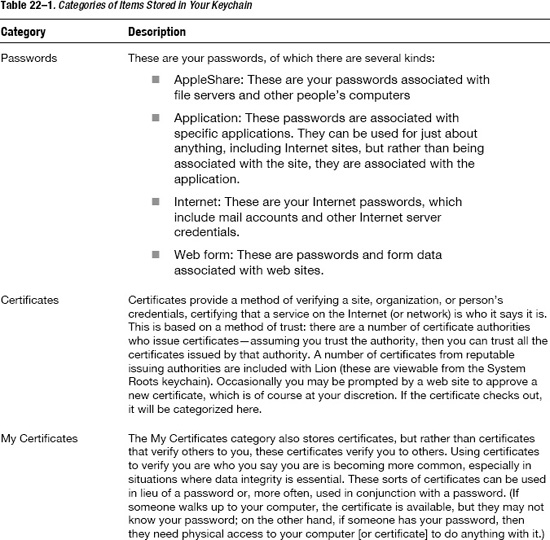
Double-clicking any of the items in your keychain will open a window providing detailed information about that item. For items such as passwords and secure notes, some details will be hidden, specifically the password and the actual content of the note.
The password items have a number of options spread out over two tabs: the Attributes tab and the Access Control tab.
The Attributes tab (Figure 22-2) provides the following information:
- Name: This is just the name of the keychain item.
- Kind: This indicates the type of information stored in the item.
- Account: This is the name associated with the account. Usually this field contains the username, but occasionally, especially for application passwords, it is used to represent something used similarly by the application.
- Where: This identifies where the password is valid; this is commonly a URI pointing to the online resource for which the item is valid, but occasionally it is something else (a protocol, for example, or just something that has meaning to an application).
- Comments: This field contains any comments associated with the item.
- Show password: This is where the password is shown. However, by default it is empty to protect the password. To view the password, you will need to select the “Show password” option and then authenticate yourself. The key icon to the right of the password text field opens the Password Assistant, which can help you create strong passwords.

Figure 22-2. The Attributes tab of a password keychain item
NOTE: All the fields in the Attributes tab are editable. If you are storing items here for your own reference, you can certainly edit these—however, if the item is being used by an application, altering this information may interfere with the normal operation of the application.
The Access Control tab (Figure 22-3) allows you to delegate what applications can access the keychain item and whether you'll be prompted to approve any new application that wants to use the information.
Figure 22-3. The Access Control tab controls how the information in the item can be accessed.
Creating Your Own Keychains and Keychain Items
While the keychain feature is designed to mostly run in the background to seamlessly manage passwords, keys, and certificates, it will also allow you to store your own information inside of it. You could store your own passwords and notes and even keep track of serial numbers for registered applications by creating secure notes.
NOTE: Besides using the keychain, you can securely store password and application data using solutions provided by third parties. Some interesting applications include the $39.99 1Password (http://agilebits.com/products/1Password, which not only stores passwords and other encrypted information but also integrates with your web browsers to make using strong web passwords a snap (it even has a version for your iPhone, which allows you to keep your password data in sync and at your fingertips when you are away from your computer) and the donationware Pastor (www.mehlau.net/pastor/), which is a lightweight, easy-to-use password storage application.
To add a keychain item, you click the little + button at the bottom of the keychain window, and a dialog box will open so you can enter your information. By default, the dialog box will be geared toward passwords. If you want to create a note, select the Note group in the left column, and then click the + button. This will open a dialog box for entering your note. Alternately, you can select File > New Password Item… or File > New Secure Note Item… directly from the menu bar.
The password dialog box (Figure 22-4) is fairly straightforward; you enter a name for your item, the account name, and your password. There are some interesting points here, though. For one, the keychain item name determines what the type of item will be. If you enter a URL, the item will be created as an Internet password; otherwise, the item will be created as an application password. Finally, the bar at the bottom will extend to the right and change from red to green as you enter your password to indicate its strength.

Figure 22-4. The password dialog box allows you to enter a password into a new keychain item.
The strength of a password is determined by how hard it would be for a malicious user to crack it using various methods. This determination consists of many variables, including the length of the password, the uniqueness, and the type of characters used. Common names and words found in dictionaries are very weak, because a modern computer can run through a dictionary list of common words and passwords in a few minutes. Beyond that, short passwords take a relatively short amount of time to crack using brute-force methods (which basically means using every possible combination of every letter, number, and symbol for each space). The difficulty of brute-force cracking increases dramatically with each additional character. It's good practice to attempt to mix uppercase and lowercase letters, numbers, and, if possible, symbols, into your passwords. Additionally, passwords should be at least nine characters long.
NOTE: Apple's Password Assistant (Figure 22-5) can help you craft secure, unique passwords based on various criteria. This utility will present itself as a dialog box when you click the key icon next to many password text fields in Mac OS X.

Figure 22-5. The Password Assistant is available in many places throughout Mac OS X to help you create secure, unique passwords.
NOTE: Ten years ago, an eight-character password was considered strong. Today, that would be the minimum acceptable in most situations. As computing power increases, passwords become increasingly less effective, since as password lengths increase, it becomes increasingly hard to remember them and therefore less practical. For this reason, a number of password alternatives have been developed and are gaining in popularity. These alternatives may be used to complement a password system or eliminate passwords altogether. These alternatives include smart cards and other hardware authentication devices, as well as biometric security measures (such as fingerprint readers).
Besides storing passwords and security certificates, you can also securely store notes containing any information you choose in your keychains. If you select Secure Notes under the Category pane and click the + button, a dialog box will open asking for a name for your note item and showing a large text field for the contents of your notes.
If you intend to store lots of personal information in a keychain, you may want to create a keychain separate from your login keychain to store information; you can easily do this by selecting File > New Keychain… from the Keychain Access menu.
Other Keychain Options
A few other features associated with keychains are available from the Keychain Access utility. These are described in the following sections.
Keychain Passwords
By default, your keychain password (the password you will need to unlock data such as passwords and notes in your keychain) is the same as your login password. You can change this password for each keychain using the Edit > Change Password for Keychain “keychain”… command.
CAUTION: When your keychain password is the same as your login password, your keychain is automatically unlocked when you log in. That means if you step away from your computer while you are logged in, someone could walk up and view your keychain contents fairly easily.
Keychain Settings
The Edit > Change Settings for Keychain “keychain”… menu item allows you to access some additional options for a particular keychain. These include the ability to lock your keychain after a certain amount of time or when your computer goes to sleep (you will need to enter your keychain password each time you or an application attempts to access a locked keychain).
Keychain First Aid
If your keychain gets mucked up to the point that it no longer functions correctly (for example, because of data or file corruption), the Keychain First Aid selection under the Keychain Access application menu can help solve a number of problems. Depending on what options are set on the First Aid tab in the Keychain Access utility's preferences, running Keychain First Aid will rebuild your keychain file and reset most settings to the defaults, including setting the keychain passwords back to the login password and setting the login keychain back to the default keychain.
Data Encryption with the FileVault
The keychain feature protects your passwords while keeping them easily accessible, and FileVault protects your data from others. FileVault, accessible from the FileVault tab in the Security preference pane (Figure 22-6), encrypts the contents of your disk, protecting it from anyone who attempts to access anything stored there when you're not logged in.
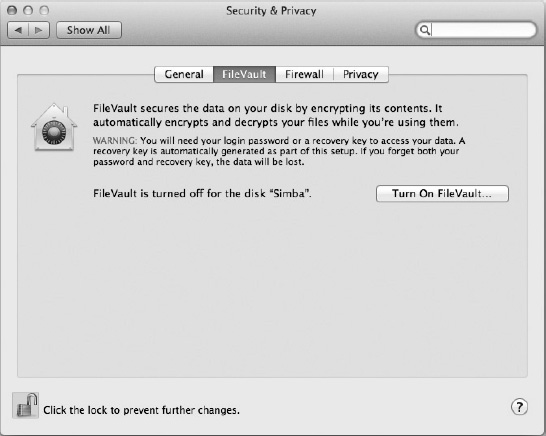
Figure 22-6. The FileVault tab of the Security preference pane lets you turn FileVault on and off.
When you first activate FileVault, you will be presented with a recovery key (Figure 22-7). Once FileVault is activated, the only way to access your information is by entering your password or using this recovery key. If both of these are lost and forgotten, then you data will be unrecoverable.

Figure 22-7. If you forget you password, you will need your recovery key to access your encrypted information.
Once the security key is presented, you will be given the option to let Apple store your security key (Figure 22-8). If you choose this option, you will be prompted to enter three questions. To recover your key from Apple, the question must be answered exactly. The final step in setting up FileVault will prompt you to restart your computer and begin the encryption process.

Figure 22-8. If you'd like, you can store a copy of your recovery key on Apple servers. The key will be released only if you can answer your three security questions exactly.
Once FileVault is set up, using your Mac will be pretty much the same, because your disk data will be decrypted as needed.
FILEVAULT CONSIDERATIONS: THE GOOD AND THE BAD
Other Security Features
In very general terms, computer security is divided into physical security and network security. Physical security represents the security of your computer when someone is sitting right in front of it, and network security protects your computer from a potential threat that could be halfway around the world. The trouble with these simple distinctions is that these days they tend to blur a bit, especially with multi user systems like OS X. For example, remote desktop technologies (such as Apple Remote Desktop and VNC) allow many users to essentially have physical access to the system, even over a network.
The Security & Privacy Preferences
Many of the common security features for protecting Mac OS X are in the Security & Privacy System Preferences pane. The Security & Privacy preference pane contains four tabs: General, FileVault, Firewall, and Privacy.
The general security options (Figure 22-9) cover a wide range of options normally associated with physical security. Table 22-2 describes the options covered on the General tab of the Security & Privacy preference pane.
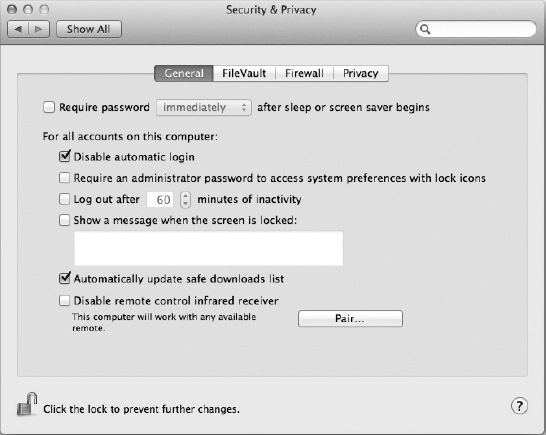
Figure 22-9. The general security options in the Security preference pane

The Firewall tab (Figure 22-10) allows you to enable or disable Mac OS X's built-in firewall software. Mac OS X's firewall is a bit different than traditional firewalls that regulate access based on port numbers and protocols. In OS X, the firewall allows or denies access based on approved applications and services.
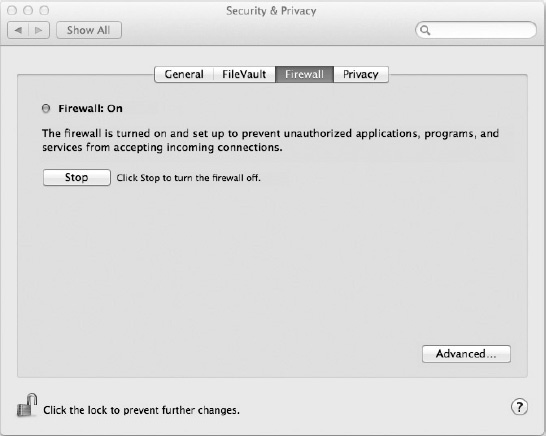
Figure 22-10. The Firewall tab allows you to enable or disable the Mac OS X firewall.
Clicking the Advanced… button will open a dialog (Figure 22-11) that allows you to control some additional options ranging from blocking all incoming network connection except those required for basic Internet services and to fine-tune or alter what services and applications can allow network connections.
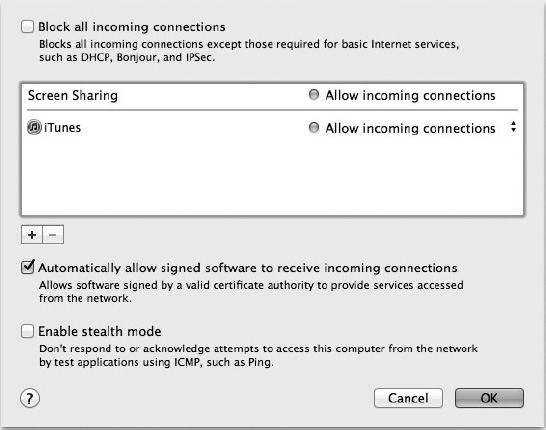
Figure 22-11. The Advanced options allow you to fine-tune Mac OS X's firewall settings.
By default basic Internet services, connections from signed software, and services that are enabled in the sharing preferences are allowed. All others are denied.
NOTE: Lion ships with the firewall allowing all incoming and outgoing connections—however, all sharing services are turned off. This effectively eliminates most potential network security issues from the outside since no individual services are accepting any incoming communications. However, certain applications may open their own network ports and run services on them. Usually, if they're from a trusted source, you'll be OK; but if they're from an untrusted source, look out! Also, since no outgoing connections are being blocked, you should have no trouble using your web browser, e-mail, or other network-enabled applications unless you are on a network with its own dedicated firewall (and even most home cable and DSL routers have built-in firewalls these days). Again, caution should be used when using untrusted applications, since by default they would be free to transmit anything.
The final tab in the Security & Privacy preference pane deals with privacy. This allows you to select which applications (if any) are allowed to use Location services as well as select if you'd like diagnostic and usage information sent to Apple to help improve later versions of OS X.
NOTE: When Location Services are enabled for an application, you are allowing that application to access the actual location of your computer. It does this using the same methods as Find My Mac (which I talked about in Chapter 14).
NOTE: One other password option is setting a firmware password, which provides low-level system protection. To set a firmware password, you must boot up from the recovery partition and use the Set Firmware Password Utility… option. This will walk you through the process to set a password. Once a firmware password is set, it will be required for most special boot sequences, including booting your computer in Target Disk mode and selecting an alternative boot device at startup. For maximum protection this should be enabled.
Summary
Besides the security features noted here, Mac OS X has other security options that either lurk in the background to provide a secure environment or enable developers to implement security features into their applications. There is also a strong focus on network security that we will discuss more in Section VII of this book.
Mac OS X is built upon a naturally secure foundation and, coupled with a range of features, makes maintaining a secure system easy and without lots of the headaches and pain associated with security. This chapter covered mostly user-centric and basic system security, and later in the book we will cover network security in more detail. Additionally, we will continue to provide added security tips where applicable throughout the book.
The next part of the book will move on to additional advanced topics and look specifically at Darwin, OS X's Unix subsystem.