
Chapter 25
Networking Beyond Connecting to the Internet
Earlier in this book (Chapter 8) we discussed the basics of connecting to a network with the goal of connecting to the Internet. For many people, that was all the networking knowledge one would need; however, Mac OS X being Mac OS X, it has lots of networking power for those who want or need it. In this chapter we are going to
- Provide a basic overview of networking and network terminology
- Look at some advanced networking options offered on the Network System Preference pane
- Explore additional networking tools offered by Mac OS X, including Network Utility and AirPort Utility
Networking Defined
When you send an e-mail message from your computer to a friend's computer, across town or halfway around the world, a whole bunch of stuff happens behind the scene to make sure it gets there. First, your message is broken up into packetsor datagrams (small organized collections of data and metadata that can be reassembled as your complete message when it reaches each destination). The way these packets are created and reassembled is defined by a protocol, in this case TCP (Transmission Control Protocol). These packets are then sent from your computer using another protocol, usually SMTP (Simple Mail Transfer Protocol), to your outgoing mail server, which will forward your message using yet another protocol, IP (Internet Protocol), on a journey around the Internet until it reaches your friend's mail server. There, your friend's computer will use another protocol, such as IMAP (Internet Mail Access Protocol), to query its mail server and download the message. Sounds like a lot of work to send a simple message. In fact, this little example glosses over a number of other stops and protocols that likely were used along the way.
NOTE: As in the preceding example, I'm going to try to keep this discussion somewhat oversimplified. My goal is to provide an understanding of how things work if you're interested, at which point you can go seek it out. For everyone else, you could probably skim over this section (or this whole chapter) and be perfectly content.
To add to the complexity, there are different ways of describing networking: there is the OSI (Open Systems Interconnection) model, which defines seven different networking protocol layers, and there is the Internet Protocol Suite (know more often as TCP/IP), which defines four. For our purposes we are going to focus on the Internet Protocol Suite, not only because it's simpler, but also because this is all most people in most situations today will need to know.
The Internet Protocol Suite (TCP/IP)
The Internet Protocol Suite, as mentioned, defines four layers of protocols that work together to send all manner of information from one point to another over a network, These layers are:
- The Link Layer: This is the lowest layer in the Internet Protocol Suite; it covers protocols that cover the connections between physical devices or hosts. For example, a Wi-Fi connection between your computer and a wireless router would fall into the link layer. Common protocols in the link layer include PPP, MAC (Media Access Control), DSL, ISDN, and IEEE 802.11 (Wi-Fi) (many of these were mentioned in Chapter 8).
- The Internet Layer: This layer defines protocols that define how datagrams and packets are sent from one location to the next through the use of gateways. In other words, this defines how data on one system is accurately routed to the system or systems where it is intended. The most common protocol for this layer is IP (IPv4 and IPv6).
- The Transport Layer: The transport layer protocols work with the application layer to assure that data is reliably transported from end to end in a network. That is, while the Internet layer assures that the data moves from system to system, the transport layer assures that the data is accurately moved from the application on one system to the appropriate application process on the other. The most common transport protocols are TCP and UDP (User Datagram Protocol).
- The Application Layer: Using the transport layer, the application layer contains protocols that allow one application to talk to another application over a network. This layer contains a long list of common protocols, including DNS, SMTP, IMAP, POP, Telnet, and HTTP.
All four layers work together, often at the same time, to make networks and network applications work as expected.
NOTE: Internet Protocol Suite gets its name from the Internet, which, as you may have guessed, is built and functions using this protocol suite. While there are other networking protocols in use that aren't covered here, they are extremely rare, as most networking technology today has evolved from the Internet.
Common Networking Terms and Protocols
Of the few common protocols just mentioned, some you may have heard of; others maybe not. One thing you may have noticed is that most of them are acronyms that aren't very descriptive of what they do or why you would care about them. Table 25–1 provides a list of some of the protocols and other networking-related terms that are fairly common, along with definitions.
NOTE: You may encounter most of the terms mentioned following if you decide to manually configure a traditional port-based firewall. While Mac OS X uses an alternative socket-based firewall, many routers contain firewalls that can be highly configured based on the type of packet being sent or received.


This is by no means an all-inclusive list of networking terms; however, these are the terms that you are most likely to encounter for certain more advanced yet common network configurations.
Advanced Mac OS X Network Configuration
In Chapter 8 we discussed connecting to the Internet. There, we relied on DHCP to handle most of the configuration of our network connection. Here we'll look behind the curtain to see what must be done if we are in a situation where DHCP either isn't available or isn't enough.
The Advanced Networking Options
To enter the advanced network configuration dialog, select the network interface you wish to configure on the Network System Preference pane and click the Advanced button in the lower-right corner. This will open up a dialog with six or seven tabs: Wi-Fi (only for Wi-Fi interfaces), TCP/IP, DNS, WINS, 802.1X, Proxies, and Hardware.
TCP/IP
The TCP/IP tab (Figure 25–1) gives you a number of options for configuring your all-important IP address, which, as described previously, is necessary for data on the network to successfully reach your system. Here you can configure IPv4 and IPv6 Configuring IPv4 has four options: Using DHCP, “Using DHCP with manual address,” BootP, and Manually. If you should have to manually configure your network, you will need to first collect a few bits of information: the IP address assigned for you computer (which must be unique, at least within your network), the router or gateway address, the subnet mask, and the IP address for your DNS server(s) (which will be covered later).

Figure 25–1. The TCP/IP tab on the Network Preference pane's Advanced dialog allows you to change your IP address and related networking information.
TIP: The “Using DHCP with manual address” option allows you to manually set your IP address while otherwise having the benefits of DHCP. This is very useful if you must have a set IP address for whatever reason (i.e., you are using your computer as a server and need a static IP address). Keep in mind if you choose this option that you must choose an unassigned unique IP address. Generally, a DHCP server will only assign IP address within a range, leaving valid IP addresses unassigned. These unassigned IP address are a good place to look for available IPs.
CAUTION: IP addresses must be unique. You should not randomly pick an IP address for any system, or you could cause some real network issues, not only for yourself, but also for others. If a static IP address is assigned to you from a network provider, that is what you should use. If you are running you own local network, you can use NAT (Network Address Translation) to set up a private network behind a router (this is what most local networks and Wi-Fi routers do). There are certain blocks of IP addresses that you are free to use within your private network within IPv4. These address spaces are 192.168.0.0 to 192.168.255.255, 10.0.0.0 to 10.255.255.255, and 172.16.0.0 to 172.31.255.255. With IPv6 the range is FC00::/7 (anything beginning with FC). If you want to experiment, experiment within that range.
NOTE: Only certain servers and routers should ever have to manually configure IPv6. If you find yourself in this situation, it's assumed that you know what you are doing, so other than showing you where to enter the information I'm not going to dwell on the specifics.
DNS
The next tab in the advanced network dialog is the DNS tab (Figure 25–2). The DNS tab has two columns: one for listing your preferred DNS servers and the other for listing your preferred search domains. A DNS server is a service that will help resolve domain names, so when you type in a domain name (like apple.com), your request will make it to the proper IP address associated with the domain name.
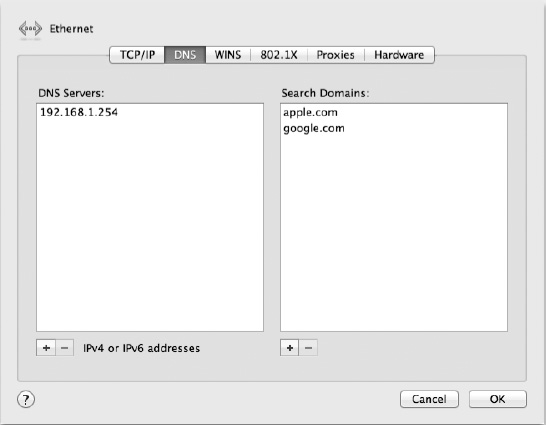
Figure 25–2. The DNS tab allows you to set up your preferred DNS servers and search domains.
TIP: Usually DHCP will automatically configure a DNS server (or servers) along with the rest of the network information, and if you are given information to manually configure your network settings, the proper DNS servers will be included. That said, you are not limited to these DNS servers; if you'd like to add to (or replace) your designated DNS server, you can. There are a number of public DNS servers that you are able to include here, including 8.8.8.8 and 8.8.4.4, two of Google's public DNS servers (for IPv6, use 2001:4860:4860::8888 and 2001:4860:4860::8844).
NOTE: DNS, while relatively simple in terms of networking on the whole, is still fairly complex—too complex to describe in detail here. If you are deeply interested in networking, it is definitely a topic worth fully understanding. A good place to start for a more complete explanation is www.howstuffworks.com/dns.htm.
The Search Domain column allows you to add a list of domain names that allows you to enter any number of domains that will be appended to names you type in Internet applications. For example, if apple.com and tumblr.com are added there (with apple.com listed first—order here is important), and then you type developer in the address field of Safari, you will be taken to http://developer.apple.com. If you type theatlantic, you will be taken to http://theatlantic.tumblr.com since theatlantic.apple.com doesn't exist.
NOTE: By default, if a term doesn't match anything in your Search Domain list, Safari will make a last-ditch attempt to add .com to the term; however, certain domains are “hungry” and will swallow all matches. tumblr.com is one such domain, so any terms that don't match *.apple.com or *.tumblr.com will result in a tumblr page-not-found screen.
WINS
The WINS tab (Figure 25–3) allows you to configure your Mac to work with Microsoft Windows name services. The NetBIOS name is the name your computer is given on Windows networks. Workgroup is the workgroup your computer will be assigned to, and the WINS Servers field is for a list of dedicated WINS servers that serve a purpose similar to a DNS server for Windows networks.
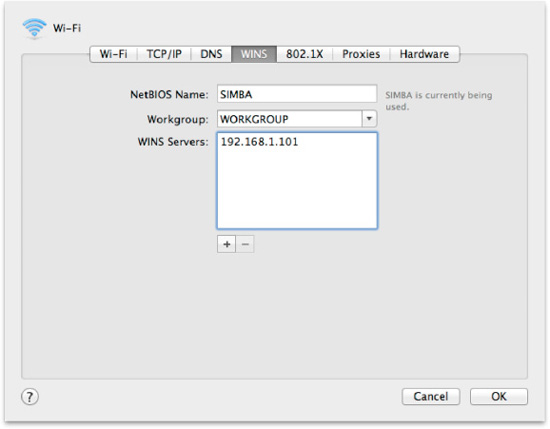
Figure 25–3. The WINS tab allows you to configure your Mac to behave on Windows networks.
802.1X
As mentioned, 802.1X is an access control standard that is enabled on many networks (especially in corporations and other large organizations). If you are required to connect to such a network, you will need to add a valid certificate to this tab. (The certificate helps certify the validity of the connection between your computer and the network). There will also be some additional configuration and authentication steps required to connect to the network. After your first successful connection, all the information will be stored, so you shouldn't need to reenter it each time. Selecting the “Enable automatic connection” option will automatically initial the network connection whenever you are attached to the protected network.
Proxies
Certain local networks are protected by a firewall that requires users to access the Internet through a proxy. A proxy is a server that sits between a computer and the Internet, ensuring all Internet traffic passes through the it. The proxy can be used for filtering, administrative control, and caching.
Occasionally, proxies will only be necessary for certain services, while other times all Internet services will need to pass through a proxy. Should your local network require a proxy, you should be given the proper configuration information from your administrator.
NOTE: While proxies are generally used to help secure a network, proxies can also be used to circumvent some network protections. For example, a common use of proxies is to circumvent web filtering (e.g., a student may use a proxy to circumvent a block on Facebook at school). It should be noted that utilizing such proxies could be used to capture personal information from unsuspecting users, and as such their use is not recommended. (A crafty student could, however, set up his or her own proxy servers for such purposes, though.)
Hardware
The Hardware tab provides information about a particular network interface, including the assigned MAC address. You can also make some adjustments to how the interface will behave; however, the Automatic settings are almost always adequate.
Wi-Fi
The Wi-Fi tab (Figure 25–4) (only shown on Wi-Fi interfaces) provides some useful options for dealing with Wi-Fi connections.

Figure 25–4. The Wi-Fi tab provides a number of options for working with Wi-Fi networks, including the ability to manage your preferred Wi-Fi networks.
One of the most useful options here is the ability to manage your preferred networks. If the “Remember networks this computer has joined” option is checked, every Wi-Fi network you connect to will be listed in the Preferred Networks field. You can also manually add or remove Wi-Fi networks using the + and – buttons under the Preferred Networks field. Networks listed as a preferred networks will be joined automatically when your computer comes into their range. If you work or live within range of many different networks, this assures that you will always connect to the network of your choice. If none of you preferred networks are in range, you will be prompted to connect to any available Wi-Fi networks.
Below the Preferred Networks options are some additional options for making changes to your Wi-Fi network; these will require an administrator's password.
Connecting to a VPN
One other common task that may be handled from the Network System Preference pane is setting up a VPN connection. The ability to connect to various types of VPNs is already built into Mac OS X; however, this isn't immediately evident from the network preferences. To configure a VPN connection, you must first add a new VPN network interface. This is accomplished by clicking the + button at the bottom of the interface list on the Network preference pane. Clicking the + button will open a dialog (Figure 25–5) where you should select VPN from the Interface menu and then select the type of VPN you are connecting to. Finally, you should give the interface a name.
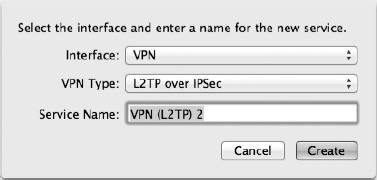
Figure 25–5. The first step in setting up a VPN connection in Mac OS X is adding an appropriate VPN network interface.
Once you have added the VPN interface, it will show up as a selectable interface in the network preferences (Figure 25–6). At this point you can fill in the appropriate configuration information. To connect to the VPN, click the Connect button. If you frequently connect to and disconnect from the VPN, you may want to select the “Show VPN status in menu bar” option to add a status icon on the menu bar that will allow you to control the VPN connection.
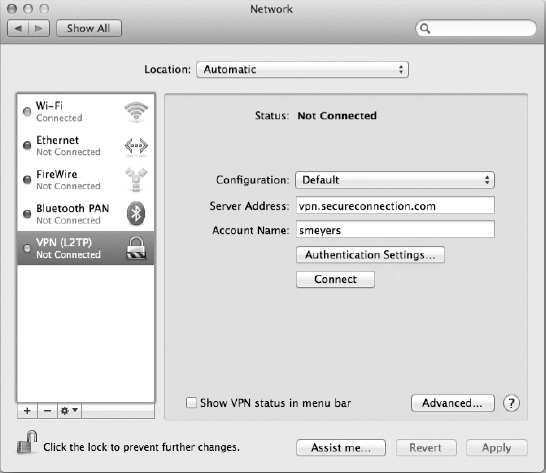
Figure 25–6. Once you have added a VPN interface, you can configure it to connect to the desired VPN server.
NOTE: Because of the many VPN types and various options for each, the details of setting up a specific VPN connection fall well outside the scope of this book. A network administrator should be able to provide you with the necessary details to accurately configure you VPN connection.
TIP: In most situations, organizations with a reasonable administrator will be able to provide you a configuration file to automatically set up your VPN interface and configuration. If such a file is available, you may import it directly into the network preferences by selecting Import Configurations… from the action menu at the bottom of the Network Interface list (the menu has a gear icon on it).
Networking Utilities in OS X
Besides the many network configuration options in the System Preferences, Mac OS X provides a number of additional tools for network configuration and monitoring. This includes Network Utility, which provides a graphical front end to common command-line networking tools, and AirPort Utility, which is used to configure Apple's range of AirPort devices.
Network Utility
Apple's Network Utility (Figure 25–7) provides a number of network information and monitoring tools. Located in the Utilities folder accessible from Launchpad, Network Utility has eight tabs, each representing a specific network utility.
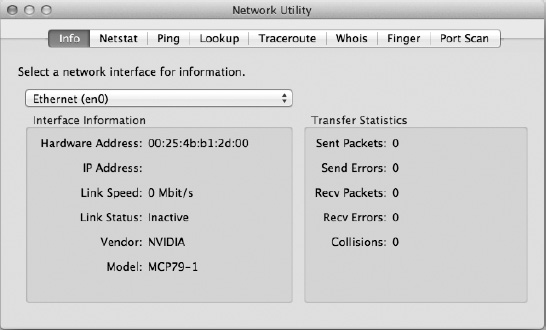
Figure 25–7. Network Utility provides eight different tools that provide network information. The Info tab shown here provides information about the selected network interface.
Info
Chances are your computer has several network interfaces. Most Macs have an Ethernet port, an AirPort card, and a FireWire bus, all of which are capable of connecting to a network.
The Info tab lets you get statistics on all your network interfaces, such as their hardware (MAC) and Internet (IP) addresses, their make and model, whether they're active, and at what speed they're connected. You can also see how many packets they've sent and received, and how many errors and collisions they've logged.
Netstat
Netstat, as its name implies, provides network statistics in four varieties (selectable by the radio buttons):
- Routing table: This is a map of known nodes from which your packets can begin their long trek across the Internet. This is not unlike a list of your local post offices.
- Statistics: This is a comprehensive list of statistics by protocol. This is the long version of the simple numbers displayed by Activity Monitor and the Info tab. If you're curious to know how many inbound IPsec/IPv6 packets failed because of insufficient memory, here's where you can find out.
- Multicast: This many-to-many communication protocol is used primarily by enterprise networks, though it's also used by mDNS, peer-to-peer technologies, and Internet Relay Chat (IRC). If you want to monitor your multicast memberships or packet statistics, Netstat is there for you.
- Socket states: Every connection on the Internet uses a socket, which is the combination of your computer's IP address and a port. It's not a bad idea to see who's connecting to your machine and what they're doing.
NOTE: For more information about the information shown here (or for more information about what Netstat is capable of), type man netstat from Terminal's command line.
Ping
Ping is a diagnostic tool that uses the Internet Control Message Protocol (ICMP) to determine your ability to reach a given IP address, be it another computer or something like a router. The theory behind Ping is that any machine that receives a ping is supposed to echo it back. Unfortunately, Ping has been abused by malware in the past—hence stealth mode.
NOTE: Stealth mode is an option in the Advanced Firewall settings on the Security & Privacy System preference pane. When stealth mode is enabled, your computer will no longer respond to ping requests, and will not answer any connection attempts to closed network ports. This has the effect of hiding your computer on a network, providing you aren't hosting any network services.
To use Ping in Network Utility, enter an IP address or domain name. Ping will then list the pings as they return, along with how long it took them to traverse the network. This can be useful in a variety of ways.
For example, if your web site goes down but your web host responds to pings, you can deduce that the host program crashed but that the server is OK. If the server does not respond to pings, you can assume something is wrong on a hardware level.
Similarly, if your server responds by IP address but doesn't respond by domain name, you can deduce that something is wrong with DNS. Further investigation would be needed to determine whether the domain name has expired or whether there is something else going on. This can be determined elsewhere in Network Utility.
Lookup
The Lookup tab combines the nslookup and dig tools to query DNS, which converts human-readable web addresses to the numerical IP addresses used by computers. The information returned by Lookup varies by host, but at the very least you can use it to get the IP address of a given server name.
Traceroute
Traceroute maps the path of packets as they travel to a given server address. Aside from being kind of interesting, it's a useful diagnostic tool. When a server is unreachable, you can use Traceroute to figure out where the packets are being stopped and who you need to call to get traffic flowing.
Like Ping, Traceroute has been abused by nefarious forces, so some servers will block Traceroute requests. Even so, you can usually get to the outer bounds of a given network, which will certainly tell you something, so Traceroute remains a good thing to have in your toolbox.
Whois
As opposed to the tools in Lookup, which convert domain names into IP addresses, Whois queries domain registries to determine who owns them. There are a couple of reasons why you might want to know this.
If your site is down and your server is reachable by IP address, but not by domain name, one possibility is that your domain name has expired or has been stolen. Checking the Whois information will let you know for sure. If Whois checks out OK, you can begin suspecting something is wrong with the name server itself.
Should you find your packets are being stopped at a certain node via Traceroute, Whois will tell you who you need to call about it. It's also a good way to see whether a domain name is available, and if it's not, to see when it expires.
As with many parts of the Internet, Whois registries have been abused. Putting your name, e-mail address, home address, and telephone number where anyone can get them is a potential privacy concern.
As such, some registrars now offer anonymous registration, whereby they will register the domain in their own name on your behalf, preventing people from getting any useful information about you. As with any such tactic, this certainly improves security by some degree, while breaking the Internet by another.
Finger
In the halcyon days of yore, when spam was just a delicious luncheon meat and the Internet was just a military research project, a computer scientist named Les Earnest wrote a program that would take an e-mail address and “point out” who it belonged to by giving you the person's name, whether they were logged on, and where their home directory was.
When the Internet opened for general use, people soon found less earnest uses for Finger, and the protocol was eventually abandoned. The tool still exists, but mainly as a way to generate the words the “connection refused.”
Port Scan
You should probably be noticing a theme with Internet tools. That is, they can be used for good or evil. Of all the tools in Network Utility, nothing fits this profile as well as Port Scan.
In a nutshell, Port Scan tries every port on a given machine and reports which ones are open. This is handy information for potential attackers, which makes it handy information for potential victims.
It's also useful for figuring out, say, why a particular Internet service is not working, because having its port closed will render any Internet application silent.
NOTE: Besides the tools here, some good command-line network utilities to read up on would be ifconfig, which lets you configure your network interfaces, similar to the Network panel in the System Preferences; and tcpdump, which lets you examine the contents of network packets and replaces the popular tcpflow application (which is always available via MacPorts).
AirPort Utility
I would be remiss not to mention a very important networking tool that comes in a pretty graphical package—AirPort Utility—which also lives in Launchpad's Utilities folder.
AirPort Utility replaces the old AirPort Setup Assistant and AirPort Admin Utility programs with a single, attractive, easy-to-use application. AirPort Utility also adds several features and makes it easier to manage multiple AirPort base stations.
At its most basic, AirPort Utility will show you which AirPort base stations are operating in your area, their names, and their IP and AirPort addresses, as well as which standards and firmware versions they support, as shown in Figure 25–8.
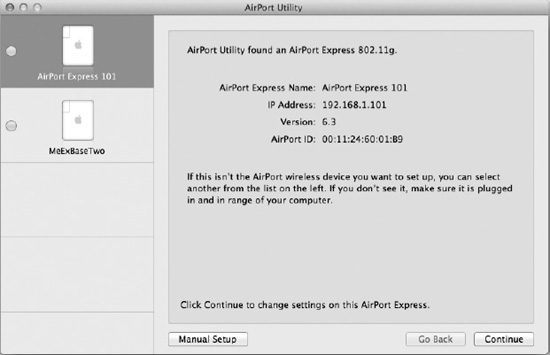
Figure 25–8. Apple's lovely graphical AirPort Utility
If one or more of the base stations in range belong to you, you can rename them and change their settings by double-clicking the device listed in the left column and clicking the Manual Setup button (or, for a more basic, step-by-step configuration, click the Continue button).
The availability and usefulness of settings in AirPort Utility will vary depending on which model of AirPort base station you have, its firmware version, and the peculiarities of your Internet provider. There are, however, a few notable groups of settings you should pay particular attention to:
- Wireless Security: To access this setting, select AirPort and then the Wireless tab from a selected device's setup screen (see Figure 25–9). Unless you're intentionally running an open access point, you need to protect your network by setting up encryption and a password from the Wireless tab of the AirPort panel. Several encryption standards are in common use, but you should probably choose one based on Wi-Fi Protected Access (WPA), such as WPA2 Personal. AirPort's recommended setting is WPA/WPA2 Personal, which supports the older version of WPA for backward compatibility. If you have machines that do not support WPA2, you can use this setting, but in general, you want to limit the abilities of your AirPort base station to those needed by machines you own.
CAUTION: If at all possible, avoid using a standard based on the Wired Equivalent Privacy (WEP) protocol. It's better than nothing, but at this point, even a moderately competent attacker can crack a WEP key with ease. If you have to use WEP to support older hardware, make it habit to frequently change your password. You should also steer clear of WPA2 Enterprise, which requires a special RADIUS server far beyond the means and needs of the everyday user.
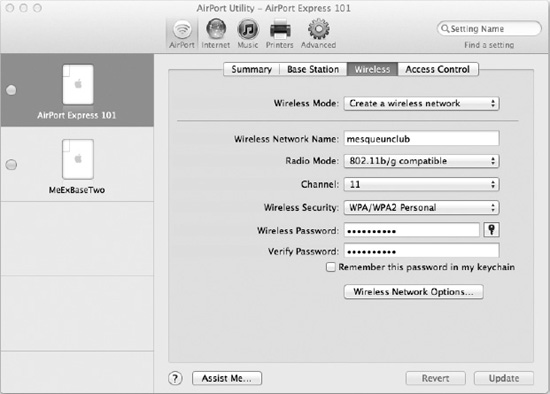
Figure 25–9. Besides setting the wireless network name (SSID), radio mode, and channel, it's always advisable to set up reliable wireless security.
- Radio Mode: This single setting resides right above the security options on the Wireless tab. Because an AirPort base station will support up to four wireless standards, you should check this to ensure you're using the smallest, fastest set of standards that will meet your needs. For example, if all your machines have an 802.11n AirPort card, supporting the a, b, or g standards could needlessly slow the network down, besides making it all the more usable by uninvited guests.
- MAC Access Control: This setting is located on the Access tab when AirPort is selected. It lets you filter access by hardware ID. This can be used to close a network to guests or to impose time limits on certain machines. This should be used only for convenience, not security. Unlike a password, a MAC address is easily spoofed.
- Remote Printing (Select Printers): By connecting a printer to your AirPort base station, you can allow any machine on the network to use the printer. This is an improvement over standard printer sharing because it doesn't require a host computer.
NOTE: While your Mac computer will immediately detect a printer set up on an AirPort device, to share the printer with a Windows computer you will need to download Bonjour Print Services for Windows. You can learn more about this here: http://support.apple.com/kb/DL999.
- AirPort Disks (Select Disks): Similar to printer sharing, you can connect USB hard drives to your AirPort base station, which will allow them to be shared by people on your network. This is also used for Apple's Time Capsule disk.
NOTE: Sharing a disk connected to an AirPort base station—known generically as network-attached storage (NAS)—is a really cool feature, particularly if you have a laptop. Shared disks host files that can be accessed over your network, or, used in conjunction with iCloud's Back to My Mac feature, the Internet. Unlike printers, hard drives contain personal data, which raises privacy issues. Apple lets you set up user accounts, password protection, and permissions on shared drives. That way, multiple people can use the same drive without having access to each other's data.
- AirPlay (Select Music): When AirPlay is selected, you can have music played from your computer to speakers connected to your AirPort. Any available AirPlay-enabled AirPort devices will show up in iTunes, where you can select what speakers the music should be played from (this works great in combination with the iOS Remote app).
Beyond these, one other AirPort feature deserves some additional explanation: Connection sharing.
AirPorts have three options for sharing an Internet connection (located under the Internet Connection tab when Internet is selected): “Share a public IP address”; “Distribute a range of IP addresses”; and Off (Bridge Mode).
NOTE: Depending on what connection-sharing option is selected, different tabs will appear under the Internet and Advanced panes in AirPort Utility.
“Share a public IP address” is the option you will want to select if you are only provided (or assigned) a single IP address, yet you want to connect multiple devices to the Internet through your AirPort. This will set up your AirPort device to use NAT to distribute private IPs to all connected devices via DHCP.
“Distribute a range of IP addresses” is the option you can use if you have been given a range of valid IP address to use for your devices. With this option selected, the AirPort will use DHCP to distribute that range of addresses to devices connecting to your AirPort.
Off (Bridge Mode) is the option you should select if you want to bypass the router features of your AirPort. This is common if you have a router that already assigns IP addresses to your network, but you wish to add wireless access points to the network using AirPort devices.
Summary
This chapter provided a closer look at Mac OS X's network configuration options, as well as some of the included network utilities. While what we covered here should cover 99 percent of all networking situations that anyone may face, there are situation where some additional research and configuration may be necessary. Keep in mind that much of the networking in Mac OS X is descended directly from its UNIX roots, and that most of the common networking features and tools found in most UNIX systems are also available in OS X (though they may require some command-line work to install, set up, and configure).
That said, now that we can set up our network, in the next chapter we will take a close look at sharing resources over our network.