
Chapter 24
Extending the Power of Darwin
After the previous chapter, we hope you are at least somewhat comfortable working at the command line. In this chapter, we'll move on and show how to extend the power of Darwin by covering the following:
- An introduction to shell scripting
- An overview of Perl, Python, and Ruby, which are three powerful scripting languages included with Lion
- How to find and install a range of additional applications using MacPorts
- How to custom-compile a Darwin application from the source code
Getting Started with Shell Scripting
Shell scripting has been a staple in UNIX since the first shell was launched. In its most basic form, a shell script allows you to add a series of shell commands to a file so that these commands can be easily run over and over. You can see an example of the value of this by examining the startup process of Mac OS X. During the startup, the shell script /etc/rc.common is started; this file begins a series of processes that effectively start up, configure, and maintain many of the necessary OS and networking functions that occur during startup.
NOTE: The rc.common file is a holdover from previous versions of OS X and has a strong UNIX heritage. Beginning with Mac OS X 10.4 Tiger, Apple introduced launchd, a startup daemon that standardizes the way processes start on OS X. In recent versions of Mac OS X, most of the old rc, xinit, and initd startup systems are gone or are no longer used very much, and it's likely that in future updates to Mac OS X they will be gone completely.
Writing a shell script can be as easy as just listing a series of any of the commands you may enter at the command line; however, shell scripts can also accept external variables and may contain simple if...then logic and loops. We'll briefly explain all of these things, but first let's take a look at a sample shell script (the line numbers are for reference and shouldn't be typed into your script):
01:  #!/bin/sh

02:

03:  # togglevis

04:  # A shell script to toggle the visibility of hidden files in the Finder

05:

06:  set `ps acx  |  grep Finder`

07:

08:  show=`defaults read com.apple.finder AppleShowAllFiles`

09:

10:  if [ $show -eq 1 ]; then

11:      defaults write com.apple.finder AppleShowAllFiles 0

12:      kill $1

13:  else

14:      defaults write com.apple.finder AppleShowAllFiles 1

15:      kill $1

16:  fi
NOTE: For those of you who really hate line numbers in programs because they prevent you from copying the text out of an e-book and running it, later in this chapter there will be a Perl script that you should be able to tweak (when you are done with this chapter) to strip them out automatically.
This handy script will toggle the visibility of hidden items in the Mac OS X Finder, which is done by setting the hidden Finder preference AppleShowAllFiles to 1 (to show all files) or 0 (to hide hidden files) and then restarting the Finder to immediately enact the change.
NOTE: Truth be told, this script doesn't restart the Finder. The script instead just kills the Finder, and since OS X depends on the Finder, it will automatically restart it.
NOTE: When you first run this script, you may get an error mentioning that AppleShowAllFiles doesn't exist. This is fine; it will be created the first time you run the script, and you shouldn't receive any further errors any time you run the script afterward.
The first line, #!/bin/sh, often referred to as the interpreter line, is important for all scripts because it points the shell to the executing script interpreter. This is often referred to as the shebang line, for the #! combination that begins it. (The # resembles a musical sharp, so “sharp” plus “bang” for the !equals “shebang.”)
NOTE: Most shell scripts in OS X (and generally in UNIX) were written for the Bourne shell (sh) for compatibility across various UNIX platforms (of which almost all have the Bourne shell installed). The Bash shell itself (aka Bourne Again SHell) is 100 percent backward compatible with the Bourne shell, with some extra features borrowed from the C shell and Korn shell. The general scripting syntax we are covering in this chapter is mostly Bourne shell compatible; however, there may be certain commands issued inside a script that are specific to OS X.
NOTE: There is no Bourne shell by default in Mac OS X; rather, /bin/sh is actually a Bash executable.
Lines 3 and 4, like all script lines beginning with # (except the shebang line), are comments. These are included to provide a clue about what's going on for anyone reading the script. Comments have no effect on how the script runs, and in this respect are purely optional elements. It is a good habit to use comments, not only for others who may be looking at your script but also for yourself should you have to look at a script weeks, months, or even years after you wrote it. Here the first comment line gives the name of the script, and the second comment describes what the script does.
Line 6 shows us two things: the use of the set command and the use of backticks (`) in scripts. In a shell script, anything within backticks is executed, and the result is passed to the script (this is called command substitution). The set command sets the arguments used in the script just as if they were entered at the command line. So, line 6 takes the results from the psacx | grep Finder command (which would be something like 261 ?? S 0:00.93 Finder) and makes them our arguments (of which there would be five). The importance of line 6 for the rest of the script is that it specifically assigns the process ID of the Finder to our first argument, which can then be accessed as the variable $1.
Line 8 sets the variable show to the result of the defaults read com.apple.finder AppleShowAllFiles command. defaults provides a way to access and alter Mac OS X user default settings from the command line. In this case, we use it to read the AppleShowAllFiles value stored in the com.apple.finder preference to determine the existing setting (0 or 1) so we can then toggle the setting. If the AppleShowAllFiles value doesn't exist yet in your Finder preference file, you will get an error similar to this:
2011-05-30 09:58:09.195 defaults[473:60b]

The domain/default pair of (/Users/scott/Library/Preferences/com.apple.finder.plist,

AppleShowAllFiles) does not exist

./togglevis: line 10: [: -eq: unary operator expected
You can ignore this, since the script will continue and actually create this value. However, if you continue to get errors after this (or if you get a vastly different error), then something else is wrong, and you should check your script closely.
Lines 10 through 16 provide a conditional if…then…else statement and provide the expected actions based on the condition. First, in line 10 we check to see whether the show variable (which is the set value of com.apple.finder AppleShowAllFiles) is 1; if it is, then we move on to line 11 where we change com.apple.finder AppleShowAllFiles to 0. Then in line 12 we kill the Finder using $1, which we set in line 6. If the condition in line 10 is false (the show variable is not 1), then we move on to the else part of the script, and in line 14 we set com.apple.finder AppleShowAllFiles to 1 and then kill the Finder. Line 16 ends the if…then…else statement with fi (that's if backward).
The script ends when it runs out of things to do.
There are a couple ways to run this script: one is to pass the script to the shell executable as an argument, and the other is to make the actual script executable. Passing the script as an argument to the shell looks like this:
Simba:bin scott$ sh togglevis
NOTE: This assumes a couple of things: First, I saved the file in a directory called bin located in my home folder (you may need to create this folder). Second, it assumes that I am currently “in” that folder.
If you want to have access to the script easily from anywhere, though, you must first make the script executable and make sure it's in a directory that is included in your $PATH (as discussed in the previous chapter). For example, we've placed this file in our own bin directory, which you can see is set in our path with the following statement:
Simba:bin scott$ echo $PATH

/Users/scott/bin:/usr/bin:/bin:/usr/sbin:/sbin:/usr/local/bin:/usr/X11/bin
To make it executable, we use the chmod command:
Simba:bin scott$ chmod u+x togglevis
Now, provided the script is in your path, you can use togglevis as you would any command from the command line.
Variables
Variables in shell scripts are generally reserved for use from within the script itself unless they are explicitly exported as environmental variables. Environment variables (which include things like $PATH) are variables that are available to all shell scripts and programs, while shell variables are available only within your script.
Setting a variable is quite easy; just create a variable name, and set its value like this:
aVariable=Value
NOTE: The possible names a variable can have are virtually endless, but there are some rules. First, although the name can contain letters, numbers, or underscores, it's best that they begin with a letter (and they can't begin with a number, since that is reserved for command-line argument variables). Second, variables obviously can't share a name with a reserved word, which is one of the many words that have special meaning to the shell. Finally, by convention, environment variables are often written with all capital letters, and shell variables are traditionally written in all lowercase letters, but of late many people use camel case, which starts out lowercase but uses a capital letter where a new word begins. An example of camel casing is aVeryLongVariable.
NOTE: Here's a list of standard shell reserved words (separated by spaces): !case do done elif else esac fi for function if in select then until while { } time [[]].
It is important not to include spaces around the = when declaring your variables; if you do, you will get an error.
If you want to make your variable an environment variable (making it available everywhere), then you must export it using the export command. Usually this is done immediately after the variable is declared. This can be done all on one line, like this:
ENWAR=Value; export ENVVAR
After the shell exports the variable, it will be immediately available for any program or shell script until the parent shell process exits. (In other words, every time you launch a new shell, you will need to redeclare and export the variable to use it again.) If you are planning on using an environmental variable over and over, it may be best to declare it in your .bash_profile file so it gets declared each time you launch your terminal or a shell.
Argument Variables
Some of the most commonly used variables are ones you don't need to declare at all. These are variables passed to the script as arguments from the command line when the script is called. For example, if you were to run an executable script called ascript, you could pass arguments to the script when you call it, like this:
Simba:~ scott$ ascript arg1 arg2 arg3
Here the arg1, arg2, and arg3 values are automatically assigned to the variables $1, $2, and $3 so they can be used as needed in the script.
NOTE: In many computer languages, counting begins with 0, not 1. Command-line arguments in scripts are no exception. In scripts, $0 is always the script itself and will return the complete path name of the executed script.
These special variables don't have to be passed in from the command line, though. Occasionally it may be advantageous to create and control these arguments from within the script. This can be done by using the set command (as we did in our example shell script earlier). The set command will replace all command-line arguments with the arguments provided.
NOTE: set is a fairly complex command in Bash with lots of different capabilities. If you use set alone on the command line, it will list every environmental variable and function available to you in a nice, readable format. Used with options, set allows you to toggle many shell attributes. If you are interested, the gory details of all the possibilities for this command begin on page 51 of the Bash man page and continue until about three-quarters of the way through page 53. Also of note, set behaves differently in other shells; for example, in csh you would use set in place of export to create environmental variables. You can find a brief description of the built-in set command as it relates to Bash at http://www.gnu.org/software/bash/manual/htmlnode/The-Set-Builtin.html.
Command Substitution
Another way to assign a variable is through command substitution. This allows you to work with the result of any shell command by enclosing the command with backticks (the character below the Esc key on most Mac keyboards). This allows you to take advantage of any shell command, making up for most of the shell's natural shortcomings. For example, the Bourne shell doesn't have built-in capabilities for simple arithmetic; however, using command substitution, you can take advantage of command-line executables that do this for you anyway, like this:
This little script uses the expr executable to do the math for you and then prints “5,” which is what you'd expect.
NOTE: The Bash shell actually does have a built-in arithmetic capability facilitated by the let built-in, so if you were so inclined, you could replace the z=`expr $x + $y` line with let z=$x+$y and get the same results. (let specifically carries out arithmetic operations on variables.)
Controlling the Flow
The ability to control the flow of a script makes it much more adaptable and useful. There are two primary ways to control the flow of a script: using conditionals, which will execute commands if certain conditions are met, and using loops, which can repeat commands over and over a predetermined number of times.
Conditional Statements
Two common conditional statements are available in shell scripts: if statements and case statements. An if statement checks to see whether a condition is true or false. If the condition is true, then a block of code is run; if it is false, an else block is run (if else exists; otherwise, nothing else happens in the block). The whole thing looks something like this:
if [ condition ]; then

    condition is met block

else

    condition not met block

fi
The fi at the end signals the end of the if statement.
One other thing that can be added to respond to multiple conditions is the elif (else-if) condition. This allows you to create logic like this:
if [ condition1 ]; then

    condition1 block

elif [ condition2  ]; then

    condition2 block

else

    no conditions met block

fi
One thing to keep in mind is that once the condition is met, the script will execute that block and then exit the if block entirely, so if condition1 is met, the script will not check for condition2 or run the code in that block.
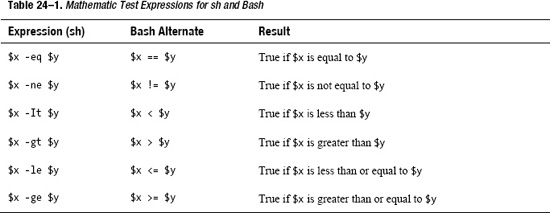
There are a number of ways to create conditional statements; one of the most common is to use a mathematical test condition, as listed in Table 24–1 (the Bash alternate expressions will work only with Bash, not a traditional Bourne shell).
Another common conditional statement is for checking on the existence of a file or directory. This is especially handy if you are creating workflow or other scripts that interact with the file system. An if statement that checks for the existence of a particular file would look like this:
if [  -e /path/to/file]; then

    If file exists do this

else

    If file doesn't exist do this

fi
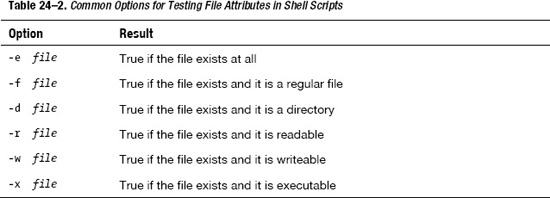
Here the -e option checks for the existence of the file. Table 24–2 lists some possible options.
NOTE: In the UNIX landscape, where everything in the file system is a file, a regular file is most easily defined by what it isn't. Specifically, it's not a block special file, a character special file, a directory file, a pipe, a FIFO special file, a symbolic link, or a socket. Those are special files, while regular files (which generally contain binary or text data) are, well, not special.
It is also possible to test multiple conditions using logical and/or statements. This allows you to check either whether multiple statements are all true or whether one of many statements is true. This is done using either && or || (that's the long bar over the key) between the conditions. [ condition1 ] && [ condition2 ] will return true if both conditions are true, while [ condition1 ] || [ condition2 ] will return true if either condition is true.
One final common conditional is to utilize the exit status of a command. Every command you run will provide an exit status; that's usually a 0 if everything ran as expected and some other number if something special happened. Using the special $? variable (which contains the exit status of the last command), you can do some interesting stuff. For example, if we wanted to periodically see whether a user was running any processes on our computer, we could use the following:
#!/bin/sh

ps U scott >> /dev/null

if [ $? = 0 ]; then

    echo "Scott is working on something."

else

    echo "Scott's not doing anything here right now"

fi
The ps U scott>> /dev/null command simply lists all the processes being run by the user scott. Since we are not interested in the output of the command (just the exit status), we send the output to /dev/null. If there are any processes, the exit status will be 0. If the user doesn't exist or the user isn't running any processes, the exit status will be 1 (different commands may provide different exit statuses for different reasons). Although this example was fairly simple, with a few tweaks it could do some more interesting things. For example, if we replaced the user scott with the user www, we could check to see whether the default Apache web server is running. If it's not, we could use the else block to restart it.
Another way of dealing with multiple potential conditions is to use a case statement. A case statement looks at a variable and responds differently depending on its value.
A case statement is generally much easier to use then an if statement; however, it's a viable alternative only if you are dealing with multiple similar outcomes that may be stored in a singe variable. For example, if we wanted to check for different exit statuses using a case statement, we could write the following:
#!/bin/sh

shutdown

case $? in

    0) echo "Returned 0: The command executed successfully…goodbye." ;;
    1) echo "Returned 1: The command or shell returned an error." ;;

    127) echo "Returned 127: The command couldn't be found." ;;

    *) echo "* is a wildcard, I'm not sure what happened" ;;

esac
NOTE: shutdown allows for the automated shutdown of the system. There are some additional options available that can allow you to schedule a system shutdown at a later time and provide warnings to other computer users. This command isn't used much on Mac OS X, but if your find yourself using other *nix systems, it can be a useful one to know.
NOTE: You need superuser privileges to run the shutdown command, so as long as you don't use sudo to run the preceding script, it should safely exit with an error and not shut down your computer.
As you can see, using case you can easily check for and respond to many different outcomes.
Loops
Now that you've learned a bit about how to selectively run or not run a command based on a condition, we will cover how you can run a command over and over with loops. There are three main types of loops for shell scripting: while, until, and for loops.
The while and until loops are similar in idea, but they do the opposite in practice. Each of them takes a condition (similar to the if statement); however, where the while loop will run a block of code as long as the condition is true, the until loop will run as long as the condition is false.
CAUTION: Poorly written loops can have the adverse effect of running forever. If you are running a script from the command line, it's easy enough to stop such a runaway script with Control-C, but if this is part of a background or startup script, things can get more complicated. Therefore, it's a good idea to test your scripts from the command line before you place them in startup files and such.
A simple while loop could look like this:
#!/bin/sh

x=1

while [ $x -le 10 ]

do

    echo $x

    x=`expr $x + r`

done
This script will simply go through the while loop, printing the value of $x and then increasing the value of x by 1 as long as the value of $x is equal to or less than 10. If we switched while to until, the loop would be skipped entirely, since our declared value of x (1) would immediately be less than or equal to 10.
NOTE: Like if statements, while and until loops can also evaluate multiple conditions using logical and (&&) and or (||) statements.
The other common loop is the for loop. Rather than relying on a true/false condition like the while and until loops, a for loop iterates over all the elements in a list. For example, a simple script to echo back the command-line arguments could look like this:
#!/bin/sh

echo "The command line arguments given to $0 are:   "

for x in $@

do

    echo $x

done
NOTE: When you run the preceding script, any arguments you add will be echoed back to you. So, if you run it, make sure to add some.
NOTE: $@ is a special variable that contains each command-line argument together in a single variable.
You may find that there is situation where you need to get out of a loop before it completes, which is accomplished with either the break command or the continue command. The break command will immediately stop the current loop pass and exit the loop process entirely (i.e., the script will continue immediately following the loop). The continue command will cause a halt in the current pass through the loop, but will continue the loop process if the conditions are still met.
Input and Output
Many scripts you write will need to provide output, and often you may want a script to prompt for input as well. In the previous chapter, you learned most of the basics you need in order to output text either to the terminal or to a file using the echo command (with redirection if you want to write the output to a file), but you can also use the printf command, which provides more options for how your output is presented. To get information into a script, you can use the read command, which will provide a prompt at the command line for input.
The following script (enhanced from the previous version) shows how read and printf work (line numbers have been added for reference):
01:  #!/bin/sh

02:

03:  printf "Please enter your input here: "

04:  read input

05:  set $input

06:  c=$#

07:  printf "You entered the following: "

08:  for x in $@

09:  do

10:  c=`expr $c -1`

11:      if [ $c -gt 0 ]

12:      then

13:          printf ""$x", "

14:      else

15:          printf "and "$x".
"

16:      fi

17:  done
When you run this script, you get something along the lines of this:
Please enter your input here:  hello goodbye dogcow

You entered the following:   "hello", "goodbye", and "dogcow".
The first thing you may notice is that unlike the echo command, printf does not automatically add a linefeed to each statement. By using printf in line 3, the prompt for the read statement appears on the same line rather than the line below.
The read statement is on line 4, and it's fairly easy: it's the read command followed by a variable to contain our input (cleverly called input).
In line 5 we set the input as our primary script arguments.
Line 6 starts a counter and starts it with $#, another special variable, which gives us the total number of arguments assigned by set in line 5.
Line 7 provides some text for our output.
Line 8 begins a for loop that will iterate through each of the arguments set in line 5. In this case, $@ and $input will contain the same values.
Line 9 starts the for loop.
Line 10 decreases the value of our counter by 1.
Line 11 uses an if statement to see whether our counter, c, is greater than 0. The counter is set up so that when it hits 0, the loop will be on our final input argument, so we continue the loop on line 13 until we reach the last of our inputs, and then switch over to line 15.
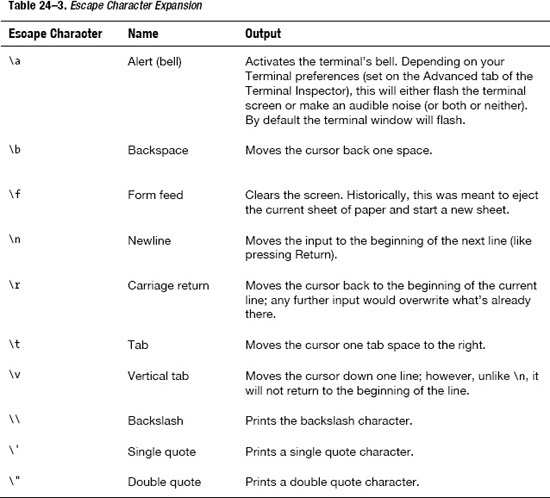
Line 13 uses the printf statement to print one of our arguments surrounded by quotes. To get the quote to print, rather than have it be interpreted as the closing or opening of the text we are printing, we need to escape the ". We do this by preceding the quote symbol with a backslash (). printf knows a number of these formatting escape characters (which are actually borrowed from the C programming language) and will automatically expand them into their proper form when printing. Table 24–3 lists the common escape characters.
If our counter is set up properly (and there aren't any other glitches in our script), line 15 will run on the last of our input values, also printing it surrounded by quotes. However, instead of placing a comma (as if to continue the list), it will then print out a . and then a newline character.
Line 16 then ends the if statement, and line 17 ends the loop and thus our little script.
One thing not shown here is that the read command can actually assign different variables to the input, where, for example, each input value would be assigned its own variable—well, that is if we assume that the number of variables and the number of words are the same. If we had the following read statement:
and entered this:
one two three
then $a would be assigned the value one, $b would be assigned the value two, and $c would be assigned the value three. In the event we set read to accept three variables and we get four or more input terms, the last read variable ($c in this case) will absorb all the remaining values.
TIP: If the integrity of your read variables is important and you want to protect against additional input, you could assign an additional read variables to suck up all the extra data. So, if you really wanted only three input values, you could set up read with four variables and then just use the first three, thus essentially ignoring all the excess input.
One final useful related tidbit is the ability to merge an entire file into a script. This is done quite easily with the dot (that is, period) command. If you paid attention, you saw this in our sample .bash_profile file toward the end of the previous chapter where we used this:
if [  -f ~/.bashrc  ];  then

    .  ~/.bashrc

fi
Here, we first check to see whether our desired file (.bashrc) exists and is a normal file. If so, we include it with the . ~/.bashrc. And that's it. This is a handy way to create complex scripts where you can write entire parts as separate files and then include them all together to effectively run as one.
CAUTION: If you combine scripts together, be careful with your variables. If two different script files use the same variable names and are then included together, unexpected (often bad) things can happen since the values of the named variables may get unexpectedly changed.
Advanced Scripting with Perl, Python, and Ruby
Shell scripting is very useful and fairly powerful for many things; however, there are a number of languages more powerful than the shell for writing scripts. Mac OS X comes with three of the biggest and most powerful scripting languages in use today: Perl, Python, and Ruby. Given the breadth of these languages (which are often referred to as interpreted programming languages or very high-level languages [VHLLs], rather than just scripting languages), it would be impossible to properly teach you how to use them in all their glory in this chapter. Although these languages are fairly easy to learn to use (some more so than others), the space (and time) needed to cover all of this goes beyond what is available in this book. Still, for those of you who are familiar with these languages, or are looking to expand your programming repertoire, we would be remiss not to talk a bit about them and how they work within OS X.
Each of these languages shares a number of benefits over compiled languages such as C, C++, Objective-C, and Java, including ease of use, portability, and immediate feedback (since there is no compilation). Since they are scripting languages, all you need to write them is a text editor. Finally, each of these languages is free and well supported across a wide range of platforms and devices. The other side of this coin is that interpreted languages such as Perl, Python, and Ruby (and shell scripts, for that matter) have a few disadvantages vs. their compiled brethren: they generally lack the performance of a well-optimized compiled program; they are not as well suited for low-level programming tasks; and if you choose to distribute your script, you are also revealing all your source code, which makes scripting languages less inviting for commercial applications.
NOTE: Performance is a tricky matter. Although a well-optimized compiled program will always outperform an interpreted program (at least on the initial execution of the program), because of caching, the advanced subsequent execution of interpreted programs can easily match that of the compiled programs. Additionally, because of hardware advances, the real-time difference between the two is rapidly diminishing (though never quite reaching equality). Interestingly, certain programming technologies, such as Java and some .NET technologies, are both compiled and interpreted. This could lead one to assume that these would share the faults of both compiled and interpreted languages, such as added development complexity and time, and less-than-optimal performance. Although this may be true, they also gain a few benefits, such as portability and source code obfuscation. (That's not to say that if a language can be portable, it actually is.)
Perl
Perl (which stands for Practical Extraction and Report Language) is historically the leading interpreted language (though Python and Ruby have been gaining on it over the past few years). Perl, as its name seems to imply, was initially designed to work with large chunks of text: to read in information and to parse it and/or manipulate it in meaningful ways. Thus, when the World Wide Web came into being with all of its marked-up text, Perl, combined with CGI (Common Gateway Interface), which allowed scripts to be executed to produce output for the first dynamic web pages, was uniquely suited to work with all of this data and manipulate it in fun, interesting, and useful ways. As a web language, Perl's popularity began to grow rapidly.
As a language, one of Perl's greatest assets, and also one of its greatest weaknesses, is its fantastic flexibility. It prides itself on providing multiple ways to solve any given task—Perl's motto is TMTOWTDI (“There's more then one way to do it.”). In the hands of a skilled programmer, this flexibility can unleash wonderful things, but it can also create a lot of unintelligible, unmaintainable code (thus giving Perl the unflattering reputation of a “write-only” language). The truth is that although Perl allows you to write some very ugly code, you can also write very clean, understandable code in Perl. Most importantly, though, when you have a problem, Perl usually can provide a way to solve it. For example, let's say we wanted to simplify numbering lines in source code (you know, because we're writing a book and sometimes it's nice to refer to line numbers). Rather than going through each code listing and manually entering numbers, we could easily whip together the following script in Perl:
#!/usr/bin/perl -w


foreach my $file ( @ARGV ) {

    my $n = 0;

    open  (OFILE,  $file)   ||  die "Sorry,  $file can't be opened:  $!";

    open  (NFILE,   ">num_$file");

    while ( <OFILE> ) {

        $n++;

        print NFILE sprintf("%3d:   ",$n),  $_;

    }

    close OFILE;

    close NFILE;

}
This script allows us to enter any number of scripts as arguments at the command line, and it will go through each one of them, numbering every line and formatting the output back into another file with the same name prefixed with num_. For example, if we saved the preceding script as pnum and then ran the script with the following command:
./pnum pnum
the script would create a new file called num_pnum that would contain the following text:
1:   #!/usr/bin/perl -w

2:

3:   foreach my $file ( @ARGV ) {

4:   my $n = 0;

5:   open (OFILE, $file) || die "Sorry, $file can't be opened: $!";

6:   open (NFILE, ">num_$file");

7:           while ( <0FILE> ) {

8:                   $n++;

9:                   print NFILE sprintf("%3d:   ",$n),  $_;

10:           }

11:           close OFILE;

12:           close NFILE;

13:   }
One other fantastic feature of Perl, which may be its ultimate strength, is that because of its maturity, it has built up a large collection of code libraries (called Perl modules) that can help you solve almost any task you can think of. Additionally, it has created a system around these libraries, the Comprehensive Perl Archive Network (CPAN), that provides an effective way of accessing these modules for your code. For the OS X user, included in CPAN are a number of modules for using Perl to manipulate Apple applications such as iTunes and iPhoto, as well as for accessing Apple events from Perl, and more.
For the ultimate in OS X/Perl programming, the Camel Bones project (http://camelbones.sourceforge.net) brings together a range of OS X/Perl-specific libraries, frameworks, and modules, allowing you to perform tasks such as creating Aqua interfaces for Perl scripts and using Perl instead of Objective-C in Cocoa applications.
Lion ships with version 5.12.3 of Perl, while, as of this writing, the latest official version of Perl is 5.14.0. Somewhere on the horizon is Perl 6, a complete rewrite of Perl that promises not only a new and improved interpreter, but also many updates to the language. For more information about Perl, the best place to start is the official web site: www.perl.org.
Python
Python, although not as well known as Perl, has been around for almost as long, but while Perl got to ride on the web wave because of its text-processing abilities, Python, being designed as a general-purpose scripting language, was often overlooked. Because of its more general-purpose beginnings, in many areas, especially surrounding math and science, Python was just the thing developers needed.
Python possesses a number of features that differentiate itself from Perl. First, Python was designed as an object-oriented scripting language (Perl gained reasonable object-oriented capabilities in version 5; however, on the whole, Perl is still used very much as a procedural programming language). Second, unlike Perl, Python script writing style is very strict. Proper indentation of code, whitespace, and line breaks have specific, essential meaning to Python. This often makes existing Python code much easier to understand than most Perl code, but dictating a strict style has also caused a few issues through Python's evolution (and of course has caused a few “free-thinking” individuals to shun the language).
Python has been around on the Mac for a while (beginning with MacPython even before Mac OS X). Today, like Perl, it's a standard part of Darwin. Unlike Perl, Python is developed as a framework, rather than many other Darwin applications, making Python available for Cocoa programming as well as Darwin development right out of the box.
Learning Python is fairly easy, as there are lots of books and online tutorials available. One of the best places to start is the Python tutorial at http://docs.python.org/tut/. One nice part about learning Python is that it comes with its own interactive interpreter, which will start when you type python at the command line without arguments. Not only is this a great tool for learning the language, but it can be very handy for unleashing the power of Python for common tasks. We use the Python interpreter all the time as a calculator (I find it much faster and more flexible to use than the GUI calculator for most things). A session with the Python interpreter could look like this:
simba:bin scott$ python

Python 2.7.1 (r271:86832, May  9 2011, 13:12:03)

[GCC 4.2.1 (Based on Apple Inc. build 5658) (LLVM build 2335.14.00)] on darwin

Type "help", "copyright", "credits" or "license" for more information.

>>> x=2
>>> for y in range(11):

…       y*x

…

0

2

4

6

8

10

12

14

16

18

20

>>>
NOTE: Remember, Python uses tabs to indent code, not spaces. In the previous code sample, there is a singe tab between the first … and y*x. There is simply a hard return after the second ….
As you may surmise from this, you can accomplish a lot of stuff with very little code. Once programmers learn the nuances of Python, they generally find themselves creating code at a significantly faster pace than with most other languages.
Ruby
Ruby is the new kid in the family, but it's making quite a showing, largely because of the buzz surrounding Ruby on Rails (RoR). RoR, which is included in Mac OS X, is a very nice web application framework written in Ruby. Ruby shares many similarities with Python in general and in Mac OS X. Both are object oriented (in Ruby everything becomes an object), both are relatively easy to pick up, and both include an interactive interpreter for playing around with code (Ruby's interactive interpreter is not built into the language in the same way that Python's is; to get to the Ruby interactive interpreter, you use the irb command). For OS X developers, the most important similarity is that they are both compiled as Cocoa frameworks, which makes them available for Cocoa development as well as Darwin development. Despite the similarities, Ruby is different from Python most noticeably semantically, but also syntactically.
Because Ruby is a newer language, it seems to have learned to avoid a number of issues and perhaps shortcomings that Perl and Python have had, while at the same time incorporating new ideas that weren't mature when Perl and Python were conceived. On the other hand, because of its relative newness, Ruby has not been tested as much as Perl or Python, and as such may not be as hardened as them. For example, there are those who think Ruby does not scale (in a performance sense) as well as Perl or Python.
NOTE: Much of the performance talk about Ruby may be because, in the past, its use on a large scale was fairly limited. Today, you need only point to Twitter or Hulu to see that Ruby can in fact scale quite well, and as it matures, we can imagine it improving in this area.
If you are looking for specifics on developing Ruby Cocoa applications, documentation is included with the Xcode Tools installation(/Developer/Documentation/RubyCocoa/).
Installing New UNIX Software
Although scripting is a good solution for simple problems, or new problems, often it's easier to just use a program that someone else has already written. UNIX and related operating systems (such as Linux) have been around for a very long time and continue to be popular, so for many of the tasks you may want to accomplish, an existing application or program may already be available. Best of all, many of these programs are available for free and are waiting for you to install them. Some are available simply by downloading an OS X installation package and installing it like any other OS X app (MySQL is a popular database that is available in many formats, including an official OS X installation package), but many more are available as a precompiled binary (i.e., a ready-to-run program), or more commonly (and often preferably) as a source package. This gives you some options. You could download the source package, configure it for your specific needs, and then compile the source code into an application optimized for your computer. You could try to locate a precompiled binary and install that (and hope that it works right). Or you could take advantage of MacPorts (formerly known as DarwinPorts), which provides a relatively easy way of finding, installing, and maintaining third-party Darwin applications. This ultimately boils down to preference, but if you haven't already formed your own, we suggest you try the following, in this order:
- An official binary release, if available, would be the first choice. This should make installation trivial and effective, and should make for easy upgrades if needed. Additionally, any other applications that may rely on the application would probably assume the official release.
- If an official version is not available, check MacPortsto see whether the application you are after is available. MacPorts, once properly set up, will provide you with a way to download and install the application. MacPorts will also assure that any other applications or libraries that the application depends on are installed as well, and will provide an effective way to upgrade the apps or uninstall them if you no longer need them.
- If you need a highly customized version of an app, or want to sidestep MacPorts for whatever reason, then you can download the source code and compile the application yourself. This will assure that the app is good to go; however, if you go this route, you will need to manually assure that all dependencies are covered, and all further maintenance of the package will need to be made manually.
- Installing a random precompiled binary should be a last resort and should generally be avoided, unless the binary comes from a trusted, reliable source and was compiled for your specific system; that is, an application compiled for Tiger (OS × 10.4) might not work right on Lion (OS × 10.7). There are very few cases where this is recommended.
NOTE: A good source of finding official binaries, or at least reputable ones, is on Apple's web site, at www.apple.com/downloads/macosx/unix_open_source/. Here Apple provides lots of UNIX and open source software and utilities to download.
NOTE: Much of the software available for Darwin has come from other UNIX and Linux roots; however, binary applications from Linux or other UNIXes will not just work in Mac OS X. First they must be specifically compiled and occasionally significantly changed to work correctly (if they will work at all).
MacPorts
As mentioned, one excellent way to get a large amount of Darwin goodness is through MacPorts. MacPorts (www.macports.org) originated as the DarwinPorts project at Apple as the quasiofficial way to manage additional Darwin applications. As such, it was rumored that sooner or later DarwinPorts would be integrated into Mac OS X. As of yet this has not happened; instead, the project was renamed to MacPorts. MacPorts is part of Mac OS Forge (http://macosforge.org), which is a larger project that hosts many of the open source projects specific to OS X. Other Mac OS Forge projects include Bonjour, the Darwin Streaming Server, WebKit, xnu (Darwin's Kernel), and Calendar Server. Apple sponsors all of these projects.
MacPorts does not have an option to install precompiled binaries, so to use MacPorts, you must have the latest version of the Xcode Tools installed. Many MacPorts applications also assume you have installed the X11 packages and the X11SDK.
MacPorts by default installs itself, and all the packages you install with it, in the /opt/local directory, so to effectively use MacPorts, you'll need to add /opt/local/bin and /opt/local/sbin to your $PATH. Additionally, if you decide at some point to use any of the X11 applications from MacPorts, you should add the line export DISPLAY=:0.0 to your .bash_profile as well.
Once all of that's out of the way, you can download and install the latest MacPorts binary installer from www.macports.org.
Once the installation is complete, the first thing you should do is to make sure everything is up to date. To do this, run the following command in the terminal:
sudo port selfupdate
NOTE: Why would you need to update something you just downloaded? Well, the binary installer is packaged together only at certain intervals, while the updating of software is constant. By performing a self-update, you ensure that you are catching any new packages that have been added since the binary package was assembled.
This will update the entire ports system. Once you start using MacPorts, you should continue to periodically run this command to make sure you are working with a current version of MacPorts and that you have a list of all the current applications.
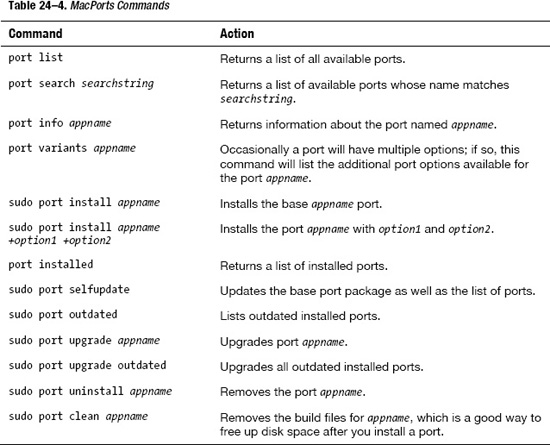
Once your environment is set up and you have the latest updated version of MacPorts installed, it's quite easy to use MacPorts with the commands listed in Table 24–4.
NOTE: Many of the commands needed to successfully install and manage MacPorts require root privileges. As such, some of the commands require the use of sudo. Please keep in mind all the cautions regarding the use of sudo covered in the last chapter.
FINK: AN ALTERNATIVE TO MACPORTS
Compiling Software from the Source Code
With the maturity of Darwin in Mac OS X combined with the availability of most popular open source software through MacPorts (or Fink), it's rare that you would ever need to compile software from source code (unless of course you are actively developing software, in which case you probably know all the information we're about to relate, plus a good bit more). Still, if you really want to try a bleeding-edge program that hasn't found its way to Fink or MacPorts, or you think you must compile an application with just the right options, then you'll want to compile your own application from source code.
CAUTION: Compiling your own software from source code is not for the weak. Things will often just not work as they should, and it could take some time and research to figure out how to get something built correctly on your computer. Sometimes, things won't work at all (unless of course you want to dig into the code yourself and tweak it). If you are easily frustrated, then we suggest that the benefits of compiling your own program might not outweigh the mental anguish you could be setting yourself up for.
Compiling your application from source code generally requires three steps: configuring, building, and installing. Usually these steps are fairly automated, and with the exception of the configure stage, are usually pretty much the same.
NOTE: To be honest, there is often a fourth step: figuring out what went wrong when one of the three primary steps fails.
Before you start any steps, though, you need to get the source code. This can usually be found on a project's web site or through a source repository such as SourceForge (www.sourceforge.net).
Step 1: Configure
For users building an application for their own use, the configure stage is the most important part of the whole build process. This is where you can customize the application for your specific needs and your specific system. The first part of configuring your build is to see what configure options are available. You do this by going into the primary source folder and typing the following:
./configure --help
This will return a whole list of configure options. Most of these options either have sensible defaults or are automatically set during the configure stage. The things you want to look at are the optional features to see whether any of them would be useful to you.
NOTE: One configure option you may want to pay special attention to is where things will get installed. Traditionally, all software you install yourself would (should) be installed in the /usr/local/ subdirectory. In UNIX file systems, things in / are necessary for the system, things in /usr/ are part of the default system, and things in /usr/local/ are things that are added on or customized for the system. Maintaining this sort of hierarchy assures that essential files aren't adversely affected by any incompatibilities or errors.
NOTE: Certain programs require that your system provide specific libraries or other applications to compile correctly, and this is especially true for certain options you may want to build into your application; these are what are referred to as dependencies. MacPorts and Fink will usually solve dependency issues automatically when you install apps using them, but when you are compiling things yourself, you need to make sure these dependencies are satisfied.
If you think you don't need any options, you can usually configure your build by just typing this:
./configure
If you want to include options, then you would type something like this:
./configure --with-optionl --with-option2 --enable-feature-x […]
Either way, when you press Return, the configure script will run and attempt to create a makefile, which will guide the actual build and install processes (together referred to as the make process).For a complex program, the configure script can take a few minutes or even longer to do its work, during which time lots of text will scroll by, letting you know what's happening. Upon successful completion, the text will often issue a message saying that the configure completed successfully, and perhaps giving some additional build advice. If something goes wrong, the text may or may not give you a clue as to what needs to be fixed.
NOTE: If something goes wrong, it's not always going to be easy to fix. Scrolling through the configure text may reveal a missing library, or it may indicate it cannot figure out what to do with your system. A missing library can usually be found and installed (sometimes it's there but the configure can't find it, in which case you may need to specify the library path as a configure option). Sometimes there is a specific issue, and if you poke around support forums, you can get an answer. Sadly, sometimes it's just not going to work on your system.
Step 2: Build
If the configure stage went without issue, the next step is to build the app. This should be as easy as typing the following:
make
Yep, that's it. Now go get a cup of coffee, stretch your legs, or play a game on your Wii while your computer compiles your program. Although these days it could take your computer anywhere from a few seconds to a few hours to compile a program, for a moderately complex application it usually takes only between 5 and 30 minutes depending on your computer.
Here's one trick to significantly speed up this process. Since even the lowliest Mac mini has at least two processor cores, you can use them both simply by adding -j 2 to the end of make. make -j 4 will work if you have four cores, and so on.
NOTE: Again, occasionally things will go wrong. Unfortunately, an error during the build process is usually even more difficult to track down than during the configure stage. If you notice the build failing in a specific that you identify with a configure option, you may try not enabling (or disabling) that particular option. If you really aren't using any strange options (or if you're not using any at all), and this is a fairly popular program, then it's likely someone else is having the same issues, and if enough people are having these issues, then it's possible someone out there has a solution.
Step 3: Install
Usually, if you are dealing with a stable version of a popular application, things go smoothly and your configure and build stages happen without issue (or without major issues anyway), after which it comes time to install your program. This is also a very easy process; just type the following:
sudo make install
That should do it.
Most software compiled this way will install software in the /usr/local/ directory. By default this directory doesn't exist in Mac OS X, so you may want to create it. If, however, you want to install your software (or parts of it) somewhere else, this can usually be configured as a configure option (though this isn't highly recommended).
To sum up, the quick way to compile a program you downloaded as source code is often as easy as this:
./configure

make

sudo make install
Summary
We covered a lot of material in this chapter, from writing to shell scripts to compiling an application from source code. The point here wasn't to make you an expert at any of these things, but to familiarize you with some of the power that Darwin brings to the Mac world. The most important parts of this chapter were the ones on MacPorts, though, since MacPorts provides the path of least resistance to the world of great new software. Then, should you ever need to install and use something like, say, figlet, you'll be just a few commands away from being able to do this:
simba:~ scott$ sudo port install figlet

Password:

--->  Fetching figlet

--->  Attempting to fetch figlet-2.2.4.tar.gz from

http://ykf.ca.distfiles.macports.org/MacPorts/mpdistfiles/figlet

--->  Attempting to fetch figlet-2.2.4.tar.gz from http://distfiles.macports.org/figlet
--->  Attempting to fetch figlet-2.2.4.tar.gz from

ftp://ftp.figlet.org/pub/figlet/program/unix/

--->  Verifying checksum(s) for figlet

--->  Extracting figlet

--->  Applying patches to figlet

--->  Configuring figlet

--->  Building figlet

--->  Staging figlet into destroot

--->  Installing figlet @2.2.4_0

--->  Activating figlet @2.2.4_0

--->  Cleaning figlet

simba:~ scott$ figlet neat huh?