
Chapter 21
Common Mac OS X Maintenance
Mac OS X tends to do a pretty good job of taking care of itself; however, there are a few things that occasionally need attention or that Mac OS X leaves up to you to take care of. The issues that we will cover in this chapter include the following:
- Disk setup and maintenance
- Font management
Disk Setup and Maintenance
NOTE: The most important thing about hard disks is that they will all fail in time. Sometimes it is a slow death where they start making a loud clicking that gets progressively worse until they just stop working; other times there is no warning. If you want to keep your data, back it up. Buy an external hard drive (or two) and use Time Machine or some other utility. Really. As the saying goes, “Pay now or pay more later.”
Hard drives—both the primary hard drive that came in your computer and any extras, either internal or external—are essential parts of your computers. If things go wrong with a hard drive, your system may stop functioning, or more importantly, you may lose data. Luckily, apart from the very real worry that your hard drive may (and someday will) eventually physically stop working, Mac OS X tends to take care of things on your drive, limiting the amount of routine maintenance needed to keep your file system and hard drive (and thus your data) healthy. Still, occasionally there are routines that you may want to run to verify that everything is OK. Additionally, someday you may want to format, partition, or utilize a specific file system on one of the hard drives connected to your system. To manage your hard drives and take care of all these functions, Mac OS X includes the Disk Utility application (located in Launchpad's Utilities group).
![]() NOTE: Two primary things can go wrong on a disk: there's physical damage, which is when the disk mechanism fails and possibly crashes, and there's file system damage, which is when the data on your disk gets mixed up or damaged. Tools like Disk Utility can often detect and repair file system damage before it causes data loss. Physical damage to the disk is more permanent and often irreparable (although in some cases the data can be recovered by special hardware and/or software).
NOTE: Two primary things can go wrong on a disk: there's physical damage, which is when the disk mechanism fails and possibly crashes, and there's file system damage, which is when the data on your disk gets mixed up or damaged. Tools like Disk Utility can often detect and repair file system damage before it causes data loss. Physical damage to the disk is more permanent and often irreparable (although in some cases the data can be recovered by special hardware and/or software).
NOTE: The term disk crash refers to the event when the arms that pass over the disk surface to read the data fall and literally crash into the disk's surface, causing irreparable damage. This used to happen with older disk mechanisms that would rely on the air force of the spinning disk to keep the arms up, so if the disks quit spinning suddenly before the arms could move back off the disk's surface (e.g., in a power failure), the arms would fall. Disk crashes like this don't happen often with today's hard drives, but mechanical issues still arise, and disks do get old and eventually wear out (usually after years of service, though).
Disk Utility divides its abilities into five panes:
- First Aid provides a couple of general maintenance tools that can help identify and repair both file system damage and issues in which the system's file permissions become altered.
- The Erase tab provides the necessary tools to partition and format a disk using various supported file systems.
- The Partition option appears if you select an entire disk, rather than just a volume in the list of devices on the left. The Partition tab allows you to split a single disk into multiple volumes (or create a single volume from multiple volumes).
- The RAID tab allows you to configure multiple disks to behave as one in various ways.
- The Restore tab lets you restore a disk image onto a disk. We'll cover each of these in the following sections.
NOTE: A disk is a physical device, whereas a volume is a file system written to a disk. The physical space on a disk can be divided up into different volumes (or even left as empty space). These divisions are referred to as disk partitions.
Performing First Aid
The First Aid tab (Figure 21-1) allows you to run a few tasks to help identify and fix certain problems with your disk's file system. If you seem to be having issues with your disk or notice anything unusual about how it's running or storing data, this is the first place to go to try to solve the problem.

Figure 21-1. Mac OS X's Disk Utility verifying a volume using one of the First Aid tools
In the lower-right corner are two buttons: Verify Disk and Repair Disk. Clicking Repair Disk will scan the disk to identify and repair many common file system errors. Although most of the errors it may find are in themselves minor, they can often cause bigger issues down the road. One gotcha here is that you can't repair the boot volume—you can, however, click the Verify Disk button to see whether there are any problems with it, and if so, you can utilize the Repair Disk function from the Disk Utility application installed on your Lion recovery partition. Just boot from your recovery partition and run the Disk Utility from there.
NOTE: To boot from Mac OS X's Recover partition, hold Command-R during a restart. (Alternately, you can hold the Command key during startup and choose the recovery partition from the list of bootable partitions.) More on the recovery partition will be covered in Appendix A.
On occasion, the Repair utility will come across an issue it cannot repair. At this point, you have two primary options (well, three if you are the type of person who can just ignore a problem until it's too late). Before you decide what you want to do, you should first make backup copies of everything you value on your hard drive. Even if you already have a copy, make another one.
CAUTION: We've had a primary disk and a backup disk fail simultaneously, and it was not a happy moment. Luckily, I had another backup and lost only about a month of work; now I use a mirrored RAID, so I don't lose any data if a drive fails. I cover mirrored RAID in the “Using RAID” section later in this chapter.
Once that's done, you can do either of the following:
- Erase, reformat, and reinstall everything on your disk: This option takes a long time and will likely cause a few frustrating moments—and nothing will ever be quite the same. However, it should fix any file system problem, plus it can clean out some other gunk that can creep into your computer as you use it over a long period of time.
- Purchase and try some other disk utility software: There are three very good, easily obtainable disk utilities out there for Macs:TechTool Pro by Micromat (
www.micromat.com), Disk Warrior by Alsoft (www.alsoft.com/DiskWarrior), and Drive Genius by Prosoft (http://prosofteng.com/products/drive_genius.php). Each of these come on a bootable CD or DVD, so you can boot them up and use them right away. The downside it that any of these will set you back about $100 (at least).
So, what happens if nothing works? Sadly, in that case it may be time to replace your hard drive. If it's your original internal hard drive and your computer is covered under warranty or AppleCare, you should be taken care of. Otherwise, you'll either have to order a new hard drive and install it yourself (easy with a Mac Pro; not so easy, but doable, with a portable, a Mac mini, or an iMac) or have to take it in and have someone else do it (a nearby Apple Store is a good choice, or ask around. Just make sure if you pay someone to do it that they are Apple certified).
NOTE: You may wonder whether replacing a hard drive in your computer will void the warranty or interfere with AppleCare. The answer is no; however, if you are not careful, you could cause some collateral damage that would void your warranty. Also, we should mention that the replacement drive (or any damage it may cause, however unlikely) will not be covered under your warranty (though it may come with its own).
The other pair of buttons on the First Aid tab, Verify Disk Permissions and Repair Disk Permissions, do what they say. In OS X, each item in your system has a set of permissions that determine who can do what with the item and, in return, what that item can do (you can find a deeper look at Unix-style permissions in Chapter 17). Occasionally, permissions can get changed, and sometimes this causes applications to behave poorly or not work at all. In such a case, setting the permissions back to their defaults usually fixes the problem. To do this, just run Repair Disk Permissions and see whether that fixes the problem.
NOTE: The Repair Disk Permissions option resets the permissions of certain Apple software to its original state. This can cure some runtime issues that occur when an application can't complete a task because of insufficient permissions. It's a fairly painless exercise, so if you are having issues, it's worth a try. It could just be the fix you need to solve your problem.
Erasing and Formatting a Volume
The Erase tab (Figure 21-2) allows you to erase all or part of a disk.
You will use this in the following scenarios:
- If you just want to zap all the data on your disk and start over
- If you want to change how a disk is formatted
- If you actually want to wipe the data on your hard drive clean
In the case of the first two scenarios, you basically do the same thing: choose a format from the Volume Format list (formats are explained in the next section), choose a name for your new volume, and click the Erase button. This effectively reformats your drive. A simple format, however, does not actually erase your disk; it just erases the existing directory information. With the directory information cleared, your computer has no record of anything stored on it, so it just assumes it's empty and starts writing over old content, keeping track of the new directory information.
If you want to actually erase the content on your hard drive so it cannot be recovered, you have two options. If you just want to assure that any files you have deleted in the trash are actually gone, then you can use the Erase Free Space button. If you want to assure that the entire volume is erased when you format it, click the Security Options button prior to formatting it. On the next screen, each of these buttons will allow you to choose between three different modes: zero out, 7-pass, or 35-pass of data. Each additional pass will assure that the data will be unrecoverable; however, it will also add a significant amount of time to the process (7 or 35 times the amount of time, to be specific).

Figure 21-2. The Disk Utility's Erase tab lets you erase and format disk volumes.
NOTE: On a magnetic hard drive, even when you overwrite data, there may be magnetic remnants of old data that, using sophisticated data recovery tools, could be reassembled into the original data. Each time you pass over the disk, you tend to wipe out some of these remnants, so by writing over the drive multiple times, you ideally make the data more and more unrecoverable.
NOTE: Researchers have pointed out that newer SSD hard drives provide different challenges. Not only is it more difficult securely wipe data from an SSD, but it's also more difficult to recover deleted data from an SSD. What this means is that zeroing out data may not actually zero out all data, while zeroed-out data is generally permanently gone.
Partitioning a Disk
Partitioning a disk is a similar process to formatting a volume; however, it allows you to create and format multiple volumes on the same disk at the same time. The Partition option (Figure 21-3) appears when you select a disk from the list at the left.

Figure 21-3. The Partition tab allows you to create and format multiple volumes on a single disk.
To partition a disk, first select the number of partitions you'd like to create on the disk from the Volume Scheme drop-down list. This will split the disk into the chosen number of partitions, each with approximately an equal size. To resize partitions, simply drag the separator between two partitions in the visual disk partition view below the Volume Scheme menu, thus shrinking one while increasing the size of the other. Alternately, you can select a partition and enter a size in the Size text field to the right (this will also change the size of surrounding partitions). When you have your partition sizes correct, you may enter a volume name in the Name field and choose a file system from the Volume Format list. If you are sure you are ready, click the Apply button, and your selected partitions will be created and formatted as you selected.
NOTE: The file system you choose to install on a partition determines some of the types and capabilities of the systems that can be run on them. This is especially true when it comes to booting the computer. For example, through fancy software like VMware Fusion or Parallels, you can run Windows on an HFS partition, but you can only boot your computer into Windows (via Boot Camp) from an MS-DOS or NTFS formatted partition.
The various file systems available in the format fields are the following:
- Mac OS Extended (Journaled): This is Mac OS X's current default file system (HFSJ or HFS+ Journaled).
NOTE: Journaled partitions keep track of what the disk is doing at all times. In the event that data on a disk is corrupted, a journaled partition may be able to piece together what was going on when the failure occurred so you don't lose any data.
- Mac OS Extended (Case-Sensitive, Journaled): This is the same as HFSJ, but it adds case sensitivity to the file system (so, for example, Apple and apple would be recognized differently in the file system).
NOTE: Although case sensitivity sounds like a good thing, it's not always. It can make certain applications and computer functions behave poorly and therefore should be used only in situations where it's essential. The normal HFS+ file system, while it ignores case, preserves it so that any data you share with case-sensitive systems will behave as expected.
- MS-DOS:This will use the FAT32 format, which is useful if you intend to physically share the volume with Windows systems.
- ExFAT: ExFat is another option for Windows partitions. Use this if size of the disk exceeds 32GB.
- Free Space: This will leave the partition empty and unusable until you reformat it later.
Resizing Partitions
One other feature that Disk Utility recently added is the ability to resize partitions. To shrink an existing partition, grab the lower-right corner of the partition in the Partition pane of the Disk Utility, and drag it to the new desired size (or use the Size text field to enter the new size). When you click Apply, the partition will be resized, creating empty space on the drive for a new partition or for expanding an existing one. To increase the size of a partition, you can use the same technique, but instead of making the existing partition smaller, you can grow it into adjacent empty space.
While doing this, keep the following in mind:
- You can shrink only a partition's unused space, so if you have 2GB of data on a 3GB partition, you'll be able to reclaim (at most) 1GB of disk space.
- You can grow a partition only into empty disk space that is physically adjacent to the partition you want to grow.
- This isn't magic, and it won't create new space that didn't exist. Often the only way to effectively repartition a disk is to erase the existing ones. Still, in some situations, this is exactly what you need.
Using RAID
The RAID tab (Figure 21-4) allows you to configure multiple hard drives into a single volume (or RAID set name).
Disk Utility allows you to create three different types of RAID configurations:
- Mirrored RAID set (a.k.a. RAID 1): This will configure two hard drives of the exact same size in a mirrored array. This means that any data you store on the resulting volume will be physically stored separately on each drive, thus assuring that the data will be safe in the event that one of the drives fails.
- Striped RAID set (a.k.a. RAID 0): This option will take two hard drives of the exact same size and combine them into one larger volume (equal to the size of both of them together). It will do this in such a way that alternating data is fed to each physical drive (i.e., striping), thus greatly increasing overall disk read and write speeds. This is very popular with people who work with large amounts of data and large media files. On the downside, if either drive fails, it will be difficult to recover any data from either drive.
- Concatenated disk set: This will take any number of hard drives and combine them into a single volume spanning all the drives.

Figure 21-4. The RAID tab allows you to combine multiple hard drives into a single volume.
Besides these options, there are many other types of RAID configurations that are possible using third-party software or hardware. Many external drive enclosures that support multiple drives include hardware that makes different types of RAID configurations much more efficient.
NOTE: The RAIDs created in Disk Utility are software RAIDs. In this case, Mac OS X does the work in the background to accomplish the desired effect. Although this is highly effective, it's not as effective as a hardware-based RAID where the device in question has dedicated resources to create and manage the RAID.
Hardware-based RAIDs, though they are physically separate volumes, will many times appear as a single volume even in Disk Utility. Most software-based RAIDs, on the other hand, will show up as different devices in Disk Utility, even though they will appear as a single volume in the Finder.
Creating and Restoring Disk Images
A popular way of transmitting large files or applications from one computer to another, especially over a network, is to create a disk image. A disk image is essentially an archive of a disk volume that can be mounted like a disk. You can create a disk image using the Disk Utility application in a number of ways.
If you know you want to create a disk image of a certain size, you can click the New Image button on Disk Utility's toolbar (or select File > New > Blank Disk Image… from the menu bar or use the Option-Command-N shortcut). This will open a dialog box that allows you to name the image file, name the volume that the image file will expand into, and choose the size of the volume. Once you've filled out the information in the dialog box, click Create, and the system will create and mount the image. At this point, the image is writable, so you can copy any data you want to this image. When you unmount the disk, the data is still stored in the image file, so when you remount it, it will be available.
Another way to create a disk image is from an existing folder. To create an image this way, use the File > New > Disk Image From Folder… command from the menu bar (Shift-Command-N). This will open a dialog for you to select a folder. Once you select the desired folder, click the Image button, and a new dialog box will pop up asking you where to save the new image along with some other options.
NOTE: If you select one of the encryption methods for your disk image, you will be prompted to create a password to decrypt the image before it is created. You will be prompted for this password before you can mount or restore this image file. If you forget it, your data will be lost.
TIP: If you work with sensitive data, you can create a secure disk image containing this data and mount the disk when you need to work with the data. Then you can unmount the image when you are done with it, returning the data into a state of blissful encryption.
Clicking an image file will mount it to your desktop (you may need to enter the password for an encrypted image file first). Occasionally you may want to restore an image file to a disk or a partition. The Restore tab (Figure 21-5) allows you to re-create the image file onto a disk volume simply by selecting a disk image (as the source), selecting an available volume that the image will fit in (as the destination), and then clicking the Restore button. You should be aware that this will overwrite the destination volume entirely.

Figure 21-5. The Restore tab allows you to restore a disk image to a disk volume.
Burning an Image File to a CD or DVD
Certain disk images are actually images of CDs or DVDs, and as such, they (or any other appropriately sized image file) can, rather than be restored to a disk volume, be burned to a CD or DVD. To accomplish this, select Images > Burn… from the Disk Utility menu (or use the Command-B keyboard shortcut). This will first prompt you to select the appropriate image file from the standard open dialog, and then it will prompt you to insert the appropriate writable disk into your disk burner. It will then burn the image to disk.
Managing Fonts
Fonts may not seem like things that need to be managed too much, and in OS X, fonts don't tend to cause many of the issues that have been attributed to them in the past. Still, if you tend to accumulate lots of fonts, you may want to manage them for a number of reasons:
- To be able to find the exact type of font you are looking for quickly and easily from a large list of installed fonts
- To “turn off” unused fonts, since many applications (especially graphics apps and word processors) load all active fonts into memory when they launch (slowing up launch time and consuming memory)
Mac OS X, beginning with Panther, included an application named Font Book that helps you manage your fonts. Font Book (Figure 21-6) provides the ability to find, preview, organize, and switch on or off all the fonts installed on your system.
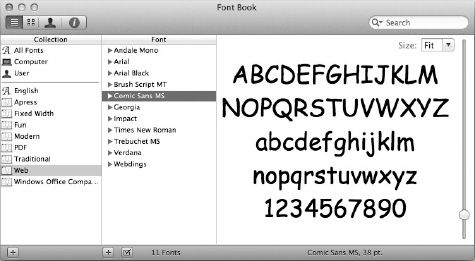
Figure 21-6. The Font Book application is included in Mac OS X to help manage fonts on your system.
The Font Book application is organized with two columns and a preview window. The first column, Collection, allows you to select and create sets, or collections, of fonts. The set you select in this column determines the specific font families that are displayed in the Font column. Selecting a font family or specific font from within a family will display that font in the view window.
TIP: Font Book has the ability to identify and resolve duplicate copies of the identical font files that may be stored in different locations. (This commonly happens when applications, especially word processors and graphics apps, install font files that are already present.) To discover duplicate fonts, you may run Edit > Look for Duplicates… (Command-L) from the menu. If duplicates are discovered, you will be presented with options for dealing with them.
You can manage your fonts here:
- To create your own collection, click the + button at the bottom of the Collection column, and give your collection a name. Then you can drag fonts displayed in the Font column into your new collection. When you select your set, only the fonts you added to it will appear in the Font column.
- To add a new font, click the + button at the bottom of the Font column, and select the font file(s) to add.
- To deactivate a font or collection of fonts, right-click the font or collection, and select the Disable option from the contextual menu. Alternately, you can select fonts in the Font column and toggle them with the small check box button at the bottom of the column. When you deactivate a font collection, it will deactivate any fonts in that collection that are not present in any other activated collection. This prevents fonts from an active collection from becoming inadvertently disabled.
- Fonts may be reactivated in the same manner.
One nice thing about creating groups of fonts, beyond the ability to activate and deactivate entire groups easily, is that the groups appear in the standard Cocoa font selection dialog box (Figure 21-7), making it easy to find specific fonts that exist within a particular collection.
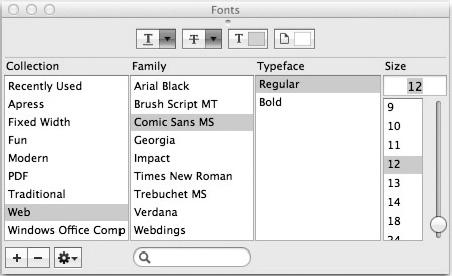
Figure 21-7. Font collections appear in the standard font selection dialog box, making finding a particular font easy.
NOTE: In Lion, Font Book provides File > Restore Standard Fonts… from the menu, which will reset the fonts on your computer to their original state. Running this command will reinstall any missing systems fonts while at the same time deleting any non system fonts, thus restoring you font collections to Lion's default.
Summary
This chapter has covered a few basic housecleaning tasks that you are likely encounter at some point. The next chapter will focus one last general admin concern that, although last, may be one of the most important: security.