
Chapter 19
Printing, Peripherals, and Bluetooth
Today, more and more features are built into computers than ever before. Most new Macs (except the Mac Pro and Mac Mini) include features such as stereo speakers, decent microphones, and even video cameras all built in and ready to use. Still, of tentimes you need something else or want to improve on what you already have on your computer. Luckily for you, a range of hardware devices exist that can work wonderfully with your Mac (commonly referred to as peripherals). Since you have a Mac, you just need to plug in most of these items, and they work (i.e., they’re plug-and-play, as it was intended). However, with the complexity and features available for some of these external devices, occasionally you need to do a little more to get the most out of them. Additionally, these days, many peripherals connect over a network or wirelessly, so rather than plugging something in, you often need to tell your computer to look for it. This chapter addresses all of this, including the following:
- Printing
- Bluetooth devices
- External storage
- Other external peripherals
Printing in Mac OS X
The world we live in is getting increasingly digital, yet we still haven’t fully entered the paperless world of the future. Sometimes you may need to resort to actually printing things. To do this, you need to connect to and configure a printer. You can connect your computer to your printer in a number of ways, ranging from physically through a USB cable to over a wireless network. If it’s over a network, whether wireless or wired, many protocols (the ways that your computer talks to the printer) are available, and each handles printing a little differently. Luckily, Mac OS X makes all of this easy (or at least as easy as possible).
How “Print” Happens
In very general terms, when you hit the Print button in an application, a few things happen:
- You are often presented with a Print dialog asking you to choose which connected printer you want to print to and what printing options (if any) you’d like to utilize. When you have made your selection, you click the Print button to print your document.
- Once you hit Print, the printing system in Mac OS X takes your document and puts it in a special block of memory called a print spool where print jobs are collected and then sent in order to a printer.
- As the document leaves the print spool and is sent to the printer, the data stream passes through a print filter that translates the raw document data into data that the printer can understand.
- The printer, as it receives this stream, usually starts printing the file as it receives it.
NOTE: Because your computer can usually feed information to your printer faster than it can print, a lot of communication is necessary between your printer and your computer to regulate the flow of information. If your printer runs out of memory (and many less-expensive printers have very little to begin with) and your computer keeps sending the data, then data will get lost, and you’ll end up with a garbled mess.
In a nutshell, that’s it. It sounds like a lot of complicated stuff going on, and actually there is, but luckily for you, all you need to worry about is step 1 and occasionally adding more paper and ink/toner to your printer. Of course, before you can print, you need to set up your printer.
NOTE: Mac OS X uses CUPS (Common Unix Printing System) to handle printing chores. CUPS was adopted by Apple in 2002 (and later purchased outright by Apple). The use of CUPS greatly simplifies the creation of print drivers for printers with the use of print filters, while at the same time providing the powerful network-printing and print management features ofIPP (Internet Printing Protocol). More information about CUPS is available at www.cups.org.
Setting Up a USB Printer
The most common printers, and the easiest to set up, are basic USB printers. In general, to set up a USB printer, plug in the printer power cord, and then plug in a USB cable from your printer into one of the USB ports on your computer. Unless your printer is a super-new model or a really strange off-brand, it’s likely that’s all you need to do. Your printer is ready to use. If in doubt, take a look on the Print & Scan pane of System Preferences (Figure 19–1); if you see the printer you just plugged in listed and correctly identified, you are good to go.
NOTE: The first time you plug in a printer to your computer, a Software Update dialog may pop up asking if you would like to download and install the software for your printer (Figure 19–2). Generally the answer is “yes you would” so click Install and let OS X take care of the rest.
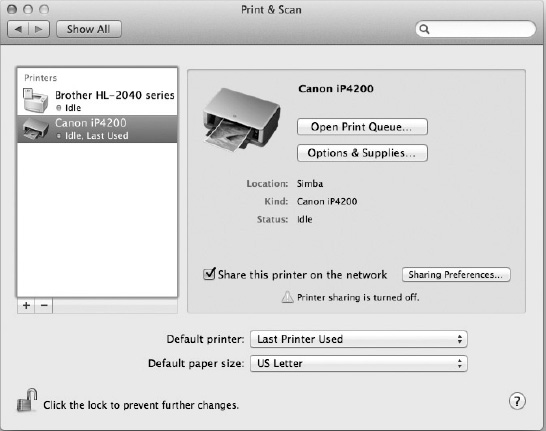
Figure 19–1. The Print & Scan pane of System Preferences showing the Canon iP4200 printer we just plugged in
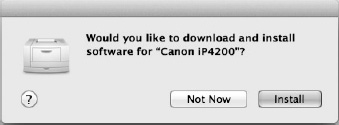
Figure 19–2. When the Canon printer was first plugged in, Software Update automatically prompted us to install the latest driver software.
At this point, you may be skeptical that everything worked; in other words, that was too easy, right? You didn’t even need to insert the CD that came with the printer. If you double-click the printer icon in the Print & Scan preference pane, the printer’s Print Queue window (Figure 19–3) will open. This window provides information about your printer, including information about any documents currently printing or waiting to be printed (documents waiting in the print spool to be printed are called print jobs). If you want to test your printer, you can select the Printer > Print Test Page command from the menu bar. If the test page prints, then all is well, and your printer is ready to use.
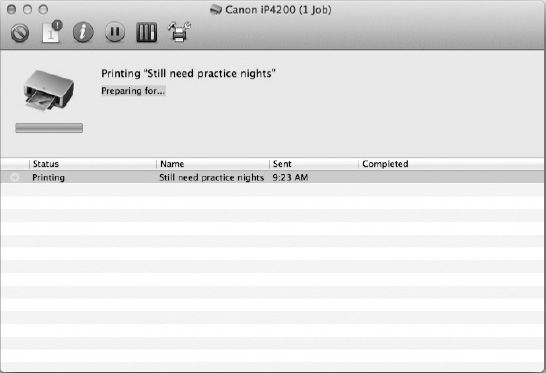
Figure 19–3. The printer’s Print Queue window provides information about a specific printer connected to your computer.
Connecting to a Network Printer or Shared Printer
Printers in most companies as well as more and more homes are accessed through a network. These printers could be actual network printers, complete with network interfaces (either wired or wireless). Or they could be common USB printers attached to other computers on a network or a network print server (such as the ones built into Apple’s AirPort and AirPort Express). The process of connecting to these printers ranges from almost as easy as connecting a USB printer to fairly easy if you know exactly what you are doing. We’ll walk you through the general process using a real-life example of connecting to a networked Brother multifunction device (a fax/scanner/printer/copier).
The first step of adding a printer is to open the Print & Scan pane from System Preferences and click the + button at the bottom of the printer list. This opens a Printer Browser window (Figure 19–4).

Figure 19–4. The Printer Browser window allows you browse and pick various types of printers to connect to.
As we look in the browser, we see Brother MFC-465 listed, which happens to be the printer we want. When we select it in the list, our computer will try to find the name, location, and driver automatically. In this case, it succeeded (Figure 19–5).
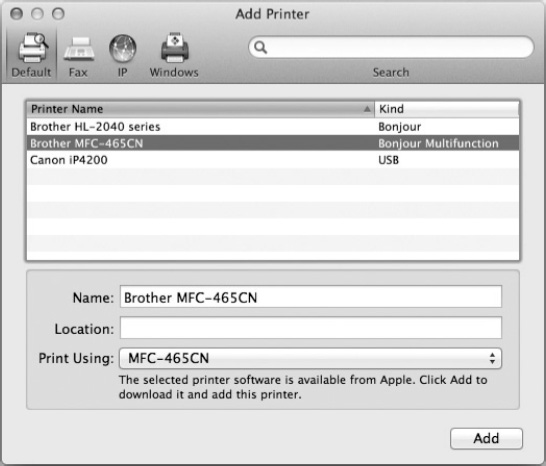
Figure 19–5. After selecting the printer we want to add, Mac OS X automatically attempts to determine the name, location, and appropriate print driver.
NOTE: You may notice that the Location field is blank; this is because the printer is connected using Bonjour. Bonjour is a special networking technology (which is also known in some non-Apple circles as zeroconf) that allows systems on a network to identify themselves and the services they offer in a flexible way without a central name server. Since this allows the location to be dynamic, it is not listed.
If the print driver is not found automatically, then you will need to select an appropriate driver manually for the printer. To do this, click the Print Using drop-down menu, and there you should first try “Auto Select,” which will try to make a best guess. If that doesn’t work then you may look for your driver in Select Printer Driver... dialog.
When your printer is selected and set up with the proper driver, click the Add button, and your printer will be ready to use.
Ninety-nine percent of the time adding a printer is quite easy. But what about the other times—the times when your printer just doesn’t get automatically recognized?
NOTE: There tends to be a few ways to think about network printers. Some printers broadcast their presence (such as Bonjour printers), and they usually just show up in the default options of the Printer Browser window. Other printers, like those that use Windows networking, are browsable; that is, you can navigate around the network to find available printers in the various Windows workgroups or domains. Finally, there are other types of network printers, and basically, you have to know where they are located on the network, and usually some more information about them, to connect to them.
NOTE: Because I had previously installed the Brother Printer driver package for my Brother HL-2040 printer, there was no need to reinstall any software drivers.
When you are attempting to connect to a network printer at work or in a large computing environment or you are attempting to use a printer that is being shared by another computer, it might not just show up in the default printer listing in the Printer Browser window. When confronted with this situation, you need to find out what type of printer sharing is being used. The most common choice around homes and offices would be some sort of Windows printer sharing. Other less common network printer sharing protocols include the following:
- Bluetooth: There just aren’t that many Bluetooth printers available right now, but if you happen to have one, the Bluetooth printer should be easily discoverable from the Bluetooth System Preference pane if it’s in range, at which point you will need to pair the device and select a driver. Only the discovery and pairing should differ from the process of connecting a USB printer or a Bonjour printer.
- IPP: Actually, this is fairly common, since CUPS is built around IPP, it is the printing system used in Mac OS X, and it’s the default printing system for many modern Unix and Linux systems. (Although an open source system, CUPS recently became an Apple product after acquiring the CUPS trademarks and hiring the original developer, Michael Sweet.) Microsoft also has IPP built into its printing services. Connecting to IPP printers within your local network is usually easy (in fact, that’s what you are doing when you connect using Bonjour); however, occasionally the printer you are attempting to connect to isn’t visible on the network, so in order to connect, you will need the printer’s location (usually an IP address or even domain), and you may need to know the path to the printer (commonly called the print queue). IPP printers can be set up under the IP options in the Printer Browser window.
- Line Printer Daemon (LPD): This is an older Unix printing system that has largely been replaced by CUPS. To connect with an LPD printer, you will need its network address, and you will need to know the name of the print queue. An LPD printer can be set up under the IP options in the Printer Browser window.
- Others: There are a handful of other, less common, mostly older, proprietary methods of connecting to a network printer. Mac OS X supports a number of these, including HP JetDirect, Canon IJ Network, Epson FireWire, Epson TCP/IP, and HP IP Printing.
NOTE: Some newer printers also have built-in Wi-Fi capability. In general, these printers, if set up properly, will appear just like any other network printer. As a bonus, since these printers are fairly new, almost all of them will use Bonjour, making connecting to the printer a snap.
If you are connecting to a Windows network printer (shared or otherwise), click the Windows button, and then browse through the network until you locate the printer you want. It’s unlikely that a driver will be selected for you automatically, so you will need to select “Select a driver to use” from the Print Using menu. When you select the appropriate driver, click the Add button.
Printer Options and the Print Queue
Once a printer is set up and working properly, there isn’t much you need to do, but some options are available to you on the Print & Scan preference pane. When you select a printer on the preference pane, the view area displays some brief information about your printer and also has one check box and three buttons. The “Share this printer with other users on the network” check box will allow you to share this printer with other users on your network (provided that printer sharing is enabled on the Sharing preference pane). If sharing is not yet configured, you can click the Sharing Preferences... button to take you to the sharing preferences to configure it. The other two buttons are the Open Print Queue button, which will open the print queue (just like double-clicking the printer icon), and the Options & Supplies button.
Clicking the Options & Supplies button will open a dialog providing three or four tabs (depending on the driver, there may or may not be a Utility tab), as shown in Figure 19–6. The General tab provides basic information about the printer and the driver. The Driver tab lists your current driver in a drop-down list and allows you to select a new driver if you want. The Supply Levels tab can show you how much ink or toner is left in your printer; however, this relies on a number of variables and may not work accurately (or at all). The Supplies button at the bottom of this tab will take you to a web site to buy more printer supplies. It’s also possible that there will be a Utility tab that contains tools specific for you printer; this is dependent on the driver, though.
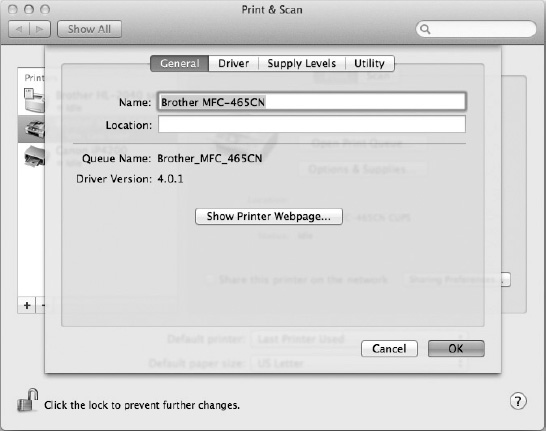
Figure 19–6. The printer Options & Supplies dialog
The Open Print Queue button will open the printer’s print queue (shown earlier in Figure 19–3). As mentioned, this will provide information about what print jobs are being printed or waiting to be printed. This will also let you pause the printer, delete print jobs, and even rearrange the order of awaiting print jobs. The Supply Levels and Printer Setup buttons open the same dialog as the Options & Supplies button does.
In general, setting up a printer to work with your Mac is a fairly easy process. Even when it’s not automatic, the features in Mac OS X tend to make it at least easier than may have been the case in the past (or is with other computer systems).
Printing from an Application
To use your printer, you usually just need to select File > Print... (Command-P) from the menu in any standard application. This will open a standard print dialog box that walks you through the printing process. The default Print dialog (Figure 19–7) is simple, with only a few options.

Figure 19–7. The default Print dialog box asks which printer you’d like to print to and provides a preview of what will be printed.
NOTE: Some applications will open the Print dialog as an attached dialog box, while others will open it as a floating window. Also, the Print dialog box may vary depending on the application because some applications provide special printing options.
If you have multiple printers connected to your computer, you can select the one you want to print to from the Printer drop-down menu (your default printer will be initially selected for you). The Presets button allows you to select any preselected print options you may want to use. For most printers, Standard is the only initial option unless you save your own print options; however, many photo printers include a few other options (different size prints, borderless options, and so on).
Along the bottom of the Print dialog box are four buttons. Print will send your document to the printer. Cancel will close the dialog box without printing. Show Details will expand the Print Dialog box to provide additional printing options (Figure 19–8). PDF will open a submenu that will provide you with various options for creating a PDF file from your document.
NOTE: All of Mac OS X’s display graphics are PDF based; as such, you will find that it can create a PDF out of any document from the Print dialog without any additional software.
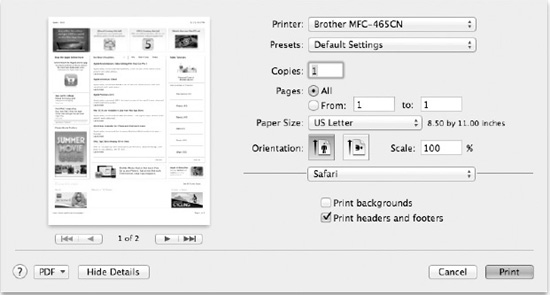
Figure 19–8. An extended Print dialog box provides many more printing options, depending on the print driver and the application.
The extended Print dialog provides a number of additional print options. The standard extended elements include a preview of the document, the ability to print multiple copies of the document, the ability to print only a range of pages rather than the entire document, the ability to adjust paper size and orientation, and the ability to scale the document up or down. However, numerous other options are available from the drop-down menu. This menu includes application options, options associated with your printer’s features, color-matching options, advanced paper-handling options, scheduling options, fax options, and more.
Connecting Bluetooth Devices
Bluetooth is a technology that allows two devices, such as your mobile phone and your computer, to connect to each other. Unlike other common methods of doing this (USB and FireWire), Bluetooth does this wirelessly, and because of this, some additional work is necessary. The best place to begin connecting and setting up a Bluetooth device is from the Bluetooth preference pane in System Preferences (Figure 19–9).
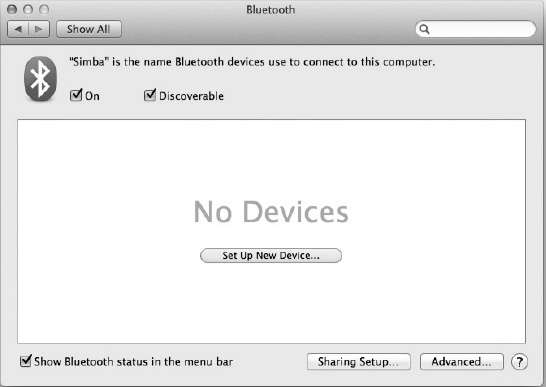
Figure 19–9. The Bluetooth preference pane, with no devices set up
When no devices are set up, the preference pane will provide a Set Up New Device button right in the middle. There are various other areas in Mac OS X where you can set up Bluetooth devices as well. When you begin to set up a new Bluetooth device, Mac OS X will launch the Bluetooth Setup Assistant to help you through the process (Figure 19–10).

Figure 19–10. The Bluetooth Setup Assistant will immediately try to detect any discoverable Bluetooth devices in range
The first screen of the Bluetooth Setup Assistant is a welcome screen. Once the Bluetooth Setup Assistant launches, it will immediately begin scanning for any detectable Bluetooth devices. Any devices that are found will appear in the list on the left pane of the Bluetooth Setup Assistant window.
To continue setting up your device, simply select your device from the list and click Continue. If your device isn’t recognized, make sure it is set up to be discoverable by other devices, and try again. Alternately, if you know the Bluetooth address of the device, you can click the Specify Device... button at the bottom of the window and manually enter the address there.
After you select your device and click Continue, the Bluetooth Setup Assistant will attempt to gather any information from your device to determine what services are available from your Bluetooth device. Once it has completed this, the assistant will walk you through pairing your device.
NOTE: When the Bluetooth Setup Assistant first discovers a device, the initial name of the device may be a strange-looking string of digits. If you wait, this string will most likely become something a bit more familiar as the computer discovers more information about the device.
To pair your Bluetooth devices, you will usually be presented with a passkey to enter on your device, or alternately you will be prompted to enter a passkey that your device has generated. The theory behind passkeys is that since various types of information can be passed from one Bluetooth device to another, the connections between Bluetooth devices should occur only through paired devices. During the pairing process, each device must use the same passkey to assure a valid pairing. The complexity of the passkeys used to pair two devices tends to be consistent with the amount of risk involved with the pairing.
NOTE: The default passkey for simple items such as headsets and mice is often 0000. The Bluetooth assistant, knowing this, will automatically attempt to pair with these devices using this passkey. If successful, the pairing will occur automatically, and you’ll never need to enter a key. This also applies to most Bluetooth printers, which don’t require a passkey at all.
TIP: If you want to choose the passkey yourself, if you want to force pairings with no passkey at all (which is not recommended), or if the initial pairing didn’t work (you have to be quick, because if the passcode isn’t entered within a short period of time, the pairing will fail), a Passcode Options... button will appear. Clicking the button will open a dialog box, allowing you to choose many different options for selecting (or not selecting) a passcode.
Once the passkey is entered in to the appropriate device (if necessary), the assistant will continue making the connection, which results in a screen indicating that the pairing was successful.
Once you are done, when you take a look on your Bluetooth preference pane, you can see that it has changed to display your Bluetooth devices (Figure 19–11).
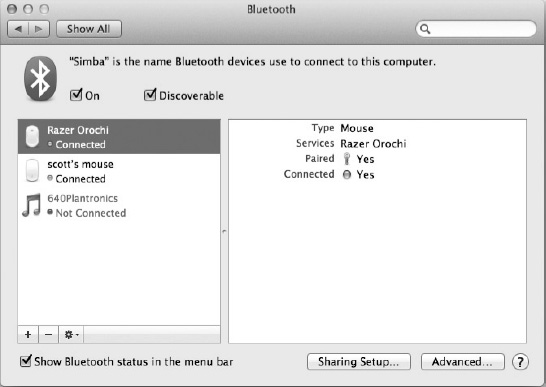
Figure 19–11. The Bluetooth preference pane changes now that devices have been set up.
Connecting External Storage
Ever since the advent of the floppy disk, and even the magnetic tapes before that, external storage has been a popular way of backing up and moving files, adding extra system storage, or even running entire operating systems. These days with the cost of large external hard drives dropping, the rampant use of thumb drives, and even media devices such as iPods being used for storage, this trend continues.
Like most things, connecting to external storage in Mac OS X is easy. In fact, you just plug in the external storage, and it shows up on your desktop alongside your primary hard drive and any other storage media you have connected to your computer. To remove it, you first tell your computer to “eject” the media and then unplug it. Still, a few things are worth knowing about: what the differences are between the different types of storage media and what all the available interfaces are and their advantages.
CAUTION: To eject media in Mac OS X, you can either select Eject from the item’s contextual menu, click the Eject button next to the item in the Devices section of a Finder window, or drag it into the Trash (to name a few ways you can do it). It’s important to do this before you unplug the device, especially with external hard drives. If you forget to “eject” the device and you just abruptly unplug the external storage device, you may have unplugged the device while it was still writing data, thus causing data loss and corruption.
Storage Media
The storage media is that actual mechanism that stores your data, of which there are three popular types: magnetic, optical, and flash.
Magnetic media includes hard drives, as well as tape drives and floppy drives. Today that primarily means hard drives, though high-end tape drives are still in use for large-scale backup and archive purposes by many organizations and institutions. Magnetic media is generally fast, is stable, can store very large amounts of data, and, these days, is relatively inexpensive. On the downside, it can be fragile and susceptible to damage from outside radiation and magnetism; it also isn’t the most energy-efficient media, since moving parts are used in almost all cases.
Optical media includes CDs, DVDs, and an array of both newer, emerging and older, deprecated media types. Advantages of optical media include the cost of storage and the durability and flexibility of the media. Because of this, optical media is perhaps the best, cost-effective media for archival for most users. On the downside, optical media is traditionally slower in both reading and writing data, and most optical media is write-once media, meaning that once the data is written, it can’t be manipulated. There are today a number of rewritable optical formats; however, they tend to lose reliability after a number of rewrites. Optical media tend to require more power than other media types. Finally, although the technology exists (and is constantly under development) to increase the storage capabilities of optical media, the capacity is significantly less today than what is available with magnetic media.
Flash media, such as memory cards and flash drives, are becoming more and more popular. Flash media is popular in many electronic devices for digital storage, including digital cameras, media players, iPods, mobile phones, PDAs, and more. It’s also more and more popular as external computer storage for moving files from place to place with thumb drives. It’s fast, durable and energy efficient (no moving parts to break, just shuffling electrons), and small. Despite all the advantages, it’s expensive and limited in capacity. Still, technologically, it has made the most gains of any storage media over the past few years. Capacity has increased, and costs have dropped dramatically.
NOTE: Newer SSD hard drives, which come standard in MacBook Airs and optional in most other Macs, are also built using flash memory similar to other flash media, and while they share all the pros (and cons) of other flash media, they appear to the system like any other hard drive.
Storage Interfaces
Besides the different types of storage media, several interfaces are available. When choosing an external storage device, it’s important to pick one with an interface that will fit your needs. Table 19–1 lists the common interfaces.
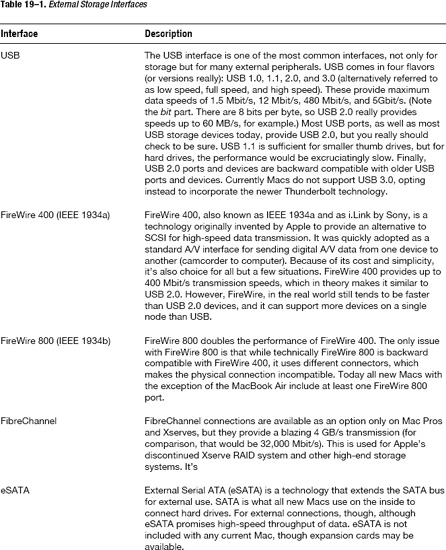

NOTE: Currently Apple ships Macs with at least two different Thunderbolt controllers. While most Macs provide four data channels, some, like the 11-inch Mac Book Air, only provide two data channels.
The goal in choosing an interface is to pick the fastest one that provides what you want. If your new iMac supports Thunderbolt, FireWire 800, and USB 2.0, but you also have an older iMac that supports only FireWire 400 and USB 1.1, then a USB drive may be the best common denominator (though you could get the FireWire 800 drive and buy a FireWire 800-to-400 adapter for better performance).
NOTE: Many external hard drives available today will include multiple interfaces. This is nice for maximum performance and connectivity, especially if you have computers of various ages.
No matter what interface or media is being used, it’s important to remember that as long as the interface on your device matches up with an interface on your computer, you are good togo.
Connecting Other Peripherals
Besides printers, extra storage, and general Bluetooth devices, lots of other things are available to plug into your computer for various reasons. Although it’s impossible to cover each possible device here, we’ll end this chapter with some general advice, as well as a few specific instances where something unique will happen that relates to Mac OS X.
Whenever you connect a device to your computer, your computer must be able identify and communicate with the device. Most of the time your Mac OS X system will at least be able to identify the device; however, it may have no idea how to communicate with the device or how to make it work. A driver generally handles this communication process, and although Mac OS X ships with a large number of drivers and knows how to communicate with a large range of products, a large number of items will need you to install a driver for them to work correctly. Usually, any device you purchase will include not only any necessary drivers but also supporting software and instructions on how to get your device working with your computer.
Occasionally there will be a product that will work well without an additional driver but certain features won’t work (common among certain multifeatured mice and keyboards). In such a situation, it’s up to you whether to install the manufacturer’s driver; in general, if you bought something for the features, then you probably want them to all work.
TIP: If you happen upon a really nice mouse with lots of features, yet you find the drivers provided with the mouse to be lacking, there are a couple of third-party mouse drivers that are extremely flexible and that work with a large number of different brands of mice. My personal favorite is SteerMouse, available from http://plentycom.jp/en/steermouse/.
The following types of devices occasionally require a driver in order to function properly:
- Scanners
- Input tablets
- Audio/MIDI interfaces
- Screen calibration devices
- Multifunction mice and keyboards
- Certain video interfaces
- Some printers
On the other hand, a large number of devices should work immediately after plugging them in (though some configuration or special software may be needed to do much with them):
- Digital cameras
- Video camcorders with a FireWire or USB link
- Most Apple hardware
- Speakers and microphones (including USB headsets)
- Some USB/MIDI keyboards and controllers
- Storage devices
- Many standard mice and keyboards (including multibutton mice with a scroll wheel)
- Many printers
Occasionally some special action occurs when you connect a particular type of device.
Digital Cameras
Mac OS X has always recognized every digital camera I’ve ever plugged in. What you need to decide, however, is how you would like your computer to respond when you attach a digital camera. In OS X the standard application for dealing with importing images, Image Capture, has changed, and so has the default behavior when you plug in your camera. When you first plug in your camera, your camera will mount as a new drive on the desktop, and that’s it (unless you have already set a preference in some other application such as iPhoto to open automatically when camera is attached)! If you don’t have iLife and thus iPhoto, you can browse and download the images on your camera using Image Capture (Figure 19–12). Image Capture provides an easy way to preview and download images from your camera to your computer (by default it will download images to your Pictures folder.)
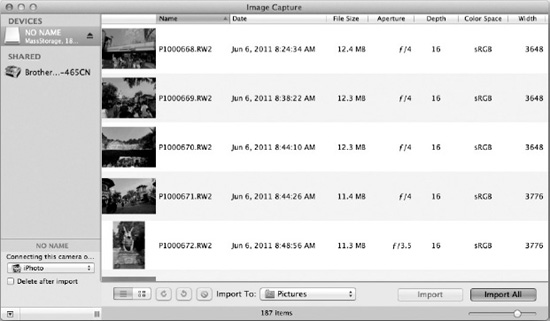
Figure 19–12. The Image Capture application is a standard part of Mac OS X and is always available for importing images from a digital camera. Additionally Image Capture can be used to scan images from supported scanners.
NOTE: You can also use Image Capture to import images from devices other than cameras. In fact, you can use Image Capture to import images from a wide range of scanners without installing any additional software or drivers (Figure 19–13).
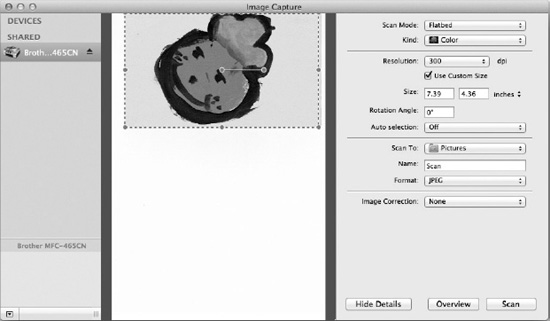
Figure 19–13. The Image Capture application also provides basic scanning tools for supported scanners.
If you’ve installed iPhoto or Aperture, you can choose to have these automatically launch to import images when you connect your camera. (In fact, when you first launch iPhoto, it will ask you whether you would like to do this. If iPhoto is your primary image application, then it’s probably a good idea to do this.)
Input Tablets
Input tablets are another interesting input device, although they’re generally used by graphic designers and artists with graphic applications. When you plug an input tablet into your Mac OS X computer, you will find that a new preference pane appears in System Preferences: Ink.
The Ink preference pane (Figure 19–14) provides options for the Inkwell feature introduced in Tiger (Mac OS X 10.4). Inkwell is a handwriting recognition technology that allows you to write text with your input tablet, which the computer will then (attempt to) convert it into editable type:
this is an example of text entered withinkwell .
As you can see, it’s still not perfect (or perhaps it’s just my handwriting), but it’s fun to play around with (and your handwriting may be better than ours).

Figure 19–14. The Ink preference pane appears when you have an input tablet connected to your computer.
NOTE: The Inkwell preference will not work until the proper driver is installed for your input tablet and the tablet is plugged in.
Summary
Now you shouldn’t have too much trouble getting any external peripheral to work with your Mac (provided it was designed to work with your Mac; getting non-Mac-compatible devices to work is often possible, but goes beyond the scope of this book). Next we will build on our discussion of external storage devices to talk about Time Machine, data backups, and recovery.