
Chapter 16
iMovie
iMovie (Figure 16–1) is Apple's consumer-level application for managing video and creating movies. Like iPhoto, iMovie is designed to easily allow people like you and me to quickly create great-looking movies from our video collections. This is especially useful now that the ability to shoot video is everywhere from our phones to our digital cameras. While entire books are written on creating movies with iMovie, in this chapter we will cover the basics, including
- Importing videos
- Managing your clips with events
- Creating new iMovie projects
- Building movies from your clips and photos
- Adding text, transitions, and music to your movie
- Exporting your movie
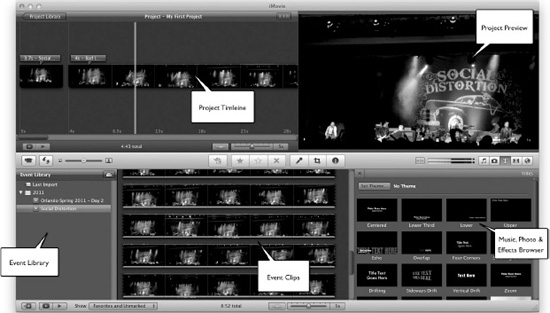
Figure 16–1. iMovie provides a single window divided into areas that help you quickly assemble and edit a movie.
Importing Video into iMovie
The first step in creating a movie in iMovie (or any video application) is to import video. When iMovie is running, it will automatically detect any camera, camcorder, or even phone with digital video files on it when it is connected to your computer.
NOTE: If for some reason your device isn't detected or you are importing video from some other device or location, you can manually begin to import using either File > Import from Camera… (Command-I), File > Import > Movies…, File > Import > Camera Archive…, or File > Import > iMovieHD Project…, depending on the source. We will be assuming you are importing from a camera here.
When new videos are detected for import, the Import window will appear (Figure 16–2). Depending on how the videos are stored on your camera (either on linear media like MiniDV tapes or on nonlinear media like hard drives or flash media), you may be able to select individual video files (nonlinear media) to import, or you may be able to control the camera to stream the video into iMovie (linear media). Either way, when you go to import the video, you will be prompted about where you want to save your video and whether you want to add it to an existing or new iMovie event (Figure 16–3). iMovie also provides you with an option to analyze and apply video stabilization after the import is complete. This is a feature of iMovie that attempts to detect and remove camera shake from videos.

Figure 16–2. iMovie's Import From: Camera window allows you to view and select videos to import.
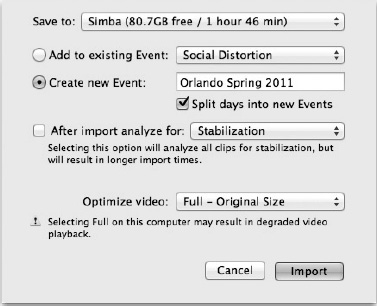
Figure 16–3. Before you import the video, you must choose a location and event to save the movie into. You can also select from options for stabilizing and optimizing your video.
NOTE: If you anticipate creating a lot of video, it may be a good idea to think about getting an external hard drive for your video. Digital video can consume a large amount of disk space. This is especially true of raw DV or HDV, but even new digital video formats such as AVCHD, which manages to significantly compress video while still retaining high quality, can fill up disk space fairly quickly.
Making a Movie
Once you have your video imported, you can start the task of taking your video clips and putting them together into a movie. This usually involves a few steps: creating a project; assembling your video clips (and photos if you want to add them to your movie); adding any text, transitions, and additional audio; and finally saving your movie.
Creating a Project
Creating a movie in iMovie begins by creating a project. To create a new project, select File > New Project… (Command-N) from the menu. This will bring up the new project dialog, which presents you with a number of Project Themes and Movie Trailers templates (Figure 16–4).
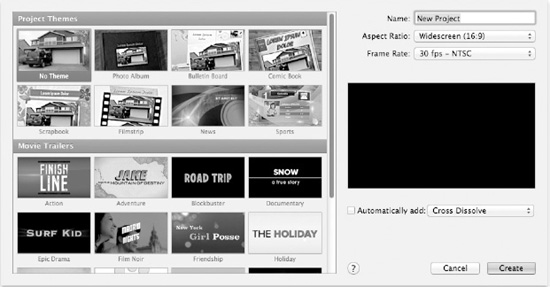
Figure 16–4. When you create a new project, you can select a theme or movie trailer to help you create a compelling movie.
Project themes allow you to just add clips and let iMovie add text effects and transitions automatically (you will of course still need to edit the text). If you don't wish to use a theme, select the No Theme theme. If you choose to use No Theme, you can still include elements from other themes in your movie.
Movie trailers are movie templates introduced in iMovie '11 that have predefined outlines and storyboards that when assembled will create a professional-looking movie trailer. To create a movie trailer, choose a trailer you'd like to create (some trailers are designed for individuals while others are designed for groups), fill out the outline (Figure 16–5), and then add clips that match up to the storyboard requirements (you can also add clips directly to the Shot List tab). When everything is filled out and the appropriate clips are added, iMovie will assemble all the pieces into a finished work.
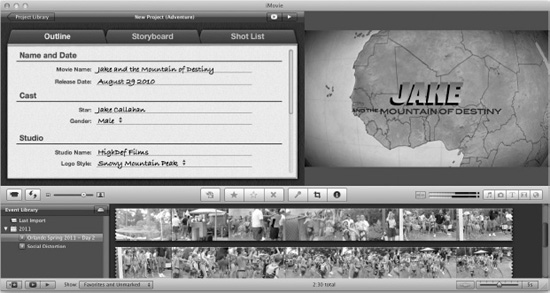
Figure 16–5. To create a movie trailer, just fill out the outline provided and add the suggested type of movie clips.
Working with Clips
To add an imported video clip to a movie, drag the clip from the event clip view to the project timeline. Sometimes, however, you may wish to work only with part of a clip. If this is the case, you can select just the part of the clip you would like to use. To do this, simply click and drag over the area of the clip you wish to use. This will surround the selected clip with a yellow box that you can expand or contract on either end by grabbing the edge and dragging. To preview just the selected video, select Play Selection from the shortcut menu. You can then drag just that selection to your project.
NOTE: When working with clips in iMovie, iMovie retains the original imported video so any edits, cuts, or crops can be reversed.
Beyond cropping a clip, you can make various audio and video adjustments to a clip by selecting it and opening the inspector by clicking the inspector button (it has an I on it) or simply pressing the I key on the keyboard.
TIP: iMovie has a number of keyboard shortcuts that use a single key to perform actions. For example, to start or stop a video from the current position, press the spacebar. To open the inspector window, press the I key. To view all the shortcuts, select Help > Keyboard Shortcuts.
TIP: The clip-editing tools are available for both event clips and project clips.
TIP: Besides adding video clips to a project, you can also add still photos from your photo library. To do this, open the photo browser to view and select an image from your iPhoto or Aperture library, and then just drag the image to the project timeline where you would like to place it. You can then use the inspector to select how long the image will be displayed and to add video effects to the image so it appears to move.
Adding Text and Transitions
Once you have your video clips set up in the timeline, you can then add transitions between clips, as well as text (referred to as titles in iMovie) that floats above a clip.
To add a transition between two clips, open the Transitions Browser, choose the transition you'd like to use, and drag it between two clips on the project timeline. Generally, that's all you have to do; however, you may use the inspector to tweak the transition if you'd like.
TIP: While transitions, used properly, can make a movie look very nice, if you use lots of different transition styles in a movie, the results will look amateurish. For a more professional look, it's best to pick a simple transition you will use throughout the whole movie and use it sparingly.
Adding titles to a movie is similar to adding a transition. First select the title style you wish to use from the Title Browser, and then drag it over the clip in the project timeline where you would like it to appear. Once you have added the text, you may edit it in the project preview view.
Adding Music and Sound Effects
To add additional background sounds or music to your movie (or foreground music if you are creating a music video), open the Music and Sound Effects Browser, select the audio file you would like to add, and drag it onto the timeline where you would like the audio to begin.
Once the audio file is added to the project timeline, you can adjust the overall volume or create fade-ins and fade-outs (called ducking) so the audio flows well with any audio already on the video track.
If you would like to add voiceovers directly to the video, click the voiceover button (the button that looks like a microphone), select your audio input device, and then click the timeline where you'd like to add your voiceover. iMovie will then begin a countdown and start recording where you selected. The recoding will continue until you click the timeline again to stop it.
Finishing Up
Once you have finished your movie masterpiece, you'll want to save it. To do this, select File > Finalize Project from the menu. This will cause all the movie to be re-rendered in your selected format (based on your project properties). For even a short video, this can take a long time, even with a super-fast computer, so you may want to consider finalizing your video when you are ready to take a break from using your computer. Once your movie is finalized, you can export it to other formats.
Exporting Your Movie
Once you have finalized your movie, it's likely that you'll want to share it. iMovie provides a host of export options under the Share menu item. While the options may differ depending on the destination, many of the share options ask you what size you will want to export your movie as. The size options include Mobile, Medium, Large, HD 720p, and HD 1080p. iMovie makes suggestions on which format to choose based on its destination. Whatever you choose, keep in mind that larger sizes result in significantly larger file sizes.
Besides choosing the size depending on the export location, you may need to provide account information. If, for example, you wish to export your movie directly to Facebook, choose your account (or add you account information) and iMovie will do therest.
Summary
Hopefully this chapter provided a good starting point for learning iMovie. As you explore and use it, you will discover that there are quite a number of interesting features lurking beneath the surface. However, iMovie does have limitations, and if you reach them you may wish to look to Final Cut Pro X for more features (and of course more complexity).
Next we will move on to the final of iLife's three principal applications: GarageBand, iLife's music creation application.