
Chapter 12
Using iCal
iCalis the Calendar application Apple includes with Mac OS X. Like Address Book, iCal's look (Figure 12–1) has changed significantly in Lion. The new look has no columns, and instead presents a unified look with four views selectable from the toolbar: Day, Week (Figure 12–2), Month (Figure 12–3), and Year (Figure 12–4).
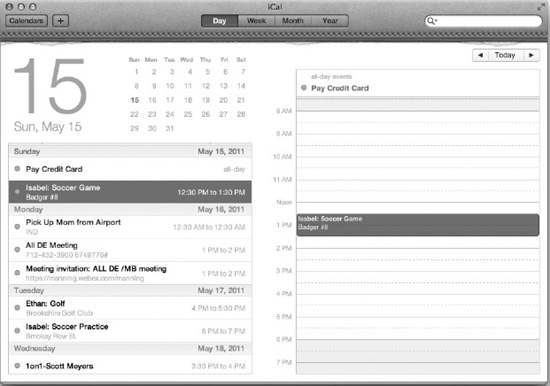
Figure 12–1. In addition to the day's schedule, the Day view in Apple's iCal provides a small monthly calendar, as well as a list of upcoming events.
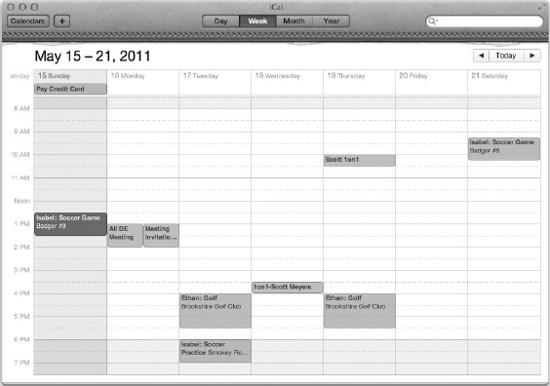
Figure 12–2. The Week view in iCal provides a look at all the events for a given week.
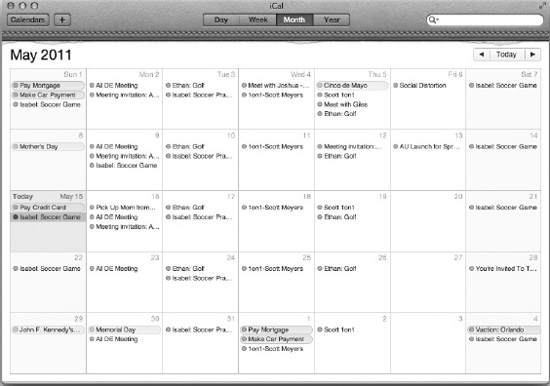
Figure 12–3. The Month view in iCal provides a traditional view of a month, with notes for a day's events.
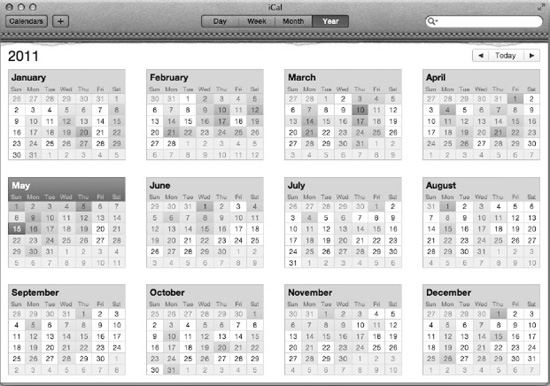
Figure 12–4. The Year view is a new view that shows that whole year in a single view. Busier days have different colors from lightly scheduled days.
Managing Calendars in iCal
iCalorganizes events into calendars accessible from the Calendars menu on the left side of the toolbar (the menu appears as a button). Each calendar can not only be viewed separately, but can have its own sharing options as well. This helps you manage your events and who has access to them all at the same time.
By default, iCal starts you out with two calendars: Home and Work. To add an additional calendar, select File > New Calendar from the menu. If you have multiple calendar accounts, a submenu of possible accounts will open with all of your calendar accounts (e.g., “On My Mac” and “Google”). Select the account you wish to create a new calendar under, and a new untitled calendar will be created and highlighted in the Calendar menu on the toolbar. You can now rename you new calendar as you wish.
Control-clicking a calendar on the Calendars menu will open a shortcut menu with a few options. Selecting the Get Info option will open up a dialog allowing you to add a description and change the highlight color of events belonging to the selected calendar.
In addition to creating different calendars to group together events, you can also create calendar groups to group together related calendars. To create a calendar group, select File > New Calendar Group (Shift-Command-N) from the menu; this will create a new group that you can individual calendars to by dragging them into that group.
Adding and Editing Events
You can add an event in a number of ways. Selecting File > New Event (Command-N) or clicking the + button next to the Calendars menu will open a Create Quick Event dialog. To create your event, type in a name for your new event, the date, and the start and end times, and press the Return key, and iCal will add the event. For example, if you type “Dentist Appointment at 8-9:30am 5/21,” iCal will create an event called Dentist Appointment from 8:00 to 9:30 a.m. on May 21st. Alternatively, you can click and drag on a time in Day or Week view to create a new event at the time, or double-click a date in Month view to add an event on that day.
TIP: The Create Quick Event text field will not only recognize specific times and dates, but will also recognize general terms like Friday or Tomorrow, so “Lunch at Noon Tomorrow with Sara Beth” will create a new event for tomorrow at noon. Events without a designated time will be added as all-day events, so you could add an event like “Disney World Vacation 6/4 to 6/12.”
When you first create an event, a popover may appear next to the event so you can make edits if necessary.
NOTE: By default, new events will be created in your default calendar. If you wish to create an event in a specific calendar, click and hold the + button and a popover will appear allowing you to select the calendar you wish to add your new event to. You can change your default calendar on the General tab of the iCal preferences.
Once your event is created, if you want to edit it or view all the information contained in it, double-click it to open the Event Information pop-up. There you can view all the event's information or click the Edit button to put the window into edit mode (Figure 12–5) so you can make changes. In edit mode, you can change the date and times associated with an event, change the calendar the event is associated with, set an alarm to go off reminding you of the event, and make the event repeatable.
This mode also allows you to tag the event as an all-day event, which will list the event differently in the calendar view and allow the event to span multiple days. Finally, you can add attachments, notes, and URLs to the event to help you keep associated files and information tied to the event. When the event information is complete, just click Done.
If an event gets rescheduled or needs to be moved for any reason, rather than having to go into edit mode, you can change the date and time of the event by dragging the event from one time slot in the calendar to another.
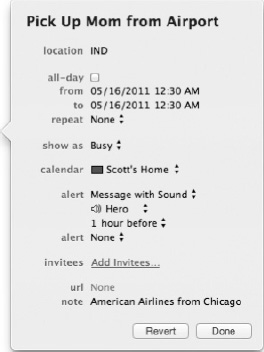
Figure 12–5. You can add and edit event information from the Event popover dialog.
Adding Reminders
Besides events, iCal also provides the ability to keep track of reminders (formerly know as To-Dos). To view reminders in iCal, select View> Show Reminders (Option-Command-T) from the menu, and the Reminders column will appear along the right side of the iCal window (Figure 12–6).
Control-clicking a reminder will open a shortcut menu that will allow you to add some details to your reminder, such as its priority and what calendar the reminder belongs to. Selecting Get Info from the shortcut menu will open a dialog with additional details, allowing you to add additional information such as a due date, and set alarms associated with the reminder.

Figure 12–6. iCal's Day view with the Reminders column shown
Inviting Others to Events and Appointments
In an event's edit mode, you are able to invite additional people to an event. By clicking Add Invitees, you can add any number of people you want to add as attendees for your event. Any attendees who are listed in your Address Book are automatically sent an invitation to the event.
NOTE: If an attendee isn't in your Address Book, you can still type in an e-mail address to send an invitation.
TIP: When you add invitees to an event, a new Available Meeting Times… hyperlink appears in the event. If you have access to the invitees' shared calendar, you can access each of the invitees' calendars to find a time when everyone is free.
Adding Time Zone Support
iCalhas a nice time zone support feature that is not activated by default, but if you often travel or deal with people in other time zones, then this is a fantastic feature to use. Activating time zone support is as easy as selecting the “Turn on time zone support” option on the Advanced tab in iCal's preferences. Once the support is turned on, you will notice that a small time zone drop-down list will appear in the upper right of iCal's main window above the search field. You can alter this field to reflect the time zone that iCal is in. Additionally, events will gain a time zone setting. With time zone support enabled, iCal will automatically alter event times based on the time zone of the event and the time zone of iCal.
Subscribing to Public Calendars
Sometimes you may want to subscribe to a calendar other than your own. For example, you may want to subscribe to a calendar that provides the schedule of your favorite basketball team, or you may want to subscribe to a calendar that contains all the common UK holidays.
To get a taste for what calendars are available, choose Calendar> Find Subscriptions… from iCal's menu. This opens your web browser to an Apple web site where Apple makes available a number of common shared calendars (including many sports teams' schedules and cultural holidays).
Besides the calendars available from Apple, organizations often post calendar links on their web sites that will allow you to subscribe to their calendars. Finally, If you know the location of a shared calendar on the Web, you can use the Calendar > Subscribe… menu command (Option-Command-S), which opens a dialog box and allows you to enter the URL of a calendar you wish to add.
You can unsubscribe from a calendar by selecting Delete from the shortcut menu of the calendar from the Calendars menu.
Sharing Your iCal Calendars
Occasionally you may have an iCal calendar that you would like to share with others. To share one of your iCal calendars, you must either use iCloud or have access to a private CalDAV server.
If you are sharing a calendar that is already being stored on iCloud, then select the iCloud calendar you wish to share and select Calendar > Share Calendar... from the menu bar. This will open up a dialog (Figure 12–7) asking you what name the calendar should be shared as, and whether you would like to share the calendar with “Everyone” or “Only the people you invite.” Publishing the calendar for everyone will create a public shared calendar that anyone with the URL can subscribe to. If you choose the “Only people you invite” option, a field will open where you can add the e-mail addresses of the people (or names of people in your Address Book) you wish to invite to share your calendar. Next to each person you add, a menu will allow you to select whether that person should have read and write access to the calendar (i.e., they will be able to add and edit events), or read-only access.

Figure 12–7. When you choose to share a calendar through iCloud, a dialog will appear to help you choose how you wish to share the calendar.
When you click the share button for “Everyone” calendars, you will be presented with a URL that leads people to your calendar; for “Only the people you invite” calendars, the individuals you are sharing the calendar with will be sent an e-mail telling them what they need to know to access the shared calendar.
If you wish to share a non-iCloud calendar, then select Calendar > Publish... from the menu bar. This will open a different dialog (Figure 12–8), asking you to choose a name you would like to share the calendar as and whether you want to publish the calendar on “iCloud” or “A private server.” If you choose a private server, you must enter the server's URL and your login credentials. Next, there are a series of check boxes to choose what information will be shared. When everything is filled out, click the Publish button and you will be given the URL to the shared calendar.
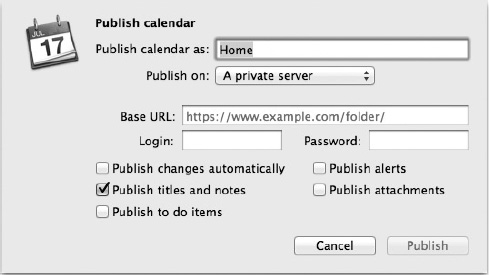
Figure 12–8. You can publish a calendar to be shared through any CalDAV server.
NOTE:If you wish to share your iCal calendars using the private server option, then you must have access to a CalDAV server. CalDAV is a standard supported by Apple and other companies in which calendar data is stored on a server and shared over the Web (usually over a secure SSL connection for nonpublic calendars). Apple's own calendaring server included with Mac OS X Lion Server is a fully compliant CalDAV server.
Managing Calendaring Accounts in iCal
As we touched upon earlier in this chapter, iCal is able to access calendars that are hosted on other systems, including Exchange 2007 and later, Google Calendars, Yahoo Calendars, Private CalDAV servers, and of course iCloud. You can add and manage these accounts from the Accounts tab in the iCal preferences (Figure 12–9).

Figure 12–9. The Accounts tab in the iCal preferences allows you to add and manage different calendaring accounts.
To add an account, click the + sign at the bottom of the Accounts list and follow the steps presented in the dialog. You will be guided though adding a CalDAV, Exchange, Google, Yahoo, or MobileMe-type calendar account.
NOTE: Many of the details of adding accounts is now better handled from the Mail, Contacts & Calendars pane of the System Preferences. This will be covered later the book.
Once an account is added, you can access some information about the account here as well. The options here will vary with account type.
One interesting option under the Accounts tab is the Delegation subtab. Delegation is similar to sharing (in fact, they are often used synonymously), in which a calendar owner can “delegate” others to access their calendar and act on their behalf. For certain accounts (including Google and Exchange), you will find any calendars you have access to on that system located under this tab. You can select any of these calendars and they too will appear in iCal.
TIP: In general, different calendaring systems have different ways of sharing calendars, and they aren't always entirely compatible. iCal makes the best of these inconsistencies and generally does a good job of smoothing out the differences, but there are still a number of oddities. For example, Google Calendar only maintains only one primary calendar per account. You can of course add other calendars in Google Calendar, but to iCal these additional calendars will show up as delegates under the Google account, so this doesn't provide the same out-of-the-box experience that you get with, for example, MobileMe. Also, certain features of other calendaring systems (sharing is a big one) are best utilized through their native interface rather than iCal.
Summary
Just like the holy trinity of onions, bell peppers, and celery in Cajun cooking (you can substitute carrots for peppers for a more French flair), e-mail, contact management, and calendaring form the traditional backbone of “getting things done” in many people's personal and professional lives. These last three chapters, on Mail, Address Book, and iCal, should have provided you enough information to be proficient with these tools. As technology continues to move forward, however, new ways to communicate are constantly being introduced. In the next chapter we will look at some different ways to communicate using iChat and FaceTime.