
Chapter 5
Mac OS X Application Basics
We have already looked at a couple specific applications, but what exactly are applications and how do they work? In this chapter, we will begin to discover what applications are and take a look at some common features found among many standard Mac OS X applications. Some things you will learn about in this chapter are
- Opening, closing, and quitting applications
- Opening and saving documents from an application
- Managing documents with Versions
- Running applications in full-screen
- Using the Services menu
In official Apple nomenclature, an application is “a computer program that performs a specific task, such as word processing, database management, and so on.” We also learn that the use of the word application specifically applies to a computer programs with a graphical interface. A computer program without a graphical interface is just a program.
NOTE: Mac OS X is capable of running different types of applications, including Java applications, AIR (Adobe Integrated Runtime) applications, web applications, and with the right software, even applications written for other operating systems. These types of applications may look or behave different from native Mac OS X applications (and each other). Unless otherwise specified, we will generally be talking about native Mac OS X applications.
NOTE: Most Mac OS X applications are written using Cocoa, Apple’s object-oriented application framework. Applications utilizing Cocoa gain many of the distinct looks, feels, and features that Mac OS X applications are know for.
Opening and Quitting Applications
There are a few common ways to launch, or open, an application in Mac OS X, each of them quite simple. The traditional way is to locate the application icon in the Finder (usually in the Applications folder) and double-click it. Single-clicking the application Dock icon can launch any applications that you have chosen to keep in the Dock. Double-clicking a document in the Finder will also open that document’s default application (and should also open the actual document). Finally, Lion introduces Launchpad, which we introduced in Chapter 1 as a new way to launch applications.
NOTE: If you’re a command-line enthusiast, you can also launch an application using the “open” command. We will discuss this more in Part 6 of the book.
Quitting applications in Mac OS X is a bit interesting; while not difficult, it is different from what many people familiar with other operating systems, like Microsoft Windows, are used to. For one, clicking the window control button (the red button located where the X button is traditionally located for the majority of Microsoft Windows applications) does not always quit an application; usually it just closes the window, leaving the application active in the background. To assure an application actually quits in Mac OS X, it is best to explicitly quit the application. There are three common ways to do this: use the Application > Quit Application command from the application menu, use the Command-Q keyboard shortcut, or select Quit from the application’s shortcut menu on the Dock.
NOTE: It is possible for an application to quit when you close the application windows. Apple’s own Address Book and iCal application are example of this. A general rule of thumb is that if an application can have multiple windows open at once (e.g., a word processor), it can have no windows open and still be running, while if an application only has one window (e.g., iCal or Address Book), then when that window closes the app may quit. In reality, application developers have to go out of their way to make an application quit when the windows are closed, so often this behavior is not utilized.
Documents and Files: Opening, Creating, Saving, and Using Versions
We looked at launching and quitting applications, but what about opening and saving the documents that we create in our applications?
Opening a Document
There are two primary ways to open a document; the first is directly opening the document from the Finder, as we discussed back in Chapter 2. The other way to open a document is to use the File > Open... command found in most application menus. The Open command (Command-O) will present you with the Open dialog (Figure 5–1). The Open dialog provides a Finder-like view, allowing you to browse the system and select the item you want to open. Once you’ve selected the desired file(s), click the Open button in the lower-right corner of the dialog to open the item(s) in the current application.

Figure 5–1. An Open dialog (in this case from the Preview application) provides a Finder-like interface for selecting the file(s) to open.
TIP: Most applications will allow you select multiple files in the Open dialog and open them all at once. To select multiple documents, hold the Command key down as you select additional files.
NOTE: Most applications are only able to open certain types of documents. While the Open dialog presents most files visible in the Finder, many files may be grayed out, signifying that the current application is not recommended for opening them. Occasionally there will be an option in the Open dialog to highlight and open additional file types that the current application is capable of opening. Some applications will even allow the user to force open file types that the current application may not be able to open properly, which often results in gibberish appearing onscreen.
Creating a New File
Often you will want to create a new file from scratch in an application. Generally this is done by selecting the File > New command in the application’s menu bar (or using the Command-N keyboard shortcut). Depending on the application, things may not be this simple. Some applications, for example, are able to create different types of documents. In many of these cases, selecting File > New will open a dialog for selecting the specific type of document you want to create. In other applications there is no explicit File > New option; rather, there are multiple File > New something options. Some applications even have a submenu attached to File > New that presents a number of new options.
This variation should not be taken as a bad thing, as it is indicative of the many amazing things you can do with Mac OS X applications. As a rule, no matter what the options are in the File menu, I find the Command-N keyboard shortcut almost always results in the desired effect, and in the few cases where it does not, then I can usually find what I am looking for in the File menu.
Saving Files (Without Versions)
With the introduction of Versions in Lion, saving files in Mac OS X has changed, at least for applications that support Versions. Since most existing (pre-Lion) applications do not yet support Versions, it is still important to understand the traditional methods of saving files, though.
SAVE VS. SAVE AS...
For applications that do not support Versions, a user can save a new file by selecting File > Save As... from the menu bar. This command will bring up the Save dialog, which differs in a number of ways from the Open dialog discussed previously. First, while the Open dialog generally opens in it own window, the Save dialog usually drops down from the current document’s toolbar. Second, even the simplest Save dialogs tend to have both a condensed view (Figure 5–2) and an extended view (Figure 5–3).
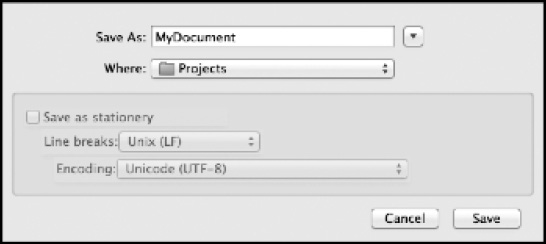
Figure 5–2. The condensed view of a Save dialog from Bare Bones’ TextWrangler
The condensed Save dialog asks what you would like to name the file to be saved and provides a drop-down menu of common and recent folders into which to save the file. Beneath that is an area with application-specific save settings, which, depending on the application, can be very simple or quite complex. Clicking the disclosure triangle to the right of the Save As text field will expand the Save dialog into an expanded Finder view and may occasionally show additional save options not available in the simplified view.

Figure 5–3. The expanded view of the Save dialog shown in Figure 5–2
NOTE: Some applications will also offer Import... and Export... options, which are similar to the Open... and Save As... options. However, these generally provide additional options, including opening or saving a file that is in a format other than the application’s native format, and changing a file from one format to another. A good example of this is when you wish to change an image file of one type to another; for example, saving a RAW image file from your DSLR (Digital SLR) camera as a JPEG for viewing on a web site.
Working with Versions
Versions is a new technology introduced with Lion that maintains a historical record of changes to a document. The concept (and much of the interface; see Figure 5–5) is very similar to that of Apple’s Time Machine backup utility, introduced in Mac OS X 10.5 Leopard. (We will cover Time Machine in Chapter 20.) However, rather than keeping snapshots of your system on an external storage system, Versions keeps a record of previous versions of a document stored locally.
Versions changes the way documents are saved in Mac OS X. Rather than overwriting the old file when a new version of a file is saved, Versions saves the newest file while retaining the previous versions of the file in the background. This not only affects how files are saved on the disk, but also alters the act of saving a file. Instead of making you choose between Save and Save As..., it provides a single Save option, which will appear either as Save... or Save Version (both share the keyboard shortcut associated with the traditional Save option: Command-S). Save... will appear for any new, unsaved document, while Save Version will appear for any existing or previously saved document. Whether or not a Save dialog appears when you save a document depends. If you are saving a new, unsaved document, the Save dialog will appear, and if there are file type changes (e.g., if you change a document from rich text to plain text in TextEdit), the Save dialog will appear. Outside of these situations, Save Version will save a new version on top of the old version.
TIP: Applications that support Versions will also save a new version of a document automatically when you close the document or quit the application. So, forgetting to save a revised document before you close it can become a thing of the past. Still, until all the applications that you use support Versions, it’s probably best to stay in the habit of frequent saving before quitting.
The Versions menu (Figure 5–4) allows you to browse all previous versions of your document, revert your current document to the last opened version, or lock your document so that no new changes can be made to it.
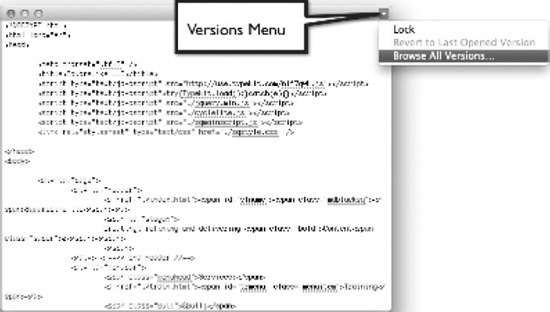
Figure 5–4. The Versions menu (on the right side of the window bar of supported applications) allows you to access Versions features.
NOTE: The Versions menu will change to notify you about a document’s status. If the document is locked, then “locked” will appear next to the menu. If the document has been edited since last opened (or saved), then “edited” will appear.
To access previous versions of a file, select Browse All Versions... from the Versions menu. This will take you to the Versions interface (Figure 5–5), where you can view past versions of your document and compare them to your current document. Using the timeline on the far right of the screen you can zoom backward to view past versions of your document. If you would like to restore a past version, select it on the right and click the Restore button. When you restore an old document, the current version simply becomes the last archived version, so nothing is ever lost.

Figure 5–5. The Versions browser presents the most recent document on the left and each of the previous document versions on the right. The past versions are browsable through a timeline.
TIP: Versions is an excellent resource for developers wanting to just try something out. If it works great but doesn’t really suit you, can always revert back to a previous state.
Full-Screen Applications
Mac OS X 10.7 Lion also introduces the ability to run an application full-screen in its own space. Application windows capable of running full-screen will have a full-screen toggle button on the right side of the window’s title bar (Figure 5–6). Clicking the toggle will expand the window to run full-screen inside of its own space (you can use the keyboard and swipe shortcuts that apply to Spaces to move from a full-screen application back to your desktop space).
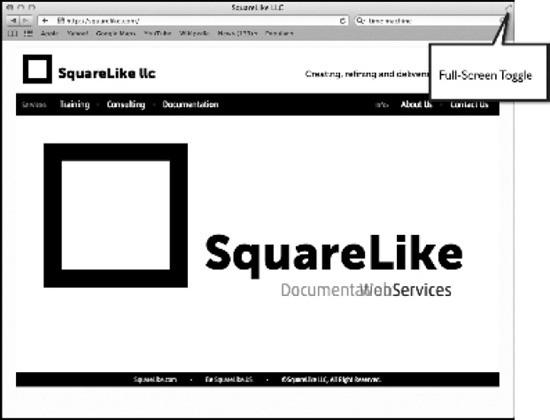
Figure 5–6. Application windows that are capable of running full-screen will have the full-screen toggle button displayed in the window’s title bar.
NOTE: Lion does not introduce the ability to run an application in full-screen. Many applications, ranging from Apple’s own Aperture to Mozilla’s Firefox web browser, have had the capability to run in full-screen for a while. However, Lion makes significant advances in not only the way full-screen mode is handled, but also in the ability to move full-screen applications into their own space. This allows for easy switching between applications, whether they are running in full-screen or not, without first having to switch out of full-screen mode.
By default, an application running in full-screen will hide the menu bar. However, by holding the cursor over the top portion of the screen, you can make the application’s menu bar slide into view, presenting you with full access to the menu bar, including the toggle button to exit the full-screen view (Figure 5–7).
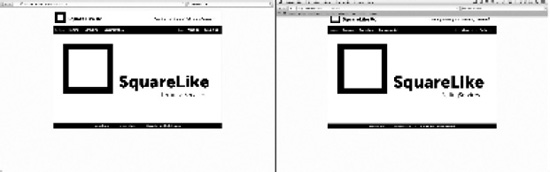
Figure 5–7. The image on the left shows Safari running in its default full-screen view with the menu bar hidden. The image on the right shows the menu bar slid into view.
Other Common Application Features
Besides what we’ve covered previously in this chapter and elsewhere in the book, there are a few other useful things to know about when working with applications in Mac OS X.
Using the Services Menu
Services are some of the most powerful features in Mac OS X. They are also some of the most overlooked. Services provide a way for users to utilize selected features and abilities of one application from within another.
Services are available from the Application > Services menu in most applications. The services available at any given time depend on a number of contextual factors. For example, selecting any text in an application will provide you with a number of available services, such as Look up in Dictionary and Search with Google. Selecting specific text may provide additional options; for example, selecting a web address will reveal the Open URL service. A number of these services even have system-wide keyboard shortcuts. For example, if you are reading some text in an application, you can select a word or phrase from that text and press Shift-Command-L to automatically open a Google search on that phrase.
NOTE: The Shift-Command-L Services shortcut is the default shortcut set up in the System’s Keyboard Shortcuts preferences in the Keyboard & Mouse preference pane. This is fully customizable and apt to change. In fact, in previous versions of Mac OS X the default shortcut for this command was Shift-Control-F. Also, in the event that there is an overlap of keyboard shortcuts between services and an application, the application’s shortcut should take precedence.
While there are a few stand-alone services that are part of Mac OS X (such as Summarize), most services are associated with applications (e.g., the Open URL service is associated with Safari). As such, the types of services available to you will depend on the specific applications you have installed. A list of all the currently available services on your system (as well as the ability to toggle each specific service on and off) is located under the Keyboard Shortcuts tab in the Keyboard System Preferences pane (covered more in Chapter 18).
NOTE: Even though the Services menu is present, Services may not be available from all applications. In general, Cocoa applications support the Services menu out of the box; however, Carbon apps (of which a few still are prevalent) don’t. If you find yourself using one of these applications and missing this feature, you should let the developer know how you feel, and perhaps they will someday update their application.
Using AppleScript and Automator
Most OS X Aqua applications expose at least some of their abilities to AppleScript and the Automator to allow savvy users to extend the functionality of the application or to utilize the features of the application in an automated workflow. This ability can be put to some very powerful uses and is covered in much depth in Chapter 31.
Summary
Most of what we have covered in this chapter applies to most of the applications you will use on your Mac. That said, developers have a lot of freedom to change the behavior of any of the features covered in this chapter in their applications (in fact, Apple has notoriously altered many of its applications to behave a little differently).
Speaking of applications, the next chapter will discuss how find, install, and manage applications.