
Chapter 2
Using the Finder
The Finder is an application that provides the interface for navigating your file system, managing files and folders, opening applications, and many more essential tasks that are required to use on your computer. It is elegantly designed to find whatever you are looking for on your computer and then get out of your way so you can work (or play, or create, or whatever you choose to do on your Mac). In this chapter we will give you a proper introduction to the Finder and how it is used including:
- A tour of the Finder window
- How to navigate around your system using the Finder
- Managing Finder items such as documents and applications
- Searching in the Finder
- Using the Finder to get information about files
- Customizing the Finder
While the Finder is an application, it is not just any application; it is a key piece of Mac OS X, one that your Mac generally expects to be running at all times any user is logged in to the Mac. One immediate difference is that there is no evident way to quit the Finder, and if you do force quit the Finder it will immediately relaunch. (If you control-option-click the Finder’s Dock icon, which is pinned to the far left position on the Dock, the resulting option that would say “Force Quit” for any other application will instead say “Relaunch”).
QUITTING THE FINDER
NOTE: The only time one can log into Mac OS X without the Finder launching is by logging exclusively into your Mac’s command line interface. This is most common when a user accesses their Mac remotely using SSH. We will delve into the command line interface later in this book.
Anatomy of the Finder Window
Most of the work done with the Finder is done in a Finder window (Figure 2–1). Before you jump in to looking at tasks the Finder can perform, you will take a look at the Finder window, explore the options available, and look at the different ways in which it allows us to look at our files.
NOTE: The word “files” has multiple contexts in Mac OS X. Generally when you refer to a file you are referring specifically to a file that is created by an application; for example, a .doc file, a text file, or an image file would all represent these types of files. However, in a broader sense everything contained on a computer is also considered a file. We will touch on this time and time again as we progress through the book. For now, just be aware that occasionally when we refer to files, we are including folders and applications in that group.
By default the Finder window consists of three main elements: the toolbar, the sidebar, and the main view area. Let’s take a look in more detail at each of these beginning with the toolbar.

Figure 2–1. By default the Finder window consists of three main elements: the toolbar, the sidebar, and the main view area.
The Toolbar
The Finder’s toolbar (Figure 2–2) in Lion has undergone some subtle changes since Snow Leopard. For example, the view options that previously appeared as buttons, now take on the appearance of a slider. Also by default the Quick Look button is gone and the Arrange button is added.
NOTE: Most toolbars for most Mac OS X applications can be customized and the Finder is no exception. Later in this chapter we will discuss customizing the toolbar including how to add back the Quick Look.
NOTE: If you upgraded Lion over a previous version of Mac OS X, your Finder’s toolbar (as well as other items) may appear differently then what is shown in this book. This is because Lion has picked up preferences from the older version of Mac OS X and has altered its default state to your past preferences.
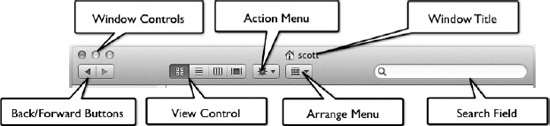
Figure 2–2. By default the Finder’s toolbar contains just a few navigation, view, and search controls. The standard application window title bar containing the window controls and the window title are also shown here.
Looking at the default buttons, the Back/Forward buttons will navigate you forward and backward through the Finder window’s history, just like the forward and backward button on most web browsers. The View control will allow you to select how you’d like to view the items in the main view area: icon view, list view, column view, or Cover Flow view. We will look more closely at the different views later in this chapter. The Arrange menu allows you to select how items are grouped together in the main view area. This is similar but different from the other Arrange by options. Finally, the Search field provides a powerful search capability of all the files on your computer (and beyond). Searching is also covered later in this chapter.
The Sidebar
The Finder’s sidebar (Figure 2–3) is a customizable area that provides easy access to specific folders, devices, network resources, and saved searches. The sidebar divides these into three categories:
Favorites: At one time Favorites was a special toolbar in the Finder that contained your favorite directories for easy access. While the concept survived, the term “Favorites” was missing from Leopard and Snow Leopard. In Lion Favorites returns, replacing “Places” and “Search For” in the sidebar. Favorites is a highly customizable place where you can quickly access any folder as well as your saved searches. A few special items in Favorites are “All My Files”, which is a predefined search, and Air Drop, a special location for peer-to-peer file sharing (which we will cover more in Chapter 26). If you would like add a folder to your Favorites just drag it onto the sidebar. You may also rearrange the items in your Favorites by dragging them up or down. To remove an item, select “Remove from Sidebar” from the item’s shortcut menu (control-click the item to bring up the shortcut menu).
Shared: The shared area will show any network devices or volumes that you have access too. By default any network devices that Mac OS X detects automatically will show up here. Additionally any network resources you connect to manually will appear here also (as long as you maintain a connection). This will not appear if you aren’t connected to a network or if no shared network resources are detected.
Devices: Any connected volumes included internal and external hard drives, disk media (i.e., CDs and DVDs), memory cards, thumb drives, digital cameras and camcorders with shared storage, and others will show up under Devices for easy access. If you are a MobileMe subscriber your iDisk will show up here as well.
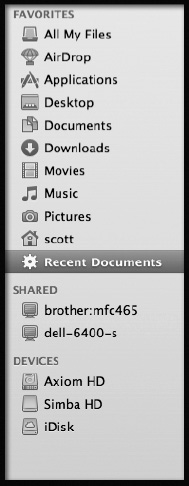
Figure 2–3. The sidebar allows easy Finder access to important locations and searches on your computer.
Views in the Finder
The View control on the Finder toolbar changes how items will appear in the Finder main view area. There are four primary views available: Icon view, List view, Column view, and Cover Flow view.
Icon View
The Icon view (Figure 2–4) is the default view. In it items appear as large icons that represent the type of each item. Folders appear as folders, files appear as files (generally with some indication of what the file contains or which application is responsible for the file). Applications appear with their own custom icon, and other various file types appear in various ways.

Figure 2–4. The Finder Icon view presents items in the Finder by large icons representing the file type.
List View
The List view (Figure 2–5) presents items in the Finder as a list. While the icon presented is smaller, the List view readily provides additional information about each item in the Finder (by default this includes the date last modified, the size, and the kind of file; however, other options are available). One additional feature of the List view is that folders have a disclosure triangle allowing you to view their contents without navigating away from your current location.

Figure 2–5. The Finder’s List view not only provides additional information about Finder items, it also allows you to view the contents of folders without changing your location.
NOTE: Disclosure triangles are small triangle elements found to the left of certain interface elements that can be toggled to reveal or hide additional information about an item. A disclosure triangle pointing to the right indicates that it is closed; you may click on the triangle to reveal the additional information. Disclosure buttons, similar to disclosure triangles, can be clicked to reveal additional options in many dialogs and utility windows. In the case of disclosure buttons, a downward facing triangle indicates that additional options are hidden, when revealed the buttons triangle will face up.
Column View
The Finder’s Column view (Figure 2–6) was introduced in the first version of Mac OS X and is the descendent of the File Viewer used in NeXTSTEP and later OpenStep (from which Mac OS X descends). The columns in Column view represent the folder hierarchy of your current location (the columns to the left represent parent folders). The columns on the right will either provide a list of enclosed items (if a folder is selected) or information about the selected item (if it’s a non-folder item), including a preview of the item.
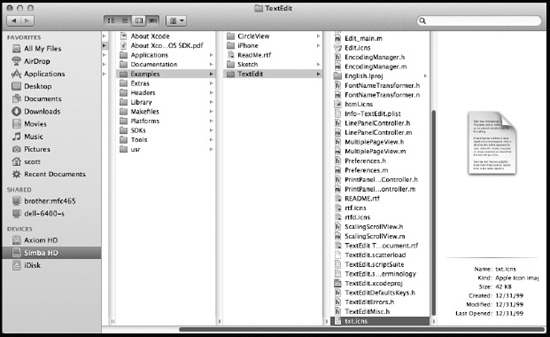
Figure 2–6. The Finder’s Column view provides a hierarchical view of your current location and provides selected information and a preview of selected Finder items.
TIP: The Column view is very nice for browsing media files. When a media file is selected, the right-most column will allow you to preview the item. This includes full playback of any supported audio or video file right from the Finder.
Cover Flow View
The fourth Finder view is the Cover Flow view. The Cover Flow view (Figure 2–7) presents a split window with a standard List view on the bottom; the top, however, provides a scrollable display that allows you to “flip through” previews of the items in your location. This view can be extremely useful for helping you to visually identify a particular file in a crowded folder, such as when you want to fine a particular image file in a folder of many image files.

Figure 2–7. The Cover Flow view is useful for visually identifying files.
Common Finder Tasks
Now that we have had a brief tour of the Finder, it is time to learn how to accomplish a number of common computing tasks that take place in the Finder. We will begin with some basic navigation tasks and then move on to a series of file management tasks.
Navigating in the Finder
Navigating in the Finder is generally pretty straightforward. To open a new Finder window either select File >New Finder Window from the Finder’s menu bar or with the Finder as the foreground application use the Command-N (![]() N) keyboard shortcut.
N) keyboard shortcut.
NOTE: Like most modern Operating Systems, Mac OS X is multitasking. It can run multiple applications and processes (a.k.a. tasks) concurrently. While there are numerous benefits to a multitasking environment, in practical terms people tend to direct their attention to one task at a time (i.e., people are not wired together to multitask, though we quite often multi-switch or quickly move from one task to another sometimes so rapidly that it seems to have the same effect). To build an effective interface around a multitasking environment, the concept foreground and background applications was introduced. In traditional terms, the foreground application is the application that has focus. All user input is directed toward that application, while the background applications whirl away behind the scenes.
TIP: In Mac OS X the active foreground application is the one whose name appears in the menu bar.
NOTE: If no Finder windows are open, clicking on the Finder icon in the Dock will also open a new Finder window. If other Finder windows are already open, clicking on the Dock icon will just bring those windows to the foreground. One caveat here is that minimized windows will stay minimized unless all current Finder windows are minimized, in which case the last window minimized will become active.
When you open a new Finder window, it will by default show the location or items that are set in the Finder preference’s “New Finder windows show:” option (covered later in this chapter). In Lion this option is initially set to “All My Files,” which displays all of the visible documents in your home directory.
TIP: There are a few ways to open a new Finder window in locations other than the default location set in the preferences. For example, stacks on the Dock have an “Open in Finder” option that will open a Finder window in that folder location. Also, if you have chosen to display hard drives or other devices on your desktop, double-clicking on the desktop icon will open a finder window at the root of the selected device.
One thing you may notice looking in the “All My Files” Finder location is there are no folders and the back button is grayed out, so it seems for all practical purposes there is nowhere to navigate to. At this point if you have a good idea of where you want to look for a file you can select its nearest location from the Finder’s sidebar.
Once you come to grips with where you are in Lion’s file system, moving around in the Finder is pretty easy. In order to move down into a folder, simply double-click on it and the Finder will descend into that folder. Moving up to a parent folder is less obvious. If you started out in a parent folder you can use one of the Back buttons on the Finder toolbar, otherwise you can either use the Go >Enclosing Folder menu option or the handy Command-Up Arrow keyboard shortcut.
NOTE: Chapter 3 is dedicated to providing you with a solid understanding of Lion’s files structure, which is a much bigger discussion than we have space for here. For now you are just trying to learn the basics of the Finder.
By selecting an appropriate location from the sidebar and navigating up or down a folder or two, you should be able to find what you are looking for with minimum amount of fuss. If, however, you wish to open a Finder window at a specific location (including locations that may normally be hidden by the Finder), you can use the Finder’s “Go to Folder…” command.
The Go to Folder Command
The Go >Go to Folder… menu item is a very useful option if you know specifically what folder you want to open. For example, as we uncover more about Mac OS X, you will soon learn about a whole range of folders that, by default, are hidden from the Finder. To access one of these folders simply use the Go >Go to Folder… Finder menu option (or the Command-Shift-G keyboard shortcut) to open the “Go to the folder” dialog (Figure 2–8). Then just enter the Folder path in the text field and select Go to immediately open a Finder window in that location.
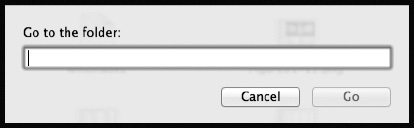
Figure 2–8. The Go to the folder dialog (Command-Shift-G from the Finder) allows you to enter a desired folder location to be opened immediately in the Finder.
For example, if you would like to go to your Library folder (which, as of Lion, is now a hidden folder). You could type “~/Library” in the text field and click Go to be taken there.
TIP: While we will discuss file paths later in the book, it is worth mentioning that the “~” in a file path is a shortcut to your Home directory. So “~/Library” is the same as “/Users/your username/Library”.
Searching
Occasionally you may need to find a file that you have no idea where it’s located (or you have an idea but you need to sort through a lot of clutter to find it). Luckily the Finder has a powerful search technology called Spotlight to help you find what you are looking for.
Spotlight, introduced with Mac OS X 10.4 (Tiger), is a system-wide search tool that locates items on your computer that match your search criteria. Spotlight not only allows you to search for items on your computer, it also allows you to save your searches by creating Smart Folders, and will even allow you to search other computers and resources on your network (provided these resources allow such access).
NOTE: When you first install Mac OS X, Spotlight is not immediately available. Before Spotlight is ready, it must index your entire system. This can take several hours to complete. While Spotlight is indexing, your hard drive will spin a lot, your system will get hot, and the computer’s fan (if it has one) will probably start running full speed. There will also be a pulsing black dot inside Spotlight’s magnifying glass icon in the upper-right corner of the menu bar that indicates Spotlight is indexing.
Performing a Basic Search
To perform a Spotlight search, you can either click the magnifying glass in the upper-right corner of your screen or use the Command-Space keyboard shortcut. This will open a simple drop-down text field for you to type in your search (Figure 2–9). As you begin to type, the drop-down field will expand to reveal possible matches for your search (Figure 2–10). As you refine your search, the matches will dynamically change to the most appropriate choices.

Figure 2–9. Spotlight’s search field

Figure 2–10. Spotlight reveals top matches for your search as you type.
Once you have finished typing your search phrase, the top results matched will be revealed for you, organized by type. Depending on how specific your search is, there could be only a few possible matches; however, often there are more matches than fit in the simple drop-down menu. Selecting the Show in Finder item will open a special Finder search window containing all the results from your search (Figure 2–11). This window will also allow you to further refine and save your search.
NOTE: Figure 2–11 also represents the results that you will get if you start your search in the search field on the Finder’s toolbar. Where you choose to enter your search depends, but using the Spotlight search field has a few unique features and it’s readily available even when an application other than the finder is in the foreground.
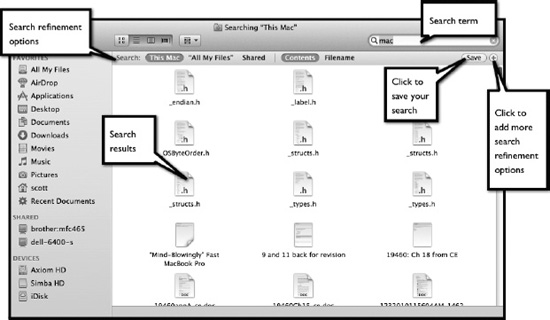
Figure 2–11. Searching in the Finder allows you to refine your search and save it.
SPECIAL SPOTLIGHT FEATURES
Refining and Saving Your Searches
Whether you start with a simple Spotlight search and, as discussed earlier, choose the Show in Finder option or you start a search directly in the Finder’s search field, you will be presented with a special Finder search window (shown above in Figure 2–11) that will allow you to refine and save your searches. The Finder search window and regular Finder window are different in two ways. First, since you are dealing with search results, the items shown are not necessarily located in a single folder but rather may be collected from all over your hard drive and attached file systems. Second, there are one or more special search toolbars present at the top of the Finder view area that allow you to refine your search.
There is always one primary search toolbar at the very top of every Finder search window that will allow you to generally refine the scope of your search. Specifically it allows you set the search for your entire computer (This Mac), or to limit the search to the specific folder from which the search began (if the search was initiated from the Spotlight menu icon this option will read “All My Files”). Furthermore, it allows you to choose whether to search just the File Name of Finder items or if it should search the Contents of individual files to match the search term. Occasionally you will have other search options listed here; for example, shared or network resources on which you have permission to perform searches may appear.
To the far right of the topmost search bar is a Save button that will allow you to save your search for future use (as a Smart Folder), and then there is a + or - button that will allow you to add or remove additional search criteria. Each time you add criteria, a new bar will appear that will allow you to refine your search from a series of drop-down lists (Figure 2–12).

Figure 2–12. Refining a search using search criteria
Table 2–1 describes the general search criteria.
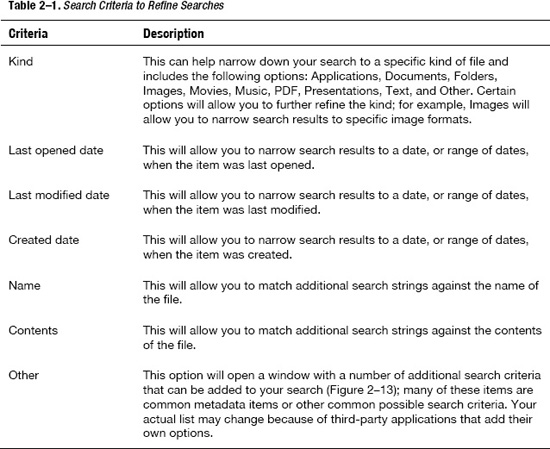
Once you have your search criteria set, you can select the specific item you are looking for in the Finder’s Search view.
If you want to save your search, click the Save button in the top-left side of the view area. This will open a Save dialog (Figure 2–14) that will let you save your search and if desired add it to your Finder sidebar (it will then appear under “Favorites”).
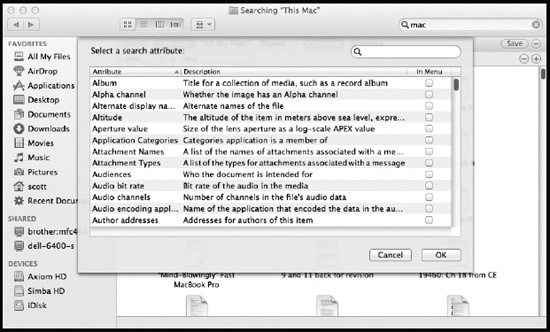
Figure 2–13. The Other search option opens a window that contains a large list of other common metadata and search criteria.

Figure 2–14. The Smart Folder Save dialog box
Setting Up Smart Folders
The default locations for saving a search is in your ~/Library/Saved Searches folder. If you look there, you will see that saved searches are nothing more than a collection of Smart Folders. There is one subtle difference between the Smart Folder created out of a search and when you create a Smart Folder from the Finder’s File >New Smart Folder… (Option-Command-N). When you start with a search, the results will always reflect the initial search term, and when you create a Smart Folder from the Finder, there is no initial search term so you can build your search based purely on other criteria (like file type and creation date).
At this point you should have a pretty good understanding of how to find things in the Finder. As you progress through the book you will learn a few more tricks, but for now let us move on to what you do once you find what you are looking for.
Opening Files and Applications
Opening a file or application is quite easy. From the Finder find the desired file or application and double-click on its icon. (If you are opening a file or application from the Dock or from Launchpad, a single click will open the item.) When you open (or launch) an application, that application will open. Opening a file is a bit more interesting since it is possible (even likely) that you may have multiple applications that could open a particular file type.
NOTE: File types are mostly determined by the file extension they are given. For example, files that end in .pdf are assumed to be PDF documents, files that end in .doc are assumed to be Microsoft Word documents, and files that end in .app are assumed to be applications (more on that later). Depending on your Finder preferences, certain file extensions may be hidden, so unless the Finder’s “Show all filename extensions” option is selected, “About Stacks.pdf” may appear as “About Stacks” in the Finder. The ability to show or hide an extension may be set on a file-by-file basis within many applications when you save a file.
Each document type in Mac OS X has a default application to open that type of file. For example, Preview (a full-featured file viewing application included with Mac OS X) will be the default application for most image and PDF files. So by default when you open a PDF file it will open in the Preview application. However, suppose you have Adobe Reader installed and would like to open a particular PDF file in Adobe Reader instead of Preview, what do you do? Mac OS X has a few options here: you could choose to open a specific PDF in Acrobat Reader once; you could choose to always open a specific PDF in Acrobat Reader while keeping Preview as the default PDF application for other PDFs; or you could make Acrobat Reader the default application for all PDFs.
Temporarily Opening a File in a Non-default Application
To open a document in its non-default application simply select “Open With” from a document’s shortcut menu. Open With will reveal a sub-menu that provides a list of all applications identified as being able to open the selected file with the default application listed at the top (Figure 2–15). If a specific application you are looking for is not listed, you may select the Other… option and browse to your desired application.
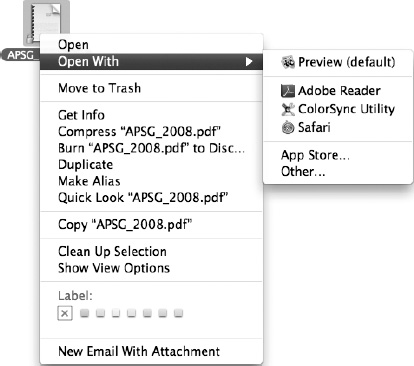
Figure 2–15. The Open With option in a document’s shortcut menu will allow you to choose which application you wish to open a document with.
Always Opening a Specific File in a Non-default Application
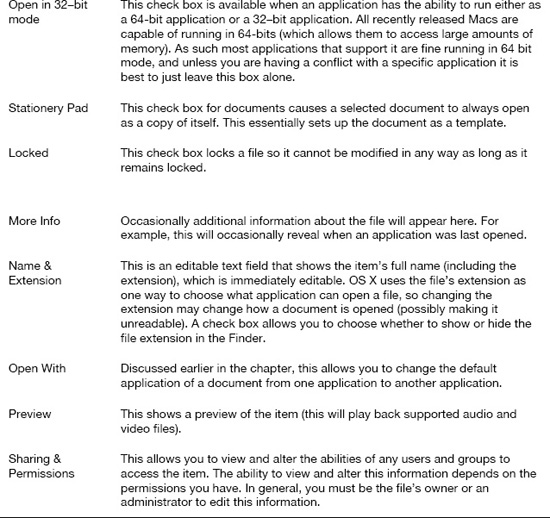
A file’s Info window (Figure 2–16) provides information and options about a particular Finder item. We will explore the Info window in detail later in this chapter. For our purposes here, first open Info window by selecting “Get Info” from an item’s shortcut menu, then look at the Open With area in the window (if not expanded click on the disclosure triangle to reveal all the Open With options). The Open With area of the Info window has a single menu, which when expanded shows a list of available applications much like the Open With option from the item’s shortcut menu. The difference here is when you choose an application, rather than immediately open the item in that application, it will instead remember the selected application and then, by default, always open the selected item in that particular application even if it isn’t the default.
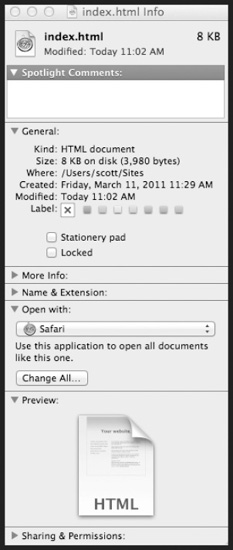
Figure 2–16. You can change the default application for a specific file of all files of a specific type in a files Info window.
Changing the Default Application for a File Type
The default application for files of a certain type can be changed in the Info window of any file of that type. To make this global change, simply open the Info window and select the desired default application under the Open With area and then click on the “Change All…” button. This will cause a dialog to appear asking you to confirm this action. Clicking the Continue button in the dialog will make the change active.
Occasionally when you install a new application, or open a file in a non-default application, you will be prompted with a dialog asking if you would like to make that application the default application for all files of that type. For example, the first time you open a PDF file in Acrobat Reader it will ask if you would like to make Acrobat Reader the default application for all PDFs (Figure 2–17).
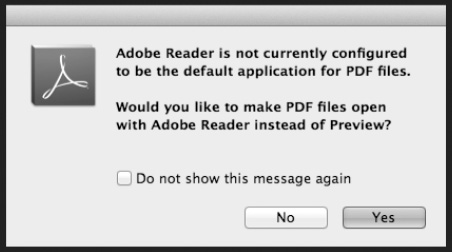
Figure 2–17. Many applications will prompt you to make them the default application for a specific file type when you install or first open them.
QUICK VIEW
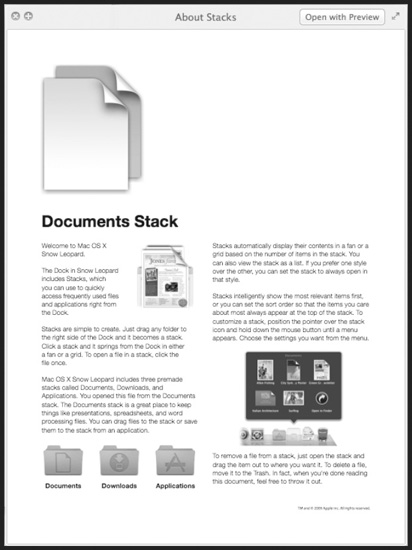
Figure 2–18. Selecting an item in the Finder and pressing the Space key will open a Quick View window allowing you to view the contents of the selected item.
Moving, Copying, and Creating Aliases of Finder Items
Besides opening and viewing files, the Finder is also used for managing your documents and applications. Management is done in the Finder by simply dragging and dropping items where you want them.
If, rather than just moving a file, you want to make a copy of the file, you can do this by using the Option-drag keyboard-mouse shortcut. (You should notice a green button with a plus sign appear while you are dragging to indicate you are making a copy.) Command-Option-drag will create an alias of the Finder item you are dragging.
NOTE: An alias is like a copy of an item, but rather than actually copying the item the alias just points to the original file. In Windows these are called shortcuts and in Unix terminology these are links.
NOTE: If you are moving a file from one volume to another, the Finder will, by default, create a copy rather than simply moving the file. You can override this behavior by holding the Command key while moving the item.
If you want to create a copy of an item in the same folder as the original, you can use the File >Duplicate command from the Finder’s menu or use the Command-D keyboard shortcut (or select Duplicate from the item’s shortcut menu). You may also create aliases by selecting File >Make Alias or pressing the Command-L keyboard shortcut. One final way to create a copy of a Finder item is to use a standard copy-paste operation; select Edit >Copy (or press Command-C) to copy an item, and select Edit >Paste (or press Command-V) to paste it wherever you want.
NOTE: Aliases are the OS X equivalent of shortcuts in Microsoft Windows. Rather than creating a copy of an item, OS X creates a link that points to the original Finder item. This is used when you want to keep one original Finder item yet you want to access it from different places in the file system.
Renaming Finder Items
To rename a Finder item, you need to first select the item and then click the name of the Finder item. If you do this too quickly, though, the system may recognize this as a double-click and open the item. Once the item is selected for editing (the name will become highlighted in a rectangular edit field), you can edit the text as desired. Alternately, you can just select a Finder item and then press the Return key; this will toggle the name for editing without the need to time your second click.
CAUTION: When the name is selected for editing, the entire name minus the file extension is selected, so any typing will immediately overwrite the original name. If you want to just tweak the name, you can use the arrow keys or your mouse to position the cursor where you want to insert or delete text without overwriting the whole name.
You can also rename Finder items in the Info window, which we will talk about very shortly.
CAUTION: Certain Finder items, such as applications and default system folders, should not be renamed. Renaming the default folders can cause all sorts of unexpected and undesirable results, and renaming applications can cause them to stop working correctly. As a general rule, you can rename any of your files and any folders you create, but you may want to think twice about renaming other items. If you do happen to make a mistake, you can use the Undo command (Command-Z) to reset the name to its previous state.
Creating New Folders and New Smart Folders
Sooner or later it’s likely you’ll want to create new folders to help organize your files or other Finder items. The easiest way to create a new folder is to select File >New Folder from the Finder’s menu or use the Shift-Command-N keyboard shortcut (or the shortcut menu item). This creates a new folder with a rather generic name, so you’ll probably want to rename it right away, and then it’s ready to go.
To create a smart folder (which is really just the result of a saved search), select File >New Smart Folder from the Finder’s menu, or use the Option-Command-N keyboard shortcut. This will open a New Smart Folder window ready for you to fill in the search criteria.
BURN FOLDERS
Getting (and Altering) Information About Finder Items
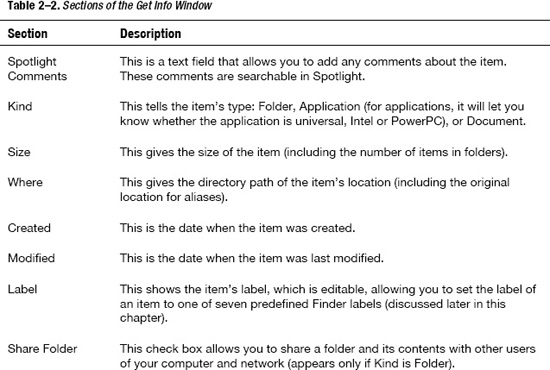
If you want to get more information about a particular Finder item, then the Info window (Figure 2–16) is the place to go. The Info window allows you not only to view information about a Finder item, but it will also allow you to add or alter information and attributes about the item. To open an Info window, select an item in the Finder, and then select File >Get Info from the Finder menu (or use the Command-I keystroke or the Get Info shortcut menu item). Table 2–2 describes the basic structure of the Info window.
NOTE: Depending on the file type, the content of the Info may vary. A document, for example, would present different information than an application.
TIP: If you want to replace the icon of any Finder item, you can do this by selecting the icon at the top of the Info window and then pasting any graphic on your Clipboard over it. Should you ever change your mind, you can delete the custom icon, which will cause the item to return to its default icon.
Compressing (Zipping) Finder Items
Often, especially when you want to send files via e-mail to someone else, you may want to compress or archive a file. OS X allows you to create .zip files from within the Finder. You can do this easily by selecting the item (or items) you want to compress and selecting File >Compress “Item Name” from the Finder’s menu or using the Compress shortcut menu item. If you want to create an archive of multiple items to be compressed into a single .zip file, just create a folder containing all the desired files and then compress the folder.
NOTE: These days many files and media formats are already compressed, so compressing, say, a single .jpg or .mp3 file won’t cut down on the file size much, if any (in fact, some will actually be larger). Still, if you are sending many files, even if they are already compressed, it’s a good idea to “zip them up” together. Even though the total file size might not decrease much, it may leave more free space on your computer because of the nuances of how files are stored on your disk. Plus, a single archive is easier to manage than a bunch of separate files.
By double-clicking a .zip file, the Finder will automatically expand the compressed item.
NOTE: By default the Finder uses the included Archive Utility to create and open compressed items. By default Lion can handle many types of compressed items via Archive Utility; however, there are some compression and encoding types that require third-party software to open. This includes the SIT format, which was once the most popular compression format for Macintosh systems prior to OS X Tiger. .sit files will require StuffIt Expander, which is available through the Mac App Store.
Labeling Finder Items
For many years Mac OS has had the ability to label Finder items, and that tradition continues. Labels allow you to colorize Finder items as a way to sort them in the Finder; additionally, labels can have names associated with them (setting the names and colors for labels is covered later in this chapter) that may help you organize special items in the Finder. To label a Finder item, you can select it in the Finder and then select the appropriate label from the File >Label: item in the Finder menu.
In Icon and Column views, the label color will highlight the item’s name with the selected color; in List view, it will highlight the item’s entire row. Items in the Finder can then be sorted by label, and labels are an additional search parameter for smart folders and Spotlight.
NOTE: When sorting items by label in the Finder, the sort order is determined alphabetically by the label name, not by the color. This may be something to keep in mind when naming labels.
Customizing the Finder
Now that you have seen some of what can be done in the Finder, let’s take a look at some of the options available to you to customize the Finder. We will begin by looking at options for customizing the Finder’s toolbar, and then move on to learning about the Finder’s preferences, and finally we will look at display options for the Finder’s various views.
Customizing the Finder’s Toolbar
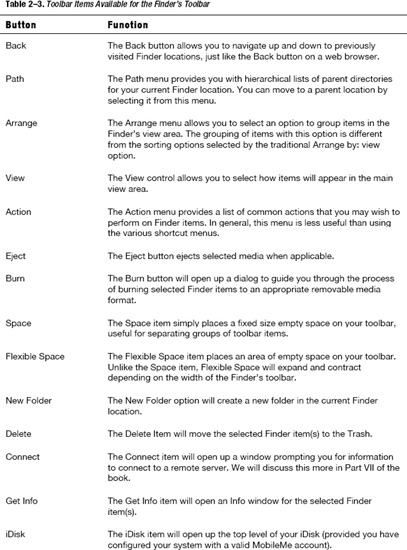
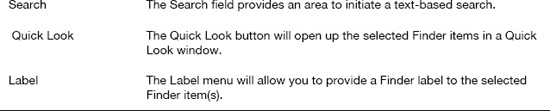
Earlier in the chapter we introduced the Finder’s toolbar (Figure 2–2). We mentioned that there are a number of available options for customizing the buttons on the Finder’s toolbar. To add or remove items on the Finder’s toolbar, select Customize Toolbar… from the toolbar shortcut menu (Control-Click on the toolbar to bring up the shortcut menu). This will open up a dialog presenting you with a number of items (Table 2–3) to customize your toolbar with (Figure 2–19). To change the items or the order of the items on your toolbar simply drag the button on or off the toolbar and move them around as desired. To return to the default toolbar simply drag the default toolbar from the bottom of the dialog up to the toolbar.
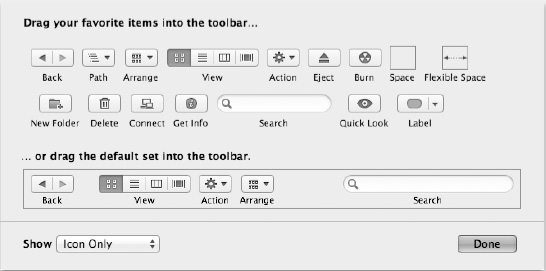
Figure 2–19. Select Customize Toolbar… from the toolbar’s shortcut menu to open a dialog presenting you new items and options to customize your toolbar.
Beneath the list of available toolbar items are two other toolbar options. The Show option allows you to select how the toolbar items are presented, by icon only, text only, or icon and text. The Use small size option will slightly decrease the size of the items in the toolbar.
Once you have customized your toolbar, click the Done button to dismiss the dialog and save your toolbar options.
View Options
One of the key controls available on the default toolbar is the view control, which allows you to select which view Finder items will be presented in: icon view, list view, column view, or Cover Flow view (we introduced these Finder views earlier in this chapter). Depending on the view, there are a number of options available for customizing how items appear in the Finder. To present these options select View >Show View Options from the Finder’s application menu (or use the Finder’s Command-J keyboard shortcut). This will open one of four view option windows (Figure 2–20) with various view options for each Finder view.

Figure 2–20. The view options available from View >Show View Options in the Finder application menu will vary with each view.
Descriptions of each of the various view options are as follows:
Always open in icon view, list view, column view, Cover Flow: Selecting this check box will set the default view for when you open the particular folder.
Apply to sub-folders: If the Always open in… option is selected, selecting this will make all sub-folders open in the same view.
Icon size: In Icon view this will allow you to scale the size of the icons from 16×16 pixels all the way up to 512×512 pixels (the default is 48×48 pixels). In List view and Cover Flow this will allow you to display small- or medium-sized icons in the list.
Grid spacing: In Icon view, this option allows you to determine how close icons will be spaced to one another when arranged on an invisible grid.
Text size: In each view this will determine the point size of the text, the default is a 12–point font size.
Label position: In Icon view this determines if the text label is below or to the right of the icon.
Show Columns: The Show Columns section in List and Cover Flow view determines what information about each item will appear in the list. The selected columns also determine how you may sort the items (by clicking on a column header).
Use relative dates: The Use relative dates option will affect how dates appear in the List view. When selected rather than absolute dates (as selected in the Language & Text System preference) relative dates such as “Today” or “Yesterday” will be displayed where appropriate.
Calculate all sizes: Normally the sizes will only be calculated for non-folder items in a directory. When the Calculate all sizes option is selected the size of folders will also be calculated (which entails discovering the size of all items included in the folder). For certain folders with many items this option can cause the system to slow down while it calculates.
Show item info: When this option is selected in the Icon view additional information will appear for certain Finder items.
Show icons: The Show icons option determines if icons will be displayed in column views.
Show icon preview: When the Show icon preview option is selected, when possible (generally with document items) Finder icons will be a rendering of the items content. For example, icons of images will be thumbnails of the image, and Text documents will appear as small thumbnails of the actual text document. When this option is unselected or the system is unable to create a preview, default icons will be used (for documents this will usually be chosen by the default application for a given file type).
Show preview column: When this option is selected for Column views, a preview column will appear for any non-folder item.
Arrange by: Arrange by will group items together in the View area based on menu selections.
Sort by: Determines how file types are sorted based on menu selection. Sort by option may vary based on Arrange by options.
Background: The Background option allows you to determine the background of the view area in Icon view. You may choose White (the default), Color (which will allow you to toggle a color picker to choose a background color), or Picture, which will allow dragging and dropping an image to display in the background.
Use as Defaults: This button allows you to select the current settings as the default settings for all Finder views. (The Finder will remember custom options, so this only affects viewing folders in which you have not previously customized the Finder views.)
Finder Preferences
Besides altering the view options for each of the Finder’s views, you can apply a number of additional preferences that affect the Finder as a whole. The Finder preferences (like most application preferences) are in the main application menu. In the case of the Finder, that’s Finder >Preferences (the default keyboard shortcut to open the preferences of any application is the Command-comma (,) shortcut). The Finder’s preferences are divided into four sections: General, Labels, Sidebar, and Advanced.
The Finder’s General Options
Table 2–4 describes the Finder’s General preferences (shown in Figure 2–21), which cover a few general Finder behaviors.
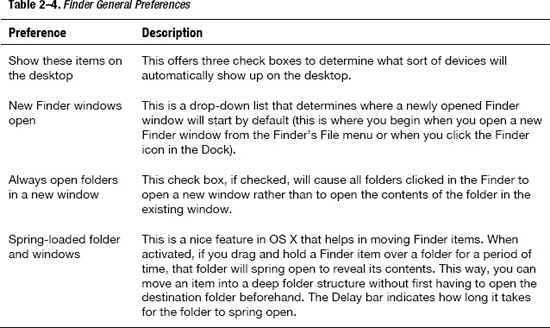
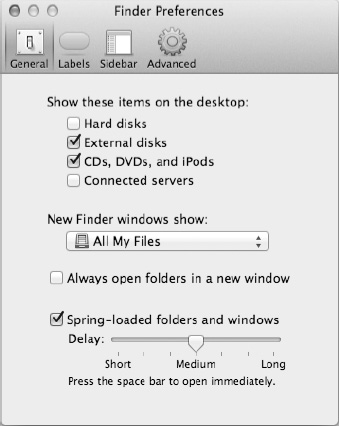
Figure 2–21. The Finder’s general preferences
Customizing Labels
The Labels tab in the Finder preferences (Figure 2–22) allows you to customize the names of the various colored labels. To change a label’s name, just edit it in the text field next to the appropriate color.
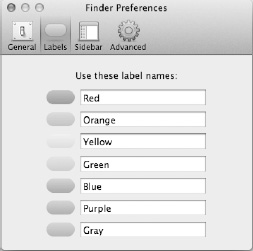
Figure 2–22. The Labels settings in the Finder
Customizing the Sidebar
The Sidebar preference tab (Figure 2–23) allows you to select what items automatically show up in the Finder’s sidebar. This includes most user-oriented folders and locations, common shared resources, and connected devices.
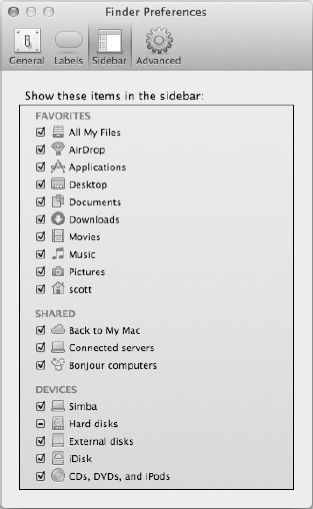
Figure 2–23. The Finder’s Sidebar option determines what items will appear in the sidebar.
Setting Advanced Options
The final Finder preferences tab are advanced options (Figure 2–24) of which there are four fairly self-explanatory check boxes:
- Show all file extensions
- Show warning before changing extension
- Show warning before emptying the Trash
- Empty Trash securely
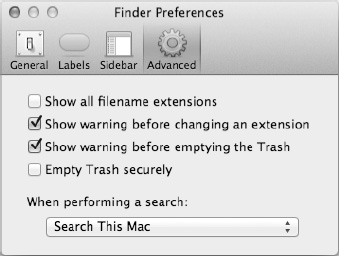
Figure 2–24. The Advanced Finder preferences
NOTE: The “Empty Trash securely” option actually writes over the disk space where the Trash items are located, making it nearly impossible to recover the items once they are deleted. This differs from a normal Trash empty procedure, which just lets the computer know that the space where the file exists is available for writing over. Until something overwrites that same area on your disk, that data could be recovered with the right software. The “Empty Trash securely” option takes more time to complete, especially if you are deleting a large amount of data. If you want to selectively use this command, you can select Finder >Secure Empty Trash… from the Finder’s application menu, or select Secure Empty Trash from the Dock Trash icon shortcut menu using the special Control-Command-click.
Summary
With what you have learned about the Finder here you should have all the knowledge you need to start working with files and applications; however, before you get too far you should first take a close look at the file system and learn how files and applications are organized in Lion. In the next chapter we will explore the files system and learn how and why things are organized the way they are. We will also take a peek at some stuff that the Finder hides from you.