
In the previous chapter, we covered handing input in a Windows Phone 7 application, and in Chapter 2, we covered rendering UI. With the fundamentals covered for input and output, let's now take a closer look at the Windows Phone 7 programming model.
In this chapter, we start first with covering the APIs available on Windows Phone 7 to obtain information either about the device or the user. Next we cover the tasks and choosers APIs that enable a Windows Phone 7 application to interact with other software components on the phone, such as the web browser from within the application.
We next cover asynchronous programming, which is fundamental when building real Silverlight applications for Windows Phone, as well as in desktop Silverlight. We quickly follow with a discussion of services programming, data persistence, and Windows Azure.
We next cover Windows Phone 7 Application lifecycle Management, otherwise known as tombstoning. This is a critical concept that will be a constant consideration. We will demonstrate how and when it plays a role with application development.
The final major topic of this chapter will be Windows Phone 7 application architecture. It is a question that developers invariably come to when building or porting an application to a new technology: how should I organize my application? We cover Model-View-ViewModel (MVVM) and pick an open source helper library that helps deal with complexities with MVVM and application development. Now let's jump into our first topic of page navigation.
Developers need to understand the state of a device in order to provide the best experience for end users, such as letting the user know when a large download is about to begin and asking if the user would like to switch to a wireless or Ethernet connection via USB.
In this section, we cover the different pieces of device status and information that are available via the Windows Phone 7 APIs, including User Identifiers, Device Identifiers, Network Status, and Device capabilities. The Chapter 4 project DeviceInfo demonstrates these APIs in action.
Most of the code for device information is simply a matter of displaying string-based properties so the only code listed in this section is for network availability info below. Otherwise, please refer to the DeviceInfo project in the source code for additional detail. The next subsection starts with user and device identification first.
There is a properties class for user information available in this release of Windows Phone 7, which is contained in the Microsoft.Phone.Info.dll. It supports exactly one value, Anonymous Identifier ANID, which can be used to identify the user. Here is the full namespace, class, and method calls to obtain a user identifier:
Microsoft.Phone.Info.UserExtendedProperties.GetValue("ANID")
Microsoft.Phone.Info.UserExtendedProperties.TryGetValue("ANID")
How unique is this ID? It identifies the user with the same value, even if the user owns multiple phones. This value is persisted across reboots. Even if you factory-reset the phone, but configure it with the same Live ID, you will get the same value for the ANID property.
Note
The ANID property returns an empty string in the emulator.
Using this property requires the user identity capability and the ID_CAP_IDENTITY_DEVICE entry in the Capabilities section of WMAppManifest.xml for the application. If an application uses this class, the user will be alerted that the application requires this capability in the Windows Phone marketplace. You should only use this capability if your application absolutely needs it, and if it provides direct benefit to the user in some fashion. For example, if it makes it possible to store and retrieve from the cloud settings and data tied to the ID. Developers should mention the benefit in the application description; otherwise, users may be less inclined to download your application.
There is a separate properties class for device information in Microsoft.Phone.Info.dll called DeviceExtendedProperties. It provides the ability to uniquely identify a device. Unlike the UserExtendedProperties class, the DeviceExtendedProperties class supports more than one value. The method call is the same as for the user property:
Microsoft.Phone.Info.DeviceExtendedProperties.GetValue()
Microsoft.Phone.Info.DeviceExtendedProperties.TryGetValue()
Table 4-1 lists the possible values that can be passed into the above method calls.
Table 4.1. Possible DeviceExtendedProperites Values
Value | Description |
|---|---|
DeviceManufacturer | The name of the manufacturer of the device. A different value may be used across different devices from the same manufacturer, or it may be empty. |
DeviceName | The name of the device. There are no rules enforced on naming and it may be empty. |
DeviceUniqueID | Uniquely identify the device. |
The device manufacture's firmware version, which is different from the OS version. This value may be empty. It is recommended that the value be parsed as a | |
DeviceHardwareVersion | The device manufacture's hardware version running on the device. This value may be empty. It is recommended that the value be parsed as a |
DeviceTotalMemory | Device's physical RAM size in bytes. It will be less than the actual amount of device memory. Most devices currently shipping have either 256MB or 512MB bytes of RAM. |
ApplicationCurrentMemoryUsage | The running application's current memory usage in bytes. Developers need to track this value closely. |
ApplicationPeakMemoryUsage | The running application's peak memory usage in bytes, which is another item that developers need to track closely. |
The last two memory reporting items are very important to track. In Chapter 3 we mentioned using a DispatcherTimer and an event handler to track the values in the Visual Studio Output Tool Window, shown in Listing 4-1
Example 4.1. Sample Tick Event to Record Debug Info
void DebugMemoryInfo_Tick(object sender, EventArgs e)
    {
      //GC.GetTotalMemory(true);
      long deviceTotalMemory =
       (long)Microsoft.Phone.Info.DeviceExtendedProperties.GetValue(
       "DeviceTotalMemory");
      long applicationCurrentMemoryUsage =
       (long)Microsoft.Phone.Info.DeviceExtendedProperties.GetValue(
       "ApplicationCurrentMemoryUsage");
      long applicationPeakMemoryUsage =
       (long)Microsoft.Phone.Info.DeviceExtendedProperties.GetValue(
       "ApplicationPeakMemoryUsage");

      System.Diagnostics.Debug.WriteLine("--> " +
        DateTime.Now.ToLongTimeString());
      System.Diagnostics.Debug.WriteLine("--> Device Total : " +
        deviceTotalMemory.ToString("#,#", CultureInfo.InvariantCulture));
      System.Diagnostics.Debug.WriteLine("--> App Current : " +
        applicationCurrentMemoryUsage. ToString("#,#", CultureInfo.InvariantCulture));
      System.Diagnostics.Debug.WriteLine("--> App Peak : " +
        applicationPeakMemoryUsage. ToString("#,#", CultureInfo.InvariantCulture));
    }
Certification requirements dictate that memory usage remain under 90MB, because the OS will shut down applications that are memory hogs. Applications can temporarily go over 90MB and not fail certification in some cases, such as if the application is transitioning pages and one page is going out of memory and another is loading data structures for display. In general, with memory constrained-devices, it is important to efficiently allocate memory to maximize performance. This is true for any mobile device application, regardless of the operating system, and it is something that makes mobile development a fun challenge: squeezing out every little bit of performance possible!
In Table 4-1 the DeviceUniqueID value will uniquely identify a device across all installed applications, even if the phone is updated with a new operating system version. This ID should not be used to identify users, because it is tied to the device, not the user
Note
Accessing DeviceUniqueID in the emulator returns false for TryGetValue.
If your application can use the DeviceUniqueID in a way that benefits the user, you should use it; be sure, however, to mention why you use it in the application description, so that the user understands the benefit. Otherwise, cautious users may shy away of downloading your application.
The System.Environment class provides the following information on the current environment via its properties:
CurrentDirectory.HasShutdownStarted.OSVersion(includes andPlatformandVersionproperties. TheVersionhas additional properties ofBuild,Major,Minor, andRevision).TickCount(Since last reboot).Version. (CLR Version).
The next section starts with a very important topic when you are building mobile applications that depend on data in the cloud: current network status.
Mobile applications must be thoughtful in using phone resources, such as data connectivity, and offer the user information when using the data connection. The Windows Phone 7 namespace Microsoft.Phone.Net.NetworkInformation provides the NetworkInterface object with the following two useful static members:
NetworkInterface .GetIsNetworkAvailablemethodNetworkInterface .NetworkInterfaceTypeproperty
The GetIsNetworkAvailable method returns true or false. The NetworkInterface property stores a value from the Microsoft.Phone.Net.NetworkInformation.NetworkInterfaceType enumeration. Table 4-2 lists the common values in which most developers will be interested. You can find the full list at
http://msdn.microsoft.com/en-us/library/microsoft.phone.net.networkinformation.networkinterfacetype(VS.92).aspx
Table 4.2. NetworkInterfaceType Enumeration Common Values
Enumeration Value | Description |
|---|---|
None | No interface exists to provide access to the Internet. |
Ethernet | The network interface is of type Ethernet. When connected via Zune and the PC, this is the value that is returned. |
MobileBroadbandGSM | This is the value returned when connected over a wireless GSM network. (AT&T or T-Mobile in the U.S. and most of the world.) |
MobileBraodbandCdma | This is the value returned when connected over a wireless CDMA network. (Verizon and Sprint in the U.S. and other regions of the world.) |
Wireless80211 | The network interface is a wireless LAN connection. |
One item to note is that, when connected to the PC without Zune running, the network connection will return either MobileBroadband or Wirless80211 if a connection is available over those protocols. Zune must be running when connected to the PC in order to have an Ethernet connection.
You may be tempted to poll network status on a background thread, but that would not be battery efficient. Instead, the code can subscribe to the System.Net.NetworkInformation.NetworkChange.NetworkAddressChanged static event. The System.Net.NetworkInformation namespace also includes a NetworkInterface class, so you will need to disambiguate namespaces.
In the DeviceInfo project, we add two TextBlock controls and two TextBox controls to store network availability and connection type, storing network availability status in the NetworkAvailableTextbox control, and network connection type in the NetworkConnectionTextbox control. Listing 4-2 has the code from the DeviceInfo project that performs network detection.
Example 4.2. Network Detection Method
#region Network Status Check
private void SetupNetworkStatusCheck()
{
  NetworkChange.NetworkAddressChanged +=
    new NetworkAddressChangedEventHandler
        (NetworkChange_NetworkAddressChanged);
  //Initialize values
  NetworkAvailableTextBlock.Text =
    PhoneNetworkApi.NetworkInterface.GetIsNetworkAvailable().ToString();
  NetworkConnectionTextBlock.Text =
    PhoneNetworkApi.NetworkInterface.NetworkInterfaceType.ToString();
}
void NetworkChange_NetworkAddressChanged(object sender, EventArgs e)
{
NetworkAvailableTextBlock.Text =
PhoneNetworkApi.NetworkInterface.GetIsNetworkAvailable().ToString();
NetworkConnectionTextBlock.Text =
PhoneNetworkApi.NetworkInterface.NetworkInterfaceType.ToString();
}
#endregionThis code requires the following two using statements for these namespaces:
using System.Net.NetworkInformation;
using PhoneNetworkApi = Microsoft.Phone.Net.NetworkInformation;
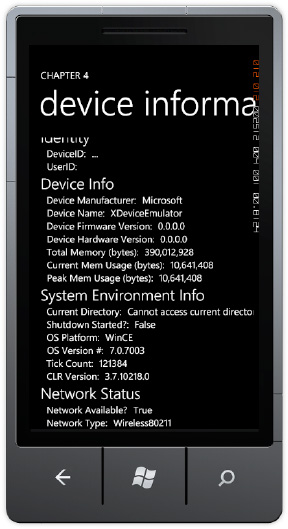
The code uses a namespace alias to disambiguate between the two namespaces for the NetworkInterface class that is present in both namespaces, though the Phone version includes the NetworkInterfaceType property. Figure 4-1 shows the UI displaying device and network info that we have covered in the previous sections.
The system tray appears at the top of the screen in portrait mode. Figure 4-2 is a clip from the Windows Phone 7 Design Template file named StatusBar_PSD.psd, which shows possible status information.

The Windows Phone 7 development guidelines recommend leaving the System Tray visible within applications, because it shows useful information without having to force the user to exit the application. The system tray does take up a little bit of screen real estate, so for games and media players, it makes sense to disable the System Tray.
The system tray can be disabled on a page-by-page basis by editing the phone:PhoneApplicationPage element and setting shell:SystemTray.IsVisible to False.
This concludes our discussion of device information. Next up is application data persistence using isolated storage on Windows Phone 7.
Windows Phone 7 supports building a single application that includes both trial and full functionality. The Microsoft.Phone.Marketplace.LicenseInformation class provides has one method named IsTrial() that the application can use to determine if the application has been fully purchased or is in trial mode.
As a developer, you get to determine what is the right trial experience for your application. For a game, it might be a certain number of tries or just the first level. For an application, it might be filtering to a subset of information, display advertising, or lack of personalization.
Application developers in Silverlight can use the MarketplaceDetailTask class to display the purchase experience. The MarketplaceDetailTask is discussed below in the Tasks section covering launchers and choosers.
For XNA Game Studio developers, the Microsoft.Xna.Framework.GamerServices.Guide class has a method named IsTrialMode to get current license information. Developers call Guide.ShowMarketplace to display the purchase experience. The Guide.SimulateTrialMode property allows developer to test their game under trial mode conditions. We cover XNA Frameworkdevelopment in more detail in Chapter 7 and 8.
Tip
Trial mode is a great way to encourage end users to try out your application, enjoy it, and purchase the full version. If you plan to sell your application, implement and test trial mode.
Silverlight developers may be wondering how they can simulate trial mode. The good news is that Silverlight developers can also use the Microsoft.Xna.Framework.GamerServices.Guide class and the SimulateTrialMode property. Set it to true to permit testing trial mode functionality.
When testing trial mode by setting SimulateTrialMode to true, a call to Guide.IsTrialMode returns the current value of SimulateTrialMode. Calling Guide.ShowMarketplace simulates making a purchase.
Warning
You must set SimulateTrialMode to false in release code. Place the code that sets it to true in #if DEBUG to ensure it is not available in a released application submitted to Marketplace.
In this section, we covered how to identify users, the device, network status, and application trial mode status for Windows Phone 7. In the next section, we move to the next major topic of settings and data storage in isolated storage.
Saving data to the file system is a necessity for most real applications. On Windows Phone 7, each application can access an isolated file system to read and write data that is only accessible to that application. This means that applications cannot share data with each other via the file system. It also means that one application cannot access or overwrite data from another application in the file system.
There are several namespaces related to data persistence that are available on Windows Phone 7. These namespaces include the following:
System.IO: Provides access to baseStream,StreamWriter, andStreamReaderclasses.System.IO.IsolatedStorage: Provides access to Isolated Storage.System.Runtime.Serialization: Must add a reference to System.Runtime.Serialization assembly.System.Xml: Provides access toXMLReaderstream class, as well as other core XML related classes.System.Xml.Linq: Must add a reference to System.Xml.Linq assembly. Provides access toXDocumentclass for XML manipulation as well as LINQ language constructs.System.Xml.Serialization: Provides access to XML serialization attributes that you can apply to .NET classes.
If you are a .NET developer, most of these look familiar, as they are the standard .NET classes related to serializing .NET objects, as well as reading and writing data to the file system. The one exception is possibly System.IO.IsolatedStorage, which is available via Silverlight on the desktop and also on Windows Phone 7. Isolated Storage represents the physical file system made available via the IsolatedStorage classes.
Unlike with Silverlight for the Web, there isn't an Isolated Storage quota on Windows Phone 7; however, it is recommended to not exceed two Gigabytes of data for an application if you are to be a good citizen and not abuse available space. Also, applications should make users aware of estimated file space requirements and try to give an option to delete data if needed. Keeping the user informed and in control is paramount.
The System.IO.IsolatedStorage namespace provides two possible methods to access the file system. The first is a key-value pair of type string-object where the key is a string and the value is of type object available in the static class IsolatedStorageSettings via its single property named ApplicationSettings. The Dictionary class stores object values, so essentially any class that can be serialized can be stored in the IsolatedStorageSettings.ApplicationSettings object. It is not limited to just simple values.
The other method to access the file system is via file and folder management using the IsolatedStorageFilestatic class. The method that provides access to the application's file system area is the GetUserStoreForApplication() method. With a reference to the user store in hand, you can create files to serialize objects to the file system.
The next two sections cover the sample code details for this section. The first example covers basic isolated storage operations, and the second example covers object persistence and serialization.
In the Chapter 4 solution DataPersistence project is a MainPage page that has a menu to three additional pages, the first named BasicIsoStorage.xaml. Figure 4-3 has the UI.
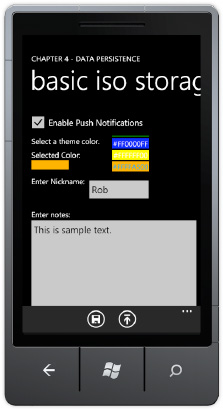
The UI has several controls that store fake settings and data values. The sample uses both the ApplicationSettings object and an IsolatedStorageFileStream object to store and retrieve the values.
Note
All of the data could persist within the ApplicationSettings object, but the sample shows how to work with the IsolatedStorageFileStream to prepare for more complex scenarios.
The code is straightforward Dictionary object access and file IO. See Listing 4-3.
Example 4.3. BasicIsoStorage.xaml.cs Code File
using System;
using System.IO;
using System.IO.IsolatedStorage;
using Microsoft.Phone.Controls;

namespace DataPersistence.pages
{
  public partial class BasicIsoStorage : PhoneApplicationPage
  {
    private const string fileName = "notes.dat";

    public BasicIsoStorage()
    {
      InitializeComponent();
    }

    private void saveAppBarIcon_Click(object sender, EventArgs e)
    {
      SaveData();
    }

    private void loadAppBarIcon_Click(object sender, EventArgs e)
    {
      LoadData();
    }

    private void LoadData()
    {
      //Load "settings"
      if (IsolatedStorageSettings.ApplicationSettings.Contains("EnablePush"))
        enableNotifications.IsChecked =
          (bool)IsolatedStorageSettings.ApplicationSettings["EnablePush"];
      if (IsolatedStorageSettings.ApplicationSettings.Contains("FavColor"))
        colorListBox.SelectedIndex =
          (int)IsolatedStorageSettings.ApplicationSettings["FavColor"];
      if (IsolatedStorageSettings.ApplicationSettings.Contains("NickName"))
        nicknameTextBox.Text =
          (string)IsolatedStorageSettings.ApplicationSettings["NickName"];
//Load "notes" text to file
using (IsolatedStorageFile isf = IsolatedStorageFile.GetUserStoreForApplication())
{
if (isf.FileExists(fileName))
{
using (IsolatedStorageFileStream fs =
isf.OpenFile(fileName, System.IO.FileMode.Open))
{
using (StreamReader reader = new StreamReader(fs))
{
notesTextBox.Text = reader.ReadToEnd();
reader.Close();
}
}
}
}
}
private void SaveData()
{
//Save "settings"
IsolatedStorageSettings.ApplicationSettings["EnablePush"] =
enableNotifications.IsChecked;
IsolatedStorageSettings.ApplicationSettings["FavColor"] =
colorListBox.SelectedIndex;
IsolatedStorageSettings.ApplicationSettings["NickName"] =
nicknameTextBox.Text;
//Save "notes" text to file
using (IsolatedStorageFile isf = IsolatedStorageFile.GetUserStoreForApplication())
{
using (IsolatedStorageFileStream fs =
isf.OpenFile(fileName, System.IO.FileMode.Create))
{
using (StreamWriter writer = new StreamWriter(fs))
{
writer.Write(notesTextBox.Text);
writer.Flush();
writer.Close();
}
}
}
}
}
}There are two application bar icons to load and save data. Loading data is a matter of checking that a key exists using ApplicationSettings.Contains, and then accessing the value via the key. The ApplicationSettings class is of type Dictionary that takes a key value of type String and stores the passed-in class as a type of Object. This permits you to pass any class into a Dictionary object, since all classes inherit from type Object. You must, however, type convert the retrieved object to the original type.Otherwise a runtime error will occur.
Loading the "Notes" TextBox data checks that the file exists and just reads the data using a StreamReader object. You may be tempted to put the filename into the StreamReader constructor directly. This will result in a code security access violation if you do. The only valid constructor parameter for an instance of StreamReader or StreamWriter is an object of type IsolatedStorageFile.
Saving the data is very similar code to loading the data. Note the use of the using construct for all objects that have a Dispose method. The following is the pseudocode:
Using (TextReader textReader = new StreamReader(streamResourceInfo.Stream) // createisntance { //...code that leverages the instance.... }//Disposed called automatically when the block is exited
Note
Only .NET objects that have handles to non-managed objects like a physical file handle have Dispose methods in .NET.
The using clause ensures that Dispose is called and that unmanaged resources are released. Otherwise, memory will not be freed immediately, and the runtime memory load will slowly increase until either Garbage Collection occurs or until the memory threshold limit is exceeded, and the app fails or until the application exits. Now that we've covered the basic isolated storage operations, we move on next to object persistence.
In the previous section, we demonstrated how to store and retrieve individual values. In this section, we add some realism by serializing objects instead of individual values. The ObjectSerialization.xaml sample starts with almost the same UI and values as the BasicIsoStorage sample, but this time the controls data bind to a sample class named AppClass, as shown in Listing 4-4.
Example 4.4. AppClass.cs Code File
using System.Xml.Serialization;

namespace DataPersistence
{
  [XmlRootAttribute("AppClass")]
  public class AppClass
  {
    public AppClass()
    {
      FavoriteColor = −1;
    }

    //Settings
    [XmlElement]
    public bool EnablePushNotifications { get; set; }

    [XmlElement]
public int FavoriteColor { get; set; }
[XmlElement]
public string NickName { get; set; }
//Data
[XmlElement]
public string Notes { get; set; }
}
}The sample AppClass class that we serialize in this example includes attributes from the System.Xml.Serialization namespace to provide support for serializing the object to the file system. The MSDN documentation covers all of the possible XML serialization attribute values:
http://msdn.microsoft.com/en-us/library/83y7df3e(v=VS.100).aspx
Configuring the data binding with Blend using sample data based on the AppClass is straightforward, as demonstrated in Chapter 2. A sample data source is added to the project that is based on the .NET AppClass class. This facilitates design-time data binding without causing issues at run-time.
In order to save and load the data, the code-behind for ObjectSerialization.xaml has modified Save and Load methods that serialize and deserialize an instance of the AppClass object, and configures it as the DataContext for the LayoutRoot Grid object. The following are the modified methods:
private void LoadData()
{
  using (IsolatedStorageFile isf = IsolatedStorageFile.GetUserStoreForApplication())
  {
    if (isf.FileExists(fileName))
    {
      using (IsolatedStorageFileStream fs =
        isf.OpenFile(fileName, System.IO.FileMode.Open))
      {
        XmlSerializer serializer = new XmlSerializer(typeof(AppClass));
        LayoutRoot.DataContext = (AppClass)serializer.Deserialize(fs);
      }
    }
  }
}

private void SaveData()
{
  using (IsolatedStorageFile isf = IsolatedStorageFile.GetUserStoreForApplication())
  {
    using (IsolatedStorageFileStream fs =
      isf.OpenFile(fileName, System.IO.FileMode.Create))
    {
      XmlSerializer xs = new XmlSerializer(typeof(AppClass));
      xs.Serialize(fs, ((AppClass)LayoutRoot.DataContext));
    }
  }
}
The serialization attributes attached to the AppClass object tell the XmlSerializer object how to read and write the class in Xml format. From there, the rest of the code in SaveData and LoadData methods is boilerplated, isolated storage file I/O, as in the previous sample.
The samples in this section exposed data management issues when you run the sample application to test the samples. If you navigate away from the sample, such as going to the Start screen, and then navigate back, the UI resets to what it is at startup. The data that was displayed is not preserved. Serializing out UI objects and settings is a critically important requirement for Windows Phone 7 applications. The concepts covered in this section lay the groundwork for the section titled Application Life Cycle Management.
In that section, application and data architecture is discussed, such that the data can be made to appear to be preserved, and to the user it will appear that the application was waiting in the background for the user to return to it. Before jumping there, we cover launchers and choosers first in the next section.
Windows Phone 7 third-party applications run in a sandbox that is isolated from other third-party applications, as well as from the underlying operating system and hardware, except where APIs are surfaced.
One of the primary namespaces where a developer can integrate with the hardware and software platform is the Microsoft.Phone.Tasks namespace. The namespaces consists of launchers and choosers. The following are the launchers:
EmailComposeTaskMarketplaceDetailTaskMarketplaceHubTaskMarketplaceReviewTaskMarketplaceSearchTaskMediaPlayerLauncherPhoneCallTaskSearchTaskSMSComposeTaskWebBrowserTask
Here are the choosers:
CameraCaptureTaskEmailAddressChooserTaskPhoneNumberChooserTaskPhotoChooserTaskSaveEmailAddressTaskSavePhoneNumberTask
Many of the launchers and choosers must be tested on a device, because the emulator does not include the full Windows Phone user experience with e-mail accounts, marketplace, and the like.
Most of the tasks in the Chapter 4 solution LaunchersAndChoosers sample project are launched directly by clicking on the name. Some open another page due to additional configuration options, or to show how the task can be fully utilized. We describe each launcher and chooser in the following section.
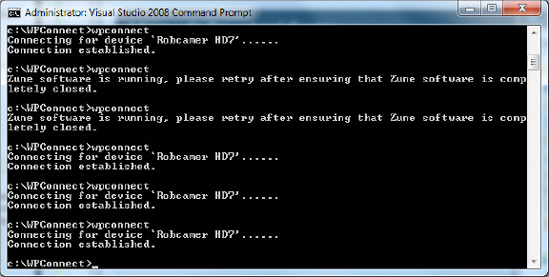
When debugging many of the launchers and choosers, the connection to Zune may prevent the application from running. To debug your application, you must use the WPConnect tool that was made available in the Windows Phone Developer Tools October and January updates. Here is a link:
http://create.msdn.com/en-us/home/getting_started
Once installed, the WPConnect tool is located here on my machine:
C:Program Files (x86)Microsoft SDKsWindows Phonev7.0ToolsWPConnect
To use the tool, run Visual Studio 2010 and connect a device to your PC via the Zune client. Once connected, close Zune and run WPConnect via a command prompt. It will display a message that the device is connected. If you disconnect the device from the cable, you will have to repeat the process. Figure 4-4 shows a few runs just to show how easy it is to enable debugging when testing media such as the pictures hub or the MediaPlayerLauncher task.
Launchers display UI to send the user to another part of the phone's functionality. When the user clicks the Back hardware button, he or she is returned to your application. Launchers are "fire and forget" in that they do not return information back to the application.
The EmailComposeTask class allows the user to send e-mail from an application. You can configure the To, Cc, Subject, and Body of the e-mail message via properties. It is not possible to attach a file to the e-mail. Also, the Body property takes a string of text, so formatting such as HTML formatting the e-mail message is not supported. Listing 4-5 has the code for the EmailComposeTask sample.
Example 4.5. EmailComposeTask Code
private void textBlock1_MouseLeftButtonUp(object sender, MouseButtonEventArgs e)
{
  //cause an exception and then send an error report.
  try
  {
    int num1 = 3;
    int num2 = 3;
    int num3 = num1 / (num1 - num2);
  }
  catch (Exception err)
  {
    EmailComposeTask task = new EmailComposeTask();
    task.To = "[email protected]";
    task.Subject = "Customer Error Report";
    //Size StringBuilder appropriately
    StringBuilder builder;
    if (null == err.InnerException)
      builder = new StringBuilder(600);
    else //need space for InnerException
      builder = new StringBuilder(1200);
    builder.AppendLine("Please tell us what you were doing when the problem occurred.


");
    builder.AppendLine("EXCEPTION DETAILS:");
    builder.Append("message:");
    builder.AppendLine(err.Message);
    builder.AppendLine("");
    builder.Append("stack trace:");
    builder.AppendLine(err.StackTrace);
    if (null != err.InnerException)
    {
      builder.AppendLine("");
      builder.AppendLine("");
      builder.AppendLine("inner exception:");
      builder.Append("inner exception message:");
      builder.AppendLine(err.InnerException.Message);
      builder.AppendLine("");
      builder.Append("inner exception stack trace:");
      builder.AppendLine(err.InnerException.StackTrace);
    }
    task.Body = builder.ToString();
    task.Show();
}The MarketplaceHubTask class launches into the Marketplace Hub. The only parameter is ContentType, which determines whether the application view or music view of the Marketplace is displayed. The following is the code to show the music view:
private void MarketplaceHubTask2_MouseLeftButtonDown(object sender, MouseButtonEventArgs e)
{
  marketplaceHubTask = new MarketplaceHubTask();
  marketplaceHubTask.ContentType = MarketplaceContentType.Music;
  marketplaceHubTask.Show();
}
There are no return properties or events. This task simply shows the marketplace hub, and allows the user to interact with the hub and then return back to the application by clicking the Back hardware button.
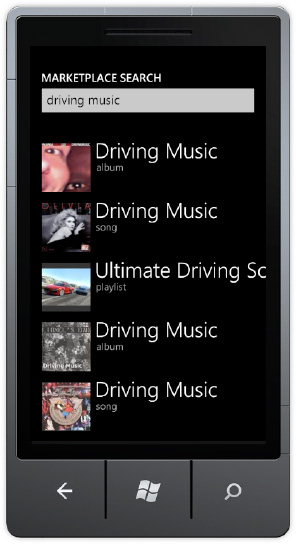
The MarketplaceSearchTask also has a ContentType property to filter by either Applications or Music. It also has a SearchTerms property to pass in search terms to kick off the search. The following is the code to kick off search:
private void MarketplaceSearchTask_MouseLeftButtonDown(object sender, MouseButtonEventArgs e)
{
  MarketplaceSearchTask marketplaceSearchTask = new MarketplaceSearchTask();
  marketplaceSearchTask.ContentType = MarketplaceContentType.Music;
  marketplaceSearchTask.SearchTerms = "driving music";
  marketplaceSearchTask.Show();
}
Figure 4-5 shows the task displayed after calling the Show() method.
The MarketplaceDetailTask class displays the marketplace details page for an application, which allows you to purchase the currently running application if it is in trial mode. You can also show the marketplace details for your other applications so you can promote them. The property that determines which application to show details for is the ContentIdentifier property, which is the product ID for the application found in marketplace when an application is certified.
Tip
Leave the property null if you wish to display the marketplace details for the currently running application.
The product ID is generated when an application is submitted to marketplace, so if you have a family of applications that you wish to cross-promote, you can simply plug in the product ID for each application to display the marketplace details page. Here is the code:
private void MarketplaceDetailTask_MouseLeftButtonDown(object sender, MouseButtonEventArgs e)
{
  MarketplaceDetailTask marketplaceDetailTask = new MarketplaceDetailTask();
  marketplaceDetailTask.ContentType = MarketplaceContentType.Applications;
  //AppID for the youtube application
  marketplaceDetailTask.ContentIdentifier = "dcbb1ac6-a89a-df11-a490-00237de2db9e";
  marketplaceDetailTask.Show();
}The marketplace review task allows you to display the marketplace review page for your application from within the application itself. This is a convenient way to encourage users to provide a review of your application. This task does not include a ContentIdentifier property, meaning that you can only display the review page for the currently running application. Here is the code:
private void MarketplaceReviewTask_MouseLeftButtonDown(object sender, MouseButtonEventArgs e)
{
  MarketplaceReviewTask marketplaceReviewTask = new MarketplaceReviewTask();
  marketplaceReviewTask.Show();
}The MediaPlayerLauncher class has three properties of interest. The Control's property identifies which media player buttons to display. You can pick MediaPlaybackControls.All for full media controls, or you can use the bitwise "or" operator to combinea custom set of playback controls. The MediaPlayerLauncher has a property named Location that lets the player know how to resolve the URL if the media is located in isolated storage, or as part of the application's xap file. The most important property is the Media property where you set the URL for the media location. Here is code to play a Channel 9 video:
private void MediaPlayerLauncher_MouseLeftButtonDown(object sender, MouseButtonEventArgs e)
{
  MediaPlayerLauncher mediaPlayerLauncher = new MediaPlayerLauncher();
  mediaPlayerLauncher.Controls = MediaPlaybackControls.FastForward |
    MediaPlaybackControls.Pause | MediaPlaybackControls.Rewind |
    MediaPlaybackControls.Skip | MediaPlaybackControls.Stop;
  mediaPlayerLauncher.Location = MediaLocationType.Data;
  mediaPlayerLauncher.Media = new Uri("http://files.ch9.ms/ch9/f2c3/b59b6efb-3c70-4bc2-b3ff-9e650007f2c3/wp7ces_high_ch9.mp4");
  mediaPlayerLauncher.Show();
}The PhoneCallTask class has two properties: DisplayName and PhoneNunber. When the PhoneCallTask.Show() method is called, a dialog box is displayed that says, "Dial DisplayName at PhoneNumber." Here is the code to dial a phone number with the user's consent:
private void PhoneCallTask_MouseLeftButtonDown(object sender, MouseButtonEventArgs e)
{
  PhoneCallTask phoneCallTask = new PhoneCallTask();
phoneCallTask.DisplayName = "Rob Cameron"; phoneCallTask.PhoneNumber = "555-555-1111"; phoneCallTask.Show(); }
The SearchTask class performs the same search as pushing the hardware Search button. It has a SearchQuery property to pass a search string for the search. Here is the code for the SearchTask:
private void SearchTask_MouseLeftButtonDown(object sender, MouseButtonEventArgs e)
{
  SearchTask searchTask = new SearchTask();
  searchTask.SearchQuery = "driving music";
  searchTask.Show();
}The SmsComposeTask class sends an SMS based on the configured properties: the To property and the Body property. Calling the Show() method brings up the SMS application on the phone with the SMS ready to go. Note that the user can decide not to send. As with other launchers, there is no way to determine whether a user cancels or goes through with the action. Here is the code:
private void SMSComposeTask_MouseLeftButtonDown(object sender, MouseButtonEventArgs e)
{
  Microsoft.Phone.Tasks.SmsComposeTask smsComposeTask = new SmsComposeTask();
  smsComposeTask.To = "555-555-5555";
  smsComposeTask.Body = "Meet me for pizza.";
  smsComposeTask.Show();
}The WebBrowserTask class opens the full browser experience based on the configured property, URL, which takes a string. Here is the code:
private void WebBrowserTask_MouseLeftButtonDown(object sender, MouseButtonEventArgs e)
{
  WebBrowserTask webBrowserTask = new WebBrowserTask();
  webBrowserTask.URL = "http://create.msdn.com";
  webBrowserTask.Show();
}
There is a known issue that if you try running this code under the debugger, it quite often displays the web browser with a blank URL. Sometimes if you click in the address bar and then click outside of the address bar, it starts working. Running the code normally without the debugger seems to work much better.
Note
Microsoft announced at Mobile World Conference in February 2011 that Internet Explorer 9 with support for HTML5 will be added to Windows Phone 7 later in 2011.
While the launchers are fire-and-forget, choosers return information back to the application, such as an image from the camera, a phone number, or e-mail address. As with the launchers, users can cancel the action; however, the application will know if the action was canceled. If the action is not canceled, the information will be returned to the application with the user's consent.
Choosers have a Show() method like with launchers but choosers also have a Completed event where data is returned. Developers wire-up the Completed event in order to process the returned values.
This task allows the user to take a picture. The task returns a stream to the taken photo. One potential "got'cha" with this task is that you cannot invoke the camera on a device while syncing with Zune, because a photo is media, and media interaction is not allowed while synching with Zune. This is another example of where the WPConnect tool comes in handy. Because the sample is a little more involved, it has its own page for a UI. Listing 4-6 shows the code.
Example 4.6. CameraTaskPage.xaml.cs Code File
using System;
using System.IO;
using System.IO.IsolatedStorage;
using System.Windows;
using System.Windows.Media.Imaging;
using Microsoft.Phone.Controls;
using Microsoft.Phone.Tasks;

namespace LaunchersAndChoosers.TaskPages
{
  public partial class CameraTaskPage : PhoneApplicationPage
  {
    private CameraCaptureTask cameraTask;
    private BitmapImage capturedImage;
    string fileName = "capturedimage.jpg";

    public CameraTaskPage()
    {
      InitializeComponent();

      cameraTask = new CameraCaptureTask();
      capturedImage = new BitmapImage();

      cameraTask.Completed += new EventHandler<PhotoResult>(cameraTask_Completed);
      PreviewImage.Source = capturedImage;
    }
void cameraTask_Completed(object sender, PhotoResult e)
{
if ((null == e.Error) && (null != e.ChosenPhoto))
capturedImage.SetSource(e.ChosenPhoto);
else
{
MessageBox.Show(e.Error.Message);
}
}
private void TakePictureButton_Click(object sender, EventArgs e)
{
cameraTask.Show();
}
private void SavePictureButton_Click(object sender, EventArgs e)
{
WriteableBitmap bmp = new WriteableBitmap(capturedImage);
using (IsolatedStorageFile iso = IsolatedStorageFile.GetUserStoreForApplication())
{
using (IsolatedStorageFileStream fs =
iso.OpenFile(fileName, System.IO.FileMode.Create))
{
bmp.SaveJpeg(fs, bmp.PixelWidth, bmp.PixelHeight, 0, 100);
savedImage.Source = bmp;
}
}
}
}
}The sample application shows the CameraCaptureTask Chooser to take a picture. Once the user accepts the picture, the image is displayed in the bottom Image object. When the user clicks the Save Application bar button, the sample saves the image to isolated storage and displays the image in the UI in the top Image object.
The EmailAddressChooserTask class allows the user to pick an e-mail for an application action, such as sharing a link or other information in the application. The task shows the phone UI with a list of contacts to choose once the Show() method is called.
The e-mail address is made available in the Completed event. It could be used as part of launching the EmailComposeTask. Here is the code:
private void EmailAddressChooserTask_MouseLeftButtonDown(object sender,MouseButtonEventArgs e) { EmailAddressChooserTask emailAddressChooserTask = new EmailAddressChooserTask(); emailAddressChooserTask.Completed += new EventHandler<EmailResult>(emailAddressChooserTask_Completed); emailAddressChooserTask.Show(); }
void emailAddressChooserTask_Completed(object sender, EmailResult e)
{
  if ((null == e.Error) && (TaskResult.OK == e.TaskResult))
  {
    MessageBox.Show("Email Address Returned is: " + e.Email);
  }
}The PhoneNumberChooserTask class allows the user to pick a phone number for an application action, such as to open the PhoneCallTask launcher. The task shows the phone UI with a list of contacts to choose once the Show() method is called. The phone number is made available in the Completed event. Here is the code:
private void PhoneNumberChooserTask_MouseLeftButtonDown(object sender, MouseButtonEventArgs e)
{
  PhoneNumberChooserTask phoneNumberChooserTask = new PhoneNumberChooserTask();
  phoneNumberChooserTask.Completed += new EventHandler<PhoneNumberResult>
(phoneNumberChooserTask_Completed);
  phoneNumberChooserTask.Show();
}

void phoneNumberChooserTask_Completed(object sender, PhoneNumberResult e)
{
  if ((null == e.Error) && (TaskResult.OK == e.TaskResult))
  {
    MessageBox.Show("Phone number returned is: " + e.PhoneNumber);
  }
}
(phoneNumberChooserTask_Completed);
phoneNumberChooserTask.Show();
}
void phoneNumberChooserTask_Completed(object sender, PhoneNumberResult e)
{
if ((null == e.Error) && (TaskResult.OK == e.TaskResult))
{
MessageBox.Show("Phone number returned is: " + e.PhoneNumber);
}
}The PhotoChooserTask class is very similar to the CameraCaptureTask, in that it returns a photo image. The PhotoChooserTask has a property named ShowCamera to give the user an option of choosing an existing photo or capturing a new photo. After calling the Show() method to launch the UI, the Completed event fires when the user is done, and the picture is loaded into an Image control in the UI. Here is the code:
private void PhotoChooserTask_MouseLeftButtonDown(object sender, MouseButtonEventArgs e)
{
  PhotoChooserTask photoChoserTask = new PhotoChooserTask();
  photoChoserTask.ShowCamera = true;
  photoChoserTask.Completed += new EventHandler<PhotoResult>(photoChoserTask_Completed);
  photoChoserTask.Show();
}

private BitmapImage capturedImage;
void photoChoserTask_Completed(object sender, PhotoResult e)
{
  if ((null == e.Error) && (TaskResult.OK == e.TaskResult))
  {
capturedImage = new BitmapImage();
capturedImage.SetSource(e.ChosenPhoto);
ChosenPhotoImage.Source = capturedImage;
}
}The SaveEmailAddressTask class shows the built-in contacts application. It allows the code to save the provided e-mail address to a new or existing contact via the Email property. Use the Completed event to determine whether an error occurred and that the task completed successfully. Here is the code:
private void SaveEmailAdressTask_MouseLeftButtonDown(object sender, MouseButtonEventArgs e)
{
  SaveEmailAddressTask saveEmailAddressTask = new SaveEmailAddressTask();
  saveEmailAddressTask.Completed += new EventHandler<TaskEventArgs>
(saveEmailAddressTask_Completed);
  saveEmailAddressTask.Email = "[email protected]";
  MessageBox.Show("Saving this email: " + saveEmailAddressTask.Email);
  saveEmailAddressTask.Show();
}

void saveEmailAddressTask_Completed(object sender, TaskEventArgs e)
{
  if ((null == e.Error) && (TaskResult.OK == e.TaskResult))
  {
    MessageBox.Show("Email address saved");
  }
}The SavePhoneNumberTask works very similarly to the SaveEmailAddressTask, except that it passes in a phone number instead of an e-mail address. Here is the code:
private void SavePhoneNumberTask_MouseLeftButtonDown(object sender, MouseButtonEventArgs e)
{
  SavePhoneNumberTask savePhoneNumberTask = new SavePhoneNumberTask();
  savePhoneNumberTask.Completed += new EventHandler<TaskEventArgs>
(savePhoneNumberTask_Completed);
  savePhoneNumberTask.PhoneNumber = "555-555-5555";
  MessageBox.Show("Saving this phone number: " + savePhoneNumberTask.PhoneNumber);
  savePhoneNumberTask.Show();
}

void savePhoneNumberTask_Completed(object sender, TaskEventArgs e)
{
if ((null == e.Error) && (TaskResult.OK == e.TaskResult))
  {
MessageBox.Show("Phone number saved");
  }
}The WebBrowser controlis not a task, but it is related to the web browser task, so it makes sense to cover it here. The WebBrowser control is much more programmable than the WebBrowserTask covered in the previous section on Launchers.
The WebBrowser control can be embedded within the XAML of an application, so the content appears more integrated with the application itself. It is still a full browser, so you can navigate away from content if following hyperlinks, but you can configure how it behaves. The following is a list of the WebBrowser control class members to help guide capabilities:
Base: Sets the base directory in isolated storage that is used to resolve relative URLs.CacheMode: Determines whether content should be cached when possible.InvokeScript: Executes a function in the script for the currently loaded content.IsScriptEnabled: Set to true to enable scripting. Applies to the next document navigated to, not the current document.LoadCompleted: Event fires when the content is fully loaded. Permits having a loading animation.Navigate: Navigates the browser control to the provided URI. Two overloads with the second taking post data and additional headers.Navigated: Fires after successful navigation.Navigating: Fires when browser is navigatingNavigateToString: Allows loading the provided HTML string into the browser.ScriptNotify:Fires when JavaScript callswindow.external.Notify(<data>).
The WebBrowserControl project sample in the Chapter 4 solution exercises the WebBrowser control with two pages. The first sample page demonstrates basic use. The second sample page demonstrates scripting interoperability between Silverlight and the hosted HTML code.
In the BasicWebBrowserControlPage.xaml, there is a WebBrowser control, a TextBox to enter a URL, and a load button in the application bar. There is also a semi-transparent Rectangle to demonstrate transparency support in the WebBrowser control.
The project includes a simple animation named AnimateGreenRect that spins and animates the size of the green Rectangle while loading content into the WebBrowser control. The Storyboard object is built using Expression Blend. First a keyframe is added at 0 seconds with the configured position. The yellow timeline indicator is slid over to 500ms and another keyframe is added by clicking the small circle with a plus sign in the Object and Timeline window as shown in Figure 4-6.

With the yellow timeline indicator over the second keyframe, move over to the Properties window and expand the Transform section. Select the Rotate tab and set the Angle property to 180 degrees. Next, select the Scale tab and set X and Y to .5. Click on the name of the Storyboard at the top of the Object and Timeline window to select the newly created Storyboard and move over to the Properties window. Check the AutoReverse checkbox and set the RepeateBehavior to Forever.
It takes just a little bit of code to wire-up playing the animation while loading the web page. Listing 4-7 has the code.
Example 4.7. BasicWebBrowserControlPage.xaml.cs Code File
public partial class BasicWebBrowserControlPage : PhoneApplicationPage
  {
    public BasicWebBrowserControlPage()
    {
      InitializeComponent();
webBrowserControl.LoadCompleted += new
System.Windows.Navigation.LoadCompletedEventHandler(webBrowserControl_LoadCompleted);
webBrowserControl.Navigating += new
   EventHandler<NavigatingEventArgs>(webBrowserControl_Navigating);
}
void webBrowserControl_Navigating(object sender, NavigatingEventArgs e)
{
System.Diagnostics.Debug.WriteLine(e.Uri);
}
private void loadUrlAppBarButton_Click(object sender, EventArgs e)
{
AnimateGreenRect.Begin();
webBrowserControl.Navigate(new Uri(WebAddressTextBox.Text));
}
void webBrowserControl_LoadCompleted(object sender, System.Windows.Navigation
.NavigationEventArgs e)
{
AnimateGreenRect.Stop();
}
}You can hook into the various events available listed above in XAML as we have done previously. Using the += syntax, Visual Studio will automatically generate the correct event handler just by hitting the tab key to generate it:
webBrowserControl.Navigating += new EventHandler<NavigatingEventArgs>(webBrowserControl_Navigating);
An important capability of the WebBrowser control is to load HTML fragments using the WebBrowser.NavigateToString() method. Another important capability is the WebBrowser.Base property allows relative URLs for items such as images to be loaded locally. Caching items to the file system can save download time and bandwidth for the user, improving overall application performance. The next section covers interacting with the HTML content via scripting.
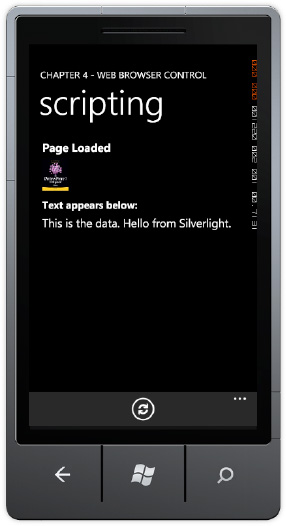
The WebBrowser control supports HTML, CSS, and JavaScript. To support JavaScript, set the IsScriptEnabled property to true in XAML or in the code-behind. The WebBrowserControlScriptingPage.xaml sample contains a WebBrowser control that is loaded with an HTML page stored in the xap as content. The HTML page contains two JavaScript script functions; one that sets the content on a DIV, the other script sets the source to an IMG tag in the HTML. Listing 4-8 has the HTML file that is stored in the xap as content.
Example 4.8. The content.html Code File
<html>
<head>
<title>Test Script</title>
<script type="text/javascript">

    function PassData(data) {
content1.innerHTML = data;
}
function SetImageSource(source) {
image1.src = source;
}
<style type="text/css">
body {
font-family: "Segoe WP";
font-size: medium;
color: #FFFFFF;
background-color: #000000;
}
</script>
</head>
<body>
<h3>
Page Loaded</h3>
<img alt="image goes here" src="" id="image1" />
<h4>
Text appears below:</h4>
<div id="content1">
</div>
</body>
</html>You can see the two JavaScript functions in Listing 4-5 as well as the div and image that are updated by the functions. The HTML file has a little bit of formatting to help the HTML file blend in with the UI. The style was creating using the Visual Studio Manage Styles dialog box by clicking the new style button. You can see the styling in the CSS style applied to the HTML BODY tag. The style does the following:
Sets the font to match the Windows Phone 7 font (
Segoe WP)Font Size to medi and a foreground color of
WhiteSet the background color to
Black
When using the WebBrowser control, try to have the content blend into the UI with styling. Windows Phone 7 supports two themes, light and dark, so you should dynamically apply styles based on the theming, which you will see is not difficult to do via the scripting bridge.
The WebBrowser Control supports invoking script. Listing 4-9 has the code-behind file where the Silverlight code calls the two scripts.
Example 4.9. The WebBrowserControlScriptingPage.xaml.cs Code File
using System;
using System.IO;
using System.IO.IsolatedStorage;
using System.Windows;
using Microsoft.Phone.Controls;

namespace WebBrowserControl.pages
{
  public partial class WebBrowserControlScriptingPage : PhoneApplicationPage
  {
public WebBrowserControlScriptingPage()
{
InitializeComponent();
Loaded += new RoutedEventHandler(WebBrowserControlScriptingPage_Loaded);
}
void WebBrowserControlScriptingPage_Loaded(object sender, RoutedEventArgs e)
{
SetUpWebBrowserControlContent();
webBrowserControl.Base = "home";
webBrowserControl.Navigate(new Uri("content.html", UriKind.Relative));
}
private void SetUpWebBrowserControlContent()
{
//Copy content out of xap and into isolated storage
using (IsolatedStorageFile isf =
IsolatedStorageFile.GetUserStoreForApplication())
{
//if (!isf.DirectoryExists("home"))
//{
isf.CreateDirectory("home");
//create base html file
using (IsolatedStorageFileStream fs =
isf.OpenFile("home/content.html", System.IO.FileMode.Create))
{
byte[] buffer = new byte[256];
int count = 0;
Stream resourceStream =
Application.GetResourceStream(
new Uri("html/content.html", UriKind.Relative)).Stream;
count = resourceStream.Read(buffer, 0, 256);
while (count > 0)
{
fs.Write(buffer, 0, count);
count = resourceStream.Read(buffer, 0, 256);
}
}
//Create Image directory
isf.CreateDirectory("home/images");
//Create image file
using (IsolatedStorageFileStream fs =
isf.OpenFile("home/images/image.jpg", System.IO.FileMode.Create))
{
byte[] buffer = new byte[256];
int count = 0;
Stream resourceStream = Application.GetResourceStream(
new Uri("images/image.jpg", UriKind.Relative)).Stream;
count = resourceStream.Read(buffer, 0, 256);
while (count > 0)
{
fs.Write(buffer, 0, count);
count = resourceStream.Read(buffer, 0, 256);
}
}
}
}private void loadUrlAppBarButton_Click(object sender, EventArgs e)
{
//Invoke script
webBrowserControl.InvokeScript(
"PassData", "This is the data. Hello from Silverlight.");
webBrowserControl.InvokeScript(
"SetImageSource", "images/image.jpg");
}
}
}The InvokeScript method on the WebBrowser control takes the name of the JavaScript method and a string array for parameters. When the refresh button is clicked, the loadUrlAppBarButton_Click shown in Listing 4-9 event fires resulting in the UI shown in Figure 4-7.
This section covers asynchronous programming, which is the preferred method do to work in Silverlight. Asynchronous programming is preferred, because it takes work off of the UI thread, which should be a priority in order to maximize UI performance for animation and transitions.
Rendering performance can be improved two ways: pushing work from the UI thread to the Render thread and pushing work such as processing remote data to a separate background thread. We cover various ways to push work off of the UI thread in this section.
You can use the standard .NET multithreading class Thread.Start and ThreadPool.QueueUserWorkItem to perform background work that writes data to isolated storage, and it will work fine. If you try to access the XAML from the standard classes without taking extra steps, it will throw an exception. Silverlight includes classes that make it easier to perform background work that interacts with the user interface.
The Dispatcher class offers a safe way to call a method that updates the UI asynchronously from a background thread by providing services for managing the queue of work items for a thread. Both the Dispatcher and the BackgroundWorker classes can perform work on a separate thread. The BackgroundWorker classsupports progress reporting and cancellation, which we cover in detail in the next section. The Dispatcher class is useful when you need a simple way to queue up background work without progress reporting or cancellation.
You can create a delegate and then user Dispatcher.BeginInvoke to fire the delegate, which then updates the UI. As an example, if you have a TextBlock named TextBlock1 that you need to update from a background thread, obtain the Dispatcher from that control and perform the update. Here is an example of using C# lambda syntax (=>).
TextBlock1.Dispatcher.BeginInvoke(() =>
  {
     TextBlock1.Text = "Data Updated";
  };
You can call Dispatcher.CheckAccess to determine if the calling thread is on the same thread as the control or the UI thread. Use BeginInvoke it if returns false. It is recommended to obtain the Dispatcher instance from the control closest to the controls being updated. So if multiple controls need to be updated and they are contained in a Grid panel, obtain the Dispatcher from the Grid.
Our sample for this section will retrieve an xml file from the services project named WcfRemoteServices that is part of the Chapter 4 solution. Remote services are covered in detail in the section titled "Connecting Windows Phone to Services and Feeds" later in this chapter. A file named ApressBooks.xml is added to the AsynchronousProgramming project. This XML file contains a simple xml schema with a few book titles in it. Here is one record from the XML file:
<ApressBook> <ID>4</ID> <ISBN>1-4302-2435-5</ISBN> <Author>Jit Ghosh and Rob Cameron</Author> <Title>Silverlight Recipes: A Problem-Solution Approach, Second Edition</Title> <Description>Silverlight Recipes: A Problem-Solution Approach, Second Edition is yourpractical
companion to developing rich, interactive web applications with Microsoft's latesttechnology. </Description> <DatePublished>2010-07-15T00:00:00</DatePublished> <NumPages>1056</NumPages> <Price>$49.99</Price> </ApressBook>
The UI for the DispatcherPage.xaml contains a ListBox with an ItemTemplate to display the above data and an application bar with one button to load the data. When the button is clicked, the LoadDataAppBarButton_Click event handler spins up a WebRequest object that points to the local developer web server from the WcfRemoteServices Project to retrieve the XML file. Here is the code snippet for the application bar button event handler:
private void LoadDataAppBarButton_Click(object sender, EventArgs e)
{
  Uri location =
      new Uri("http://localhost:9090/xml/ApressBooks.xml", UriKind.Absolute);
  WebRequest request = HttpWebRequest.Create(location);
  request.BeginGetResponse(
      new AsyncCallback(this.RetrieveXmlCompleted), request);
}
All remote service calls MUST be executed asynchronously, so the callback function named RetrieveXmlCompleted is where the results are actually returned to the application. Here is the RetrieveXmlCompleted method:
void RetrieveXmlCompleted(IAsyncResult ar)
{
  List<ApressBook> _apressBookList;
  HttpWebRequest request = ar.AsyncState as HttpWebRequest;
  WebResponse response = request.EndGetResponse(ar);
  Stream responseStream = response.GetResponseStream();
  using (StreamReader streamreader = new StreamReader(responseStream))
  {
    XDocument xDoc = XDocument.Load(streamreader);
    _apressBookList =
    (from b in xDoc.Descendants("ApressBook")
      select new ApressBook()
      {
        Author = b.Element("Author").Value,
        Title = b.Element("Title").Value,
        ISBN = b.Element("ISBN").Value,
        Description = b.Element("Description").Value,
        PublishedDate = Convert.ToDateTime(b.Element("DatePublished").Value),
        NumberOfPages = b.Element("NumPages").Value,
        Price = b.Element("Price").Value,
        ID = b.Element("ID").Value
      }).ToList();
  }
  //Could use Anonymous delegate (does same as below line of code)
  // BooksListBox.Dispatcher.BeginInvoke(
  //  delegate()
  //  {
  //    DataBindListBox(_apressBookList);
// } // ); //Use C# 3.0 Lambda BooksListBox.Dispatcher.BeginInvoke(() => DataBindListBox(_apressBookList)); }
The xml file is received and then loaded into an XDocument object for some basic Linq to XML manipulation to turn it into a collection of APressBook .NET objects. Once that little bit of work is completed, the collection needs to be pushed back to the UI thread. This is where the BooksListBox.Dispatcher is finally used to fire the DataBindListBox method to perform the data binding.
The previous code snippet includes an alternative method of passing the _apressBookList to the UI thread and databind. It could be reduced further to the following:
BooksListBox.Dispatcher.BeginInvoke(() =>
{
BooksListBox.ItemsSource = _apressBookList;
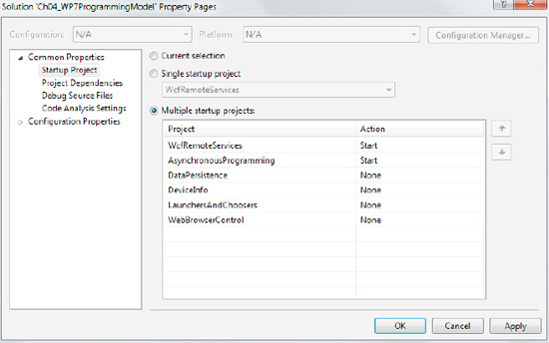
});To test the Dispatcher using WebRequest, both the WCFRemoteServices project and the AsynchronousProgramming project must be running.Right-click on the Ch04_WP7ProgrammingModel Solution and configure it to have multiple startup projects, as shown in Figure 4-8.
If you still want to use standard .NET Framework threading, You can call SynchronizationContext.Current to get the current DispatcherSynchronizationContext, assign it to a member variable on the Page, and call Post(method, data) to fire the event back on the UI thread. Calling Send(method, data) instead of Post will make a synchronous call, which you should avoid doing if possible as it could affect UI performance.
For long running processes, having the ability to cancel work as well as show work progress is necessary for a good user experience. A convenient class that provides a level of abstraction as well as progress updates is the System.ComponentModel.BackgroundWorker class. The BackgroundWorker class lets you indicate operation progress, completion, and cancellation in the Silverlight UI. For example, you can check whether the background operation is completed or canceled and display a message to the user.
The Chapter 4 sample AsynchronousProgramming project test page named BackgroundWorkerPage.xaml explores the BackgroundWorker class. To use a background worker thread, declare an instance of the BackgroundWorker class at the class level, not within an event handler:
BackgroundWorker bw = new BackgroundWorker();
You can specify whether you want to allow cancellation and progress reporting by setting one or both of the WorkerSupportsCancellation and WorkerReportsProgress properties on the BackgroundWorker object to true. The next step is to create an event handler for the BackgroundWorker.DoWork event. This is where you put the code for the time-consuming operation. Within the DoWork event, check the CancellationPending property to see if the user clicked the Cancel button. You must set e.Cancel = true in DoWork so that WorkCompleted can check the value and finish correctly if the work was completed.
If the operation is not cancelled, call the ReportProgress method to pass a percentage complete value that is between 0 and 100. Doing this raises the ProgressChanged event on the BackgroundWorker object. The UI thread code can subscribe to the event and update the UI based on the progress. If you call the ReportProgress method when WorkerReportsProgress is set to false, an exception will occur. You can also pass in a value for the UserState parameter, which in this case is a string that is used to update the UI.
Once the work is completed successfully, pass the data back to the calling process by setting the e.Result property of the DoWorkerEventArgs object to the object or collection containing the data resulting from the work. The DoWorkerEventArgs.Result is of type object and can therefore be assigned any object or collection of objects. The value of the Result property can be read when the RunWorkerCompleted event is raised upon completion of the operation and the value can be safely assigned to UI object properties. Listing 4-10 shows the XAML modifications in the ContentPanelGrid.
Example 4.10. The BackgroundWorkerPage.xamlContentPanel XAML
<Grid x:Name="ContentPanel" Grid.Row="1" Margin="12,0,12,0">
<StackPanel Orientation="Vertical" d:LayoutOverrides="Height">
<StackPanel x:Name="StatusStackPanel" Orientation="Vertical">
<StackPanel Orientation="Horizontal" d:LayoutOverrides="Width">
<TextBlock x:Name="processingStateTextBlock" TextWrapping="Wrap"
VerticalAlignment="Top" Width="190" Margin="12,34,0,0"/>
<Button x:Name="cancelButton" Content="Cancel Operation"
VerticalAlignment="Top" Click="cancelButton_Click" Width="254" />
</StackPanel>
<ProgressBar x:Name="BookListDownloadProgress" Width="456"
HorizontalAlignment="Left" />
</StackPanel>
<ListBox x:Name="BooksListBox" ItemsSource="{Binding ApressBookList}"
Height="523" ItemTemplate="{StaticResource BookListBoxDataTemplate}" />
</StackPanel>
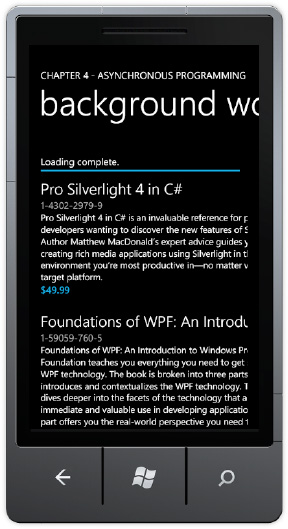
</Grid>The StatusStackPanel container that has the status info is made visible when the work is started, and is then hidden since the work is completed. Figure 4-9 has the UI.
One additional wrinkle is that the code overrides OnNavigateFrom. If the BackgroundWorker thread is busy, the code cancels the operation, since the user navigated away. Listing 4-11 has the full source code.
Example 4.11. The BackgroundWorkerPage.xaml.cs Code File
using System.ComponentModel;
using System.Windows;
using Microsoft.Phone.Controls;

namespace AsynchronousProgramming.pages
{
  public partial class BackgroundWorkerPage : PhoneApplicationPage
  {
    private BackgroundWorker _worker = new BackgroundWorker();

    public BackgroundWorkerPage()
    {
      InitializeComponent();
//Configure BackgroundWorker thread
_worker.WorkerReportsProgress = true;
_worker.WorkerSupportsCancellation = true;
_worker.DoWork +=
new DoWorkEventHandler(worker_DoWork);
_worker.ProgressChanged +=
new ProgressChangedEventHandler(worker_ProgressChanged);
_worker.RunWorkerCompleted +=
new RunWorkerCompletedEventHandler(worker_RunWorkerCompleted);
//Kick off long running process
//Make status visible
_worker.RunWorkerAsync();
StatusStackPanel.Visibility = Visibility.Visible;
}
protected override void OnNavigatedFrom(
System.Windows.Navigation.NavigationEventArgs e)
{
//Cancel work if user navigates away
if (_worker.IsBusy)
_worker.CancelAsync();
base.OnNavigatedFrom(e);
}
void worker_DoWork(object sender, DoWorkEventArgs e)
{
ApressBooks books = new ApressBooks();
books.LoadBooks();
int progress;
string state = "initializing...";
//Do fake work to retrieve and process books
for (int i = 1; i <= books.ApressBookList.Count;i++ )
{
if (_worker.CancellationPending == true)
{
e.Cancel = true;
break;
}
else
{
progress = (int)System.Math.Round((double)i /
books.ApressBookList.Count * 100d);
if ((progress > 15) && (progress < 90))
state = "processing..." ;
if (progress > 85)
state = "finishing..." ;
if (progress == 95)
state = "Loading complete.";
_worker.ReportProgress(progress, state);
System.Threading.Thread.Sleep(250);}
}
e.Result = books;
}
void worker_ProgressChanged(object sender, ProgressChangedEventArgs e)
{
BookListDownloadProgress.Value = e.ProgressPercentage;
processingStateTextBlock.Text = e.UserState as string;
}
void worker_RunWorkerCompleted(object sender, RunWorkerCompletedEventArgs e)
{
if (e.Cancelled == true)
MessageBox.Show("Operation cancelled.","Cancelled",MessageBoxButton.OK);
else
LayoutRoot.DataContext = e.Result as ApressBooks;
//Clean up status UI
BookListDownloadProgress.Value = 0;
processingStateTextBlock.Text = "";
StatusStackPanel.Visibility = Visibility.Collapsed;
}
private void cancelButton_Click(object sender, RoutedEventArgs e)
{
_worker.CancelAsync();
}
}
}Silverlight includes the standard .NET locking primitives, such as Monitor or lock, as well as the ManualResetEvent class where deadlocks can occur. A deadlock occurs when two threads each hold on to a resource while requesting the resource that the other thread is holding. A deadlock will cause the application to hang. It is easy to create a deadlock with two threads accessing the same resources in an application.
The BackgroundWorker class tries to prevent deadlocks or cross-thread invocations that could be unsafe.
Any exceptions that can occur must be caught within the background thread, because they will not be caught by the unhandled exception handler at the application level. If an exception occurs on the background thread, one option is to catch the exception and set Result to null as a signal that there was an error. Another option is to set a particular value to Result as a signal that a failure occurred.
In this section, we cover the supported networking and service protocols available to Windows Phone 7 applications. These include Windows Communication Foundation (WCF), HttpWebRequest, and WebClient. Windows Communication Foundation is Microsoft's service development framework for SOAP, REST, and Feed-based services. HttpWebRequest and WebClient are straightforward HTTP request and response classes.
We demonstrated how to use HttpWebRequest earlier, when we discussed the Dispatcher and how it helps to marshal data back over to the UI thread. WebClient has similar functionality as HttpWebRequest and is fine for doing small amounts of work if preferred.
Warning
One item to note is that WebClient primarily runs on the UI thread, which, as a Silverlight developer, you always want to avoid as much as possible. Use HttpWebRequest instead.
In Silverlight for Windows Phone 7, you can set the User-agent string and Headers for requests like using this syntax:
request.Headers.Add(HttpRequestHeader.UserAgent, "appname");
In Chapter 1, we discussed how Silverlight for Windows Phone 7 relates to Silverlight 3 and Silverlight 4. Regarding WCF, Silverlight for Windows Phone 7 is based on Silverlight 3, supporting the WCF capabilities available in Silverlight 3, with some additions like the ability to set User-agent and Headers as noted earlier. WCF includes client-side libraries to call services and a server-side programming model to create services. You can use the WCF libraries to connect to services implemented in other programming models and languages, as long as it is a supported network and wire protocol.
There is a fair amount of networking capability available in Windows Phone 7 for Silverlight developers, including SOAP, REST, and Basic Authentication. With all of the code samples and blog posts on the Internet for Silverlight and the .NET Framework, it can be confusing to know exactly what is supported. This link includes information on what is not supported in Silverlight for Windows Phone 7 when compared to Silverlight 4 and the .NET Framework:
http://msdn.microsoft.com/en-us/library/ff637320(v=VS.95).aspx
Here is a summary of items that are not supported:
New networking features available in Silverlight 4
Custom WCF bindings
Sockets
WCF Data Services
Duplex Communication over HTTP
JSON Serialization (partial support is available using the DataContractJsonSerializer class)
RSS and Atom Feeds
Silverlight toolkit networking features
Focusing on what's supported, you can add a Service Reference in Visual Studio to access a SOAP or REST service. You can also generate a proxy class with the slsvcutil.exe utility, which we cover in the following section. You can include credentials via Basic Authentication; just don't forget to wrap the call in SSL.
To have some data and services to work with, a new project solution named WcfRemoteServices is added to the Chapter 4 project. It is a WCF Service Application project type. When run, it launches the development web server to host the service. The project also includes an ADO.NET Entity Framework model to represent the AdventureWorks sample database available from Microsoft. The EF model is located in the model folder.-+
The database server used in the sample is SQL Server 2008 Express R2, which is available for free here:
www.microsoft.com/express/Database/
The sample database is available from CodePlex here:
http://msftdbprodsamples.codeplex.com/
The default Service1 WCF class is removed, and one service class is added to the project in the services folder named, AdventureWorks. To create the service, edit the corresponding IAdventureWorks Interface, and then implement the Interfaces in the AdventureWorks.svc class by editing the AdventureWorks.svc.cs file.
The service methods implement the Interfaces using LINQ queries against the AdventureWorksModel EF model. Listings 4-12 and 4-13 have the code for the Interface and concrete implementation of the AdventureWorks service.
Example 4.12. The IAdventureWorks Interface for the SOAP WCF Service
using System;
using System.Collections.Generic;
using System.ServiceModel;
using WcfRemoteServices.model;
using System.Runtime.Serialization;

namespace WcfRemoteServices.services
{
  // NOTE: You can use the "Rename" command on the "Refactor" menu to change the
  //interface name "IProducts" in both code and config file together.
  [ServiceContract]
  public interface IAdventureWorks
  {
[OperationContract]
List<Product> FullProductList();
[OperationContract]
List<ProductCategory> ProductCategoryList();
[OperationContract]
List<ProductSubcategory> ProductSubcategoryList();
[OperationContract]
List<Product> GetProductsByCategory(Int32 CategoryID);
[OperationContract]
List<Product> GetProductsBySubcategory(Int32 SubCategoryID);
[OperationContract]
int CheckInventory(Int32 ProductID);[OperationContract]
List<Vendor> FullVendorList();
VendorGeoLocation GetVendorAddress(Int32 VendorID);
}
[DataContract]
public class VendorGeoLocation
{
[DataMember]
public double Latitude { get; set; }
[DataMember]
public double Longitude { get; set; }
}
}Example 4.13. The AdventureWorks.svc.cs Class Implementation for the WCF Service
using System;
using System.Collections.Generic;
using System.ServiceModel;
using WcfRemoteServices.model;
using System.Runtime.Serialization;
namespace WcfRemoteServices.services
{
// NOTE: You can use the "Rename" command on the "Refactor" menu to change the
//interface name "IProducts" in both code and config file together.
[ServiceContract]
public interface IAdventureWorks
{
[OperationContract]
    List<Product> FullProductList();

    [OperationContract]
    List<ProductCategory> ProductCategoryList();

    [OperationContract]
    List<ProductSubcategory> ProductSubcategoryList();

    [OperationContract]
    List<Product> GetProductsByCategory(Int32 CategoryID);

    [OperationContract]
    List<Product> GetProductsBySubcategory(Int32 SubCategoryID);

    [OperationContract]
    int CheckInventory(Int32 ProductID);
[OperationContract]
    List<Vendor> FullVendorList();

    VendorGeoLocation GetVendorAddress(Int32 VendorID);
  }

  [DataContract]
  public class VendorGeoLocation
  {
    [DataMember]
    public double Latitude { get; set; }

    [DataMember]
    public double Longitude { get; set; }
  }
}In the AdventureWorks service, the interface has a method named GetVendorAddress that uses the Bing Maps Geocode service to obtain a latitude and longitude. The developer environment is located here:
http://dev.virtualearth.net/webservices/v1/geocodeservice/geocodeservice.svc/mex
The staging environment is here:
http://staging.dev.virtualearth.net/webservices/v1/geocodeservice/geocodeservice.svc
The production environment is here:
http://dev.virtualearth.net/webservices/v1/geocodeservice/geocodeservice.svc
Once the WCF services are created, use the WCF Service Configuration Editor tool in the Visual Studio Tools menu to create the configuration for the services, which is located in the WcfRemoteServices Web.Config file. The most important item to keep in mind is that Silverlight for Windows Phone only supports basicHttpBinding and webHttpBinding. For security, Windows Phone 7 supports Basic Authentication for credentials (SSL always recommended if using Basic Authentication).
To access a remote service in Visual Studio 2010, you can generate a proxy class for the remote service using the Add Service Reference in the Windows Phone application as shown in Figure 4-10.
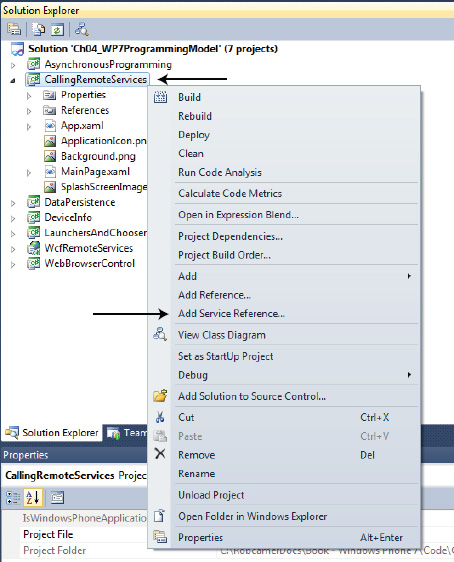
Silverlight includes a command-line tool for complete control when generating proxy classes. For Silverlight for Windows Phone 7, use the Silverlight 3 version of the tool called slsvcutil.exe, located at c:Program Files (x86)Microsoft SDKsSilverlightv3.0Tools. The following is an example command-line for the two services we just created:
slsvcutil.exe http: //localhost:9090/services/AdventureWorks.svc/out:c: estAdventureWorksProxy.cs
One advantage of using the command-line tool is that you can customize the proxy generation. For this sample, the slsvcutil.exe is used to generate the proxy class.
With the server-side service SOAP service created and the client proxy in hand, the WebServicePage.xaml page is customized to call the SOAP service. A ListBox control with an inline DataTemplate is added to the XAML of the WebServicePage.xaml page (see the following):
<ListBox x:Name="ProductsListBox" HorizontalAlignment="Left" VerticalAlignment="Top" >
  <ListBox.ItemTemplate>
    <DataTemplate>
      <StackPanel Margin="0,0,0,20">
<TextBlock Text="{Binding Name}" Style="{StaticResource PhoneTextLargeStyle}" />
<TextBlock Text="{Binding ProductNumber}" Style=
"{StaticResource PhoneTextSmallStyle}" />
<TextBlock Text="{Binding ListPrice}" Style="{StaticResource PhoneTextAccentStyle}" />
</StackPanel>
</DataTemplate>
</ListBox.ItemTemplate>
</ListBox>Listing 4-14 has the code-behind file that calls the service asynchronously and then data binds the list box with the product info.
Example 4.14. The WebServicePage.xaml.cs Code File
using Microsoft.Phone.Controls;

namespace CallingRemoteServices.pages
{
  public partial class WebServicePage : PhoneApplicationPage
  {
    public WebServicePage()
    {
      InitializeComponent();
    }

    private void PhoneApplicationPage_Loaded(object sender, RoutedEventArgs e)
    {
      AdventureWorksClient adventureWorksClient = new AdventureWorksClient();
      adventureWorksClient.FullProductListCompleted +=
        new EventHandler<FullProductListCompletedEventArgs>(
          adventureWorksClient_FullProductListCompleted);
      adventureWorksClient.FullProductListAsync();
    }

    void adventureWorksClient_FullProductListCompleted(
      object sender, FullProductListCompletedEventArgs e)
    {
      ProductsListBox.ItemsSource = e.Result;
    }
  }
}
When you run the sample, it takes a good 10 seconds to download and data bind the data, as it is a long list, but it demonstrates how to call a SOAP service in Windows Phone 7. Figure 4-11 has the UI.
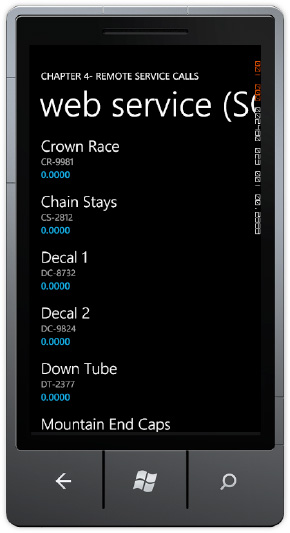
This concludes the demonstration on how to call SOAP web services. In the next section, we cover ADO.NET Data Services, and demonstrate accessing REST services with the OData client for Windows Phone 7.
We now switch to demonstrating how Windows Phone 7 can call REST services using an OData client. A new WCF Data Service item named AdventureWorksRestOData.svc is added to the WcfRemoteServices project and the class is edited to look like the following:
namespace WcfRemoteServices.services
{
  public class AdventureWorksREST : DataService<AdventureWorksEntities>
  {
    public static void InitializeService(DataServiceConfiguration config)
    {
            config.SetEntitySetAccessRule("*", EntitySetRights.All);
      config.DataServiceBehavior.MaxProtocolVersion = DataServiceProtocolVersion.V2;
config.SetEntitySetPageSize("*", 20);
}
}
}Notice that the DataService class also uses the AdventureWorksEntities Entity Framework model as the basis for which objects it makes available via REST. A similar URL is used to access the service:
http://localhost:9090/services/AdventureWorksRestOData.svc
To retrieve the Vendors list, append the text Vendors to the end of this URL. Other REST operations are supported as well, but that's all it takes to create the REST Service.
In the WP7 client project named CallingRemoteServices, a new page is added, named RestDataServicesODataPage.xaml, where the AdventureWorksREST service is called. We need to generate a client proxy class using the DataSvcUtil.exe available at this link:
http://odata.codeplex.com/releases/view/54698#DownloadId=161862
It works similarly to the slsvcutil.exe we looked at previously:
DataSvcUtil /uri:http://localhost:9090/services/AdventureWorksRestOData.svc
/out:c:	estAventureWorksREST.cs /language:CSharp
The generated class is added to the WP7 CallingRemoteServices project. There is one other item that we need to add to the project, which is a Windows Phone 7 version of the System.Data.Services.Client.dll. This assembly is also available at the CodePlex link, the same place where you download DataSvcUtil.exe. At this point, the project should compile without errors.
Essentially, we just created an OData Windows Phone 7 client to the REST services we created previously at the AdventureWorksRestOData.svc end point. We change the namespace in the AventureWorksRESTOData.cs to AdventureWorksModelOdataClient to ensure there are no name collisions. We add a using AdventureWorksModelOdataClient statement to RestDataServicesODataPage.xaml.cs.
Now that we have everything set up, we add a ListBox named VendorsListBox control to the ContentPanelGrid control in RestDataServicesODataPageXAML. We create a simple DataTemplate as well. Here is the XAML:
<ListBox.ItemTemplate>
  <DataTemplate>
    <StackPanel Margin="0,0,0,30">
      <TextBlock Text="{Binding Name}" />
      <TextBlock Text="{Binding AccountNumber}" />
      <StackPanel Orientation="Horizontal">
        <TextBlock Text="Credit Rating:" Margin="0,0,4,0"/>
        <TextBlock Text="{Binding CreditRating}" />
      </StackPanel>
    </StackPanel>
  </DataTemplate>
</ListBox.ItemTemplate>
</ListBox>
Listing 4-15 shows the code-behind for RestDataServicesOdataPage.xaml.
Example 4.15. The RestDataServicesOdataPage.xaml.cs Code File
using System;
using System.Data.Services.Client;
using System.Windows;
using AdventureWorksModelOdataClient;
using Microsoft.Phone.Controls;

namespace CallingRemoteServices.pages
{
  public partial class RestDataServicesODataPage : PhoneApplicationPage
  {
    public RestDataServicesODataPage()
    {
      InitializeComponent();
    }

    private void PhoneApplicationPage_Loaded(object sender, RoutedEventArgs e)
    {
      AdventureWorksEntities context =
        new AdventureWorksEntities(
          new Uri("http://localhost:9090/services/AdventureWorksRestOData.svc"));

      DataServiceCollection<Vendor> vendors =
        new DataServiceCollection<Vendor>(context);
      //Add REST URL for collection
      VendorsListBox.ItemsSource = vendors;
      vendors.LoadAsync(new Uri("/Vendors", UriKind.Relative));
    }
  }
}
As you can see, it is pretty straightforward to connect to REST services with the OData client. You can support viewing collections of data, as well as inserting and deleting records. The sample named ODataClient_WinPhone7SampleApp.zip located at this link demonstrates viewing collections as well as inserting and deleting records:
http://odata.codeplex.com/releases/view/54698#DownloadId=161862
In the next section we cover accessing REST+JSON services directly.
There will be scenarios where you will build an application that connects to services created on non-Microsoft platforms that deliver JSON data over REST services. Another scenario is that you have a data-tier to retrieve data already created, and you just need to plug in that data-tier into a service that publishes the data via REST+JSON. This section provides an example of connecting to JSON data in those situations.
To have a completely fresh look at service creation for this scenario, another WCF Service Application project is added to the Chapter 4 solution named WcfRemoteServicesSimpleRestJSON. Use the refactoring capabilities in Visual Studio 2010 to change IService1 to IAdventureWorksRestJSON and to change the implementation from Service1 to AdventureWorksRestJSON. The IAdventureWorksRestJSONInterface is further modified to return rest data and it is provided a UriTemplate for the underlying GetVendors method. Listing 4-16 is the Interface IAdventureWorksRestJSON.
Example 4.16. The IAdventureWorksRestJSON Interface Code File
using System.Collections.ObjectModel;
using System.ServiceModel;
using System.ServiceModel.Web;
using WcfRemoteServicesSimpleRestJSON.Models;

namespace WcfRemoteServicesSimpleRestJSON
{
  [ServiceContract]
  public interface IAdventureWorksRestJSON
  {
    [OperationContract]
    [WebGet(UriTemplate = "/Vendors",
      BodyStyle = WebMessageBodyStyle.Bare,
      ResponseFormat = WebMessageFormat.Json)]
    ObservableCollection<Vendor> GetVendors();

  }
}
Listing 4-17 provides the concrete implementation of the Interface.
Example 4.17. The IAdventureWorksRestJSON Interface Code File
using WcfRemoteServicesSimpleRestJSON.Models;
using System.Collections.ObjectModel;

//TEST THE SERVICE: http://localhost:9191/AdventureWorksRestJSON.svc/Vendors

namespace WcfRemoteServicesSimpleRestJSON
{
  public class AdventureWorksRestJSON : IAdventureWorksRestJSON
  {

    public ObservableCollection<Vendor> GetVendors()
    {
      //Replace with real data layer here
      ObservableCollection<Vendor> vendors = new ObservableCollection<Vendor>()
      {
        new Vendor(){AccountNumber="111111", CreditRating=65,
          Name="Frabrikam Bikes" },
        new Vendor(){AccountNumber="222222", CreditRating=40,
          Name="Contoso Sports" },
        new Vendor(){AccountNumber="333333", CreditRating=30,
          Name="Duwamish Surfing Gear" },
      };

      return vendors;
    }

  }
}
The implementation simply creates an ObservableCollection of Vendor objects inline and returns the collection. Plug in your data layer here and using the refactoring capabilities to rename namespaces and classes in order to customize to your needs.
Using the refactoring capabilities in Visual Studio will automatically update the web.config that is in the project to match the new class names. Listing 4-18 shows the complete web.config file.
Example 4.18. Web.config file for AdventureWorksRestJSON Service
</system.web>
<system.serviceModel>
  <behaviors>
    <serviceBehaviors>
      <behavior name="RestDataServiceBehavior">
        <serviceMetadata httpGetEnabled="true"  policyVersion="Policy15"/>
        <serviceDebug includeExceptionDetailInFaults="true" />
      </behavior>
    </serviceBehaviors>

    <endpointBehaviors>
      <behavior name="REST">
        <webHttp helpEnabled="true"/>
      </behavior>
    </endpointBehaviors>
  </behaviors>
  <services>
    <service behaviorConfiguration="RestDataServiceBehavior"
            name="WcfRemoteServicesSimpleRestJSON.AdventureWorksRestJSON">
    <endpoint address="" behaviorConfiguration="REST" binding="webHttpBinding"
      contract="WcfRemoteServicesSimpleRestJSON.IAdventureWorksRestJSON" />
    <endpoint address="mex" binding="mexHttpBinding" name="RestDataMetaData"
      contract="IMetadataExchange" />
    </service>
    </services>
    <serviceHostingEnvironment multipleSiteBindingsEnabled="true" />

  </system.serviceModel>
  <system.webServer>
    <modules runAllManagedModulesForAllRequests="true" />
    <directoryBrowse enabled="true" />
  </system.webServer>
</configuration>
Notice the address attribute for the <endpoint> element under the <services> element. There are two endpoints configured for the service: one to return data with an attribute of address="" and the other to return metadata with an address="mex." These addresses are relative to where the service is hosted. In this case, the project is hosted in the file AdventureWorksRestJSON.svc, which is part of the URL where the service is hosted:
http://localhost:9191/AdventureWorksRestJSON.svc
The WcfRemoteServicesSimpleRestJSON project's Web tab defines where the project is hosted, such as the port number. Now that we have a functioning service, we add a label to MainPage.xaml in the CallingRemoteServices project that navigates to a new page named AdventureWorksRestJSONPage.xaml. Save the project and switch to Expression Blend to edit the page. Uncomment the application bar, and four application bar buttons are added. A ListBox named VendorsListBox is added to the ContentPanel Grid. Two buttons titled "Add" and "Delete" are added beneath the VendorsListBox. The sample demonstrates the following things:
Application bar button to show the returned JSON
Application bar button that retrieves the JSON, parses it into a collection, and then data binds with the
VendorsListBoxApplication bar button to save the current object list to isolated storage
Application bar button to load from isolated storage the saved object list
The
Addbutton adds a record to the collection displayed in theVendorsListBoxThe
Deletebutton deletes the currently selected record in theVendorsListBox
To test calling the REST+JSON service the leftmost application bar button calls the service and displays the returned JSON in a MessageBox:
#region Get Raw JSON data
HttpWebRequest request;
private void GetRawJSONDataAppBarBtn_Click(object sender, EventArgs e)
{
  request = WebRequest.CreateHttp("http://localhost:9191/AdventureWorksRestJSON.svc/Vendors");
  request.BeginGetResponse(new AsyncCallback(ReceiveRawJSONData), null);
}

string returnedResult;
void ReceiveRawJSONData(IAsyncResult result)
{
  WebResponse response = request.EndGetResponse(result);
  using (StreamReader reader = new StreamReader(response.GetResponseStream()))
  {
    returnedResult = reader.ReadToEnd();
  }
  LayoutRoot.Dispatcher.BeginInvoke(() =>
  {
    MessageBox.Show(returnedResult);
  });
}
#endregion
Figure 4-12 displays the returned JSON when the leftmost application bar is clicked.
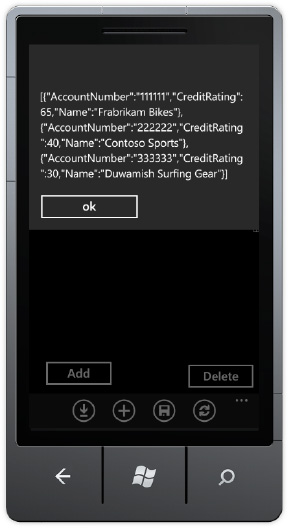
The application bar button second to the left makes the same web call, but this time it serializes the JSON into a collection of Vendor objects. Here is the code:
#region Retrieve Vendors Data
private void GetVendorsAppbarBtn_Click(object sender, EventArgs e)
{
  request = WebRequest.CreateHttp("http://localhost:9191/AdventureWorksRestJSON.svc/Vendors");
  request.BeginGetResponse(new AsyncCallback(GetVendors), null);
}

//add a reference to System.Servicemodel.web to get DataContractJsonSerializer
void GetVendors(IAsyncResult result)
{
  DataContractJsonSerializer ser = null;
  WebResponse response = request.EndGetResponse(result);
  ser = new DataContractJsonSerializer(typeof(ObservableCollection<Vendor>));
  DataStore.Instance.Vendors = ser.ReadObject(response.GetResponseStream()) as ObservableCollection<Vendor>;
  VendorsListBox.Dispatcher.BeginInvoke(() =>
  {
VendorsListBox.ItemsSource = DataStore.Instance.Vendors; }); } #endregion
This code uses the DataContractJsonSerializer class to deserialize the JSON data into Vendor objects. A Lambda expression (the =>) is used to fire an anonymous delegate back on the UI thread to data bind the Vendors collection to the VendorsListBox. The anonymous delegate is represented by the block created by the braces.
JSON.NET is very popular in the dev community as an alternative JSON serializer to the DataContractJsonSerializer class. Many blog posts also claim that JSON.NET is faster at performing serialization over DataContractJsonSerialize.It also provides additional features, such as LINQ to JSON. Here is a link: http://json.codeplex.com/
In the previous code, you may have noticed the DataStore.Instance.Vendors object, which we will now explain. SQL Server Compact Edition, Microsoft's mobile database, is not currently available for Windows Phone 7. There are several third-party and open source solutions available to provide object persistence support, as well as an abstraction layer to hide boilerplate code. See Listing 4-19.
Example 4.19. The DataStore and Vendor Class Code File
using System;
using System.Collections.ObjectModel;
using System.ComponentModel;
using System.IO.IsolatedStorage;
using System.Runtime.Serialization;
using System.Runtime.Serialization.Json;

namespace RestJSON.DataModel
{
  sealed public class DataStore
  {
    //Declare suported collection types here
    public ObservableCollection<Vendor> Vendors { get; set; }

    //Provide a static read-only instance
    private static readonly DataStore instance = new DataStore();

    //Private Constructor for Singleton
    public DataStore() { }

    //The entry point into this Database
    public static DataStore Instance
    {
      get
      {
        return instance;
      }
    }

    //Deserialize ObservableCollection from JSON
    public T LoadCollection<T>(T collectionToLoad, string collectionName)
    {
      using (IsolatedStorageFile store =
              IsolatedStorageFile.GetUserStoreForApplication())
{
if (store.FileExists(collectionName + ".txt"))
{
using (IsolatedStorageFileStream stream = store.OpenFile(
collectionName + ".txt", System.IO.FileMode.Open))
{
DataContractJsonSerializer serializer =
new DataContractJsonSerializer(typeof(T));
return (T)serializer.ReadObject(stream);
}
}
else
{
throw new Exception("Table not found");
}
}
}
//Serialize ObservableCollection to JSON
public void SaveCollection<T>(T collectionToSave, string collectionName)
{
if (collectionToSave != null)
{
using (IsolatedStorageFile store =
IsolatedStorageFile.GetUserStoreForApplication())
{
using (IsolatedStorageFileStream stream =
store.CreateFile(collectionName + ".txt"))
{
DataContractJsonSerializer serializer =
new DataContractJsonSerializer(typeof(T));
serializer.WriteObject(stream, collectionToSave);
}
}
}
}
//Delete ObservableCollection from Iso Storage
public void DeleteCollection(string tableName)
{
using (IsolatedStorageFile store =
IsolatedStorageFile.GetUserStoreForApplication())
{
if (store.FileExists(tableName + ".txt"))
{
store.DeleteFile(tableName + ".txt");
}
}
}
}
[DataContract()]
public class Vendor : INotifyPropertyChanged
{private string AccountNumberField;
private byte CreditRatingField;
private string NameField;
[DataMemberAttribute()]
public string AccountNumber
{
get
{
return this.AccountNumberField;
}
set
{
this.AccountNumberField = value;
NotifyPropertyChanged("AccountNumber");
}
}
[DataMemberAttribute()]
public byte CreditRating
{
get
{
return this.CreditRatingField;
}
set
{
this.CreditRatingField = value;
NotifyPropertyChanged("CreditRating");
}
}
[DataMemberAttribute()]
public string Name
{
get
{
return this.NameField;
}
set
{
this.NameField = value;
NotifyPropertyChanged("Name");
}
}
public event PropertyChangedEventHandler PropertyChanged;
private void NotifyPropertyChanged(String propertyName)
{
if (null != PropertyChanged)
{
PropertyChanged(this, new PropertyChangedEventArgs(propertyName));
}
}} }
The DataStore class shown in Listing 4-19 is not a lot of code, and it includes the Vendor class as well; but it provides a simple layer of abstraction that makes the code in the event handler much cleaner. Figure 4-13 shows the UI after the button second from the left is clicked.

The last two buttons use the DataStore class to save to isolated storage and retrieve the data from isolated storage. Here are the event handlers:
private void SaveVendorsAppbarBtn_Click(object sender, EventArgs e)
{
  DataStore.Instance.SaveTable<ObservableCollection<Vendor>>(
    DataStore.Instance.Vendors, "Vendors");
}

private void LoadVendorsAppbarBtn_Click(object sender, EventArgs e)
{
  DataStore.Instance.Vendors =
DataStore.Instance.LoadTable<ObservableCollection<Vendor>>(
DataStore.Instance.Vendors, "Vendors");
VendorsListBox.ItemsSource = DataStore.Instance.Vendors;
}The Vendors save and load functionality turns into simple code with the help of the DataStore class. When the data is loaded into the VendorsListBox, save the data, click the Start hardware button, and then click the back button. The Resuming... screen is displayed, and the data is not loaded. You can click the Load button to load the data from isolated storage and data bind it with the VendorsListBox. We cover how to manage application life cycle, also known as tombstoning, next.
The last two buttons in the UI are Add and Delete. Note that while the Vendors object collection that is part of the DataStore object is read-only, you can still add and remove objects from the collection. The read only modifier applies to the Vendors instance, not its underlying collection. The following is the code for the Add and Delete button:
private void addVendorButton_Click(object sender, RoutedEventArgs e)
{
  if (DataStore.Instance.Vendors != null)
  {
    DataStore.Instance.Vendors.Add(
    new Vendor()
    {
      AccountNumber = "555555",
      CreditRating = 45,
      Name = "Frabrikam Sports"
    });
  }
}

private void deleteButton_Click(object sender, RoutedEventArgs e)
{
  if (DataStore.Instance.Vendors != null)
  {
    DataStore.Instance.Vendors.Remove((Vendor)VendorsListBox.SelectedItem);
  }
}
The Add button is hard-coded to demonstrate how simple the operation is, but you could just as easily create a page with a set of controls that data bind to a new Vendor instance's properties and, upon clicking save, add the Vendor instance to the collection. The delete button removes the Vendor item selected in the VendorsListBox control from the underlying collection.
This concludes our discussion on connecting to remote services. Next up is the Bing Maps Control for Windows Phone 7, where we demonstrate adding pins to the map programmatically and via data binding to a collection.
The Bing Maps control provides full mapping capabilities on Windows Phone 7. The control is optimized for mobile performance, including map tiles optimized for mobile bandwidth speeds.
The Bing Maps control fully supports Silverlight data binding for pushpin data with templates for plotting information. Users can pinch zoom the map, so it is not recommended to implement buttons for zooming in and out.
A new project named BingMapsControl is added to the Chapter 4 solution. A Bing Maps control is dropped into the ContentPanelGrid control, and two application bar buttons are enabled. The next three sections cover licensing, how to add a pin programmatically, and how to data bind to a collection of locations and plot on the Bing Maps control.
As of this writing, the Bing Maps control is free to use for consumer-facing applications. This means if you are building a store locator, points of interest application, and so on that consumers would use, there is no licensing cost. To get started go to this URL to obtain an application key:
www.bingmapsportal.com
Set the Application Type to mobile for your mobile application. Next, set the key value in XAML, either directly or via data binding, for the CredentialProvider attribute:
<bing:Map Name=" TestBingMapsControl"
   CredentialsProvider="AppKeyGoesHere" />
It is really that simple to gain access to what is a very powerful Silverlight-based mapping control. The next two sections cover plotting data on the Bing Maps control.
There are many mobile scenarios where your application just needs to plot a single point, or a small number of points, and center the map on a point. In the BingMapsControl project's MainPage.xaml code file, the application bar is enabled. The left button plots a single point on the map by setting the location on a Pushpin object configured in the XAML. The following is the XAML for the Bing Maps Control:
<bing:Map Name="TestBingMapsControl"
  CredentialsProvider="..." >
  <bing:Pushpin x:Name="SinglePushpin" Visibility="Collapsed">
    <bing:Pushpin.Content>
      <Ellipse Width="25" Height="25" Fill="#FF00FF4A"/>
    </bing:Pushpin.Content>
  </bing:Pushpin>
</bing:Map>
Notice the <bing:Pushpin> object named SinglePushpin nested within the Map object. The Content property for the Pushpin is set to an Ellipse object. Notice that Visibility is set to Collapsed initially. All that's missing is a location.
The event handler for the left application bar button titled "add a pin" sets the position on the Pushpin object by name and then configures Visibility to Visible. Here is the code:
private void AddaPinAppBarBtn_Click(object sender, EventArgs e)
{
  //SinglePushpin is defined in XAML
  GeoCoordinate location = new GeoCoordinate(34d, −84d);
  SinglePushpin.Location = location;
  SinglePushpin.Visibility = Visibility.Visible;

  //Center and Zoom in on point
  TestBingMapsControl.Center = location;
  TestBingMapsControl.ZoomLevel = 11;
//Turn on zoom bar for emulator testing TestBingMapsControl.ZoomBarVisibility = Visibility.Visible; }
The Location property for the Pushpin object is set and Pushpin made visible. The Map control is also centered on the configured Location and zoomed in a bit. Figure 4-14 shows the results of clicking the application bar button.
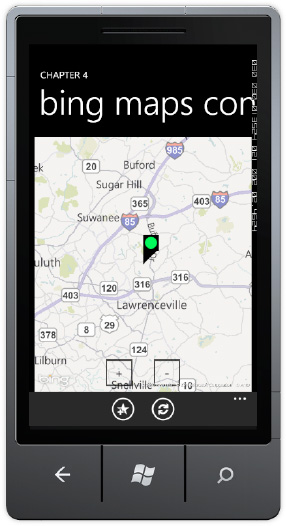
You could add another Pushpin object, and have one represent current location and the other represent desired location. Using Pushpin objects is a quick and easy way to get data on the Map control. For a large number of positions to plot, a MapItems control is recommended. We cover that in the next section.
Note that the zoom-in (+) and zoom-out (-) buttons are just there to ease development within the Emulator. You should have zoom-in and zoom-out buttons in a real application. The user should use pinch-zoom instead.
In this section, we use the same MainPage.xaml and TestBingMapsControl Bing Maps control to plot a collection of points. A <bing:MapItemsControl> is nested within the TestBingMapsControl. The MapItemsControl represents a collection of points to plot on the Bing Maps control.
Two classes are added to the project:PushpinCollection and PlotPoint. The class PushpinCollection publishes a list of PlotPoint objects, and provides a method to initialize the collection. The PlotPoint class represents a point that is plotted, containing Quantity and Location properties. Quantity is what is displayed and Location represents where to plot the point. Listing 4-20 contains the source for the classes.
Example 4.20. The PushpinCatalog and PlotPoints Classes
using System.Collections.Generic;
using System.Device.Location;

namespace BingMapsControl
{
  public class PushpinCollection
  {
    private List<PlotPoint> points;
    public List<PlotPoint> Points { get { return points; } }

    public void InitializePointsCollection()
    {
      //Generate sample data to plot
      points = new List<PlotPoint>()
      {
        new PlotPoint()
        { Quantity = 50,
          Location= new GeoCoordinate(35d, −86d)
        },
        new PlotPoint()
        { Quantity = 40,
          Location= new GeoCoordinate(33d, −85d)
        },
         new PlotPoint()
        { Quantity = 60,
          Location= new GeoCoordinate(34d, −83d)
        },
        new PlotPoint()
        { Quantity = 20,
          Location= new GeoCoordinate(40d, −120d)
        },
      };
    }
  }

  public class PlotPoint
  {
    public int Quantity { get; set; }
    public GeoCoordinate Location { get; set; }
  }
}
Expression Blend is used to data bind the MapItemsControl to the Points collection of the PushpinCatalog class. A DataTemplate is created to render the PlotPoint items into a customized Pushpin template. Listing 4-21 the XAML for the BingMapsControl project's MainPage.xaml page.
Example 4.21. The BingMapsControl's MainPage.xaml
<phone:PhoneApplicationPage
    xmlns="http://schemas.microsoft.com/winfx/2006/xaml/presentation"
    xmlns:x="http://schemas.microsoft.com/winfx/2006/xaml"
    xmlns:phone="clr-namespace:Microsoft.Phone.Controls;assembly=Microsoft.Phone"
    xmlns:shell="clr-namespace:Microsoft.Phone.Shell;assembly=Microsoft.Phone"
    xmlns:d="http://schemas.microsoft.com/expression/blend/2008"
    xmlns:mc="http://schemas.openxmlformats.org/markup-compatibility/2006"
    xmlns:bing="clr-namespace:Microsoft.Phone.Controls.Maps;assembly=Microsoft
.Phone.Controls.Maps"
    xmlns:local="clr-namespace:BingMapsControl"
    x:Class="BingMapsControl.MainPage"
    mc:Ignorable="d" d:DesignWidth="480" d:DesignHeight="696"
    SupportedOrientations="Portrait" Orientation="Portrait"
    shell:SystemTray.IsVisible="True"
    >

  <phone:PhoneApplicationPage.Resources>
    <local:PushpinCollection x:Key="PushpinCollectionDataSource" d:IsDataSource="True"/>
    <DataTemplate x:Key="PlotPointDataTemplate">
      <Grid>
        <bing:Pushpin Location="{Binding Location}"
         ToolTipService.ToolTip="{Binding Quantity}" />
      </Grid>
    </DataTemplate>
  </phone:PhoneApplicationPage.Resources>
  <phone:PhoneApplicationPage.FontFamily>
    <StaticResource ResourceKey="PhoneFontFamilyNormal"/>
  </phone:PhoneApplicationPage.FontFamily>
  <phone:PhoneApplicationPage.FontSize>
    <StaticResource ResourceKey="PhoneFontSizeNormal"/>
  </phone:PhoneApplicationPage.FontSize>
  <phone:PhoneApplicationPage.Foreground>
    <StaticResource ResourceKey="PhoneForegroundBrush"/>
  </phone:PhoneApplicationPage.Foreground>
  <phone:PhoneApplicationPage.ApplicationBar>
    <shell:ApplicationBar IsVisible="True" IsMenuEnabled="True">
      <shell:ApplicationBarIconButton x:Name="AddaPinAppBarBtn"
                  IconUri="/icons/appbar.favs.addto.rest.jpg"
                  Text="add a pin" Click="AddaPinAppBarBtn_Click"/>
      <shell:ApplicationBarIconButton x:Name="DatabindAppBarBtn"
                  IconUri="/icons/appbar.refresh.rest.jpg"
                  Text="data bind" Click="DatabindAppBarBtn_Click"/>
    </shell:ApplicationBar>
  </phone:PhoneApplicationPage.ApplicationBar>

  <!--LayoutRoot is the root grid where all page content is placed-->
  <Grid x:Name="LayoutRoot" Background="Transparent"
    DataContext="{Binding Source={StaticResource PushpinCollectionDataSource}}">
<Grid.RowDefinitions>
    <RowDefinition Height="Auto"/>
    <RowDefinition Height="*"/>
  </Grid.RowDefinitions>

  <!--TitlePanel contains the name of the application and page title-->
  <StackPanel x:Name="TitlePanel" Grid.Row="0" Margin="12,17,0,28">
    <TextBlock x:Name="ApplicationTitle" Text="Chapter 4"
               Style="{StaticResource PhoneTextNormalStyle}"/>
    <TextBlock x:Name="PageTitle" Text="bing maps control" Margin="9,-7,0,0"
                 Style="{StaticResource PhoneTextTitle1Style}"/>
  </StackPanel>

  <!--ContentPanel - place additional content here-->
  <Grid x:Name="ContentPanel" Grid.Row="1" Margin="12,0,12,0">
    <bing:Map x:Name="TestBingMapsControl"
        CredentialsProvider="your bing maps AppID goes here" >
        <bing:MapItemsControl Name="mapLayer"
           ItemTemplate="{StaticResource PlotPointDataTemplate}"
           ItemsSource="{Binding Points}"/>
        <bing:Pushpin x:Name="SinglePushpin" Visibility="Collapsed">
          <Ellipse Width="25" Height="25" Fill="#FF00FF4A"/>
        </bing:Pushpin>
      </bing:Map>
    </Grid>
  </Grid>
</phone:PhoneApplicationPage>
The following is the application bar button event handler that loads the Points collection:
private void DatabindAppBarBtn_Click(object sender, EventArgs e)
    {
      PushpinCollection collection = LayoutRoot.DataContext as PushpinCollection;
      if (collection != null)
        collection.InitializePointsCollection();
    }
This code needs to grab the instance of the PushpinCollection that is configured as the DataContext of the LayoutRoot Grid object. See Figure 4-15.
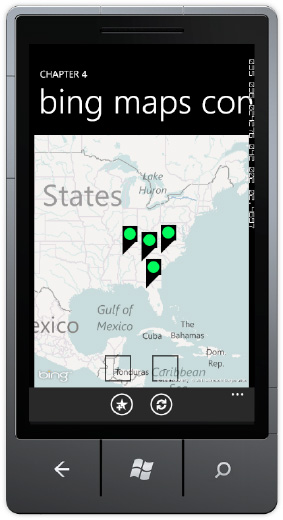
Windows Phone 7 is not currently a multitasking operating system, which begs the question: how does the operating system handle application switching and state? In this section, the Windows Phone 7 application execution model is discussed in detail. We starts with an overview of the user experience, and then detail what happens under the hood. Finally the section explains how to manage application state within the available framework.
Note
Microsoft announced at Mobile World Conference in February 2011 that support for multi-tasking scenarios will be added to Windows Phone 7 later in 2011.
If you have a Windows Phone 7 device, you are familiar with the navigation model. You know that the Start and the Back hardware button play an important role in the navigation model. The navigation model is similar to web browser navigation, which suggests that the phone maintains a back-stack of pages previously visited. Given that third-party applications do not multitask with other third-party applications in the current release, this brings up an intriguing question: what happens when you navigate back to a previous third-party application?
You probably noticed in previous examples that if you dynamically loaded data either via code or a remote service call, if you hit the Start button and then the Back button, the Resuming... screen is displayed and the application UI is rendered, but is missing the dynamic data. This happens because, while the operating system keeps a record in the back-stack of which apps have run previously, it does not maintain application state. Applications have a responsibility with the operating system to restore the application to its previous state.
If you are a Windows Forms or WPF developer, you are familiar with these four events related to application life cycle:
Launching:Application initially loadsClosing:Application is excited by the userActivated: Application comes to the foregroundDeactivated:Application loses focus
On Windows Phone 7, these events retain their general meaning, but with a twist. Launching and Closing work as expected. The Launching event fires upon initially launching the application. Closing fires upon exit.
The Deactivated event fires when the application loses focus when a hardware button is tapped, a phone call comes in, and so on. But the twist is that instead of continuing to run, the application is shut down, and an entry in the back-stack is made.
If the user navigates back to the application via the placeholder in the back-stack, the Activated event fires and the application resumes. Even though the application is no longer running when the Deactivated event fires, the Closing event does not fire. Same when the application launches upon resume in the Activated event; the Launching event does not fire.
For this section, the code for calling REST+JSON services in the CallingRemoteServices project is copied into this project to give us some interesting data to work with. We add additional code to log what is happening via the Visual Studio Output window using Debug.WriteLine, so as to not interfere with basic application functionality, but to let us know what is happening.
Note
Configure both the WcfRemoteServicesSimpleRestJSON and AppExecutionModel projects as startup projects for the solution to ensure the service is running.
The application lifecycle events are not attached to the individual pages, like MainPage.xaml. Instead, the events are attached to the Application object directly via the Microsoft.Phone.Shell.PhoneApplicationService class as part of the Application.ApplicationLifetimObjects collection. The lifecycle events are already created for you when you start a new project. In this project a few more events are added to the code:
The application uses Debug.WriteLine("") to log when in an event handler. Let's now run the application, close the application, and then review the logged events in the Output Window.
In App constructor
In Application_Startup
In Application_Launching
In MainPage Constructor
In PhoneApplicationPage_Loaded
In PhoneApplicationPage_BackKeyPress
In Application_Closing
In Application_Exit
Let's next load the application, click the Start button, navigate back, and then hit the back button again to exit the application.
In App constructor
In Application_Startup
In Application_Launching
In MainPage Constructor
In PhoneApplicationPage_Loaded
In Application_Deactivated
'taskhost.exe' (Managed): Loaded 'System.Runtime.Serialization.dll'
In Application_Exit
...navigate to Start screen,application tombstones, and then navigate back to application
In App constructor
In Application_Startup
In Application_Activated
In MainPage Constructor
In PhoneApplicationPage_Loaded
In PhoneApplicationPage_BackKeyPress
In Application_Closing
In Application_Exit
You can see that the Page and Application constructors and Page_Loaded fire every time, whether as part of initial launch or when resuming from tombstoning. Same for Application_Exit. It fires whether tombstoning or actually exiting the application. You will really want to understand this event cycle to ensure that you place code in the appropriate event handler, depending on what's desired. The next section discusses how to maintain state.
Let's now add state management to the code copied from the AdventureWorksRestJSONPage page in the CallingRemoteServices project. First, let's generate random state in the App() constructor and store in a variable named randomState as a string. The state will be the current DateTime.Now value when the application is launched. It will be saved in Application_Deactivated, and restored in Application_Activated. The application will use Debug.WriteLine to log the state in App.xaml.cs. Here is the code to initialize state:
if (PhoneApplicationService.Current.StartupMode ==
    StartupMode.Launch)
{
  Debug.WriteLine("In App constructor");
  randomState = DateTime.Now.ToString();
  Debug.WriteLine("Random State: = " + randomState);
}
Notice that the code in App() to initialize state checks to ensure the application is Launching and not Activating. This is because the constructor is called in both cases as shown in the previous section.
The recommended location to store application state is in PhoneApplicationService.Current.State, which is of type IDictionary<string, object>. The "key" is a string, and the state is of type object, which means it can store any serializable object, including complex objects that contain objects. Here is the code to save in Application_Deactivated and restore in Application_Activated:
// Code to execute when the application is activated (brought to foreground)
// This code will not execute when the application is first launched
private void Application_Activated(object sender, ActivatedEventArgs e)
{
  Debug.WriteLine("Activating - load state");
  IDictionary<string, object> state =
    PhoneApplicationService.Current.State;
  if (state.ContainsKey("Random State"))
  {
    randomState = state["Random State"] as String;
  }
  Debug.WriteLine("Random State Restore - " + randomState);
  Debug.WriteLine("In Application_Activated");
}

// Code to execute when the application is deactivated (sent to background)
// This code will not execute when the application is closing
private void Application_Deactivated(object sender, DeactivatedEventArgs e)
{
  Debug.WriteLine("Deactivating - save state");
  IDictionary<string, object> state =
    PhoneApplicationService.Current.State;
  state["Random State"] = randomState;
  Debug.WriteLine("In Application_Deactivated");
}
The Application_Deactivated event adds the data to the State object. The Application_Activated event restores state, but first uses State.ContainsKey to make sure the state information is present before trying to retrieve the state using the key value.
Warning
Applications have 10 seconds in both Application_Deactivated and Application_Activated to complete work.If saving or loading data goes beyond 10 seconds, the operating system will end the event handler.
The following is the data from the Output window after launching the app, clicking the Start button, and then the Back button:
In App constructor
Random State: = 1/24/2011 11:59:26 PM
In Application_Startup
In Application_Launching
In MainPage Constructor
In PhoneApplicationPage_Loaded
Deactivating - save state
In Application_Deactivated
In Application_Exit
In Application_Startup
Activating - load state
Random State Restore - 1/24/2011 11:59:26 PM
In Application_Activated
In MainPage Constructor
In PhoneApplicationPage_Loaded
In PhoneApplicationPage_BackKeyPress
In Application_Closing
In Application_Exit
As an alternative, you can handle state management at the page level. In many ways, this method makes more sense, because it is easier to restore the data as close to where it is needed, as opposed to restoring in App.xaml.cs and then passing it along. The code in MainPage.xaml.cs overrides the OnNavigatedFrom and OnNavigatedTo methods as shown here:
protected override void OnNavigatedFrom(
  System.Windows.Navigation.NavigationEventArgs e)
{
  base.OnNavigatedFrom(e);
  IDictionary<string, object> state = PhoneApplicationService.Current.State;
  state["Selected Item"] = VendorsListBox.SelectedIndex;
  DataStore.Instance.SaveCollection<ObservableCollection<Vendor>>(
    DataStore.Instance.Vendors, "Vendors");
}

protected override void OnNavigatedTo(
  System.Windows.Navigation.NavigationEventArgs e)
{
  base.OnNavigatedTo(e);
  if (PhoneApplicationService.Current.StartupMode ==
    StartupMode.Activate)
  {
    //Load data from isolated storage
    DataStore.Instance.Vendors =
    DataStore.Instance.LoadCollection<ObservableCollection<Vendor>>(
    DataStore.Instance.Vendors, "Vendors");
VendorsListBox.ItemsSource = DataStore.Instance.Vendors;
// The state bag for temporary state
IDictionary<string, object> state =
PhoneApplicationService.Current.State;
// See if the bag contains the selected item
if (state.ContainsKey("Selected Item"))
{
//Set selected item on page
VendorsListBox.SelectedIndex = (int)state["Selected Item"];
//Scroll to selected item
VendorsListBox.ScrollIntoView(
VendorsListBox.Items[VendorsListBox.SelectedIndex]);
}
}
}Notice that the code does not save the Vendors collection to the PhoneApplicationService.Current.State object. The application could do that, but it seems to make sense to persist the major data collections where they would normally be saved, as opposed to being temporary state. On the other hand, saving the selected item makes sense, because when the user returns to the application after resume, the user will expect to see the application state just as they left it.
When you run the application, retrieve it from the service and then tombstone it by clicking a hardware button; then click the Back button to resume. Notice that the data is restored, and the current item is selected in the VendorsListBox control. To the user, it is as if the application continued to run when it really hadn't.
Understanding and supporting good life-cycle management is critical to providing a robust user interface. With good state management, a user will not even notice that the application stopped running. While we demonstrated tombstoning and persisting data in the MainPage class, in Chapter 6 we pick up the programming model discussion again starting with how to architect Silverlight for Windows Phone 7 applications correctly to manage these scenarios.
You can configure an application to run under the lock screen. This means that when the phone lock careen activates, the application continues to run in the foreground and is not tombstoned. This also means that the application continues to consume CPU and more importantly battery when running under the lock screen. Here is a link to the documentation:
http://msdn.microsoft.com/en-us/library/ff941090%28v=VS.92%29.aspx
There are some application scenarios in which running under the lock screen greatly enhances the user experience. An application that records GPS values while running under lock for a run tracker program is an excellent example.
It is pretty straightforward to implement running under the lock screen. Essentially configure ApplicationIdleDetectionMode to disabled in App.xaml.cs:
PhoneApplicationService.Current.ApplicationIdleDetectionMode = IdleDetectionMode.Disabled;
Handle theApplication's RootFrameObscured and UnObscured events. When the application is Obscured, execute code to reduce CPU cycles as much as possible to conserve battery. In the UnObscured event, restart application functionality to restore the application or game.
In this chapter we started by covering how to identify users, the device, network status, and application trial mode status for Windows Phone 7, and then investigated application data persistence with Isolated Storage. We next investigated platform integration by covering the launchers and choosers.
This chapter also covered how to load HTML into the WebBrowser control, as well as how to call HTML script from Silverlight and how to call Silverlight methods from HTML script. The chapter moved on to cover the Bing Maps control and the Application Execution Model in detail. In the next chapter, we cover advanced user interface development.