
In this and the next chapter, we won't be covering Silverlight. These two chapters are 100 percent dedicated to game development with XNA Game Studio, which is a free Visual Studio add-on that ships with the Windows Phone Developer Tools.
If you jumped straight to this chapter in the book, first please review the extensive introduction to XNA Game Studio development in Chapter 1. Chapter 3 focuses on user input. It also contains several examples based on XNA Game Studio development related to touch and accelerometer input. In Chapter 6, we discussed how to work with the XNA Media Library APIs, playing music, displaying image art, and the like. I recommend reviewing those chapters prior to diving in here.
In general, it is impossible to cover the full range of game development in just two chapters, so we take an optimized approach that builds on existing samples available at Microsoft's AppHub website, which is located at http://create.msdn.com. There are quite a few samples based on the XNA Framework that we leverage in this chapter to jumpstart game development. Why reinvent a game screen or menu framework when there are tried and true samples that we can leverage while covering key concepts of game development?
Note
The AppHub samples are available under the Microsoft Permissive License (Ms-PL) license, which you can download and review at http://create.msdn.com/downloads/?id=15.
I'm not a lawyer, so I won't provide an opinion on the license – but please do download and read it.
A hot topic of interest to indie game developers is access to Xbox LIVE gamer services. Xbox LIVE gamer services provide matchmaking, Achievements, Leaderboards, etc. support to Xbox games. You can find more information here:
http://msdn.microsoft.com/en-us/library/microsoft.xna.framework.gamerservices.aspx
On Windows Phone 7, a subset of Xbox LIVE gamer services is available to Xbox LIVE publishers. Example Xbox Live game publishers are Microsoft Game Studios, Electronic Arts, and Gameloft. Generally, a game developer works with an existing Xbox LIVE game publisher to ship a game that includes Xbox LIVE gamer services. It is difficult for a new game developer to immediately become an Xbox LIVE game publisher. It is a high bar; just look at the names of existing publishers.
So for an indie game developer, create an awesome game or possibly a fully fleshed out concept as the first step to gain access to Xbox LIVE gamer services. The next step is to get your game in front of an existing Xbox LIVE game publisher. Microsoft Game Studios currently has an e-mail alias to which you can send proposals: [email protected]. The other way to get noticed is to submit your finished game to AppHub and climb the popularity charts. An existing proven success as an indie publisher will help you get noticed.
Don't lose hope if you have your heart set on Xbox LIVE gamer services. Initially, the services were not available to Xbox Indie game publishers as part of create.msdn.com, but the services were eventually made available to indie game publishers on big Xbox. One can hope that in the future more Xbox LIVE gamer services become available to indie developers on Windows Phone 7 as well.
In the next section we will begin a journey of taking the HelloXNA project from Chapter 1 and turn it into a full-fledged game with a menu system, score keeping, options, tombstone support, and the like – all of the things you need to consider when building a game for Windows Phone 7.
Back in Chapter 1, we covered XNA Game Studio development fundamentals in the HelloXNA sample. The sample covered game loop basics with a very simple UI that had a hero ship that shot a missile at the alien attacker ship. As you recall, XNA is not event driven. Rather, it checks status on objects and input (polls) in a type loop that tries to ensure that the screen is drawn at 30 frames/second. Frame rate can drop if a game spends too much time "thinking" when updating objects. Here is a summary of how this works:
while (Game.IsRunning)
{
  Update();  //Perform calculations, update objects, handle input
  Draw();  //Draw background, objects, effects
}
The HelloXNA sample isn't really much of a "game," because there wasn't any interactivity. It essentially loaded up content and initialized state in the Game.LoadContent method. The Update method did some screen bounds checking and reset objects when they flew off the screen, and then the objects were rendered in the Draw method. In the HelloXNA sample, you cannot move the hero ship and the one attacker appears on the screen at the same place. In this section we will turn it into a "real" game with a menu, score, movable hero ship, and more worthy opponents in the alien attackers.
In the next section, we turn the HelloXNA game into a real game in the Chapter 7 AlienShooter sample project. The AlienShooter game will include a main menu, options menu, and actual game play. We introduce a Game Management sample that provides a ScreenManager class, a Menu class, and GameScreen objects to manage game functions. The game is modularized into individual screen classes, so you can have a screen that shows the main menu, a screen that shows the options for the game, and so on, as well as a screen that actually handles game play. By following these best practices your game will have a professional look and feel as well as be more maintainable. In subsequent sections we cover how to add basic animations and effects to provide more interesting game play.
This section covers how to add the game management and screens to the AlienShooter sample project. We start by creating the Chapter 7 code solution with a project named AlienShooter based on the XNA Game Studio 4.0 Windows Phone 7 Game (4.0) project template. The best way to start creating a "real" game is to base it on the Game State Management sample, which includes a main menu, an options screen, some gameplay, and a pause menu. It displays a loading screen between menus and gameplay with a popup message box to confirm that a user intends to quit. You can download the sample here:
http://create.msdn.com/en-US/education/catalog/sample/game_state_management
Tip
Right-click on the .zip and select "unblock" to ensure that security checks don't prevent you from being able to compile and run the application.
When you deploy the GameStateManagementSample (Phone) sample, notice that the game does not show up in the Games Hub, but is instead in the application list. The Genre attribute on the App element in the WMManifest.xml file determines where an application appears. The default is Genre="Apps.Normal" so that the application appears in the Application List. Change the genre attribute to Genre="Apps.Games" to have the game show up in the Games Hub.
Run the GameStateManagementSample (Phone) sample project to see the nice animations and transitions available with this sample. Let's get started by transitioning the AlienShooter sample to this format and then we will add in the code from Chapter 1's sample named HelloXNA. From there we will refactor to make the game interactive.
Tip
Close the Toolbox tool window to give yourself more space when working with XNA Game Studio games since there aren't components relevant in the Toolbox tool window.
With both the AlienShooter and GameStateManagementSample (Phone) sample projects open, we first create two new folders in AlienShooter named Screens and GameManagement. Copy the contents of the ScreenManager folder in the GameStateManagementSample (Phone) sample project to the GameManagement folder in the AlienShooter project. Copy the Screens folder content to the Screens folder content in the AlienShooter project.
Once copied over, select the option to Show All Files at the top of the Solutions Tool Window in Visual Studio. The next step is to right-click on the files in Visual Studio and select Include In Project to add them to the AlienShooter project. Be sure to fix up the namespaces by changing them from GameStateManagement to AlienShooter.GameManagement for the GameManagement folder content and to AlienShooter.Screens for the Screens folder content. You will also need to add a using AlienShooter.GameManagement; statement to all of the code files in the Screens folder as well. After fixing everything up the application should compile without any errors or warnings.
Next open the GameStateManagementSample (Phone) Content project folder and copy over all of the content files to the AlienShooterContent project folder using Windows Explorer except for the Content.contentproj file. As before, select the option to Show All Files in Visual Studio 2010, and then include the files into the AlienShooterContent project folder. We decide to split the content between GameManagement content and actual game content. Create a new folder in the AlienShooterContent project named GameManagement and copy menufont.spritefont and blank.png into the AlienShooterContent project GameManagement folder. The rest of the content is related to game play, which we will eventually replace anyway.
Next we go through the GameStateManagementSample (Phone) project'sGame1.cs and modify the AlienShooter Game1.cs to match the game state sample's Game.cs file. First, rename the Game1 class to AlienShooterGame and rename the code file Game1.cs to AlienShooterGame.cs. You will notice right away that the default spriteBatch private variable is not present in the game state sample, which suggests that the Game1.Draw and Game1.Update methods must not perform any game logic in this code file. Instead, there is a private field variable named screenManager of type ScreenManager that is added. Add a using AlienShooter.GameManagement; statement to the top of AlienshooterGame.cs as well.
We next move to the Constructor AlienShooterGame() and modify it to match the game state sample's GameStateManagementGame constructor as shown in Listing 7-1.
Example 7.1. AlienShooterGame Constructor
public AlienShooterGame()
{
  graphics = new GraphicsDeviceManager(this);
  Content.RootDirectory = "Content";
  TargetElapsedTime = TimeSpan.FromTicks(333333);

  // you can choose whether you want a landscape or portrait
  // game by using one of the two helper functions defined below
  InitializePortraitGraphics();
  // InitializeLandscapeGraphics();

  // Create the screen manager component.
  screenManager = new ScreenManager(this);

  Components.Add(screenManager);

  // attempt to deserialize the screen manager from disk. if that
  // fails, we add our default screens.
  if (!screenManager.DeserializeState())
  {
    // Activate the first screens.
    screenManager.AddScreen(new BackgroundScreen(), null);
    screenManager.AddScreen(new MainMenuScreen(), null);
  }
}
The code file defines two helper functions that set whether the game is a portrait or landscape game. Listing 7-2 has the code for the two helper functions.
Example 7.2. Helper Functions to Configure Portrait or Landscape Game
private void InitializePortraitGraphics()
{
  graphics.PreferredBackBufferWidth = 480;
  graphics.PreferredBackBufferHeight = 800;
}

private void InitializeLandscapeGraphics()
{
  graphics.PreferredBackBufferWidth = 800;
  graphics.PreferredBackBufferHeight = 480;
}
The next bit of code in Listing 7-1 for the AlienShooterGame constructor creates the ScreenManager and then adds it to the Components collection for the Microsoft.Xna.Framework.Game base class.
Component classes inherit from the Microsoft.Xna.Framework.DrawableGameComponent class, which attempts to modularize game development by providing the ability to have objects Update and Draw themselves without forcing all of that logic into the default Game.Draw and Game.Update methods. The ScreenManager class inherits from DrawableGameComponent and handles all of the actual Draw and Update logic for the game. I cover the ScreenManager class in detail in just a bit, so let's continue updating our AlienShooterGame (formerly Game1.cs) code file to get our game up and running. The last section of the AlienShooterGame constructor attempts to load the ScreenManager instance from disk. If it cannot, it loads the default screens to start the game.
The code overrides Game.OnExiting to serialize game state to disk in this event handler to set up state for the next time the game launches.
protected override void OnExiting(object sender, System.EventArgs args)
{
  // serialize the screen manager whenever the game exits
  screenManager.SerializeState();

  base.OnExiting(sender, args);
}
Unlike in Chapter 1, where all of our code was packed into Game1.cs, AlienShooterGame.cs does not perform any code in Update or in Draw. For our new version of the application, we use the ScreenManager to do work for us so we remove the LoadContent, UnloadContent, and Update methods from AlienShooterGame.cs. We modify Game.Draw to set the background color to Color.Black from Color.CornflowerBlue but otherwise this completes our edits for this file.
In order to test our work, we need to modify where GameManagement content is loaded from because remember that we placed that content inside of a GameManagement folder in the AlienShooterContent project. Open up the ScreenManager class and find the LoadContent override. Modify the load locations like this:
font = content.Load<SpriteFont>("GameManagement/menufont");
blankTexture = content.Load<Texture2D>("GameManagement/blank");
Once the above edits are completed, test and run and the AlienShooter project should work just like the GameStateManagementSample (Phone) sample project with a bit of code and content reorganization under the covers. You can choose to follow these steps by hand in your project or simply grab the AlienShooter project and rename the namespaces, game class, and screen classes to match your application. In the next section we go through the Game Management related classes located in the GameManagement folder to help you understand what's going on under the covers so that you can further customize the game to meet your needs.
The GameManagement folder contains three class files, GameScreen.cs, InputState.cs, and ScreenManager.cs. The ScreenManager class orchestrates loading GameScreen objects and transitions between GameScreen objects for you. The GameScreen abstract base class contains all of the underlying plumbing code to plug into the Game Management framework and is the base class for objects declared in the Screens folder. The InputState class collects Keyboard, Gamepad, and TouchPanel inputs. For Windows Phone 7, TouchPanel input is primary, though some devices support a keyboard as well. Figure 7-1 shows the class diagram for the Game Management classes.

The ScreenManager class is a DrawableGameComponent, while the GameScreen base class is not. The ScreenManager manages one or more screen classes that inherit from GameScreen. ScreenManager maintains a stack of screens, calls their Update and Draw methods at the appropriate times, and automatically routes input to the top most active screen.
You will notice that DrawableGameComponent looks very similar to the Game class. There are method overrides available for LoadContent, UnloadContent, Update, and Draw, much like the Game class. Under the covers the XNA Framework keeps the main Game class and available DrawableGameComponents in sync with respect to the Update and Draw methods, so that the developer can just focus on each individual component and screen.
In the ScreenManager.Draw and ScreenManager.Update methods, each screen is given an opportunity to process input, and either Update or Draw itself if it is the active screen. The ScreenManager's framework provides nice transition support for fade-in and fade-out of screens as the user navigates the game. If you like the way things work as is, you can just focus on your menu, options, game play screen, etc., and the framework takes care of the rest.
Now that we have covered the game management plumbing provided by the ScreenManager class, we will switch focus to the UX aspects of screens and menu. There are several screens in the project that were copied over from the Game Management sample that provide the starter UI. We go through these screens in this section.
The BackgroundScreen class sits behind all of the other menu screens. It draws a background image that remains fixed in place regardless of whatever transitions that other screens may implement. The content that is loaded is the background.png. Swap the background.png file with your default background image.
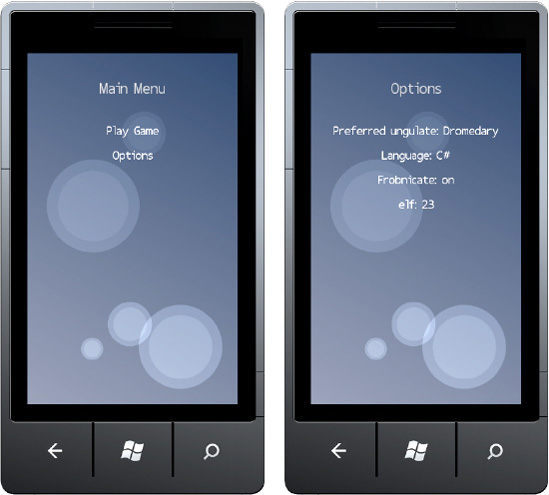
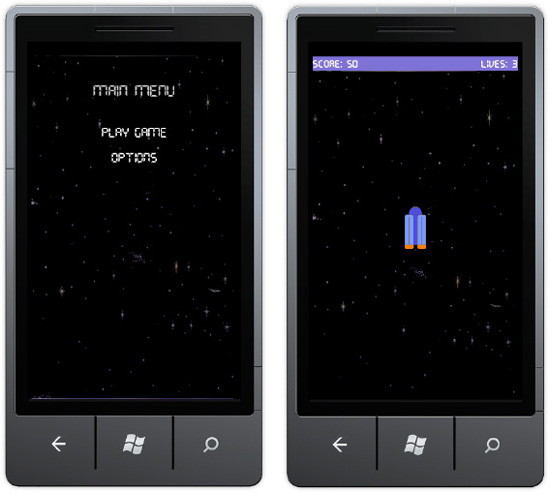
The MainMenuScreen class is the first screen that is loaded by the game. It displays the main menu items of Play and Options. The OptionsMenuScreen class is displayed over the main menu screen. It provides the user a chance to configure the game. Figure 7-2 shows the default Main Menu and Options Menu screens.
The menu items have a nice "Metro" transition when flying in and out. Individual menu items are still graphic items with additional logic to detect a touch and fire an event. The MenuEntry class provides menu item functionality. Here is the constructor for the OptionsMenuScreen class:
public OptionsMenuScreen()
    : base("Options")
{
    // Create our menu entries.
    ungulateMenuEntry = new MenuEntry(string.Empty);
languageMenuEntry = new MenuEntry(string.Empty);
frobnicateMenuEntry = new MenuEntry(string.Empty);
elfMenuEntry = new MenuEntry(string.Empty);
SetMenuEntryText();
// Hook up menu event handlers.
ungulateMenuEntry.Selected += UngulateMenuEntrySelected;
languageMenuEntry.Selected += LanguageMenuEntrySelected;
frobnicateMenuEntry.Selected += FrobnicateMenuEntrySelected;
elfMenuEntry.Selected += ElfMenuEntrySelected;
// Add entries to the menu.
MenuEntries.Add(ungulateMenuEntry);
MenuEntries.Add(languageMenuEntry);
MenuEntries.Add(frobnicateMenuEntry);
MenuEntries.Add(elfMenuEntry);
}The MenuEntries collection in the OptionsMenuScreen constructor is a protected member of the MenuScreen base class for the MainMenuScreen and OptionsMenuScreen classes. The MenuScreen.Draw and MenuScreen.Update methods measure and position menu entries for drawing to the screen. The MenuScreen class includes the sliding transitions logic for menu items in case you want to modify it.
Click on a menu item to view the transition to a new screen. The loading screen inherits from the GameScreen class coordinates transitions between the menu system and the game itself. Normally one screen will transition off at the same time as the next screen is transitioning on, but for larger transitions that can take a longer time to load their data; we want the menu system to be entirely gone before we start loading the game. This is done as follows:
Tell all the existing screens to transition off.
Activate a loading screen, which will transition on at the same time.
The loading screen watches the state of the previous screens.
When the loading screen sees they have finished transitioning off, it activates the real next screen, which may take a long time to load its data. The loading screen will be the only thing displayed while this load is taking place.
This concludes the overview of the Game Management ScreenManager, GameScreen, MenuScreen, and MenuEntry classes. In the next section we dive in and start to customize the template game for the AlienShooter game.
In this section, we begin customizing the game management starter project with content and game logic. We start by adding the content from the original game in Chapter 1 to AlienShooter. We copy over the Sprites and Textures folder and remove background.png, which is the generic XNA Framework sample image.
When you create a new XNA project, it always creates two projects, one project for your game and the other for your content. The Content project provides compile-time processing for game assets, including detecting missing assets, asset conversion, compression, and pre-processing. The key component to the Content project is the Content Pipeline.
The content pipeline does the work of preparing assets for use within an XNA Framework game. Assets are processed in two steps. The first step is importing the content. For the majority of formats, XNA has Content Importer classes to convert content into a common intermediate format. The second step converts the imported content into a final compiled, compressed, format via a Content Processor.
Importing content is as simple as adding new items to the Content project. In most cases, the content pipeline automatically detects the asset type and assigns the correct Content Importer and Content Processor. It is also possible to create custom Content Importer and Content Processor classes for assets not supported by the built-in classes.
In the Chapter 1 HelloXNA sample we demonstrate how to load content a single texture at a time using this code from the LoadContent method:
HeroShip = this.Content.Load<Texture2D>("Sprites/heroship");
SpaceShip = this.Content.Load<Texture2D>("Sprites/spaceship");
Missile = this.Content.Load<Texture2D>("Sprites/missile");
Each content item is loaded into a single texture. When drawn, each item requires its texture to be loaded by the GPU and rendered. The above items are drawn to the screen with these three lines of code in the Draw method:
spriteBatch.Draw(SpaceShip, SpaceShipPosition, Color.White);
spriteBatch.Draw(Missile, MissilePosition, Color.White);
spriteBatch.Draw(HeroShip, HeroShipPosition, Color.White);
Loading each texture is a performance hit for the GPU. A better way is to load a single texture that contains all of the images, and then just tell Draw which area of the texture to draw for that item. This type of texture is called a sprite sheet and is very common to use in game development, especially when creating sprite animation, which we will cover later in the chapter. There are two challenges with using sprite sheets: you have to take all of your individual images and mash them into a larger image, and you have to remember which part of the single large texture contains the particular image you want to draw to the screen.
Luckily AppHub comes to the rescue again with a ready-to-go custom Content Importer and Content Processor that can take a collection of images and automatically turn them into a single sprite sheet, solving the first challenge. For the complete background on the sample, download it here:
http://create.msdn.com/en-US/education/catalog/sample/sprite_sheet
The sample also includes a runtime class to include in your game named SpriteSheet, which allows either named or indexed access to images so that you do not have to remember the exact pixel location, solving the second challenge listed previously.
We implement the SpriteSheet sample in AlienShooter by copying over the SpriteSheetPipeline and SpriteSheetRuntime (Phone) projects from the AppHub SpriteSheetSample and adding them to the Chapter 7 Solution. Right-click the References folder in the AlienShooterContent project, select Add Reference, choose the Projects tab, and select the SpriteSheetPipeline project. Next, right-click on the References folder in the AlienShooter project and select Add Reference, choose the Projects tab, and select the SpriteSheetRuntime (Phone) project.
In the AlienShooterContent project navigate to the Sprites folder and exclude from the project these assets: heroship.tga, missile.tga, and spaceship.tga. We don't want to add the textures twice, so they should not be included as individual assets any more. Next, right-click on the Sprites folder and select Add | New Item... and choose XML File with a name of AlienShooterSpriteSheet.xml. Listing 7-3 shows the edited XML file.
Example 7.3. AlienShooterSpriteSheet.xml Sprite Sheet XML File
<?xml version="1.0" encoding="utf-8" ?>
<XnaContent>
<Asset Type="System.String[]">
<Item>Sprites/heroship.tga</Item>
<Item>Sprites/missile.tga</Item>
<Item>Sprites/spaceship.tga</Item>
</Asset>
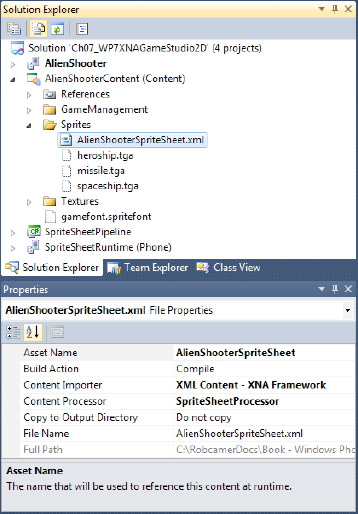
</XnaContent>If you don't edit the file correctly, you will get a compile error if the SpriteSheetPipeline Content Processor cannot find an asset listed in the XML file. Notice in this example that the folder location is included relative to the AlienShooterContent project to correctly identify the asset location. Figure 7-3 shows the Solution tool window with the AlienShooterContent project expanded and the Properties dialog for the AlienShooterSpriteSheet.xml.
Notice in Figure 7-3 that the individual sprite images are hidden and not part of the project in the Sprites folder, though they need to be accessible in the file system to the SpriteSheetProcessor Content Processor so that it can turn them into a single sprite sheet. The only content that is part of the Sprites folder is the AlienShooterSpriteSheet.xml XML file. Also in Figure 7-3, notice that the custom SpriteSheetProcessor Content Processor is configured for the XML file. Let's now draw update the GamePlay screen to start to render our new AlienShooter assets. A using SpriteSheetRuntime statement is added to the top of the GamePlay.cs code file. Three new private fields are added at the top of the GamePlayScreen class:
SpriteSheet alienShooterSpriteSheet;
Texture2D backgroundTexture;
Rectangle screenRect;
The alienShooterSpriteSheet variable will let us render the entire sprite sheet to the screen for debug purposes. The backgroundTexture variable represents our game background as with the HelloXNA sample and the screenRect variable holds a variable that points to the Rectangle object that is the size of the draw area.
The LoadContent method is updated to load the alienShooterSpriteSheetSpriteSheet and backgroundTextureTexture2D variables:
alienShooterSpriteSheet = content.Load<SpriteSheet>("Sprites/AlienShooterSpriteSheet");
backgroundTexture = content.Load<Texture2D>("Textures/background");
Most of the code in the Update and HandleInput methods is commented out since we no longer want the place holder code. The placeholder draw code is modifiedin theDraw method, and the following two additional items are added to draw the backgroundTexture and the alienShooterSpriteSheet to the screen:
spriteBatch.Begin();
//Draw background
spriteBatch.Draw(backgroundTexture, screenRect, Color.White);
//Draw Sprite Sheet
spriteBatch.Draw(alienShooterSpriteSheet.Texture,
  new Rectangle(screenRect.Width / 2, screenRect.Height / 2,
                alienShooterSpriteSheet.Texture.Width / 2,
                alienShooterSpriteSheet.Texture.Height / 2),
    Color.White);
spriteBatch.End();
Everything should compile and the game now shows AlienShooter assets on the GamePlayScreen, as shown in Figure 7-4.

Notice how tightly the Hero Spaceship, Missile, and Alien Ship are automatically packed in Figure 7-4 by the custom Content Processor. Just to close the loop, the code to draw an individual image from the AlienShooterSpriteSheet is very simple. Here is the code to just draw the Hero Spaceship at a point in the middle of the screen:
spriteBatch.Draw(alienShooterSpriteSheet.Texture,
    new Vector2((screenRect.Width / 2)-
                alienShooterSpriteSheet.SourceRectangle("heroship").Width / 2,
                          (screenRect.Height / 2)-
                alienShooterSpriteSheet.SourceRectangle("heroship").Height / 2),
    alienShooterSpriteSheet.SourceRectangle("heroship"),
There is a verbose computation to create a Vector2 for the screen center minus the center of the Hero Ship, but otherwise it is the standard Draw(texture, Vector, SourceRectangle, Color) method. Notice how easy it is to identify the Rectangle on the alienShooterSpriteSheet where the Hero Ship resides. Just pass in the asset name and the SpriteSheet class will locate it. More on drawing later in the chapter, but I wanted to close out how to completely work with the SpriteSheet class.
When you download the SpriteSheet Sample from AppHub, it includes an example extension on how to add a compression option to the Content Processor. Unfortunately the extension does not work for the XNA Game Studio 4.0 Reach profile. It just works for the HiDef profile.
Tip
The "Reach" profile limits XNA Game Studio to a subset of functions supported on Windows Phone, Xbox, and Windows for maximum compatibility. The "HiDef' profile supports only Xbox and Windows. It includes support for custom HLSL shaders as well as additional features.
We dive into creating a more robust game below but first let's cover some of the other constructs for a real game such as displaying game status text and menus, which is covered in the next section.
Displayed text, such as game status and menus, is an important component of game development. Users want a nice clean menu system to navigate. Game status is critical to game play; it makes the game interesting such as how much life is left, high score, rounds of ammunition available, and the like.
There are two methods to display text in the XNA Framework. The first is via the SpriteFont class. The SpriteFont class leverages the built in Font classes on your PC to create the font texture to display letter character images when rendered. The SpriteFont class is covered in the next section.
The other method to display text in the XNA Framework is with customized bitmap fonts. This method is more advanced, which means it is highly customizable but also requires additional work. To demonstrate working with fonts a new project named FontsSample is added to the Chapter 7 solution.
The SpriteFont class takes a built in font and rasterizes it based on configuration parameters. To add a text Font for rendering in XNA Game Studio, right-click on the FontsSampleContent project and select Add
While we take fonts for granted when working in Microsoft Word or in Outlook, fonts are licensed content. You must have redistribution rights to include a font in your game. Search the Web for "purchase fonts online" and quite a few sites show up. Some include free fonts with others for purchase.
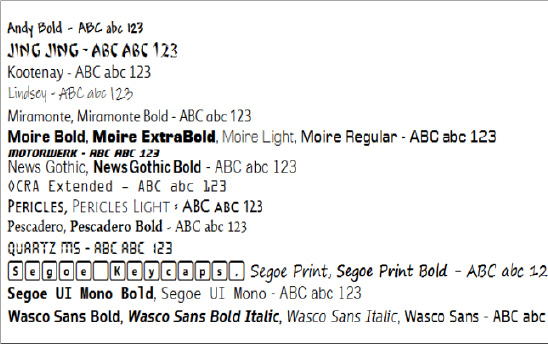
Luckily XNA Game Studio 4.0 includes a set of OpenTypefonts you can use in your games. Figure 7-5 shows the fonts that are licensed by Microsoft for your use. The image is taken from the AppHub education catalog.
For our sample, name the new Sprite Font item SegoeKeycaps24 and click Add. A new item named SegoeKeycaps16.spritefont is added to the FontSampleContent project. What may surprise you is that the SegoeKeycaps16.spritefont file is an XML file. Listing 7-4 shows the contents of the newly added file.
Example 7.4. SpriteFont XML File Format
<?xml version="1.0" encoding="utf-8"?>
<XnaContent xmlns:Graphics="Microsoft.Xna.Framework.Content.Pipeline.Graphics">
<Asset Type="Graphics:FontDescription">
<FontName>Segoe UI Mono</FontName>
<Size>14</Size>
<Spacing>0</Spacing>
<UseKerning>true</UseKerning>
<Style>Regular</Style>
<!-- <DefaultCharacter>*</DefaultCharacter> -->
<CharacterRegions>
<CharacterRegion>
<Start> </Start>
<End>~</End>
</CharacterRegion>
</CharacterRegions>
</Asset>
</XnaContent>The XML file describes the parameters for what should be rendered when text is drawn using this SpriteFont. For our example, change the FontName element to Segoe Keycaps. Change the Size to 16 and leave everything else at the default values.
You can edit the Spacing element to increase the space between characters, as well as modify the UseKerning item to modify how the font is laid out. Kerning adjusts the spacing between characters to be more pleasing to the eye. An example of kerning is when a capital "W" overhangs a neighboring "e" slightly when typing the word "Well." Without kerning, letters do not overhang or underhang as the case may be. The Style element indicates whether it should be Regular, Bold, or Italic.
The last element to discuss is the CharacterRegions element. CharacterRegions element controls what letters are available in the font. The default range is 32 (ASCII space) to 126 (ASCHII '~'). This reduces the number of characters rasterized as part of the content import process.
To draw the SegoeKeycaps16 Sprite Font, add a new private member named segoeKeycaps16 of type SpriteFont to the Game1 class in the FontSample project. Next add this line of code to the Game1.LoadContent method:
segoeKeycaps16 = Content.Load<SpriteFont>("SegoeKeycaps16");We used the SpriteBatch.Draw method to draw textures to the screen. The SpriteBatch.DrawString method has six overloads to provide flexibility in drawing text to the screen. Here are a couple of examples:
spriteBatch.DrawString(segoeKeycaps24, text, new Vector2(24, 130), Color.Yellow);

spriteBatch.DrawString(segoeKeycaps24, text, new Vector2(24, 450), Color.Orange,
    -.25f * (float)Math.PI, Vector2.Zero, 3, SpriteEffects.None, 0);
You can tinge the font color by adjusting the fourth parameter with a color value such as Color.Yellow. The second DrawString call above applies a –negative 45 degree rotation in the fifth parameter and a 300 percent scale in the sixth parameter, with an orange tinge applied to the Sprite Font. Another font is added to the project named Miramonte with Italics style and a few more DrawString calls are in the code but Figure 7-6 shows the results.
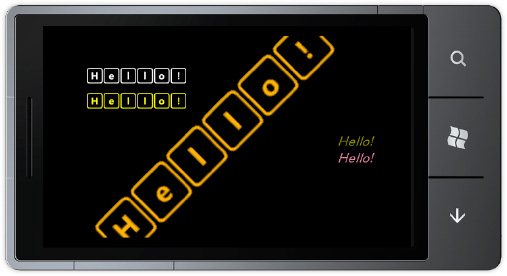
The scaled font renders pretty well but you can see some stretching in the letter "e" in Figure 7-6 that could be more obvious with other fonts. In the next section we cover how to create a bitmap font.
Bitmap fonts are not dependent on a built-in font. Instead, the fonts are loaded from a texture similar to what is shown in Figure 7-7.
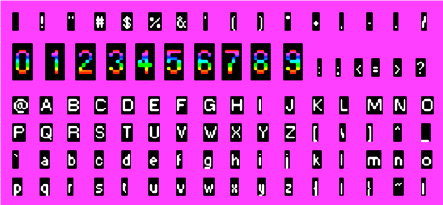
The example in Figure 7-7 was copied from MSDN by zooming in the browser by 200% and taking a screenshot, but you can create a custom bitmap font texture using any drawing program by following the conventions specified in the documentation.
The character order matters, with a space as the upper-left character. You can use a solid white or black background color for monochrome characters. In the previous example, black is used as the background color. Multicolored characters are supported with an alpha channel.
The space between characters must be filled with Magenta color (Red:255 Green:0 Blue:255 Alpha:255). The FontTextureProcessor class is applied to the texture instead of the default processor. The FontTextureProcessor will pack the characters in as close as possible so you don't have to worry about exact spacing between characters.
A new project named BitmapFontSample is added to the Chapter 7 solution. The bitmap font texture in Figure 7-7 is added to the BitmapFontSampleContent project with a name of BitmapFont.bmp. The Content Processor is configured to Sprite Font Texture - XNA Framework from the default of Texture - XNA Framework.
The SpriteFont class is still used as the member type for the bitmapFont object and the bitmap font is loaded in LoadContent just like for a regular SpriteFont content:
SpriteFont bitmapFont;
...//Load Content
bitmapFont = Content.Load<SpriteFont>("BitmapFont");
Drawing is the same as well with the DrawString method:
spriteBatch.Begin();
spriteBatch.DrawString(bitmapFont, text, new Vector2(24, 70), Color.White);
spriteBatch.End();
In summary, the primary differences when using a custom bitmap font is that you must draw out the characters correctly in the proper order and you configure the Content Processor to Sprite Font Texture - XNA Framework for the bitmap font texture.
The MenuScreen class is part of the GameStateManagementSample (Phone) sample project. It is the base class for the MainMenu.cs and OptionsMenu.cs screen objects that are part of the AlienShooter game project.
The MenuScreen class takes advantage of a helper class named MenuEntry, which draws the text and publishes a Selected event. The MenuEntry class does not detect the touch. Instead, the MenuScreen does most of the work to draw, detect a touch, and associate the touch with the correct MenuEntry item. A good way to understand how this works is to look at the constructor for the MainMenuScreen class:
public MainMenuScreen()
    : base("Main Menu")
{
    // Create our menu entries.
    MenuEntry playGameMenuEntry = new MenuEntry("Play Game");
    MenuEntry optionsMenuEntry = new MenuEntry("Options");

    // Hook up menu event handlers.
    playGameMenuEntry.Selected += PlayGameMenuEntrySelected;
    optionsMenuEntry.Selected += OptionsMenuEntrySelected;

    // Add entries to the menu.
    MenuEntries.Add(playGameMenuEntry);
    MenuEntries.Add(optionsMenuEntry);
}
The MainMenuScreen class creates the menu entries and associates event handlers with the menu entries. The base class MenuScreen handles the animation and positioning. A developer can customize the animation and layout by modifying the base MenuScreen class.
One way to customize the menu screens is to change the Font in the AlienShooterContent project. Open the /GameManagement/menufont.spritefont file and change the FontName element to Quartz MS from Figure 7-5 and change the Size to 24. The font has a science fiction look to it, which suites a game named AlienShooter pretty well.
We also modify the GamePlayScreen class to have Score and Lives text across the top with a SlateBlue color background. This is achieved via the SpriteBatch.DrawString method as well as adjusting the background color to SlateBlue and drawing the backgroundTexture 34 pixels lower via the added backgroundPosition Vector2 object. Figure 7-8 shows both the updated menu screen and game play screen.
When you run the project on a device, the animations and transitions look pretty nice. These can certainly be customized as well once you understand how to create animations and transitions in XNA Game Studio. We cover both topics in detail to create the actual game play.
In this section we focus on building out the game. Remember in Chapter 1 that we drew all of the objects directly in the Game1.cs class. In this chapter we will build up an object hierarchy to add better organization to the game structure. We start with an explanation of how sprite animation works so that we can then encapsulate the work in a GameObject class.
In this section we cover spite animation, which is the technique that brings a 2D game to life. Sprite Animation is a matter of showing frames or individual sprites at set intervals to give the illusion of motion, no different than flipping a drawing book that has pictures of a stick man running. Each picture is static, but when drawn in the correct order with the right position, the stick man appears animated when flipping through the images.
A new project named SpriteAnimation is added to the Chapter 7 solution. Project references to the SpriteSheetRuntime and SpriteSheetPipeline are added to the SpriteAnimation and SpriteAnimationContent projects respectively in order to take advantage of the automatic Sprite Sheet creation and easy sprite access via file name within the Sprite Sheet without having to remember coordinates or the math to track frames.
The Sprite Sheet is created from the AlienShooter textures. For the hero ship, we want to add rocket engine exhaust animations as well as for the missile. For the alien spaceship, a bit of glow is added underneath that shimmers and some tilt to the left and right is added to the ship. To create these effects I fired up Paint.NET and created 10 sprites for each object, varying, the patterns enough to make cartoonish flame for the hero ship and missile as well as the glow and tilt for the spaceship. Figure 7-9 shows the individually edited sprite files in the file system.

The files are added to the Sprite Sheet XML file as shown in Listing 7-5
Example 7.5. SpriteAnimationSpriteSheet.xml Content File
<?xml version="1.0" encoding="utf-8" ?>
<XnaContent>
  <Asset Type="System.String[]">
    <Item>Sprites/heroship0.tga</Item>
    <Item>Sprites/heroship1.tga</Item>
    <Item>Sprites/heroship2.tga</Item>
    <Item>Sprites/heroship3.tga</Item>
    <Item>Sprites/heroship4.tga</Item>
    <Item>Sprites/heroship5.tga</Item>
<Item>Sprites/heroship6.tga</Item>
<Item>Sprites/heroship7.tga</Item>
<Item>Sprites/heroship8.tga</Item>
<Item>Sprites/heroship9.tga</Item>
<Item>Sprites/spaceship0.tga</Item>
<Item>Sprites/spaceship1.tga</Item>
<Item>Sprites/spaceship2.tga</Item>
<Item>Sprites/spaceship3.tga</Item>
<Item>Sprites/spaceship4.tga</Item>
<Item>Sprites/spaceship5.tga</Item>
<Item>Sprites/spaceship6.tga</Item>
<Item>Sprites/spaceship7.tga</Item>
<Item>Sprites/spaceship8.tga</Item>
<Item>Sprites/spaceship9.tga</Item>
<Item>Sprites/missile0.tga</Item>
<Item>Sprites/missile1.tga</Item>
<Item>Sprites/missile2.tga</Item>
<Item>Sprites/missile3.tga</Item>
<Item>Sprites/missile4.tga</Item>
<Item>Sprites/missile5.tga</Item>
<Item>Sprites/missile6.tga</Item>
<Item>Sprites/missile7.tga</Item>
<Item>Sprites/missile8.tga</Item>
<Item>Sprites/missile9.tga</Item>
</Asset>
</XnaContent>The Content Processor is configured to SpriteSheetProcessor, which instructs the Content Pipeline to collect the individual files and mash them together into a single texture, as shown in Figure 7-10.
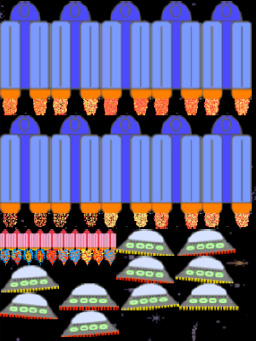
Personally, I would find it tedious to hand create a sprite texture, as shown in Figure 7-10 and prefer drawing individual images and letting the SpriteSheet sample code do the hard work for me. Once you see how easy it is to animate sprites using this method I think you will agree.
Drawing the frames so that it animates between the images is pretty straightforward. In the Game1 class for the SpriteAnimation sample, the following private fields are declared:
SpriteSheet SpriteAnimationSpriteSheet;
int spriteIndex = 0;
Rectangle screenRect;
TimeSpan timeToNextFrame = new TimeSpan();
TimeSpan frameTime = TimeSpan.FromMilliseconds(50d);
The spriteIndex variable is used to append a number from 0 to 9 to the sprite name of heroship, missile, and spaceship. Note in Figure 7-9 and Listing 7-5 how the sprite images are named. Incrementing spriteIndex steps over to the next sprite by name in Figure 7-10.
the timeToNextFrame field is used to sum elapsed time for the game. The frameTime field stores how often the spriteIndex should change over to the next frame. Here is the code from Game1.Update that performs this calculation:
protected override void Update(GameTime gameTime)
{
  // Allows the game to exit
  if (GamePad.GetState(PlayerIndex.One).Buttons.Back == ButtonState.Pressed)
    this.Exit();

  // TODO: Add your update logic here
  // Add elapsed game time between calls to Update
  // Once enough time has passed, i.e. timeToNextFrame > frameTime
  //increment sprite index.
  timeToNextFrame += gameTime.ElapsedGameTime;
  if (timeToNextFrame > frameTime)
  {
    if (spriteIndex < 9)
      spriteIndex++;
    else spriteIndex = 0;
      frameElapsedTime = TimeSpan.FromMilliseconds(0d);  }
  base.Update(gameTime);
}
Essentially, the frameTime variable is how long any given frame is displayed. If you want the frames to animate more slowly, increase the value of the frameTime variable, currently set to 50.
Drawing a frame is pretty straightforward as well. Here is the code to draw the center of the hero ship at the center of the screen:
spriteBatch.Draw(SpriteAnimationSpriteSheet.Texture,
  new Vector2((screenRect.Width / 3) -
          SpriteAnimationSpriteSheet.SourceRectangle("spaceship" + spriteIndex.ToString()).Width / 2,
       (screenRect.Height / 3) -
         SpriteAnimationSpriteSheet.SourceRectangle("spaceship" + spriteIndex.ToString()).Height / 2),
  SpriteAnimationSpriteSheet.SourceRectangle("spaceship" + spriteIndex.ToString()),
  Color.White);
The previous code takes the entire sprite sheet and uses this parameter for the source rectangle to select which sprite to draw:
SpriteAnimationSpriteSheet.SourceRectangle("spaceship" + spriteIndex.ToString())You can only see the actual animation by running the code, but Figure 7-11 provides a snapshot.
We copy over all of the heroship, alienship, and missile images and SpriteSheet XML file to the AlienShooterContent content project's Sprites folder so that we can leverage the assets we created in our primary game.
Now that you understand how to animate sprites, we can move forward and create a GameObject class that handles the animation logic, as well as other object state allowing the code to focus more on game play and let the GameObject class handle rendering and state management.
Remember from our ScreenManager coverage that the actual game functionality exists in the GameplayScreen class. The rest of this chapter focuses on the code in the in the GameplayScreen class that manages the game objects as well as the game object code itself. The goal is that you come away with a solid understanding of how to go about creating your own games.
We create a class named GameObject to be our base class for game assets, which includes the hero ship, the missiles, and the alien ships. The GameObject class handles the animation, Update, and Drawing for each object. We copied over the assets and sprite sheet logic from the SpriteAnimation sample project. Here is the GameObject constructor:
public GameObject(SpriteSheet loadedTexture, string spriteName, Rectangle screenRect)
{
  SpriteAnimationSpriteSheet = loadedTexture;
  SpriteCenter = new Vector2(
    SpriteAnimationSpriteSheet.SourceRectangle(spriteName + 0).Width / 2,
    SpriteAnimationSpriteSheet.SourceRectangle(spriteName + 0).Height / 2);
  //Used to access sprite in SpriteSheet
  //Assume starts at 0 so SpriteName+0 is first Sprite frame for animation
  //NumberOfAnimationFrames is how many sprite frames that are available
  SpriteName = spriteName;
  _screenRect = screenRect;
//Default initialization FrameTime = TimeSpan.FromMilliseconds(100d); NumberOfAnimationFrames = 10; Position = Vector2.Zero; ElapsedFrameTime = TimeSpan.FromMilliseconds(0d); Velocity = Vector2.Zero; Rotation = 0f; Alive = false; }
The constructor for GameObject takes the following parameters:
SpriteSheet loadedTexturestring spriteNameRectangle screenRect
Just as with the SpriteAnimation sample, all of the individual object frames are combined into a single texture shared by all of the objects, which is more efficient than loading individual textures and switching textures when rendering. The loadedTexture parameter represents the single texture and is passed in to the constructor. The spriteName parameter is used by the animation code so that the correct object frames can be found in the loadedTexture. This code assumes a naming convention starting at spriteName+0 through spriteName+NumberOfAnimationFrames, which is hard-coded to 10 frames for all objects. The screenRect parameter is used to check when objects collide with screen bounds.
The GameObject class has quite a few public properties declared that are used to animate the sprite and to hold information on Sprite such as the center point, position, velocity and rotation. Here are the declarations:
public SpriteSheet SpriteAnimationSpriteSheet { get; set; }
public string SpriteName { get; private set; }
public int NumberOfAnimationFrames { get; set; }
public TimeSpan FrameTime { get; set; }
public TimeSpan ElapsedFrameTime { get; set; }
public Vector2 SpriteCenter { get; set; }
public bool Alive { get; set; }
public Vector2 Position { get; set; }
public Vector2 Velocity { get; set; }
public float Rotation { get; set; }
There is an additional property related to collision detection that we will cover next.
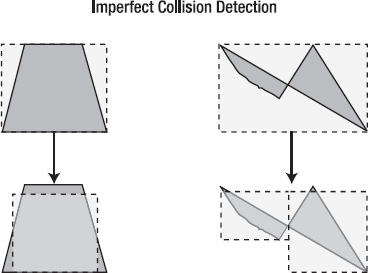
The BoundingRect property of type Rectangle is used to return the Rectangle area that contains the sprite on screen. This property is used for collision detection. If you have ever played a video game where the objects seemed to touch but nothing happen, it is a result of imperfect collision detection, as shown in Figure 7-12 where a regular shaped object, like a rectangle, is used to define the area of an irregularly shaped object.
There are more than a few algorithms for sprite collision detection that can be found in books focused on the topic that range in accuracy from bounding rectangles to resource intensive point by point comparison. Probably the best answer lies somewhere in-between those extremes, such as using more than one bounding box or only performing point-by-point comparison on sides that could collide, and so on. For our purposes, we check for intersection using the BoundingRect property defined in GameObject:
public virtual Rectangle BoundingRect
{
  get
  {
    return new Rectangle((int)Position.X, (int)Position.Y,
      SpriteAnimationSpriteSheet.SourceRectangle(SpriteName + 0).Width,
      SpriteAnimationSpriteSheet.SourceRectangle(SpriteName + 0).Height);
  }
}
One trick to that you can use to adjust collision detection is to call the Inflate(horizontalAmount,verticalAmount) method to individually increase or decrease (with a negative value) the sides of the Rectangle to better match the object shape.
The rest of the GameObject class contain its individual methods to reset its position if the object flies off the screen, update the object state, and draw the object to screen. Methods are marked with the virtual keyword so that they can be overridden in inherited classes as needed:
public virtual void ResetGameObject()
{
  Position = Vector2.Zero;
  Velocity = Vector2.Zero;
  Alive = false;
}
public virtual void Update(GameTime GameTime)
{
if (Alive)
{
Position += Velocity;
//Check screen bounds
if ((Position.X < 0) ||
(Position.X > _screenRect.Width) ||
(Position.Y < 0) ||
(Position.Y > _screenRect.Height))
ResetGameObject();
//Update animation
UpdateAnimation(GameTime);
}
}
private void UpdateAnimation(GameTime gameTime)
{
ElapsedFrameTime += gameTime.ElapsedGameTime;
if (ElapsedFrameTime > FrameTime)
{
if (_spriteIndex < NumberOfAnimationFrames - 1)
_spriteIndex++;
else _spriteIndex = 0;
ElapsedFrameTime = TimeSpan.FromMilliseconds(0d);
}
}
public virtual void Draw(GameTime gameTime, SpriteBatch spriteBatch)
{
if (Alive)
{
spriteBatch.Draw(SpriteAnimationSpriteSheet.Texture, Position - SpriteCenter,
SpriteAnimationSpriteSheet.SourceRectangle(SpriteName + _spriteIndex.ToString()),
Color.White);
}
}The ResetGameObject is called when an object is "destroyed" or flies off the screen. The method is pretty simple in just setting Position and Velocity to a zero vector and Alive to false.
The Update method checks to see if the object is Alive before updating Position by adding Velocity to it and then checking screen bounds. The Update method also calls the UpdateAnimation method, which leverages the code we developed in the SpriteAnimation sample. Finally, the Draw method simply applies the same logic we used in the SpriteAnimation sample to draw the correct frame to screen as part of the animation sequence.
Now that we have our base class out of the way, we move on to cover the enemy alien class and then move on to the user controlled hero ship and missile classes.
The AlienGameObject class that represents the frenzied aliens is remarkably simple. The class inherits from the GameObject class and uses the inherited constructor with some modifications:
public AlienGameObject(SpriteSheet loadedTexture,
          string spriteName, Rectangle screenRect)
  : base(loadedTexture, spriteName, screenRect)
{
  Alive = true;
  ResetGameObject();
}
The Alive property is set to true because we want enemies to keep dropping. There is a customized ResetGameObject method that overrides the base class version as well:
public override void ResetGameObject()
    {
      //Randomize animation
      _spriteIndex = (int)(randomNumber.NextDouble() * NumberOfAnimationFrames);
      //Randomize initial position
      Position = new Vector2(randomNumber.Next(_screenRect.Width), 35);

      //Apply default alien speed
      Velocity = new Vector2(randomNumber.Next(alienVelocityArc), alienSpeed);
      Alive = true;
    }
The alien spaceship has a unique shape. For better collision detection we override the BoundingRect property and call Rectangle.Inflate(0,2); to inflate the Rectangle on the Y axis resulting in much better collision detection for this game:
public override Rectangle BoundingRect
{
  get
  {
    Rectangle rect = new Rectangle((int)Position.X, (int)Position.Y,
      SpriteAnimationSpriteSheet.SourceRectangle(SpriteName + 0).Width,
      SpriteAnimationSpriteSheet.SourceRectangle(SpriteName + 0).Height);
    rect.Inflate(0,20);
    return rect ;
  }
}
That's it to this class. All of the lively action is a result of the animation code handled by the base class and the ResetGameObject method. The ResetGameObject method does a couple of things:
It starts the animation at a random index, so that the objects don't appear to be animating in sync, which would be boring.
It randomly picks an 'X' value for the initial
PositionVector2to start the drop.Finally, it applies a random but very small 'X' value to the Velocity so that the alien space ships don't appear to just fall straight down.
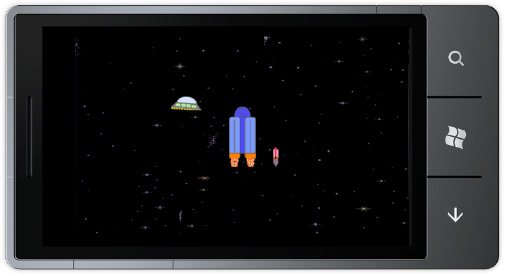
Figure 7-13 shows an army of aliens invading.

You will want to play on a real device to get a full sense of the game, but as you can see in Figure 7-13, the aliens strike different drop lines and fall fairly randomly for such little code. The animation code helps to keep things lively as well. In the next section, we cover the hero ship class, which takes accelerometer and touch input to move and fire missiles at the invasion.
We create another class named UserGameObject that inherits from the GameObject class. This class represents the player, which is the Hero Ship in AlienShooter, which makes it unique to the other classes since it takes user input in the form of accelerometer and touch. The accelerometer input will move the ship left or right by tilting the phone. It has a window so that if the phone is relatively flat the ship does not move. Touching the screen will fire missiles.
By default, the Game Management sample does not include support for Accelerometer input. The GamePlayScreen class has a HandleInput method that takes a parameter of type InputState, which is a class that captures keyboard, controller, and touch input. It does not capture Accelerometer input by default. In the source code for the book, you will find a modified InputState class, as well as a new class named AccelerometerState, which is shown in Listing 7-6.
Example 7.6. AccelerometerState Class File
public class AccelerometerState
{
  public double X;
  public double Y;
  public double Z;
  public DateTimeOffset Timestamp;
}
The modifications to the InputState class are pretty straightforward:
//robcamer - Add a private instance of AccelerometerState
public AccelerometerState CurrentAccelerometerState { get; private set; }
//robcamer - Add private field for the accelerometer
private Accelerometer accelerometer;
The constructor for the InputState class is modified to instantiate the previous two private variables, as well as add an event handler to the Accelerometer:
CurrentAccelerometerState = new AccelerometerState();
//Robcamer - initialize accelerometer
accelerometer = new Accelerometer();
accelerometer.ReadingChanged +=
  new System.EventHandler<AccelerometerReadingEventArgs>(accelerometer_ReadingChanged);
accelerometer.Start();
The values of CurrentAccelerometerState are updated in the accelerometer_ReadingChanged event handler:
void accelerometer_ReadingChanged(object sender, AccelerometerReadingEventArgs e)
{
  CurrentAccelerometerState.X = e.X;
  CurrentAccelerometerState.Y = e.Y;
  CurrentAccelerometerState.Y = e.Z;
  CurrentAccelerometerState.Timestamp = e.Timestamp;
}Now that we have the modifications in place for the InputState class, two private fields related to user input are added to the UserGameObject class.
private AccelerometerState _accelerometerState;
private Vector2 _leftRightVector = new Vector2(5, 0);
The _accelerometerState and _leftRightVector fields are modified in the UserGameObject.HandleInput method.
public void HandleInput(InputState input)
{
  //Must check for TouchLocationState as wel as Count
  //Otherwise, FireMissile will be called twice
//Once for 'Pressed' and once for 'Released'
if ((input.TouchState.Count > 0) &&
input.TouchState[0].State == TouchLocationState.Pressed)
{
FireMissile();
}
_accelerometerState = input.CurrentAccelerometerState;
if (_accelerometerState.X > .1)
{
Velocity = _leftRightVector;
}
if (_accelerometerState.X < -.1)
{
Velocity = -_leftRightVector;
}
//near Zero tilt left or right so
//set velocity to zero
if ((_accelerometerState.X < .1) &&
(_accelerometerState.X > -.1))
Velocity = Vector2.Zero;
}If the _accelerometerStateX component is greater than .1, a positive or negative velocity is applied to the Velocity vector via the leftRightVector variable in the proper tilt direction. Likewise, if the user holds the phone close to neutral, Velocity is set to zero. If you don't like how it responds, play with the .1 value to see what feels good to you.
The other part of the HandleInput session is to detect if the screen is touched. Each touch fires to TouchState values, one for TouchLocationState.Pressed and one for TouchLocationState.Released. If the screen is touched the FireMissile method is fired.
The UserGameObject class manages a collection of Missile objects since they are closely associated with the hero ship:
public List<MissileGameObject> Missiles;
public int MaxNumberofMissiles;
The Missile related properties are public properties because the GameplayScreen will need to check collisions between missiles and enemy alien ships. Also, the number of available missiles could be adjusted dynamically as part of game play for a "blitz" mode, where the hero ship can fire more than three at a time as an example. The Missiles collection is instantiated in the UserGameObject constructor:
MaxNumberofMissiles = 3;
Missiles = new List<MissileGameObject>();
for (int i=0;i < MaxNumberofMissiles; i++)
  Missiles.Add(new MissileGameObject(loadedTexture,"missile",screenRect));
When the screen is touched, the FireMissile method code searches for an available missile. Only three are available by default, and sets the missile property to Alive and the MissilePosition property to the same Position value for the hero ship / UserGameObject class. Note that once the Missile is set to Alive, it automatically starts moving based on the default logic implemented in the GameObject class.
The UserGameObject class overrides the Update method with custom code to position the spaceship correctly with user input. It also manages the Missiles collection by calling Update for missiles where Alive is true, i.e., they are in flight. Here is the UserGameObject.Update method:
public override void Update(GameTime gameTime)
{
  base.Update(gameTime);

  if (Position.X < SpriteCenter.X)
    Position = new Vector2(SpriteCenter.X,Position.Y);
  if (Position.X > (_screenRect.Width - SpriteCenter.X))
    Position = new Vector2(_screenRect.Width-SpriteCenter.X,Position.Y);


  for (int i = 0; i < MaxNumberofMissiles; i++)
  {
    if (Missiles[i].Alive == true)
      Missiles[i].Update(gameTime);
  }
}
The Draw method is overridden as well:
public override void Draw(GameTime gameTime, Microsoft.Xna.Framework.Graphics.SpriteBatch spriteBatch)
{
  for (int i = 0; i < MaxNumberofMissiles; i++)
  {
    if (Missiles[i].Alive == true)
      Missiles[i].Draw(gameTime, spriteBatch);
  }
  base.Draw(gameTime, spriteBatch);
}
The Draw method checks to see if each Missile is Alive and then calls Draw for the Missile object. The last item in the UserGameObject class to cover is the LoadContent method. In this method, the ContentManager instance is passed in so that the UserGameObject can make a sound effect when a missile is fired from the hero ship. Here is the method:
public void LoadContent(ContentManager content)
{
  _missileLaunchSoundEffect =
                content.Load<SoundEffect>("SoundEffects/MissileLaunch");
}XNA Game Studio has very rich audio mixing capabilities to support Dolby quality sound. For our game the SoundEffect class provides a quick and easy way to play audio during a game with the Play method. We add three sound effects to the AlienShooterContent project in the SoundEffects folder:
One item to note is that I recorded the sounds using the Windows 7 Recorder tool, which generates a .wma file. When added to the Content project the XNA Framework automatically chose the Song - XNA Framework Content Processor. This format cannot be played by the SoundEffect class. Simply change the Content Processor to Sound Effect - XNA Framework and the audio plays fine.
Let's now move on to a discussion of the Missile class.
The Missile class pretty straightforward, shown in Listing 7-7.
Example 7.7. Missile GameObject Class File
using System;
using System.Collections.Generic;
using System.Linq;
using System.Text;
using SpriteSheetRuntime;
using Microsoft.Xna.Framework;

namespace AlienShooter.GameObjects
{
  class MissileGameObject : GameObject
  {
    public MissileGameObject(SpriteSheet loadedTexture,
             string spriteName, Rectangle screenRect)
      : base(loadedTexture, spriteName, screenRect)
    {
      ResetGameObject();
    }

    public override void ResetGameObject()
    {
      Position = new Vector2(-SpriteCenter.X, _screenRect.Height + SpriteCenter.Y);
      Velocity = new Vector2(0,-5);
      Alive = false;
    }
  }
}
The next class we cover is the GameStatusBoard class.
The GameStatusBoard class keeps track of and displays the score and lives available during the game. This class also plays sound effects when an enemy ship is destroyed and when the hero ship takes a hit from an enemy ship. The GameStatusBoard class also vibrates the phone when an alien ship hits the hero ship using the VibrateController class. Figure 7-14 shows the status board in action.
In the following two sections, we cover keeping score and tracking lives functionality in the GameStatusBoard class.
Each time a hero ship missile intercepts an alien space ship, 5 points are added to the GameStatusBoard.Score property. The Score property is modified in the GamePlay screen, which we cover later. Within the GameStatusBoard class, updating the score results in a SoundEffect.Play call for the Explosion.wma file:
public int Score
{
  get { return _score; }
  set
  {
    _score = value;
_alienExplosionSoundEffect.Play(); } }
The GameStatusBoard.Update method has a switch statement to display a message based on current score:
switch (Score)
{
  case 50: _displayMessage = true;
    _message = "Nice Start!";
    break;
  case 60: _displayMessage = false;
    break;
  case 100: _displayMessage = true;
    _message = "Keep It Up!";
    break;
  case 120: _displayMessage = false;
    break;
  default: break;
}
When the _displayMessage field is true based on score, GameStatusBoard.Draw displays the message in the Status Board with this call:
if (_displayMessage)
  spriteBatch.DrawString(_gameFont, _message, new Vector2(175, 0),
    _livesTextColor);
That's it for score keeping. We next cover tracking hero ship lives and game over functionality.
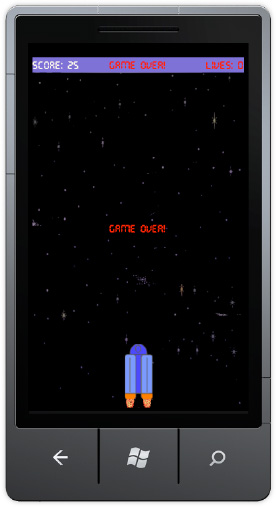
Be default, when playing the Alien Shooter game, you get 3 lives to start. Each time an alien ship intersects the hero ship, a life is deducted. At 2 lives a message of "Warning!" is displayed. At 1 life, a message of "Danger!" is displayed. Finally, when zero lives are the state, a "Game Over!" message is displayed at top and in the middle of the screen. Also, each time a live is deducted, the phone is briefly vibrated. Here is the declaration and instantiation of the VibrateController class:
private VibrateController _vibrateController = VibrateController.Default;
private TimeSpan _vibrateTimeSpan = TimeSpan.FromMilliseconds(400);
Here is the Lives property where the sound is played and phone vibrated when the Lives property is modified:
public int Lives
{
  get { return _lives; }
  set
  {
    _lives = value;
    _heroShipDamageSoundEffect.Play();
    _vibrateController.Start(_vibrateTimeSpan);
  }
}
Here is the code from the GameStatusBoard.Update method that determines what message to display, and in what color:
switch (_lives)
{
  case 3: _livesTextColor = Color.LightGreen;
          break;
  case 2: _livesTextColor = Color.Yellow;
          _displayMessage = true;
          _message = "Waring!";
          break;
  case 1: _livesTextColor = Color.Red;
          _displayMessage = true;
          _message = "Danger!";
          break;
  case 0: _livesTextColor = Color.Red;
          _displayMessage = true;
          _message = "Game Over!";
          GameOver = true;
          break;
}
Here is the corresponding code from the GameStatusBoard.Draw method that determines when to display a message about the hero ship help on the screen:
if (_displayMessage)
  spriteBatch.DrawString(_gameFont, _message, new Vector2(175, 0),
    _livesTextColor);
if (GameOver)
  spriteBatch.DrawString(_gameFont, _message, new Vector2(175, 370),
    _livesTextColor);
Having an informative game status board is an important component of any game development effort. This section covered how simple it is to provide the basics. In the next section, we cover the overall logic in the GamePlayScreen class that pulls together all of the game objects we just covered.
When you click "new game" in the main menu, the GameplayScreen is the screen that loads and the GameplayScreen class is where all of the game action occurs. The following sections cover how the GameplayScreen class manages the game objects, collision detection, and scoring.
Now we are ready to modify the GameplayScreen class to manage the game objects. We declare the object instances needed:
//Game objects
GameStatusBoard statusBoard;
List<AlienGameObject> enemies;
int maxEnemies = 5;
UserGameObject heroShip;
int maxMissiles = 3;
//Indicates to draw game over frame;
bool drawGameOverFrame = false ;
The maxMissiles and maxEnemies variable are not a constant because we may want to change it dynamically during the game as part of the game play. Otherwise, one UserGameObject named heroShip and a List of AlienGameObjects are the other key components of the game. Another potential modification would be to increase the number of AlienGameObjects in the game as the score gets higher to make it more interesting. Otherwise a player will get bored if nothing changes.
Next we load and initialize assets in LoadContent():
public override void LoadContent()
{
  if (content == null)
    content = new ContentManager(ScreenManager.Game.Services, "Content");

  gameFont = content.Load<SpriteFont>("gamefont");
  alienShooterSpriteSheet = content.Load<SpriteSheet>("Sprites/AlienShooterSpriteSheet");
  backgroundTexture = content.Load<Texture2D>("Textures/background");
  backgroundPosition = new Vector2(0, 34);
  //Get a pointer to the entire screen Rectangle
  screenRect = ScreenManager.GraphicsDevice.Viewport.Bounds;

  //Initialize Enemies collection
  enemies = new List<AlienGameObject>();
  for (int i = 0; i < maxEnemies; i++)
  {
    enemies.Add(new AlienGameObject(alienShooterSpriteSheet, "spaceship", screenRect));
  }

  //Initialize Player Object
  heroShip = new UserGameObject(alienShooterSpriteSheet, "heroship", screenRect, maxMissiles);
  heroShip.Position = new Vector2(screenRect.Width / 2, 720);
  heroShip.LoadContent(content);

  //Initialize Status Board
  statusBoard = new GameStatusBoard(gameFont);
  statusBoard.LoadContent(content);

  // A real game would probably have more content than this sample, so
  // it would take longer to load. We simulate that by delaying for a
  // while, giving you a chance to admire the beautiful loading screen.
  Thread.Sleep(1000);

  // once the load has finished, we use ResetElapsedTime to tell the game's
  // timing mechanism that we have just finished a very long frame, and that
  // it should not try to catch up.
  ScreenManager.Game.ResetElapsedTime();
}
By breaking out our game assets into objects it greatly unclutters the code in GameplayScreen class. As an example, initializing the enemies object is a matter of passing in the texture information for the animations:
//Initialize Enemies collection
enemies = new List<AlienGameObject>();
for (int i = 0; i < maxEnemies; i++)
{
  enemies.Add(new AlienGameObject(alienShooterSpriteSheet, "spaceship", screenRect));
}Addingsupport for the heroShip and the AlienGameObject to the GameplayScreen.Update method is pretty straightforward now that we have nice objects that manage work for us:
public override void Update(GameTime gameTime, bool otherScreenHasFocus,
                                                bool coveredByOtherScreen)
{
  if (IsActive)
  {
    if (!statusBoard.GameOver)
    {
      CheckForCollisions();

      heroShip.Update(gameTime);
      statusBoard.Update(gameTime);

      for (int i = 0; i < maxEnemies; i++)
      {
        enemies[i].Update(gameTime);
      }
    }
  }
  base.Update(gameTime, otherScreenHasFocus, coveredByOtherScreen);
}
If StatusBoard.GameOver is not true, i.e. the hero ship has lives available, the game action continues. Otherwise, the code is straightforward, calling Update for each object. Notice the call to the CheckForCollisions method. We cover collision detection in the next sub section.
Adding support for user input is just as easy by adding a call to heroShip.HandleIpnut(input) just after the else in the GameplayScreen.HandleInput method. For the GameplayScreen.Draw method the Draw method is called for each object. If StatusBoard.GameOver is true, the Draw method is not called for the enemies any further and the game is over.
public override void Draw(GameTime gameTime)
{
  ScreenManager.GraphicsDevice.Clear(ClearOptions.Target,
                                      Color.SlateBlue, 0, 0);

  // Our player and enemy are both actually just text strings.
  SpriteBatch spriteBatch = ScreenManager.SpriteBatch;

  spriteBatch.Begin();
  //Draw Background
  spriteBatch.Draw(backgroundTexture, backgroundPosition, Color.White);
  //Draw Status Board
  statusBoard.Draw(gameTime, spriteBatch);
  //Draw Hero Ship
  heroShip.Draw(gameTime, spriteBatch);
//Draw enemies
if (!statusBoard.GameOver)
{
for (int i = 0; i < maxEnemies; i++)
{
enemies[i].Draw(gameTime, spriteBatch);
}
}
spriteBatch.End();
// If the game is transitioning on or off, fade it out to black.
if (TransitionPosition > 0)
ScreenManager.FadeBackBufferToBlack(1f - TransitionAlpha);
}In the GameplayScreen.Update method, there is a call to the CheckForCollisions method. This method detects collisions between inflight missiles and enemy alien ships (a score) as well as collisions between enemy alien ships and the hero ship (lose a life). Here is the code for the CheckForCollisions method:
private void CheckForCollisions()
{
  //Checking for two major collisions
  //1 - Has an in flight missile intersected an alien spaceship - score 5 pts
  for (int i = 0; i < heroShip.MaxNumberofMissiles; i++)
    if (heroShip.Missiles[i].Alive)
      for (int j = 0; j < maxEnemies; j++)
        if ((enemies[j].Alive) &&
            (enemies[j].BoundingRect.Intersects(heroShip.Missiles[i].BoundingRect)))
        {
          statusBoard.Score += 5;
          enemies[j].ResetGameObject();
          heroShip.Missiles[i].ResetGameObject();
        }
  //2 - Has an alien spaceship intersected the hero ship - deduct a life
  for (int j = 0; j < maxEnemies; j++)
    if ((enemies[j].Alive) && (enemies[j].Position.Y > 600) &&
        (enemies[j].BoundingRect.Intersects(heroShip.BoundingRect)))
    {
      statusBoard.Lives -= 1;
      for (int i = 0; i < maxEnemies; i++)
        enemies[i].ResetGameObject();
      for (int i = 0; i < heroShip.MaxNumberofMissiles; i++)
        heroShip.Missiles[i].ResetGameObject();
    }
}
For detecting a hit by a missile by an alien ship, each missile's bounding box must be compared with each enemy alien ship's bounding box. Same goes for detecting a collision between an enemy ship and the hero ship to lose a life. Each one must be compared every frame for the most part. This means that every time two objects are compared, which could be every frame, two new bounding boxes must be constructed. Remember the bounding box includes a position for the bounding box as well as height and width. Here is the code to return a bounding box in the GameObject base class as a refresher:
public virtual Rectangle BoundingRect
{
  get
  {
    return new Rectangle((int)Position.X, (int)Position.Y,
      SpriteAnimationSpriteSheet.SourceRectangle(SpriteName + 0).Width,
      SpriteAnimationSpriteSheet.SourceRectangle(SpriteName + 0).Height);
  }
}
In a mobile application you want to try to minimize memory allocations to reduce garbage collection activity. In a mobile game, it is especially important to watch memory allocations. As an example, when an enemy is destroyed by a hit, the AlienGameObject for that enemy has its Alive property set to false. We could instead set the object to null and then instantiate a new object but that just wastes CPU cycles on garbage collection.
Another way to minimize CPU cycles is to only do work if needed. Notice in the CheckforCollisions method that the if statements are structured to only perform work and get a BoundingRect when needed. As an example, an enemy alien ship can only intersect the hero ship after it has fallen about two/thirds of the way down the screen so a check is made to only perform the collision calculations if the alien ship is below 600 pixels on the screen.
if ((enemies[j].Alive) && (enemies[j].Position.Y > 600) &&
    (enemies[j].BoundingRect.Intersects(heroShip.BoundingRect)))
Part of game development is always looking for ways to do things smartly. For myself, it is one of the most enjoyable parts of the effort.
This chapter covered extensively the process of building out the game play leveraging existing samples like the GameScreen Game Management and the Sprite Sheet processor samples to build out 2D game. In the next chapter we focus on making enhancements to this game such as explosions for collisions as well as important housekeeping items such as adding support for saving and loading the game as well as the very important tombstoning support. The next chapter also provides an introduction to 3D game development.