
In this chapter, we cover additional topics related to the programming model. This is the final chapter on Silverlight for Windows Phone 7 development, so expect to see a variety of topics, including advanced data binding, encryption services, photo manipulation, video playback, and how to achieve deeper integration with Windows Phone for certain scenarios.
In this section, I cover how to access Syndicated Services like RSS feeds from Windows Phone 7, as well as advanced Model-View-ViewModel (MVVM) techniques to incorporate page navigation, showing progress, and lazy loading images. The last subsection covers the IValueConverter interface, which allows you to data bind any data type to just about any other data.
A sample project based on the MVVM Light project template named AdvancedDataBinding is added to the Chapter 6 solution. MVVM is leveraged for this example to demonstrate how to handle slightly additional complexity of separating concerns between the View and the ViewModel when dealing with more complex scenarios.
By default, the MainPage.xaml binds to the MainViewModel in the ViewModel folder. MainPage.xaml presents a menu of four items that navigate to individual pages corresponding to the sections that follow:
Syndicated Services (/View/SyndicatedServices.xaml)
Showing Progress (/View/ShowingProgress.xaml)
Lazy Load Images (/View/LazyLoadImages.xaml)
Data Bind to Anything (/View/DatabindToAnything.xaml)
MainPage.xaml consists of a ListBoxdatabound to a collection of items that represent the above pages. Here is the XAML:
<ListBox x:Name="listBox1" Margin="24,0,0,0"
  ItemsSource="{Binding Pages}"
  ItemTemplate="{StaticResource PageItemTemplate}" />
In MainViewModel.cs, the ApplicationTitle and PageName properties are updated for the current project. A Pages property is added to MainViewModel class that is of type List<PageItemViewModel>:
public const string PagesPropertyName = "Pages";
private List<PageItemViewModel> _pages = null;
public List<PageItemViewModel> Pages
{
  get
  {
    return _pages;
  }

  protected set
  {
    if (_pages == value)
    {
      return;
    }

    var oldValue = _pages;
    _pages = value;

    // Update bindings, no broadcast
    RaisePropertyChanged(PagesPropertyName);
  }
}
The MainViewModel class has a method named LoadPageInfo(), which instantiates the Pages collection:
private void LoadPagesInfo()
{
  Pages = new List<PageItemViewModel>()
  {
    new PageItemViewModel(){PageTitle="syndicated services",
      PageUri=new Uri("/View/SyndicatedServices.xaml",UriKind.Relative)},
    new PageItemViewModel(){PageTitle="showing progress",
      PageUri=new Uri("/View/ShowingProgress.xaml",UriKind.Relative)},
    new PageItemViewModel(){PageTitle="lazy load images",
      PageUri=new Uri("/View/LazyLoadImages.xaml",UriKind.Relative)},
    new PageItemViewModel(){PageTitle="data binding to anything",
      PageUri=new Uri("/View/DatabindToAnything.xaml",UriKind.Relative)}
  };
}
Normally, the PageItem class would be a simple Model class; however, I made it a ViewModel class because of necessary support to allow databinding and navigation from a ListBox displaying the Pages data. When an item is selected in the ListBox shown in Figure 6-1, the application should navigate to the associated page. We don't want to write code to do this in the MainPage.xaml.cs code-behind file. Instead we take advantage of messaging and commanding support provided by the MVVM Light toolkit.

The selected item in the ListBox on MainPage.xaml should perform navigation to the associated page pointed to by the selected item. This means that the Commanding support is required at the PageItem / ItemTemplate level, not at the ListBox level. To support this functionality, a ViewModel class named PageItemViewModel is added that supports GalaSoft Light Messaging and Commanding (see Chapter 5 for details on GalaSoft MVVM). Listing 6-1 shows the PageItemViewModel.
Example 6.1. PageItemViewModel Class File
using System;
using GalaSoft.MvvmLight.Command;
using GalaSoft.MvvmLight.Messaging;
using GalaSoft.MvvmLight;
namespace AdvancedDataBinding.ViewModel
{
  public class PageItemViewModel : ViewModelBase
  {
    public PageItemViewModel()
    {
      //Wire up the NavigateToPageCommand RelayCommand to send the message
      //for the Uri of the page to navigate to.
      NavigateToPageCommand = new RelayCommand<Uri>(
param => SendNavigationRequestMessage(param));
}
#region PageItem properties
public const string PageTitlePropertyName = "PageTitle";
private string _pageTitle = null;
public string PageTitle
{
get
{
return _pageTitle;
}
set
{
if (_pageTitle == value)
{
return;
}
var oldValue = _pageTitle;
_pageTitle = value;
RaisePropertyChanged(PageTitlePropertyName);
}
}
public const string PageUriPropertyName = "PageUri";
private Uri _pageUri = null;
public Uri PageUri
{
get
{
return _pageUri;
}
set
{
if (_pageUri == value)
{
return;
}
var oldValue = _pageUri;
_pageUri = value;
// Update bindings, no broadcast
RaisePropertyChanged(PageUriPropertyName);
}
}
#endregion
#region Commanding and Messaging
public RelayCommand<Uri> NavigateToPageCommand
{
get;private set;
}
protected void SendNavigationRequestMessage(Uri uri)
{
Messenger.Default.Send<Uri>(uri, "PageNavRequest");
}
#endregion
}
}The PageItemViewModel class is broken up into two sections, one for the properties and the other for the Commanding and Messaging support. The PageItemViewModel class has two properties, PageTitle and PageUri. The PageUri points to the appropriate XAML file to navigate to for the PageTitle property value.
The Commanding and Messaging support is pretty simple code. The NavigateToPageCommand is what the MainPage.xaml View DataBinds to when the ListBoxItem is clicked via the MVVM Light EventToCommand Behavior. The NavigateToPageCommandRelayCommand<T> is connected to the MVVM Light Messaging infrastructure via this code in the PageItemViewModel constructor:
NavigateToPageCommand = new RelayCommand<Uri>(
  param => SendNavigationRequestMessage(param));
The NavigateToPageCommand takes an Uri and passes it to the SendNavigationRequestMessage. This is a bit of indirection, as the Uri property comes from the ListBox's template and then is sent back to the View via the MVVM Light Messaging infrastructure but it does promote decoupling of the UI from the ViewModel.
The MainPage.xaml View receives the message via this line of code added to the PhoneApplicationPage constructor and uses an inline Lambda statement to call the NavigationService:
Messenger.Default.Register<Uri>(
        this, "PageNavRequest",
        (uri) => NavigationService.Navigate(uri));
I mentioned earlier that the DataTemplate data binds to the NavigateToPageCommand. Here is the ItemTemplate="{StaticResourcePageItemTemplate}" for the MainPage.ListBox control:
<DataTemplate x:Key="PageItemTemplate">
  <Grid Margin="0,15">
    <TextBlock Margin="0,0,1,0" TextWrapping="Wrap" Text="{Binding PageTitle}"
       d:LayoutOverrides="Width, Height" Style="{StaticResource PhoneTextLargeStyle}">
      <Custom:Interaction.Triggers>
        <Custom:EventTrigger EventName="MouseLeftButtonDown">
          <GalaSoft_MvvmLight_Command:EventToCommand Command="{Binding NavigateToPageCommand, Mode=OneWay}" CommandParameter="{Binding PageUri}"/>
        </Custom:EventTrigger>
      </Custom:Interaction.Triggers>
    </TextBlock>
  </Grid>
</DataTemplate>
The EventToCommand behavior is dragged from the Assets | Behaviors section and is dropped on the TextBlock. Figure 6-2 shows the Properties window for the EventToCommand behavior.
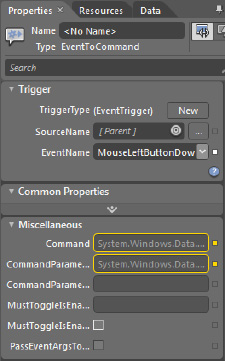
In Figure 6-2, the Command value is databound to the NavigateToPageCommand property on the PageItemViewModel class. The CommandParameter is databound to PageUri property of the selected item from the MainViewModel Pages collection of type PageItemViewModel.
This was a detailed walkthrough of relatively simple functionality, but it demonstrates the powerful capabilities of MVVM Light's Commanding and Messaging infrastructure to support decoupling UI from the ViewModel via Silverlight's data binding framework.
The next section covers how to access syndicated services like RSS feeds from Windows Phone 7.
Silverlight 3 and later includes excellent support for easily consuming syndicated feeds like RSS, ATOM, and formatted data feeds. Unfortunately, the System.ServiceModel.Syndication.dll is not available in the Silverlight for Windows Phone 7 SDK. You can simply add a reference to the Silverlight 3 version of the assembly, but it is just as easy to use LINQ to XML to parse syndication feeds.
For the AdvancedDataBinding project, a page named SyndicatedServices.xaml is added to the View folder and a ViewModel named SyndicatedServicesViewModel is added to the ViewModel folder. The SyndicatedServicesViewModel is added to the ViewModelLocator class in the ViewModel folder.
Clicking the syndicated services label shown in Figure 6-3 navigates to the page. The page is configured with a ListBox named feedListBox and added to the ContentPanel in SyndicatedServices.xaml. The Application Bar is enabled to have a single button named LoadFeedAppBarBtn with a title of "load feed."
In the code, the Click event for the LoadFeedAppBarBtn Application Bar Button is wired up to fire an event that makes an HttpWebRequest to the Educational Resources feed from AppHub. Here is the code:
HttpWebRequest httpWebRequest;
private void LoadFeedAppBarBtn_Click(object sender, EventArgs e)
{
httpWebRequest = HttpWebRequest.CreateHttp( "http://public.create.msdn.com/Feeds/CcoFeeds.svc/CmsFeed?group=Education Catalog List"); httpWebRequest.BeginGetResponse(new AsyncCallback(ReceiveFeedData), null); }
The ReceiveFeedData method has code to parse the response, load the data into an XDocument, and parse the feed into a collection of FeedItem objects that is databound to the feedListBox.ItemsSource property. Listing 6-2 has the FeedItem class.
Example 6.2. FeedItem Class File
using System;

namespace AdvancedDataBinding
{
  public class FeedItem
  {
    public string Title { get; set; }

    public string Description { get; set; }

    public Uri Link { get; set; }
  }
}
Here is the code for the ReceiveFeedData method:
void ReceiveFeedData(IAsyncResult result)
{
  HttpWebResponse response = httpWebRequest.EndGetResponse(result) as HttpWebResponse;
  using (StreamReader reader = new StreamReader(response.GetResponseStream()))
  {
    XDocument doc = XDocument.Parse(reader.ReadToEnd());
    var items = from results in doc.Descendants("item")
                select new FeedItem
                {
                  Title = results.Element("title").Value.ToString(),
                  Link = new Uri(results.Element("link").Value.ToString(), UriKind.Absolute),
                  Description = results.Element("description").Value.ToString()
                };
    LayoutRoot.Dispatcher.BeginInvoke(() =>
    {
      feedListBox.ItemsSource = items;
    });
  }
}
As demonstrated in Chapter 4, the response is read into a StreamReader object and the feedListBox.Dispatcher is used to marshal the data over to the UI thread for assignment to the ItemsSource property. A simple DataTemplate is configured on feedListBox.ItemTemplate that binds to FeedItem object properties:
<ListBox.ItemTemplate>
  <DataTemplate>
    <StackPanel Margin="0,0,0,30">
<TextBlock Text="{Binding Title}" Margin="0,0,12,0" FontSize="24" FontFamily="Segoe WP Semibold" />
<TextBlock Text="{Binding Description}" />
<HyperlinkButton NavigateUri="{Binding Link}" FontFamily="Segoe WP SemiLight"
TargetName="_blank" FontSize="18.667" FontStyle="Italic"
Content="More..." HorizontalAlignment="Left"/>
</StackPanel>
</DataTemplate>
</ListBox.ItemTemplate>Figure 6-3 shows the UI when the Application Bar button is clicked.

If you click More... it loads the URL for the content into the Web Browser. Clicking the back button takes you back to the page. Notice in Figure 6-3 that the Description is formatted as HTML. I can change the DataTemplate to have a WebBrowser control instead of a TextBlock but when I do this, the HTML does not render.
The WebBrowser control supports navigating to an HTML fragment using the NavigateToString Method, but it does not have a simple HTML property that we can data bind, too. We would rather not write a lot of code to data bind to the HTML fragment. When working in Silverlight, whenever a control is missing a property, you can always add it using XAML Attached properties. The goal is to have a simple HTML property of type text for the HTML fragment from the feed that gets loaded via the NavigateToString method. Listing 6-3 shows the attached property class.
Example 6.3. WebBrowserHTMLProp Code File
public static class WebBrowserHTMLProp
{
  public static readonly DependencyProperty HtmlProperty =
    DependencyProperty.RegisterAttached(
      "Html", typeof(string), typeof(WebBrowserHTMLProp),
      new PropertyMetadata(OnHtmlPropChanged));

  public static string GetHtml(DependencyObject dependencyObject)
  {
    return (string)dependencyObject.GetValue(HtmlProperty);
  }

  public static void SetHtml(DependencyObject dependencyObject, string value)
  {
    dependencyObject.SetValue(HtmlProperty, value);
  }

  private static void OnHtmlPropChanged(DependencyObject dependencyObject,
    DependencyPropertyChangedEventArgs e)
  {
    var webBrowser = dependencyObject as WebBrowser;

    if (webBrowser == null)
      return;

    var html = e.NewValue.ToString();
    webBrowser.NavigateToString(html);
  }
}
It is mostly boilerplate code with the important code in the OnHtmlPropChanged method where the HTML is loaded into the WebBrowser via NavigateToString. Unfortunately, because this code is part of the DataTemplate, an error is thrown stating that "You cannot call WebBrowser methods until it is in the visual tree." Because the DataTemplate is composited and then added to the Visual Tree, the Attached Property does not help us here but it can assist in situations where the WebBrowser control is embedded into the static XAML. Instead a TextBlock is placed within the DataTemplate. Figure 6-3 shows the output. Clicking "More..." loads the link into IE Mobile.
An alternative approach for this feed would be to just display the Title in the ListBox and then navigate to another page that displays the Description details in a WebBrowser control that is part of the static XAML visual tree of the page.
In this section I covered how to load an RSS feed using LINQ to XML. We will explore adding additional functionality for displaying feed data, showing progress, and lazy loading images in the following sections.
In this section, I demonstrate how to have your ViewModel drive UI, such as when to show progress bars or not, via data binding. It is a quick example based on the previous example that downloads the AppHub feed but the concept is very important to help you understand how to put more code into your ViewModels and less code in your View.
The SyndicatedServicesViewModel.cs code file is copied and renamed ShowProgressViewModel as well as the constructor. The new ShowProgressViewModel property is added to the ViewModelLocator just as before, and a new View named ShowingProgress.xaml is created and data bound to the ShowProgressViewModel. Run the project and it should work just as the previous sample.
A new Boolean property named ShowProgressBar is added to the ShowProgressViewModel class. The ShowProgressBar property is set to true just before the HttpWebRequest.CreateHttp method call in the ShowProgressViewModel .DownloadAppHubFeed method. The property must be modified on the UI thread so that data binding propagates to the UI and an error doesn't happen from cross-thread access:
public void DownloadAppHubFeed()
{
  Deployment.Current.Dispatcher.BeginInvoke(() =>
  {
    ShowProgressBar = true;
  });
  ...
At the end of the ShowProgressViewModel.ReceiveFeedData method set ShowProgressBar to false. This completes the changes in the ViewModel. The progress bar should be enabled right before making the web call and then disabled once the new data is data binded to the UI. Again the property must be modified on the UI thread:
Deployment.Current.Dispatcher.BeginInvoke(() =>
{
  FeedItems = items.ToList<FeedItem>();
  //Artificial delay to test progress bar
  System.Threading.Thread.Sleep(3000);
  ShowProgressBar = false;
});
In the ShowProgress.xaml page, add a progress bar that applies to the width of the screen in the middle of the page. The progress bar should look like the native WP7 progress bar, otherwise known as "the flying dots." Luckily the Silverlight for Windows Phone Toolkit has been updated to include two new controls, TiltEffect and PerformanceProgressBar. Previously you had to create a customized version of the built-in progress bar in order to have good UI thread performance.
Once the latest Silverlight toolkit for WP7 is installed, add PerformanceProgressBar to the Toolbox window in Visual Studio and drag the control on to the ShowingProgress.xaml View. Switch over to Expression Blend and set the HorizontalAlignment to stretch and reset Margin to just a top Margin of 300. Next set the IndeterminateProperty to True and you can see the flying dots at design-time in Expression Blend. We only want to see the flying dots when loading data so let's data bind the LoadingDataPerfProgressBar's Indeterminate property to the ShowProgressViewModel.ShowProgressBar property. Here is the XAML for the PerformanceProgressBar from ShowingProgress.xaml:
<toolkit:PerformanceProgressBar x:Name="LoadingDataPerfProgressBar" Margin="0,300,0,0"
  VerticalAlignment="Top"  IsIndeterminate="{Binding ShowProgressBar}" />
By default, the data is obtained by ShowProgressViewModel when the application loads and the ShowProgressViewModel is created. We modify the constructor to not automatically call the DownloadAppHubFeed() method. The ShowingProgressView is modified to have an Application Bar button that manually downloads the feed. Clicking the Application Bar button will enable the progress bar, download the feed, and then disable the progress bar by calling the DownlaodAppHubFeed() method. Figure 6-4 shows the flying dots in the emulator.

This example demonstrates the power of Silverlight and its data binding infrastructure to allow the ViewModel non-visual class to drive the UI based on the applications current state. This technique is critical to effective MVVM development and can be extended to other data-driven UI to indicate state and display additional UI when needed.
When developing for a mobile device with constrained networking and hardware capabilities relative to a desktop computer, you sometimes have to take additional steps beyond the "default" programming model. As an example, loading a ListBox with data and images from a remote server can peg the UI thread resulting in a poor user experience for scrolling and animations. Anytime work can be taken off of the UI thread is a win for performance.
A Silverlight for Windows Phone team member David Anson blogged here about a way to offload image loading to a background thread that results in much better UI performance:
http://blogs.msdn.com/b/delay/archive/2010/09/02/keep-a-low-profile-lowprofileimageloader-helps-the-windows-phone-7-ui-thread-stay-responsive-by-loading-images-in-the-background.aspx
In the blog post, Dave introduces the LowProfileImageLoader class to address the very specific issue of loading lots of images from the web simultaneously. The LowProfileImageLoader slows the loading of images but the UI remains responsive as images are loaded because the UI thread is not slammed waiting for images to load and then data bind.
To test out the LowProfileImageLoader, let's work with the Netflix API. I picked this API because it has an interesting set of images (movie art) in a well-documented API. The API is available at developer.netflix.com.
Note
You must register an account to use the Netflix APIs at http://developer.netflix.com/member/register.
We will use the OData Client Library for Windows Phone 7 that we covered in Chapter 4 to access the Netflix API. As before we add a reference to System.Data.Services.Client.dll. We use the DataSvcUtil.exe to generate a proxy class:
DataSvcUti.exe /uri:http://odata.netflix.com/Catalog/ /out:Netfli xOdataAPI.cs
/Version:2.0 /DataServiceCollection
Adding the DataServiceCollection option has the tool implement the INotifyPropertyChanged interface, which is important for change notification purposes. The OData access is wired into the LazyLoadViewModel.cs class, which is a copy of the ShowProgressViewModel:
public void DownloadNetflixTopTitles()
{
Deployment.Current.Dispatcher.BeginInvoke(() =>
{
ShowProgressBar = true;
});
topMovieTitles = new DataServiceCollection<Title>(ODataContext);
topMovieTitles.LoadCompleted +=
new EventHandler<LoadCompletedEventArgs>(topMovieTitles_LoadCompleted);
topMovieTitles.LoadAsync(new Uri("/Titles()",UriKind.Relative));
}
void topMovieTitles_LoadCompleted(object sender, LoadCompletedEventArgs e)
{
Deployment.Current.Dispatcher.BeginInvoke(() =>
{
ShowProgressBar = false;
TopMovieTitles = topMovieTitles;
});
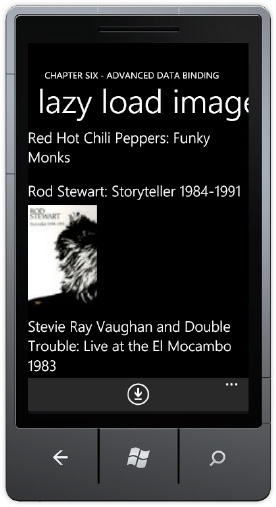
}The LazyLoad.xaml View page is modified to include a ListBox with a simple DataTemplate that shows the movie title and image. Figure 6-5 shows the UI.
Not every movie title has box art, but many do. Let's now modify this application to use the LowProfileImageLoader class to asynchronously display the images. Download the source code at the blog post link above and grab the PhonePerformance.dll. Add a reference to it in the AdvancedDatabinding project and then add a namespace reference to LazyLoadImage.xaml:
xmlns:delay="clr-namespace:Delay;assembly=PhonePerformance"
Next update the NetflixTopTitleDataTemplate so that the image is not loaded from the built-in Source property but instead is loaded using this XAML:
<Image delay:LowProfileImageLoader.UriSource="{Binding BoxArt.SmallUrl}"
HorizontalAlignment="Left" Stretch="UniformToFill" Width="150"/>
The performance difference is much more obvious on a physical device over 3G, but as you can see it is pretty trivial to add support for the LowProfileImageLoader to see if it can help with any performance issues related to image loading in your applications.
There are situations where you need to data bind to a value and the value type or format does not quite line up with what you need. The IValueConverter interface allows your application to data bind to just about anything including data that does not match the type expected for a particular control.
As an example, let's say you have a field that takes values of either Yes or No. You could use a ListPicker but a CheckBox makes more sense since it is just two values. You can implement IValueConverter to convert true to a Yes value and No value to false (and vice versa) while still using standard data binding mechanisms.
In this section, we create a custom IValueConverter named HtmlToImageUriConverter. This very simple converter parses the AppHub Feed html, previously displayed as raw html text, into a URL that points to an image related to the content. The URL is extracted from the HTML. Listing 6-4 shows the code for the converter.
Example 6.4. WebBrowserHTMLProp Code File
using System;
using System.Windows.Data;

namespace AdvancedDataBinding.Converters
{
  public class HtmlToImageUriConverter : IValueConverter
  {
    public object Convert(object value, Type targetType,
      object parameter, System.Globalization.CultureInfo culture)
    {
      string html = (string)value;
      string imageUrl = "";
      if (null != html)
      {
        string[] strings = html.Split('"'),
        if (strings.Length > 3)
          imageUrl = strings[3].Trim();
      }
      return imageUrl;
    }

    public object ConvertBack(object value, Type targetType,
      object parameter, System.Globalization.CultureInfo culture)
    {
      throw new NotImplementedException();
    }
  }
}
The converter is somewhat brittle in that it depends on the URL value to be the fourth string when split, but one wouldn't expect the feed format to change very often, and it makes for an interesting sample. The converter is made available to the DatabindToAnything.xaml View via an xml namespace import:
xmlns:converters="clr-namespace:AdvancedDataBinding.Converters"
The converter is added as a resource in this XAML:
<phone:PhoneApplicationPage.Resources>
  <converters:HtmlToImageUriConverter x:Key="HtmlToImageConverter"/>
</phone:PhoneApplicationPage.Resources>
Applying the converter is a simple modification in XAML or visually in Expression Blend. Here is the updated ListBoxDataTemplate:
<DataTemplate>
  <StackPanel Margin="0,0,0,30">
    <TextBlock Text="{Binding Title}"  Margin="0,0,12,0" Style="{StaticResource PhoneTextLargeStyle}" />
    <Image delay:LowProfileImageLoader.UriSource=
        "{Binding Description, Converter={StaticResource HtmlToImageConverter}}"          Margin="0,6,0,4" Width="100" HorizontalAlignment="Left" />
    <HyperlinkButton  NavigateUri="{Binding Link}" FontFamily="Segoe WP SemiLight" TargetName="_blank"
        FontSize="18.667" FontStyle="Italic"  Content="More..." HorizontalAlignment="Left" Margin="-12,0,0,0"/>
  </StackPanel>
</DataTemplate>
The Binding.Converter parameter is configured to the added StaticResource to apply the converter for the Image object. Note that this sample also implements the LowProfileImageLoader for better performance as well as the PerformanceProgressBar to give better visual status to the user. Figure 6-6 shows the resulting output with a nice image instead of the raw HTML that was displayed previously.

In this section, data binding concepts are extended to more real world scenarios while also incorporating MVVM concepts. The next section provides a quick tour of available encryption services in Windows Phone 7.
A mobile device no matter what operating system or platform is inherently insecure. A mobile device is not locked safely in a server room within a secure data center like a web server. A mobile device is easily misplaced or stolen. For just about any computing platform, loss of physical control is loss of security. Therefore, it is important to minimize storing sensitive data on a mobile device.
However, there are scenarios in which it is convenient to store sensitive data on a device. As an example, a user would never use a video player application that requires the user to memorize and enter a long key to unlock DRM'd content. It is a risk management challenge that weighs the benefits and inconvenience provided by any given security solution. This section in the MSDN documentation provides a detailed overview of balancing security with convenience:
http://msdn.microsoft.com/en-us/library/ff402533(v=VS.92).aspx
In the next few sections, I provide an overview of the capabilities available in the Windows Phone 7 platform.
Many mobile applications transfer data to and from the server-side of a mobile application solution. In cases where sensitive data must be transported always use Secure Sockets Layer (SSL) to protect data in transit. This link lists SSL root certificates that ship on Windows Phone 7:
http://msdn.microsoft.com/en-us/library/gg521150(v=VS.92).aspx
Once sensitive data is on the device, use available encryption services on the platform to secure the data. Windows Phone 7 supports the following cryptographic algorithms:
AES
HMACSHA1
HMACSHA256
Rfc2898DeriveBytes
SHA1
SHA256
The next covers how to use these algorithms to securely store data on Windows Phone 7.
We add a project named EncryptingData to the Chapter 6 solution based on the GalaSoft MVVM project template. The UI takes some data to encrypt, a password and salt to perform the encryption, and then a couple of TextBlocks to show the encrypted data as well as results from decrypting.
The Application Bar is enabled with four buttons:
Encrypt Data
Decrypt Data
Save to Isolated Storage
Load from Isolated Storage
All the UI data fields and event methods have corresponding properties on the MainViewModel class. The encryption operations are actually performed on MainViewModel properties with data binding bringing the results to the UI. Figure 6-7 shows the UI layout.

The following using statements are added to the MainViewModel class to provide the necessary access for stream-based processing and encryption:
using System.IO;
using System.IO.IsolatedStorage;
using System.Security.Cryptography;
using System.Text;
In addition to the ViewModel data fields backing the UI MainPage.xaml View, four additional methods are added to MainViewModel:
EncryptData
DecryptData
SaveEncryptedDataToIsolatedStorage
LoadEncryptedDataFromIsolatedStorage
Each method performs the task described by the method name. These four methods are accessed via the Application Bar buttons in the View as shown in Listing 6-5.
Example 6.5. MainPage.Xaml.cs Code File
using System.Windows;
using System.Windows.Controls;
using EncryptingData.ViewModel;
using Microsoft.Phone.Controls;

namespace EncryptingData
{
  public partial class MainPage : PhoneApplicationPage
  {
    MainViewModel vm;
    // Constructor
    public MainPage()
    {
      InitializeComponent();
      vm = this.DataContext as MainViewModel;
    }

    private void EncryptAppBarBtn_Click(object sender, System.EventArgs e)
    {
      vm.EncryptData();
    }

    private void DecryptAppBarBtn_Click(object sender, System.EventArgs e)
    {
      vm.DecryptData();
    }

    private void SaveIsoAppBarBtn_Click(object sender, System.EventArgs e)
    {
      vm.SaveEncryptedDataToIsolatedStorage();
    }

    private void LoadIsoAppBarBtn_Click(object sender, System.EventArgs e)
    {
      vm.LoadEncryptedDataFromIsolatedStorage();
    }

    private void PasswordBox_LostFocus(object sender,
      System.Windows.RoutedEventArgs e)
    {
      if (((PasswordBox)sender).Password.Length < 8)
        MessageBox.Show("Salt Value must be at least eight characters.",
"Minimum Length Error",MessageBoxButton.OK);
}
}
}The four encryption related methods in MainViewModel code are shown in Listing 6-6.
Example 6.6. Methods from MainViewModel.cs Code File
public void EncryptData()
{
  using (AesManaged aes = new AesManaged())
  {
    Rfc2898DeriveBytes rfc2898 = new Rfc2898DeriveBytes(Password,
      Encoding.UTF8.GetBytes(SaltValue), 10000);
    aes.Key = rfc2898.GetBytes(32);
    aes.IV = rfc2898.GetBytes(16);
    using (MemoryStream memoryStream = new MemoryStream())
    {
      using (CryptoStream cryptoStream = new CryptoStream(memoryStream,
        aes.CreateEncryptor(), CryptoStreamMode.Write))
      {
        //Encrypt Data with created CryptoStream
        byte[] secret = Encoding.UTF8.GetBytes(DataToEncrypt);
        cryptoStream.Write(secret, 0, secret.Length);
        cryptoStream.FlushFinalBlock();
        aes.Clear();
        //Set values on UI thread
        Deployment.Current.Dispatcher.BeginInvoke(() =>
        {
          EncryptedData = Convert.ToBase64String(memoryStream.ToArray());
        });
      }
    }
  }
}

public void DecryptData()
{
  MemoryStream memoryStream = null;

  using (AesManaged aes = new AesManaged())
  {
    //Generate Key and IV values for decryption
    Rfc2898DeriveBytes rfc2898 = new Rfc2898DeriveBytes(Password, Encoding.UTF8.GetBytes(SaltValue), 10000);
    aes.Key = rfc2898.GetBytes(32);
    aes.IV = rfc2898.GetBytes(16);

    using (memoryStream = new MemoryStream())
    {
      using (CryptoStream cryptoStream =
        new CryptoStream(memoryStream, aes.CreateDecryptor(),
                          CryptoStreamMode.Write))
{
//Decrypt Data
byte[] secret = Convert.FromBase64String(EncryptedData);
cryptoStream.Write(secret, 0, secret.Length);
cryptoStream.FlushFinalBlock();
byte[] decryptBytes = memoryStream.ToArray();
aes.Clear();
//Update values on UI thread
Deployment.Current.Dispatcher.BeginInvoke(() =>
{
DecryptedData = Encoding.UTF8.GetString(decryptBytes, 0, decryptBytes.Length);
});
}
}
}
}
public void SaveEncryptedDataToIsolatedStorage()
{
//Save secret to Application Settings
if (EncryptedData != "")
{
if (IsolatedStorageSettings.ApplicationSettings.Contains(StorageKeyName))
{
IsolatedStorageSettings.ApplicationSettings[StorageKeyName] =
EncryptedData;
}
else
{
IsolatedStorageSettings.ApplicationSettings.Add(
StorageKeyName, EncryptedData);
}
}
}
public void LoadEncryptedDataFromIsolatedStorage()
{
//Retrieve secret from Application Settings
if (IsolatedStorageSettings.ApplicationSettings.Contains(StorageKeyName))
{
Deployment.Current.Dispatcher.BeginInvoke(() =>
{
EncryptedData =
IsolatedStorageSettings.ApplicationSettings[StorageKeyName].ToString();
});
}
else
{
Deployment.Current.Dispatcher.BeginInvoke(() =>
{
EncryptedData = "";
});
}
}The code generates a Key for AES based on the Password and Salt values provided by the user. The Rfc2898DeriveBytes class is used to generate the HMACSHA1 random number (iteration count of 1,000) for the AES Key and IV values. What's handy with implementing encryption via the ViewModel is that it is easily reusable. The MainViewModel class has zero dependencies on UI.
One other item to note is that this section demonstrates the only truly secure means to encrypt data, because it requires a password by the user. This is because the initial release of the Windows Phone Developer Tools does not include access to a secure key store. This is a frequently requested feature by developers so I would bet that it is one of the first features to be added to the next release of the tools.
Windows Phone 7 supports BMP, TIF, GIF, JPEG, and PNG formats in general. However, from a development perspective JPG and PNG are supported for viewing in the Silverlight Image control. The JPG and PNG formats are recommended for displaying images within an application. JPG is preferred when the image will remain opaque. The PNG format supports transparency and is preferred for this scenario.
The Image control is the Silverlight class for displaying images in applications. A related Silverlight object that us very useful is the ImageBrush object. As an example, setting the background on a Panorama object is via an ImageBrush like this:
<controls:Panorama.Background>
  <ImageBrush  ImageSource="PanoramaBackground.jpg" Opacity="0.785" />
</controls:Panorama.Background>
Note that for the Opacity value to have an effect with an ImageBrush object, the image pointed to via the ImageSource property must be a .PNG file.
The BitmapImage is the utility class that provides the class for the Image.Source property. The BitmapImage supports the JPEG and PNG format. The BitmapImage has two constructors, one that takes a URI and the other that takes a Stream. You can set Image.Source via a BitmapImage without having to save the file to disk, which is better for performance.
The WriteableBitmap class is a versatile class that provides a BitmapSource that can be written to and updated. The WriteableBitmap class has properties to retrieve DPI, Format, Metadata, Palette, and Pixel size. The WriteableBitmap class provides methods to CopyPixels and to WritePixels into the WriteableBitmap. It is possible to generate an image within your application using the WriteableBitmap's constructor that takes a UIElement:
WriteableBitmap bmp =
new WriteableBitmap(element, transform)
The WriteableBitmap class allows you to generate images on the client when needed. One example would be if you need to add branding to an image or somehow modify it before rendering, such as when creating a music+video hub application, covered later in this chapter.
This is a short section highlighting key classes, properties, and capabilities when working with images. These classes are leveraged in the next couple of sections including the next section that demonstrates how to work with the media library on Windows Phone 7.
The MediaLibrary class provides access to the media available on the device as part of the music+video hub and corresponding Zune service. So if a user rips their CD collection, purchases some music from Zune, and so on, and the content is available in the music+video hub on the device, the MediaLibrary class provides the ability to enumerate and index the content but you cannot add media content to the Media Library except for images, which can be added to the Pictures collection. If you download audio or video content in your application you can only save it to your application's isolated storage area.
The MediaLibrary class does not provide access to media content stored in individual third-party application's isolated storage area. Here is a list of the available media collections on Windows Phone 7:
Albums:
AlbumCollectionclassArtists:
ArtistCollectionclassGenres:
GenreCollectionclassPictures:
PictureCollectionclassPlaylists:
PlaylistCollectionclassSongs:
SongCollectionclass
To gain access to the MediaLibrary class add a reference to the Microsoft.Xna.Framework assembly. The MediaLibrary class was originally available as part of the XNA Game Studio development environment for the Zune music player, and that is how it is made available on Windows Phone 7. Add a using clause for the Microsoft.Xna.Framework.Media namespace to get started.
Note
To run this sample while debugging, shutdown Zune and run the WPConnect.exe tool from a command-line to enable debugging when accessing media content on a physical device.
The Chapter 6 sample code has a project named WorkingWithMediaLibrary to demonstrate how to access media content. The project is once again based on the MVVM Light SDK and data bound to the UI. This time we use a Panorama control as the main page with a background based on a photo from a recent vacation. There are four PanoramaItem panels:
Albums
Artists
Playlists
Songs
Each PanoramaItem includes a ListBox that data binds to a collection of these items. You might be tempted to do something like this for making the media available to the UI:
public AlbumCollection Albums
{
  get { return _mediaLibrary.Albums; }
}
Data binding to this property does not return any data. This is because there could be many artists, albums, and songs in a collection. Instead you must access each item via indexed access into the collection. To make the media items available, declare properties of type List<Album>, and so on, for each property just like with other samples.
The interesting aspect to this code sample is the method call that loads the data as shown in Listing 6-7.
Example 6.7. MainViwModelMethod that Populates the Media Collections
private void CreateDataCollections()
{
  Albums = new List<Album>();
  Album album = null;
  for (int i = 0; i < _mediaLibrary.Albums.Count;i++)
  {
    album = _mediaLibrary.Albums[i];
    Albums.Add(album);
  }

  Artists = new List<Artist>();
  Artist artist = null;
  for (int i = 0; i < _mediaLibrary.Artists.Count; i++)
  {
    artist = _mediaLibrary.Artists[i];
    Artists.Add(artist);
  }

  Songs = new List<Song>();
  Song song = null;
  for (int i = 0; i < _mediaLibrary.Songs.Count; i++)
  {
    song = _mediaLibrary.Songs[i];
    Songs.Add(song);
  }

  Playlists = new List<Playlist>();
  Playlist playlist = null;
  for (int i = 0; i < _mediaLibrary.Playlists.Count; i++)
  {
    playlist = _mediaLibrary.Playlists[i];
    Playlists.Add(playlist);
  }
}
You must access the media item by index into a local variable and then add it to the List<Artist> collections, as shown in Listing 6-7, for each media type in order to have an actual object reference. Note that adding the entire collection as in the sample can be risky from a memory consumption standpoint if the user has a large media collection.
The MediaLibrary.Albums collection has a reference to album art available but it is not directly published as a property on the Album object. The Album object does have a HaveArt property with a GetAlbumArt method. Remember from the previous sample that IValueConverter data converters allow you to data bind to anything. For this sample a simple data converter that creates a BitmapImage object to hold the image returned by the Album.GetAlbumArt() method call. The BitmapImage is then returned as the value for the Image.Source property to display the album art. Listing 6-8 shows the data converter.
Example 6.8. AlbumArtConverter Code File
using System;
using System.Windows.Data;
using System.Windows.Media.Imaging;
using Microsoft.Xna.Framework.Media;

namespace WorkingWithMediaLibrary.Converters
{
  public class AlbumArtConverter : IValueConverter
  {
    public object Convert(object value, Type targetType, object parameter,
      System.Globalization.CultureInfo culture)
    {
      try
      {
        BitmapImage artImage = new BitmapImage();
        Album album = value as Album;
        if (album.HasArt)
        {
          artImage.SetSource(album.GetAlbumArt());
        }
        return artImage;
      }
      catch (Exception err)
      {
        return "";
      }
    }

    public object ConvertBack(object value, Type targetType, object parameter,
      System.Globalization.CultureInfo culture)
    {
      throw new NotImplementedException();
    }
  }
}
The last item to cover is that you can play songs or SongCollection objects via the MediaPlayer.Play() method, which is covered in more detail below. Figure 6-8 shows the UI in the emulator, which has just test data for a single album and a few songs so you will want to run on a real device with a populated library.

This concludes our coverage of the Windows Phone 7 media library programmable API. Next up is how to create a Photo Extras application.
Developers always ask about ways to integrate with the underlying platform. This is especially true for a mobile device where mobile devices users want to perform actions with as little effort as possible. One popular use case is manipulating pictures taken with the built-in camera. Many applications allow photo manipulation directly on the device so integrating these application as much as possible to the Pictures Hub benefits the end-user.
Integrated experiences are a key differentiator for Windows Phone 7 and this is extended to developers as well. You can build applications that integrate with the Pictures hub such that your application can be launched directly from the Extras menu.
A Photos Extra application is accessible from within the Pictures hub Single Photo Viewer (SPV). When in the SPV, swipe up the Application Bar to expose the extras... menu item to launch a Photo Extra application to work on the currently displayed image. Note that images are the only media type that can be added to the Media Library, so once a Photos Extra performs its magic on an image, it can be saved back to the media library to be shared with others. Figure 6-9 shows the Photos Extra UI.

The next section covers how to create a Photos Extra application.
This section covers how easy it is to integrate with the Pictures hub. Building a Photos Extra application includes the following two major steps:
A new project named PhotosExtraApp is added to the Chapter 6 solution. We will turn this project into a Photos Extra App and use MVVM Light as part of the sample. We will take advantage of messaging to communicate between the image editing View named ImageEditorView.xamland the backing ViewModel class named PictureEditingViewModel.cs. We also will use a few type converters as well. Fist we need to edit the project so that it shows up in the Photos Extra menu. The next section covers how to create the Extras.xml file.
The Extras.xml file is pretty easy to create. Here are its contents:
<Extras>
  <PhotosExtrasApplication>
    <Enabled>true</Enabled>
  </PhotosExtrasApplication>
</Extras>
Run the application to test that the WP7 Book Photos Extra is added to the Extras menu when in the Single Picture Viewer in the Pictures hub. When selected, the application just launches normally and doesn't present an editing mode but the test is successful with the application appearing in the menu. The next section covers how to capture the current picture.
Retrieving the selected photo is performed in the OnNavigatedTo method override of the application. A set of parameters are passed in when the application is launched from the Single Photo Viewer in the Pictures hub. This allows the application to know when it is launched as a Photos Extra or when the application is simply launched from the application list or Start screen tile if pinned to the Start screen because no query parameters are present.
To retrieve the query parameters, you use the NavigationContext.QueryString property. The QueryString object is a Dictionary<string, string> object. Look for the pre-defined QueryString["token"] to know that the application was launched as a Photos Extra. Use the query value to also obtain a handle to the image.
To get started, we override OnNavigatedTo in Main.xaml.cs in order to capture the query string value to set the correct picture on PictureEditingViewModel.PictureToEdit property. Listing 6-9 has the code for PhotosExtraAppMainPage.xaml.cs.
Example 6.9. PhotosExtraApp MainPage.xaml.cs Code File
using System;
using System.Collections.Generic;
using System.Windows.Controls;
using GalaSoft.MvvmLight.Messaging;
using Microsoft.Phone.Controls;
using Microsoft.Xna.Framework.Media;

namespace PhotosExtraApp
{
  public partial class MainPage : PhoneApplicationPage
  {
    // Constructor
    public MainPage()
    {
      InitializeComponent();
    }

    protected override void OnNavigatedTo(System.Windows.Navigation.NavigationEventArgs e)
    {
      base.OnNavigatedTo(e);
      //Process query string
      IDictionary<string, string> queryStrings = this.NavigationContext.QueryString;
      if (NavigationContext.QueryString.Count > 0 &&
        NavigationContext.QueryString.ContainsKey("token"))
      {
        MediaLibrary library = new MediaLibrary();
        Picture picture = library.GetPictureFromToken(queryStrings["token"]);
        //Remove this query string item so that when the user clicks
        //"back" from the ImageEditorView page the app doesn't loop back
        //over to the ImageEditorView in an endless loop of navigation because
        //the query string value is still present and picked up by
        //MainPage.OnNavigateTo each time...
        NavigationContext.QueryString.Remove("token");

        //Send Message with Picture object
        SetPictureAndNavigate(picture);
      }
}
private void ListBox_SelectionChanged(object sender, System.Windows.Controls.SelectionChangedEventArgs e)
{
ListBox lb = sender as ListBox;
SetPictureAndNavigate(lb.SelectedItem as Picture);
}
void SetPictureAndNavigate(Picture picture)
{
Messenger.Default.Send<Picture>(picture, "PictureToEdit");
NavigationService.Navigate(new Uri("/ImageEditorView.xaml", UriKind.Relative));
}
}
}The query string value for the token parameter is obtained and the MediaLibrary.GetPictureFromToken method is called to obtain the correct image from the Picture hub. The picture is passed to the SetPictureAndNavigate method shown in Listing 6-9. This same method is called when an image is selected from the ListBox in MainPage.xaml via the ListBox_SelectionChanged method also in Listing 6-9.
Notice in the SetPictureAndNavigate method, it uses the MVVM Light Messenger.Default.Send to pass the picture as a message. The message is registered for and received in the PictureEditingViewModel class constructor in this line of code:
Messenger.Default.Register<Picture>(
  this, "PictureToEdit",
  (picture) => { PictureToEdit = picture; });
The PictureEditorView.xamlView databinds to the PictureEditingViewModel so that the Image control on that page can data bind to the PictureEditingViewModel.PictureToEdit property. This allows the UI to data bind to a ViewModel without directly accessing the ViewModel by using MVVM Light Toolkit Messaging.
Let's finish discussing the MainPage.xaml functionality before diving further into the picture edit page. The ListBox in MainPage.xaml data binds to the List<Picture> Pictures property in the MainViewModel class. The interesting part of the MainViewModel class is loading the images:
private void CreateDataCollections()
{
  Pictures = new List<Picture>();
  Picture picture = null;
  for (int i = 0; i < _mediaLibrary.Pictures.Count; i++)
  {
    picture = _mediaLibrary.Pictures[i];
    Pictures.Add(picture);
    if (i > 30)
      break;
  }
}
The CreateDataCollections method is hard coded to just load the first 30 pictures found into the MainViewModel.Pictures property. Figure 6-10 shows the MainPage.xaml UI with sample images from the Emulator rendered in a basic data template that shows the name, the image, and the album it is from.

The ListBox data binds to the List<Picture> Pictures collection. The data template includes an Image control. It leverages a value converter named ImageSourceConverter that calls Picture.GetImage() and sets it on the Source property for the Image control in the Data Template. Picture.GetThumbnail would be a better choice for the ListBox template, because it is a small image but we use the same converter when displaying the image on the edit screen and GetImage returns the full image and so looks better when full screen.
MainPage.xaml only displays when launched from the App List. When an image is touched, it opens to the picture editing View named PictureEditorView.xaml. When launched from the Photos Extra menu with the QueryStrings value present, the application goes straight to the picture editing view as shown in Figure 6-11.

Notice that in both Figure 6-10 and Figure 6-11 that the name does not include the extension. The TextBlock data binds to the Picture.Name property that includes the extension but it is parsed out. This is accomplished by a simple value converter named ImageNameConverter that has a simple line of code to obtain just the name portion:
return ((string)value).Split('.')[0];Notice also that in Figure 6-11, when the UI is in Landscape mode the text title disappears to maximize space for image viewing and editing. This is also achieved via a value converter. The TextBlock's Visibility property Element data binds to the Orientation of the Page. The value converter sets Visibility to Collapsed if the phone is in Landscape mode. Otherwise the TextBlock's Visibility is configured to Visible. The PictureEditorView data binds to the PictureEditingViewModel class shown in Listing 6-10.
Example 6.10. PictureEditingViewModel.cs Code File
using System.IO;
using System.Windows.Media.Imaging;
using GalaSoft.MvvmLight;
using GalaSoft.MvvmLight.Command;
using GalaSoft.MvvmLight.Messaging;
using Microsoft.Xna.Framework.Media;
namespace PhotosExtraApp.ViewModel
{
  public class PictureEditingViewModel : ViewModelBase
  {
    private MediaLibrary mediaLibrary;

    public PictureEditingViewModel()
    {
      mediaLibrary = new MediaLibrary();

      //Register to receive message with picture object from Picture Hub
      //This message is sent from MainPage.xaml.cs in OnNavigateTo
      Messenger.Default.Register<Picture>(
       this, "PictureToEdit",
       (picture) => { PictureToEdit = picture; });

      //Instantiate Commands
      SaveImageCommand = new RelayCommand(
        () => SaveImage());

      SaveImageAsCommand = new RelayCommand<string>(
        param => SaveImageAs(param));

      RevertToSavedImageCommand = new RelayCommand(
        () => EditImage());
      EditImageCommand = new RelayCommand(
        () => RevertToSavedImage());
    }

    #region Image State
    public const string PictureToEditPropertyName = "PictureToEdit";
    private Picture _pictureToEdit = null;
    public Picture PictureToEdit
    {
      get
      {
        return _pictureToEdit;
      }

      set
      {
        if (_pictureToEdit == value)
        {
          return;
        }
        var oldValue = _pictureToEdit;
        _pictureToEdit = value;
        RaisePropertyChanged(PictureToEditPropertyName);
      }
    }


    public const string ModifiedPicturePropertyName = "ModifiedPicture";
    private WriteableBitmap _modifiedPicture = null;
public WriteableBitmap ModifiedPicture
{
get { return _modifiedPicture; }
set
{
if (_modifiedPicture == value)
{ return; }
var oldValue = _modifiedPicture;
_modifiedPicture = value;
RaisePropertyChanged(ModifiedPicturePropertyName);
}
}
//Property to data bind to for SaveAs input UI
//Used for SaveAs command
public const string ImageSaveAsNamePropertyName = "ImageSaveAsName";
private string _imageSaveAsName = null;
public string ImageSaveAsName
{
get { return _imageSaveAsName;}
set
{
if (_imageSaveAsName == value)
{ return; }
var oldValue = _imageSaveAsName;
_imageSaveAsName = value;
RaisePropertyChanged(ImageSaveAsNamePropertyName);
}
}
public const string ImageIsDirtyPropertyName = "ImageIsDirty";
private bool _imageIsDirety = false;
public bool ImageIsDirty
{
get { return _imageIsDirety; }
set
{
if (_imageIsDirety == value)
{ return; }
var oldValue = _imageIsDirety;
_imageIsDirety = value;
RaisePropertyChanged(ImageIsDirtyPropertyName);
}
}
#endregion
#region Image Actions for RelayCommand Objects
private void EditImage()
{
//Editing, unsaved changes pending
ImageIsDirty = true;
}//View must set the writable bitmap area
//prior to executing this command
//This Save action takes a new name
private void SaveImageAs(string saveAsName)
{
using (MemoryStream jpegStream = new MemoryStream())
{
//Tell the UI to update the WriteableBitmap property
Messenger.Default.Send<bool>(true, "UpdateWriteableBitmap");
ModifiedPicture.SaveJpeg(jpegStream, ModifiedPicture.PixelWidth,
ModifiedPicture.PixelHeight, 0, 100);
//Update current Picture to reflect new modified image
PictureToEdit = mediaLibrary.SavePicture(saveAsName, jpegStream);
//Saved, not editing
ImageIsDirty = false;
};
}
//View must set the writable bitmap area
//prior to executing this command
//This save action overwrites existing image
private void SaveImage()
{
using (MemoryStream jpegStream = new MemoryStream())
{
//Tell the UI to update the WriteableBitmap property
Messenger.Default.Send<bool>(true, "UpdateWriteableBitmap");
ModifiedPicture.SaveJpeg(jpegStream, ModifiedPicture.PixelWidth,
ModifiedPicture.PixelHeight, 0, 100);
//Update current Picture to reflect new modified image
PictureToEdit = mediaLibrary.SavePicture(PictureToEdit.Name, jpegStream);
//Saved, not editing
ImageIsDirty = false;
};
}
//PictureEditingView registers to receive this message
//It would clear out any edits at the UI level.
private void RevertToSavedImage()
{
Messenger.Default.Send<bool>(true, "UndoImageChanges");
}
#endregion
#region Image Editing Commmands
public RelayCommand SaveImageCommand { get; private set; }
public RelayCommand<string> SaveImageAsCommand { get; private set; }
public RelayCommand EditImageCommand { get; private set; }
public RelayCommand RevertToSavedImageCommand { get; private set; }
#endregion
}
}The PictureEditingViewModel class has two primary data properties: PictureToEdit of type Picture and the ModifiedPicture of type WriteableBitmap. The idea is to display the selected picture to be modified in an Image control.
Note
The sample doesn't actually modify the control, but you could enable drawing, etc., just like what was demonstrated in Chapter 2.
The user can then edit the image in the UI. The modifications under the covers would result in additional Silverlight controls added to the XAML with the Grid WritableBitMapSourceArea as the top-level parent. When the user clicks save, the Grid is passed into the WriteableBitmap to turn it into a bitmap image.
You can pass any UIElement into the WriteableBitmap.Render method and it will turn the element and its children into an image. In the SaveImageCommand (SaveImage()) and SaveImageAsCommand (SaveImageAs()) commands, a message is sent to the UI to update the ModifiedPicture property on the VM prior to saving. We could do this in a way without tying the View to the ViewModel via additional messages, but for our example this is sufficient.
The PictureEditingViewModel class also sends a message to the UI to ask the View to undo modifications to the image. Listing 6-11 has the PictureEditorView code-behind file.
Example 6.11. PictureEditorView .xaml.cs Code File
using System.Windows.Controls;
using GalaSoft.MvvmLight.Messaging;
using Microsoft.Phone.Controls;
using PhotosExtraApp.ViewModel;

namespace PhotosExtraApp
{
  /// <summary>
  /// Description for ImageEditorView.
  /// </summary>
  public partial class PictureEditorView : PhoneApplicationPage
  {
    PictureEditingViewModel vm;
    /// <summary>
    /// Initializes a new instance of the ImageEditorView class.
    /// </summary>
    public PictureEditorView()
    {
      InitializeComponent();

      vm = DataContext as PictureEditingViewModel;

      //Register for message to undo changes
      Messenger.Default.Register<bool>(
        this, "UndoImageChanges",
        (param) => UndoImageChanges());

      Messenger.Default.Register<bool>(
this, "UpdateWriteableBitmap",
(param) => UpdateWriteableBitmap());
}
private void UpdateWriteableBitmap()
{
//Update WriteableBitmap so it is ready to save
vm.ModifiedPicture.Render(WriteableBitmapSourceArea, null);
}
private void UndoImageChanges()
{
//Undo Image changes
//Reset WriteableBitmapSourceArea Grid to just hold
//the original image content only
Image img = ImageToEdit;
WriteableBitmapSourceArea.Children.Clear();
WriteableBitmapSourceArea.Children.Add(img);
}
private void EditAppBarBtn_Click(object sender, System.EventArgs e)
{
vm.EditImageCommand.Execute(null);
}
private void saveAppBarBtn_Click(object sender, System.EventArgs e)
{
vm.SaveImageCommand.Execute(null);
}
private void SaveAsAppMenItem_Click(object sender, System.EventArgs e)
{
vm.SaveImageAsCommand.Execute(vm.ImageSaveAsName);
}
private void RevertToLastSaveMenuItem_Click(object sender, System.EventArgs e)
{
vm.RevertToSavedImageCommand.Execute(null);
}
}
}This code walkthrough demonstrates how to set up all the infrastructure for a picture modifying Photos Extra application. It does not actually perform edits, that we leave to the enterprising reader to build the next great Photos Extra application.
So far, we have discussed working with the Media Library and the Picture hub with Photo Extras applications. In this section, we discuss video and audio media. As mentioned previously, Windows Phone 7 third-party applications cannot add media to the Media Library but third-party applications can add content to Isolated Storage in addition to playing video and audio content in memory.
In this section we cover supported codecs, playing video, audio, and DRM considerations within the context of the programming model.
Windows Phone 7 has extensive codec and container support as detailed at this link:
http://msdn.microsoft.com/en-us/library/ff462087%28VS.92%29.aspx
Container support for a variety of media includes WAV, MP3, WMA, 3GP, MP4, 3G2, M4A, WMV, M4V, 3G2, JPG, and PNG. Of note, GIF, BMP, and TIF are not supported in the Image control in Silverlight.
Decoder support is a long list at the above link, but of note support is available for MP3, WMA Standard v9, AAC-LC, HE-AAC v1, HE-AAC v2, AMR-NB, WMV (VC-1, WMV9) simple, main, and advanced. Also supported are MPEG-4 Part 2, Simple, Advanced Simple, MPEG-4 Part 10 Level 3.0 Baseline, Main, High, and H.263. There are specific requirements in terms of bitrate, constant bitrate vs. variable bitrate, as well as methods of playback, so check the above link when troubleshooting playback issues on a device to see if a capability or playback method is not correct.
The emulator does not support all of the codecs supported on a device. Specifically, AAC-LC, HE-AAC v1, HE-AAC v2, AMR-NB, MPEG-4 Part 2 simple, MPEG-4 Part 2 advanced, MPEG-4 Part 10 level 3 baseline, main or high, and H.263 are all not supported.
The following codecs are supported but with caveats:
WMV (VC-1, WMV9) – Simple Profile – Unsupported above 320 × 176 pixels.
WMV (VC-1, WMV9) - Main Profile – Unsupported above 800 × 488 pixels.
WMV (VC-1, WMV9) - Advanced Profile – Unsupported above 720 × 480 pixels.
When investigating video support for your content, it is recommended to test on a real device first to ensure that an accurate assessment is made.
Progressive download is generally used for short form video, clips, music videos, and the like. The file is completely downloaded over HTP while playback begins immediately.
We create a project named WorkingWtihMedia in the Chapter 6 solution. The MainPage is a menu page to launch additional pages to test out functionality starting with testing progressive play back in the MediaPlayerLauncher, which was covered in Chapter 4 in the LaunchersAndChoosers sample.
Silverlight supports both progressive and streaming video via the MediaElement control, but a simple way to play progressive non-DRM video is via the Microsoft.Phone.Tasks.MediaPlayerLauncher task. A page named MediaPlayeTask.xaml is added to the WorkingWithMedia project that has a single button titled play video.
private void textBlock1_MouseLeftButtonDown(object sender, MouseButtonEventArgs e)
{
  MediaPlayerLauncher mediaPlayerLauncher = new MediaPlayerLauncher();
  mediaPlayerLauncher.Controls = MediaPlaybackControls.FastForward |
    MediaPlaybackControls.Pause | MediaPlaybackControls.Rewind |
    MediaPlaybackControls.Skip | MediaPlaybackControls.Stop;
  mediaPlayerLauncher.Location = MediaLocationType.Data;
  mediaPlayerLauncher.Media = new
Uri("http://ecn.channel9.msdn.com/o9/ch9/8/9/6/6/3/5/WP7Xbox_ch9.mp4");
  mediaPlayerLauncher.Show();
}
As you can see, it is possible to configure what vcr controls are visible during playback. In the next section, we cover playing video with the MediaElement, which is pretty simple as well – but you will need to build up your own media player for best user experience. This is because the MediaElement is a blank canvas with a highly programmable API. By default, it does not have any media controls and the like. Unless you need specific functionality or want complete control over the playback UI the MediaPlayerLauncher task is easiest.
One situation where the MediaPlayerLauncher is not a good choice is with DRM'd content. I cover DRM'd video later in the chapter. The next section covers playing progressive video with the MediaElementcontrol.
TheMediaElement is a very powerful control with a rich API to provide fined-grained control during playback with a rich event model. We create a simple example that hooks into the interesting events as well as displays values for video related properties.
A new page named MediaElement.xaml is added to the WorkingWithMedia project. A MediaElement control is added to the page. The application bar is enabled to host a play and pause button that will programmatically control the MediaElement control. Several TextBlocks are laid out to display values from various MediaElement properties as shown in Figure 6-12.

There are several interesting events available with the MediaElement control. Listing 6-12 shows the available media-related events.
Example 6.12. PictureEditorView .xaml.cs Code File
using System;
using System.Windows;
using System.Windows.Threading;
using Microsoft.Phone.Controls;

namespace WorkingWithMedia.pages
{
  public partial class MediaElement : PhoneApplicationPage
  {
    public MediaElement()
    {
      InitializeComponent();
      DispatcherTimer timer = new DispatcherTimer();
      timer.Tick += new EventHandler(timer_Tick);
      timer.Interval = new TimeSpan(0, 0, 1);
      timer.Start();
}
void timer_Tick(object sender, EventArgs e)
{
CanSeekTextBlock.Text = mediaPlayer.CanSeek.ToString();
CanPauseTextBlock.Text = mediaPlayer.CanPause.ToString();
DroppedFramesTextBlock.Text =
mediaPlayer.DroppedFramesPerSecond.ToString();
}
private void mediaPlayer_MediaOpened(object sender, RoutedEventArgs e)
{
mediaPlayer.Play();
}
private void mediaPlayer_MediaFailed(object sender,
ExceptionRoutedEventArgs e)
{
MessageBox.Show("Media Failed: " + e.ErrorException.Message);
}
private void mediaPlayer_MediaEnded(object sender, RoutedEventArgs e)
{
}
private void PlayAppBarBtn_Click(object sender, EventArgs e)
{
mediaPlayer.Source =
new Uri("http://ecn.channel9.msdn.com/o9/ch9/8/9/6/6/3/5/WP7Xbox_ch9.wmv",
UriKind.Absolute);
}
private void PauseAppBarBtn_Click(object sender, EventArgs e)
{
mediaPlayer.Pause();
}
private void mediaPlayer_CurrentStateChanged(object sender,
RoutedEventArgs e)
{
CurrentStateTextBlock.Text = mediaPlayer.CurrentState.ToString();
}
private void mediaPlayer_BufferingProgressChanged(object sender,
RoutedEventArgs e)
{
BufferingProgressTextBlock.Text = mediaPlayer.BufferingProgress.ToString();
}
private void mediaPlayer_DownloadProgressChanged(object sender,
RoutedEventArgs e)
{
DownloadProgressChangedTextBlock.Text = mediaPlayer.DownloadProgress.ToString();} } }
Notice that clicking play doesn't start playback. Instead, it sets the Source property on the MediaElement control. If the video configured on the Source property is successfully opened, the MediaOpened event fires, which is where Play is actually called.
For custom video delivery, you can use the MediaElement.SetSource() method in your code to specify the media to be played. One overload of SetSource() accepts a System.IO.Stream, which is suited for the scenario where you decide to acquire the media through some other mechanism rather than have the MediaElement handle the download. When you acquire the media file, you can create a Stream around it (using a more concrete type like System.IO.IsolatedStorage.IsolatedStorageFileStream) and pass it to SetSource().
The second overload of SetSource() accepts an instance of the System.Windows.Media.MediaStreamSource type. The MediaStreamSource type is actually a way to plug a video container file format into Silverlight, for which the MediaElement does not come with a built-in parser. Video container file formats and related specifications are complex topics, and consequently a treatment of MediaStreamSource implementations is beyond the scope of this book.
When the Source is set by either mechanism, for progressive download scenarios the MediaElement immediately starts to download the media. The MediaElement.DownloadProgressChanged event is raised repeatedly as the download progresses. The MediaElement.DownloadProgress property reports the download progress as a percentage value (actually a double between 0 and 1 that you can convert to percentage) that you can use to track and report the download progress in the DownloadProgressChanged eventhandler.
Note
For more information on Silverlight and MediaStreamSource check out Silverlight Recipes: A Problem-Solution Approach, Second Edition: http://apress.com/book/view/1430230339.
In addition to progressive download video, streaming video is another technique used to deliver media to a player. Streaming does not require downloading the media file locally, and it is well suited for scenarios involving either live or on-demand broadcasts to a large population of viewers.
Microsoft provides Smooth Streaming, an IIS Media Services extension that enables adaptive streaming of media to Silverlight and other clients over HTTP. Smooth Streaming provides a high-quality viewing experience that scales massively on content distribution networks, making true HD 1080p media experiences a reality.
Smooth Streaming is the productized version of technology first used by Microsoft to deliver on-demand video for the 2008 Summer Olympics at NBCOlympics.com. By dynamically monitoring both local bandwidth and video rendering performance, Smooth Streaming optimizes playback of content by switching video quality in real-time to match current network conditions resulting in a better viewing experience.
Smooth Streaming uses the simple but powerful concept of delivering small content fragments (typically two seconds worth of video) and verifying that each has arrived within the appropriate time and played back at the expected quality level. If one fragment does not meet these requirements, the next fragment delivered will be at a somewhat lower quality level. Conversely, when conditions allow it, the quality of subsequent fragments will be at a higher level if network conditions improve.
Note
For more information on IIS Smooth Streaming go to http://learn.iis.net/page.aspx/558/getting-started-with-iis-smooth-streaming/.
The Microsoft.Web.Media.SmoothStreaming.SmoothStreamingMediaElement is a customized version of the MediaElement that works directly with IIS Smooth Streaming technology. The SmoothStreamingMediaElement available in Windows Phone 7 is compatible with the IIS Smooth Streaming Client 1.1. Windows Phone 7 is a subset of the full client support. The phone icon in the API reference identifies members of classes in the Microsoft.Web.Media.SmoothStreaming namespace that are available for Windows Phone 7 development. Review the documentation at the following link:
http://msdn.microsoft.com/en-us/library/microsoft.web.media.smoothstreaming(v=VS.90).aspx
IIS Smooth Streaming combined with the SmoothStreamingMediaElement provide an incredibly powerful and flexible streaming capability with support for multiple video and audio tracks, multiple languages, subtitles, Timeline Markers, Fast Forward and Rewind, and metadata in tracks for "pop-up" information during playback for a rich media experience. Please refer to this link for details on capabilities:
http://msdn.microsoft.com/en-us/library/ee958035(v=VS.90).aspx
The Silverlight Media Framework (SMF), or "smurf," is an open source CodePlex project that provides a robust, scalable customizable media player for IIS Smooth Streaming media delivery. The SMF builds on the core functionality of the Smooth Streaming Client (formerly known as the Smooth Streaming Player Development Kit) and adds a large number of additional features, including an extensibility API that allows developers to create plug-ins for the framework. The SMF also now includes full support for Windows Phone 7 so developers can incorporate high-end video playback experiences in their Windows Phone 7 applications. Please check out the SMF at this link:
http://smf.codeplex.com/
Most long form video, whether it be TV show episodes, movies, or live TV, has some form of Digital Rights Management (DRM). As the goal of DRM is to prevent illegal copying of digital content, securely storing licenses to content is of paramount concern.
Silverlight for Windows Phone 7 supports DRM via Microsoft PlayReady. Microsoft PlayReady is a platform independent DRM content access technology that is optimized for broad use across a range of devices. Microsoft PlayReady supports subscription, purchase, rental, and pay-per-view business models that can be applied to many digital content types and to a wide range of audio and video formats.
On Windows Phone 7, there is support for Microsoft PlayReady built into the platform including a secure key store for online and offline DRM key storage. After DRM media is accessed the first time, the license is stored offline enabling offline playback of DRM'd content.
A full discussion of DRM is beyond this book but here is a link for more information on Microsoft PlayReady technology:
www.microsoft.com/PlayReady/Default.mspx
When it comes to DRM protected content available via the Zune Service, either purchased or subscription, you can play that content within Silverlight applications using the MediaElement as well as the MediaPlayer available in the XNA Framework. License acquisition occurs behind the scenes with no additional work necessary by the developer. For content that is not owned by the end-user, you can use the MarketplaceDetailsTask to show UI that allows the user to purchase the content.
Because audio is critical to video playback, audio support is covered in pretty good detail in concert with what has been discussed above regarding video playback. However, in addition to the MediaElement and SmoothStreamingMediaElement, developers can play audio using the Microsoft.Xna.Framework.Media.MediaPlayer object. We demonstrated this in the Chapter 6 WorkingWithMediaLibrary project in this event handler from MainPanoramaPage.xaml.cs:
private void ListBox_SelectionChanged(object sender, SelectionChangedEventArgs e)
{
object obj = (sender as ListBox).SelectedItem;
MediaLibrary library = new MediaLibrary();
try
{
switch (obj.GetType().ToString())
{
case "Microsoft.Xna.Framework.Media.Album": MediaPlayer.Play(((Album)(obj)).Songs); break;
case "Microsoft.Xna.Framework.Media.Song": MediaPlayer.Play((Song)(obj)); break;
case "Microsoft.Xna.Framework.Media.Playlist": MediaPlayer.Play(((Playlist)(obj)).Songs); break;
case "Microsoft.Xna.Framework.Media.Artist": MediaPlayer.Play(((Artist)(obj)).Songs); break;
}
}
catch (Exception ex)
{
MessageBox.Show("Error: " + ex.Message);
};
}The MediaPlayer object can play by Album, Song, Playlist, and Artist, but only one of these items at a time. So, for example, for a custom play list you must provide one song at a time. The MediaPlayer object has two events that you can hook, MediaStateChanged and ActiveSongChanged. MediaStateChanged fires when state changes from Paused, Playing, or Stopped to another MediaState value. Here is a code example, not from a specific project but provided as reference:
public MainPage()
{
InitializeComponent();MediaPlayer.MediaStateChanged += new EventHandler<EventArgs>(MediaPlayer_MediaStateChanged);
MediaPlayer.ActiveSongChanged += new EventHandler<EventArgs>(MediaPlayer_ActiveSongChanged);
}
void MediaPlayer_ActiveSongChanged(object sender, EventArgs e)
{
if (MediaPlayer.Queue.Count == 0)
{
//add a song to Play
MediaPlayer.Play(nextSong);
}
}
void MediaPlayer_MediaStateChanged(object sender, EventArgs e)
{
switch (MediaPlayer.State)
{
case MediaState.Paused:
break;
case MediaState.Playing:
break;
case MediaState.Stopped:
break;
}
}On a related note, you can prompt the user to purchase additional music using MarketplaceSearchTask and passing in a search string containing the artist, album, and song title. You can also use the WebBrowserTask and Zune Http links for content if you have the ID for the content. Here is an example:
WebBrowserTask task = new WebBrowserTask();
task.URL = HttpUtility.UrlEncode("http://social.zune.net/External/LaunchZuneProtocol.aspx?
pathuri=navigate%3FalbumID%3Dd1935e06-0100-11db-89ca-0019b92a3933");
task.Show();You can then use the MediaLibrary object covered above and demonstrated in the WorkingWithMediaLibrary project to find acquired content and show album art as well as purchase the media.
You might guess that the MarketplaceDetailsTask could also show the purchase UI but it is not supported in this release.
Applications that play music or video can integrate more deeply into the Windows Phone 7 user experience. This helps to provide consistent quick access to content for the end user, while also allowing your application to surface content and the application itself within the music+videos hub in addition to the App List. Figure 6-13 shows the music+videos hub panorama for reference.

The music+videos hub has an apps, history, and new section that a music or video application can integrate into for a richer user experience.
An application that calls the Microsoft.Devices.MediaHistory or Microsoft.Devices.MediaHistoryItem classes is considered as a Music + Videos hub application and will appear in the Marquee list in the hub when installed on the phone. When an application is submitted to the Windows Phone Marketplace, the marketplace detects that the application uses these classes and will automatically update the hub type to Music + Videos in the application's Windows Phone application manifest.
The Windows Phone 7 Certification Requirements Document covers music+videos hub application certification requirements in section 6.5. In this section, we build a sample music+videos hub application that you can use to guide you in building your own application that takes advantage of this integration point.
As you can see in Figure 6-13 that shows the music+videos hub, applications and content are represented by tiles. Here are the rules for tiles:
Tile images must be a .jpg image.
The application title or logo must be present on each tile.
The now playing tile must be 358 pixels × 358 pixels in size.
Other tiles shown on the hub must be 173 pixels × 173 pixels in size.
The Title property of the MediaHistoryItem class must be set to text that represents the content, such as a station name or video title.
We create two tiles to represent the videos, named ParisVideoTile.jpg and tdfVideoTile.jpg, to correspond to the videos of the Paris skyline video and Tour De France video. We also create two now playing tiles appropriately named NowPlayingParisTile.jpg and NowPlayingtdfTile.jpg.
All of the image tiles are passed into the MediaHistoryItemAPI as a System.IO.Stream object.
When an application is ingested into marketplace, marketplace detects if the application makes calls to the MediaHistory and MediaHistoryItem classes and updates the application manifest so that the application is ready for publishing. We cover how to work with these APIs in the next section.
You can test music+videos hub applications with Visual Studio and an actual device, but you must edit the manifest file manually. Set the HubType attribute on the <App> element to a value of 1 and be sure to disconnect from Zune when testing. The APIs will throw an exception if syncing with Zune.
Because the emulator does not ship with the full Windows Phone 7 experience (i.e.,themusic+videoshub is not available), it is not possible to test music+videoshub applications in the emulator in this release.
There's a tool that allows Visual Studio 2010 to connect to a device without the Zune Client software running. This functionality is especially necessary for applications that play media because it is not possible to play media when connected to the Zune Client. It is also not possible to update music+videos hub items like the "History," "Now playing," and "New" sections while connected to Zune.
To enable debugging without the Zune client running, download the WPDTPTConnect tool available with the Zune Client in this directory: robcamer. The steps are as follows:
Connect the device.
Close the Zune software.
Run either the 32-bit or 64-bit version of the WPDTPTConnect tool from the command-line.
Disconnecting the device reverts back to normal Zune functionality with the device.
We start with a Windows Phone Application project named MusicPlusVideoHub in the Chapter Six solution. We create a simple UI with two videos from a recent vacation to play as shown in Figure 6-14.

We add another page to the application called VideoPlayerPage.xaml that contains a MediaElement where the content is actually played. When one of the thumbnails shown in Figure 6-14 is clicked, the associated video is passed as part of the query string and the application navigates to the VideoPlayerPage.xaml page to actually play the video. Here is the method handler for the top thumbnail image when touched or clicked:
private void PlayParisImage_MouseLeftButtonUp(object sender, MouseButtonEventArgs e)
{
NavigationService.Navigate(new Uri(
"/VideoPlayerPage.xaml?video=Paris",UriKind.Relative));
}Note
The videos are royalty-free because the author recorded them, but the videos were shot with an old camera at 320 × 240, resulting in terrible quality on a high-resolution device like Windows Phone 7. But they are still useful to demonstrate the concepts.
The VideoPlayerPage.xaml page does not manifest any video playing UI as we are laser focused on just the code to create a music+videos hub application. Listing 6-13 has the code for VideoPlayerPage.xaml.cs.
Example 6.13. Initial VideoPlayerPage.xaml.cs Code File
using System;
using System.Windows;
using Microsoft.Phone.Controls;
namespace MusicPlusVideoHub
{
public partial class VideoPlayerPage : PhoneApplicationPage
{
public VideoPlayerPage()
{
InitializeComponent();
}
protected override void OnNavigatedTo(System.Windows.Navigation.NavigationEventArgs e)
{
VideoPlayer.Source = new
Uri(@"/video/"+NavigationContext.QueryString["video"]+".wmv",UriKind.Relative);
base.OnNavigatedTo(e);
}
private void VideoPlayer_MediaOpened(object sender, RoutedEventArgs e)
{
VideoPlayer.Play();
}
private void VideoPlayer_MediaFailed(object sender, ExceptionRoutedEventArgs e)
{
MessageBox.Show(e.ErrorException.Message);
}
  }
}In Listing 6-13, we process the query string with the video name in the OnNavigatedTo event handler. If the media is successfully opened we play it. If it fails to open the application displays a messagebox with the error message.
We now focus on modifying the code to become a music+videos hub application. From the Windows Phone 7 application certification requirements, the application needs to do these items:
The application must update the "New" section of the music+videos hub when media is added to the device.
The application must update the "Now playing" section of the music+videos hub when the application plays media.
The application must update the "History" section of the music+videos hub when the application plays media.
The application must launch the playback experience when the user taps on a hub tile in the "History" or "Now playing" area of the music+videos hub.
Note
The "Now playing" tile must update for each media item played, i.e., you cannot have one "Now playing" tile for the entire application or for a video series or an album.
Before proceeding, let's add a using clause for the Microsoft.Devices and System.IO namespaces to MainPage.xaml.cs and VideoPlayerPage.xaml.cs code files. The Microsoft.Devices provides access to the MediaHistory and MediaHistoryItem classes, which we use to update the "Now playing," "New," and "History" sections of the music+videos hub. We pass in the image tiles as a System.IO.Stream object.
When the application acquires new content such as user-selected favorite radio stations or videos, it must update the "New" section in the music+videos hub for each content item individually. For our sample application, we add code to the MainPage.xaml.cs code file for the two media items available, a video of the Paris skyline and a short clip taken by the author at the 2010 Tour De France.
Add a call to the UpdateMusicPlusVideosHub_NewSection() method in the MainPage constructor. In this method we have the following code shown in Listing 6-14.
Example 6.14. UpdateMusicPlusVideosHub_NewSection Method Code
StreamResourceInfo ParisTileStreamResource =
Application.GetResourceStream(new Uri("images/hubTiles/ParisTile.jpg",
UriKind.Relative));
//Create the MediaHistoryItem that has been newly aquired
MediaHistoryItem ParisVideoMediaHistoryItem = new MediaHistoryItem();
ParisVideoMediaHistoryItem.ImageStream = ParisTileStreamResource.Stream;
ParisVideoMediaHistoryItem.Source = "xap";
ParisVideoMediaHistoryItem.Title = "Paris Skyline Video";
//Set State for situation when navigating via click in Music+Videos Hub
ParisVideoMediaHistoryItem.PlayerContext.Add("videoHub", "Paris");
//This method call writes the history item to the 'New' section
MediaHistory.Instance.WriteAcquiredItem(ParisVideoMediaHistoryItem);
//NEW Tour De France Video
StreamResourceInfo tdfTileStreamResource =
Application.GetResourceStream(new Uri("images/hubTiles/TDFTile.jpg",
UriKind.Relative));
//Create the MediaHistoryItem that has been newly aquired
MediaHistoryItem tdfVideoMediaHistoryItem = new MediaHistoryItem();
tdfVideoMediaHistoryItem.ImageStream = tdfTileStreamResource.Stream;
tdfVideoMediaHistoryItem.Source = "xap";
tdfVideoMediaHistoryItem.Title = "Tour De France Video";
//Set State for situation when navigating via click in Music+Videos Hub
tdfVideoMediaHistoryItem.PlayerContext.Add("videoHub", "TDF");
//This method call writes the history item to the 'New' section
MediaHistory.Instance.WriteAcquiredItem(tdfVideoMediaHistoryItem);In the UpdateMusicPlusVideosHub_NewSection method code shown in Listing 6-14, we retrieve a stream that contains the desired image using Application.GetResourceStream. Since the images are stored as content in the XAP file, we simply pass in an Uri to the content based on the project folder structure. Images retrieved from server-side APIs work just as well and can be customized with a brand using the WriteableBitmap class as shown previously.
Once we have a stream to the image, we can create a MediaHistoryItem object. We assign the stream pointing to the tile image that we obtained via Application.GetResourceStream to the MediaHistoryItem.ImageStream property. According to IntelliSense, the MediaHistoryItem .Source property is not used but we set it to "xap." We set MediaHistoryItem.Title to the desired name of the object, "Paris Skyline Video" and "Tour De France Video" for our two videos.
The MediaHistoryItem class contains a dictionary of key/value pairs stored in the PlayerContext property. The values stored in the PlayerContext property are made available to the application when the item is touched in the music+videoshub in the OnNavigatedTo method of the XAML page configured as the DefaultTask for the application in WMAppManifest.xml. I cover how to leverage this information in the section titled "Implement Playback from music+videoshub" later in this chapter.
We add a key/value pair to the MediaHistoryItem.PlayerContext Dictionary object. For our simple application, we just need one value to be stored with the MediaHistoryItem. For a more complex implementation, multiple values may be stored in order to facilitate accessing the media content when the item is selected in the music+videos hub.
The last bit of code is to add the new media item to the "New" section of the music+videos hub by calling the MediaHistory.Instance.WriteAcquiredItem method and passing in our newly created MediaHistoryItem. The next two subsections covers the code added to the VideoPlayerPage.xaml file in order to update the "Now playing" and "History" sections.
In VideoPlayerPage.xaml.cs we follow the same process as we did in the previous section and create a MediaHistoryItem each time content is played in the UpdateMusicPlusVideoAppNowPlaying() method. This method is called when the media is successfully opened in the VideoPlayer_MediaOpened event where playback begins with a call to VideoPlayer.Play.
We create a MediaHistoryItem but with a few modifications. The tile image is different for "Now playing" in terms of size, which is 358 × 358 pixels square. The other change is that we add a different key/value pair to MediaHistoryItem.PlayerContext using a key name of "videoHub". This helps us distinguish between values passed within app versus a value made available as a result of clicking on an item in the music+videos hub.
As covered in the previous section, the MediaHistoryItem object makes the PlayerContext values available to the music+videos hub and passes those values back to the application upon activation. The last bit of code in the UpdateMusicPlusVideoAppNowPlaying() method is that we assign the newly created MediaHistoryItem to the MediaHistory.Instance.NowPlayingproperty.
In VideoPlayerPage.xaml.cs we follow the same process as we did in the previous section and create a MediaHistoryItem each time content is played in the UpdateMusicPlusVideoAppHistory() method. This method is called when the media is successfully opened in the VideoPlayer_MediaOpened event where playback begins with a call to VideoPlayer.Play.
As before the code acquires an image, this time the same 173 × 173 pixel tile that we display in the "New" section of the music+videos hub. This image includes the book logo in the upper left corner so that the content is associated with the application. This method also adds the "videoHub" key to the PlayerContext as before:
VideoMediaHistoryItem.PlayerContext.Add("videoHub", video);The other code that is different when adding an item to the music+videos "History" section is a call to MediaHistory.Instance.WriteRecentPlay() method where the code passes in the newly created MediaHistoryItem.
According to the AppHub certification requirements, the play back experience should display when media associated with the application is selected in the music+videos hub. This helps to provide the seamless experience of selecting media and having it immediately start playing without having to find the media by navigating the application.
The application implements a simple scheme to provide this experience by passing in to the application an ID that identifies the correct video. In the sample application, either "Paris" or "TDF" are passed in to identify the correct video. This value is captured in the OnNavigatedTo event of the DefaultTask XAML page, which in this application is MainPage.xaml. Here is the code from MainPage.xaml.cs:
protected override void OnNavigatedTo(
System.Windows.Navigation.NavigationEventArgs e)
{
base.OnNavigatedTo(e);
if (NavigationContext.QueryString.Count > 0 &&
NavigationContext.QueryString.ContainsKey("videoHub"))
{
NavigationService.Navigate(new Uri("/VideoPlayerPage.xaml?video=" +
NavigationContext.QueryString["videoHub"], UriKind.Relative));
NavigationContext.QueryString.Remove("videoHub");
}
}In general, there are two reasons why the MainPage.OnNavigatedTo event will fire for a XAML page. It will fire as a result of normal application startup with the passed-in query values if launched from the music+video hub, or because the Mainpage.xaml was activated as a result of a "Back" navigation from the VideoPlayerPage as part of normal application back stack function. If it is activated as a result of selecting media in the music+videos hub, the QueryString Dictionary object will contain the videoHub key/value pair that was associated with the item when it was initially added to the hub.
In the OnNavigatedTo method, the code checks to see if there are any values available in the NavigationContext.QueryString dictionary. If there is, it indicates that the page was activated from the music+videos hub as part of application start up. If this is the case, the application navigates to the VideoPlayerPage.xaml file, passing in the video name. It also removes the videoHub key so that we don't enter an endless loop of navigating back and forth between MainPage.xaml and VideoPlayerPage.xaml.
This completes our implementation of a music+videos hub application. In the next section, we shift gears and cover remote media consumption.
In this section we cover how Microsoft push notifications work, when to use notifications, and how to add push notifications to your application. First we start with an overview of how Microsoft push Notifications work.
Microsoft Push Notification Services (MPNS) provides a facility to connect your Windows Phone 7 application to the server without requiring continuous polling by the application. Polling works and is functional, but if an application is continuously polling and the server response is "nothing to download," the application is potentially consuming battery without any user benefit.
Note
Push notifications are not a new concept in the industry. Other platforms include push notification services as well.
Another challenge with polling is that Windows Phone 7 does not support multitasking for third-party applications running on the device. Therefore, for an application to poll for data it must remain in the foreground as the active application. While not letting any third-party application to drain the battery polling for data in the background helps to enhance the end-user experience, applications still need to be able to react to application data and status changes even when not running.
Microsoft Push Notification Services raw push notifications sends the actual data to the application. You can use raw notifications in addition to tile and toast notifications to send information directly to your application. It can be up to 1kb in size. The idea is to send a toast that something has happened and then send a raw notification to the application so that it can display the corresponding data when the application is launched.
Microsoft Push Notification Services allows an application to receive notifications that data has been updated or application status has changed even when the application is not running. When a toast notification is received, the user receives a "toast," which is a little pop-up across the top of the screen that the user can click on, resulting in launching your application. Figure 6-15 shows a sample toast notification from the MSDN documentation.
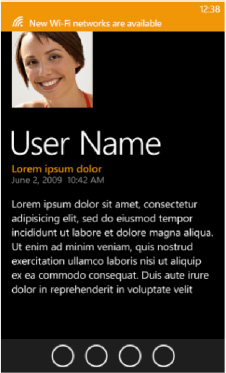
The toast notification is system generated. It displays over any application running, whether the Start screen or running application. If the application that expects to receive the notification is running, the toast notification is not displayed, but because the application is already running, the application simply processes and displays the data directly.
An important user experience consideration is to use toast notifications sparingly and with flexible configuration settings to help the user tune which notifications they are interested in receiving. The reason why is because toast notifications are disruptive, appearing over top any running application, even an action game.
Note
First party applications such as the phone dialer and other built-in applications can multitask with a running third-party application, as well as with other first-party applications.
Another type of notification is a tile notification, which updates the application tile if, and only if, the user decided to pin your application's tile to the Windows Phone 7 Start screen. Tile notifications can consist of a value for the tile Title value, a Count value (between 1 and 99), as well as a 173 × 173 background image for the tile. There are not any additional customizations available but with a little bit of server-side work your application can dynamically generate custom images for the tile background, which we cover further down in the chapter.
For MPNS to work by sending important data to the user's phone, it implies some sort of server-side component to the Windows Phone 7 application receiving the notification, which is correct. Essentially MPNS is a proxy between the server-side component of your solution and the Windows Phone 7 application component. Figure 6-16 provides a graphical representation of how MPNS works.
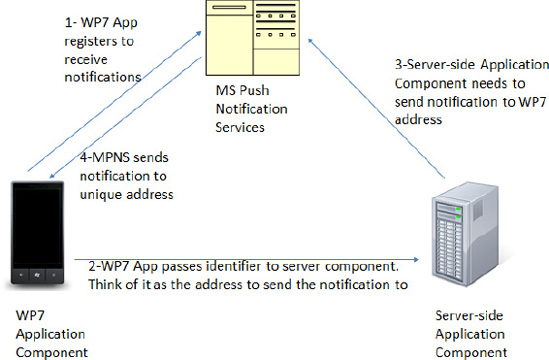
The user via their Windows Phone 7 phone initiates the request to MPNS. MPNS receives the request and passes a URI back to the application. The application then passes the URI to the server-side application component along with information on which notifications the user would like to receive such as scores for their favorite sports team.
The server-side component now has all the information it needs, the "address" to send the notification to via MPNS as well as the criteria the user has chosen for what notifications the user would like to receive.
Note from Figure 6-16 that there is a server-side component that you must create in order to support push notifications. The server-side component performs the following two primary tasks:
For all of the gory details on push notifications, I recommend reviewing the MSDN documentation to start:
http://msdn.microsoft.com/en-us/library/ff402537(v=VS.92).aspx
Also, there is a full set of Windows Phone 7 labs including labs on push notifications available here:
www.microsoft.com/downloads/en/details.aspx?displaylang=en&FamilyID=ca23285f-bab8-47fa-b364-11553e076a9a
For this section, I want to focus on the Windows Push Notification Server Side Helper Library created by the Microsoft evangelism team to assist developers quickly implement push notification services. The library supports sending all three push notification messages available, specifically Raw, Tile, and Toast. The library abstracts out the complexity of implementing push notifications to just a few lines of code for your application.
To get started, obtain a copy of the Push Notification Server Side Helper for WP7 "Recipe" from this link:
http://create.msdn.com/en-us/education/catalog/article/pnhelp-wp7
The sample code included with the download provides a very powerful example of how to work with the library it includes a "server" application as a Windows Presentation Foundation client. A real application could be a Windows Service or similar construct on other platforms.
What's great about the sample is that it demonstrates a dialog between the client and the server. For example, the client keeps the server aware of whether the user has pinned the application tile. Once the user has pinned the tile the server-side application is made aware and prepares to send tile updates. Even just switching tabs on the server-side WPF application results in UI updates via RAW notifications on the WP7 application. Run the sample to see it in action.
Microsoft has done research that indicates end-users like applications that support live tiles. It promotes "at a glance" information delivery, such as when the Outlook tile indicates the number of unread messages. As mentioned in the previous section, Microsoft Push Notification Services provides fine-grained control over tile updates for maximum personalization.
There are situations where an ISV develops an application that doesn't need full push notification functionality but the ISV would still like to support tile updates. Windows Phone 7 provides a client-side pull API that allows an application to update its pinned tile on a pre-defined basis of every hour, every day, or every week. No other update schedule is available. Delivery times will vary within the specified schedule meaning if an application registers for a tile update on a daily basis, the tile update can happen at any time within that time period. Still, this can provide a simple way to add a Live Tile to an application.
The API that provides this functionality is the Microsoft.Phone.Shell.ShellTileSchedule API. The API takes a URI to a web service or image located on a web site as well as an interval setting. Listing 6-15 shows the code.
Example 6.15. ShellTileNotificationSample MainPage.xaml.cs
using System;
using Microsoft.Phone.Controls;
using Microsoft.Phone.Shell;
namespace ShellTileNotificationSample
{
public partial class MainPage : PhoneApplicationPage
{
// Constructor
public MainPage()
{
  InitializeComponent();
}
//store as global variable so that the schedule
//can be Started and Stopped.
private ShellTileSchedule shellTileSchedule;
private void StartShellTileAppBarBtn_Click(object sender, EventArgs e)
{
StartShellTileSchedule();
}
private void StartShellTileSchedule()
{
shellTileSchedule = new ShellTileSchedule();
shellTileSchedule.Recurrence = UpdateRecurrence.Interval;
shellTileSchedule.Interval = UpdateInterval.EveryHour;
shellTileSchedule.StartTime = DateTime.Now;
shellTileSchedule.RemoteImageUri =
new Uri(@"http://apress.com/resource/bookcover/9781430232193?size=medium");
shellTileSchedule.Start();
}
private void StopShellTileAppBarBtn_Click(object sender, EventArgs e)
{
if (shellTileSchedule != null)
shellTileSchedule.Stop();
}
}
}Create a private variable for the ShellTileSchedule instance so that you can stop it at a later time if the user decides for some reason to want to turn off Live Tile updates. In this example, two application bar buttons titled start and stop control the schedule. Once the tile is pinned it can take up the full interval time before it is updated.
Tile updates do not occur if the phone is in an idle state, meaning the screen is off or the lock screen is visible. As soon as the screen is on and unlocked the tile will update. Figure 6-17 shows the updated tile.
The image at the URI must be less than 80KB in size with a maximum download time of 15 seconds. If the API cannot download the image within 15 seconds three consecutive times the schedule will be removed.
You can have more than one ShellTileSchedule available in your application, although only one schedule can be active at a time. As an example, let's say you are building an application that provides news coverage for all 32 NFL football teams. You could create 32 URIs that are updated with team specific content and present a menu to the user that says something like "which team would you like to get live tile updates for?" Once the user selects a team, create the corresponding ShellTileSchedule to that team's URI, and voila! Customized live tile updates with just a few lines of code.
At launch, Windows Phone 7 supported the English, French, Italian, and German languages. Otherwise known as EFIGs. At Mobile World Congress 2011, Microsoft announced that more languages will be added in 2011. Supporting multiple languages can increase the market share for your application. Luckily Windows Phone 7 provides full localization support just as what is available in the full .NET Framework.
There is extensive documentation available on localization in .NET. Here is a link to the localization best practices for Windows Phone:
http://msdn.microsoft.com/en-us/library/ff967552(v=VS.92).aspx
This link describes how to build a localized application for Windows Phone:
http://msdn.microsoft.com/en-us/library/ff637520(VS.92).aspx
This chapter is the last chapter on Silverlight for Windows Phone development, and it covers a lot of ground. It starts off with a discussion of advanced data binding techniques, how to lazy load images for a ListBox, as well as how to data bind to any type using the IValueConverter interface.
Encryption Services available in Windows Phone 7 are covered as well, describing capabilities and precautions when it comes to securing data. The chapter shifts gears to a discussion of the Image classes and capabilities, as well as the MediaLibrary APIs.
The chapter moves on to covering two key integration capabilities, how to build a Photos Extra application as well as a music+video hub application. Along the way, the chapter covers audio and video support and capabilities.
Finally the chapter concludes with a discussion of Microsoft Push Notification Services and ends with a short overview on Localization, as there is broad coverage of localization in the .NET Framework MSDN documentation.
In the next two chapters, the book shifts gears, focusing exclusively on building 2D and 3D development with the XNA Framework.