
Over the course of this book, you have learned how to develop Zend Framework applications, working with many of the most commonly used components. In this chapter, I'll discuss some other components that will likely find a place in your day-to-day work.
When you are rapidly developing dynamic web applications, it is far too easy to get caught up in functionality at the expense of performance—or performance at the expense of functionality.
I often run into a common issue when I create a method in a model that runs a couple of queries and returns some sort of aggregated result. This in itself is not an issue. The issue comes up when you become complacent with regard to the number of queries that you are running behind the method call or do not consider how the system will behave under heavy load.
The first thing I do when I notice performance issues is to enable Zend_Db_Profiler. It provides a wealth of information about the queries that are being run without adding debugging code to your project classes. Having this information at hand makes it much easier to locate and remedy bottlenecks.
Note
One additional benefit of profiling Zend_Db is getting to see all the SQL that Zend_Db generates. I am a bit of a control freak and like to know what is going on behind the scenes!
Configuring your application to use the database profiler is a trivial task. You simply set the database parameter profiler to true in the application.ini config file in the development section, as shown in Listing 11-1. By adding this to the development section, the profiler will be enabled locally but will not be in the production environment.
Example 11.1. Turning On the db Profiler in application/configs/application.ini
resources.db.params.profiler = true
Once the profiler is turned on, you need a way to view the data. You could add this directly to the main layout file, but you will probably need to do this in every project that uses Zend_Db, so it makes sense to create a view script to render the profiling results. By doing this, you will be able to drop this file into any other application that uses the profiler.
To get started, create a new view directory in application/views/scripts named util. Then create a new file named profiler.phtml in the util directory.
The first thing the profiler view script needs to do is fetch the current database adapter and determine whether the profiler is enabled. If it is not enabled, then the script does nothing. If it is, it generates a table with the profiling information, as shown in Listing 11-2.
Example 11.2. The Profiler View Script in application/views/scripts/util/profiler.php
<?php
// get the default db adapter
$db = Zend_Db_Table::getDefaultAdapter();
$profiler = $db->getProfiler();
if($profiler->getEnabled() && $profiler->getTotalNumQueries() > 0) { ?>
<div style='text-align:center'>
<h2>Database Profiling Report</h2>
    <p>Total queries executed: <?php echo $profiler->getTotalNumQueries()?></p>
    <p>Total elapsed time: <?php echo $profiler->getTotalElapsedSecs()?></p>
</div>
<table class='spreadsheet' cellpadding='0' cellspacing='0' style='margin:10px auto'>
    <thead>
        <tr>
            <th>#</th>
            <th>Query</th>
            <th>Time</th>
        </tr>
    </thead>
    <tbody>
<?php foreach ($profiler->getQueryProfiles() as $queryNumber => $query) { ?>
    <tr>
        <td>(<?php echo $queryNumber + 1?>)</td>
        <td><?php echo $query->getQuery();?></td>
        <td><?php echo $query->getElapsedSecs();?></td>
    </tr>
<?php }?>
</tbody>
</table>
<?php }?>Now you need to render this file in the main layout script. This will enable you to profile every page on the site with no additional effort.
You render this script as you would any other view script with one additional consideration; the view renderer helper automatically sets the view script path to the current module's view directory. Zend_View will throw an exception when you try to view a module page, such as http://localhost/contact, since there is probably no util/profiler.phtml file in its view directory.
This is easy to fix—you just add the script path before you render it. You don't need to worry about any conflicts with the module scripts since the module's action controller has already rendered its response by the time the layout file is rendered.
Update the main site layout file (application/layouts/scripts/layout.phtml) to render the profiler script after the closing </body> tag. First add the script path to the main application view directory, and then render the profiler.phtml file, as shown in Listing 11-3.
Example 11.3. Rendering the Profiler Script in application/layouts/scripts/layout.phtml
</body>
<?php
    $this->addScriptPath(APPLICATION_PATH . '/views/scripts'),
    echo $this->render('util/profiler.phtml'),
Now when you load any page, you should see the database profiling report at the bottom of the page, as shown in Figure 11-1.
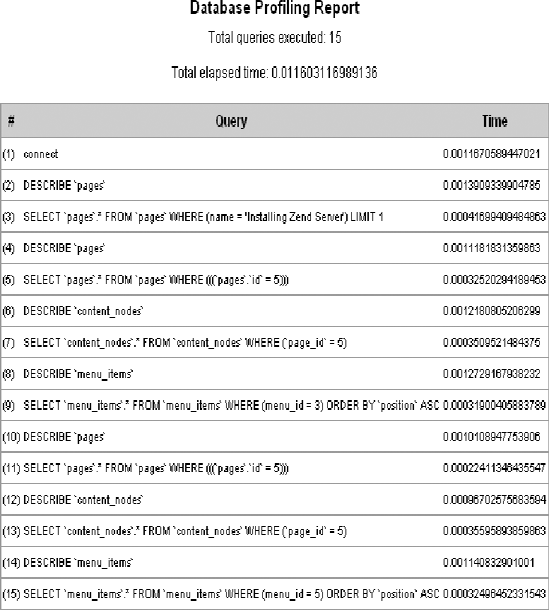
This information reveals an issue with the application; a few queries are duplicated several times. Looking back at the code, this makes sense; when you refactored the page controller to use SEO-friendly URLs, you added a new query that fetches the page row by the name. Then it passes the row id to the CMS_Content_Item_Page. The issue is the fact that the CMS_Content_Item_Page class then takes the ID and fetches the same information again. Time to refactor!
The CMS_Content_Item_Page class loads the page based on the ID that you pass the constructor. This worked before you refactored for the SEO-friendly URLs but now adds an extra, unnecessary query.
One solution to this issue is to update the CMS_Content_Item_Page class so you have the option to pass it a Zend_Db_Table_Row. To do this, you need to update two methods in the abstract CMS_Content_Item_Abstract class: the constructor method and the loadPageObject() method.
The constructor method was set up to pass the page as an integer. You need to update this function to enable it to pass the page to the loadPageMethod() method as an object or an integer, as shown in Listing 11-4.
Example 11.4. The Updated Constructor in library/CMS/Content/Item/Abstract.php
public function __construct ($page = null)
{
    $this->_pageModel = new Model_Page();
    if (null != $page) {
        $this->loadPageObject($page);
    }
}
Next you need to update the loadPageObject() method to evaluate the page argument. If it is a Zend_Db_Table_Row object, then it sets this as the row. Otherwise, it converts it into an integer and attempts to load the page table row, as shown in Listing 11-5.
Example 11.5. The Updated loadPageObject() Method
public function loadPageObject ($page)
{
    if (is_object($page) && get_class ($page) == 'Zend_Db_Table_Row') {
        $row = $page;
        $this->id = $row->id;
    } else {
        $this->id = intval($page);
        $row = $this->_getInnerRow();
    }
     if ($row) {
        if ($row->namespace != $this->_namespace) {
            throw new Zend_Exception('Unable to cast page type:' . $row->namespace .
                ' to type:' . $this->_namespace);
        }
        $this->name = $row->name;
        $this->parent_id = $row->parent_id;
        $contentNode = new Model_ContentNode();
        $nodes = $row->findDependentRowset($contentNode);
        if ($nodes) {
            $properties = $this->_getProperties();
            foreach ($nodes as $node) {
                $key = $node['node'];
                if (in_array($key, $properties)) {
                    // try to call the setter method
                    $value = $this->_callSetterMethod($key, $nodes);
                    if ($value === self::NO_SETTER) {
                        $value = $node['content'];
                    }
                    $this->$key = $value;
                }
}
}
} else {
throw new Zend_Exception("Unable to load content item");
}
}Next you need to update the page controller so it passes the full row to the content item. This is a simple task; you just update the line in the open action, as shown in Listing 11-6.
Example 11.6. Updating the Page Controller to Pass the Complete Row in application/controllers/PageController.php
if ($row) {
    $this->view->page = new CMS_Content_Item_Page($row);
Now when you refresh the page, you will see that you resolved two of the unnecessary queries, but it is still querying twice for the same page.
If you step through the code now, you will see that it is the menu controller that is doing this; it is loading a page object for each of the menu items. This adds a lot of flexibility in rendering the menus, so I would focus on caching the menu so it is not running these queries on every page view.
The CMS project that you have developed in this book builds a page directly from page data in the database. This gives you a great deal of control and flexibility, which is critical when you are building dynamic sites.
There is a downside, however. This is a resource-intensive process that is not always necessary. For example, the high-level site architecture (the main menu) is not likely to change very often. Using the dynamic approach, the server has to rebuild this menu every request, even though the underlying data is read much more than it is written. This makes the menu a prime candidate for caching.
Zend_Cache provides a generic interface for caching data that can work with a range of back-end technologies. It splits the caching responsibilities into two areas:
Zend_Cache_Frontendis the interface that you program to.Zend_Cache_Backendmanages the underlying cached data and how the system stores it.
To get started, you need to update your application to enable caching. You can do this in a few ways. The simplest method is to update the bootstrap file, adding a new _init*() function, as you did with the view and autoloader. In this section, I'll explain another approach to bootstrapping resources: creating Zend_Application resources themselves. By moving this function to its own application resource, you can reuse the resource in any Zend Framework project.
A number of configuration options give you control over how the cache is handled by your application.
First you need to set two general cache settings: where to store the front-end and back-end cache.
Next you need to set the front-end options:
lifetime: This is the length of time that the cache will persist. This is measured in seconds and defaults to 3600 (1 hour).automatic_serialization: This enables you to store data in the cache that is not in string form by serializing it. It is slower but makes reading and writing to the cache easier.
On the back end, you will need to set the following settings:
lifetime: This is the same setting as the front-end option of the same name.cache_dir: This is the directory that the cache files will be stored in when you use a file-based back end.
Note
In this example, you are going to use the most common settings, but I strongly recommend reviewing the current Zend Framework documentation; a number of methods for optimizing your site caching are beyond the scope of this book.
First you need to create a folder for the cache in the root of your project named cache. Then you will add these settings to the application.ini configuration file, as shown in Listing 11-7. Zend_Application will pass these settings to your application resource, enabling you to fine-tune the cache without altering your source code.
Example 11.7. The Cache Settings in application/configs/application.ini
resources.cache.frontEnd = core
resources.cache.backEnd = file
resources.cache.frontEndOptions.lifetime = 1200
resources.cache.frontEndOptions.automatic_serialization = true
resources.cache.backEndOptions.lifetime = 3600
resources.cache.backEndOptions.cache_dir = APPLICATION_PATH "/../cache"
The first step to create an application resource is to add a new folder to the library for your resources. Create a new folder in the library/CMS folder named Application. Then add a subfolder named Resource to this. Note that when I build library components, I try to follow the Zend Framework structure as much as possible. This makes it much easier for a developer who is experienced with the framework to find their way around your code.
Next you should add the path to the plug-in folder in the application.ini configuration file (see Listing 11-8) that tells the application where to look for additional plug-ins.
Example 11.8. Adding the Resource Folder to the Application Configuration file in application/configs/application.ini
pluginPaths.CMS_Application_Resource = APPLICATION_PATH "/../library/CMS/Application/Resource"
Now you are ready to create the cache resource. Create a new file in the library/CMS/Application/Resource folder named Cache.php. Then create a class in this file named CMS_Application_Resource_Cache, which extends Zend_Application_Resource_ResourceAbstract.
When the application loads this resource, it will call the init() method. Zend_Application registers the return value of this method, so in this case you will create and configure the cache and return the cache object. This allows you to fetch the cache from Zend_Application using the getResource('cache') method. It is also a good idea to add the cache to the Zend_Registry so you can work with the cache without loading the application object.
In the case of this resource, most of the work is already done for you. Zend_Cache has a cache factory method. You pass this method your cache configuration options, and it builds the cache object for you, as shown in Listing 11-9.
Example 11.9. The Cache Application Resource in library/CMS/Application/Resource/Cache.php
<?php
class CMS_Application_Resource_Cache extends Zend_Application_Resource_ResourceAbstract
{
    public function init ()
    {
        $options = $this->getOptions();
        // Get a Zend_Cache_Core object
        $cache = Zend_Cache::factory(
            $options['frontEnd'],
            $options['backEnd'],
            $options['frontEndOptions'],
            $options['backEndOptions']);
        Zend_Registry::set('cache', $cache);
        return $cache;
    }
}
It is important to understand that the bootstrap object is not global. This means you need to fetch the bootstrap in order to access the registered resources. Zend_Application_Bootstrap_Bootstrap makes this easier by registering the bootstrap as a front controller parameter. This enables you to fetch the bootstrap at any point from your front controller using the getInvokeArg('bootstrap') method. I will demonstrate its usage in the next section.
When you profiled the application, it became clear that the menus were running several queries on every page load. The site menus are not likely to change very often, which makes this a perfect use case for caching.
Caching data with Zend_Cache is a trivial task; you simply call the Zend_Cache save() method. The save() method takes three arguments:
The data to cache: This data should be in string form, but since you turned the
automatic_serializationoption on, you can cache any form of data including arrays and objects.Zend_Cachehandles serializing the data when you write to the cache and unserializing it when you fetch it back from the cache.The cache key: This is a unique identifier for the cached data. I try to use descriptive names, such as
menu_1, where1is the primary key of the menu in the database.Tags: This is an array of tags, which enables you to categorize a cache entry. In this case, you will create a tag for each menu item so you can flush the menu from the cache when you update an item and leave other cache entries intact.
To get started, open the menu controller's render action. When you configured the cache with the cache application resource, it registered the Zend_Cache instance with the application. This is registered as a front controller parameter, so you can fetch it anywhere in your controllers. Fetch the bootstrap using the getInvokeArg('bootstrap') method, as shown in Listing 11-10. Then fetch the cache resource from the bootstrap, using the getResource('cache') method.
Now that you have the configured instance of Zend_Cache, you are ready to cache the menus. But first, you need to check whether the menu is already cached. If you find it in the cache, you simply pass the menu to the view. Otherwise, you need to load the menu and cache it.
Loading the menu into the cache is a very straightforward task; you simply build the menu and then save it to the cache using the save() method. Now you need to create an array of tags for each of the pages that the menu points to. You pass these tags to the save() method as the third argument. This enables you to find all the cache entries that are associated with a specific page so you can purge specific files from the cache when the page changes or is removed.
Example 11.10. The Updated Render Menu Action in application/controllers/MenuController.php
public function renderAction ()
{
    $menu = $this->_request->getParam('menu'),
    // fetch the Zend_Cache object
    $bootstrap = $this->getInvokeArg('bootstrap'),
    $cache = $bootstrap->getResource('cache'),
    $cacheKey = 'menu_' . $menu;
    // attempt to load the menu from cache
    $container = $cache->load($cacheKey);
    if (! $container) {
        // if the menu is not cached then build it and cache it
        $mdlMenuItems = new Model_MenuItem();
        $menuItems = $mdlMenuItems->getItemsByMenu($menu);
        if (count($menuItems) > 0) {
            foreach ($menuItems as $item) {
// add a cache tag so you can update the menu when you update the items
$tags[] = 'menu_item_' . $item->id;
$label = $item->label;
if (! empty($item->link)) {
$uri = $item->link;
} else {
// add a cache tag to this menu so you can update the cached menu
// when you update the page
$tags[] = 'page_' . $item->page_id;
// update this to form more search engine friendly URLs
$page = new CMS_Content_Item_Page($item->page_id);
$uri = '/page/open/title/' . $page->name;
}
$itemArray[] = array('label' => $label , 'uri' => $uri);
}
$container = new Zend_Navigation($itemArray);
// cache the container
$cache->save($container, $cacheKey, $tags);
}
}
if($container instanceof Zend_Navigation_Container) {
$this->view->navigation()->setContainer($container);
}
}Now if you refresh the page that you profiled earlier, you will see the same results as on the earlier profile; it ran all the same queries. This is because it still runs the queries to build the cache. Now refresh the page again, and this time it should load the menu directly from the cache, without querying the database, as shown in Figure 11-2.

Instant gratification is a very important part of the user experience for your site managers. The cache is set to expire every 60 minutes, but when an administrator changes a menu, they expect to see the update immediately.
To do this, you need to update the application in a few areas, clearing the cached menu when you update the menu, one of its items, or one of the pages. To get started, open the Menu model's updateMenu() method.
Note
This method of updating the cache will work only in single-machine configurations. For clusters or other multiple machine configurations, a more advanced updating method will be required. The first thing you need to do is fetch the cache. Since you are not doing this within the scope of the front controller, you will need to fetch it from the registry. Then you need to clean the menu from the cache so it will rebuild.
Zend_Cache has two methods for cleaning the cache:
remove(): This removes a specific entry (by ID) from the cache.clean(): This method can remove multiple records, such as all the records with thepage_1tag.
In this case you know the ID of the record, and you need to change only one record, so use the remove() method, as shown in Listing 11-11.
Example 11.11. Removing the Cache Record When You Update a Menu in application/models/Menu.php
public function updateMenu($id, $name)
{
    $currentMenu = $this->find($id)->current();
    if($currentMenu) {
        // clear the cache entry for this menu
        $cache = Zend_Registry::get('cache'),
        $id = 'menu_' . $id;
        $cache->remove($id);
        $currentMenu->name = $name;
        return $currentMenu->save();
    }else{
        return false;
    }
}
Next you need to update the menu item model, clearing the cached menu each time you modify its items, as shown in the addItem() method in Listing 11-12. Repeat this in each method that updates menu items.
Example 11.12. Removing the Menu Cache Record When You Update a Menu Item in application/models/MenuItem.php
public function addItem ($menuId, $label, $pageId = 0, $link = null)
{
    // clear the cache entry for the menu
    $cache = Zend_Registry::get('cache'),
    $id = 'menu_' . $menuId;
    $cache->remove($id);

    $row = $this->createRow();
    $row->menu_id = $menuId;
    $row->label = $label;
    $row->page_id = $pageId;
    $row->link = $link;
    $row->position = $this->_getLastPosition($menuId) + 1;
    return $row->save();
}
You also need to update the cached menu when you update or remove one of the pages to which it points. When you cached the menu, you added tags for each of the pages that the menu references; now you need to update the page model, clearing any cache records that are tagged to a page when you update or delete it. Listing 11-13 demonstrates how to do this in the updatePage() method. Repeat this in the deletePage() method.
Example 11.13. Clearing Cache Records That Are Tagged to a Page You Update in application/models/Page.php
public function updatePage($id, $data)
{
    // find the page
    $row = $this->find($id)->current();
    if($row) {
        // clear any cache records which are tagged to this page
        $cache = Zend_Registry::get('cache'),
        $tag = 'page_' . $id;
        $cache->clean(
            Zend_Cache::CLEANING_MODE_MATCHING_TAG,
            array($tag)
        );

        // update each of the columns that are stored in the pages table
        $row->name = $data['name'];
        $row->parent_id = $data['parent_id'];
        $row->save();
        // unset each of the fields that are set in the pages table
        unset($data['id']);
        unset($data['name']);
        unset($data['parent_id']);
        // set each of the other fields in the content nodes table
if(count($data) > 0) {
$mdlContentNode = new Model_ContentNode();
foreach ($data as $key => $value) {
$mdlContentNode->setNode($id, $key, $value);
}
}
} else {
throw new Zend_Exception('Could not open page to update!'),
}
}Once you have cached the menus, there are five more queries when you open a page; these queries are being done by the content item when you load it. Since you turned automatic serialization on, you can cache any form of object, including the loaded content items.
To cache the loaded content item, open the page controller's open action. You will need to refactor this slightly to optimize it for the cache (Listing 11-14). The goal with caching the content is to minimize database traffic, but you do have one challenge; you still need to resolve a title to the page if the request passes a SEO-friendly URL. Time to refactor!
Now you need to test and see whether a title was passed. If it was, then resolve the title to the page. Once you have this page ID, you attempt to load the cached item as you did with the menu. If the item does not exist in the cache, then load it as you did with the menus and save it to the cache. You should tag this record with the page ID so it will reload if you make any changes to the page.
Example 11.14. Updating the Open Page Action to Cache the Content Item in application/controllers/PageController.php
public function openAction ()
{
    $title = $this->_request->getParam('title'),
    $mdlPage = new Model_Page();
    $row = null;
    if (null !== $title) {
        $select = $mdlPage->select();
        $select->where('name = ?', $title);
        $row = $mdlPage->fetchRow($select);
        $id = $row->id;
    } else {
        $id = $this->_request->getParam('id'),
    }

    // first confirm the page exists
    $bootstrap = $this->getInvokeArg('bootstrap'),
    $cache = $bootstrap->getResource('cache'),
    $cacheKey = 'content_page_' . $id;
    $page = $cache->load($cacheKey);
    if(!$page) {
        if($row instanceof Zend_Db_Table_Row) {
            $page = new CMS_Content_Item_Page($row);
} else {
$page = new CMS_Content_Item_Page($id);
}
// add a cache tag to this menu so you can update the cached menu
// when you update the page
$tags[] = 'page_' . $page->id;
$cache->save($page, $cacheKey, $tags);
}
$this->view->page = $page;
}Now if you refresh the page (twice), the profiler will disappear. That is because it displays only when there are queries to profile, and your application is now serving content without hitting the database.
It is becoming very common to have international teams of contributors working on a website together. Many people standardize their applications to use common languages, but this can limit the reach of your project.
Zend Framework supports many levels of internationalization. It gives you fine-grained control over the locale and character sets it uses, for example. In this section, I will focus multilingual applications.
Zend_Translate makes translating your ZF projects much easier than using the native PHP functions. It supports a range of source formats, has a very simple API, and tightly integrates with many ZF components such as Zend_View and Zend_Form.
The first thing you need to do is determine which adapter you want to use. The adapters are in the same vein as those for Zend_Db_Table; they allow the common API to connect to a range of data sources.
In this example, you will use the CSV adapter. You can create the files with either a text editor or most spreadsheet programs.
There are many ways to integrate Zend_Translate with your project, but I prefer to create application resources for any kind of generalized configuration like this. This enables you to reuse the resource in any ZF project you work on.
To get started, create a new folder in the application folder named lang. Then create two files in this folder: source-en.csv and source-es.csv.
Note
It is not technically necessary to create a language file for your default language. If the translate helper does not locate a translation, it simply renders the text you pass it. I prefer to create one nonetheless because this file serves as a template for people who want to translate the application into their language of choice.
The next step is to update your application.ini configuration file, adding the adapter you want to use and the paths to your language files, as shown in Listing 11-15.
Example 11.15. Adding the Translate Settings to application/configs/application.ini
resources.translate.adapter = csv
resources.translate.default.locale = "en_US"
resources.translate.default.file = APPLICATION_PATH "/lang/source-en.csv"
resources.translate.translation.es = APPLICATION_PATH "/lang/source-es.csv"
Now create a new file in library/CMS/Application/Resource named Translate.php. Create a new class named CMS_Application_Resource_Translate that extends Zend_Application_Resource_ResourceAbstract.
The translate application resource needs to create an instance of Zend_Translate, adding each of the translation files with their appropriate locales. Then it registers the Zend_Translate instance in Zend_Registry so the rest of the application can access it, as shown in Listing 11-16.
Example 11.16. The Translation Application Resource in library/CMS/Application/Resource/Translate.php
<?php
class CMS_Application_Resource_Translate extends Zend_Application_Resource_ResourceAbstract
{
    public function init ()
    {
        $options = $this->getOptions();
        $adapter = $options['adapter'];
        $defaultTranslation = $options['default']['file'];
        $defaultLocale = $options['default']['locale'];
        $translate = new Zend_Translate($adapter, $defaultTranslation, $defaultLocale);
        foreach ($options['translation'] as $locale => $translation) {
            $translate->addTranslation($translation, $locale);
        }
        Zend_Registry::set('Zend_Translate', $translate);
        return $translate;
    }
}
Once this resource is configured, you are ready to start translating your interface. Translating the front end is a very straightforward task; Zend_View has a translate() helper, which automatically fetches the Zend_Translate instance from the registry. You simply pass the helper the string you want translated. In this example, I will just translate the headline on the search box; you can follow this lead and translate the rest of the application.
Update application/layouts/scripts/layout.phtml, replacing the search box headline with the code in Listing 11-17.
Example 11.17. Translating the Search Box Headline in application/layouts/scripts/layout.phtml
<div id='searchForm'>
    <h2><?php echo $this->translate('Search Site'),?></h2>
    <?php
        $searchForm = new Form_SearchForm();
        $searchForm->setAction('/search'),
        echo $searchForm->render();
    ?>
    <br />
</div>
Next you need to add Search Site to the language files, as shown in Listings 11-18 and 11-19.
Example 11.18. The Translated Search Headline in application/lang/source-en.csv
"Search Site"; "Search Site"
Example 11.19. The Translated Search Headline in application/lang/source-es.csv
"Search Site"; "Busca Sitio"
Now your CMS will render this text in the proper language, which Zend_Translate will determine based on the headers that the browser passes it.
Other Hidden Gems
Zend Framework has many other components that I do not have time to go over in this section. Some are very specific to certain classes of applications, while there are many more that can be used in a wide range of projects.
I learn something new every time I visit the Zend Framework site and recommend that you do the same.
You started this chapter by learning how to fine-tune your project to perform as quickly as possible. You stepped through profiling the application to identify bottlenecks. Then you optimized the core content item class to resolve one of the largest issues.
Once this was done, you went on to set up the CMS cache. After caching several of the items, you optimized the application to the point that it no longer queries the database at all for standard page views.
Next you learned about internationalization and set up your CMS to take advantage of Zend_Translate.
The subject matter covered in this chapter could have easily filled entire books, but I hope it gave you a taste of some of the lower-level features of the framework and provided a solid starting point for you to start exploring on your own.