
In this chapter, you'll create the template for your CMS using Zend_View and Zend_Layout, which make up the presentation layer for the Zend Framework.
The core purpose of the Zend_View class is to separate this presentation code from the application logic and data. Separating the HTML from your core application code makes all your code easier to read and follow.
The view scripts are basically PHP files that are rendered within the scope of Zend_View. As such, you can use any of the standard PHP that you need to create your dynamic templates. This is one of the things that I like best about the framework; it gives you a rich set of tools to help with common challenges but allows you to use the tools you are already comfortable with as well.
Rendering your view scripts is a two-stage process. First, the action controller creates a new instance of Zend_View (which is done with its view renderer action helper), which you load with data in your action method. Second, once the action method has been processed, the view renderer helper tells Zend_View to render the appropriate view script. Zend_View takes control from this point and renders the actual view scripts, returning the response to the controller's response segment.
In many situations, you need to do the same repetitive coding tasks many times over the course of a project. The Zend Framework developers anticipated this and created a system of helpers that allow you to create reusable widgets and functions that you can use throughout your view scripts.
Behind the scenes, the helpers are simply classes. When you call a helper from within your script, Zend_View creates a new instance of the class and then runs the method that is relates to the helper class name, named using the camelCase convention. For example, MyHelper will run the myHelper() method. Zend_View then returns the response from this method.
The framework ships with a good number of helpers, which include tools to render form controls, run different actions and embed the results, add JavaScript functionality, and much more.
Zend_Layout utilizes the "two-step" view pattern, which enables you to create templates that wrap your individual view scripts. This standardizes your site's look and feel. It also makes it much easier to manage design components that are used sitewide.
Zend_Layout allows you to name sections of your site templates and then load these from within your controller and view scripts. For example, you may have a common header for an entire controller, while each action will generally render the page body.
Zend_Layout comes into its own when you use its MVC component. This component includes a front controller plug-in and action helper, which tightly integrate the layout with the front controller.
You start the Zend_Layout MVC by calling its static startMvc() method. You can pass this method an array of configuration options. At a minimum, I generally set the following:
layout: This is the layout script to render. Note thatZend_Layoutwill add the.phtmlextension to your name, so pass this optionlayoutinstead oflayout.phtml.layoutPath: This is the path to the layout scripts.
Once you have started the Zend_Layout MVC, you can access the layout throughout your controller and view scripts:
In the controllers, you access the instance using the controller plug-in:
$this->_helper->layout.In the view, you use the view helper:
$this->layout().
Note
The controller plug-in does more than just provide access to the layout; it also sets a layout variable for each named segment of the response.
Zend_Layout adds continuity to your site layout and can manage the look and feel as well. This works but leaves something to be desired.
It is quite common to have a standard layout for a site and unique features for each site section. Examples I have run into range from a different header graphic for a news section to a completely distinctive look for an e-commerce checkout page.
The solution to this is utilizing skins. Skins manage the look and feel of your site with CSS and graphics files. You simply switch the skin when you want to modify the design but not the layout. See Figure 2-1 to visualize how the page is built using this three-step approach.

Design can be a very frustrating and intimidating task for programmers. In my opinion, a great deal of this boils down to one of the most striking differences between programming and design:
The foundation of programming is binary logic; there is a right and wrong way to implement a given algorithm.
The foundation of design is how your brain interprets what it sees; since everyone interprets things differently, it is impossible to say whether something is right or wrong.
This is obviously an oversimplification that does not account for the fact that there are many situations in programming where something technically works but could be improved upon. On the other side of the coin, quite a few design principles are cut and dried.
Using the three-step view pattern, you separate all the application code from the final presentation layer. This allows you to focus on one thing at a time, which makes both the programming and the design easier. It also enables you to change the look and feel of the site without altering the view scripts themselves. I will use this approach in the CMS's templating system in the examples, focusing on the layout structure first and then talking about the look and feel later in the process.
Before you can put pen to paper and start designing the interface, it is important to determine the current requirements of the interface. Initially, you need the following areas:
The site header
The main site menu
The main content area
The site submenu
The site administrator's menu
The user login form
The site footer
The next step is determining how these blocks will fit into the interface. The focus in this chapter is on the techniques that are used in building a template, so I will use a straightforward two-column layout for the example, as in Figure 2-2.
Now it is only a matter of choosing where to put the interface components (see Table 2-1).
Table 2.1. The Main Components of the Site Template
Area | Components |
|---|---|
Header | The site header The main site menu |
Main Content | The main content area |
Sidebar | The site submenu The site administrator's menu The user login form |
Footer | The site footer |
Once this is laid out, you are ready to mock it up.
The first step in building a template is to create a mock design. This can take many forms. Many successful web programmers work from sketches, but I prefer the more conventional approach of creating the design using a graphic design program. The key reason for this is that you are able use this working design as both a reference and the base for the graphical elements for your site.
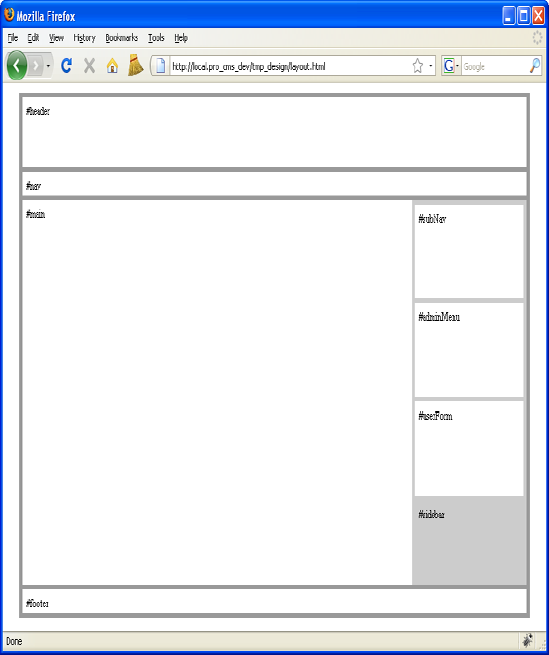
First create a wireframe, which is essentially a line drawing with dimensions. It is important to take care when creating this wireframe so you can measure elements accurately. For reference, I like to add labels to the blocks in the wireframe with their permanent ID and dimensions. See Figure 2-3 for the wireframe of the CMS interface.
I generally create a temporary folder in the public folder to build and test the base HTML page. Create a new folder in your public folder named temp_design. Add two subfolders to this, images and css, just like the main public folder. Then add a CSS file named style.css to the css folder, and add an HTML file named layout.html to the root of the temp_design folder (see Listing 2-1).
Example 2.1. The Temporary Static Design Folder
/ public
    / temp_design
        / images
        / css
/ style.css
/ layout.htmlNext open the layout.html file in your editor, and add the base page HTML (Listing 2-2). This includes the header, the main content area, and the sidebar, which contains an area for the submenu, the administrator menu, and the administrator login form. Note that I don't worry about any head elements except the link to the style sheet at this time; I will use the Zend_View placeholders for these.
Note
A number of PHP IDEs are available that can accelerate your PHP development and make it easier to develop more stable code. I personally use Zend Studio because it integrates with Zend Server and Zend Framework. PDT is a free Eclipse-based option that I have used as well.
Example 2.2. The HTML for the Design in public/tmp_design/layout.html
<html>
<head>
    <meta http-equiv="Content-Type" content="text/html; charset=UTF-8" />
    <link href="css/style.css" media="all" rel="stylesheet" type="text/css" />
</head>
<body>
    <div id="pageWrapper">
        <div id="header">
        <p>#header</p>
        </div>
        <div id="nav">
            <p>#nav</p>
        </div>
        <div id="sidebar">
            <div id="subNav">
                <p>#subNav</p>
            </div>
            <div id="adminMenu">
                <p>#adminMenu</p>
            </div>
            <div id="userForm">
                <p>#userForm</p>
            </div>
            <p>#sidebar</p>
        </div>
        <div id="main">
            <p>#main</p>
        </div>
        <div id="footer">
            <p>#footer</p>
        </div>
    </div>
</body> </html>
Next open the style sheet. The finer points of CSS-based layout are beyond the scope of this book, so I will just show you how I do it (see Listing 2-3).[1] Here are a few keys for me:
I like to use relative measurements in layouts so people can resize the page as they want. I use the 10 pixel trick (if the font size is 10 pixels, then 1 em = 10 pixels) to make calculating this easier.
I temporarily set some fixed dimensions early that will become fluid later. This is to help me visualize the page.
I use the same colors for the elements as I did in the wireframe.
I like to display the element's ID for reference sake.
Example 2.3. The Design's CSS in public/tmp_design/layout.css
@CHARSET "ISO-8859-1";

body {
    font-size: 10px;
}

* {
    margin: 0;
    padding: 0;
}

p {
    padding: .5em;
    font-size: 1.2em;
}

#pageWrapper {
    background: #999;
    width: 79em;
    margin: 1em auto;
    padding: .5em;
}

#header {
    background: #fff;
    height: 7.5em;
    margin: 0 0 .5em 0;
}
#nav {
background: #fff;
height: 2.5em;
margin: 0 0 .5em 0;
}
#sidebar {
background: #ccc;
float: right;
width: 17em;
height: 40em;
margin: 0 0 .5em .5em;
padding: .5em;
}
#main {
background: #fff;
height: 41em;
margin: 0 0 .5em 0;
}
#subNav,#adminMenu,#userForm {
background: #fff;
width: 17em;
height: 10em;
margin: 0 0 .5em 0;
}
#footer {
clear: both;
background: #fff;
height: 2.5em;
margin: 0;
}Now your page is ready to be previewed in the browser. Navigate to http://localhost/tmp_design/layout.html. The page should look like the wireframe, as shown in Figure 2-4.

Now that the HTML design is done, you can roll up your sleeves and get back to the CMS. You need to turn the static HTML design into a Zend_Layout. Since you already have a layout that works, this is going to take only a minute of cutting and pasting.
The first step is to move the design files into their permanent locations in the CMS. Once the files are moved, you will rename them. You will name the CSS file after the layout so it is easy to make the association.
Create a new folder in the
applicationfolder namedlayouts.Add a subfolder to the
layoutsfolder namedscripts.Copy the
layout.htmlfile to theapplication/layouts/scriptsfolder, and then rename it tolayout.phtml.Move the
style.cssfile frompublic/tmp_designtopublic/css, and then rename it tolayout.css.Delete the
public/tmp_designfolder.
Now that the files are in place, open the layout.phtml file in your editor. The first thing you need to do is set up the page head. This will be done using the Zend_View placeholder helper. This helper enables you to pass content between view scripts. There are several concrete implementations of the placeholder helpers that ship with the framework:
Doctype: This renders the proper doctype declaration.HeadLink: This adds links to the head, such as links to style sheets.HeadMeta: This is used to add metadata about your document.HeadScript: This helper is used to add JavaScript to the document. It can be used for both inline and linked files.HeadStyle: This helper is used to add inline CSS styles. Use theHeadLinkhelper to link to a style sheet.HeadTitle: This is used to add the document title.
You will use several of these helpers to create the <head> section of the layout. First set the doctype before the HTML, as shown in Listing 2-4.
Example 2.4. Setting the Doctype in application/layouts/layout.phtml
<?php
echo '<?xml version="1.0" encoding="UTF-8" ?>';
echo $this->doctype();
?>
Then you need to replace the static <head> section in the template with a dynamic block that will render the site title, scripts, and style sheets, as shown in Listing 2-5.
Example 2.5. Setting Up the Page Head in application/layouts/layout.phtml
<head>
<meta http-equiv="Content-Type" content="text/html; charset=UTF-8" />
    <?php
    echo $this->headTitle();
    echo $this->headScript();
// add a link to the site style sheet
$this->headLink()->appendStylesheet('/css/layout.css'),
echo $this->headLink();
?>
</head>Now you are ready to add the dynamic content to your layout file. You do this by rendering layout variables in each of the sections that you will need to be able to manipulate; you can use the view layout() helper to do this. This helper fetches the current layout instance and then returns it. This allows you to use the fluent interface, calling the variable directly from the helper call, like $this->layout()->variable.
Replace the entire layout.phtml file's <body> section with the code in Listing 2-6.
Example 2.6. Rendering Content Using Custom Placeholders in application/layouts/layout.phtml
<body>
<div id="pageWrapper">
<div id="header">
<h1>Zend Framework CMS</h1>
</div>
<div id="nav">
<?php echo $this->layout()->nav;?>
</div>
<div id="sidebar">
<div id="subNav">
<?php echo $this->layout()->subNav;?>
</div>
<div id="adminMenu">
<?php echo $this->layout()->adminMenu;?>
</div>
<div id="userForm">
<?php echo $this->layout()->userForm;?>
</div>
</div>
<div id="main">
<?php echo $this->layout()->content?>
</div>
<div id="footer">
<p><em>Powered by the Zend Framework</em></p>
</div>
</div>
</body>When you use the MVC components of Zend_Layout, each of the named segments of the controller response is set as a layout variable. The default segment is the content segment, where the main output from the controller is saved. These segments make it easy to create modular applications; the layout controller helper fetches each of the named segments of the response and assigns them to layout variables. For example, if you forwarded to the nav controller's render action, the layout helper would set the nav variable to the response from the nav controller.
Now that you have created this layout, you need to update your application so it utilizes your layout script.
First you need to update application/configs/application.ini, adding the layout resource to the production section, as shown in Listing 2-7.
Example 2.7. Adding the Layout Resource to application/configs/application.ini
resources.layout.layoutPath = APPLICATION_PATH "/layouts/scripts"
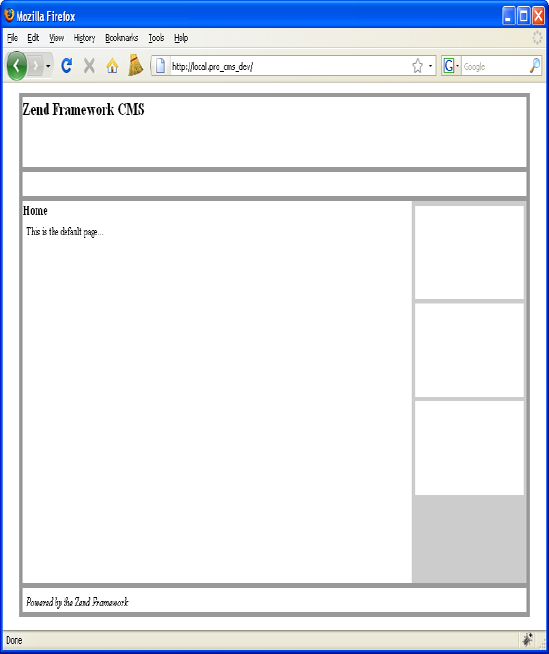
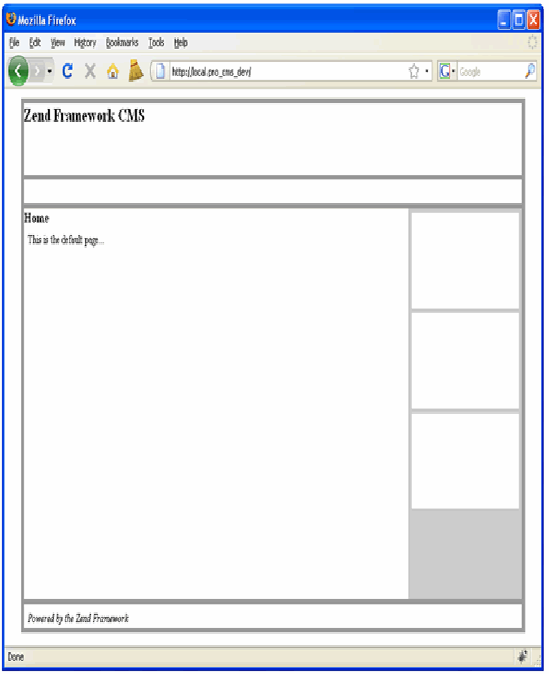
Now if you navigate to http://localhost, you will see that the entire Zend Framework welcome page is rendering within your layout. Open application/views/scripts/index/index.phtml, and replace the welcome page with a simple headline and teaser, as shown in Listing 2-8.
Now that the layout is complete, you are ready to test it within the scope of your Zend Framework project. Once this is set, you are ready to test the layout in the browser. Navigate to http://localhost. The page should look like the static HTML design, with the default page message, as in Figure 2-5.
Now that the layout is implemented, the site is starting to take shape, but the design clearly leaves something to be desired. Zend_View and Zend_Layout do a good job of handling rendering dynamic XHTML; in this section, you'll add onto this functionality by creating a helper that will handle adding skins to your XHTML pages.
A skin consists of the CSS style sheets and graphics that add the look and feel to the layout. There are no hard and fast rules regarding what can and cannot be defined in the skin; you will notice, for example, that in this skin you will be overriding some of the base dimensions in the layout.
The first thing you need to do to set up your skin is to create a new folder in the /public folder named skins. Next create a folder in that folder named blues for your blues skin.
The skins consist of CSS files and graphics. Create two new folders in the skins/blues folder: one named images and one named css.
Next you need to add the required files to the skin. To start, add two style sheets: one named layout.css and one named text.css. In this CMS, the skins will also contain a skin.xml file, which will tell the loadSkin() helper information about the skin, such as which style sheets to load.
When you are done, your skin folder should contain the folders and files shown in Listing 2-9.
Example 2.9. The Blues Skin
/ public
    / skins
        / blues
            / css
                / layout.css
                / text.css
            / images
/ skin.xmlAt this point, the skin.xml file will just contain a list of style sheets. Note that the loadSkin() helper will load these in order, so you can manipulate the CSS cascade. Open the skin.xml file in your editor and your skin's style sheets, as in Listing 2-10.
Note
The skin.xml file is not a standard XML schema; it is solely used for this project.
Next you need to define the styles for the skin. The example shown in Listing 2-11 and Listing 2-12 is a very simple design; feel free to get creative if you want.
Example 2.11. The Skin's Design Features in public/skins/blues/css/layout.css
@CHARSET "ISO-8859-1";

body {
    font-size: 10px;
    background:url(../images/body.jpg) repeat-x;
}

* {
    margin: 0;
    padding: 0;
}

p {
    padding: .5em;
    font-size: 1.2em;
}

#pageWrapper {
    width: 79em;
    margin: 1em auto;
    padding:1em 0;
    -moz-border-radius: 5px;
    border:#749BCE 1px solid;
    background: #fff;

}

#header {
    height: 5em;
    padding:1em 2em;
}

#nav {
    background: url(../images/nav.jpg) repeat-x #FD9421;
    height: 2.5em;
    margin: 0 0 .5em 0;
    padding:.5em 0;
    border-top:#FD9421 1px solid;
}

#sidebar {
    float: right;
    width: 17em;
    height: 40em;
    margin: 0 0 .5em .5em;
    padding: .5em;
}

#main {
min-height:30em;
margin: 0 0 .5em 0;
padding:2em;
}
#subNav,#adminMenu,#userForm {
width: 17em;
height: 10em;
margin: 0 0 .5em 0;
}
#footer {
clear: both;
height: 2.5em;
margin: 0;
text-align:center;
font-style:italic;
}Example 2.12. The Skin's Typography in public/skins/blues/styles/text.css
@CHARSET "ISO-8859-1";

body {
    font-family:Helvetica, Arial, sans-serif;
}
Note that you will be doing a lot more work to this skin as the site progresses, but this should make things look a little nicer for now.
The placeholders I mentioned earlier are good examples of Zend_View helpers. The placeholders are one example of the initial helpers that ship with the framework. When these do not suit your needs, it is very easy to create your own helper classes to add reusable custom functionality to your view scripts.
Now you'll create the new view helper class that will load the skin, but first I'll go over a few key points about writing helpers:
Filename: The file's name should be the same as your class name (not including the prefix).
Class prefix: Zend's prefix for the class name is
Zend_View_Helper. You can set yours to be whatever you want when you add the path to the helpers.Loading helpers: The framework will automatically load the helpers located in the current module's
views/helpersfolder. Those should use theZend_View_Helperprefix.Class methods: Your class can have as many methods as required, but it must have a constructor that is named the same as your class name, using the camelCase convention.
Zend_View_Helper_Abstract: Your class should extend the
Zend_View_Helper_Abstractbase class.
First, to create the loadSkin() view helper, you need to create the class. Add a new file to application/views/helpers named LoadSkin.php. Next, open this file, and add the class for your helper. The class name should be Zend_View_Helper_LoadSkin, and it should extend Zend_View_Helper_Abstract.
Then create the constructor method, loadSkin(), which you need to be able to pass the skin that you want to load to. The helper will load the config file for this skin and then add each of the style sheets that are specified to the view headLink() placeholder, as shown in Listing 2-13.
Example 2.13. The loadSkin() Class in application/views/helpers/LoadSkin.php
<?php
/**
 * this class loads the cms skin
 *
 */
class Zend_View_Helper_LoadSkin extends Zend_View_Helper_Abstract
{
    public function loadSkin ($skin)
    {
        // load the skin config file
        $skinData = new Zend_Config_Xml('./skins/' . $skin . '/skin.xml'),
        $stylesheets = $skinData->stylesheets->stylesheet->toArray();
        // append each stylesheet
        if (is_array($stylesheets)) {
            foreach ($stylesheets as $stylesheet) {
                $this->view->headLink()->appendStylesheet('/skins/' . $skin .
                    '/css/' . $stylesheet);
            }
        }
    }
}The loadSkin helper requires that you pass it a valid skin. You could set this skin setting in the layout script when you call the helper, but this can make your CMS less flexible; ideally, you should be able to switch the skins without touching the layout file.
You may want to do something more dynamic in the future, but for now it makes sense to set the skin while you are bootstrapping the application. As I mentioned in the first chapter, Zend_Application initializes the front controller by default, which in turn initializes Zend_View. This default behavior is sufficient most of the time, but in this case you need more control over the process. To get this control, you can initialize the view yourself and then set the view object manually.
The first thing you need to do is create a new method in the Bootstrap class called _initView() (Listing 2-14). In the _initView() method, you will create a new instance of Zend_View. Then you need to set the doctype and page title. Next set the skin to the blues skin. Once this is set, you fetch the ViewRenderer action helper and manually set this instance as the view instance for it to use.
Example 2.14. The _initView() Method in application/Bootstrap.php
protected function _initView()
{
    // Initialize view
    $view = new Zend_View();
    $view->doctype('XHTML1_STRICT'),
    $view->headTitle('Zend CMS'),
    $view->skin = 'blues';

    // Add it to the ViewRenderer
    $viewRenderer = Zend_Controller_Action_HelperBroker::getStaticHelper(
        'ViewRenderer'
    );
    $viewRenderer->setView($view);

    // Return it, so that it can be stored by the bootstrap
    return $view;
}
Now that the view is set, you need to update the layout script to use the skin. Replace the line in the head of your layout script that appended the layout.css file with a call to the loadSkin() helper. You need to pass this the skin that you set in the Bootstrap file, as in Listing 2-15.
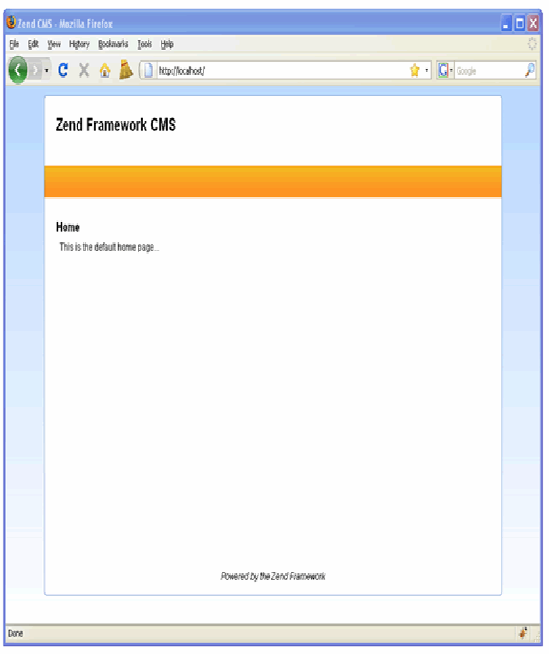
Now that the skin is implemented, it's time to admire your work. Navigate to http://localhost. The layout should now use your skin and be a little easier on the eyes (see Figure 2-6).
In this chapter, you learned how to create and manage designs using Zend Framework's presentation layer. Then you created the default site skin, which will be used throughout the rest of the book.
[1] For detailed advice on CSS layout, see Craig Grannell's The Essential Guide to CSS and HTML Web Design (friends of ED, 2007).