
In this chapter, I'll cover how to install and manage a site with your CMS.
The first step to install your CMS on your production server is to create the database. Therefore, create a new database on your server using the MySQL command in Listing 12-1.
Once you create the database, you need to create a new user for the CMS database using the command in Listing 12-2. On your local server, you may have used the root MySQL user, but this is a critical security risk on a production database. Make sure you make a note of the user's credentials, because you will need to update the CMS configuration file when you install the application code base.
Example 12.2. Creating the CMS Database User
CREATE USER 'cms_user'@'localhost' IDENTIFIED BY 'secret_password';
Grant the user permission to SELECT, INSERT, UPDATE, and DELETE on the cms_database database using the command in Listing 12-3.
Example 12.3. Granting the cms_user Access to the cms_database
GRANT SELECT,INSERT,UPDATE,DELETE ON cms_database.* TO 'cms_user'@'localhost';
Now you are ready to install the database. Over the course of this book, you have built the database step-by-step, but when you install a new copy, it is more convenient to run a database dump script, which will install the whole, empty database, as in Listing 12-4. The only data that this dump script inserts is the default menus and the default site administrator account.
Example 12.4. The Database Dump for the CMS Database
SET FOREIGN_KEY_CHECKS=0;
-- ----------------------------
-- Table structure for content_nodes
-- ----------------------------
DROP TABLE IF EXISTS `content_nodes`;
CREATE TABLE `content_nodes` (
  `id` int(11) NOT NULL auto_increment,
  `page_id` int(11) default NULL,
  `node` varchar(50) default NULL,
  `content` text,
  PRIMARY KEY  (`id`)
) ENGINE=InnoDB AUTO_INCREMENT=41 DEFAULT CHARSET=utf8;

-- ----------------------------
-- Table structure for menu_items
-- ----------------------------
DROP TABLE IF EXISTS `menu_items`;
CREATE TABLE `menu_items` (
  `id` int(11) NOT NULL auto_increment,
  `menu_id` int(11) default NULL,
  `label` varchar(250) default NULL,
  `page_id` int(11) default NULL,
  `link` varchar(250) default NULL,
  `position` int(11) default NULL,
  PRIMARY KEY  (`id`)
) ENGINE=InnoDB AUTO_INCREMENT=14 DEFAULT CHARSET=utf8;

-- ----------------------------
-- Table structure for menus
-- ----------------------------
DROP TABLE IF EXISTS `menus`;
CREATE TABLE `menus` (
  `id` int(11) NOT NULL auto_increment,
  `name` varchar(50) default NULL,
  `access_level` varchar(50) default NULL,
  PRIMARY KEY  (`id`)
) ENGINE=InnoDB AUTO_INCREMENT=6 DEFAULT CHARSET=utf8;

-- ----------------------------
-- Table structure for pages
-- ----------------------------
DROP TABLE IF EXISTS `pages`;
CREATE TABLE `pages` (
  `id` int(11) NOT NULL auto_increment,
  `parent_id` int(11) default NULL,
  `namespace` varchar(50) default NULL,
  `name` varchar(100) default NULL,
  `date_created` int(11) default NULL,
  PRIMARY KEY  (`id`)
) ENGINE=InnoDB AUTO_INCREMENT=11 DEFAULT CHARSET=utf8;

-- ----------------------------
-- Table structure for users
-- ----------------------------
DROP TABLE IF EXISTS `users`;
CREATE TABLE `users` (
  `id` int(11) NOT NULL auto_increment,
  `username` varchar(50) default NULL,
  `password` varchar(250) default NULL,
  `first_name` varchar(50) default NULL,
  `last_name` varchar(50) default NULL,
  `role` varchar(25) default NULL,
  PRIMARY KEY  (`id`)
) ENGINE=InnoDB AUTO_INCREMENT=2 DEFAULT CHARSET=utf8;

-- ----------------------------
-- Records
-- ----------------------------
INSERT INTO `menu_items` VALUES ('1', '1', 'Home', '0', '/', '1');
INSERT INTO `menu_items` VALUES ('2', '2', 'Manage Content', '0', '/page/list', '1');
INSERT INTO `menu_items` VALUES ('3', '2', 'Manage Menus', '0', '/menu', '2');
INSERT INTO `menu_items` VALUES ('4', '2', 'Manage Users', '0', '/user/list', '3');
INSERT INTO `menu_items` VALUES ('5', '2', 'Rebuild Search Index', '0',
 '/search/build', '4');
INSERT INTO `menus` VALUES ('1', 'main_menu', null);
INSERT INTO `menus` VALUES ('2', 'admin_menu', null);
INSERT INTO `users` VALUES ('1', 'admin', '5f4dcc3b5aa765d61d8327deb882cf99', 'test', 'user', 'Administrator');
'/search/build', '4');
INSERT INTO `menus` VALUES ('1', 'main_menu', null);
INSERT INTO `menus` VALUES ('2', 'admin_menu', null);
INSERT INTO `users` VALUES ('1', 'admin', '5f4dcc3b5aa765d61d8327deb882cf99', 'test', 'user', 'Administrator');Once your database is installed and configured, you are ready to install the application. Your directory structure may depend on your server configuration, but in most hosting situations you will have a public document root for your server named www or public_html. Upload all the files that are in your application's public directory into this directory.
Next you need to upload the application and library files. The application and library directories should not be directly accessible by the public. Upload these directories to the root of your hosting account, which should be next to the document root, as in Listing 12-5.
Example 12.5. Standard Directory Structure for Your CMS
/ account root
  /public_html
  /application
  /library
You can alternatively put your library and application directories in any location that is accessible by your web server. Simply update your application, and include the paths in your index.php file.
If you are hosting this CMS on a dedicated server, you may want to be able to share a common Zend Framework library. You can move the Zend directory from your application's library to the directory specified in your server's PHP include path.
Note
As the framework evolves, which is quite a rapid process, you may not want to be tied to using one specific version of the framework. What I do is create subdirectories in the include directory like ZF_1_8. I then add this to my include path in the index.php file.
The only configuration that you will likely need to do to your CMS is to update the application.ini file by updating the database connection information, as in Listing 12-6. I also turn the profiler off.
Example 12.6. Setting Your Production Database Connection in application/configs/application.ini
resources.db.adapter = "pdo_mysql"
resources.db.params.host = "localhost"
resources.db.params.username = "cms_user"
resources.db.params.password = "secret_password"
resources.db.params.dbname = "cms_database"
resources.db.params.profiler = false
resources.db.isDefaultTableAdapter = true
Then set your application environment to production in .htaccess, as in Listing 12-7.
Once your CMS is installed and configured, the first thing you should do is log in and update the admin user account. The default database installation script (Listing 12-4) creates a user with the following credentials:
Username: admin
Password: password
To get to the login page, click the link under My Account in the sidebar. Then go to /user/list. You should see the user table, as in Figure 12-1.
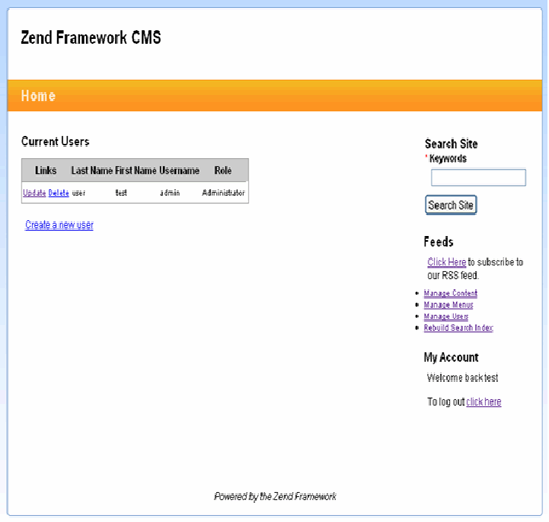
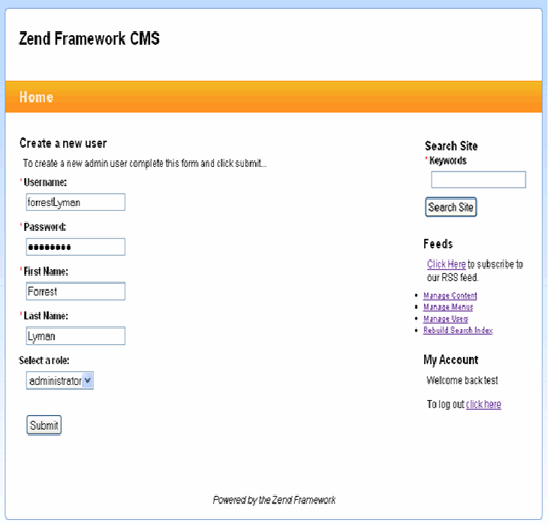
You can either create a new user and delete the default user or just update the default user account. I will create a new user. Click the "Create a new user" link beneath the user table. This will open the create user form (see Figure 12-2). Create the user, and click Submit.
Now that you have secured your CMS installation, you are ready to start working with content. Click the Manage Content link on the sidebar to get started.
When you click the Manage Content link, you will see a message that you do not have any pages yet. Click the "Create a new page" link beneath this. This will open the page form (see Figure 12-3). Fill out the page form, and click Submit to create it. Once your page is created, you will be directed back to the page/list page. The page will now display a table with your new page in it.

Now you need to add your new page to the site navigation. Click the Manage Menus link in the sidebar. You will see a table with the current menus, as in Figure 12-4.

To add your page to the main menu, click the Manage Menu Items link in the main_menu row. This will open the menu items list for the main_menu. Click "Add a new item." This will open the add item form (see Figure 12-5).
There are two types of menu items: static links and direct links to existing pages. In this example, you are adding a link to the page that you just created, so you select the page from the drop-down list. Once you have done this, click Submit to create the menu item.

In this case, your new menu item will be inserted after the Home link, which is probably what you want. When you do need to reorder a menu, you can do so in the Manage Menu Items table. You will notice that there are Move Up and Move Down links next to the menu items (see Figure 12-6). Clicking these will sort your menu items.

The CMS project I guided you through building in this book was very simplistic by design. I wanted to focus on the underlying technologies rather than show you how to build the next best CMS solution. I also think that the simpler software is, the easier it is to customize.
Over the course of this project, you learned how to work with many Zend Framework components. Between this foundation of experience and the online Zend Framework resources, you should be well on your way to becoming a proficient CMS developer.