
Chapter 8
Using Reminders, Notes, and Notifications
In This Chapter
![]() Setting Reminders
Setting Reminders
![]() Making Notes
Making Notes
![]() Using Notification Center
Using Notification Center
As I’ve said many times before in my books, “If it works in one place, it’s likely to show up in another.” In this case, three popular timesaving (and headache-preventing) apps have crossed over from the world of iOS devices — namely, the iPhone, iPad, and iPod touch — and have securely landed on your iMac Desktop! Those apps are Reminders, Notes, and Notification Center.
That’s not the only good news, though: These three Mac applications work seamlessly with an iCloud account you’ve already set up, so if you also use an iOS device (with the same Apple ID), the notes you take and the reminders you make are automatically synchronized among all your Apple computers and devices.
Because all three applications have a similar goal — namely, to keep you in touch with the information, daily tasks, and digital events that matter to you — I’m going to cover them in one shiny chapter. Consider this chapter a guide that demonstrates how you can note, remind, and notify like a power user!
Remind Me to Use Reminders
You don’t need to look far to find the Reminders application on your Mac. Just click the Reminders icon on the Dock to display the main window, as shown in Figure 8-1.
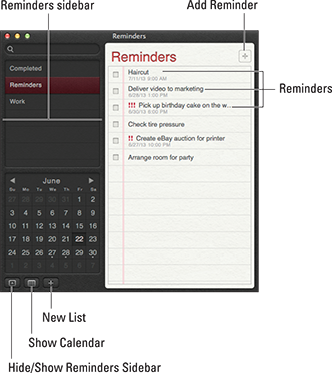
Figure 8-1: The Reminders window in action.
The highlights of the Reminders window include
- Search box: Click here and type a phrase or name to search for it among your reminders.
- Reminders sidebar: You can add as many separate Reminder lists as you like in the application (one for work, for example, and another for your Mac user group). In the sidebar, you can switch quickly between your lists. (Note that two lists, Reminders and Completed, already appear.)
- Hide/Show Reminders Sidebar button: Click this button (lower left) to hide or show the Reminders sidebar. You save a significant amount of screen real estate when the display is hidden.
- Calendar: This handy calendar indicates which days of the current month already have reminders pending: They’re displayed with a dot under the date. You can jump to any date by clicking it. To move forward and backward through the months, click the Previous (left arrow) and Next (right arrow) buttons next to the month name. (Note that this calendar does not sync or exchange reminder dates with the Calendar application.)
- New List button: Click this button (bottom left) to add a new Reminder list to the sidebar; or, from the keyboard, press
 +L. The list name is highlighted in a text box, where you can simply type the new name and then press Return.
 - Reminders: These entries are the reminders themselves. In its simplest form, a reminder is just a short phrase or sentence. Each is prefaced by a check box that you select when the reminder is complete, thereby moving that reminder automatically to the Completed list. And yes, conversely, if you select the Completed list in the sidebar and deselect the check box for a reminder, it returns (like a bad penny) to the original list.
- Add Reminder button: Click this button (upper right) to add a new reminder to the currently selected list; or, from the keyboard, press +N. Press Return afterward to save it to your list.
Adding a reminder is straightforward. First, click a date in the calendar display to jump to that date, and then click the Add Reminder button. Type a few words and press Return to create a basic reminder. Now for the fun part: Hover your cursor over the reminder you just created, and an Info button (the lowercase i in a circle icon) appears next to the text. The game is afoot! Click that Info button to display the settings you see in Figure 8-2.

Figure 8-2: Editing a reminder.
The fields on the Edit sheet are
- Reminder text: Click this text to edit the reminder text itself.
- On a Day: Enable this check box if the reminder should appear in Notification Center on a particular day. By default, the date is the one selected when you created the reminder. You can click the Date and Time fields to change them.
- At a Location: Here’s a powerful feature. Enable this check box, and you can choose a card from your Contacts application that includes an address (or simply type an address into the box). Now Reminders will monitor your current location on your cellular-enabled iOS device (using Location Services) and notify you when you’re leaving or arriving at that location (and optionally, on the date and time you specify in the On a Day field). For example, you could create a reminder that notifies you on your iPhone when you’re arriving at the mall on September 15 to pick up the watch that’s being repaired. Shazam!
- Repeat: Set this reminder to automatically repeat every day, week, two weeks, month, or year at the same time. To disable repeat, choose None.
- Priority: You can assign one of four priorities to the reminder: Low, Medium, High, or None. Assigning a priority prefaces the reminder text with one (Low), two (Medium), or three (High) red exclamation points so that the reminder stands out from the crowd.
- Note: Click next to the Note field to enter a free-form text note along with the reminder.
Click the Done button on the Edit sheet when you’ve finished making changes. You can edit a reminder as often as you like. For example, I sometimes have to change the date on a reminder multiple times as my schedule changes.
 To delete a reminder from the list, right-click it and choose Delete from the menu that appears.
Taking Notes the Mavericks Way
Imagine a notepad of unlimited pages that’s always available whenever you’re around your iMac, iPhone, iPod touch, or iPad. That’s the idea behind Notes, and it’s superbly simple! To open the application, click the Notes icon on the Dock, which resembles a familiar yellow notepad. The window shown in Figure 8-3 appears.
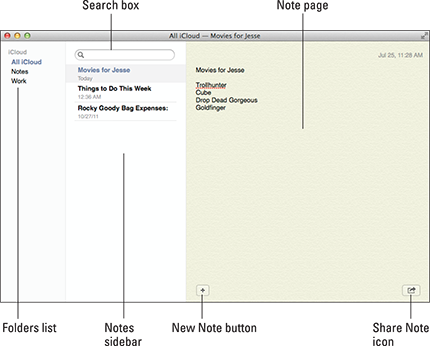
Figure 8-3: The notable Notes application window.
The salient stuff in the Notes window includes
- Search box: If you’re hunting for a specific note, click in this box and type a phrase or name to search for it.
- Folders list: You can create new folders to hold specific kinds of notes. In Figure 8-3, for example, I added a Work folder. To add a new folder, choose File⇒New Folder or press +Shift+N, and then type the new folder name. To switch between folders, display the Folders list and click the desired folder.
- Notes sidebar: Each Note you create appears as a separate entry in the sidebar. You can click a Note to switch to it immediately.
- New Note button: Click this button to add a new Note. You can also right-click the sidebar and choose New Note from the contextual menu. Notes uses the first line of text that you type as the title of the Note, which appears in the sidebar.
- Note page: This free-form pane is where you type the body of your note. You can also drag images from a Finder window and include them in the body of the note and even attach files by dragging them from a Finder window as well.
- Share Note icon: Open this pop-up menu to share the contents of the current note, just like the Share button that appears on the Finder window toolbar. Sharing options can include a new e-mail message, a new message in the Messages application, and new postings to Twitter and Facebook.
To edit a note, click it to select it in the sidebar, and then simply make your changes or additions in the Note page. You can format the text from the Format menu — everything from different fonts and colors to inserting bulleted and numbered lists.
To delete a note you no longer need, right-click it in the sidebar and choose Delete from the menu that appears.
If a note is particularly important and you’d like to keep it “front and center” on your Mavericks Desktop, double-click the note in the sidebar to open it in a separate window and then choose Window⇒Float on Top. Now the note window will stay visible on your Desktop until you quit the Notes application. Even if other application windows are active and would normally be on top of the note window, it’s downright stubborn, and refuses to be hidden from view!
Staying Current with Notification Center
Unlike Reminders and Notes, Notification Center isn’t an application you launch. Instead, the Notification Center icon appears at the far right side of the Finder menu bar, and it’s always running.
Click the icon (or, if you’re using a trackpad, swipe from the right edge to the left) to display your notifications, as shown in Figure 8-4. These notifications can be generated by a whole host of Mavericks applications and functions, including Calendar, Mail, FaceTime, Reminders, Game Center, Photo Stream, Messages, Safari, Facebook, and even the Apple App Store.
I love how Notification Center doesn’t interfere with open applications. It simply moves the entire Desktop to the left so that you can see your notifications. You can close Notification Center at any time by clicking anywhere on the Desktop to the left, clicking the Notifications icon on the Finder menu bar again, or swiping in the opposite direction.
Notification entries that appear in Notification Center are grouped under the application that created them. Many entries can be deleted from the Notification Center by clicking the Delete button that appears next to the application heading (the button bears an X symbol). Other entries, such as Calendar alerts, remain in Notification Center until a certain time has elapsed.
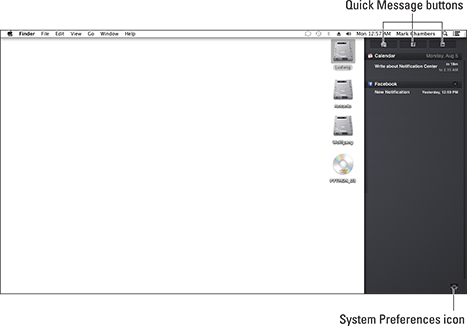
Figure 8-4: Notification Center muscles your Desktop to the side.
At the top of Notification Center is a Quick Message button. Just click it to display a pop-up dialog where you can specify the recipients of the message, type your message text, and then click Send — all without having to even launch the Messages application. Depending on the Internet accounts you’ve added in System Preferences, you may see Facebook and LinkedIn Quick Message buttons at the top of Notification Center as well.
But wait, there’s more to Notification Center than just a strip of happenings! Depending on the settings you choose, notifications can also appear without Notification Center being open at all. These notifications are displayed as pop-up banners (which disappear in a few seconds) and alerts (which must be dismissed by clicking a button). Figure 8-5 illustrates a typical alert notification.
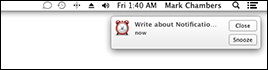
Figure 8-5: An alert notification appears on your Desktop.
Mavericks allows actions in notifications. Depending on the application or function that generated the notification, you may see buttons on a banner or an alert that allow you to take care of business (without requiring the application to be running). For example, if a new e-mail message is received in Apple Mail, you can choose to reply to or delete the message. Websites can display updates as notifications, and you can answer a FaceTime call directly from the notification. You’ll also receive notifications from the App Store indicating the applications that need updating.
You can configure the notifications for all your applications from the Notifications pane in System Preferences, which you can reach easily if Notification Center is open. Just click the gears icon at the lower right of the screen.