
Chapter 4
Opening and Closing and Clicking and Such
In This Chapter
![]() Introducing the highlights of the Finder
Introducing the highlights of the Finder
![]() Discussing that missing button on your pointing device
Discussing that missing button on your pointing device
![]() Launching and quitting applications
Launching and quitting applications
![]() Identifying and selecting icons
Identifying and selecting icons
![]() Using keyboard shortcuts to speed things up
Using keyboard shortcuts to speed things up
![]() Managing windows in Mavericks
Managing windows in Mavericks
Ah, the Finder — many admire its scenic beauty, but don’t ignore its unsurpassed power nor its many moods. And send a postcard while you’re there.
Okay, so the OS X Finder might not be quite as majestic as the mighty Mississippi River, but it’s the basic toolbox that you use every single day while piloting your iMac. The Finder includes the most common elements of Mavericks: window controls, common menu commands, icon fun (everything from launching applications to copying files), network connections, keyboard shortcuts, and even emptying the Trash. In fact, one could say that if you master the Finder and find how to use it efficiently, you’re on your way to becoming a power user! (My editor calls this the Finder “window of opportunity.” She’s a hoot.)
That’s what this chapter is designed to do: This is your Finder tour guide, and we’re ready to roll.
Working within the Finder
This is a hands-on tour, with none of that “On your right, you’ll see the historic Go menu” for you! Time to get off the bus and start the tour with Figure 4-1, in which I show you around the most important elements of the Finder. (In the upcoming section “Performing Tricks with Finder Windows,” I give you a close-up view of window controls.)
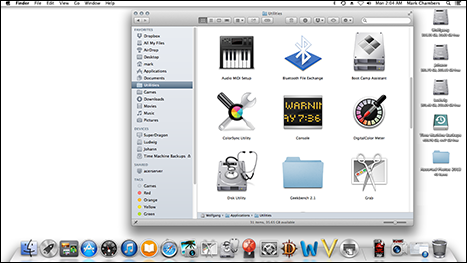
Figure 4-1: The friendliest face in Mavericks: the Finder, complete with a window, window bar, and menu bar.
The popular attractions include
- The Apple menu (
 ): This is a special menu because it appears both in the Finder and within every application menu that you run. It doesn’t matter whether you’re in iTunes or Adobe Photoshop or Microsoft Word: If you can see a menu bar, the Apple menu is there. The Apple menu contains common commands to use no matter where you are in Mavericks, such as Restart, Shut Down, and System Preferences.
 - The Finder menu bar: Whenever the Finder is ready to use (or, in Mac-speak, whenever the Finder is the active application, rather than another application), the Finder menu bar appears at the top of your screen. You know the Finder is active and ready when the word Finder appears at the left of the menu bar (just to the right of the Apple menu).
 In case you’re brand-new to computers, a menu is simply a list of commands. For example, you click the File menu and then choose Save to save a document. When you click a menu, it extends down so that you can see the commands it includes. While the menu is extended, you can choose any enabled menu item (just click it) to perform that action. You can tell that an item is enabled if its name appears in black. Conversely, a menu command is disabled if it is grayed out — clicking it does nothing.
 When you see a menu path, like this example — File⇒Save — it’s just a visual shortcut that tells you to click the File menu and then choose Save from the drop-down menu that appears.
 - The Desktop: Your Desktop serves the same purpose as your physical desktop: You can store stuff here (files, folders, alias icons, and so on), and it’s a solid, stable surface where you can work comfortably. Application windows appear on the Desktop, for example, as do other applications, such as your Stickies notes and your DVD player. Just double-click an application or document icon on the Desktop to launch it.
You can easily customize your Desktop. For example, you can use your own images to decorate the Desktop, organize it to store new folders and documents, arrange icons how you like, or put the Dock in another location. Don’t worry — I cover all this in other areas of the book — I just want you to know that you don’t have to settle for what Apple gives you as a default Desktop.
- All sorts of icons: This is a Macintosh computer, after all, replete with tons of make-your-life-easier tools. Icons can appear on your Desktop as well as within the Finder window itself. Each icon is a shortcut to a file, folder, network connection, or device in your system, including applications that you run and documents that you create. Refer to Figure 4-1 to see the icon for my iMac’s internal hard drive (named Wolfgang) at the upper-right corner of the Desktop.
Sometimes you click an icon to watch it do its thing (like icons in the Dock, which I cover next), but usually you double-click an icon to make something happen.
If you’re using a late-model iMac, you may be able to share files with other Macs on your local network using the AirDrop feature in Mavericks. For the full scoop on AirDrop, visit Chapter 21. - The Dock: The Dock is an organizational tool for your favorite applications, documents, folders, network connections, and websites. You can also refer to it to see what applications are running. Click an icon there to open the item. For example, the postage-stamp icon represents the Apple Mail application, and clicking the spiffy compass icon launches your Safari web browser.
- The Finder window: Finally! The basic Finder window in Figure 4-1 displays the contents of my Utilities folder. You use Finder windows to launch applications; perform disk chores, such as copying and moving files; and navigate your hard drive.
Pointing in a Mac World
Mavericks takes a visual approach to everything, and what you see in Figure 4-1 is designed for point-and-click convenience. You click (or double-click) an item, it opens, you do your thing, and life is good. If you’ve grazed on the other side of the fence — one of Those Who Were Once Windows Users — you’re probably accustomed to using a mouse with at least two buttons. This brings up the nagging question: “Hey, Mark! Where the heck are my mouse buttons?” Or perhaps you’re thinking even farther out of the box, and you ordered a Magic Trackpad as your pointing device of choice — again, no buttons!
In a nutshell, the “buttons” on your iMac’s Magic Mouse (or Magic Trackpad) are the entire top surface! Although you won’t see any separate buttons for clicking, your Magic pointing device can tell when you tap with one finger (to single-click). Owners of a Magic Trackpad should think “tap” whenever they read “click” in the Apple world. If you’ve used an iPhone, iPad, or iPod touch, the idea of tapping something onscreen makes perfect sense.
To configure everything Magic Mouse — including all your buttons and your double-click/tracking/scrolling speeds — visit the Mouse pane within System Preferences. You can also configure your wireless mouse from here as well. Similarly, you can configure your wireless Magic Trackpad using the Trackpad pane. (More on the System Preferences window in the next section.)
Speaking of right-clicking, you can easily configure your Apple pointing device to recognize a right-click (also called a secondary click) within System Preferences. Tapping the top-right corner (of a Magic Mouse) or tapping with two fingers (on the Magic Trackpad) performs the same default function in Mavericks that clicking the right mouse button does in Windows. Namely, when you right-click most items — icons, documents, even your Desktop — you get a shortcut menu of things. That is, you get more commands specific to that item. (To keep familiar things familiar, I call it the “right-click menu,” and I promise to refer to it as such for the rest of the book.)
 If you’re using a Magic Trackpad with your iMac, never use any object other than your finger (or a trackpad stylus) on the trackpad surface! That means no pencils (no, not even the eraser end), pens, or chopsticks; they can damage your trackpad in no time at all. And no, that doesn’t bode well for ladies with long fingernails.
Figure 4-2 illustrates a typical convenient right-click menu within a Finder window.
But that’s not all. Apple’s series of Multi-Touch gestures for your Magic Mouse or Trackpad includes all sorts of handy time-saving commands! Depending on the changes you make within the Mouse and Trackpad panes in System Preferences, these gestures can include

Figure 4-2: Well-adjusted folks call this a right-click menu.
- Double-clicking: Tap twice with one finger to double-click.
- Scrolling: To move in any direction within a document window, just swipe two fingers across the surface in that direction.
- Two-finger paging: Swipe your thumb and first fingertip to the left or right across the surface to page through a document or move to the next or previous image in a set (like web pages in Safari or photos in your iPhoto library).
- Two-finger zooming: Pinching your thumb and first fingertip toward each other on the surface zooms in on a document or image. The reverse (moving your fingertips away from each other) zooms out. You can also enable zooming with a modifier key.
- Three-finger full-screen switching: Swipe your thumb and first two fingertips to the left or right across the surface to move between open applications in full-screen mode.
- Rotate: Place your thumb and index finger on the trackpad and turn clockwise (or counterclockwise) to rotate a photo.
- Perform actions within OS X itself: Using the combination of thumb and fingers you specify, you can configure the display and operation of many features within Mavericks.
I know all these gestures sound like a kids’ gymnastics meet, but they’ll soon become second nature to you. I recommend that you visit the Mouse and Trackpad panes in System Preferences and simply experiment with the possibilities of Multi-Touch — each gesture is demonstrated with a video clip, making the gestures very easy to learn!
Launching and Quitting for the Lazy iMac Owner
Now it’s time for you to pair your newly found mouse and trackpad acumen with the Mavericks Finder window. Follow along this simple exercise. Move your cursor over the iTunes icon on the Dock (the round blue icon bearing a musical note), and click once. Whoosh! Mavericks launches (or starts) the iTunes application, and you see a window much like the one in Figure 4-3.

Figure 4-3: Click a Dock icon to launch that application.
If an application icon is already selected (which I discuss in the next section), you can simply press ![]() +O to launch it. The same key shortcut works with documents, too.
+O to launch it. The same key shortcut works with documents, too.
Besides the Dock, you have several other ways to launch an application or open a document in Mavericks:
- Using Launchpad: Click the Launchpad icon on the Dock (it’s the second one to the right of the Finder icon, sporting a rocket-ship icon) to display all your application icons in a full-screen display. If you have more than one screen (or page) worth of applications, press the arrow keys to move between Launchpad pages (with a Magic Trackpad or Magic Mouse, swipe two fingers to the left or right). To launch an application, just click the icon. (If you’re a proud owner of an iPhone, iPad, or iPod touch, you’ll be very familiar with Launchpad because it corresponds directly to the Home screen on those devices.)
- From the Apple menu (): A number of applications can always be launched anywhere within Mavericks from the Apple menu:
- System Preferences: This is where you change all sorts of settings, such as your display background and how icons appear.
- Software Update: This uses the Internet to see whether update patches are available for your Apple software, as I discuss in Chapter 24.
- App Store: This launches the App Store and displays software that you can download for your iMac.
- From the Desktop: If you have a document that you created, an application icon, or an application alias (shortcut) on your Desktop, you can launch or open it here by double-clicking that icon (tapping with one finger twice in rapid succession when the cursor is on top of the icon).
Double-clicking a device or network connection on your Desktop opens the contents in a Finder window. This trick works for CDs and DVDs that you’ve loaded as well as for external hard drives and USB flash drives. Applications and documents launch from a CD, a DVD, or an external drive just the same as they launch from your internal drive (the one that’s named Macintosh HD), so you don’t have to copy stuff from the external drive just to use it. (You can’t change the contents of most CDs and DVDs; they’re read-only, so you can’t write to them.)
- From the Recent Items selection: When you click the Apple menu () and hover your mouse over the Recent Items menu item, the Finder displays all the applications and documents that you used over the past few computing sessions. Click an item in this list to launch or open it.
- From the Login Items list: Login Items are applications that Mavericks launches automatically each time you log in to your user account.
I cover Login Items in detail in Chapter 20.
- From the Finder window: You can also double-click an icon within the confines of a Finder window to open it (for documents), launch it (for applications), or display the contents (for a folder).
The Quick Look feature can display the contents of just about any document or file — without actually opening the corresponding application! Sweet. To use Quick Look from a Finder window, click a file to select it, click the Action button (which bears an eye icon) on the Finder window toolbar, and then choose Quick Look. My favorite method of using Quick Look? Just click a file to select it and press the spacebar!
After you finish using an application, you can quit that application to close its window and return to the Desktop. Here are a number of ways to quit an application:
- Press
 +Q. This keyboard shortcut quits virtually every Macintosh application on the planet. Just first make sure that the application that you want to quit is active!
 - Choose the Quit command from the application’s menu. To display the Quit command, click the application’s name — its menu — from the menu bar. This menu is always to the immediate right of the Apple () menu. For example, Safari displays a Safari menu, and that same spot in the menu is taken up by Calendar when Calendar is the active application. In Figure 4-3, look for the iTunes menu, right next to .
- Choose Quit from the Dock. You can right-click an application’s icon on the Dock and then choose Quit from the right-click menu that appears.
A running application displays a small blue ball under its icon in the Dock.
- Click the Close button on the application window (refer to Figure 4-8). Some applications quit entirely when you close their window, like the System Preferences window or the Apple DVD Player. Other applications might continue running without any window, like Safari or iTunes; to close these applications, you have to use another method in this list.
- Choose Force Quit from the Apple menu. This is a last-resort measure! Use this only if an application has frozen and you can’t use another method in this list to quit. Force-quitting an application doesn’t save any changes to any open documents within that application!
Juggling Folders and Icons
Finder windows aren’t just for launching applications and opening the files and documents that you create. You can also use the icons within a Finder window to select one or more specific items or to copy and move items from place to place within your system.
A field observer’s guide to icons
Not all icons are created equal. Earlier in this chapter, I introduce you to your iMac’s hard drive icon on the Desktop, but here is a little background on the other types of icons that you might encounter during your iMac travels:
- Hardware: These are your storage devices (such as your hard drive) as well as external peripherals (such as your iPod, DVD drive, USB flash drive, and printer).
- Applications: These icons represent the applications (or programs) that you can launch. Most applications have a custom icon that incorporates the company’s logo or the specific application logo, so they’re very easy to recognize, as you can see in Figure 4-4. Many applications written for Mavericks will automatically load any open documents you were working on when you last closed the application; otherwise, you typically get a new blank document or an Open dialog from which you can choose the existing file you want to open.

Figure 4-4: A collection of some of my favorite application icons.
- Documents: Many of the files on your hard drive are documents that can be opened within the corresponding application, and the icon usually looks similar to the application’s icon. Double-clicking a document automatically launches the required application (that is, as long as OS X recognizes the file extension or associated application).
- Files: Most of the file icons on your system are mundane things (such as preference and settings files, text files, log files, and miscellaneous data files), yet most are identified with at least some type of recognizable icon that lets you guess what purpose the file serves. You also come across generic file icons that look like a blank sheet of paper (used when Mavericks has no earthly idea what application opens that type of file).
- Aliases: An alias acts as a link to another item elsewhere on your system. For example, to launch Adobe Acrobat, you can click an Adobe Acrobat alias icon that you can create on your Desktop rather than click the actual Acrobat application icon. The alias essentially acts the same way as the original icon, but it doesn’t take up the same space — only a few bytes for the icon itself, compared with the size of the actual application. Plus, you don’t have to go digging through folders galore to find the original application icon. (Windows switchers know an alias as a shortcut, and the idea is the same although Macs had it first. Harrumph.) You can always identify an alias by the small curved arrow at the base of the icon, and the icon might also sport the tag
aliasat the end of its name.You have three ways to create an alias. Here’s one:
- Select the item. The following section has details about selecting icons.
- Choose File⇒Make Alias, or press +L.
Figure 4-5 illustrates a trio of typical alias icons.

Figure 4-5: No, not the famous girl-spy TV show. These are alias icons in Mavericks.
Here’s another way to create an alias:
- Hold down +Option.
- Drag the original icon to the location where you want the alias.
Note that this funky method doesn’t add the alias tag to the end of the alias icon name (unless you drag it to another location in the same directory)!
Another option for creating an alias is to right-click the original icon and choose Make Alias.
So why bother to use an alias? Three good reasons:
- Launch an application or open a document from anywhere on your drive. Organization and convenience … life is good.
- Add aliases wherever you need them. Aliases take up very little hard drive space, and that tiny size allows you to add multiple aliases (and mucho convenience) for a single application without gulping down hard drive real estate.
- Send an alias to the Trash without affecting the original item. When that work project is finished, you can safely delete a Pages alias without worrying about deleting the actual application icon.
 If you move or rename the original file, Mavericks is actually smart enough to update the alias, too! However, if the original file is deleted (or if the original is moved to a different volume, such as an external hard drive), the alias no longer works. (Go figure.)
Selecting items
Often, the menu commands or keyboard commands that you perform in the Finder need to be performed on something: Perhaps you’re moving an item to the Trash, or getting more information on the item, or creating an alias for that item. To identify the target of your action to the Finder, you need to select one or more items on your Desktop or in a Finder window. In this section, I show you how to do just that.
Selecting one thing
Mavericks gives you a couple of options when selecting just one item for an upcoming action:
- Move your pointer over the item and click. A dark border (or highlight) appears around the icon, indicating that it’s selected.
- Type the first few letter of the icon’s name. After you type a letter, OS X highlights the first icon that matches that character.
- If an icon is already highlighted on your Desktop or within a window, move the selection highlight to another icon in the same location by using the arrow keys. To shift the selection highlight alphabetically, press Tab (to move in order) or press Shift+Tab (to move in reverse order).
Selecting items in the Finder doesn’t actually do anything to them by itself. You have to perform an action on the selected items to make something happen.
Selecting a whole bunch of things
You can also select multiple items with aplomb by using one of these methods:
- Adjacent items
- Drag a box around them. In case that sounds like ancient Sumerian, here’s the explanation: Click a spot above and to the left of the first item; then hold down your finger on the surface of the mouse and drag the mouse down and to the right. If you’re using a trackpad, just hold down your finger while moving it down and to the right. (This is dragging, in Mac-speak.) A box outline like the one in Figure 4-6 appears, indicating what you’re selecting. Any icons that touch or appear within the box outline are selected when you release the mouse button.
- Click the first item to select it and then hold down the Shift key while you click the last item. Mavericks selects both items and everything between them.
- Nonadjacent items: Select these by holding down the key while you click each item.
If you turn it on, the status bar displays additional information on what you’re doing within a Finder window. (To check it out, choose View⇒Show Status Bar from the Finder menu.) The status bar tells you how much space is available on the drive you’re working in as well as how many items are displayed in the current Finder window. When you select items, it shows you how many you highlighted.
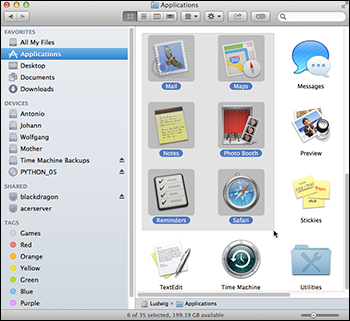
Figure 4-6: Drag a box around icons to select them.
Copying items
Want to copy items from one Finder window to another, or from one location (like a CD) to another (like your Desktop)? Très easy. Just use one of these methods:
- On the same drive
- To copy one item to another location: Hold down the Option key (you don’t have to select the icon first) and then click and drag the item from its current home to the new location.
To put a copy of an item within a folder, just drop the item on top of the receiving folder. If you hold the item that you’re dragging over the destination folder for a second or two, Mavericks opens a new window so that you can see the contents of the target — this feature is called spring-loaded folders, and you can turn it on by clicking Finder⇒Preferences.
- To copy multiple items to another location: Select them all first (see the earlier section “Selecting a whole bunch of things”), hold down the Option key, and then drag and drop one of the selected items where you want it. All the items that you selected follow the item you drag. (Rather like lemmings. Nice touch, don’t you think?)
To help indicate your target when you’re copying files, Mavericks highlights the location to show you where the items will end up. (This works whether the target location is a folder or a drive icon.) If the target location is a window, Mavericks adds a highlight to the window border.
- To copy one item to another location: Hold down the Option key (you don’t have to select the icon first) and then click and drag the item from its current home to the new location.
- On a different drive
- To copy one or multiple items: Click and drag the icon (or the selected items, if you have more than one) from the original window to a window you open on the target drive. (No need to hold down the Option key whilst dragging.) You can also drag one item (or a selected group of items) and simply drop the items on top of the drive icon on your Desktop.
The items are copied to the top level, or root, of the target drive.
- To copy one or multiple items: Click and drag the icon (or the selected items, if you have more than one) from the original window to a window you open on the target drive. (No need to hold down the Option key whilst dragging.) You can also drag one item (or a selected group of items) and simply drop the items on top of the drive icon on your Desktop.
If you try to move or copy something to a location that already has an item with the same name, Figure 4-7 illustrates the answer: You get a confirmation dialog that prompts you to decide whether to replace the file or to stop the copy/move procedure and leave the existing file alone. Good insurance, indeed.

Figure 4-7: Replace the existing file only if you’re sure.
Moving things from place to place
Moving things from one location to another location on the same drive is the easiest action you can take. Just drag the item (or selected items) to the new location. The item disappears from the original spot and reappears in the new spot.
Duplicating in a jiffy
If you need more than one copy of the same item within a folder, use the Mavericks Duplicate command. I use Duplicate often when I want to edit a document but ensure that the original document stays pristine, no matter what. I just create a duplicate and edit that file instead.
To use Duplicate, you can
- Click an item to select it and then choose File⇒Duplicate.
- Right-click the item and choose Duplicate from the menu.
- Hold down the Option key and drag the original item to another spot in the same window. When you release the mouse button, the duplicate file appears like magic!
The duplicate item has the word copy appended to its name. A second copy is named copy2, a third is copy3, and so on.
You can also hold down the Option key while dragging the item to a different Finder window, and the duplicate is created there (but without the word copy appended.)
Duplicating a folder also duplicates all the contents of that folder, so creating a duplicate folder can take some time to create if the original folder was stuffed full (or contained very large files). The duplicate folder has copy appended to its name, but the contents of the duplicate folder keep their original names.
Keys and Keyboard Shortcuts to Fame and Fortune
Your iMac keyboard might not be as glamorous as your mouse, but any Macintosh power user will tell you that using keyboard shortcuts is usually the fastest method of performing certain tasks in the Finder, such as saving or closing a file. I recommend committing these shortcuts to memory and putting them to work as soon as you begin using your iMac so that they become second nature to you as quickly as possible.
Special keys on the keyboard
The Apple standard keyboard has a number of special keys that you might not recognize — especially if you’ve made the smart move and decided to migrate from the chaos that is Windows to OS X! Table 4-1 lists the keys that bear strange hieroglyphics on the Apple keyboard as well as what they do.
Table 4-1 Too-Cool Key Symbols
|
Action |
Symbol |
Purpose |
|
Media Eject |
 |
Ejects a CD or DVD from your optical drive (if you have one) |
|
Audio Mute |
 |
Mutes (and restores) all sound produced by your iMac |
|
Volume Up |
 |
Increases the sound volume |
|
Volume Down |
 |
Decreases the sound volume |
|
Command |
 |
Primary modifier for menus and keyboard shortcuts |
|
Control |
 |
Modifier for shortcuts |
|
Option |
 |
Modifier for shortcuts |
Using Finder and application keyboard shortcuts
The Finder is chock-full of keyboard shortcuts that you can use to take care of common tasks. Some of the handiest shortcuts are included in the online Cheat Sheet for this book, which you’ll find at
www.dummies.com/cheatsheet/imac
But wait, there’s more! Most of your applications also provide their own set of keyboard shortcuts. While you’re working with a new application, display the application’s Help file and print a copy of the keyboard shortcuts as a handy cheat sheet.
If you’ve used a PC before, you’re certainly familiar with three-key shortcuts — the most infamous being Ctrl+Alt+Delete, the beloved shutdown shortcut nicknamed the Windows Three-Finger Salute. Three-key shortcuts work the same way in Mavericks (but you’ll be thrilled to know that you won’t need to reboot your iMac using that notorious Windows shortcut)! If you’re new to computing, just hold down the first two keys simultaneously and then press the third key to activate a three-key shortcut.
You’re not limited to the keyboard shortcuts listed previously, either. Within System Preferences, visit the Keyboard pane and click the Keyboard Shortcuts button to change an existing shortcut or add another.
Performing Tricks with Finder Windows
In this section of your introduction to OS X, I describe basic windows management within Mavericks: how to move things around, how to close windows, and how to make ’em disappear and reappear like magic.
Scrolling in and resizing windows
Can you imagine what life would be like if you couldn’t see more than a single window’s worth of stuff? Shopping would be curtailed quite a bit — and so would the contents of the folders on your hard drives!
That’s why Mavericks adds scroll bars that you can click and drag to move through the contents of the window. By default, scroll bars don’t appear until you move your pointer close to them, but when they’re visible, you can either
- Click the scroll box and drag it. (For the uninitiated, that means clicking the darker portion of the bar and holding down your finger on the surface of your pointing device while you move in the desired direction.)
- Click anywhere in the empty area above or below the box to scroll pages one at a time.
- Hold down the Option key and click anywhere in the empty area above or below the bar to scroll to that spot in the window.
Of course, you can also scroll by moving one finger on the surface of your Magic Mouse or Magic Trackpad in the desired direction (both vertically and horizontally). To set the scroll gesture behavior, open System Preferences and click the Mouse pane (or Trackpad pane, depending on which one you’re using).
Figure 4-8 illustrates both vertical and horizontal scroll bars in a typical Finder window.
Often, pressing your Page Up and Page Down keys moves you through a document one page at a time. Also, pressing your arrow keys moves your insertion cursor one line or one character in the four compass directions.

Figure 4-8: A plethora of helpful window controls.
You can also resize most Finder and application windows by enlarging or reducing the window frame itself. Move your pointer over any edge of the window and then drag the edge in any direction until the window is the precise size you need. You can also drag a corner of the window diagonally to resize two dimensions at once.
Minimizing and restoring windows
Resizing a window is indeed helpful, but maybe you simply want to banish the doggone thing until you need it again. That’s a situation for the Minimize button, which also appears in Figure 4-8. A minimized window disappears from the Desktop but isn’t closed; by default, it simply reappears in the Dock as a miniature icon. Minimizing a window is easy: Move your pointer over the Minimize button at the top-left corner of the window — a minus sign appears in the button to tell you that you’re on target — and then click.
Hold down the Shift key whilst you minimize, and prepare to be amazed when the window shrinks in slow motion like Alice in Wonderland!
To restore the window to its full size again (and its original position on the Desktop), just click its window icon in the Dock.
Moving and zooming windows
Perhaps you want to move a window to another location on the Desktop so that you can see the contents of multiple windows at the same time. Click the window’s title bar (that’s the top frame of the window, which usually includes a document or application name) and drag the window anywhere you like. Then lift your finger. (Don’t click the icon in the center of the title bar, though. You won’t move the window, just the icon itself.)
Many applications can automatically arrange multiple windows for you. Choose the Window⇒Arrange All menu item (if it appears).
To see all that a window can show you, use the Zoom feature to expand any Finder or application window to its maximum practical size. Note that a zoomed window can fill the entire screen, or (if that extra space isn’t applicable for the application) the window might expand only to a larger part of the Desktop. To zoom a window, move your pointer over the button (as shown in the earlier Figure 4-8) at the top-left corner of the window. When the plus sign appears in the Zoom button, click to claim the additional territory on your Desktop. (You can click the Zoom button again to automatically return the same window to its previous dimensions.)
Closing windows
When you’re finished with an application or no longer need a window open, move your pointer over the Close button at the top-left corner of the window. When the X appears in the button, click it. (And yes, I can get yet another reference out of Figure 4-8, which I’m thinking of nominating as Figure of the Year.)
If you have more than one window open in the same application and you want to close ’em all in one swoop, hold down the Option key whilst you click the Close button in any of the windows.
If you haven’t saved a document and you try to close that document’s window, Mavericks gets downright surly and prompts you for confirmation. “Hey, human, you don’t really want to do this, do you?” If you answer in the affirmative — “Why, yes, machine. Yes, indeed, I do want to throw this away and not save it.” — the application discards the document that you were working on. If you decide to save the current state of your document (thereby saving your posterior from harm), you can use the File⇒Save a Version menu command. (For those applications that don’t support the OS X Version feature, the menu command is File⇒Save As.)
Using Finder Tabs
With the introduction of Mavericks, OS X now has a powerful new feature you can use to display multiple locations in the same window: Finder Tabs, which work just like the tabs in Safari (as well as other popular browsers for both Macs and PCs). To open a new tab in a Finder window, you have a wealth of choices:
- Click the desired location and press +T.
- Right-click the location and choose Open in New Tab.
- Select the location and click the New Tab button (which bears a plus sign) at the right side of the window.
- Click the Action icon (which bears a gear icon) in any Finder window toolbar and choose New Tab.
For example, if you’re working on an iMovie project, you might create tabs using the Applications item in the Finder window sidebar and a folder (or even a DVD disc or shared drive) named Work that contains your video clips. The location appears as a new tab immediately under the toolbar. You can open as many tabs as you like. To close a tab, hover your cursor over it and click the X button that appears. And you guessed it, the incredibly hardworking Figure 4-8 illustrates three Finder Tabs at work.
So why all the hullaballoo? Think about switching between multiple locations on your Mac instantly, and you start to understand why this crusty old Mac fanatic is so excited! Just click a tab to switch to that location; you can even drag files and folders from tab to tab. You can drag the Finder Tabs themselves to reorder them as you like.
You can also set new folders to open in tabs instead of windows. Just click the Finder menu at the top of your Desktop, choose Preferences, and then select the Open Folders in Tabs Instead of New Windows check box to enable it.