
Chapter 15
Making Film History with iMovie
![]() Taking stock of the iMovie window
Taking stock of the iMovie window
![]() Importing and adding media content
Importing and adding media content
![]() Using transitions in your movie
Using transitions in your movie
![]() Putting text titles to work
Putting text titles to work
![]() Adding animated maps
Adding animated maps
![]() Creating a movie trailer
Creating a movie trailer
![]() Sharing your movie with others
Sharing your movie with others
Remember those home movies that you used to make in high school? They were entertaining and fun to create, and your friends were impressed. In fact, some kids are so downright inspired that you’re not surprised when you discover at your high school reunion that they turned out to be graphic artists, or got involved in video or TV production.
iMovie, part of the iLife suite, makes movie-making as easy as those homemade movies. Apple simplifies all the technical stuff, such as importing video and adding audio, leaving you free to concentrate on your creative ideas. In fact, you won’t find techy terms such as codecs or keyframes in this chapter at all. I guarantee that you’ll understand what’s going on at all times. (How often do you get a promise like that with video-editing software?)
With iMovie, your digital video (DV) camcorder, and the other parts of the iLife suite, you can soon produce and share professional-looking movies, with some of the same creative transitions and titles used by Those Hollywood Types every single day. All on your iMac, all by yourself.
If you turn out to be a world-famous Hollywood Type Director in a decade or so, don’t forget the little people — like computer book authors — along the way!
Shaking Hands with the iMovie Window
If you’ve ever tried using a professional-level video-editing application, you probably felt as though you were suddenly dropped into the cockpit of a jumbo jet. In iMovie, though, all the controls you need are easy to use and logically placed.
To launch iMovie, click the iMovie icon on the Dock or within Launchpad. (It looks like a star from the Hollywood Walk of Fame.) You can also click the Applications folder in any Finder window Sidebar and then double-click the iMovie icon.
To follow the examples I show you here, take these strenuous steps and create a new movie project:
- Choose File⇒New Movie (or press
 +N).
+N).
iMovie displays the dialog you see in Figure 15-1.
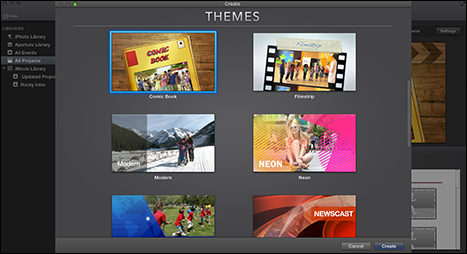
Figure 15-1: Creating a new movie project within iMovie.
 You can also create movie trailers (a short preview or teaser) within iMovie, as I demonstrate later in this chapter. Generally, however, you create your trailer project after your movie is completed (unless, of course, you’re specifically creating just a trailer). Why? For the same reason that studios create trailers after the filming is finished: After you complete your movie, you’ll have all the clips imported already, and you’ll have a better idea of what you want to include while “teasing” your audience!
 - Click a Theme thumbnail to select a theme to apply to your finished movie.
iMovie automatically adds the transitions and titles that correspond to that theme.
Normally, this is what you want to do. However, you can add transitions and titles manually, as I’ll show you later in this chapter. So if you decide not to use a theme out of the gate, click the No Theme thumbnail.
- Click the Create button.
- Type a name for your project.
- Click OK.
iMovie adds the new project to the thumbnail list in the Project Library pane, and you’re on your way! Check out Figure 15-2: This is the whole enchilada, in one window.
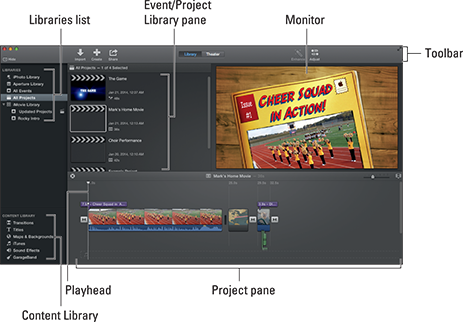
Figure 15-2: iMovie is a lean, mean, video-producing machine.
The controls and displays that you’ll use most often are
- Monitor: Think of this as being just like your TV or computer monitor. Your video clips, still images, and finished movie play here. You’ll also crop and rotate your video within the monitor.
- Content Library: This row of buttons allows you to add effects such as transitions, titles, music, and sound effects.
- Libraries list: This list allows you to display your photos (from your iPhoto and Aperture libraries) as well as all the video clips you can add to your project from events you’ve imported. You can also select an existing iMovie project from the iMovie Library. To hide the Libraries list and make more room for the Event/Project Library pane, click the Hide button that appears near the top-left corner of the iMovie window. (To display the Libraries list again, click the same button, which now reads Show.)
- Event/Project Library pane: If you select an event from the All Events entry in the Libraries list, iMovie displays a thumbnail of that event’s content in the Event pane. (Move your mouse over the Event thumbnail to see previews of the clips.) If you decide you want to include a clip, double-click the Event to display the clips and add the desired clip to your project. This pane also acts as the Project Library pane, where you can display your iMovie projects; click the All Projects entry in the Libraries list to display your projects as thumbnails. To load a project, just double-click the thumbnail, and it appears in the Project pane.
 The Event/Project Library pane displays different content, depending on the entry you select in the Library list.
 - Project pane: This pane is where most of your work gets done within iPhoto, displaying the elements you added to that specific project (such as video clips, still photos, and audio clips). Your movie appears as a linear “strip” of thumbnails, making it easy to select, insert, and delete elements.
- Playhead: The red vertical line that you see in the Event and Project panes is the playhead, which indicates the current editing point while you’re browsing your clips or creating your movie. When you’re playing your movie, the playhead moves to follow your progress through the movie.
- Toolbar: This strip of buttons allows you to import video, share your completed movies, enhance and adjust video clips, and switch between the iMovie Library and iMovie Theater. (More on iMovie Theater later in the chapter.)
Those are the major highlights of the iMovie window. A director’s chair and megaphone are optional, of course, but they do add to the mood.
A Bird’s-Eye View of Moviemaking
I don’t want to box in your creative skills here — after all, you can attack the moviemaking process from a number of angles. (Pun, unfortunately, intended.) However, I’ve found that my movies turn out the best when I follow a linear process, so before I dive into specifics, allow me to provide you with an overview of moviemaking with iMovie.
Here’s my take on the process, reduced to seven basic steps:
- Import your video clips from your DV camcorder, FaceTime HD camera, iPhoto Library, or your hard drive.
- Drag your new selection of clips from the Event pane to the Project pane and arrange them in the desired order.
- Import or record audio clips (from iTunes, GarageBand, or external sources, such as audio CDs or audio files that you’ve recorded yourself) and add them to your movie.
- Import your photos (directly from iPhoto, Aperture, or your hard drive) and place them where needed in your movie.
- Add professional niceties, such as voiceovers, transitions, effects, and text to the project.
- Preview your film and edit it further if necessary.
- Share your finished film with others through the web, e-mail, your Apple TV, an iOS device (an iPhone, iPad, or iPod touch), or within iMovie Theater. If your iMac has an optical drive, you can also use a DVD recording application to create a DVD movie disc using your exported movie. I use (and recommend) Toast 11 Titanium from Roxio, at www.roxio.com.
Wondering how you save your project in iMovie — especially when there’s no Save item on the File menu? iMovie automatically saves your project as you work, leaving you free to concentrate on your moviemaking art!
Importing the Building Blocks
Sure, you need video clips to create a movie of your own, but don’t panic if you have but a short supply. You can certainly turn to the other iLife applications for additional raw material. (See, I told you that whole “integration thing” would come in handy.)
Along with video clips you import from your DV camcorder, your iMac’s built-in FaceTime HD camera, and your hard drive, you can call on iPhoto and Aperture for still images (think credits) and iTunes and GarageBand for background audio and effects. In this section, I show you how.
Pulling in video clips
Your iMac is equipped already with the extras that come in handy for video editing — namely, a large hard drive and ports to connect stuff. Depending on the iMac model you’re using and your external devices, you may use a USB or FireWire connection. Today’s mass-storage camcorders, tablets, and smartphones use a USB connection to transfer clips. I cover both FireWire mini-DV camcorders and USB mass-storage devices in this section.
Oh, and don’t forget that your iMac has a FaceTime HD camera on board, ready to record clips — heck, you’re a self-contained movie studio!
Here’s the drill if your clips are on your FireWire mini-DV camcorder or mass-storage USB video device:
- Plug the proper cable into your iMac.
- Set the camcorder to VTR (or VCR) mode.
Some camcorders and digital cameras call this Play mode.
- Click the Import button on the toolbar (refer to Figure 15-2).
iMovie opens the Import window.
- Open the Import To pop-up menu at the top of the Import window and choose the destination for your new video clips.
To create a new event for the imported clips, choose New Event. Alternatively, you can import into an existing Event or an existing iMovie project. Heck, if your family reunion spanned more than one day, you can create a new Event for each day. (How do they think up these things?)
- Click the desired video source in the Source list at the right of the Import window.
If you’re using a tape-based camcorder, playback controls appear under the Camera Import window, mirroring the controls on your FireWire DV camcorder. This allows you to control the unit from iMovie. Keen! If you’re using a mass-storage camcorder connected by USB, you instead get an Import All button beneath the thumbnails of available clips. (Note that this button changes to Import Selected if you select one or more of the clips.)
If you choose your FaceTime HD camera from the list, you’ll see a real-time preview and a Big Red Record button. Click the Record button to start and stop recording. (You can skip the rest of the steps in this section, which deal only with USB and FireWire camcorders.)
- To import selected clips from your FireWire DV camcorder, advance the video to a couple of seconds before the point where you want to start your capture; then click Import.
- Click OK and admire your handiwork.
iMovie begins transferring the footage to your iMac and automatically adds the imported clips to the specified destination.
If your clips are already on your hard drive, rest assured that iMovie can import them, including those in high-definition video (HDV) format. iMovie also recognizes a number of other video formats, as shown in Table 15-1.
Table 15-1 Video Formats Supported by iMovie
|
File Type |
Description |
|
DV |
Standard 4:3 digital video |
|
DV Widescreen |
Widescreen 16:9 digital video |
|
MOV |
QuickTime movies |
|
HDV and AVCHD |
High-definition (popularly called widescreen) digital video, in 720p and 1080i |
|
MPEG-2 |
Digital video format used for DVD movies |
|
MPEG-4 |
A popular format for streaming Internet and wireless digital video, as well as handheld iOS devices such as the iPad, iPhone, and iPod touch |
To import a movie file, follow this bouncing ball:
- Click the Import button on the toolbar.
- Click the drive that stores your clips in the Sidebar and navigate to their location.
- Select the desired clips in the list.
- From the Import To pop-up menu at the top of the Import window, choose the destination within iMovie.
- Click Import.
Alternatively, you can also drag a video clip from a Finder window and drop it in the Project pane.
Making use of still images
Still images come in handy as impressive-looking titles or as ending credits to your movie. (To be truly professional, make sure you list a gaffer and a best boy.) However, you can use still images also to introduce scenes, close scenes, or separate clips according to your whim. For example, I use stills when delineating the days of a vacation within a movie or different Christmas celebrations over time.
Here are two methods of adding stills to your movie:
- Adding images and video clips from iPhoto or Aperture: Click the iPhoto Library entry in the Libraries list to experience the thrill that is your iPhoto Library, right from iMovie (as shown in Figure 15-3). You can elect to display your entire iPhoto Library or more selective picks, such as specific albums, Faces, Places, or Events. (Even your Facebook images are within reach.) When you find the image you want to add, just drag it to the right spot in the Project pane.
If you’ve installed Apple’s Aperture photo application, you can also access images from Aperture by clicking the Aperture Library item in the Libraries list.
- Importing images from your hard drive: If you’re a member of the International Drag-and-Drop Society, you can drag TIFF, JPEG, GIF, PICT, PNG, and PSD images directly from a Finder window and drop them into the Project pane as well.
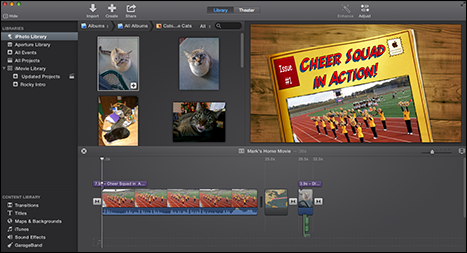
Figure 15-3: Pulling still images from iPhoto is child’s play.
Importing and adding audio from all sorts of places
You can pull in everything from Wagner to Weezer as both background music and sound effects for your movie. In this section, I focus on how to get those notes into iMovie and then how to add them to your movie by dragging them to the Project pane.
You can add audio from a number of sources:
- Adding songs from iTunes and GarageBand: Click the iTunes button in the Content Library (or press +4) to display the contents of your iTunes Library. Click the desired song in the scrolling list (which displays all your music). To display a playlist or Smart Playlist, click the Music drop-down list box above the waveform display. Figure 15-4 illustrates the dynamite ABBA playlist I selected for this project. You can add a track to your movie by dragging any song entry from the list to the desired spot in the Project pane.
You’re not limited to iTunes for ear candy, however. If you exported any original music you’ve composed in GarageBand to your iTunes Library, you can use those songs in your own movie! Click the GarageBand button in the Content Library to view your GarageBand music, and then drag and drop to your heart’s content.

Figure 15-4: Calling on my iTunes Library to add ABBA to my iMovie.
- Adding sound effects: If you need the sound of a horse galloping for your Rocky Mountain vacation clips, click Sound Effects in the Content Library. iMovie includes a number of top-shelf audio effects that you can use in the sound effects audio track in the Project pane. This way, you can add sound effects even when you’ve already added a background song. Again, to add a sound effect, drag it to the perfect spot in the Project pane.
If you have several gigabytes of music in your iTunes Library, it might be more of a challenge to locate Janis Joplin’s rendition of “Me and Bobby McGee,” especially if she’s included in a compilation. Let your iMac do the digging for you! Click in the Search box above the track list and begin typing a song name. iMovie narrows down the song titles displayed to those that match the characters you type. To reset the search box and display all your songs in the Library or selected playlist, click the X icon that appears to the right of the box.
- Recording directly from a microphone: Yep, if you’re thinking voiceover narration, you’ve hit the nail on the head. Check out the sidebar “Narration the easy way” for the scoop.
You can fine-tune both the audio within a video clip or an audio clip that you add to your project. With the desired audio or video selected in the Event pane, click the Adjust button at the top of the window, and then click one of the buttons that appear above the Viewer. These buttons provide audio controls that allow you to change the volume of the selected clip. You can even add effects to your audio, such as Shortwave Radio or Cathedral, and you can use iMovie’s built-in Equalizer to fine-tune the audio. When you’re done tweaking, click the Adjust toolbar button again. (Oh, and don’t forget that you can always return the clip to its original settings; just click the Reset Clip button at the right side of the Viewer.)
Building the Cinematic Basics
Time to dive in and add the building blocks to create your movie. Along with the video clips, audio tracks, and still images that you’ve imported, you can add Hollywood-quality transitions, optical effects, and animated text titles. In this section, I demonstrate how to elevate your collection of video clips into a real-life, honest-to-goodness movie.
Adding clips to your movie
You can add clips to your movie via the Project pane and the Event pane. The Dynamic Duo works like this:
- Project pane: This displays the media you’ve added to your project so far, allowing you to rearrange the clips, titles, transitions, and still images in your movie.
- Event/Project Library pane: This pane acts as the source repository for all your clips, displaying them arranged by Event (the date they were shot or the date they were imported) or by Project (media you’ve added to existing iMovie projects).
Typically, you’ll add a clip to your movie from an Event. Follow these steps:
- Click the All Events entry in the Libraries list.
- Move your cursor across clips in the Event pane to watch a preview of the video.
- When you have decided what to add to your project, you can either add the entire clip or a selection.
- To select an entire clip: Right-click the clip’s thumbnail and choose Select Entire Clip from the menu that appears.
- To select a portion of a clip: Click and hold, and then drag your cursor across the thumbnail. A yellow frame appears around your selection. To change the length of the selected video, hover your cursor over either end of the clip and drag the handle that appears on either side. If you make a mistake while selecting video, just click any empty space within the Event pane to remove the selection frame and try again.
- Drag the selection from the Event pane to the spot where it belongs in the Project pane.
Alternatively, you can press the E key.
 Preview your work — and do it often.
iMovie includes a Play Full Screen button, which appears when you move your cursor to the Viewer. (Alternatively, press ![]() +Shift+F or choose View⇒ Play Full Screen to watch the selection.) Press the spacebar to pause, and press Esc to return to iMovie. Of course, you can also move your cursor across the filmstrip in the Edit pane to quickly browse your project.
+Shift+F or choose View⇒ Play Full Screen to watch the selection.) Press the spacebar to pause, and press Esc to return to iMovie. Of course, you can also move your cursor across the filmstrip in the Edit pane to quickly browse your project.
To play a selection from the beginning, press (the slash that leans to the left). If you’ve ever watched directors at work on today’s movie sets, you may have noticed that they’re constantly watching a monitor to see what things will look like for the audience. You have the same option in iMovie!
Marking clips
While you’re watching video in the Event/Project Library pane, you may decide that a certain clip has a favorite scene or that another clip has material you don’t want, such as Uncle Ed’s shadow puppets. (Shudder.) iMovie features Favorite and Rejected frames, allowing you to view and use your best camera work (and ignore the worst stuff).
To mark a great video clip as a Favorite, select and right-click a range of frames or the entire clip in the Event/Project Library pane, and then click the Favorite menu item (or press F). To mark clips that are sub-par, select the offending clip in the Event/Project Library pane and press Delete (or right-click and choose Reject). Clips marked as Favorites have a green line on top of the clip, and clips marked as Rejected have a red line.
You can use the Search Filter option to specify which type of marked clips are shown: Click the pop-up menu next to the Search field at the top of the Event/Project Library pane. Your options include displaying all clips, displaying just Favorite clips, hiding Rejected clips, or displaying just Rejected clips.
If you decide that a Rejected clip isn’t so bad after all, or that a Favorite really isn’t your best work, no problem. Unmark any selected Favorite or Rejected scene in the Event/Project Library pane by choosing Mark⇒Unrate (or just press U).
Removing clips from your movie
Don’t like a clip? Bah. To banish a clip from your movie, follow these steps:
- Click the offending clip in the Project pane to select it.
Alternatively, you can select a portion of a clip by holding the button down and then dragging the selection box that appears.
- Press Delete.
This deletes the clip from the Project pane, but the clip is still available if you choose All Events or the iMovie Library from the Libraries list.
If you remove the wrong clip, don’t panic. Instead, use iMovie’s Undo feature (press ![]() +Z) to restore it.
+Z) to restore it.
Reordering clips in your movie
If Day One of your vacation appears after Day Two, you can easily reorder your clips and stills by dragging them to the proper space in the Project pane. When you take your finger off the mouse (or trackpad), iMovie automatically moves the rest of your movie aside with a minimum of fuss and bother.
Editing clips in iMovie
If a clip has extra seconds of footage at the beginning or end (as it should, to ensure you get all the action), you don’t want that superfluous stuff in your masterpiece. Our favorite video editor gives you the following functions:
- Crop: Removes unwanted material from a video clip or still image
- Rotate: Rotates a clip or image on its center axis
- Trim: Trims frames from a video clip
Before you can edit, however, you have to select a section of a clip:
- Click a clip or an image in either the Project pane (where changes you make are specific to this project) or the Event pane (where edits you make are reflected in any project using that footage).
iMovie displays the clip or image in the monitor.
- To select the entire clip or image, simply click it.
- Drag your cursor across the thumbnail to select the section of the media you want to edit.
Some editing functions, such as Crop and Rotate, will automatically apply to the entire clip.
The selected region is surrounded by a yellow frame. You’re ready to edit that selected part of the clip.
Move your cursor to the beginning or ending of the selection, and handles will appear. You can make fine changes to the selected section by dragging them.
- To crop: Click the Adjust button at the top of the screen to display the editing controls in the Viewer, and then click the Crop button. Drag the edges of the frame using the handles to select the section you want to keep. To preview your selection, click the Play button that appears when you move your cursor into the Viewer pane. When you’re ready, click the Done button (which bears a check mark), and everything but the selected region is removed.
- To rotate: Click the Adjust button and then click the Crop button. Now you can click one of the two rotation buttons that appear at the right side of the Viewer (both of which carry a box and curved arrow icon). Each click rotates the media 90 degrees in the indicated direction. Click the Done button (with the check mark) when the clip or image is properly oriented.
- To trim: Right-click the selection and choose Trim to Playhead from the contextual menu. iMovie removes the frames up to the playhead position from the selected video.
Edits that you make to one clip or still image can actually be copied to multiple items! Select the edited clip and choose Edit⇒Copy from the iMovie menu. Now you can select one or more clips and choose Edit⇒Paste Adjustments to apply Video, Audio, or Crop edits. (To apply all three types of edits, just choose All.)
Transitions for the masses
Many iMovie owners approach transitions as visual bookends: They merely act as placeholders that appear between video clips. Nothing could be farther from the truth, though, because judicious use of transitions can make or break a scene. For example, which would you prefer after a wedding ceremony — an abrupt, jarring cut to the reception, or a gradual fadeout to the reception?
Today’s audiences are sensitive to transitions between scenes. Try not to overuse the same transition. Pick two or three that match the mood of your film and the scenes between which you’re transitioning. Also weigh the visual impact of a transition carefully. You might even decide that having no transition is the most effective (directors call this deliberate lack of a transition a jump cut).
iMovie includes a surprising array of transitions, including old favorites (such as Fade In and Dissolve) and some nifty stuff that you might not be familiar with (such as Cube and Page Curl). To display your transition collection (see Figure 15-5), click the Transitions entry in the Content Library (or press ![]() +1).
+1).
To see what a particular transition looks like, move your cursor over the thumbnail to display the transition in miniature.
Adding a transition couldn’t be easier: Drag the transition from the thumbnail list and drop it between clips or between a clip and a still image in the Project pane. In iMovie, transitions are applied in real time.

Figure 15-5: Add transitions for flow between clips in iMovie.
Even Gone with the Wind had titles
The next stop on our iMovie Hollywood Features Tour is the Titles list, shown in Figure 15-6. You’ll find it by clicking the Titles entry in the Content Library or by pressing ![]() +2. You can add a title with a still image, but iMovie also includes everything you need to add basic animated text to your movie.
+2. You can add a title with a still image, but iMovie also includes everything you need to add basic animated text to your movie.
Most of the controls you can adjust are the same for each animation style. You can change the font, the size of the text, and the color of the text. To add a title manually, follow these steps:
- Select a Title animation thumbnail from the Titles list and drag it to the desired spot in the Project pane.
Note that the title is displayed in the Viewer as well as the Project pane.
- Select the Title and click the Adjust button at the top of the window.
- Click the Title Settings button (which bears a capital T symbol) to make any changes to the fonts or text attributes.
- Click in the text box within the Viewer to delete the default text and type your own titles.
- Click the Done button to save your changes.
- Click the Play button in the Viewer to preview your title.
iMovie displays a preview of the effect in the monitor with the settings that you choose.

Figure 15-6: Add titles for your next silent film.
Adding maps and backgrounds
iMovie includes easy-to-use animated maps — think Indiana Jones traveling by airplane from place to place — and static backgrounds that can be used with your titles. To display them, click the Maps & Backgrounds entry in the Content Library (or press ![]() +3).
+3).
To use an animated map, drag one of the globe or map thumbnails to the Project pane. After the globe or map is created, select it and click the Adjust button to display the controls above the Viewer. Click the Map Settings button (which bears a globe icon) and then click the Start Location button (and, optionally, the End Location button) to enter the start and stop points for the animation. Type a city or place name to see your choices. (Heck, you can even type in an airport code or decimal coordinates to specify the spot.) Click Done and watch as iMovie animates your location (or your trip) in seconds!
To add a static background from the browser, drag it to the desired spot within the Project pane.
Creating an Honest-to-Goodness Movie Trailer
Yes, friends, you read that correctly! As I mention at the beginning of the chapter, iMovie includes a Trailer feature that can actually turn your film clips into a Hollywood-class preview, complete with genre transitions and background music.
To create a trailer project, follow these steps:
- Choose File⇒New Trailer (or press +Shift+N).
- Click a Movie Trailer thumbnail to select it.
If you hover your cursor over the thumbnail and click the Play icon that appears, iMovie displays a nifty preview of the trailer style that you selected. You can click different thumbnails to preview their look before you make your decision. Naturally, you’ll want to choose a trailer style that most closely matches the mood you want to project with your movie.
Note that each trailer has a suggested number of cast members. This number reflects the number of people that will appear in the clip “placeholders” during the editing process. (More on this in a page or two.)
- Click Create.
- Type a name for your project and click OK.
iMovie replaces the Project pane with the Trailer pane, as shown in Figure 15-7. On the Outline tab, you can edit the titles used in the trailer, as well as pop-up lists for information, such as the gender of the star(s) and the logo style you want for your “studio” at the beginning of the trailer. To change a text field, click in it and type the new text. You’ll see the changes you make in the Trailer display appear in the monitor in real time.
After you complete your edits to the titles, click the Storyboard tab. Now you can edit the text for each transition: Simply click the text to display the edit box and type. You can also drag clips from your Event pane (or from a Finder window) to fill the storyboard’s placeholders for video clips. To delete a clip from the storyboard, click it to select it and then press Delete.
To preserve the “look and feel” of the trailer storyboard, try to match your clips with the description and suggested activity indicated by the placeholder. (In other words, don’t stick a wide-angle video clip of the family dog cavorting in the yard in a placeholder marked “Closeup.” You get the idea.)
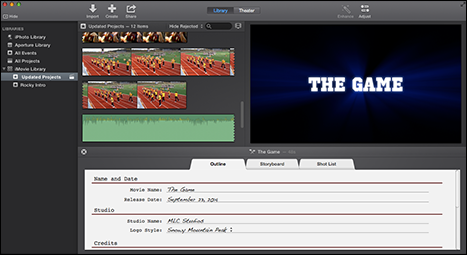
Figure 15-7: Build your movie trailer from the Trailer pane.
The Storyboard tab might not look like an editing timeline, but you can move the cursor anywhere within the storyboard to preview your trailer! The playhead indicator appears wherever the cursor appears, allowing you to watch the clip or transition that it’s resting upon. You’ll soon be sweeping your mouse to the left or right to move through each section of your trailer.
For an overall listing of each clip required for the full trailer, click the Shot List tab. On this tab, clips are organized by type. For example, all the action clips appear in one section, and all the landscape and closeup clips are grouped together as well. If necessary, you can also add, delete, or swap video clips from the Shot List.
To preview your trailer in its entirety, move your cursor inside the Viewer and click the Play button (or the Play Full-Screen button at the far right of the Viewer controls). Naturally, any storyboard placeholder that you haven’t filled with a clip will display just the placeholder.
Note that iMovie displays your trailer when you click the Updated Projects entry in the Libraries list, and it now appears in the Event/Project Library pane.
I bet all those hard-working Hollywood video editors are fuming at how easy it is to create a trailer in iMovie!
Sharing Your Finished Classic with Others
Your movie is complete, iMovie has saved it automatically to your drive, and now you’re wondering where to go from here. Select your movie in the Event/Project Library pane and click Share on the toolbar at the top of the window. iMovie can unleash your movie upon your unsuspecting family and friends (and even the entire world) in a number of ways:
- iTunes: Send your movie to your iTunes Library as a movie.
- Theater: Add your movie to the iMovie Theater on your iMac.
- YouTube/Facebook/Vimeo/CNN iReport: Why, certainly you can send your iMovie directly to any of these websites! Can it get more convenient than that? (I think not.)
- File: Create a copy of your movie on your hard drive in one of four different resolutions (from Standard Definition to High Definition).
- Email: Send your movie as an e-mail message attachment.
When you choose a sharing option, iMovie displays the video quality for the option and makes automatic changes to the movie attributes. (For example, choosing Email reduces the finished movie as far as possible in file size.)
If you’re worried about permanently reducing the quality of your project by sharing it in a smaller size, fear not! When you choose a sharing option to export your movie, your original project remains on your hard drive, unchanged, so you can share a better-quality version at any time in the future.