
Chapter 5
A Plethora of Powerful Fun
In This Chapter
![]() Making the most of your Home folder
Making the most of your Home folder
![]() Arranging your Desktop for greater efficiency
Arranging your Desktop for greater efficiency
![]() Adding time savers to the Dock
Adding time savers to the Dock
![]() Using the Trash (and rescuing precious stuff from it)
Using the Trash (and rescuing precious stuff from it)
![]() Using Mission Control and Dashboard to perform Desktop magic
Using Mission Control and Dashboard to perform Desktop magic
![]() Printing documents
Printing documents
When you’re no longer a novice to Mavericks and the basics of the Finder, turn your attention to a number of more advanced topics ’n tricks to turn you into an iMac power user — which, after all, is the goal of every civilized consciousness on Planet Earth.
Consider this chapter a grab bag of Mavericks knowledge. Sure, I jump around a little, but these topics are indeed connected by a common thread: They’re all surefire problem-solvers and speeder-uppers. (I can’t believe the latter is really a word, but evidently it is. My editors told me so.)
Home, Sweet Home Folder
Each user account that you create within Mavericks is actually a self-contained universe. For example, each user has a number of unique characteristics and folders devoted just to that person, and Mavericks keeps track of everything that a user changes or creates. (In Chapter 20, I describe the innate loveliness of multiple users living in peace and harmony on your iMac.)
This unique universe includes a different system of folders for each user account on your system. The top-level folder uses the short name that Mavericks assigns when that user account is created. Naturally, the actual folder name is different for each person, so Mac techno-types typically refer to this folder as your Home folder. (Mine is called mark, as you’ll see in upcoming figures.)
Each account’s Home folder contains a set of subfolders, including
- Movies
- Music
- Pictures
- Downloads (for files you download via Safari and Mail attachments that you save to disk)
- Sites (for web pages created by [or provided to] the user)
- Documents (created by the user)
Although you can store your stuff at the root (top level) of your hard drive, that gaggle of files, folders, and aliases can get very crowded and confusing very quickly. Here’s a Mark’s Maxim to live by:
 Your Home folder is where you hang out and where you store your stuff. Use it to make your computing life much easier!
 Create subfolders within your Documents folder to organize your files and folders even further. For example, I always create a subfolder in my Documents folder for every book that I write so that I can quickly and easily locate all the documents and files associated with that book project.
I discuss security within your Home folder and what gets stored where in Chapter 20. For now, Figure 5-1 shows how convenient your Home folder is to reach because it appears in the Finder window Sidebar (on the left). One click of your Home folder, and all your stuff is within easy reach.

Figure 5-1: Your Home folder is the central location for all your stuff on your iMac.
In addition to the Finder window Sidebar, you can reach your Home folder in other convenient ways:
- From the Go menu: Choose Go⇒Home to display your Home folder immediately from the Finder window. Alternatively, you can press
 +Shift+H to accomplish the same thing.
 - From within Open and Save dialogs: The standard File Open and File Save dialogs displayed by Mavericks also include the same Home folder (and subfolder) icons as the Finder window Sidebar.
- Within any new Finder window you open: If you like, you can set every Finder window that you open to open automatically within your Home folder.
- Choose Finder⇒Preferences and click the General button on the toolbar to display the dialog that you see in Figure 5-2.
- Click the arrows at the right side of the New Finder Windows Show pop-up menu.
A menu pops up (hence the name).
- Click your Home folder entry in the menu.
- Click the Close button at the top-left corner of the dialog.
You’re set to go. From now on, every Finder window you open displays your Home folder as the starting location!
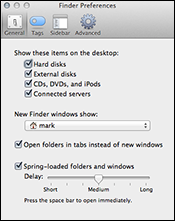
Figure 5-2: Set Mavericks to open your Home folder within new Finder windows.
Here’s another reason to use your Home folder to store your stuff: Mavericks expects your stuff to be there when you migrate your files from an older Mac to a new Mac.
Arranging Your Desktop
Many folks put all their documents, pictures, and videos on their Mavericks Desktop because the file icons are easy to locate! Your computing stuff is right in front of you … or is it?
Call me a finicky, stubborn fussbudget — go ahead, I don’t mind — but I prefer a clean Mavericks Desktop without all the iconic clutter. In fact, my Desktop usually has just three or four icons even though I use my iMac several hours every day. It’s an organizational thing; I work with literally hundreds of applications, documents, and assorted knickknacks daily. Sooner or later, you’ll find that you’re using that many, too. When you keep your stuff crammed on your Desktop, you end up having to scan your screen for one particular file, an alias, or a particular type of icon, which ends up taking you more time to locate it on your Desktop than in your Documents folder!
Plus, you’ll likely find yourself looking at old icons that no longer mean anything to you, or stuff that’s covered in cobwebs that you haven’t used in years. Stale icons … yuck.
I recommend that you arrange your Desktop so that you see only a couple of icons for the files or documents that you use the most. Leave the rest of the Desktop for that cool image of your favorite actor or actress.
Besides keeping things clean, I can recommend a number of other favorite tweaks that you can make to your Desktop:
- Keep Desktop icons arranged as you like.
- Close all windows and right-click any open space within your Desktop to display the Finder menu.
- From the right-click menu, choose Show View Options.
- From the Sort By pop-up menu, choose the criteria that Mavericks uses to automatically arrange your Desktop icons, including the item name, the last modification date, or the size of the items.
I personally like things organized by name. You can also quickly change your sorting criteria by right-clicking any open space and choosing Sort By.
- Choose a favorite background.
- Tap two fingers on the surface of your Magic Mouse (or Magic Trackpad) over any open spot on your Desktop. (Or, if you use an older pointing thing with a right mouse button, click that instead.)
- From the right-click menu that appears, choose Change Desktop Background.
You see the Desktop & Screen Saver pane within System Preferences, as shown in Figure 5-3. Browse through the various folders of background images that Apple provides, a range of solid colors, or use an image from your iPhoto library or Pictures folder.
- Display all the peripherals and network connections on your system.
- Click any open space on your Desktop to switch to the Finder menu.
- Choose Finder⇒Preferences.
- Make sure that all four of the top check boxes (Hard Disks; External Disks; CDs, DVDs, and iPods; and Connected Servers) are selected.
Any external networks, hard drives, or devices to which you’re connected show up on your Desktop. You can double-click the Desktop icon to view your external stuff.
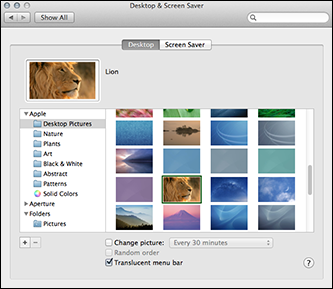
Figure 5-3: Choose a Desktop background of more interest.
Putting the Dock to the Test
If the Dock seems like a nifty contraption to you, you’re right again. It’s like one of those big control rooms that NASA uses. From the Dock — that icon toolbar at the bottom of the Mavericks Desktop — you can launch an application, monitor what’s running, and even use the pop-up menu commands to control the applications that you launch. (Hey, that NASA analogy is even better than I thought!)
By default, the Dock hangs out at the bottom of your screen, but you can move it to another edge, change the size of the icons, or even hide it until it’s necessary. (You can find more details on customizing the Dock using System Preferences in Chapter 6.)
When you launch an application — either by clicking an icon on the Dock, clicking an icon within Launchpad, or double-clicking an icon in a Finder window or the Desktop — the icon begins to bounce hilariously in the Dock to indicate that the application is loading. (So much for my NASA analogy.) After an application is running, the application icon appears in the Dock with a shiny blue dot underneath. Thus, you can easily see what’s running at any time just by glancing at the Dock.
 You can hide most applications by pressing
 ![]() +H. Although the application itself is still running, it might not appear on the Dock.
+H. Although the application itself is still running, it might not appear on the Dock.
 Some applications run in the background — that is, they don’t show up on the Dock. You generally don’t even know that these applications are working for you. However, if you need to see in detail what’s going on, you can always use the Activity Monitor utility to view everything that’s happening on your iMac. (For example, an Apple support technician might ask you to run Activity Monitor to help troubleshoot a problem.) To run the Activity Monitor
- Click the Spotlight icon on the Finder menu bar.
- Type Activity Monitor.
- Click the Activity Monitor entry in the Spotlight menu (or just press Return).
Adding Dock icons
Ah, but there’s more: The Dock can offer more than just a set of default icons! You can add your own MIS (or Most Important Stuff) to the Dock, making it the most convenient method of taking care of business without cluttering up your Desktop. You can add
- Applications: Add any application to your Dock by dragging the application icon into the area to the left of the separator line (the vertical line in the Dock that appears between applications and folders or documents). The existing Dock icons move aside so that you can place the new neighbor in a choice location.
 Do not try to add an application anywhere to the right of the separator line. You can’t put applications there because Mavericks might think that you want the application dumped in the Trash!
 - Folders: Here’s where you want to add things to the area to the right of the separator line. A folder or volume icon that you drag to the Dock is called a stack in Mavericks, and you can display the contents with a single click. (The contents of the folder “fan out” into a half-circle or grid arrangement, depending on the number of items in the folder. In fact, if you have enough items in the stack, scroll bars will appear.) To open or launch an item, just click it in the stack display.
Mavericks already includes two stacks on the Dock by default: your Documents folder and your Downloads folder.
- Web URLs: Sure, you can add your favorite website from Safari! Drag it right from the Safari Address bar into the area to the right of the separator line. When you click the URL icon, Safari opens the page automatically.
Removing Dock icons
You can remove an icon (okay, almost any) from the Dock at any time as long as the application isn’t running. In fact, I always recommend that every Mavericks user remove the default icons that never get used to make more room available for your favorite icons. The only two icons you can’t remove are the Finder and Trash icons. To remove an icon from the Dock, just click and drag it off the Dock. You’re rewarded with a ridiculous puff of smoke straight out of a Warner Brothers cartoon! (One of the OS X developers was in a fun mood, I guess.)
When you delete an icon from the Dock, all you delete is the Dock icon: The original application, folder, or volume is not deleted, and you can even add that banished icon back to the Dock in the future.
Using Dock icon menus
From the Dock menu, you can open documents, open the location in a Finder window, set an application as a Login Item, control the features in some applications, and other assorted fun, depending on the item.
To display the right-click Dock menu for an icon
- Move your cursor over the icon.
- Right-click.
Note that you can also press the Control key and click the icon, or even hold down the left mouse button (or tap and hold on a trackpad) for a second or two.
I cover the Dock settings that you can change within System Preferences in Chapter 6. You can also change the same settings from the Apple menu if you hover your mouse over the Dock item, which displays a submenu with the settings.
What’s with the Trash?
Another sign of an iMac power user is a well-maintained Trash bin. It’s a breeze to empty the discarded items you no longer need, and you can even rescue something that you suddenly discover you still need!
The Mavericks Trash bin resides on the Dock, and it works just like the Trash has always worked in OS X: Simply drag selected items to the Trash to delete them.
Note one very important exception: If you drag an external device or removable media drive icon on your Desktop to the Trash (such as an iPod, an iPhone, a DVD, or an external hard drive), the Trash bin icon automagically turns into a giant Eject icon, and the removable device or media is ejected or shut down — not erased. Repeat, not erased. (That’s why the Trash icon changes to the Eject icon — to remind you that you’re not doing anything destructive.)
Here are other methods of chunking items you select to go to the wastebasket:
- Choose File⇒Move to Trash.
- Click the Action button on the Finder toolbar and choose Move to Trash from the list that appears.
- Press +Delete.
- Right-click the item and choose Move to Trash from the right-click menu.
You can always tell when the Trash contains at least one item because the basket icon is full of crumpled paper! However, you don’t have to unfold a wad of paper to see what the Trash holds: Just click the Trash icon in the Dock to display the contents of the Trash. To rescue something from the Trash, drag the item(s) from the Trash folder to the Desktop or to any other folder in a Finder window. (If you’re doing this for someone else who’s not familiar with Mavericks, remember to act as though it were a lot of work, and you’ll earn big-time DRP, or Data Rescue Points.)
When you’re sure that you want to permanently delete the contents of the Trash, use one of these methods to empty the Trash:
- Choose Finder⇒Empty Trash.
- Choose Finder⇒Secure Empty Trash.
If security is an issue around your iMac, and you want to make sure that no one can recover the files you’ve sent to the Trash, using the Secure Empty Trash command takes a little time but helps to ensure that no third-party hard drive repair or recovery program could resuscitate the items you discard.
- Press +Shift+Delete.
- Right-click the Trash icon on the Dock and then choose Empty Trash from the right-click menu.
Working Magic with Dashboard, Mission Control, and Spaces
iMac power users tend to wax enthusiastic over the convenience features built into Mavericks. In fact, we show ’em off to our PC-saddled friends and family. Three of the features that I’ve demonstrated the most to others are the OS X Dashboard display and the amazing convenience of Mission Control. In this section, I show ’em off to you as well. (Then you can become the Mavericks evangelist on your block.)
Using Dashboard
The idea behind Dashboard is deceptively simple, yet about as revolutionary as it gets for a mainstream personal computer operating system. Dashboard is an alternative Desktop that you can display at any time by using the keyboard or your pointing device (by swiping upward with three fingers and clicking Dashboard); the Dashboard desktop holds widgets (small applications that each provides a single function). Examples of default widgets that come with Mavericks include a calculator, a world clock, weather display, and a dictionary/thesaurus. (Think of the apps you can download for an iPhone or iPad, and you’re in the same territory.)
Oh, did I mention that you’re not limited to the widgets that come with Mavericks? Simply click the plus button at the bottom of the Dashboard display and drag new widgets to your Dashboard from the menu at the bottom of the screen. To remove a widget, click the minus button at the bottom of the Dashboard display, and then click the X icon that appears next to the offending widget. When you’re done with your widgets — that sounds a bit strange, but I mean no offense — press the Dashboard key again to return to your Desktop.
Widgets can also be rearranged any way you like by dragging them to a new location.
Simple applications like these are no big whoop. After all, OS X has always had a calculator and a clock. What’s revolutionary is how you access your widgets. You can display and use them anywhere in Mavericks, at any time, by simply pressing the Dashboard key. The default key on most late-model iMacs is F4, although you can change the Dashboard key via the Mission Control pane within System Preferences (or even turn it into a key sequence, like Option+F4).
A WebClip widget can include text, graphics, and links, which Dashboard updates every time you display your widgets. Think about that for a second: Dynamic displays, such as weather maps, cartoons, and even the Free Music Download image from the iTunes Store are all good sources of WebClip widgets! (That last one is a real time saver.)
Follow these steps to create a new WebClip Dashboard widget from your favorite website:
- Run Safari and navigate to the site you want to view as a widget.
- Choose File⇒Open in Dashboard.
If you’ve added the Open in Dashboard button to the Safari toolbar (which bears a pair of scissors and a dotted box), you can click it instead.
- Select the portion of the page you want to include in your widget.
This step allows you to choose the section with the desired content.
- Drag the handles at the edges of the selection border to resize your widget frame to the right size and then click Add.
Bam! Mavericks displays your new WebClip widget within Dashboard.
When you click a link in a WebClip widget, Dashboard loads the full web page in Safari, so you can even use WebClips for surfing chores with sites you visit often.
Switching between apps with Mission Control
In Chapter 4, I mention using the ![]() +Tab keyboard shortcut to switch between your open applications. If you’ve moved to the iMac from a PC running Windows, you might think this simple shortcut is all there is to it. Ah, dear reader, you’re in Mavericks territory now!
+Tab keyboard shortcut to switch between your open applications. If you’ve moved to the iMac from a PC running Windows, you might think this simple shortcut is all there is to it. Ah, dear reader, you’re in Mavericks territory now!
Mission Control is a rather complex-sounding feature, but (like Dashboard) it’s really all about convenience. If you typically run a large number of applications at the same time, Mission Control can be a real time saver, allowing you to quickly switch among a forest of different application windows (or display your Desktop instantly without those very same windows in the way). The feature works in three ways:
- Press F3 (or Control+↑, depending on your keyboard) to show all open windows using Mission Control, grouped by application; then click the one you want. Figure 5-4 illustrates the tiled All Window display on my iMac after I press F3. Move the cursor on top of the window you want to activate (the window border turns blue when it’s selected) and click once to switch to that window. You can specify which keys you want to use within the Mission Control pane in System Preferences.

Figure 5-4: Mission Control is the Desktop manager within Mavericks.
- Press Control+F3 (or Control+↓, depending on your keyboard) to show all open windows from the application that you’re currently using; then click the one that you want to activate. This Mission Control function is great for choosing from all the images that you’ve opened in Adobe Photoshop or all the Safari web pages littering your Desktop!
- Press +F3, and all your open windows scurry to the side of the screen (much like a herd of zebras would if you dropped a lioness in the middle). Now you can work with drives, files, and aliases on your Desktop — and when you’re ready to confront those dozen application windows again, just press the keyboard shortcut a second time.
Although the Mission Control screen appears automatically when necessary, you can also launch it at any time from your iMac’s Launchpad display, from the Mission Control icon in the Dock (which looks like a tiny Desktop with three windows), or by pressing the Mission Control/F3 key on your keyboard. From a Magic Trackpad, display the Mission Control screen by swiping up with three fingers.
Switching between desktops with Spaces
Ah, but what if you want to switch to an entirely different set of applications? For example, suppose that you’re slaving away at your pixel-pushing job, designing a magazine cover with Pages. Your page-design desktop also includes Photoshop and Apple’s Aperture, which you switch between often, using one of the techniques I just described. Suddenly, however, you realize that you need to schedule a meeting with others in your office using the OS X Calendar application, and you also want to check your e-mail in Apple Mail. What to do?
Well, you could certainly open Launchpad, launch those two applications on top of your graphics applications, and then minimize or close them. With Mission Control’s Spaces feature, though, you can press the Control+← or Control+→ sequences to switch to a completely different “communications” Desktop, with Calendar and Apple Mail windows already open and in your favorite positions! Figure 5-4, shown in the previous section, illustrates two available Spaces desktops, labeled Desktop 1 and Desktop 2, as well as my Dashboard screen. (If you’re using a trackpad, you can swipe to the left or right using three fingers to switch Spaces.)
After you’re done setting up your meeting and answering any important e-mail, simply press Control+← or Control+→ to switch back to your “graphics” desktop, where all your work is exactly as you left it! (And yes, Virginia, Spaces does indeed work with full-screen applications.)
Now imagine that you’ve also created a custom “music” Desktop for GarageBand and iTunes … or perhaps you joined Safari and iPhoto as a “webmaster” Desktop. See why everyone’s so excited?
To create a new Desktop for use within Spaces, click the Mission Control icon on the Dock, or press F3. Now you can set up new Spaces desktops. Move your cursor to the top-right corner of the Mission Control screen and click the Add button (with the plus sign) that appears. (If you’ve relocated your Dock to the right side of the screen, the Add button shows up in the upper-left corner instead.) Spaces creates a new, empty, Desktop thumbnail. Switch to the new Desktop by clicking the thumbnail at the top of the Mission Control screen and open those applications you want to include. (Alternatively, you can drag the applications from Mission Control onto the desired Desktop thumbnail.) That’s all there is to it!
To switch an application window between Spaces desktops, drag the window to the edge of the Desktop and hold it there. Spaces will automatically move the window to the next Desktop. (Applications can also be dragged between desktops within the Mission Control screen.) You can also delete a Desktop from the Mission Control screen: Just hover your pointer over the target Spaces thumbnail and then click the Delete button (with the X) that appears.
You can jump directly to a specific Spaces Desktop by clicking its thumbnail within your Mission Control screen — or you can hold down the Control key and press the number corresponding to that Desktop. Additionally, you can always use the Control+← or Control+→ shortcuts to move among desktops and full-screen applications.
You can even activate Mission Control, Spaces, and Dashboard by using your cursor instead of the keyboard:
- Click the System Preferences icon on the Dock.
- Click the Mission Control icon to display the settings.
- Click the Hot Corners button.
- Click the desired Screen Corner pop-up menu to choose what function that screen corner will trigger.
- Press +Q to save your changes and then exit System Preferences.
When you move your pointer to that corner, the feature you’ve specified automatically kicks in. Sweet!
Printing within OS X
Mavericks makes document printing a breeze. Because most Mac printers use a Universal Serial Bus (USB) port, setting up printing couldn’t be easier. Just turn on your printer and connect the USB cable between the printer and your iMac; Mavericks does the rest.
Printer manufacturers supply you with installation software that might add cool extra software or fonts to your system. Even if Mavericks recognizes your USB printer immediately, I recommend that you still launch the manufacturer’s OS X installation disc. For example, my new Epson printer came with new fonts and a CD/DVD label application, but I wouldn’t have ’em if I hadn’t installed the Epson software package.
After your printer is connected and installed, you can use the same procedure to print from within just about every OS X application on the planet! To print with the default page layout settings — standard 8½-x-11" paper, portrait mode, no scaling — follow these steps:
- Within the active application, choose File⇒Print or press the +P shortcut.
OS X displays the Print dialog.
- From this dialog, you can
- Print from a different printer connected to your iMac or print over a network connection to a shared printer on another computer (or a printer with built-in Ethernet networking).
Open the Printer pop-up menu to display all the printers that you can access.
- Print multiple copies.
For more than one copy, click in the Copies field and type the number of copies that you need.
- Check what the printed document will look like.
Use the left- and right-arrow keys under the Preview display to look at each page of your document as it will appear when printed.
If you have to make changes to the document or you need to change the default print settings, click Cancel to return to your document. (You have to repeat Step 1 again to display the Print dialog again.)
- Print from a different printer connected to your iMac or print over a network connection to a shared printer on another computer (or a printer with built-in Ethernet networking).
If everything looks good at this point and you don’t need to change any settings (like choosing a different page size or to print only a portion of the document), click Print — and you’re done! Or, to change settings, click the Show Details button at the bottom of the sheet. Now you can make a number of optional changes to your print job:
- To print a range of selected pages, select the From radio button and then enter the starting and ending pages.
To print the entire document, leave the default Pages option set to All.
- To select a different paper size, click the Paper Size pop-up menu.
- To choose application-specific settings (like collating and grayscale printing), click the pop-up menu in the center of the Print dialog and choose the desired settings pane that you need to adjust.
When you’re set to go, click Print.
You can also save an electronic version of a document in the popular Adobe Acrobat PDF format from the Print dialog — without spending money on Adobe Acrobat. (Slick.)
- Click the PDF button to display the destination pop-up menu.
- Choose Save as PDF.
Mavericks prompts you with a Save As dialog, where you can type a name for the PDF document and also specify a location on your hard drive where the file should be saved.
Heck, if you like, you can even fax a PDF (with an external USB modem or a multifunction printer), add the PDF to iBooks, or send it as a Messages or an Apple Mail e-mail attachment! Just choose these options from the destination list rather than Save as PDF.