
Chapter 9
Keeping Track with Contacts and Maps
In This Chapter
![]() Adding contact cards
Adding contact cards
![]() Editing contacts
Editing contacts
![]() Using contact information throughout OS X
Using contact information throughout OS X
![]() Creating and e-mailing groups
Creating and e-mailing groups
![]() Printing contacts
Printing contacts
![]() Importing and exporting vCards
Importing and exporting vCards
Are you still struggling with a well-thumbed address book stuck in a drawer of your office desk or an archaic folded map in your glove box? Are you fighting a wallet or purse crammed with sticky notes and odd scraps of paper, each of which bears an invaluable e-mail address, phone number, or scribbled directions? If so, you can finally set yourself free and enjoy the “Paperless Lifestyle” of the new millennium with the revolutionary new Rauncho Digital Buddy! Only $29.95 — and it doubles as an indestructible garden hose! But wait! There’s more! And if you order in the next 10 minutes, we’ll also send you… .
Of course, you and I would tune that stuff out as soon as we heard it, but believe it or not, the digital Address Book and Road Map does exist (after a fashion), and you already have both on your iMac — Contacts and Maps. In this chapter, I show you how to store and retrieve all your contact data, including Internet contact information, photographs, and much more. You’ll also learn how to view and print travel directions and virtually tour a city!
(And before you ask, operators are not standing by.)
Hey, Isn’t Contacts Just a Part of Mail?
In early versions of OS X, Contacts (then called Address Book) was relegated to the minor leagues and usually appeared only when you asked for it in Mail. Although it could be run as a separate application, many Mac owners never launched it as a standalone.
Now, however, the Contacts application appears in the limelight, earning a default location on the Dock and available whenever you need it. Although Contacts can still walk through a meadow hand-in-hand with Mail, it also flirts with other OS X applications.
Figure 9-1 illustrates the default face of the Contacts application, complete with a personal address card: your contact information, which you enter during the initial setup of your iMac. This card carries a special me tag on your thumbnail image (indicating that it’s your personal card) as well as your user thumbnail next to your name. Other OS X applications use the data in your card to automatically fill out your personal information in all sorts of documents. (In Figure 9-1, I added a number of well-known friends as well … a composer or two. You know the drill.)
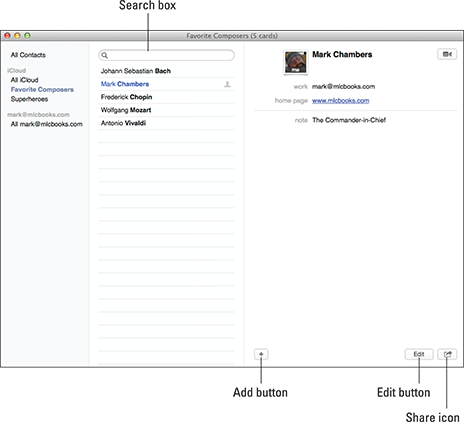
Figure 9-1: Greetings from the OS X Contacts application!
Entering Contact Information
Unless you actually meet and hire a group of Data Elves, you do have to either add contacts to Contacts manually or import your contacts from another existing address book application. Allow me to demonstrate here how to create a new contact card:
- From the Dock, launch Contacts by clicking its icon.
The icon looks like an old-fashioned paper address book with an @ symbol on the cover.
- Press the
 +N shortcut to create a new contact.
Alternatively, choose File⇒New Card, or click the Add button (which carries a plus sign) at the bottom of the window and then click New Contact from the menu that appears.
Contacts displays the template that you see in Figure 9-2, with the First (name) field highlighted and ready for you to type.
- Enter the contact’s first name and press Tab to move to the Last name field.
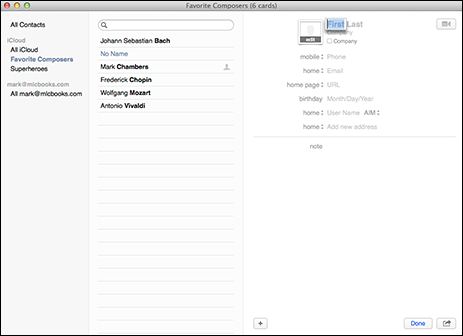
Figure 9-2: “Hey, I don’t know anyone named First Last!”
- Continue entering the corresponding information in each field, pressing Tab to move through the fields.
 If a field isn’t applicable (for example, if a person has no home page), just press Tab again to skip it. (Note that when you’re browsing your contacts, fields show up within a card only if you’ve already entered a value — in other words, the fields you skip won’t appear unless you add them later.) You can press Return to add extra lines to the Address field.
Note the up- and down-arrow icons next to each field. When you see those, Contacts is telling you that there are additional versions of the field that you can enter as well. (Think home and work addresses.) Click the up/down arrow, and a pop-up menu appears, allowing you to choose which version of the field will be displayed. Depending on the field, Contacts may automatically display an additional version; for example, if you enter a work address for the contact, another field for the contact’s home address appears. Click this new field and then you can enter the contact’s home address, too.
You can also add new fields to a card, such as web addresses (URLs), birthdays, and maiden names. To add a new field, choose Card⇒Add Field and then choose the field you want to add from the menu that appears. You can also click the Add button at the bottom of the window to display the same menu. - To add a photograph to the card, choose Card⇒Choose Custom Image (or drag an image from a Finder window, Mail message, web page, or iPhoto on top of the thumbnail square).
If you choose to assign an image, click Defaults to select an image from the Mavericks thumbnail set (which is the same set you get when assigning a user account image). Click Photo Stream to choose an image from your Photo Stream, or click Faces to select an image of someone’s face that you’ve tagged in iPhoto. You can also drag an image from a Finder window or paste an image you copied to your Clipboard earlier.
Because your iMac has a built-in FaceTime HD camera, you can click the Camera tab to take a new image. You can also choose to add a Photo Booth effect to your new image. - When you’re done, click the Done button at the bottom of the Contacts window to save the card.
You can edit the contents of a card at any time by displaying it and clicking the Edit button at the bottom (or by pressing ![]() +L, or even by clicking Edit on the Contacts menu bar and choosing the Edit Card menu item). When you’re finished editing the card, click Done at the bottom of the Contacts window.
+L, or even by clicking Edit on the Contacts menu bar and choosing the Edit Card menu item). When you’re finished editing the card, click Done at the bottom of the Contacts window.
 No need to edit a card to add information to the Note field. Just click and type.
You can also add contact cards directly to Contacts from the OS X Mail application as well as a number of third-party e-mail applications (go figure). In Mail, click the message (to highlight it) from the person whom you want to add, click the friendly Message menu, and then choose Add Sender to Contacts. However, adding contacts this way doesn’t add their supporting information — just their name and e-mail address — and, if they used Mail on their end to send the message and they have a photo attached to their personal card, their photo gets imported as well. Once again, your nimble fingers have to manually enter the rest.
“Mark, I never use the Home Page field when I add a contact. Can’t I get rid of it completely?” Indeed you can, good reader! To customize the default fields that appear when you create a new contact card, open the Contacts menu, choose Preferences, and then click the Template tab. Each field has a Delete icon (the red minus sign) and some have an Add icon (the green plus sign). To remove a field from your template, click the Delete icon. To add a new version of a field (for example, a home e-mail address), click the Add icon next to the existing field of the same type, and then click the up/down arrow icon to select the field name. To add a completely new field (such as Middle or Maiden Name), click the Add Field drop-down menu.
Don’t forget to add those fax numbers! If you have an external USB analog modem that’s compatible with OS X Mavericks (or a multifunction printer that supports faxing), you can fax from any application. Just choose File⇒Print (or press ![]() +P), click the PDF button at the bottom of the Print dialog, and choose Fax PDF. OS X automatically fills in the address for you but only if the contact has a fax number entered as part of the contact card.
+P), click the PDF button at the bottom of the Print dialog, and choose Fax PDF. OS X automatically fills in the address for you but only if the contact has a fax number entered as part of the contact card.
If someone sends you an e-mail message with a vCard (look for an attachment with a .vcf extension), consider yourself lucky. Just drag the vCard from the attachment window in Mail and drop it in your Contacts; any information that the person wants you to have is added automatically. Sweet!
To delete a card, right-click the unlucky name and then choose Delete Card.
Using Contact Information
Okay, after you have your contact information in Contacts, what can you actually do with it? Often, all you really need is a quick glance at an address. To display the card for any contact in Contacts, just click the desired entry in the Name column. You can move to the next and previous cards by using the up- and down-arrow keys on your keyboard. (Oh, and don’t forget that you can right-click many items in a card to display menu commands specific to those items.)
But wait, there’s more! You can also
- Copy and paste. The old favorites are still around. You can copy any data from a card (press +C) and paste it into another open application (press +V).
- Visit a contact’s home page. Click the contact entry to select it, and then click the page link displayed in the card. Safari dutifully answers the call, and next thing you know, you’re online and at the home page specified in the entry.
- Send an e-mail message. Click and drag to select any e-mail address on a card; then choose Contacts⇒Services⇒New Email to Address. Bingo! Depending on the information that you select, other services might also be available.
- Add a Messages buddy. From Messages, choose Buddies⇒Add Buddy. From the dialog that appears, you can select a contact card that has an Instant Messenger address and add it to your Buddy list.
- Export contacts. From Contacts, select the contacts that you want to export and then choose File⇒Export⇒Export vCard. Contacts displays a Save sheet. Navigate to the location where you want to save the cards and click Save.
- Send a contact through Mail or Messages. Click the Share a Contact button (it looks like a box with an arrow) at the bottom of the Contacts window, and choose either Email Card or Message Card. The Contacts application automatically creates a new Mail message (or Messages conversation) with the contact information attached as a vCard.
- Search amongst your contacts. If you’re searching for a specific person and all you have is a phone number or a fragment of an address, click in the Search field (which bears a magnifying glass icon) and type the text. While you continue to enter characters, Contacts shows you how many contact cards contain matching characters and displays just those entries in the Name column. Now that’s sassy! (And convenient. And fast as all get-out.) Check out Figure 9-3; a couple of familiar folks share the same address in Gotham City, and I found them by using the Search field.
Speaking of searching using a contact card in Contacts, Spotlight is also at your beck and call. Click a contact to select it and then choose Edit⇒Spotlight. Whoosh! Mavericks searches your entire system for everything related to that contact and displays it in the familiar Spotlight window. (Find more on Spotlight in Chapter 7.)
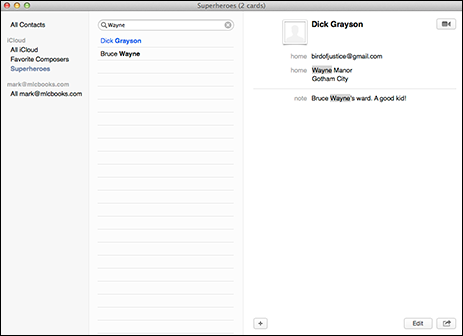
Figure 9-3: Holy text match, Batman!
Arranging Your Contact Cards
Contacts also provides you with a method of organizing your cards into groups. Use a group to identify folks with a common link, such as family, friends, co-workers, or folks who enjoy yodeling. For example, you could set up a Cell Phone group that you can use when syncing data with your Bluetooth smartphone. You can hide or display the Groups list at the left of the Contacts window by choosing View⇒Hide/Show Groups (or by pressing ![]() +1).
+1).
To create and name a group, click the Add button at the bottom of the window and click New Group. (You can also choose File⇒New Group or press ![]() +Shift+N.) Contacts adds a highlighted text box where you can type the group name. Then press Return to save it.
+Shift+N.) Contacts adds a highlighted text box where you can type the group name. Then press Return to save it.
Then, with your new (empty) group created, just add folks manually. From the group list, click the All Contacts link to see a list of everyone in Contacts database, and then click and drag the entries that you want to add to the desired group name.
Or, you can first select the entries for those contacts you want to add to the group, and then choose File⇒New Group from Selection instead. This saves you a step because the group is created and the members are added automatically simultaneously.
After you create a New Group, you can instantly display members of that group by clicking its name in the group list. To return to the display of all your contacts, click the All Contacts link.
To further organize your groups, you can drag and drop a group on top of another group. The “dropped” group becomes a subgroup, which is handy for organizing things, such as branch offices in your company or perhaps relatives to whom you’re not speaking at the moment.
Need an even harder-working group? Create a smart group, which — get this — automatically adds new contacts you create to the proper group or removes them from the group, depending on the criteria you specify! To create a smart group, follow these steps:
- Choose File⇒New Smart Group.
- Type a name for the new smart group.
- From the Card pop-up menu, choose the item that will trigger the action.
For example, you can choose to automate a smart group according to the contents of each new card, a company name, or a particular city or state.
- From the Contains pop-up menu, choose the criteria for the item.
You can set an item to contain (or not contain) a specific string of characters, or change it in a certain amount of time. To illustrate, one of my hardest-working smart groups automatically checks the Company field in every new card for my publisher’s company name and adds that contact card to my Wiley Publishing group if a match occurs.
- To add another criteria line: Click the button with the plus sign at the end of the first text field.
- To delete a criteria line: Conversely, if you decide you have one criteria line too many, click the button with the minus sign next to the offending rule.
- After your smart group criteria are correct, click OK.
The smart group name appears in your group list. Voilà!
Here’s another handy feature of a Contacts group: You can send all the members of a group the same e-mail message at one time. In Mail, simply enter the Group name in the To field of the Compose window, and the same message is sent to everyone. Even Gandalf couldn’t do that (but my copy editor bets that Dumbledore could).
Using Network Directories
I know, I know. I said earlier that you’d have to enter all your contacts yourself (or import them, if possible), but I was talking about your personal contacts. You can also access five types of external directories from Contacts:
- iMac users working in a Windows network environment can use Exchange 2007 (or later) or Outlook network directories.
- If you’re a member of a company NetInfo network — and if you don’t know, ask your wizened network administrator — you can search network directory servers from Contacts. These servers are available automatically, so no configuration is necessary. Sweet.
- OS X Mavericks Server — a separate purchase from the App Store — offers a Contacts server feature for sharing directories across your network, using the CardDAV standard.
- Contacts can share contact information using your iCloud, Google, Facebook, LinkedIn, or Yahoo! account.
- You can search Internet-based LDAP directories. Again, suffice it to say that your network guru can tell you whether LDAP servers are available to you. (In another blazing display of techno-nerd acronym addiction, LDAP stands for Lightweight Directory Access Protocol.) With LDAP, you can search a central company directory from anywhere in the world as long as you have an Internet connection. Your network administrator or the LDAP server administrator can supply you with these settings.
To search any network directory, you need to create a corresponding directory account. Follow these steps to add a directory account:
- Choose Contacts⇒Preferences to display the Preferences window.
- Click the Accounts tab.
- Click the Add button at the bottom of the Accounts list to launch the Add Account assistant.
- If you’re using an Exchange directory, click Exchange from the list. If you’re connecting to a CardDAV or LDAP directory, choose Other Contacts Account from the list.
- Click Continue.
Type the required information in the fields that appear. (Your network administrator should be able to provide you with the necessary values.)
- Click Create.
You’ll see the blue network directory entry appear in the Group column.
The rest is easy! Click the desired directory link in the group display and use the Search field as you normally would. Matching entries display the person’s name, e-mail address, and phone number.
“But hey, Mark, what if I’m not online? My company’s LDAP directory isn’t much good then, right?” Normally, that’s true. LDAP information is available to you only when you’re online and the LDAP server is available. To make a person’s information always available (even if your network is unavailable), search the LDAP database and drag the resulting entry from the contacts list to the desired group (or the All Contacts link) on the group display. You’ll import the information to your local Contacts database — and you’ll see it even when you’re not online! (You should repeat this import step on a regular basis, since the import is a “snapshot” of the current database and doesn’t automatically update with any changes made later.)
Printing Contacts with Flair
For those moments when you need an archaic hard copy of your contacts, Contacts offers a whopping four formats: mailing labels, envelopes, lists, and even a snappy pocket address book.
By default, Contacts prints on standard U.S. letter-size paper (8½ x 11") in portrait orientation. You can change these settings to, for example, legal-size paper or landscape orientation, right from the Print dialog (choose File⇒Print or press ![]() +P).
+P).
Follow these steps to print your contacts:
- Press +P.
Contacts displays the Print dialog. To show all the settings, click the Show Details button at the bottom of the sheet.
If you need more than one copy, click in the Copies field to specify the desired number.
Need labels? We’ve got ’em! From the Style pop-up menu, choose Mailing Labels and then specify what type of label stock you’re using on the Layout pane. Click the Label button to sort your labels by name or postal code, choose a font, select a text color, and add an icon or image to your labels. To switch to a standard contact list, click Style again and then click Lists. (You can also print envelopes and pocket address book pages in a similar manner; just choose the desired entry from the Style pop-up menu.) - Select the desired Attributes check boxes to specify which contact card fields you want to appear in your list.
The Attributes list appears only if you’re printing contacts in either the Lists style or the pocket address book style.
- Click the Print button to send the job to the selected printer.
Alternatively, you can create a PDF file in a specified location, which is a handy trick to use if you’d rather not be burdened with paper, but you still need to consult the list or give it to others. (PDF files are a special document display format developed by Adobe; they are displayed like a printed document but take up minimal space.) To display the contents of a PDF file in OS X, you need only double-click it in the Finder window, and the built-in Preview application is happy to oblige. Even faster, select the PDF file in the Finder window and press the spacebar for a Quick Look.
Swapping Bytes with vCards
A vCard is a standard file format for exchanging contact information between programs such as Contacts, Microsoft Entourage, Microsoft Outlook, Eudora, and the Android operating system. (Heck, if you’re sharp enough to have an iPod, iPhone, or iPad, you can even store vCard data there.) Think of a vCard as an electronic business card that you can attach to an e-mail message, send via File Transfer Protocol (FTP), or exchange with others by using your smartphone and tablet computer. vCard files end with the extension .vcf.
In Contacts, you can create a single vCard containing one or more selected entries by choosing File⇒Export⇒Export vCard. Then, like with any other OS X Save dialog, just navigate to the spot where you want the file saved, give it a name, and click Save.
Here are two ways to import vCards into Contacts:
- Drag the vCard files to Contacts and drop them in the application window.
- Choose File⇒Import (or press +O). From the Open dialog, navigate to the location of the vCard files that you want to add, select them, and then click Open.
The vCard tab in the Contacts Preferences window allows you to choose the format of your exported vCard files. Older devices work only with vCard 2.1 format, while newer applications recognize the improved vCard 3 format. You can also specify whether your exported vCard files will contain the contents of the Notes field and also whether they will include any photos you’ve attached. If you’d rather not provide the private data on your personal (or Me) card in a vCard, make sure that you select the Enable Private Me Card check box.
Introducing the Maps Window
If you’re an owner of an iPad, iPhone, or iPod touch, prepare yourself for a joyful state: With the arrival of OS X Mavericks, your beloved Maps application now resides on your Dock! As long as you have a connection to the Internet, Maps is ready to display locations, provide directions, and even allow for informal views of important sites worldwide! (Recognize the grand dame in Figure 9-4?)
Displaying an overhead view of an address is one of the simplest chores in all of OS X. From the Maps window, just click in the Search box at the top-right corner, type the address, and press Return. Maps displays the address with a red pushpin to help you locate it.
Depending on the location you’ve chosen, you may also see a tiny Info icon (which looks like a lowercase “i” within a circle) next to the name. To view more information, click the Info icon.

Figure 9-4: The Statue of Liberty shines in the Maps application.
You can quickly map your current location. Just choose View⇒Go to Current Location, or press ![]() +L.
+L.
Ah, but why stop with just a simple address? You can also enter information such as
- The name of a landmark, monument, or building (for example, Statue of Liberty).
- The name of a business or restaurant (or even a genre of food, such as Chinese) followed by the city name. Maps displays matching sites with pushpins (complete with reviews), and you can click any of the pushpins to find out more information on that location. Figure 9-5 illustrates a search for pizza. You can see the Info pop-up that appeared when I clicked the Info icon next to the restaurant name, complete with a link to its website and reviews a-plenty.
- Attractions and services, followed by the city name. You can search for a gas station, movie theater, or a local park.
If you need to zoom in or zoom out on a Maps display, use the scroll function on your mouse, click the plus and minus buttons at the bottom-right corner of the Maps window, or use the ![]() +plus and
+plus and ![]() +minus shortcuts. To move around the Maps window, click and drag the map in the desired direction.
+minus shortcuts. To move around the Maps window, click and drag the map in the desired direction.
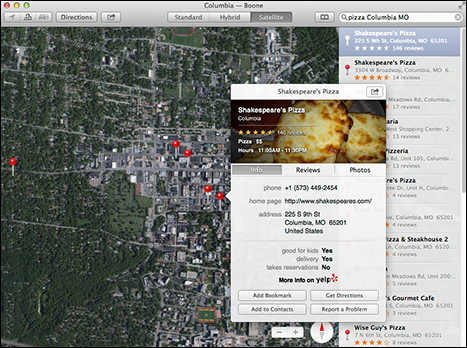
Figure 9-5: Looks like this pizza joint is highly rated.
Switching Views in Maps
A traditional printed map offers you only one view, which may be perfectly fine for determining a route, but provides no visual interest. (The word banal comes to mind.) Maps, on the other hand, offers three types of views, each of which offers certain advantages:
- Standard mode is a familiar line map, with streets and highways marked. Standard mode is best for planning a road trip, just like your father’s old-fashioned paper map.
- Satellite mode is a photographic overhead view without streets or highways marked, which is great for panoramic views of your neighborhood or a location and its surroundings.
- Hybrid mode is a photographic overhead view with streets and highways marked. (A friend of mine who’s a realtor loves Hybrid mode because she can display an overview of a neighborhood with identified streets.)
To select your view, click one of the three buttons at the top of the Maps window, or press ![]() +1 for Standard,
+1 for Standard, ![]() +2 for Hybrid, or
+2 for Hybrid, or ![]() +3 for Satellite. Figure 9-4 illustrates Satellite view mode, while Figure 9-6 shows off Standard view.
+3 for Satellite. Figure 9-4 illustrates Satellite view mode, while Figure 9-6 shows off Standard view.

Figure 9-6: Standard view reminds me of an auto GPS unit.
For additional visual thrills, you can angle the Maps display with a slight 3D effect — nothing quite as grand as a 3D TV, but it does help add depth to Satellite and Hybrid views. To toggle 3D on and off, press ![]() +0, or press the button with the buildings icon in the upper-left corner of the Maps window (refer to Figure 9-4).
+0, or press the button with the buildings icon in the upper-left corner of the Maps window (refer to Figure 9-4).
By default, Maps is oriented with north at the top of the screen. To change the orientation, click the compass at the bottom-right corner of the screen and drag in the desired direction. To immediately return to north at the top of the screen, press ![]() +up or choose View⇒Snap to North.
+up or choose View⇒Snap to North.
Getting Directions over Yonder
My primary use for a map is getting directions from one point to another, and Maps doesn’t disappoint when it comes to navigation. Click the Directions button to display the panel you see in Figure 9-7, and you’re ready to plot your course.

Figure 9-7: The Directions panel is ready to provide directions to your next clambake.
Follow these steps to get directions between two addresses:
- In the Start box, type the starting address.
As you type, Maps provides a pop-up list of suggestions taken from your recent locations, as well as addresses from your Contacts database and matching streets from around the globe. To choose one of these suggestions, just click it. To clear the contents of the field, click the X button that appears at the right side of the box.
- Press Tab to move to the End box.
- In the End box, type the destination address.
Note that your destination doesn’t have to be a specific address — for example, Memphis, TN works just fine.
- Click the Car button (which carries a car icon) for road directions, or the Walk button (which sports a pedestrian icon) for walking directions.
- Press Return to generate your directions or Clear to start over.
As you can see in Figure 9-7, Maps usually offers more than one route for your trip. The first route suggested is typically the fastest or shortest, and it appears as a bright blue line. To view one of the other routes (light blue), just click it, and it turns bright blue to indicate it’s now the selected route. You can see the approximate mileage and time for the currently selected route at the top of the turn list. The turn-by-turn list provides approximate mileage for each leg of the journey.
You can easily print the route map and directions by choosing File⇒Print (or by pressing ![]() +P), and then clicking the Show Details button at the bottom of the Print sheet to display all the options.
+P), and then clicking the Show Details button at the bottom of the Print sheet to display all the options.
If you’d rather create a PDF document with your map and directions, choose File⇒Export as PDF.
Finally, Maps also allows you to share your maps and directions using Mail, Messages, Twitter, or Facebook. Click the Share button at the top of the window, and then select the desired sharing method.