
Chapter 7: Music on the Desktop
In This Chapter
![]() Getting started with Windows Media Player
Getting started with Windows Media Player
![]() Making the most out of your music
Making the most out of your music
![]() Ripping and burning
Ripping and burning
![]() Creating and using playlists
Creating and using playlists
![]() Using alternatives to WMP
Using alternatives to WMP
![]() Finding more music
Finding more music
Music on the Windows desktop rates as hard to find, a little bit boring, and certainly less enticing than the Metro tiled version over on the Start screen. But if you’re listening to music because you like to listen to music (as opposed to buying more music from Microsoft’s Windows Store), the experience isn’t bad at all.
Windows 8.1 comes with Windows Media Player (WMP), which is a decent application, and the subject of most of this chapter. Better players are out there, and I talk about a couple of them in this chapter, too.
 If you’re looking for tips about iTunes, I have a bunch (see Book X, Chapter 1). I don’t like running iTunes on Windows; it works much better on a Mac. If you’ve installed and use iTunes as an alternative to Windows Media Player, I direct you to Book X, Chapter 1.
 Windows Media Player has one additional good point: With WMP you have a lot of control over your privacy — what data’s sent to Mother Microsoft and what stays private. If you don’t like the idea of Microsoft collecting your playing history, you’ll appreciate the control WMP offers over the tiled, Metro Music app — which knows all, sees all, and tells all to Microsoft.
Getting Started with Windows Media Player
The first problem you’re likely to have with Windows Media Player? Finding it! This section helps you track down WMP and, if you’re starting it for the first time, walks you through the setup screens that appear. If you’ve already found and fired up WMP a time or ten, this section explains how to adjust your privacy settings, if you so choose.
Pinning WMP to the Start menu or taskbar
In Book VI, Chapter 3, I go through a long list of applications that are built in to Windows but are hard to find. Windows Media Player is probably the most-often-used program on the list.
Here’s the quick way to bring it back:
1. Flip over to the Start screen.
If you’re looking at the desktop, press the Windows key on your keyboard or push the Windows button on your tablet. Say hello to the tiled interface.
2. Immediately type media.
As shown in Figure 7-1, Windows fills out the rest of the name as you type (!), and Windows Media Player appears on the right side of the screen.
3. Tap and hold or right-click the Windows Media Player link in the upper-right corner.
Windows pops up a little text box.

Figure 7-1: Searching for the Windows Media Player.
4. Tap or click Pin to Start if you want a tile for WMP to appear on the Metro Start screen. Tap or click Pin to Taskbar if you want to put a WMP icon on your desktop taskbar.
I put WMP on my Start screen but not on my taskbar. Why? I generally use VLC to play media — a subject I discuss several times later in this chapter. But sometimes I really do want to use WMP, so I look (and look and look) for it in the Start screen.
Setting WMP right the first time
The first time you fire up WMP, you’re presented with a bunch of inscrutable choices.
If you haven’t run WMP yet, here’s how to get off on the right foot:
1. Get WMP running. If you have a tile on the Start screen, click it. If you have an icon on the taskbar, click it.
Either way, you’re propelled to the desktop and presented with the Welcome screen shown in Figure 7-2.

Figure 7-2: If you value your privacy, don’t accept the Microsoft-recom-mended settings.
2. Select the Custom Settings radio button and then click the Next button.
WMP shows you the Select Privacy Options dialog box, shown in Figure 7-3, which enables you to limit Windows Media Player’s snooping. I think that’s a good idea. You may feel that I’m being too harsh and that Microsoft should be able to keep records of everything you’re playing. Fair enough.

Figure 7-3: Big Brother wants your permission.
3. Select or deselect the various check boxes, depending on your preferences.
Microsoft has a long, tumultuous history of using Windows Media Player to gather all sorts of personal information about you and your media-playing habits. (Of course, the tiled, Metro Music app collects everything with wild abandon anyway.) Approach this dialog box with skepticism. I select only the Display Media Information from the Internet and the Update Music Files by Retrieving Media Information from the Internet check boxes. You may want to send Microsoft more, but unless you have an overwhelming reason to do so, I suggest that you limit your exposure. Of course, if you choose the option Display Media Information from the Internet, Microsoft keeps tabs on you, too. I guess it all boils down to a question of how much privacy you’re willing to give up to get cool features such as automatically downloaded album covers and correct song titles.
The check box marked Download Usage Rights Automatically when I Play or Sync a File only applies to DRM-protected (read: copy protected) files that you bought long ago from Microsoft, which is why I never let WMP check for Usage Rights. Anything Microsoft sold you in the recent past doesn’t have DRM protection. Anything that still has DRM protection deserves to be deleted. Terminated with extreme prejudice.
4. When you’re comfortable with your privacy choices, click the Next button.
WMP then asks whether you want it to be used as the default music and video player. If you haven’t yet installed a competing product, such as VLC, go ahead and make WMP your default music and video player.
5. Choose whether you want WMP to be your default player and click the Next button.
Finally, WMP may ask if you want to set up an online store. In this case, the option is called Media Guide, and it’s an option because Microsoft owns the Media Guide. You can buy music in much better ways, as I explain in the last section in this chapter.
6. Choose Don’t Set Up a Store Now and click Finish.
WMP springs to life, scans your Music library, and displays the available songs, as shown in Figure 7-4.

Figure 7-4: Windows Music Player opens, shouting “Put me in, Coach! I’m ready to play, today.”
WMP may take a while to scan your Music library and add songs as it bumps into them. (I talk about libraries in general, and the Music library in particular, in Book VII, Chapter 3.) Initially, your Music library includes your own Music folder. WMP also reaches out into your computer’s Public Music folder, across your network and HomeGroup, to see whether any media collections have been made available. Later in this chapter, I show you how to expand the library’s reach.
Tweaking privacy options after installation
If you already installed WMP or the latest version came preinstalled on your PC, take a moment now to turn off the $#@! Usage Rights setting. Follow these steps to do so:
1. Start WMP.
If you put a tile on your Start screen, tap or click it. If you put an icon on your desktop taskbar, click it. If you haven’t done either, go to the Start screen, type windows media, and click Windows Media Player.
2. Press Alt to open the main menu. (If you used an older version of WMP, I bet you wondered where it was hidden.) Then choose Tools⇒Options and click the Privacy tab (see Figure 7-5).

Figure 7-5: Control WMP privacy settings.
3. In particular, make sure the Download Usage Rights Automatically When I Play or Sync a File check box isn’t selected. Personally, I deselect all check boxes except for the first two (refer to Figure 7-5).
 You may be wondering about the Automatically Check If Protected Files Need to Be Refreshed and the Set Clock on Devices Automatically check boxes. Both of those are related to subscription services — where you pay by the month for the capability to play music (or video) files. Both of those are obsolete, with Xbox Music now in the subscription driver’s seat.
4. Click the OK button.
Your changes take affect immediately — although, if you didn’t make these changes soon enough, Microsoft may already have your unique player ID on file. That isn’t a horrible lapse of personal security, but it does add to the stockpile of personal information Microsoft has on file.
If you have questions about the other tabs in the Options dialog box, see the section “Customizing WMP,” later in this chapter.
Playing with Now Playing
So much for the preliminaries. Let’s get to the music, shall we?
After WMP scans your music — assuming you have any! — the screen appears in Library view, which looks like Figure 7-6.

Figure 7-6: Library view, where you can leaf through your music.
Library view, shown in Figure 7-6, enables you to leaf through the music that WMP has identified. (See the earlier section “Setting WMP right the first time” for details about what’s imported.) From Library view, you see the identified albums and songs in the middle, and get a plethora of tools for finding and playing music and videos arrayed all around the window.
You control Windows Media Player by using the three tabs in the upper-right corner of the window and you control the music/videos by using the bar at the bottom.
![]() Play tab: Click or tap the tab to see the current playlist — the songs or videos that are going to be played. See the section, “Managing Playlists,” later in this chapter.
Play tab: Click or tap the tab to see the current playlist — the songs or videos that are going to be played. See the section, “Managing Playlists,” later in this chapter.
![]() Burn tab: Sets up WMP to burn a CD or DVD — transfer music from your computer to a CD or DVD. See the section, “Burning CDs and DVDs,” later in this chapter.
Burn tab: Sets up WMP to burn a CD or DVD — transfer music from your computer to a CD or DVD. See the section, “Burning CDs and DVDs,” later in this chapter.
![]() Sync tab: Synchronizes chosen songs with a supported plugged-in device. There aren’t many devices that sync with Windows Media Player. No, it won’t work with an iPad.
Sync tab: Synchronizes chosen songs with a supported plugged-in device. There aren’t many devices that sync with Windows Media Player. No, it won’t work with an iPad.
![]() Controls: The controls to play, pause, stop, and so on are labeled with their universal icons. See the next section, “Controlling the playback buttons,” for details.
Controls: The controls to play, pause, stop, and so on are labeled with their universal icons. See the next section, “Controlling the playback buttons,” for details.
Library view, shown in Figure 7-6, enables you to leaf through the music that WMP imported when you first launched the program. (See the earlier section, “Setting WMP right the first time,” for details about what’s imported.) To get there, double-click an album and then click the Play tab on the right. From Library view, you see the album and songs in the middle, and the following navigation tools are at your disposal:
![]() Navigation pane: Lets you choose the type of media you want to see or hear, look at it by album or artist, pick a playlist, or open up folders that aren’t in your Music library.
Navigation pane: Lets you choose the type of media you want to see or hear, look at it by album or artist, pick a playlist, or open up folders that aren’t in your Music library.
Windows Media Player mashes together all the music in your Music library, but it doesn’t include the albums (or video tracks or recorded TV shows) outside your Music library (or Video Library or Recorded TV Library). To see music from a CD, USB flash drive, MP3 player, or any of the exposed music libraries on your network, you must pick that specific library in the navigation pane on the left or click the wedge to the left of the word Library and choose a different source.
![]() Address bar: In WMP, the address bar lets you choose a type of media and, in the case of music, navigate to specific albums.
Address bar: In WMP, the address bar lets you choose a type of media and, in the case of music, navigate to specific albums.
The location of the music on your hard drive doesn’t matter; as long as an album is in your Music library, WMP picks it up. That said, if you can’t find an album you’re looking for, flip to the section, “Leafing through the library,” later in this chapter.
![]() Playlist: When the Play tab is selected, you see a playlist on the right side of the Now Playing window. A playlist is a sequence of tracks. You can create your own playlists or rely on the ones built in to WMP. The Now Playing playlist, for example, is the list of tracks that are queued up to play, one after the other. To play a different track from the current playlist, double-click the track in the list of playlist contents. See the section, “Managing Playlists,” later in this chapter, for details.
Playlist: When the Play tab is selected, you see a playlist on the right side of the Now Playing window. A playlist is a sequence of tracks. You can create your own playlists or rely on the ones built in to WMP. The Now Playing playlist, for example, is the list of tracks that are queued up to play, one after the other. To play a different track from the current playlist, double-click the track in the list of playlist contents. See the section, “Managing Playlists,” later in this chapter, for details.
If you click the small bunch of squares in the lower-right corner of WMP (refer to Figure 7-6), the program shrinks to an appearance that Microsoft calls Now Playing mode, as shown in Figure 7-7.

Figure 7-7: WMP in Now Playing mode.
Controlling the playback buttons
The buttons along the bottom of the library window (refer to Figure 7-6) are similar to the buttons on a conventional CD player. From left to right:
![]() Shuffle jumps quasi-randomly among all the songs in the current playlist.
Shuffle jumps quasi-randomly among all the songs in the current playlist.
![]() Repeat plays all the items in the current playlist and then goes back to the top and plays them again.
Repeat plays all the items in the current playlist and then goes back to the top and plays them again.
You can turn on both Shuffle and Repeat, in which case WMP picks tracks randomly from the playlist and doesn’t stop until you turn it off.
![]() The Stop button stops the playing. Click the Play button to start playing again. Unlike Pause/Resume, the Stop/Start button returns to the start of the track. To start a different track, double-click that track in the playlist.
The Stop button stops the playing. Click the Play button to start playing again. Unlike Pause/Resume, the Stop/Start button returns to the start of the track. To start a different track, double-click that track in the playlist.
![]() Play/Pause work just the way you expect. When playing is paused, the Pause button toggles to a Play button. Click it again to make playing resume.
Play/Pause work just the way you expect. When playing is paused, the Pause button toggles to a Play button. Click it again to make playing resume.
![]() The Previous Track button skips to the start of the preceding track. From the first track in the playlist, it skips to the beginning of the last track on the playlist.
The Previous Track button skips to the start of the preceding track. From the first track in the playlist, it skips to the beginning of the last track on the playlist.
![]() The Next Track button skips to the start of the next track. From the last track in the playlist, it skips to the first.
The Next Track button skips to the start of the next track. From the last track in the playlist, it skips to the first.
![]() The Mute button silences the sound. Click the button again to restore the sound. Unlike the Pause button, the Mute button does not halt playing. If you mute the sound for ten seconds, you miss hearing ten seconds of the track. If you mute Snoop Dogg for ten seconds, you get un-rapped (heh-heh-heh).
The Mute button silences the sound. Click the button again to restore the sound. Unlike the Pause button, the Mute button does not halt playing. If you mute the sound for ten seconds, you miss hearing ten seconds of the track. If you mute Snoop Dogg for ten seconds, you get un-rapped (heh-heh-heh).
That’s about all you need to know to play music from a playlist.
Playing a CD
Want to play a CD? Here’s how:
1. Take the CD out of its plastic case, if it’s in one.
2. Wipe the pizza stains off the shiny side. (Don’t worry about the other side.)
The correct method: Hold the CD with one finger in the hole in the middle, the other on the edge, and wipe gently from the middle to the outside. Start with a clean soft cloth, and if that doesn’t work, try rubbing alcohol or plain ol’ soap and water.
3. Stick the CD in the PC’s drive and close it.
Windows shows you a toaster notification, sliding in from the right, that asks you to tap to choose what happens with Audio CDs. If you tap or click the toaster notification, Windows then gives you the option to Play the Audio CD with Windows Media Player or to take no action. (See Figure 7-8.)

Figure 7-8: The toaster notification on top appears when you insert an audio CD. If you tap or click it, the choices appear below.
4. Tap or click the No, I’d Rather Clip My Toenails — What Did You Think I Wanted to Do? or the Play Audio CD Windows Media Player button, whichever suits your fancy.
If WMP isn’t running already, it starts all by itself. Then you wait a few seconds, and WMP starts playing the first track, using the Now Playing visage (refer to Figure 7-7).
 Be aware of the fact that if you do tap or click to play the CD in Windows Media Player, you’ve set a precedent: In the future, every time you insert an audio CD, it’ll start playing unless you change the AutoPlay settings (as I explain in the sidebar, “How to change AutoPlay settings”).
How does WMP know what’s on an audio CD? After it identifies the CD from information encoded along with the recorded tracks, it gets the CD’s description and track titles over the web from a database maintained for that purpose.
If a CD is quite obscure — or really good — it may not be in the Microsoft database. Then WMP can display only the information it finds on the CD itself: the number of tracks and the playtime of each track. If a CD isn’t in the Microsoft database, you can enter the names of the songs manually. (To do so, right-click any song and choose Edit, and then type a new name.)
Copying from a CD (Also Known As Ripping)
When you rip a CD, your computer converts the audio tracks on the CD into files that your computer can understand. Most people rip to MP3 files because they’re universal — they’ll play on anything. But if you’re an audiophile, you may want to rip to FLAC files, which carry all the original music information. If you’re happy with the CD ripping settings in Windows Media Player, all you need to do is put the CD in your drive, wait for WMP to start, and then click the Rip CD icon at the top. Ripping a CD onto your computer is that easy.
If you haven’t ripped a CD yet, it helps to understand and adjust the settings before you rip that first CD. In WMP, the settings are sticky, so they remain the same until you adjust them again. In the following sections, I explain a little about music file formats and then walk you through the settings that you can adjust in WMP.
Understanding music file formats
Microsoft wants you to store music in its format. The Windows Media Audio format, created and owned by Microsoft, is the default format in which Windows Media Player rips files from a CD onto your computer. The WMA format has advantages: It creates files that are higher in quality and/or smaller in size than the MP3 format that I suggest you use. However, WMA has major disadvantages:
![]() First, at least in theory, WMA files can be locked down with Digital Rights Management (DRM) restrictions. It appears as if Microsoft (following Apple’s lead) has finally gotten over its DRM dreams, but WMA still leaves your files potentially vulnerable. Why fill your libraries with files that can, at some point, be protected?
First, at least in theory, WMA files can be locked down with Digital Rights Management (DRM) restrictions. It appears as if Microsoft (following Apple’s lead) has finally gotten over its DRM dreams, but WMA still leaves your files potentially vulnerable. Why fill your libraries with files that can, at some point, be protected?
![]() Second, not every player can play WMA files. Apple and Microsoft are duking it out in the marketplace, and they aren’t always interested in interoperability. Furthermore, the next awesome music widget may come from who-knows-where. Copying your music in a proprietary format means you may have trouble playing it wherever you want down the road.
Second, not every player can play WMA files. Apple and Microsoft are duking it out in the marketplace, and they aren’t always interested in interoperability. Furthermore, the next awesome music widget may come from who-knows-where. Copying your music in a proprietary format means you may have trouble playing it wherever you want down the road.
By contrast, the MP3 format is inherently more flexible. MP3 rates as a more-or-less standard format, free to everyone. (That is, no one has to pay to license MP3, unlike with WMA; the cost can be a deterrent to supporting a format.) MP3 is also an open format, which is to say that no one can apply Digital Rights Management restrictions to MP3 files, making them infinitely more portable than files in a proprietary format.
So, when you copy new music files to your computer, you want those files to be MP3.
Adjusting the WMP ripping settings
If you want to rip CD files into the MP3 format, you have to change the settings inside Windows Media Player. Don’t worry; it’s easy if you know how.
Here’s how to rip a CD that any computer can work with:
1. Put the audio CD that you want to copy into the CD drive.
Windows responds with notifications like the ones in Figure 7-8. Sooner or later you end up in the Library view of Windows Media Player, similar to Figure 7-6.
2. When your CD starts playing, press the Alt key, and then choose Tools⇒Options. Then click the Rip Music tab.
You see the Rip Music tab of the Options dialog box, shown in Figure 7-9.

Figure 7-9: Set rip parameters before you start ripping.
3. (Optional) In the Rip Music to This Location box (refer to Figure 7-9), tap or click the Change button. Navigate to your Public Music folder (probably c:UsersPublicPublicMusic) and click OK.
This step ensures that the audio files you rip end up in your computer’s Public Music folder, where other people using your computer and other people on your network can find them. See Book VI, Chapter 1 for an introduction to Public folders.
Of course, if you’re the only one who listens to the music on your computer, you can skip this step. Or you can stick the ripped music on SkyDrive.
4. In the Rip Settings Format drop-down box, choose MP3.
5. Slide the Audio Quality slider over to 192 Kbps or 256 Kbps.
At 192 Kbps, the quality of the songs you rip is close to the original quality of the CD recording. If you don’t mind making your files bigger for higher-quality songs, choose 256 Kbps or even 320 Kbps (which is, in my opinion, indistinguishable from the original).
See Table 7-1 for a thumbnail comparison of sound quality and file size.
6. (Optional) If you’re trying to rip a really scratchy CD and don’t mind allowing WMP extra time to try to recover all the music it can possibly ferret out, on the Devices tab, click your CD drive and then click Properties. Select the box marked Use Error Correction and click OK.
For details, see the section “Customizing WMP,” near the end of this chapter.
7. Click OK.
8. Back in Windows Media Player (see Figure 7-10), make sure that Windows Media Player has correctly identified the name of the album and all the tracks, er, songs.

Figure 7-10: Windows Media Player is ready to let ’er rip.
If any information is missing — rare, in my experience, even with obscure CDs — right-click the incorrect entry and choose Find Album Info. WMP phones home and retrieves as many matches for the album as it can find. You can then choose the correct album or right-click the track, choose Edit, and type your own information.
9. (Optional) If you want to choose specific songs to copy, select the check boxes to the left of each track that you want to copy and deselect the check boxes next to the ones you want to leave behind.
To rip all tracks (copy all songs) on the CD, you don’t need to do anything.
10. Click the Rip CD link.
The Rip settings are “sticky,” so after you set them correctly, there’s no need to reset them. Thus, the second time you rip a CD (and all subsequent times), you can click Rip Music and rip away.
Windows Media Player dutifully copies the tracks you selected, placing the “ripped” files in the default folder, which (if you followed Step 5) is your Public Music folder.
Table 7-1 Number of CDs That Fit on a 32GB iPad
|
MP3 Quality |
Sound Quality |
Number of CDs |
|
128 Kbps |
Excellent on a portable player and so-so on good sound equipment |
More than 500 |
|
192 Kbps |
Very good on normal consumer audio systems |
More than 350 |
|
256 Kbps |
Indistinguishable from the original CD |
More than 280 |
|
320 Kbps |
As good as it gets |
More than 200 |
To a first approximation, WMP makes a folder for each artist, and inside the artist’s folder, it makes a subfolder for each album. The music tracks go into the album’s folder. (Things get a little hairy when two artists collaborate on a song. In that case, WMP puts all the songs in one folder, and that folder usually goes under the name of the artist who performed most of the album. If WMP can’t decide, you may find a folder named Various Artists or Unknown Artist. Frequently, classical music is filed under the name of the composer, not the artist performing the piece.)
If you’re connected to the Internet, WMP grabs all associated album information — track titles, album cover art, and artist — and sticks it in the folder along with the music. Sweet.
Because you ripped the album into your Public Music folder, your newly ripped album appears in the Music library list (if you’ve expanded your libraries; see Book VII, Chapter 3), and in the Windows Media Player Library list, for you, for other people who use your computer, and for anyone who can connect to your Public Music folder. Even Macs on your home network can get to it. Smart, eh
Organizing Your Media Library
Windows Media Player picks up all the songs in your Windows 8.1 Music library, which you can sort through to find and select songs to play, but that isn’t always the best way to find the music you want. This section introduces to you the library-based organization and explains ways to further organize and find your files using built-in WMP tools for rating, sorting, and searching.
Leafing through the library
When you start WMP, it’s in Library mode, which displays a window split into three panes, with the library’s structure on the left, the contents of the selected item on the right, and the current playlist also on the right, as shown in Figure 7-11.
WMP uses the Windows 8.1 libraries — Music, Video, Pictures — to organize soundtracks, videos, TV shows, and so on. When you understand how Windows libraries work, you can organize your music just the way you want. I talk about Windows 8.1 libraries in Book VII, Chapter 3.

Figure 7-11: My Music library, or at least a small part of it, seen through the eyes of Windows Media Player.
You can see the media-related Windows 8.1 libraries along the left side: Music, Videos, and Pictures. Also along the left are additional categories that are specific to (and handled by) Windows Media Player. You can choose from among the categories by clicking the category. Here’s the rundown of categories you find:
![]() Playlist: Every playlist you’ve created appears here. See “Managing Playlists,” later in this chapter, for details about creating a playlist.
Playlist: Every playlist you’ve created appears here. See “Managing Playlists,” later in this chapter, for details about creating a playlist.
![]() Music: Contains all the audio tracks in your Windows Music library, such as those you ripped from CDs, copied from other computers, or bought via the tiled Music app. You can have WMP sort and gather audio tracks by artist, album, or genre (rock, classical, comedy, folk, jazz, dance, or Cajun, for example).
Music: Contains all the audio tracks in your Windows Music library, such as those you ripped from CDs, copied from other computers, or bought via the tiled Music app. You can have WMP sort and gather audio tracks by artist, album, or genre (rock, classical, comedy, folk, jazz, dance, or Cajun, for example).
The Music library contains only items in your Windows Music library. If you’ve expanded your libraries, as I discuss in Book VII, Chapter 3, that includes your Music folder and your computer’s PublicMusic folder. If you want to look in other libraries in your HomeGroup or network, you have to click the specific library, as listed under Other Libraries, at the bottom of the list.
![]() Videos: Contains the contents of your Windows Video Library. WMP can play video files in many formats, including ASF, AVI, MPG, WMV, and many others — but not the Apple-protected M4V format, or the Apple MOV format, and not in the native DVD movie VOB format. (See the earlier sidebar “Why can’t I rip a video DVD?”).
Videos: Contains the contents of your Windows Video Library. WMP can play video files in many formats, including ASF, AVI, MPG, WMV, and many others — but not the Apple-protected M4V format, or the Apple MOV format, and not in the native DVD movie VOB format. (See the earlier sidebar “Why can’t I rip a video DVD?”).
![]() Pictures: Contains various kinds of image files that happen to be located in your Windows Pictures Library. WMP may be the worst place to work with pictures. See the discussion of Windows Photo Gallery in Book VI, Chapter 5.
Pictures: Contains various kinds of image files that happen to be located in your Windows Pictures Library. WMP may be the worst place to work with pictures. See the discussion of Windows Photo Gallery in Book VI, Chapter 5.
![]() Other Libraries: Most of the time this includes links to shared media on PCs attached to your HomeGroup.
Other Libraries: Most of the time this includes links to shared media on PCs attached to your HomeGroup.
Changing album and song data
The Windows Media Player library folders are powerful tools for keeping your recordings organized because they offer so many different ways of looking at the same information.
It behooves you to keep your data clean. Misfiled and misidentified songs lead to endless frustration when you can’t find a song that you know should be in the library. If you want to change the data associated with a bunch of songs (for example, if the songs are all by the same artist or on the same album), follow these steps:
1. Find them in the library and get the library to list the individual songs.
If you can only see an album cover, double-click the cover, and WMP shows you a list of songs.
2. Select the songs.
Ctrl+click to select individual songs or Shift+click to select a group of songs.
3. Right-click one of the fields (for example, Album or Artist) and choose Edit. Click the Content tab.
You’ll find that the descriptions on the Content tab don’t match WMP’s column headings (for example, Artist on the tab, Contributing Artist in WMP), but the correlation isn’t hard to divine.
4. Choose the tag you want to change. Type the new value and press Enter.
All selected songs are changed at the same time.
If you want to get serious about manipulating tags like these, get Media Monkey (www.mediamonkey.com). Media Monkey handles tags like a, well, like a monkey. You can use Media Monkey and WMP on the same Library, no problem.
Rating songs
One of the most powerful WMP capabilities, creating and manipulating playlists based on your own ratings of individual songs or videos, works only if you take the time to rate your songs. To rate any track or album at any time, right-click it, choose Rate, and give it a rating from 1 to 5 stars. You can even select multiple tracks or albums and rate them all in one fell swoop. In the WMP list shown in Figure 7-11, you can just click the stars next to a track.
If you have WMP show you albums rather than individual songs, the really cool rating system doesn’t work as well. When WMP rates an album, it uses the average rating of all the songs in the album. So, if you have an absolutely great song inside an otherwise rather dull album and then you sort the albums by rating, you may not even get around to that truly great song. The only solution? Lie. Rate all songs in the album with five stars. That way, the album floats to the top of the charts.
Sorting songs
You have a great deal of flexibility in the ways you can sort. If you want to look at all your rap and hip-hop albums, for example, make sure that you’re looking at the Music category (in the upper-left area) and then double-click Album to list all albums by album name. Now click the top of the Genre column to sort the list of tracks by genre, from A to Z. Click Genre again to sort the list backward.
If your collection of recordings is large, sorting the list in different ways can help you find items you want. Microsoft claims that Windows Media Player can handle tens of thousands — even hundreds of thousands — of tracks. Go ahead. Put it to the test.
Searching
You can search the Music library (or any of the other libraries, for that matter) for items that have certain words in their titles or for artist names, album names, composer names, conductor, date, or genres. When your collection of recordings becomes too large to inspect easily, searching is a convenient way to find things in it.
To find what you want, simply start typing in the Search box in the upper-right part of the screen. WMP responds immediately, narrowing its list of found items as you type. The following tips can help you with searching and discerning WMP’s search results:
![]() You can use the usual Windows search tricks. For example, AND, OR, and NOT work in the Search box: A search on Willie Nelson AND minuet brings up Willie’s “Bach Minuet in G” from his album The Promiseland. No, I’m not kidding.
You can use the usual Windows search tricks. For example, AND, OR, and NOT work in the Search box: A search on Willie Nelson AND minuet brings up Willie’s “Bach Minuet in G” from his album The Promiseland. No, I’m not kidding.
![]() Results include titles and genre. In Figure 7-12, my search for blue brought up Eric Clapton’s song “Blues Power,” as I would expect, but also Eric Bibb’s Get Onboard album. Why? The album is filed under the genre Blues.
Results include titles and genre. In Figure 7-12, my search for blue brought up Eric Clapton’s song “Blues Power,” as I would expect, but also Eric Bibb’s Get Onboard album. Why? The album is filed under the genre Blues.
![]() You may have to navigate through a link to see search results. Depending on where you perform the search, WMP may display a list of how many artists, albums, or songs match the search criteria. In that case, simply click the underlined link to view the results.
You may have to navigate through a link to see search results. Depending on where you perform the search, WMP may display a list of how many artists, albums, or songs match the search criteria. In that case, simply click the underlined link to view the results.

Figure 7-12: Searches look for titles, artist names, album names, genres, composers, and other ancillary meta information.
Strangely, Windows Media Player doesn’t participate in the Charms bar based Search that’s touted on the tiled side of the Windows 8.1 fence. If you try to use the Search charm in WMP, you won’t find anything.
Searching the Music library is much like searching in File Explorer on the desktop — no doubt because they use the same search engine.
Managing Playlists
Er, maybe that should be mangling playlists.
WMP gives you all sorts of control over which songs you hear, and it does so through playlists. Did you ever want to rearrange the order of the songs on The Beatles’ White Album? My son just about croaked when he found out he could burn a CD that plays Britney Spears’s “Oops! . . . I Did It Again” immediately after Eminem’s homage “Oops! . . . The Real Slim Shady Did It Again.” You’ve got the power. Hmmm. That’s a catchy tag line, isn’t it?
Windows Media Player helps you create your own playlists, and you can modify them to your heart’s content.
Creating a new playlist
If you have a favorite set of tracks that you like to hear in a particular order and the tracks are in the Music library (or Video Library), you can build a playlist that gives you precisely what you want. It’s like being able to create your own, custom CD.
In fact, you can use a playlist to make your own custom CD if you have a CD burner (er, recorder). Nothing to it. The section “Burning CDs and DVDs,” later in this chapter, explains how.
To make your own playlist, follow these steps:
1. In Windows Media Player, make sure that the Music library is showing (on the left edge). On the right, click the tab marked Play.
2. If the Playlist area on the right has a bunch of music in it, click the Clear List link at the top of the Playlist area.
Windows Media Player invites you to drag items to create a new playlist, as shown in Figure 7-13.
3. On the left, navigate to each song that you want to have on the playlist and then drag it to your preferred location on the right.
You can use any of the navigation tools: Choose an artist, album, or genre, or use the Search box. Everything’s fair game.
WMP adds the track to the playlist. In Figure 7-14, I build a playlist of rock songs by the Thai-American artist Tata Young.
4. If you decide that you don’t want a specific song on the playlist, right-click it and choose Remove from List.
5. Click and drag a song to move it up or down in the playlist.
6. When you’re happy with your playlist, click the Save List button at the top of the Playlist area.
WMP highlights the Untitled Playlist text box, inviting you to type a name for the new playlist.
7. Type a name for your new playlist in the Untitled Playlist text box and press Enter.
WMP saves your new playlist. It appears anywhere playlists appear, anywhere in Windows Media Player.
That’s how easy it is to create a new playlist.
Note how Windows Media Player shows you the common decency of not arbitrarily rearranging the order of the songs.

Figure 7-13: Build a new playlist by dragging tracks to the area on the right.

Figure 7-14: Various tracks from my favorite Thai rock singer.
Renaming and deleting playlists
To change a playlist’s name, you can right-click the playlist name on the left in the Playlists list and choose Rename. Or, you can simply click the playlist name near the top of the Playlist area on the right and type the new name.
To delete a playlist, follow these steps:
1. Tap and hold or right-click the playlist in the Playlists list (say that ten times really fast) and choose Delete. Or, just click the playlist and press Delete.
WMP responds with a confusing dialog box, as shown in Figure 7-15.

Figure 7-15: Select an option to delete a playlist.
Don’t worry. Removing a playlist does not remove the songs from your computer. Where the dialog box says Delete from Library and My Computer, it isn’t referring to the songs. The songs stay on your computer no matter which choice you make. The dialog box is referring to the playlist — and you can delete a playlist from your computer with no ill effect.
2. Choose either the Delete from Library Only or the Delete from Library and My Computer check box, and then click OK.
There’s essentially no difference between the two choices, unless you want to copy playlists from computer to computer.
Burning CDs and DVDs
If your computer has a CD or DVD writer, you can create an audio CD by using tracks in the Music library. Windows Media Player makes it easy.
Most audio players these days will play MP3 files: You don’t need to create an audio CD, if it’s going to be used in any reasonably modern CD or DVD player. I mention this because you can fit a bunch more songs on a CD if you just burn the MP3 files without formatting it as an audio CD. A standard audio CD can hold one album (or maybe half of a very long album — you get the idea), whereas a CD packed with MP3s can hold 100 to 200 songs.
From a bit’s point of view, a CD holds about 650MB (megabytes = millions of bytes). That’s enough for eight or ten typical songs, if they’re in normal audio format. But a typical song that’s been ripped and converted to a normal MP3 runs 3MB to 5MB. It isn’t at all unusual for a CD filled with MP3 files to hold 10 or 12 or more albums.
Which leads to the big question: If you need to make a CD to play in a CD player, should you use File Explorer or Windows Media Player? The short answer:
![]() If you need to play the CD in an old CD player that doesn’t understand MP3 files, you have to burn in Windows Media Player — and you’ll only get a dozen typical songs or so on a CD. See the next section, “Burning an audio CD.”
If you need to play the CD in an old CD player that doesn’t understand MP3 files, you have to burn in Windows Media Player — and you’ll only get a dozen typical songs or so on a CD. See the next section, “Burning an audio CD.”
![]() If you’re going to play the CD in a CD player that understands MP3s, my preference is to burn it in Windows Media Player, too. It’s a little harder to set up than in File Explorer, where you just click and drag and you’re done. But WMP has a bunch of support that just doesn’t exist in File Explorer. See “Burning data CDs and DVDs with Media Player,” a little later in this chapter, for details.
If you’re going to play the CD in a CD player that understands MP3s, my preference is to burn it in Windows Media Player, too. It’s a little harder to set up than in File Explorer, where you just click and drag and you’re done. But WMP has a bunch of support that just doesn’t exist in File Explorer. See “Burning data CDs and DVDs with Media Player,” a little later in this chapter, for details.
Burning an audio CD
In this section, I only deal with audio CDs, the old-fashioned CDs that only hold one album per CD, give or take a bit.
The process of writing data to a CD is called burning. Rip and burn. Rip and burn. WMP enables you to burn a plain, old-fashioned, everyday audio CD very, very easily. Here’s the quickest way I know to put together a dynamite audio CD:
1. Stick a blank CD-R disc in your CD drive.
Assuming that you have a CD drive that’s capable of burning CDs and that this is the first time you’ve put a blank CD in your PC, Windows responds with a notification that says CD-RW Drive: Tap to Choose What Happens with Blank CDs. If you then tap or click the notification, you get a second notification, shown in Figure 7-16.

Figure 7-16: The toaster notification on top appears first. Click or tap on it, and you get the choices shown at the bottom of the screen.
2. Tap or click the Burn an Audio CD Using Windows Media Player icon.
 Keep in mind that this is a “sticky” choice: The next time you insert a blank CD, Windows will assume that you want to burn an audio (not a data) CD and take you to the appropriate place in Windows Media Player. If you want to reset or change the Windows default action, follow the instructions in the sidebar, “How to change AutoPlay settings,” earlier in this chapter.
Windows opens WMP and starts a burn list for you on the right (see Figure 7-17).

Figure 7-17: Ready to create a burn list.
3. Using any tricks you can muster (listing by artist or album, sorting, searching, pulling up an existing playlist — whatever), click and drag the tracks you want to burn and arrange them on the right in the burn list.
Keep an eye on the “free” number at the top of the list. WMP has been known to overestimate the available room on a CD, so it’s a good idea to leave a minute or two or three, unused, on the CD.
If you try to put too much music on a CD, WMP breaks out the burn list, with horizontal lines marking the current disc, the next disc, the next disc, and so on. When you burn a multidisc list, you just have to keep feeding CDs into the drive. Easy.
4. As a precaution, if you just created a unique playlist, save it by clicking the name Burn List at the top of the playlist on the right (see Figure 7-18) and typing a new name.
The saved playlist can come in handy if a problem crops up with the burn that you don’t find out about for a day or two or three. You can select your saved playlist rather than redo the working of choosing and arranging the tracks just the way you want them.

Figure 7-18: Save your Burn List in case you need it later.
5. Before you burn, double-check the burn options so that you don’t, uh, get burned. Press the Alt key and then choose Organize⇒Options and then click the Burn tab. See Figure 7-19.

Figure 7-19: Set the basic burn character-istics.
6. Follow the advice in Table 7-2 to set up the burn the way you want it.
7. When you’re happy with your choices, click the OK button.
WMP goes back to the main Burn window (refer to Figure 7-18).
8. Click the Start Burn button at the top of the burn list.
WMP processes each track in turn, converting it from a music file into data that’s required on an audio CD and, when it’s done converting, writing each one to the CD.
It’s truly that simple. When WMP is done, pull the CD out of the CD burner and plop the CD into any CD player. The magic’s the music.
Table 7-2 Recommended Burn Options
|
Setting |
Recommendation |
Reason |
|
Burn Speed |
Slow |
Greatly reduces the chances of turning out a coaster. If it takes longer, it takes longer, okay? |
|
Apply Volume Leveling Across Tracks |
Select |
It takes more time but ensures that a rogue song doesn’t blast your ears. |
|
Burn CD without Gaps |
Select |
If you deselect this check box, WMP inserts an additional two-second gap between each track. |
|
Add a List of All Burned Files |
M3U |
Use M3U, the universal playlist format. WPL is the Microsoft format. |
|
Use Media Information to Arrange Files |
Deselect |
Keep this option deselected so that WMP leaves the sequence of your tracks the way you set them when you burn a “data disc” — a disc full of MP3 files. (Note that WMP always honors your sequencing when you burn an old-fashioned audio CD.) If you select the box, WMP groups data disc songs by album, no matter how you laid out the tracks in the burn list. The files appear in MusicArtistAlbum folders, where the artist and album information is pulled from each individual track. |
The copying process takes, oh, a third to a fifth of the time it would take to play the copied tracks, the exact time depending on the speed of your CD writer.
If you interrupt the writing process by clicking the Stop Burn button or by removing the CD from the writer before the burn is complete, WMP goes bananas, and the whole process stops. A fried CD-R ain’t good for anything but a coaster.
Burning data CDs and DVDs with Media Player
The procedure for burning data CD-Rs, CD-RWs, DVD-Rs, and DVD-RWs with Windows Media Player is essentially the same as that described in the preceding section, except that . . .
. . . you can fit a whole lot more music on a data CD than on an audio CD. In spite of that fact, the burning process for a data CD can go faster than that for an audio CD. Why? WMP doesn’t have to preprocess data files — it doesn’t need to convert them into a form that works with audio CD players.
If you already set the data disc’s options in the preceding section’s Step 6 (refer to Table 7-2), you’ve done everything you need to do to produce top-notch MP3 CDs and DVDs. Just remember to click the check box icon above the burn list and choose Data CD or DVD, as shown in Figure 7-20.

Figure 7-20: To burn a data disc (full of MP3s), be sure to choose Data CD or DVD before you start the burn.
Sharing Your Windows Media Player Media
Windows Media Player can make media in its libraries available to other computers on your network by using the streaming technique. To a first approximation, streaming involves using your Windows PC to send signals to a digital media player, which can then play the music or show a movie on a television. That can be mighty handy if you want to hook up an Xbox or some other network digital media player to play songs or movies.
The mechanics for setting up a network in your house or small office are straightforward. The mechanics for sharing things over the network aren’t quite so easy.
If your Windows computer is part of a HomeGroup (see Book VII, Chapter 5) and you haven’t changed any settings, your computer automatically shares everything in its media libraries (Music library, Video Library, Picture Library) with all other computers in the HomeGroup and with every user on every computer in the HomeGroup.
If you have an Xbox or some other kind of networked digital media player that doesn’t understand HomeGroups, you should hop in to Windows Media Player and give Windows permission to share your media — assuming that you want to share your media.
Here’s how to share all your media:
1. Start Windows Media Player and click the Play tab.
2. In the upper-left corner, choose Stream⇒More Streaming Options.
You see the Media Streaming Options dialog box. Depending on how many computers you have connected to your network, it looks more or less like Figure 7-21.
3. In the Show Devices On drop-down box, choose All Networks.
4. Click the button marked Allow All.
This step sets up streaming for any device now connected to your network. It also opens your media libraries to other computers on your network. Windows Media Player on those other computers shows your media libraries under the Other Libraries entry on the left side of the main Windows Media Player window.
If you get stuck with a copy-protected file that plays only on your computer, or an odd file format that works only on your computer, streaming in this way may be a viable option — if your network is fast enough to handle the load.

Figure 7-21: Media sharing options.
Customizing WMP
You can customize WMP in several ways. You get to most of the settings by pushing the Alt key on your keyboard (or the onscreen keyboard), choosing Organize⇒Options. This command displays a dialog box with a bunch of tabs for customizing many aspects of WMP behavior:
![]() Player: Controls general aspects of WMP behavior, such as checking for automatic updates.
Player: Controls general aspects of WMP behavior, such as checking for automatic updates.
![]() Rip Music: Controls aspects of the copying process, including, most importantly, the format of ripped CDs (which you set to MP3 already, right?). You can also control the amount of data compression to apply when copying a CD. (More compression makes the copied tracks occupy less space but reduces sound quality.) It also controls the folder to which music is copied. (You changed it to your computer’s Public Music folder, right?) The earlier section, “Copying from a CD (Also Known As Ripping),” explains these settings in more detail.
Rip Music: Controls aspects of the copying process, including, most importantly, the format of ripped CDs (which you set to MP3 already, right?). You can also control the amount of data compression to apply when copying a CD. (More compression makes the copied tracks occupy less space but reduces sound quality.) It also controls the folder to which music is copied. (You changed it to your computer’s Public Music folder, right?) The earlier section, “Copying from a CD (Also Known As Ripping),” explains these settings in more detail.
![]() Devices: Lists available devices that WMP can use (such as CD drives and portable players) and enables you to control certain aspects of their behavior. If you tend to rip CDs with lots of scratches, click the Devices tab, click your DVD drive and then choose Properties. In the Rip section at the bottom (see Figure 7-22), select the Use Error Correction check box and click OK. That makes ripping go slower, in some circumstances, but increases the chances that you perform a clean rip, even from an iffy CD.
Devices: Lists available devices that WMP can use (such as CD drives and portable players) and enables you to control certain aspects of their behavior. If you tend to rip CDs with lots of scratches, click the Devices tab, click your DVD drive and then choose Properties. In the Rip section at the bottom (see Figure 7-22), select the Use Error Correction check box and click OK. That makes ripping go slower, in some circumstances, but increases the chances that you perform a clean rip, even from an iffy CD.
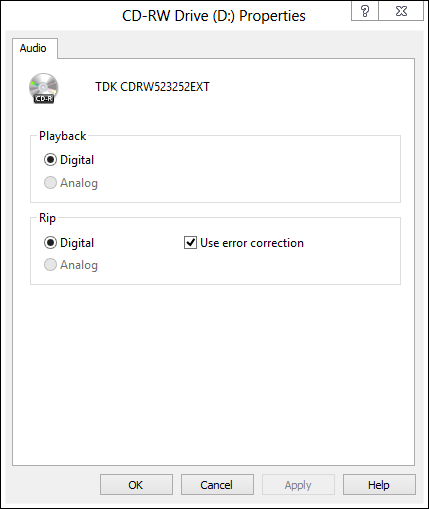
Figure 7-22: Tell Windows to keep trying, over and over, to produce a high-quality rip.
![]() Burn: A subject I talk about extensively in the section “Burning CDs and DVDs,” earlier in this chapter.
Burn: A subject I talk about extensively in the section “Burning CDs and DVDs,” earlier in this chapter.
![]() Performance: Lets you control how WMP handles streaming media.
Performance: Lets you control how WMP handles streaming media.
![]() Library: Controls whether WMP looks for video files in the Pictures Library, whether volume-leveling information should be calculated for new files, and how WMP retrieves information from the Internet.
Library: Controls whether WMP looks for video files in the Pictures Library, whether volume-leveling information should be calculated for new files, and how WMP retrieves information from the Internet.
Although there’s a setting here for overwriting media information with the information taken from the Internet, in my experience, you have to manually apply that information. WMP doesn’t go behind your back to update your album covers or track descriptions, willy-nilly, with anything it finds in the Microsoft music data website.
![]() Plugins: Lets you decide what happens with your WMP plug-ins (which are few and far between) and visualizations (which abound on the web).
Plugins: Lets you decide what happens with your WMP plug-ins (which are few and far between) and visualizations (which abound on the web).
![]() Privacy and Security: Primarily controls how much information you send to Microsoft every time you use WMP. See the section “Tweaking privacy options after installation,” earlier in this chapter.
Privacy and Security: Primarily controls how much information you send to Microsoft every time you use WMP. See the section “Tweaking privacy options after installation,” earlier in this chapter.
My privacy settings are shown at the beginning of this chapter (refer to Figure 7-3). If you decide to give Microsoft more information than the amount shown in that figure, I strongly recommend that you click the Read the Privacy Statement Online link and read the information with a thoroughly jaundiced eye.
![]() Network: Lets you select the network protocols that WMP may use to receive streaming media. It also lets you control proxy settings, which you may have to change if your computer is on a local-area network protected by a separate firewall.
Network: Lets you select the network protocols that WMP may use to receive streaming media. It also lets you control proxy settings, which you may have to change if your computer is on a local-area network protected by a separate firewall.
It would take an advanced degree in computer science to even begin to understand many of these settings. Come to think of it, I have an advanced degree in computer science and I don’t understand some of those settings. It’s a good policy to change one of the options only if you understand it well and keep careful notes so that you can restore the original setting if anything goes wrong.
There’s no harm in looking at the options, though. You can discover a lot by rummaging through each tab of the Options dialog box.
Where to Find and Buy Good Music
Saving the hardest part for last . . . .
Finding music that you’re going to like has gotten considerably simpler because of some very fancy mathematical matching algorithms. But even after you’ve found the good stuff, it can be hard to buy. Let me start with the easier of the two.
Buying music and videos online
Once upon a time, buying music online was easy. Now you’re faced with myriad choices, all fiercely competitive, and the details about each of the offerings change just about once a week.
The big three music stores — Amazon, Google, and Apple — have been around for years. Microsoft’s also trying to enter the fray, although its offerings aren’t quite as extensive as the other three — at least, today. Aside from easy access to the tiled, Metro Music app, it isn’t at all clear what Microsoft can or will bring to the party.
Here’s the current skinny on each of the main services:
![]() Although it wasn't the first online store to go with cheap MP3 files, Amazon brought unfettered music to the masses. Amazon usually has the best prices and loads of discounted music — with an ever-changing array of free downloads (go to
Although it wasn't the first online store to go with cheap MP3 files, Amazon brought unfettered music to the masses. Amazon usually has the best prices and loads of discounted music — with an ever-changing array of free downloads (go to www.amazon.com and search for free MP3). With 20 million different tracks at last count, you'll be hard pressed to find more music, and everything's in blissfully unencumbered 256 Kbps MP3 format.
Amazon will store your music, if you like, and let you get to it with the Amazon Cloud Player application, which runs on PCs, Macs, iPads, and all kinds of phones. It's free for the first 5GB of storage, including unlimited storage of any songs you buy at Amazon, and $20 per year for 20GB plus unlimited amounts of music from any source. Visit www.amazon.com/clouddrive/learnmore for details.
What’s not to like? If you’re buying music to play on an iPhone or iPad, you have to go through the additional step of copying the music from the download location to iTunes or into the iCloud. The iTunes Store also has a separate downloader (see the next section) that complicates things, the first time you download.
![]() iTunes converted to the copy-protection-free religion shortly after Amazon made big cuts into Apple’s market share: Apple was selling copy-protected music, and everybody in the know went with Amazon’s unencumbered MP3s. It didn’t take long at all for iTunes to get rid of copy protection.
iTunes converted to the copy-protection-free religion shortly after Amazon made big cuts into Apple’s market share: Apple was selling copy-protected music, and everybody in the know went with Amazon’s unencumbered MP3s. It didn’t take long at all for iTunes to get rid of copy protection.
The result was historic. With 28 million titles or so and enormous volume, iTunes is, by far, the largest online music and video store — although Amazon and Microsoft are trying hard to catch up, and Google may not be far behind. iTunes frequently gets new albums out before the others because of sweetheart deals with the major labels. Although iTunes isn’t the cheapest, it’s cheap enough for most Mac, iPad, and iPhone owners, and it’s integrated with those devices to be tap-tap-tap easy. If you buy an album or video once, you get it on all your devices, no questions asked, and if you ever lose your copy, getting a replacement is like falling off a log.
One relatively new feature, called iTunes Match, lets you keep all your music, no matter where you bought it, on the Internet for $25 per year. Details are in Book X, Chapter 1.
Downsides? iTunes (the program) doesn’t download nice, neat MP3 files. You can get iTunes to convert the files you’ve bought to MP3, but it takes several steps. As long as you live in an Apple world, it’s all neat and easy — but it’s hard to break out of the walled garden.
![]() Google’s Music Store, the latecomer to the list, has lots of hooks into Android devices. In addition to offering plain, unfettered MP3s at 320 Kbps, Google also has a web player, Google Play, that works very well as long as you’re in the United States. Amazon and Apple don’t have web players. Google prides itself on nurturing indie bands, so if you’re looking for something slightly out of the mainstream (or way out for that matter), Google may have what you’re looking for. You can store up to 20,000 songs on Google’s website free, and any songs that you buy from Google get stored free without denting your 20,000 allowance. When you buy a song from Google, it’s immediately available inside your Android phone or tablet, or on the web player. You can also download the MP3 any time you like. With Google’s new All Access service, you can have unlimited access to “millions” of songs for $10 per month.
Google’s Music Store, the latecomer to the list, has lots of hooks into Android devices. In addition to offering plain, unfettered MP3s at 320 Kbps, Google also has a web player, Google Play, that works very well as long as you’re in the United States. Amazon and Apple don’t have web players. Google prides itself on nurturing indie bands, so if you’re looking for something slightly out of the mainstream (or way out for that matter), Google may have what you’re looking for. You can store up to 20,000 songs on Google’s website free, and any songs that you buy from Google get stored free without denting your 20,000 allowance. When you buy a song from Google, it’s immediately available inside your Android phone or tablet, or on the web player. You can also download the MP3 any time you like. With Google’s new All Access service, you can have unlimited access to “millions” of songs for $10 per month.
![]() Spotify (
Spotify (www.spotify.com) and Rdio (www.rdio.com) both offer unlimited streaming at a reasonable fee (generally around $10/month), and they link into all sorts of services that make it easier to find and play the music you want.
The market’s changing rapidly with iPad and iPhone and Android apps popping up all over, linking into the major services. Windows 8 Metro apps may appear at some point in the future. For now, frankly, you can’t go wrong with any of them.
Where should you buy your music? Tough choice. At this moment (and I'm sure the offerings will change by the time you read this), I tend to buy everything from Amazon, just because I'm old-fashioned and like to have real MP3s on my PC. But I'm sorely tempted with Google's offer to keep copies of my music for me, where I don't have to worry about backing it up. And, yes, sometimes I'm lazy and buy an album from iTunes for my iPad. Bandcamp (www.bandcamp.com) has some very good format options, and they're very artist-friendly.
Using the Amazon music store
Last night I went to the Phuket Blues and Rock Festival (www.phuketbluesfestival.com) and saw an absolutely riveting performance by Eric Bibb, a tremendous blues guitarist and singer. Today I dropped by my friendly local music shop and couldn't find a single CD by Eric Bibb.
Many people think they have to use the music ordering mechanism that’s attached to their players to get new music simply. Not true. Yes, I could’ve used the Metro Music buying mechanism to get Eric’s latest. Ordering it from the iTunes Store for my iPad or iPhone would’ve been a cinch. But it’s also easy to buy from alternate sources — a Good Thing if you don’t particularly want to enrich Microsoft or Apple.
So I hopped on Amazon and was listening to Eric’s latest album in a few minutes. Here’s how:
1. Point your web browser to www.amazon.com.
2. At the top of the Amazon page in the Search box, choose MP3 Downloads and on the right, type the name of the artist or album you’re looking for. Click Go.
I searched for Eric Bibb, and Amazon responded with 297 songs and albums from Eric Bibb (see Figure 7-23). I peeled myself off the floor.
3. You can click the album cover to get more information, but if you know what you want, click the Download MP3Album link.
I decided to download Eric’s latest, Deeper in the Well.
4. Amazon takes me to the ordering page for the album. I have 1-Click set up with Amazon, so I click the 1-Click link.
If I was new to Amazon, it’d take a couple of extra steps to sign up.
Amazon says I must install the Amazon MP3 Downloader.

Figure 7-23: Amazon boasts an extensive collection of MP3s.
5. Follow the instructions and install the downloader.
It takes about 30 seconds.
6. After the downloader is installed, Amazon prompts you to click the Download Album button. Do so.
It may take a few minutes, but ultimately the Amazon downloader downloads all the tracks and puts them in your Music folder, in a newly created folder named Amazon MP3. In this case, I found a new folder named MusicAmazon MP3Eric BibbDeeper in the Well that contains MP3s for all songs in the album.
Thank heaven for MP3 files: No restrictions on where they can go. No restrictions on who can play them.
Finding new music you’ll like
My first piece of advice: Start with Norah Jones and move from there.
Okay, okay. Start with Metallica . . . er, Nickelback . . . uh, Linkin Park . . . all right, I give up, what do you like?
If you have an iPad or iPhone or some sort of iMusic player, you probably already know about Genius, the Apple program that tries to guess what you’re going to like based on what you’ve been listening to. Genius works well, as long as most of your music listening goes through Apple one way or another.
I've been impressed with a blog called Google Play Magnifier, www.magnifier.blogspot.com, that keeps on top of the music industry and tells me about music that I find interesting. An interview with Mick Jagger, reminiscing about the Stones' American invasion? New stuff from Corinne Bailey Rae? Hey, it's got me hooked.
The easiest way to find new music, though, is to listen to one of the sites that specializes in helping you discover music that's similar to what you're listening to now. Both Pandora (www.pandora.com) and Last.fm (www.last.fm) build custom channels — actually playlists — based on the music that you choose and then let you vote thumbs-up or thumbs-down on songs they dig out of their archives. Each refines the offerings based on the songs you choose, and they're quite remarkable. Both have free versions with extra perks for those who pay.
Pandora chooses music based on The Music Genome Project (www.pandora.com/mgp.shtml), which tries to identify parts of songs that people like: "Since we started back in 2000, we've carefully listened to the songs of tens of thousands of different artists — ranging from popular to obscure — and analyzed the musical qualities of each song one attribute at a time. This work continues each and every day as we endeavor to include all the great new stuff coming out of studios, clubs, and garages around the world."
Last.fm, on the other hand, relies on a crowdsourcing technique it calls scrobbling to have many, many people make recommendations based on what they like. “Millions of songs are scrobbled every day. This data helps Last.fm to organize and recommend music to people; we use it to create personalized radio stations and a lot more besides.”
As we went to press, Google, Spotify, and Rdio have all announced similar search/channel building capabilities. Go forth and boogie.
One last tip: If you remember a song's melody or a few words, but can't figure out what song it is, try Midomi (www.midomi.com). You can hum or sing a few bars, or type in some lyrics, and Midomi will run out and find songs that match your criteria. Amazing what it can find.