Chapter 26
Macintosh Networking
In This Chapter
![]() Hooking up a Macintosh network
Hooking up a Macintosh network
![]() Using a Macintosh network
Using a Macintosh network
![]() Mixing Macs and PCs
Mixing Macs and PCs
This book dwells on mostly networking Windows-based computers, as though Microsoft were the only game in town. I’m sure plenty of people in Redmond, WA (where Microsoft is headquartered) wished that it were so. But alas, there is an entirely different breed of computer: the Apple Macintosh, more commonly referred to simply as Mac.
Every Macintosh ever built, even an original 1984 model, includes networking support. Newer Macintosh computers have better built-in networking features than older Macintosh computers, of course. The newest Macs include built-in Gigabit Ethernet connections or 802.11n wireless connections, or both. Support for these network connections is pretty much automatic, so all you have to do is plug your Mac into a network or connect to a wireless network, and you’re ready to go.
This chapter presents what you need to know to network Mac computers running OS X, Apple’s operating system for Mac computers. You’ll see how to control basic Mac network options, such as TCP/IP and file sharing. I also show you how to join a Mac to a Windows domain network.
Basic Mac Network Settings
Most network settings on OS X are automatic. If you wish, you can look at and change the default network settings by following these steps:
1. Choose System Preferences⇒ Networking.
The Network preferences page appears, as shown in Figure 26-1.

Figure 26-1: Network preferences.
2. Click Advanced.
The advanced network settings are displayed, as shown in Figure 26-2.

Figure 26-2: Advanced network settings.
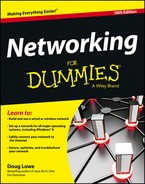
3. Click the TCP/IP tab to view or change the TCP/IP settings.
This brings up the TCP/IP settings, as shown in Figure 26-3. From this page, you can view the currently assigned IP address for the computer. And, if you wish, you can assign a static IP address by changing the Configure IPv4 drop-down from Using DHCP to Manually. Then, you can enter your own IP address, subnet mask, and router address. (For more information about IP addresses, refer to Chapter 5.)
4. Click the DNS tab to view or change the DNS settings.
This brings up the DNS settings shown in Figure 26-4. Here, you can see the DNS servers being used, and you can add additional DNS servers if you wish.
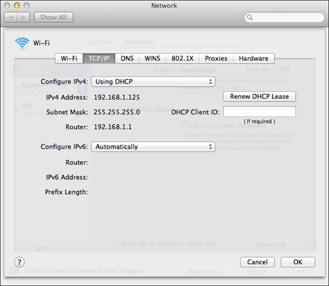
Figure 26-3: Mac network TCP/IP settings.

Figure 26-4: DNS settings.
5. Click the Hardware tab to view hardware information.
This brings up the settings page shown in Figure 26-5. The most useful bit of information on this tab is the MAC address, which is sometimes needed to set up wireless security. (For more information, refer to Chapter 9.)

Figure 26-5: Hardware settings.
What about OS X Server?
At one time, Apple offered the Mac OS X Server dedicated network operating system (NOS). In 2011, Apple merged Mac OS X Server with its desktop OS and made the server components of the OS available as an inexpensive add-on you can purchase from the App Store. For the latest version of OS X (10.8, released in July of 2012), the Server App enhancement can be purchased for about $20.
The Server App download adds a variety of network server features to OS X, including
![]() Apache web server, which also runs on Windows and Linux systems
Apache web server, which also runs on Windows and Linux systems
![]() MySQL, which is also available in Windows and Linux versions
MySQL, which is also available in Windows and Linux versions
![]() Wiki Server, which lets you set up web-based wiki, blog, and calendaring sites
Wiki Server, which lets you set up web-based wiki, blog, and calendaring sites
![]() NetBoot, a feature that simplifies the task of managing network client computers
NetBoot, a feature that simplifies the task of managing network client computers
![]() Spotlight Server, which lets you search for content on remote file servers
Spotlight Server, which lets you search for content on remote file servers
![]() Podcast Producer, which lets the create and distribute multimedia programs
Podcast Producer, which lets the create and distribute multimedia programs
Joining a Domain
If you’re using a Mac in a Windows domain environment, you can join the Mac to the domain by following these steps:
1. Choose Settings⇒Users & Groups.
This brings up the Users & Groups page, as shown in Figure 26-6.

Figure 26-6: Users and Groups.
2. Select the user account you want to join to the domain and then click Login Options.
The Login Options page appears, as shown in Figure 26-7.

Figure 26-7: Login Options.
3. If the lock icon at the bottom left of the page is locked, click it and enter your password when prompted.
By default, the user login options are locked to prevent unauthorized changes. This step unlocks the settings so that you can join the domain.
4. Click the Join button.
You’re prompted to enter the name of the domain you want to join, as shown in Figure 26-8.
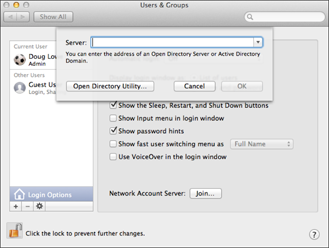
Figure 26-8: Joining a domain.
5. Enter the name of the domain you want to join.
When you enter the domain name, the dialog box expands to allow you to enter domain credentials to allow you to join the domain, as shown in Figure 26-9.
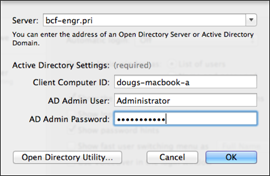
Figure 26-9: Authenticating with the domain.
6. Enter the name and password of a domain administrator account; then click OK.
You return to the Login Options page, which shows that you have successfully joined the domain; see Figure 26-10.

Figure 26-10: Congratulations! You have now joined the domain.
7. Close the Users & Groups window.
Connecting to a Share
After you join a domain, you can access its network shares via the Finder. Just follow these steps:
1. Click Finder.
2. Choose Go⇒Connect to Server.
The Connect to Server dialog box appears.
3. Type the path that leads to the server share you want to connect to.
To type a network path, follow this syntax:
smb://server-name/share-name
Replace the server-name with the name of the server that contains the share and share-name with the name of the share. For example, to connect to a share named files on a server named lowe01, type smb://lowe01/files.
4. Click Connect.
You’ll be prompted for login credentials.
5. Enter a domain username and password and then click OK.
Precede the user name with the domain name, separated by a backslash. For example, if the domain name is lowewriter.pri and the user name is Doug, enter lowewriter.priDoug as the username.
After connection is complete, the files in the share display in the Finder window. You can then open files directly from the share (provided you have the right software, such as Microsoft Office, to read the files). You can also drag and drop files between the Mac and the file shares.