
Once you have signed your APK files, you need a way to get them onto your users’ devices. The following sections describe the various ways to deploy your APK files. Three methods are covered:
- Deploying manually using the adb.exe tool
- Hosting the application on a web server
- Publishing through the Android Market
Besides these methods, you can install your applications on users’ devices through e-mails, SD card, and so on. As long as you can transfer the APK file onto the user’s device, you can install the application.
Using the adb.exe Tool
Once your Android application is signed, you can deploy it to emulators and devices using the adb.exe (Android Debug Bridge) tool (located in the platform-tools folder of the Android SDK).
Using the command prompt in Windows, navigate to the <Android_SDK>platform-tools folder. To install the application to an emulator/device (assuming the emulator is currently up and running or a device is currently connected), issue the following command:
adb install "C:UsersWei-Meng LeeDesktopLBS.apk"
EXPLORING THE ADB.EXE TOOL
The adb.exe tool is a very versatile tool that enables you to control Android devices (and emulators) connected to your computer.
By default, when you use the adb command, it assumes that currently there is only one connected device/emulator. If you have more than one device connected, the adb command returns an error message:
error: more than one device and emulator
You can view the devices currently connected to your computer by using the devices option with adb, like this:
D:Android 3.0android-sdk-windowsplatform-tools>adb devices
List of devices attached
HT07YPY09335    device
emulator-5554   device
emulator-5556   device
As the preceding example shows, this returns the list of devices currently attached. To issue a command for a particular device, you need to indicate the device using the -s option, like this:
adb –s emulator-5556 install LBS.apk
If you try to install an APK file onto a device that already has the APK file, it will display the following error message:
Failure [INSTALL_FAILED_ALREADY_EXISTS]
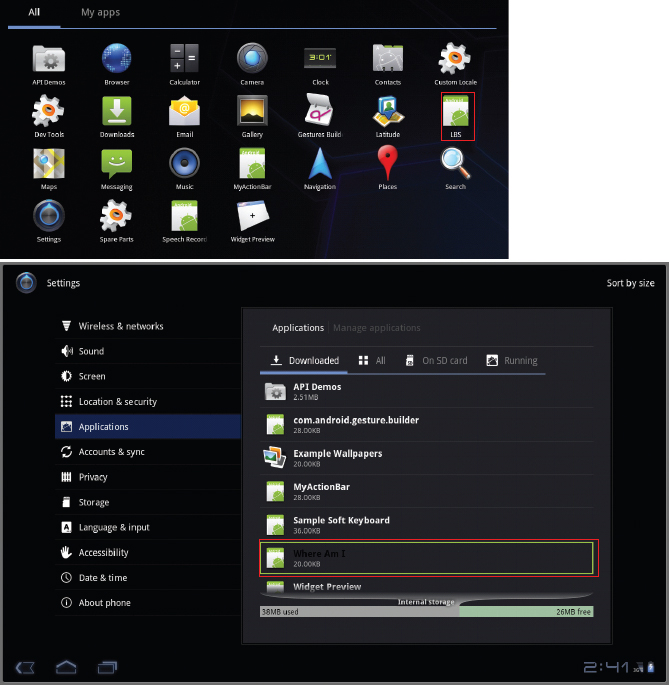
When you inspect the Launcher on the Android device/emulator, you will be able to see the LBS icon (on the top of Figure 6-11). If you select Settings ⇒ Applications ⇒ Manage Applications on your Android device/emulator, you will see the “Where Am I” application (on the bottom of Figure 6-11).
Besides using the adb.exe tool to install applications, you can also use it to remove an installed application. To do so, use the shell option to remove an application from its installed folder:
adb shell rm /data/app/net.learn2develop.LBS.apk
Another way to deploy an application is to use the DDMS tool in Eclipse (see Figure 6-12). With an emulator (or device) selected, use the File Explorer in DDMS to go to the /data/app folder and use the “Push a file onto the device” button to copy the APK file onto the device.

Using a Web Server
If you wish to host your application on your own, you can use a web server to do that. This is ideal if you have your own web hosting services and want to provide the application free of charge to your users (or you can restrict access to certain groups of people).
NOTE Even if you restrict your application to a certain group of people, there is nothing to stop users from redistributing your application to other users after they have downloaded your APK file.
To demonstrate this, I will use the Internet Information Server (IIS) on my Windows 7 computer. Copy the signed LBS.apk file to c:inetpubwwwroot. In addition, create a new HTML file named Install.html with the following content:
<html>
<title>Where Am I application</title>
<body>
Download the Where Am I application <a href="LBS.apk">here</a>
</body>
</html>
NOTE If you are unsure how to set up the IIS on your Windows 7 computer, check out the following link: http://technet.microsoft.com/en-us/library/cc725762.aspx.
On your web server, you may need to register a new MIME type for the APK file. The MIME type for the .apk extension is application/vnd.android.package-archive.
NOTE To install APK files over the Web, you need an SD card installed on your emulator or device. This is because the downloaded APK files will be saved to the download folder created on the SD card.
By default, for online installation of Android applications, the Android emulator or device only allows applications to be installed from the Android Market (www.android.com/market/). Hence, for installation over a web server, you need to configure your Android emulator/device to accept applications from non-Market sources.
From the Application settings menu, check the “Unknown sources” item (see Figure 6-13). You will be prompted with a warning message. Click OK. Checking this item will allow the emulator/device to install applications from other non-Market sources (such as from a web server).

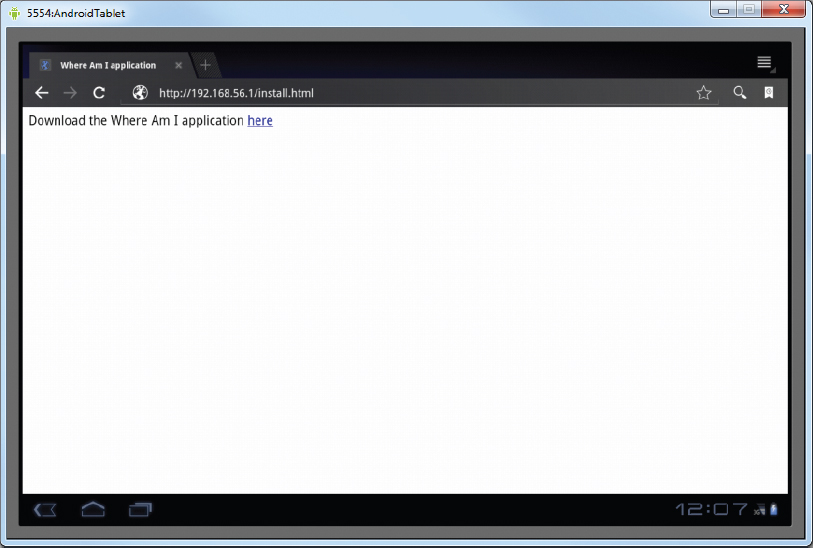
To install the LBS.apk application from the IIS web server running on your computer, launch the Browser application on the Android emulator/device and navigate to the URL pointing to the APK file. To refer to the computer running the emulator, you should use the computer’s IP address. Figure 6-14 shows the Install.html file loaded on the web browser. Clicking the “here” link will download the APK file onto your device. Click the Download button at the bottom of the screen to reveal the download’s status.
To install the downloaded application, simply tap on it. It will show the permission(s) required by the application. Click the Install button to proceed with the installation. When the application is installed, you can launch it by clicking the Open button.
Besides using a web server, you can also e-mail your application to users as an attachment; when the users receive the e-mail, they can download the attachment and install the application directly onto their device.
Publishing on the Android Market
So far, you have learned how to package your Android application and distribute it in various ways — via web server, the adb.exe file, e-mail, and SD card.
However, these methods do not provide a way for users to discover your applications easily. A better way is to host your application on the Android Market, a Google-hosted service that makes it very easy for users to discover and download (i.e., purchase) applications for their Android devices. Users simply need to launch the Market application on their Android device in order to discover a wide range of applications that they can install on their devices.
In this section, you will learn how to publish your Android application on the Android Market. You will walk through each of the steps involved, including the various items you need to prepare your application for submission to the Android Market.
Creating a Developer Profile
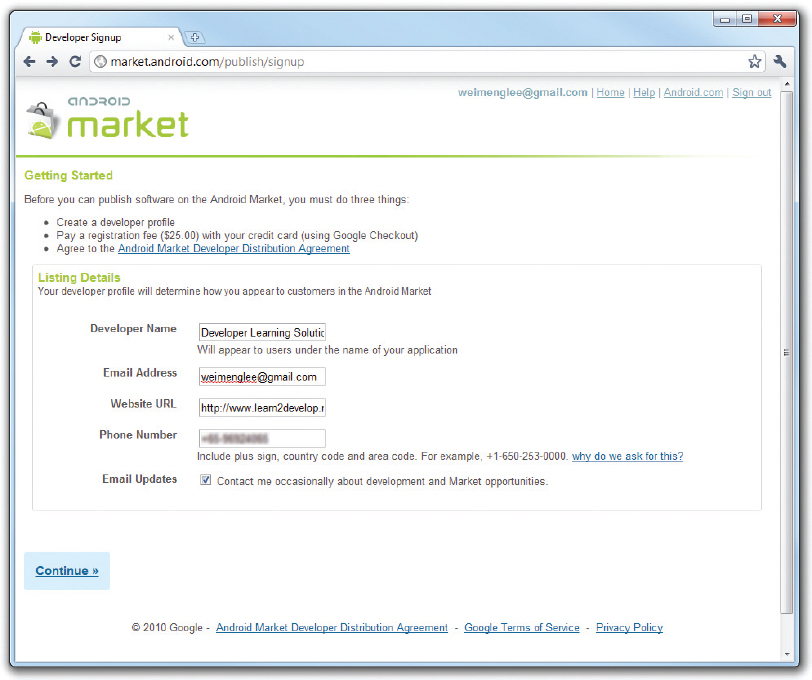
The first step toward publishing on the Android Market is to create a developer profile at http://market.android.com/publish/Home. For this, you need a Google account (such as your Gmail account). Once you have logged in to the Android Market, you first create your developer profile (see Figure 6-15). Click Continue after entering the required information.
For publishing on the Android Market, you need to pay a one-time registration fee, currently U.S. $25. Click the Google Checkout button to be redirected to a page where you can pay the registration fee. After paying, click the Continue link.
Next, you need to agree to the Android Market Developer Distribution Agreement. Check the “I agree” checkbox and then click the “I agree. Continue” link.
Submitting Your Apps
Once you have set up your profile, you are ready to submit your application to the Android Market. If you intend to charge for your application, click the Setup Merchant Account link located at the bottom of the screen. Here you enter additional information such as bank account and tax ID.
For free applications, click the Upload Application link, shown in Figure 6-16.

You will be asked to supply some details about your application. Figure 6-17 shows the first set of details you need to provide. Among the information needed, the following are compulsory:
- The application in APK format.
- At least two screenshots. You can use the DDMS perspective in Eclipse to capture screenshots of your application running on the emulator or real device.
- A high-resolution application icon. This size of this image must be 512 × 512 pixels.
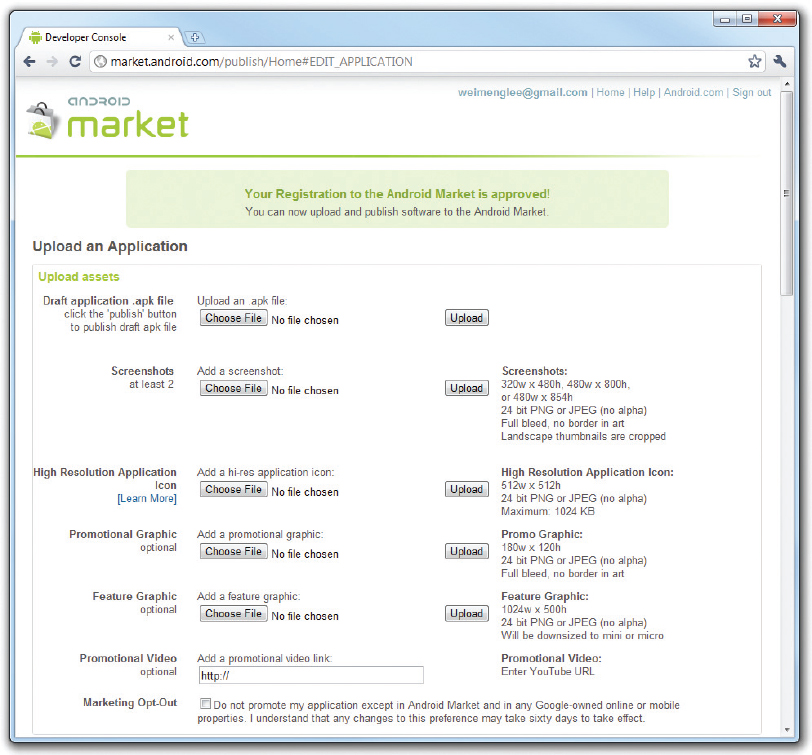
The other information details are optional, and you can always supply them later.
Figure 6-18 shows that I have uploaded the LBS.apk file to the Android Market site. In particular, note that based on the APK file that you have uploaded, users are warned about any specific permissions required, and your application’s features will be used to filter search results. For example, because my application requires GPS access, it will not appear in the search result list if a user searches for my application on a device that does not have a GPS receiver.

The next set of information you need to supply, shown in Figure 6-19, includes the title of your application, its description, as well as recent changes’ details (useful for application updates). You can also select the application type and the category in which it will appear in the Android Market.

On the last dialog, you indicate whether your application employs copy protection, and specify a content rating. You also supply your website URL and your contact information (see Figure 6-20). When you have given your consent to the two guidelines and agreements, click Publish to publish your application on the Android Market.

That’s it! Your application is now available on the Android Market. You will be able to monitor any comments submitted about your application (see Figure 6-21), as well as bug reports and total number of downloads.

Good luck! All you need to do now is wait for the good news; and hopefully you can laugh your way to the bank soon!