
An activity or fragment contains Views and ViewGroups. A view is a widget that has an appearance on screen. Examples of views are buttons, labels, and text boxes. A view derives from the base class android.view.View.
One or more views can be grouped together into a ViewGroup. A ViewGroup (which is itself a special type of view) provides the layout in which you can order the appearance and sequence of views. Examples of ViewGroups include LinearLayout and FrameLayout. A ViewGroup derives from the base class android.view.ViewGroup.
Android supports the following ViewGroups:
- LinearLayout
- AbsoluteLayout
- TableLayout
- RelativeLayout
- FrameLayout
- ScrollView
The following sections describe each of these ViewGroups in more detail. Note that in practice it is common to combine different types of layouts to create the UI you want.
LinearLayout
The LinearLayout arranges views in a single column or a single row. Child views can be arranged either vertically or horizontally. To see how LinearLayout works, consider the following elements typically contained in the main.xml file:
<?xml version="1.0" encoding="utf-8"?>
<LinearLayout
    xmlns:android="http://schemas.android.com/apk/res/android"
    android:orientation="vertical"
    android:layout_width="fill_parent"
    android:layout_height="fill_parent"
    >
<TextView
    android:layout_width="fill_parent"
    android:layout_height="wrap_content"
    android:text="@string/hello"
    />
</LinearLayout>
In the main.xml file, observe that the root element is <LinearLayout> and it has a <TextView> element contained within it. The <LinearLayout> element controls the order in which the views contained within it appear.
Each View and ViewGroup has a set of common attributes, some of which are described in Table 3-1.
TABLE 3-1: Common Attributes Used in Views and ViewGroups
| ATTRIBUTE | DESCRIPTION |
| layout_width | Specifies the width of the View or ViewGroup |
| layout_height | Specifies the height of the View or ViewGroup |
| layout_marginTop | Specifies extra space on the top side of the View or ViewGroup |
| layout_marginBottom | Specifies extra space on the bottom side of the View or ViewGroup |
| layout_marginLeft | Specifies extra space on the left side of the View or ViewGroup |
| layout_marginRight | Specifies extra space on the right side of the View or ViewGroup |
| layout_gravity | Specifies how child Views are positioned |
| layout_weight | Specifies how much of the extra space in the layout should be allocated to the View |
| layout_x | Specifies the x-coordinate of the View or ViewGroup |
| layout_y | Specifies the y-coordinate of the View or ViewGroup |
NOTE Some of these attributes are applicable only when a View is in a specific ViewGroup. For example, the layout_weight and layout_gravity attributes are applicable only when a View is in either a LinearLayout or a TableLayout.
For example, the width of the <TextView> element fills the entire width of its parent (which is the screen in this case) using the fill_parent constant. Its height is indicated by the wrap_content constant, which means that its height is the height of its content (in this case, the text contained within it). If you don’t want to have the <TextView> view occupy the entire row, you can set its layout_width attribute to wrap_content, like this:
<TextView
    android:layout_width="wrap_content"
    android:layout_height="wrap_content"
    android:text="@string/hello"
/>
This will set the width of the view to be equal to the width of the text contained within it.
UNITS OF MEASUREMENT
When specifying the size of an element on an Android UI, you should be aware of the following units of measurement:
dp — Density-independent pixel. 160dp is equivalent to one inch of physical screen size. This is the recommended unit of measurement when specifying the dimension of views in your layout. You can specify either “dp” or “dip” when referring to a density-independent pixel.
sp — Scale-independent pixel. This is similar to dp and is recommended for specifying font sizes.
pt — Point. A point is defined to be 1/72 of an inch, based on the physical screen size.
px — Pixel. Corresponds to actual pixels on the screen. Using this unit is not recommended, as your UI may not render correctly on devices with different screen sizes.
Consider the following layout:
<?xml version="1.0" encoding="utf-8"?>
<LinearLayout xmlns:android="http://schemas.android.com/apk/res/android"
    android:orientation="vertical"
    android:layout_width="fill_parent"
    android:layout_height="fill_parent"
    >
<TextView
    android:layout_width="105dp"
    android:layout_height="wrap_content"
    android:text="@string/hello"
    />
<Button
    android:layout_width="160dp"
    android:layout_height="wrap_content"
    android:text="Button"
    />
</LinearLayout>
Here, you set the width of both the TextView and Button views to an absolute value. In this case, the width for the TextView is set to 105 density-independent pixels wide, and the Button to 160 density-independent pixels wide. Figure 3-1 shows how the views look when viewed on an emulator with a resolution of 320×480.

Figure 3-2 shows how the views look when viewed on a high-resolution (480×800) emulator.

As you can see, in both emulators the width of both views is the same with respect to the width of the emulator. This demonstrates the usefulness of using the dp unit, which ensures that even if the resolution of the target device is different, the size of the view relative to the device remains unchanged.
The preceding example also specifies that the orientation of the layout is vertical:
<LinearLayout
    xmlns:android="http://schemas.android.com/apk/res/android"
    android:orientation="vertical"
    android:layout_width="fill_parent"
    android:layout_height="fill_parent"
    >
The default orientation layout is horizontal, so if you omit the android:orientation attribute, the views appear as shown in Figure 3-3.

In LinearLayout, you can apply the layout_weight and layout_gravity attributes to views contained within it, as the following modifications to main.xml show:
<?xml version="1.0" encoding="utf-8"?>
<LinearLayout xmlns:android="http://schemas.android.com/apk/res/android"
    android:orientation="vertical"
    android:layout_width="fill_parent"
    android:layout_height="fill_parent"
    >
<TextView
    android:layout_width="105dp"
    android:layout_height="wrap_content"
    android:text="@string/hello"
    />
<Button
    android:layout_width="160dp"
    android:layout_height="wrap_content"
    android:text="Button"
    android:layout_gravity="right"
    android:layout_weight="0.2"
    />
<EditText
    android:layout_width="fill_parent"
    android:layout_height="wrap_content"
    android:textSize="18sp"
    android:layout_weight="0.8"
    />
</LinearLayout>
Figure 3-4 shows that the button is aligned to the right of its parent (which is the LinearLayout) using the layout_gravity attribute. At the same time, you use the layout_weight attribute to specify the ratio in which the Button and EditText views occupy the remaining space on the screen. The total value for the layout_weight attribute must be equal to 1.

AbsoluteLayout
The AbsoluteLayout enables you to specify the exact location of its child views. Consider the following UI defined in main.xml:
<?xml version="1.0" encoding="utf-8"?>
<AbsoluteLayout
    android:layout_width="fill_parent"
    android:layout_height="fill_parent"
    xmlns:android="http://schemas.android.com/apk/res/android"
    >
<Button
    android:layout_width="188dp"
    android:layout_height="wrap_content"
    android:text="Button"
    android:layout_x="126px"
    android:layout_y="361px"
    />
<Button
    android:layout_width="113dp"
    android:layout_height="wrap_content"
    android:text="Button"
    android:layout_x="12px"
    android:layout_y="361px"
    />
</AbsoluteLayout>
Figure 3-5 shows the two Button views located at their specified positions using the android_layout_x and android_layout_y attributes.

However, there is a problem with the AbsoluteLayout when the activity is viewed on a high-resolution screen (see Figure 3-6). For this reason, the AbsoluteLayout has been deprecated since Android 1.5 (although it is still supported in the current version). You should avoid using the AbsoluteLayout in your UI, as it is not guaranteed to be supported in future versions of Android. Instead, use the other layouts described in this chapter.

TableLayout
The TableLayout groups views into rows and columns. You use the <TableRow> element to designate a row in the table. Each row can contain one or more views. Each view you place within a row forms a cell. The width of each column is determined by the largest width of each cell in that column.
Consider the content of main.xml shown here:
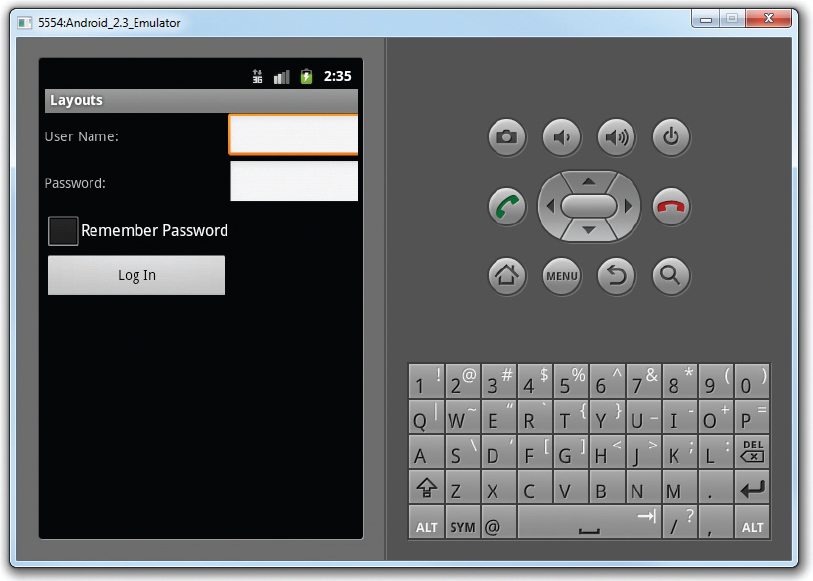
<?xml version="1.0" encoding="utf-8"?>
<TableLayout
    xmlns:android="http://schemas.android.com/apk/res/android"
    android:layout_height="fill_parent"
    android:layout_width="fill_parent"
    >
    <TableRow>
        <TextView
            android:text="User Name:"
            android:width ="120px"
            />
        <EditText
            android:id="@+id/txtUserName"
            android:width="200px" />
    </TableRow>
    <TableRow>
        <TextView
            android:text="Password:"
            />
        <EditText
            android:id="@+id/txtPassword"
            android:password="true"
            />
    </TableRow>
    <TableRow>
        <TextView />
        <CheckBox android:id="@+id/chkRememberPassword"
            android:layout_width="fill_parent"
            android:layout_height="wrap_content"
            android:text="Remember Password"
            />
    </TableRow>
    <TableRow>
        <Button
            android:id="@+id/buttonSignIn"
            android:text="Log In" />
    </TableRow>
</TableLayout>
Figure 3-7 shows what the preceding looks like when rendered on the Android emulator.

Note that in the preceding example, there are two columns and four rows in the TableLayout. The cell directly under the Password TextView is populated with a <TextView/> empty element. If you don’t do this, the Remember Password checkbox appears under the Password TextView, as shown in Figure 3-8.
RelativeLayout
The RelativeLayout enables you to specify how child views are positioned relative to each other. Consider the following main.xml file:
<?xml version="1.0" encoding="utf-8"?>
<RelativeLayout
    android:id="@+id/RLayout"
    android:layout_width="fill_parent"
    android:layout_height="fill_parent"
    xmlns:android="http://schemas.android.com/apk/res/android"
    >
    <TextView
        android:id="@+id/lblComments"
        android:layout_width="wrap_content"
        android:layout_height="wrap_content"
        android:text="Comments"
        android:layout_alignParentTop="true"
        android:layout_alignParentLeft="true"
        />
    <EditText
        android:id="@+id/txtComments"
        android:layout_width="fill_parent"
        android:layout_height="170px"
        android:textSize="18sp"
        android:layout_alignLeft="@+id/lblComments"
        android:layout_below="@+id/lblComments"
        android:layout_centerHorizontal="true"
        />
    <Button
        android:id="@+id/btnSave"
        android:layout_width="125px"
        android:layout_height="wrap_content"
        android:text="Save"
        android:layout_below="@+id/txtComments"
        android:layout_alignRight="@+id/txtComments"
        />
    <Button
        android:id="@+id/btnCancel"
        android:layout_width="124px"
        android:layout_height="wrap_content"
        android:text="Cancel"
        android:layout_below="@+id/txtComments"
        android:layout_alignLeft="@+id/txtComments"
        />
</RelativeLayout>
Notice that each view embedded within the RelativeLayout has attributes that enable it to align with another view. These attributes are as follows:
- layout_alignParentTop
- layout_alignParentLeft
- layout_alignLeft
- layout_alignRight
- layout_below
- layout_centerHorizontal
The value for each of these attributes is the ID for the view that you are referencing. The preceding XML UI creates the screen shown in Figure 3-9.

FrameLayout
The FrameLayout is an on-screen placeholder that you can use to display a single view. Views that you add to a FrameLayout are always anchored to the top left of the layout. Consider the following content in main.xml:
<?xml version="1.0" encoding="utf-8"?>
<RelativeLayout
    android:id="@+id/RLayout"
    android:layout_width="fill_parent"
    android:layout_height="fill_parent"
    xmlns:android="http://schemas.android.com/apk/res/android"
    >
    <TextView
        android:id="@+id/lblComments"
        android:layout_width="wrap_content"
        android:layout_height="wrap_content"
        android:text="This is my lovely dog, Ookii"
        android:layout_alignParentTop="true"
        android:layout_alignParentLeft="true"
        />
    <FrameLayout
        android:layout_width="wrap_content"
        android:layout_height="wrap_content"
        android:layout_alignLeft="@+id/lblComments"
        android:layout_below="@+id/lblComments"
        android:layout_centerHorizontal="true"
        >
        <ImageView
            android:src = "@drawable/ookii"
            android:layout_width="wrap_content"
            android:layout_height="wrap_content"
            />
    </FrameLayout>
</RelativeLayout>
Here, you have a FrameLayout within a RelativeLayout. Within the FrameLayout, you embed an ImageView. The UI is shown in Figure 3-10.
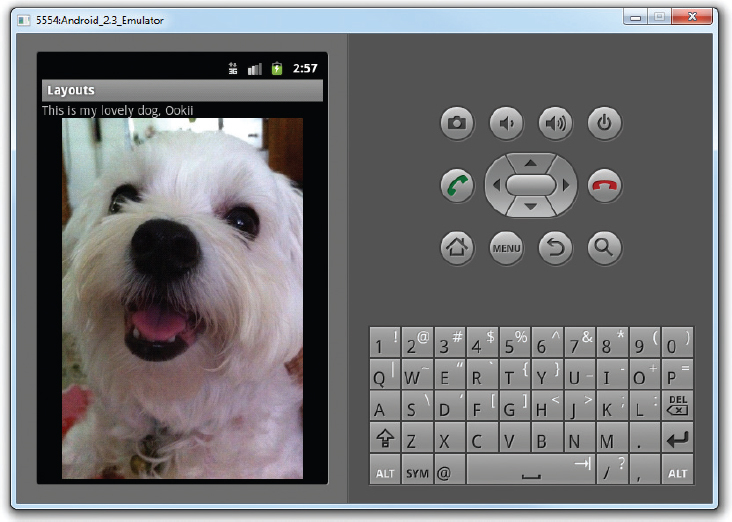
NOTE This example assumes that the res/drawable-mdpi folder has an image named ookii.png.
If you add another view (such as a Button view) within the FrameLayout, the view will overlap the previous view (see Figure 3-11):

<?xml version="1.0" encoding="utf-8"?>
<RelativeLayout
    android:id="@+id/RLayout"
    android:layout_width="fill_parent"
    android:layout_height="fill_parent"
    xmlns:android="http://schemas.android.com/apk/res/android"
    >
    <TextView
        android:id="@+id/lblComments"
        android:layout_width="wrap_content"
        android:layout_height="wrap_content"
        android:text="This is my lovely dog, Ookii"
        android:layout_alignParentTop="true"
        android:layout_alignParentLeft="true"
        />
    <FrameLayout
        android:layout_width="wrap_content"
        android:layout_height="wrap_content"
        android:layout_alignLeft="@+id/lblComments"
        android:layout_below="@+id/lblComments"
        android:layout_centerHorizontal="true"
        >
        <ImageView
            android:src = "@drawable/ookii"
            android:layout_width="wrap_content"
            android:layout_height="wrap_content"
            />
        <Button
            android:layout_width="124dp"
            android:layout_height="wrap_content"
            android:text="Print Picture"
            />
    </FrameLayout>
</RelativeLayout>
NOTE You can add multiple views to a FrameLayout, but each will be stacked on top of the previous one. This is useful in cases where you want to animate series of images, with only one visible at a time.
ScrollView
A ScrollView is a special type of FrameLayout in that it enables users to scroll through a list of views that occupy more space than the physical display. The ScrollView can contain only one child View or ViewGroup, which normally is a LinearLayout.
The following main.xml content shows a ScrollView containing a LinearLayout, which in turn contains some Button and EditText views:
<?xml version="1.0" encoding="utf-8"?>
<ScrollView
    android:layout_width="fill_parent"
    android:layout_height="fill_parent"
    xmlns:android="http://schemas.android.com/apk/res/android"
    >
    <LinearLayout
        android:layout_width="fill_parent"
        android:layout_height="wrap_content"
        android:orientation="vertical"
        >
        <Button
            android:id="@+id/button1"
            android:layout_width="fill_parent"
            android:layout_height="wrap_content"
            android:text="Button 1"
            />
        <Button
            android:id="@+id/button2"
            android:layout_width="fill_parent"
            android:layout_height="wrap_content"
            android:text="Button 2"
            />
        <Button
            android:id="@+id/button3"
            android:layout_width="fill_parent"
            android:layout_height="wrap_content"
            android:text="Button 3"
            />
        <EditText
            android:id="@+id/txt"
            android:layout_width="fill_parent"
            android:layout_height="300px"
            />
        <Button
            android:id="@+id/button4"
            android:layout_width="fill_parent"
            android:layout_height="wrap_content"
            android:text="Button 4"
            />
        <Button
            android:id="@+id/button5"
            android:layout_width="fill_parent"
            android:layout_height="wrap_content"
            android:text="Button 5"
            />
    </LinearLayout>
</ScrollView>
Figure 3-12 shows the ScrollView enabling users to drag the screen upward to reveal the views located at the bottom of the screen.
