
Eclipse is a highly extensible multi-language software development environment that supports application development of all sorts. Using Eclipse, you could write and test your applications using a wide variety of languages, such as Java, C, C++, PHP, Ruby, and so on. Because of its extensibility, new users of Eclipse often feel inundated with the IDE. Hence, the following sections aim to make you more at home with Eclipse when you develop your Android applications.
Workspaces
Eclipse adopts the concept of a workspace. A workspace is a folder that you have chosen to store all your projects.
When you first start Eclipse, you are prompted to select a workspace (see Figure A-1).

When Eclipse has finished launching the projects located in your workspace, it will display several panes in the IDE (see Figure A-2).
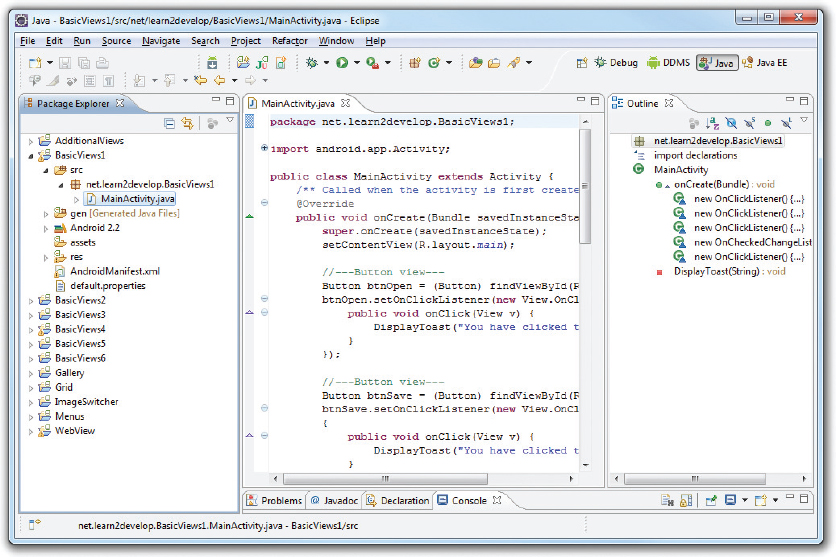
The following sections highlight some of the more important panes that you need to know about when developing Android applications.
Package Explorer
The Package Explorer, shown in Figure A-3, lists all the projects currently in your workspace. To edit a particular item in your project, you can double-click on it and the file will be displayed in the respective editor.

You can also right-click on each item displayed in the Package Explorer to display context sensitive menu(s) related to the selected item. For example, if you wish to add a new .java file to the project, you can right-click on the package name in the Package Explorer and then select New ⇒ Class (see Figure A-4).

Using Projects from Other Workspaces
There may be times when you have several workspaces created to store different projects. If you need to access the project in another workspace, there are generally two ways to go about doing so. First, you can switch to the desired workspace by selecting File ⇒ Switch Workspace (see Figure A-5). Specify the new workspace to work on and then restart Eclipse.

The second method is to import the project from another workspace into the current one. To do so, select File ⇒ Import... and then select General ⇒ Existing Projects into Workspace (see Figure A-6).

In the Select root directory textbox, enter the path of the workspace containing the project(s) you want to import and tick the project(s) you want to import (see Figure A-7). To import the selected project(s), click Finish.

Note that even when you import a project from another workspace into the current workspace, the physical location of the imported project remains unchanged. That is, it will still be located in its original directory. To have a copy of the project in the current workspace, check the “Copy projects into workspace” option.
Editors
Depending on the type of items you have double-clicked in the Package Explorer, Eclipse will open the appropriate editor for you to edit the file. For example, if you double-click on a .java file, the text editor for editing the source file will be opened (see Figure A-8).

If you double-click on the icon.png file in the res/drawable-mdpi folder, the Windows Photo Viewer application will be invoked to display the image (see Figure A-9).

If you double-click on the main.xml file in the res/layout folder, Eclipse will display the UI editor, where you can graphically view and build the layout of your UI (see Figure A-10).

To edit the UI manually using XML, you can switch to XML view by clicking on the main.xml tab located at the bottom of the screen (see Figure A-11).

Perspectives
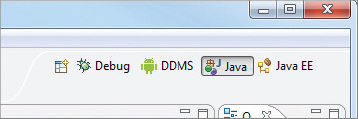
In Eclipse, a perspective is a visual container for a set of views and editors. When you edit your project in Eclipse, you are in the Java perspective (see Figure A-12).
The Java EE perspective is used for developing enterprise Java applications, and it includes other modules that are relevant to it.
You can switch to other perspectives by clicking on the perspective name. If the perspective name is not shown, you can click the Open Perspective button and add a new perspective (see Figure A-13).

The DDMS perspective contains the tools for communicating with Android emulators and devices. This is covered in more detail in Appendix B. The Debug perspective contains panes used for debugging your Android applications. You will learn more about this later in this appendix.
Auto Import of Namespaces
The various classes in the Android library are organized into namespaces. As such, when you use a particular class from a namespace, you need to import the appropriate namespaces, like this:
import android.app.Activity;
import android.os.Bundle;
Because the number of classes in the Android Library is very large, remembering the correct namespace for each class is not an easy task. Fortunately, Eclipse can help find the correct namespace for you, enabling you to import it with just a click.
Figure A-14 shows that I have declared an object of type Button. Because I did not import the correct namespace for the Button class, Eclipse signals an error beneath the statement. When you move the mouse over the Button class, Eclipse displays a list of suggested fixes. In this case, I need to import the android.widget.Button namespace. Clicking the “Import ‘Button’ (android.widget)” link will add the import statement at the top of the file.

Alternatively, you can also use the following key combination: Control+Shift+o. This key combination will cause Eclipse to automatically import all the namespaces required by your class.
Code Completion
Another very useful feature of Eclipse is the support for code completion. Code completion displays a context-sensitive list of relevant classes, objects, methods, and property names as you type in the code editor. For example, Figure A-15 shows code-completion in action. As I type the word “fin,” I can activate the code-completion feature by pressing Ctrl+Space. This will bring up a list of names that begin with “fin.”
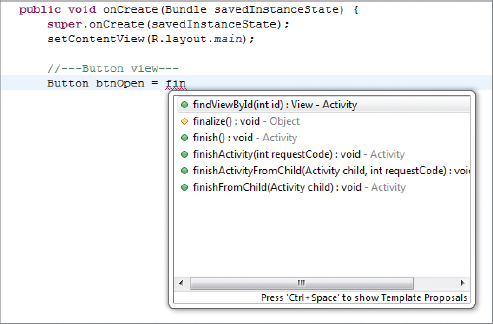
To select the required name, simply double-click on it or use your cursor to highlight it and press the Enter key.
Code completion also works when you type a “.” after an object/class name. Figure A-16 shows an example.

Refactoring
Refactoring is a very useful feature that most modern IDEs support. Eclipse supports a whole slew of refactoring features that make application development efficient.
In Eclipse, when you position the cursor at a particular object/variable, the editor will highlight all occurrences of the selected object in the current source (see Figure A-17).

This feature is very useful for identifying where a particular object is used in your code. To change the name of an object, simply right-click on it and select Refactor ⇒ Rename. . . (see Figure A-18).

After entering a new name for the object, all occurrences of the object will be changed dynamically (see Figure A-19).

A detailed discussion of refactoring is beyond the scope of this book. For more information on refactoring in Eclipse, refer to www.ibm.com/developerworks/library/os-ecref/.