
Nowadays, mobile devices are commonly equipped with GPS receivers. Because of the many satellites orbiting the earth, you can use a GPS receiver to find your location easily. However, GPS requires a clear sky to work and hence does not always work indoors or where satellites can’t penetrate (such as a tunnel through a mountain).
Another effective way to locate your position is through cell tower triangulation. When a mobile phone is switched on, it is constantly in contact with base stations surrounding it. By knowing the identity of cell towers, it is possible to translate this information into a physical location through the use of various databases containing the cell towers’ identities and their exact geographical locations. The advantage of cell tower triangulation is that it works indoors, without the need to obtain information from satellites. However, it is not as precise as GPS because its accuracy depends on overlapping signal coverage, which varies quite a bit. Cell tower triangulation works best in densely populated areas where the cell towers are closely located.
A third method of locating your position is to rely on Wi-Fi triangulation. Rather than connect to cell towers, the device connects to a Wi-Fi network and checks the service provider against databases to determine the location serviced by the provider. Of the three methods described here, Wi-Fi triangulation is the least accurate.
On the Android, the SDK provides the LocationManager class to help your device determine the user’s physical location. The following Try It Out shows you how this is done in code.
TRY IT OUT: Setting the Map to Display a Specific Location Using the Location Manager Class
1. Using the same project created in the previous section, add the following statements in bold to the MainActivity.java file:
package net.learn2develop.LBS;

import com.google.android.maps.MapActivity;
import android.os.Bundle;
import android.widget.Toast;

import android.content.Context;
import android.location.Location;
import android.location.LocationListener;
import android.location.LocationManager;

public class MainActivity extends MapActivity {
    private LocationManager lm;
    private LocationListener locationListener;

    /** Called when the activity is first created. */
    @Override
    public void onCreate(Bundle savedInstanceState) {
        super.onCreate(savedInstanceState);
        setContentView(R.layout.main);

        //---use the LocationManager class to obtain locations data---
        lm = (LocationManager)
            getSystemService(Context.LOCATION_SERVICE);
        locationListener = new MyLocationListener();
    }

    public void TrackingUsingGPS(boolean StartTracking)
    {
        if (StartTracking) {
            lm.requestLocationUpdates(
                LocationManager.GPS_PROVIDER,
                0,
                0,
                locationListener);
        } else    {
            lm.removeUpdates(locationListener);
        }
    }

    public void TrackingUsingCellularWiFi(boolean StartTracking)
    {
        if (StartTracking) {
            lm.requestLocationUpdates(
                LocationManager.NETWORK_PROVIDER,
                0,
                0,
                locationListener);
        } else    {
            lm.removeUpdates(locationListener);
        }
    }

    private class MyLocationListener implements LocationListener
    {
        @Override
        public void onLocationChanged(Location loc) {
            if (loc != null) {
                Toast.makeText(getBaseContext(),
                    "Location changed : Lat: " + loc.getLatitude() +
                    " Lng: " + loc.getLongitude(),
                    Toast.LENGTH_SHORT).show();
            }
            //---obtain a reference to the ShowMap fragment---
            ShowMap mapFragment =
                (ShowMap)getFragmentManager().findFragmentById(
                R.id.mapFragment);
            //---invoke the method from the fragment---
            mapFragment.gotoLocation(loc.getLatitude() +
            "," + loc.getLongitude());
        }

        @Override
        public void onProviderDisabled(String provider) {
        }

        @Override
        public void onProviderEnabled(String provider) {
        }

        @Override
        public void onStatusChanged(String provider, int status,
            Bundle extras) {
        }
    }

    @Override
    protected boolean isRouteDisplayed() {
        // TODO Auto-generated method stub
        return false;
    }
}
2. Add the following statements in bold to the ShowMap.java file:
package net.learn2develop.LBS;

import com.google.android.maps.GeoPoint;
import com.google.android.maps.MapController;
import com.google.android.maps.MapView;
//...

import android.view.Menu;
import android.view.MenuInflater;
import android.view.MenuItem;

public class ShowMap extends Fragment {
    private MapView mapView;
    private MapController mc;
    private GeoPoint p;

    class MapOverlay extends com.google.android.maps.Overlay
    {
        //...
    }

    @Override
    public View onCreateView(LayoutInflater inflater,
    ViewGroup container, Bundle savedInstanceState) {
        return inflater.inflate(
            R.layout.showmap, container, false);
    }

    @Override
    public void onStart() {
        super.onStart();
        mapView = (MapView) getActivity().findViewById(R.id.mapView);
        mc = mapView.getController();

        mapView.setBuiltInZoomControls(true);
        mapView.setSatellite(true);
        mapView.setTraffic(true);
    }

    //---go to a particular location---
    public void gotoLocation(String latlng)
    {
        //---the location is represented as "lat,lng"---
        String[] coordinates = latlng.split(",");
        double lat = Double.parseDouble(coordinates[0]);
        double lng = Double.parseDouble(coordinates[1]);
        p = new GeoPoint((int) (lat * 1E6),
                         (int) (lng * 1E6));
        mc.animateTo(p);
        mc.setZoom(16);

        //---Add a location marker---
        MapOverlay mapOverlay = new MapOverlay();
        List<Overlay> listOfOverlays = mapView.getOverlays();
        listOfOverlays.clear();
        listOfOverlays.add(mapOverlay);

        mapView.invalidate();
    }

    @Override
    public void onCreate (Bundle savedInstanceState) {
        super.onCreate(savedInstanceState);
        //---need to call this in order to fire the
        // onCreateOptionsMenu() event---
        setHasOptionsMenu(true);
    }

    //---creating action items on the action bar for a fragment---
    @Override
    public void onCreateOptionsMenu(Menu menu, MenuInflater inflater) {
        super.onCreateOptionsMenu(menu, inflater);
        CreateMenu(menu);
    }

    //---when a menu item is selected---
    @Override
    public boolean onOptionsItemSelected(MenuItem item)
    {
        return MenuChoice(item);
    }

    //---create the action items---
    private void CreateMenu(Menu menu)
    {
        MenuItem mnu1 = menu.add(0, 0, 0, "Start Tracking");
        {
            mnu1.setShowAsAction(
                MenuItem.SHOW_AS_ACTION_IF_ROOM |
                MenuItem.SHOW_AS_ACTION_WITH_TEXT);
        }

        MenuItem mnu2 = menu.add(0, 1, 1, "Stop Tracking");
        {
            mnu2.setShowAsAction(
                MenuItem.SHOW_AS_ACTION_IF_ROOM |
                MenuItem.SHOW_AS_ACTION_WITH_TEXT);
        }

        MenuItem mnu3 = menu.add(0, 2, 1, "Use GPS");
        {
            mnu3.setShowAsAction(
                MenuItem.SHOW_AS_ACTION_WITH_TEXT);
            mnu3.setCheckable(true);
        }

        MenuItem mnu4 = menu.add(0, 3, 1, "Use Cellular/WiFi");
        {
            mnu4.setShowAsAction(
                MenuItem.SHOW_AS_ACTION_WITH_TEXT);
            mnu4.setCheckable(true);
        }
    }

    private boolean MenuChoice(MenuItem item)
    {
        //---obtain an instance of the activity---
        MainActivity mainActivity;
        mainActivity = (MainActivity) getActivity();

        switch (item.getItemId()) {
        case 0:
            Toast.makeText(getActivity(), "Tracking turned on",
                Toast.LENGTH_LONG).show();
            //---calling the methods from the activity---
            mainActivity.TrackingUsingGPS(true);
            mainActivity.TrackingUsingCellularWiFi(true);
            return true;
        case 1:
            Toast.makeText(getActivity(), "Tracking turned off",
                Toast.LENGTH_LONG).show();
            mainActivity.TrackingUsingGPS(false);
            mainActivity.TrackingUsingCellularWiFi(false);
            return true;
        case 2:
            if (!item.isChecked()) {
                Toast.makeText(getActivity(),
                    "Using GPS for location tracking",
                    Toast.LENGTH_LONG).show();
            }
            item.setChecked(!(item.isChecked()));
            mainActivity.TrackingUsingGPS(item.isChecked());
            return true;
        case 3:
            if (!item.isChecked()) {
                Toast.makeText(getActivity(),
                    "Using Cellular/WiFi for location tracking",
                    Toast.LENGTH_LONG).show();
            }
            item.setChecked(!(item.isChecked()));
            mainActivity.TrackingUsingCellularWiFi(item.isChecked());
            return true;
        }
        return false;
    }
}
3. Add the following statements in bold to the AndroidManifest.xml file:
<?xml version="1.0" encoding="utf-8"?>
<manifest xmlns:android="http://schemas.android.com/apk/res/android"
    package="net.learn2develop.LBS"
    android:versionCode="1"
    android:versionName="1.0">
    <uses-sdk android:minSdkVersion="11" />

    <uses-permission android:name="android.permission.INTERNET">
    </uses-permission>
    <uses-permission
        android:name="android.permission.ACCESS_COARSE_LOCATION">
    </uses-permission>
    <uses-permission
        android:name="android.permission.ACCESS_FINE_LOCATION">
    </uses-permission>

    <application android:icon="@drawable/icon" android:label="Where Am I">
        <uses-library android:name="com.google.android.maps" />
        <activity android:name=".MainActivity"
                  android:label="@string/app_name">
            <intent-filter>
               <action android:name="android.intent.action.MAIN" />
               <category android:name="android.intent.category.LAUNCHER" />
            </intent-filter>
        </activity>
    </application>
</manifest>
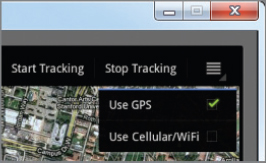
4. Press F11 to debug the application on the Android emulator. Figure 4-17 shows the action items displayed on the action bar.

5. Clicking the Start Tracking item makes the application listen for location information using GPS, the cellular network, and Wi-Fi. Clicking the Stop Tracking item stops the application from listening for location information. Alternatively, you can also click the Use GPS item to only use GPS, and click Use Cellular/Wi-Fi to use cellular and Wi-Fi networks. For this exercise, click the Use GPS item.
NOTE When testing on the Android emulator, clicking the Start Tracking or Use Cellular/Wi-Fi items causes the application to crash. This is because the NETWORK_PROVIDER is not supported on the Android 3.0 emulator.
6. To simulate GPS data received by the Android emulator, use the Location Controls tool (see Figure 4-18) located in the DDMS perspective.
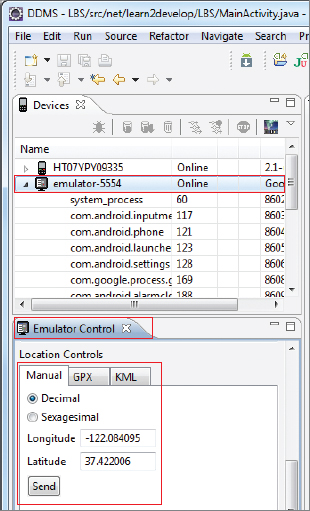
7. Ensure that you have first selected the emulator in the Devices tab. Then, in the Emulator Control tab, locate the Location Controls tool and select the Manual tab. Enter a latitude and longitude and click the Send button.
8. Note that the map on the emulator now animates to another location (see Figure 4-19). This proves that the application has received the GPS data.

How It Works
In Android, location-based services are provided by the LocationManager class, located in the android.location package. Using the LocationManager class, your application can obtain periodic updates of the device’s geographical locations, as well as fire an intent when it enters the proximity of a certain location.
In the MainActivity.java file, you first obtain a reference to the LocationManager class using the getSystemService() method. To be notified whenever there is a change in location using GPS, you need to register a request for location changes so that your program can be notified periodically. This is done via the requestLocationUpdates() method:
        lm.requestLocationUpdates(
                LocationManager.GPS_PROVIDER,
                0,
                0,
                locationListener);
This method takes four parameters:
- provider — The name of the provider with which you register. In this case, you are using GPS to obtain your geographical location data.
- minTime — The minimum time interval for notifications, in milliseconds.
- minDistance — The minimum distance interval for notifications, in meters.
- listener — An object whose onLocationChanged() method will be called for each location update.
The MyLocationListener class implements the LocationListener abstract class. You overrode four methods in this implementation:
- onLocationChanged(Location location) — Called when the location has changed
- onProviderDisabled(String provider) — Called when the provider is disabled by the user
- onProviderEnabled(String provider) — Called when the provider is enabled by the user
- onStatusChanged(String provider, int status, Bundle extras) — Called when the provider status changes
In this example, you’re more interested in what happens when a location changes, so you write some code in the onLocationChanged() method. Specifically, when a location changes, you display a small dialog on the screen showing the new location information: latitude and longitude. You show this dialog using the Toast class.
To use the Cellular and Wi-Fi networks (important for indoor use) to obtain your location data, you use the network location provider, like this:
        lm.requestLocationUpdates(
                LocationManager.NETWORK_PROVIDER,
                0,
                0,
                locationListener);
You combine both the GPS location provider with the network location provider within your application.
To stop listening for location updates, you use the removeUpdates() method:
lm.removeUpdates(locationListener);
In the ShowMap fragment, you added four action items to the Action Bar, two of which are displayed on the Action Bar, and two under the overflow action item. In Chapter 2, you learned how to add action items to the Action Bar by overriding the onCreateOptionsMenu() method within the activity. However, in this case, the fragment is adding action items, instead of the activity. To enable a fragment to add action items, you need to call the setHasOptionsMenu() method so that the fragment fires the onCreateOptionsMenu():
    @Override
    public void onCreate (Bundle savedInstanceState) {
        super.onCreate(savedInstanceState);
        //---need to call this in order to fire the
        // onCreateOptionsMenu() event---
        setHasOptionsMenu(true);
    }
Once this is done, the rest is relatively straightforward:
    //---creating action items on the action bar for a fragment---
    @Override
    public void onCreateOptionsMenu(Menu menu, MenuInflater
    inflater) {
            super.onCreateOptionsMenu(menu, inflater);
            CreateMenu(menu);
    }

    //---when a menu item is selected---
    @Override
    public boolean onOptionsItemSelected(MenuItem item)
    {
        return MenuChoice(item);
    }

    //---create the action items---
    private void CreateMenu(Menu menu)
    {
        MenuItem mnu1 = menu.add(0, 0, 0, "Start Tracking");
        {
            mnu1.setShowAsAction(
                MenuItem.SHOW_AS_ACTION_IF_ROOM |
                MenuItem.SHOW_AS_ACTION_WITH_TEXT);
        }

        MenuItem mnu2 = menu.add(0, 1, 1, "Stop Tracking");
        {
            mnu2.setShowAsAction(
                MenuItem.SHOW_AS_ACTION_IF_ROOM |
                MenuItem.SHOW_AS_ACTION_WITH_TEXT);
        }

        MenuItem mnu3 = menu.add(0, 2, 1, "Use GPS");
        {
            mnu3.setShowAsAction(
                MenuItem.SHOW_AS_ACTION_WITH_TEXT);
            mnu3.setCheckable(true);
        }

        MenuItem mnu4 = menu.add(0, 3, 1, "Use Cellular/WiFi");
        {
            mnu4.setShowAsAction(
                MenuItem.SHOW_AS_ACTION_WITH_TEXT);
            mnu4.setCheckable(true);
        }
    }

    private boolean MenuChoice(MenuItem item)
    {
       MainActivity mainActivity;
       mainActivity = (MainActivity) getActivity();

        switch (item.getItemId()) {
        case 0:
            Toast.makeText(getActivity(), "Tracking turned on",
                Toast.LENGTH_LONG).show();
            mainActivity.TrackingUsingGPS(true);
            mainActivity.TrackingUsingCellularWiFi(true);
            return true;
        case 1:
            Toast.makeText(getActivity(), "Tracking turned off",
                Toast.LENGTH_LONG).show();
            mainActivity.TrackingUsingGPS(false);
            mainActivity.TrackingUsingCellularWiFi(false);
            return true;
        case 2:
            if (!item.isChecked()) {
                Toast.makeText(getActivity(),
                    "Using GPS for location tracking",
                    Toast.LENGTH_LONG).show();
            }
            item.setChecked(!(item.isChecked()));
            mainActivity.TrackingUsingGPS(item.isChecked());
            return true;
        case 3:
            if (!item.isChecked()) {
                Toast.makeText(getActivity(),
                    "Using Cellular/WiFi for location tracking",
                    Toast.LENGTH_LONG).show();
            }
            item.setChecked(!(item.isChecked()));
            mainActivity.TrackingUsingCellularWiFi(item.isChecked());
            return true;
        }
        return false;
    }
Note that when a particular option is selected (for example, Use GPS), a checkmark is displayed next to it (see Figure 4-20). This is achieved using the setChecked() method of the MenuItem object. In order for a checkmark to be displayed, you need to call its setCheckable() method first.
In order to call a method on the activity from within a fragment, you need to obtain an instance of the activity and then call its method directly, like this:
        //---obtain an instance of the activity---
        MainActivity mainActivity;
        mainActivity = (MainActivity) getActivity();

        //---calling the methods from the activity---
        mainActivity.TrackingUsingGPS(true);
        mainActivity.TrackingUsingCellularWiFi(true);
MONITORING A LOCATION
One very cool feature of the LocationManager class is its ability to monitor a specific location. This is achieved using the addProximityAlert() method. The following code snippet shows how to monitor a particular location so that if the user is within a five-meter radius from that location, your application will fire an intent to launch the web browser:
    //--use the LocationManager class to obtain locations data--
    lm = (LocationManager)
        getSystemService(Context.LOCATION_SERVICE);

    //---PendingIntent to launch activity if the user is within
    // some locations---
    PendingIntent pendIntent = PendingIntent.getActivity(
        this, 0, new
        Intent(android.content.Intent.ACTION_VIEW,
          Uri.parse("http://www.amazon.com")), 0);

    lm.addProximityAlert(37.422006, -122.084095, 5, -1, pendIntent);
The addProximityAlert() method takes five arguments: latitude, longitude, radius (in meters), expiration (time for the proximity alert to be valid, after which it will be deleted; -1 for no expiration), and the pending intent.
Note that if the Android device’s screen goes to sleep, the proximity is also checked once every four minutes in order to preserve the battery life of the device.