Chapter 13. Printers
Printers are the number two output device right behind video displays. Their main purpose is to output hard copy versions of what you see on the computer screen. Most printers connect via USB, although you also encounter printers that connect directly to the network—and on the rare occasion, printers that connect to parallel ports. Some printers also act as fax machines, copiers, and scanners; these are known as multifunction devices or multifunction printers (MFPs).
Generally, Windows Vista behaves the same as Windows XP when it comes to printing. So whenever one operating system is mentioned in this chapter, the same applies to the other operating system, unless otherwise stated.
This chapter is broken into two sections. First are printer types and technologies, and second is installing, configuring, and troubleshooting printers.
Printer Types and Technologies
Businesses utilize several types of printers. The most common business-oriented printer is the laser printer. However inkjet printers are more prevalent in the home due to their lower cost and their capability to print in color with excellent resolution. A technician might also encounter thermal and impact printers. Some printers connect directly to a computer; others connect to the network or to a print server. This section describes the four main types of printers and how they function; it also discusses the differences between local and network printers.
Types of Printers
Each type of printer has its own characteristics that affect how a technician installs, configures, and troubleshoots them. The most common type of printer that a business would use is the laser printer; this type of printer also happens to be the most complicated and difficult to troubleshoot.
Laser Printers
Laser printers can produce high-quality text and graphics on cut sheets of paper; printers that print to individual pieces of paper are known as page printers. The bulk of laser printers print in black, but there are also color laser printers, which of course are more expensive. They are called laser printers because inside the printer is a laser beam that projects an image of the item to be printed onto an electrically charged drum; this image is later transferred to the paper. Text and images that are shown on paper are created from electrically charged toner, which is a type of powder stored in a replaceable toner cartridge. The type of toner used can vary from one brand to the next, but they all work essentially the same way.
Known also as a photoelectric or photosensitive drum, the laser printer drum is at the center of the whole laser printing process, but there are a couple of other important components including the primary corona wire, transfer corona wire, fusing assembly, and of course, the laser itself. These components are shown in Figure 13.1.
Figure 13.1 Components involved in the six-step laser printing process

The following list describes the six-step laser printing process:
1. Cleaning: A rubber blade removes excess toner from the drum as it spins. An erasing lamp removes any leftover charge on the drum bringing it to zero volts.
2. Conditioning: Also known as charging. A negative charge is applied to the drum by the primary corona wire, which is powered by a high-voltage power supply within the printer.
3. Writing: Also known as exposing. The laser is activated and “writes” to the drum as it spins. Where the laser hits the drum, it dissipates the negative charge toward the center of the drum that is grounded. The “written” areas of the drum now have a lesser negative charge.
4. Developing: The surface of the drum that was previously exposed to the laser is now applied with negatively charged toner. This toner has a higher charge than the areas of the drum that were written to.
5. Transferring: The toner, and therefore the text or image, is transferred to paper as the drum rolls over it. On many laser printers, the paper slides between the drum and a positively charged corona wire (known as the transfer corona wire). The transfer corona wire applies the positive charge to the paper. Because the paper now has a positive charge, and the toner particles on the drum have a negative charge, the toner is attracted to the paper. (When it comes to voltages, opposites attract.) In many printers the paper passes by a static elimination device (often a strip), which removes excess charge from the paper.
6. Fusing: The toner is fused to the paper. The paper passes through the fusing assembly that includes pressurized rollers and a heating element that can reach approximately 400 degrees F (or about 200 degrees C).
Note
On some laser printers, the cleaning stage occurs at the end of the fusing stage, cleaning off the photosensitive drum and reducing its voltage to zero.
ExamAlert
Know the six-step laser printing process (also known as the electrophotographic printing process) for the exam.
In some laser printers the drum, laser, and primary corona wire are contained within the toner cartridge. Issues that are caused by these components can usually be fixed just by replacing the toner cartridge.
Note
Toner cartridges are replaceable; they are known as consumables. Whatever material it is that actually prints on to paper is usually considered a consumable, regardless of the type of printer.
Laser printers have some advantages over other printers:
• Speed: A laser printer can print anywhere from 10 to 100 pages per minute depending on the model and whether it is a color or black-and-white laser printer.
• Print quality: The laser printer commonly prints at 600DPI (dots per inch), which is considered letter quality, but 1,200DPI and higher resolution printers are also available.
Inkjet Printers
Inkjet printers are common in small offices, in home offices, and for personal use. They can print documents but more commonly print photographs and graphical information in color; most of the time they connect to the computer by way of USB.
The inkjet printer works by propelling ink onto various sizes of paper. Many inkjets store ink in multiple ink cartridges that are consumable; they have to be replaced when empty. Some inkjet printers stop operating if just one of the ink cartridges is empty. Two common types of inkjet printers are the thermal inkjet and the piezoelectric inkjet:
• Thermal inkjets: These account for the bulk of consumer inkjets and are the more recognizable type. To move the ink to the paper, heat is sent through the ink cartridge, forming a bubble (known as the thermal bubble) that pushes the ink onto the paper; immediately afterward another charge of ink is readied. The reservoir of ink is within the ink cartridge; this is where the heat transfer occurs. HP and Canon develop many models of thermal inkjet printers. Don’t confuse thermal inkjets with thermal printers.
• Piezoelectric inkjets: These account for the bulk of commercial inkjets. The printing processes within a piezoelectric inkjet and a thermal inkjet are similar; however, the piezo inkjet applies current to the ink material, causing it to change shape and size, forcing the ink onto the paper. The reservoir of ink is in another area outside of where the current is applied. This process enables longer print head life as compared to thermal inkjets. Epson develops many models of piezoelectric inkjet printers. Piezoelectric inkjets can also be found in manufacturing assembly lines.
The inkjet print process is fairly simple:
1. The paper or other media is pulled or moved into position by a roller mechanism, or moved into position by an assembly line’s conveyor belt as with some piezoelectric inkjets.
2. The print head, located on a mechanical arm, moves across the paper, placing black and colored ink as directed by the print driver.
3. At the end of the line, the paper or media is advanced, and the print head either reverses direction and continues to print (often referred to as Hi-Speed mode) or returns to the left margin before printing continues.
4. After the page is completed, the paper or other media is ejected.
Thermal Printers
Thermal printers produce text and images by heating specially coated thermal paper. It is typical to see thermal printers used in point-of-sale systems, gas station pumps, and so on. Thermal printers consist of the following parts:
• Thermal head: This generates the heat and takes care of printing to the paper.
• Platen: This is the rubber roller that feeds the paper past the print head.
• Spring: Applies pressure to the print head, which brings the print head into contact with the paper.
• Circuit board: Controls the mechanism that moves the print head.
To print, thermal paper is inserted between the thermal head and the platen. The printer sends current to the thermal head, which in turn generates heat. The heat activates the thermo-sensitive coloring layer of the thermal paper, which becomes the image.
Impact Printers
Impact printers use force to transfer ink to paper, for example, a print head striking a ribbon with paper directly behind it, similar to a typewriter. This type of printer is somewhat deprecated although certain environments might still use it: auto repair centers, warehouses, accounting departments, and so on.
One type of impact printer, the daisy-wheel, utilizes a wheel with many petals, each of which has a letter form (an actual letter) at the tip of the petal. These strike against the ribbon that impresses ink upon the paper that is situated behind the ribbon. But by far the most common type of impact printer is the dot-matrix.
Dot-matrix printers are also known as line printers because they print text one line at a time and can keep printing over a long roll of paper, as opposed to page printers that print to cut sheets of paper. Dot-matrix printers use a matrix of pins that work together to create characters, instead of a form letter. The print head that contains these pins strikes the ribbon that in turn places the ink on the paper. Print heads either come with 9 pins or 24 pins, with the 24-pin version offering better quality, known as near letter quality (NLQ). Dot-matrix printers are loud and slow but are cheap to maintain.
Local Versus Network Printers
A local printer is one that connects directly to a computer, normally by USB, or parallel connection. When a user works at a computer, that computer is considered to be the local computer. So, if a printer is connected to that computer, it is known as the local printer.
A network printer is one that connects directly to the network or to a print server device. Network printers are shared by more than one user on the computer network. Usually, network printers are given an IP address and become yet another host on the network. If the printer connects directly to the network, it is usually by way of a built-in RJ45 port on the printer, just like how a computer’s network card connects to the network. A print server could be a computer or smaller black box device. Many SOHO routers from Linksys and D-link offer print server capabilities. In this case the printer connects via USB to the print server/router, and a special piece of software is installed on any client computers that want to print to that printer.
Regardless of whether a printer is local or on the network, it can be controlled by Windows, described in the following section.
Cram Quiz
Answer these questions. The answers follow the last question. If you cannot answer these questions correctly, consider reading this section again until you can.
1. Which type of printer uses a photoelectric drum?
![]() A. Impact
A. Impact
![]() B. Dot-Matrix
B. Dot-Matrix
![]() C. Laser
C. Laser
![]() D. Inkjet
D. Inkjet
2. During which step of the six-step laser printing process is the transfer corona wire involved?
![]() A. Developing
A. Developing
![]() B. Transferring
B. Transferring
![]() C. Fusing
C. Fusing
![]() D. Cleaning
D. Cleaning
3. Which stage of the six-step laser printing process involves extreme heat?
![]() A. Fusing
A. Fusing
![]() B. Transferring
B. Transferring
![]() C. Exposing
C. Exposing
![]() D. Writing
D. Writing
4. What is the most common type of consumer-based printer?
![]() A. Thermal printer
A. Thermal printer
![]() B. Laser printer
B. Laser printer
![]() C. Thermal inkjet
C. Thermal inkjet
![]() D. Impact printer
D. Impact printer
5. What is the rubber roller that feeds the paper past the print head known as?
![]() A. HVPS
A. HVPS
![]() B. Cartridge
B. Cartridge
![]() C. Spring
C. Spring
![]() D. Platen
D. Platen
6. What is a common amount of pins in a dot-matrix printer’s print head?
![]() A. 40
A. 40
![]() B. 24
B. 24
![]() C. 8
C. 8
![]() D. 184
D. 184
Cram Quiz Answers
1. C. The laser printer is the only type of printer that uses a photoelectric drum.
2. B. The transfer corona wire gets involved in the six-step laser printing process during the transferring step.
3. A. The fusing step uses heat (up to 200 degrees Celsius) and pressure to fuse the toner permanently to the paper.
4. C. The thermal inkjet is the most common type of printer used in the consumer market today.
5. D. The platen is the rubber roller that feeds the paper past the print head.
6. B. Dot-matrix printer print heads usually have 24 pins or 9 pins.
Installing, Configuring, and Troubleshooting Printers
Physically installing printers and installing device drivers is usually straightforward, but the configuration of printers in Windows is more complex because so many configurable options exist. Troubleshooting as always should be approached from a logical standpoint. This section covers the installation, configuration, and troubleshooting of printers.
Printer Installation and Drivers
When installing printers focus on several things:
• Compatibility: Make sure that the printer is compatible with the version of Windows that runs on the computer that controls the printer. Check the Windows Vista/XP Logo’d Products List to verify this. If the printer is to connect to the network, make sure that it has the right type of compatible network adapter to do so.
• Installing printer drivers: Generally, the proper procedure is to install the printer driver to Windows before physically connecting the printer. However, if the driver already exists on the computer, the printer can simply be connected. Usually, the best bet is to use the driver that came on disc with the printer, or download the latest driver from the manufacturer’s website. Verify that the driver to be installed is the correct one and that it is for the correct operating system, and version of the operating system, for example 32-bit or 64-bit versions of Windows. Printer drivers are installed in a similar fashion to other drivers described in this book, but Windows includes a wizard specifically for printers called the Add Printer Wizard. This can be accessed by navigating to Start and opening the Control Panel in Classic mode; then select Printers (in Vista) or Printers and Faxes (XP). Any current printers should be listed in the right window pane. From there, right-click anywhere in the work area and select Add Printer.
• Connecting the device: In general, devices connecting via USB or IEEE 1394 can be connected without turning the computer off. (That is, they are hot-swappable.) However, devices that connect to a parallel, SCSI, or serial port require that the computer be shut down first. (Parallel ports are less common today, but if a user wants to connect a printer to one, they need to use a compatible IEEE 1284 cable that has a 25-pin parallel connector on one end and a centronics connector on the other.) Plug the USB or other connector cable into the computer first, and then connect the printer to an AC outlet. (It’s recommended to use a surge protector for printers but is generally not recommended to use a UPS for a laser printer.) Verify that the device turns on.
• Calibrating the printer: Color laser printers, inkjet printers, and multifunction printers might need to be calibrated before use. This involves aligning the printing mechanism to the paper and verifying color output. Usually the software that accompanies the printer guides a user through this process. In some cases, these calibration tests can be done via the small display on the printer.
• Testing the printer: First test the printer by printing a test page in Windows. This can be done by locating the printer in the Printers window (Printers and Faxes in XP), right-clicking it, and selecting Properties; then click the Print Test Page button on the General tab. The resulting page should show the operating system the local computer runs and various other configuration and driver information. If the page can be read properly and the Windows logo is using the correct colors, the test passed. Some printers offer a test page option on the small display of the printer as well. After a test page has been printed, it might be wise to try printing within the most used applications as well, just to make sure they work properly. Some applications might behave differently, and some configurations of printers in Windows could cause a particular application to have print failures.
Configuring Printers
Configuration of printers can be done in one of two places. The first is the small display that might be included on a printer; these are more common on laser printers. These menu driven displays are usually user-friendly and intuitive. But the second, and the one that I’d like to focus on in this section, is within Windows, specifically by double-clicking the printer icon within the Printers window and by accessing the Properties page of the printer. Both of these can be done by accessing the Printers page (Printers and Faxes page in XP). To open this window navigate to Start, open the Control Panel in classic mode, and select Printers (Printers and Faxes in XP). Another option would be for a user to open Windows Explorer and navigate to Control Panel; then select Printers. To open a printer simply double-click it. To manage it’s properties right-click the printer in question and select Properties. If you work with printers often, consider placing a shortcut to the printer or printers on the desktop or within the Quick Launch. Several items can be configured by double-clicking the printer and within the Printer Properties window including Managing print jobs, setting the priority of the printer, configuring the print spooler, and managing permissions.
Managing Printers and Print Jobs
To manage a printer or an individual print job, just double-click the printer in which the job was sent to. A window similar to Figure 13.2 should display on the monitor.
Figure 13.2 A typical printer window with one print job

In Figure 13.2 you can notice that one print job called Document1 is listed. If the job went to the printer properly, it would say Printing under the Status column. Any other message would mean that the job was either spooled, queued, stopped, or has failed. These jobs can be paused, restarted, or stopped completely if they are not printing properly. This can be done by right-clicking in the job or by selecting the Document menu. Keep in mind that larger documents take longer to spool before they start printing. In addition to this, all documents can be paused or canceled, or the entire printer can be taken offline from the Printer menu. Use these tools to troubleshoot any printing misqueues.
Printer Priority
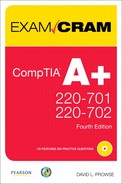
Printer priority can be configured within the Advanced tab of a printer’s Properties page, as shown in Figure 13.3.
Figure 13.3 Printer priority and spooling
The priority of a printer can be configured from 1 to 99, 99 being the highest. This is useful in two situations:
• Scenario 1: Let’s say that several users and their manager share a printer. Chances are that you would want to give the manager the highest priority when it comes to print jobs. It is possible to install two software printers in Windows that point to the same physical printer. The first software printer could be given a higher priority (say 99) and a share name such as “manager,” with permissions that allow access only by the manager. The second software printer would be given a lower priority (say 50) and use a share name such as “users.” After the client computers are configured properly to access the correct printers, the manger should always get precedence over other print jobs on the shared physical printer.
• Scenario 2: Imagine that there are two or more physical printers that have been combined to create a printer pool. Each printer in the pool can be given a different priority. One printer in the pool is often set aside for managers and executives with a higher priority than the others.
Print Spooling
Whenever a job goes to print there are three possible options:
• Print directly to the printer: This means that the print job goes right to the printer without any delays. This relies solely on the amount of memory in the printer (which can be increased BTW just like in computers). Of course, if the print job is larger than the amount of RAM in the printer, the job will probably fail. Usually a better solution is to spool the document.
• Start printing immediately: This is the first of two spooling options. When this setting is selected, one page at a time of the document will be spooled to the hard disk drive. When an entire page has been spooled, it is sent to the printer for printing. This repeats until all the pages of the document have been spooled and ultimately printed. This is the default setting in Windows and is usually the best option, as shown in Figure 13.3.
• Start printing after last page is spooled: This means that the entire document will be spooled to the hard drive, and then pages are sent to the printer for printing. This is usually slower than “Start printing immediately” but might have less issues such as stalls or other printing failures.
The spooler is controlled by the Print Spooler service. Not only can you have issues in which print jobs or printers stop working, but the Print Spooler service can fail also. This service can be started, stopped, and restarted from the GUI and from the Command Prompt:
• Adjusting the Print Spooler service in Computer Management: Open the Computer Management console window; then click the + sign to expand Services and Applications and click Services. Now, in the right window pane, scroll until you find the Print Spooler service. To start a stopped service, right-click it and click Start. Alternatively, you can click the Start or other buttons on the toolbar.
• Adjusting the Print Spooler service in the Command Prompt: In Windows Vista you need to run these commands as an administrator; let’s review the two ways to do this.
1. Click Start > All Programs > Accessories; then right-click Command Prompt and select Run as Administrator.
2. Click Start and type cmd in the search field, and instead of pressing Enter, press Ctrl+Shift+Enter.
Windows XP does not require opening the Command Prompt as an administrator. When the Command Prompt is open, you can start the Print Spooler service by typing net start spooler. Typing Net stop spooler stops the service.
ExamAlert
Know how to configure spooling and how to start and stop the Print Spooler service within Computer Management and in the Command Prompt.
New XPS Feature in Windows Vista
Windows Vista incorporates the XML Paper Specification (XPS) print path. The XPS spooler is meant to replace the standard Enhanced Metafile print spooler that Windows has used for years. With XPS (part of the Windows Presentation Foundation) Vista provides improved color and graphics support, and support for the CMYK colorspace, and reduces the need for colorspace conversion.
This is implemented as the Microsoft XPS Document Writer that can be found in Start > Control Panel > Printers. A document created within any application in Windows can be saved as an .XPS file to be later viewed on any computer that supports XPS. It can also be printed from any computer that supports XPS, but will print only with proper fidelity if the computer has an XPS-compliant printer.
Printer Pooling
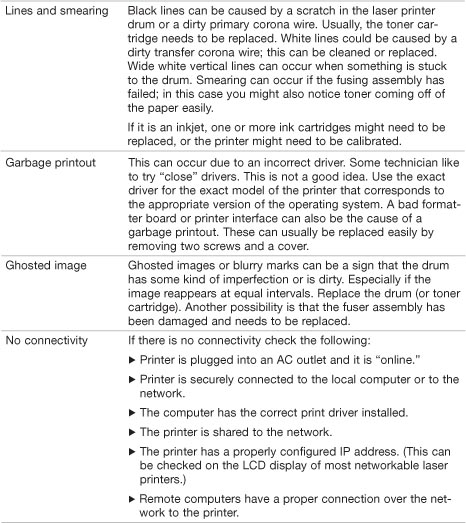
Printer pooling takes multiple separate printers and combines them to form a team of printers that work together to complete print jobs as quickly as possible. This can be accomplished from the Ports tab of the printer’s Properties window. Normally a printer will be shown next to the port it connects to. To add a second installed printer to the pool click Enable printer pooling; then check mark the other printer listed, as shown in Figure 13.4
Figure 13.4 Enabled printer pooling option

As you can see in Figure 13.4, the Printer Pooling option has been selected, and a second printer (HP LaserJet 5) has been check marked that adds it to the pool along with the Epson Stylus printer. At this point, any jobs sent to the first printer that can’t be processed right away will be transferred to the second printer. This is a one-way printer pool; two-way printer pools are also possible but aren’t done as much. Quite often, printer pools consist of all identical printers.
Note
Remote printers can be connected to and controlled from the ports tab. This can be done by adding a port and then entering the IP address of the printer to be controlled, or the computer name of the computer that the remote printer is connects to.
Sharing Printers and Managing Permissions
A printer must first be shared before other users can send print jobs to it. There are two steps involved in sharing printers in Windows. First, printer sharing in general must be enabled:
• To enable Printer Sharing in Windows Vista, go to Start > Control Panel > Network and Sharing Center; click the down arrow for Printer Sharing and select the radio button labeled Turn on Printer Sharing.
• To enable Printer Sharing in Windows XP, go to Start > Control Panel > Network Connections. Then right-click any network adapter and select Properties. Check mark File and Printer Sharing for Microsoft Networks. This is normally enabled by default.
Next, the individual printer needs to be shared. This can be done in the Sharing tab of the printer’s Properties window. Click the Share This Printer radio button and give the printer a share name. Note that the share name does not need to be the same as the printer name. Click OK, and the printer should show up as shared within the Printers window.
Permissions can be set for a printer in the Security tab of the printer’s Properties window. Users and groups can be added in this window, and the appropriate permission can be assigned including Print, Manage Printers, and Manage Documents. Regular users normally are assigned the Print permission, whereas administrators get all permissions, enabling them to pause the printer or cancel all documents (Manage Printers), and pause, cancel, and restart individual documents. For more information on permissions, see Chapter 15 “Security.”
Selecting a Separator Page
Separator pages help users to find the start and end points of their print job. The separator page might be printed as a blank piece of paper or with the username and title of the document to be printed. This can be added from the Advanced tab by clicking the Separator Page button. From there click the browse button that shows the System32 folder by default. Initially four separator pages are in this folder, the most common of which are pcl.sep and pscript.sep. However, some companies opt to use a custom separator page. Click the appropriate separator page and click open; then click OK. The separator page will be added to the appropriate documents.
Note
There are a lot of other settings in the printer Properties window. Spend some time looking through the various tabs and configurations to better prepare yourself for the exam.
Troubleshooting Printers
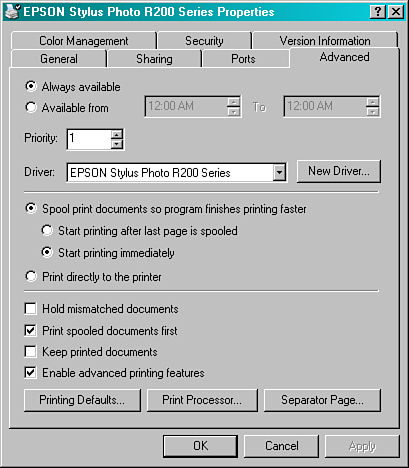
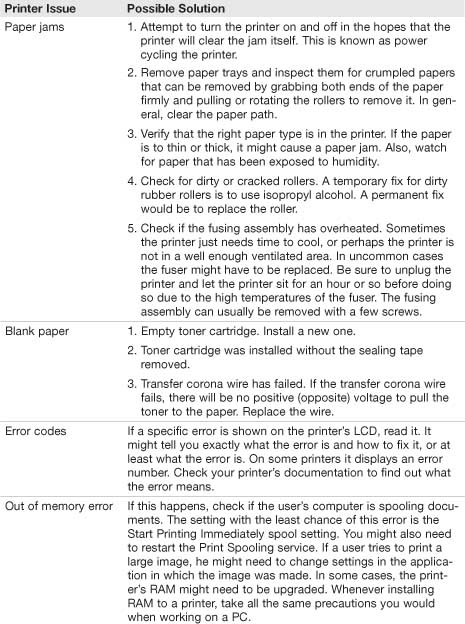
Sometimes companies have paid consultants that take care of all printers and copying machines, and sometimes taking care of these devices is the job of the in-house IT guy. Either way, it is a good idea to know some of the basic issues that can occur with printers and how to troubleshoot them. Table 13.1 describes some of these issues and possible solutions. Some of these issues, for example paper jams and resulting error codes, might be displayed on a printer’s LCD.
Table 13.1 Printer Problems and Solutions
In general, when working with printers, try to keep them clean and use printer maintenance kits. Like changing the oil in a car, printers need maintenance also. HP and other manufacturers offer maintenance kits that include items such as fusers, rollers, separation pads, and instructions on how to replace all these items. Manufacturers recommend that this maintenance be done every once in a while, for example every 200,000 pages printed. When you finish installing a maintenance kit, be sure to reset the maintenance count.
When troubleshooting printers, don’t forget to RTM! Read The Manual! Most printers come with one, and they often have a troubleshooting section toward the back. In some cases, the manual will be in PDF format on the disc that accompanied the printer. Regardless of whether a manual accompanied the printer or if it can’t be found, the manufacturer will usually have the manual on its website in addition to a support system for its customers. Use it! And keep in mind that many products come with a warranty, or the customer might have purchased an extended warranty. I remember one time I was troubleshooting two-color laser printers. They were only two weeks old when they failed. When the manufacturer knew the error code that was flashing on the printer’s display, it didn’t want to hear anything else; it simply sent out a tech the next day because the device was under warranty. To sum up, let the manufacturer help you. If it doesn’t cost the company anything, it can save you a lot of time and aggravation.
Cram Quiz
Answer these questions. The answers follow the last question. If you cannot answer these questions correctly, consider reading this section again until you can.
1. When connecting a laser printer’s power cable, what type of device is not recommended?
![]() A. Surge protector
A. Surge protector
![]() B. Line conditioner
B. Line conditioner
![]() C. UPS
C. UPS
![]() D. AC outlet
D. AC outlet
2. When finished installing a new printer and print drivers, what should you do? (Select all that apply.)
![]() A. Calibrate the printer.
A. Calibrate the printer.
![]() B. Install the print drivers.
B. Install the print drivers.
![]() C. Check for compatibility.
C. Check for compatibility.
![]() D. Print a test page.
D. Print a test page.
3. Which is the faster option when it comes to spooling documents?
![]() A. Print directly to the printer.
A. Print directly to the printer.
![]() B. Start printing immediately.
B. Start printing immediately.
![]() C. Start printing after the last page is spooled.
C. Start printing after the last page is spooled.
![]() D. Start printing after the separator page.
D. Start printing after the separator page.
4. What command turns off the print spooler?
![]() A.
A. net disable print spooler
![]() B.
B. net stop print spooler
![]() C.
C. net restart spooler
![]() D.
D. net stop spooler
5. What is it known as when two printers are joined together so that they can work as a team?
![]() A. Printer pooling
A. Printer pooling
![]() B. Printer spooling
B. Printer spooling
![]() C. pscript.sep
C. pscript.sep
![]() D. Printer joining
D. Printer joining
6. What window in Windows Vista enables printer sharing?
![]() A. Network Connections
A. Network Connections
![]() B. Network and Sharing Center
B. Network and Sharing Center
![]() C. Network
C. Network
![]() D. My Network Places
D. My Network Places
7. How can a paper jam be resolved? (Select all that apply.)
![]() A. Clear the paper path.
A. Clear the paper path.
![]() B. Use the right type of paper.
B. Use the right type of paper.
![]() C. Check for damaged rollers.
C. Check for damaged rollers.
![]() D. Check for a damaged primary corona wire.
D. Check for a damaged primary corona wire.
8. What is a possible reason for having blank pages come out of a laser printer?
![]() A. Failed transfer corona wire
A. Failed transfer corona wire
![]() B. Failed primary corona wire
B. Failed primary corona wire
![]() C. Failed fusing assembly
C. Failed fusing assembly
![]() D. Damaged roller
D. Damaged roller
9. What is a possible reason for having black lines show up on printouts?
![]() A. Scratch on the laser printer drum
A. Scratch on the laser printer drum
![]() B. Damaged roller
B. Damaged roller
![]() C. Damaged transfer corona wire
C. Damaged transfer corona wire
![]() D. Scratch on the fusing assembly
D. Scratch on the fusing assembly
Cram Quiz Answers
1. C. An uninterruptible power supply (UPS) is not recommended for laser printers due to the high draw of the laser printer.
2. A and D. After the printer is installed, meaning it has been connected, and the drivers have been installed, you should calibrate the printer (if necessary) and print a test page. Before starting the installation, you should check for compatibility with operating systems, applications, and so on.
3. B. Start Printing Immediately is the faster print option when spooling documents. Print Directly to the Printer doesn’t use the spooling feature, and there is no Start Printing After the Separator Page.
4. D. The command net stop spooler stops or turns off the print spooler service.
5. A. Printer pooling is when two or more printers are combined to get print jobs out faster.
6. B. The Network and Sharing Center in Windows Vista is where printer sharing is enabled.
7. A, B, and C. There are several possible reasons why a paper jam might occur. The paper could be stuck somewhere in the paper path, the paper could be too thick, or the rollers could be damaged.
8. A. If the transfer corona wire has failed, there is no way for the toner to be “attracted” to the paper, resulting in blank sheets coming out of the printer.
9. A. A scratch on the laser printer drum can account for black lines showing up on printouts. Another culprit can be a dirty primary corona wire.
Additional Reading and Resources
Additional A+ resources: http://www.davidlprowse.com/aplus
Soper, Mark Edward; Mueller, Scott; Prowse, David L.. CompTIA A+ Certification Guide. ISBN13: 9780789740472. Que.