Chapter 7. Installing and Upgrading Windows
Now that we have discussed the “guts” of the computer, including the motherboard, CPU, RAM, and power supplies, it’s time to talk about installing operating systems. Our focus is on Windows Vista, but we also discus Windows XP and throw in little bits of Windows 2000 Professional here and there. For the 2009 CompTIA A+ exams, you need to know how to:
• Install Windows Vista
• Install Windows XP
• Upgrade to Windows Vista from Windows XP or Windows 2000
• Upgrade to Windows XP from Windows 2000
• Troubleshoot Windows Vista/XP installations and upgrades
Note
I recommend that you attempt to get your hands on a full version copy of Windows Vista (Ultimate is preferred) and Windows XP (Professional is preferred), and a test computer to run clean installations of both operating systems, and running an upgrade from XP to Vista. If you have been building a computer as you progress through this book, install to that one. This hands-on approach can help you to better visualize how operating system installs and upgrades perform.
I’ve broken this chapter into two main sections so that we can first focus on everything to do with Vista and then focus on everything to do with XP. Installations of Windows 2000 are rare due to the fact that the OS is a decade old, so there are no step-by-step instructions on how to install it in this chapter. But have no fear, the installation of Windows XP is similar to Windows 2000; there are just a few more steps in Windows XP. The CompTIA A+ objectives mention Windows 2000, but it is doubtful that you will get many questions on the exam concerning that operating system. What I’ve done is to focus on Vista first, XP second, and where necessary I added notes about Windows 2000. Let’s start by talking about how to install and upgrade Windows Vista.
Installing and Upgrading to Windows Vista
Before you can install Windows Vista or upgrade to it, you first need to decide which version of Vista you will use. Then, you should check the computer’s hardware to make sure it is compatible with Windows Vista. Next, you need to decide on an installation method: from DVD, CD, as an image, or over the network. Finally, start the installation. New installations are known as “clean” installs; the other option is to upgrade from Windows XP or 2000.
Windows Vista Versions
Windows Vista is an entire line of Microsoft operating systems designed for desktop PCs and laptops. Vista was released over a span of several months during the end of 2006 and beginning of 2007, culminating in a worldwide release on January 30, 2007. Within the Windows Vista group are the versions Home Basic, Home Premium, Business, and Ultimate, available in 64-bit and 32-bit versions. In Table 7.1, the check marks indicate the components that are included in these various versions of Vista. We talk more about these components in Chapter 8, “Configuring Windows.”
Table 7.1 Comparison of Windows Vista Versions

Note
As you can see, Home Basic is just that: basic, with none of the bells and whistles of the other versions. The A+ exams focus on the other three versions in Table 7.1: Vista Home Premium, Business, and Ultimate.
Note
There are two additional versions of Vista including Vista Starter (sold in underdeveloped technology markets), and Vista Enterprise (not sold through retail or OEM channels), which are not covered on the exam.
ExamAlert
Know the main differences between the Vista editions Home Premium, Business, and Ultimate for the exam.
Windows Vista Minimum Requirements and Compatibility
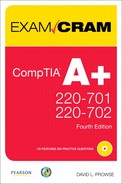
When you decide on the version of Vista you want to use, and before installing that operating system, you should learn as much as you can about the computer you plan to install to. Components in a computer should meet Windows Vista’s minimum requirements and should be listed on Microsoft’s website as compatible with Vista. Table 7.2 shows the minimum hardware requirements for Windows Vista.
Table 7.2 Windows Vista Minimum Requirements
Note
The above specs are the minimum requirements. Microsoft recommends a 1GHz Processor for all versions of Vista and 1GB of RAM plus a 40GB HDD for Vista Home Premium/Business/Ultimate.
ExamAlert
Memorize the minimum requirements for Windows Vista.
You can use several websites and system analysis tools to check whether a system’s hardware will be compatible with Windows Vista. If you check a computer that already has an operating system installed, use the following tools:
• Windows Vista Compatibility Center: http://www.microsoft.com/windows/compatibility/
• Windows Vista Logo’d Products List: http://winqual.microsoft.com/HCL/Default.aspx?m=v. You can also use this site to check any hardware that you haven’t installed yet.
• System Information: The Windows System Information tool can be accessed by opening the Run prompt and typing msinfo32.exe.
• Belarc Advisor: Currently a free download, this program can be found at http://www.belarc.com/free_download.html. It’s extremely quick and painless; all you need to do is double-click the .exe file when the download is complete. It automatically installs, looks for updates, and creates a profile of your computer that runs in a browser window. Here you can find all the hardware- (and software)-related information on one screen; it also gives you system security status. To run the program subsequently, just access Start > All Programs > Belarc Advisor.
For computers without an installed operating system, consider using self-booting diagnostic programs like the following:
• PC Diagnostic tools: http://www.pc-diagnostics.com
• #1-TuffTEST: http://www.tufftest.com/
• PC Check: http://www.eurosoft-uk.com
Note
The Windows Vista DVD has a Check compatibility online option, but this is meant more for upgrades, as opposed to clean installations.
Windows Vista Installation Methods
There are several types of installation methods for Windows operating systems. They include
• Local installation from DVD-ROM: Installation by DVD-ROM is the most common. A “local” installation is the default type. It means that you insert the DVD-ROM into the DVD-ROM drive of the computer you are sitting at, known as the local computer. When you sit at the computer and answer all the questions it asks you, it is known as an “Attended Installation;” you are attending to the computer as the install progresses. The steps for this type of installation are listed later in this chapter, in the next section titled “Installing Windows Vista.”
• Local installation from CD-ROM: Microsoft recommends that the DVD-ROM be used for installations of Windows Vista; however, you can order a CD-ROM version, if you can provide proof of purchase. To do so, visit this site: http://www.microsoft.com/windowsvista/1033/ordermedia/default.mspx. Keep in mind that unattended installations of Vista from CD-ROM are not possible because the Vista files span multiple CDs.
• Network installation: You can install Windows over the network in a variety of ways. To automate the process, Windows Vista can be installed from a server automatically, using either Windows Deployment Services (made specifically for deploying Windows Vista), which can be installed on Windows Server 2008/2003, or the Remote Installation Services (RIS) program, which can be installed on Windows Server 2003 and Windows 2000 Server. These two server-based programs work with the Windows System Image Manager program in Vista. This program can be used to create an answer file that is used during an Unattended Installation. The answer file provides the responses needed for the installation, with no user intervention. In Windows Vista, there is a single XML-based answer file called Unattend.xml.
Note
The Windows System Image Manager (SIM) for Vista is part of the Windows Automated Installation Kit (AIK), which can be downloaded from www.microsoft.com, just search for “Windows Automated Installation Kit (AIK).” For a free CBT tutorial on how to use WSIM, search the Microsoft TechNet (http://technet.microsoft.com) for: “Windows Vista Virtual Lab Express: Windows System Image Manager Overview.”
• Disk image: Windows can also be installed by cloning the entire disk image of another installation. This can be done by using programs like Acronis True Image or Norton Ghost. When cloning a disk image, both computers need to be identical, or as close to identical as possible. The hard disk of the target for a cloned installation must be at least as large as the original system. To avoid Security Identifier (SID) conflicts, use the Sysprep utility. The Sysprep utility for Windows Vista is installed with the operating system and can be found by navigating to: C:WindowsSystem32Sysprep. Sysprep uses an answer file created with the System Image Manager (SIM). It creates a unique SID and makes other changes as needed to the network configuration of the system. Another tool that can be used to avoid SID conflicts is called NewSID, which can be downloaded from the Microsoft TechNet.
• Installing from a recovery disc: Computers with Windows preinstalled use a recovery disc (DVD or CD), hidden partition, or both. This disc and/or partition contains a factory image of Windows. The purpose of this is to give users the ability to return their computer back to the state when it was first received. This means that the system partition (usually the C: drive) will be formatted, and re-imaged with Windows. This works well in a two partition system, in which the operating system is on C: and data is stored on D: or another drive letter. In this scenario, if the operating system fails and cannot be repaired, the computer can be returned to its original “factory” state, but the data won’t be compromised. Whenever buying a computer from a company such as HP, Dell, and so on, make sure that they offer some kind of recovery disc.
Note
Although it’s not covered on the exam, it’s also possible to install Windows Vista from a USB flash drive. This is done in essentially the same manner as installing from DVD; however, you need to partition and format the USB drive, xcopy the contents of the DVD to the flash drive, and set the BIOS to boot from USB.
Installing Windows Vista
Now that you have decided on the version of Vista to use and have verified compatibility of hardware, it’s time to install. The Windows Vista installation is more simplified than earlier versions of Windows. This section covers the steps involved in a “clean” local installation of Vista.
Step 1. Begin the installation from the DVD-ROM. There are two methods to perform a clean install of Windows Vista from DVD:
• Install Windows Vista by running the Setup program from within the current version of Windows. (This is the recommended method.) Insert the Windows Vista DVD. The disc most likely autoruns and you see the setup screen shown in Figure 7.1. Otherwise, just go to the DVD drive in Windows Explorer and double-click the setup.exe file to start the installation.
Figure 7.1 Windows Vista Installation Screen

• Boot the computer from the Windows Vista DVD. This is necessary if no operating system exists on the computer. If you choose this option, do the following:
1. Make sure the DVD drive is configured as the first boot device in the system BIOS.
2. Insert the Windows Vista DVD into the system’s DVD drive. (If the drive won’t open while in the BIOS, insert the disc immediately after saving the BIOS.)
3. Save the BIOS and restart the system.
4. The DVD should boot automatically and start the installation, but if you are prompted to boot from the DVD, press any key. There is only a small window of time for this, approximately 5 seconds. This prompt is a protective measure; if you get the prompt, it means that there is data of some sort on the drive. Startup of the installation might take a minute; then you see a GUI-based window asking for information. (There is no text portion.)
Step 2. Input the Language to install, Time and currency format, and Keyboard or input method. At this time there is also an option to learn more about the installation by clicking the What to know before installing windows link. After you input your settings for step 2, you must click Next, and then on the next screen click Install now.
Step 3. Enter the Product key and decide whether to automatically activate Windows (can be delayed up to 30 days).
Step 4. Accept the license terms.
Step 5. Select whether you are doing a custom install, which includes a clean installation or an upgrade. (Within these steps we are doing a clean installation.) If you install to a computer with no operating system, the Upgrade option will be disabled.
Step 6. Select where to install Windows Vista. From here you can select the drive and administer partitions as you see fit. The proper disk preparation order when installing any operating system is to partition the drive, format the partition (or partitions), and start the installation (copy files). For more information on partitioning the drive during the installation process, see the next section titled “Creating Partitions During a Windows Vista Installation.” If necessary, you can also load third-party drivers for the media (hard drive) to be installed to by clicking on Load Driver. These might be drivers for SATA or SCSI controllers, or other special hard disk controllers. These drivers can come from floppy disk, CD, DVD, or USB flash drive. Microsoft recommends that before you install, you check if the devices you want to use are listed at the Windows Vista Compatibility Center: http://www.microsoft.com/windows/compatibility/ or at the Windows Logo’d Products List: http://winqual.microsoft.com/HCL/Default.aspx?m=v. If you click on Load Driver and cannot supply a proper driver for Windows Vista, or the computer cannot read the media in which the driver is stored, you need to exit the installation program. When you finish, click Next, and the system automatically copies files from the DVD, expands those files, installs features and updates, and completes the installation. The system might need to restart several times during this installation process (for example, after it installs updates and when it completes the installation), but you can let the Vista installation work its magic until you get to the next step.
Step 7. Select a username, password, and picture.
Step 8. Select a computer name and desktop background.
Step 9. Configure Windows Update to Use Recommended Settings, Install important Updates Only, or Ask Me Later. For more information on Windows Update see Chapter 9, “Maintaining Windows.”
Step 10. Set the time zone, time, and date.
Step 11. Set the computer’s location: either home, work, or public location.
Now it’s time to start Windows. Vista checks the computer’s performance (which might take a while) and then asks you for your password (if you opted to use one) before you can access the operating system. After you have logged on with the proper password, the Welcome Center window should appear, and you can continue with initial tasks such as connecting to the Internet or transferring files and settings.
ExamAlert
Know the steps involved with installing Windows Vista.
Note
There is a short video covering the installation of Windows Vista on my website: http://www.davidlprowse.com.
Creating Partitions During a Windows Vista Installation
During the installation of Windows Vista, you can create, delete, or extend partitions as mentioned in step 6 of the previous section. There are several options; here are a few:
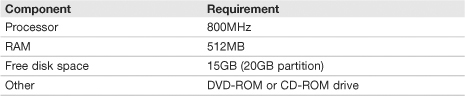
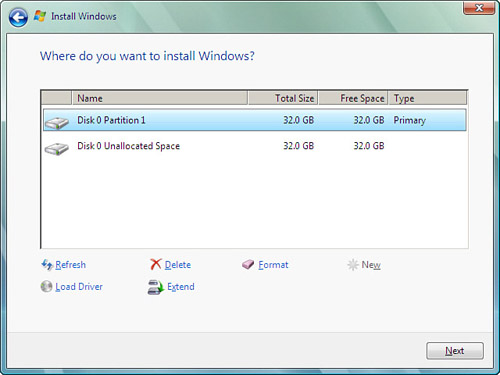
• To use all the space in the disk, either create a new partition that encompasses the entire disk or highlight the default Disk 0 Unallocated Space that Microsoft usually displays automatically, and click Next (see Figure 7.2).
Figure 7.2 Example of using an entire disk as one partition for the Windows Vista installation
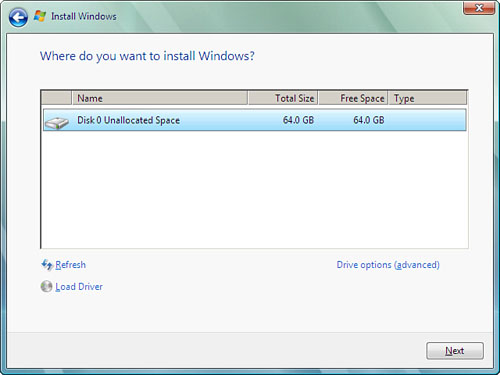
• To use only part of the space, click Drive options (advanced); then click New, specify the partition size, and click Apply (See Figure 7.3 and Figure 7.4).
Figure 7.3 Specifying a partition size
Figure 7.4 Partition Table after creating a new partition, known as Partition 1
• To use a preexisting partition (if this disk was used previously), highlight the partition desired and click Next. Be careful, whatever partition you select for the installation will be formatted, and all data on that partition will be erased.
You can also format partitions from here; they are automatically formatted as NTFS. In addition, you can extend preexisting partitions to increase the size of the partition but without losing any data.
Note
For more information on partitions, volumes, and formatting in Windows, see Chapter 8, “Configuring Windows.”
Upgrading to Windows Vista
Upgrades are done in essentially the same manner as clean installs. The difference is that all the settings, applications, and data remain in the system partition if the upgrade is successful. However, before starting the upgrade, you should first check to see if your computer (and operating system) is compatible and if it will survive the process. Refer to Table 7.2 for the Vista minimum requirements. You can also use the following utilities and websites to do this:
• Windows Vista Upgrade Advisor: This is a website that is accessed by clicking on the Check compatibility online button when you first insert the Windows Vista DVD (refer to Figure 7.1). Of course, the computer that you want to upgrade needs to have Internet access. The direct link for this site is: http://www.microsoft.com/windows/windows-vista/get/upgrade-advisor.aspx.
• Windows Vista Compatibility Center: http://www.microsoft.com/windows/compatibility/
• Windows Vista Logo’d Products List: http://winqual.microsoft.com/HCL/Default.aspx?m=v.
To start the Windows Vista upgrade process from Windows XP or 2000, do the following:
Step 1. Insert the Windows Vista DVD into the DVD-ROM drive while your old version of Windows is running.
Step 2. Unless you disabled Autorun, the Install Windows screen is displayed (refer to Figure 7.1). If you do have autorun disabled, access your DVD-ROM drive and double-click setup.exe. It is recommended that you select Check compatibility online.
Step 3. After checking compatibility (if necessary), click Install now.
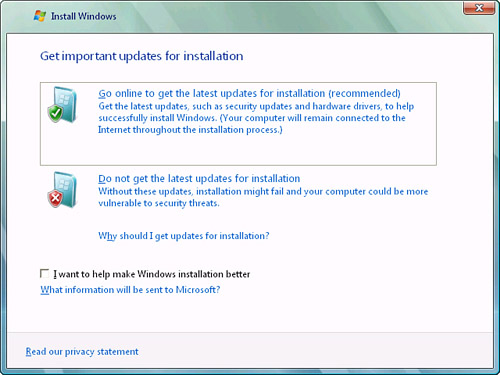
Step 4. Next is the updates screen. It is recommended that you select the first option Go Online and Get the Latest Updates for Installation, as shown in Figure 7.5. There is also an option to send anonymous information back to Microsoft during the install. If you do not want to do this, leave the I Want to Help Make Windows Installation Better check box blank.
Figure 7.5 Important updates window
Step 5. Type in the product key. This should have come with your upgrade disc.
Step 6. Next, accept the terms of the license; otherwise the installation will end.
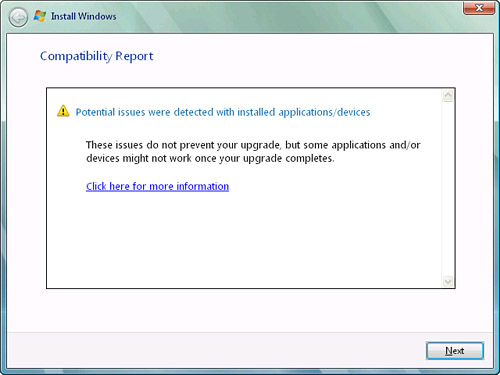
Step 7. In the next window, you have two options: upgrade or custom. Select the first option to upgrade the previous version of Windows to Windows Vista. If you receive any type of compatibility report window (such as the one in Figure 7.6) that say you have potential issues, consider stopping the installation for now and finding out what hardware or software needs to be replaced using the websites listed previously. Then start the upgrade again when you have fixed these issues. In some cases when you receive a compatibility report, the installation will not let you continue, and in other cases you can proceed at your own risk; but be warned, some devices or applications might not function when the upgrade completes.
Figure 7.6 Compatibility Report
Step 8. Next, Vista copies files, gathers files, expands files, installs features and updates, and finally, completes the upgrade. This might require several restarts and take from several minutes to several hours to finish, depending on the computer’s resources. Let the upgrade continue unhindered until you get to step 9.
Step 9. After the final restart, you should see the Help protect Windows automatically screen. Select the option that best suits you.
Step 10. Configure the time zone, time, and date.
Step 11. Finally, select the location for the computer, and click Start to begin using Windows Vista.
Verifying and Troubleshooting Windows Vista Installations
When you complete the clean installation or upgrade, test it. We previously discussed this concept a few times, but it can’t be stated enough. Verify that your installation has gone smoothly by testing it. For example, attempt to navigate through Windows, access administrative functions, connect to the Internet, and so on.
If you have confirmed that Windows is working normally, update the system. As of the publishing of this book, the latest service pack (SP) for Windows Vista is SP2. It is possible that the service pack was included on your installation media, but if not, download it and install it before going any further. Then, download any other updates that are necessary utilizing the Windows Update feature. More information about service packs and updates can be found in Chapter 9, “Maintaining Windows.”
Installations usually go smoothly, but not always. If an installation fails for any reason, or if the installation completed but Windows doesn’t seem to be behaving properly, consider reviewing the log files to find out more about the problem and why it occurred. Windows Vista is a bit more complicated than older Windows systems when it comes to log files. Vista’s log files might vary slightly and have different locations depending on the phase of the installation when they were logged. The Vista installation process is broken into four phases:
• Downlevel phase: This is the phase that is run from within the previous operating system, meaning when you start the installation from the DVD in Windows XP, for example.
• Windows Preinstallation Environment phase: Also known as Windows PE, this phase occurs after the restart at the end of the downlevel phase. If installing to a new hard drive, this phase occurs when you first boot the computer to the Windows Vista DVD.
• Online configuration phase: The online configuration phase starts when a user receives the following message: Please wait a moment while Windows prepares to start for the first time.” Hardware support is installed during this phase.
• Windows Welcome phase: During this phase, a computer name is selected for the computer, and the Windows System Assessment Tool (Winsat.exe) checks the performance of the computer. This is the final phase before the user first logs on.
There are log files for each phase; they are pretty much the same log files but in different locations. However, we are most concerned with the last two phases. For the most part in these two phases, the log files are in the same location. Table 7.3 covers the important log files during these two phases.
Table 7.3 Windows Vista Installation Log Files

Note
You might notice that Vista doesn’t have a setuplog.txt file like older versions of Windows does. This is because there is no text portion to the installation of Windows Vista.
Note
For a list of all log files within all phases of the Windows Vista installation, see the following link: http://support.microsoft.com/kb/927521.
If the system won’t start, you can still view these files. However, this depends on the type of installation and how far the installation got. If it was a clean installation, you should boot to the Windows Vista DVD; then access the System Recovery Options menu, and select the Command Prompt. If it was an upgrade that didn’t get far, and if Windows XP/2000 was previously installed on an NTFS drive, you can boot to the Recovery Console from a Windows XP or 2000 CD and view the log files from there. For more information about System Recovery Options (Vista), and the Recovery Console (XP/2000), see Chapter 10, “Troubleshooting Windows.”
If you cannot start the clean installation or upgrade, check the following:
• Processor speed and memory size: Verify that your computer meets the minimum requirements for Windows Vista. Refer to Table 7.2 for more information.
• Free disk space: You need 15GB free for Windows Vista; the more space available, the better.
• Hardware conflicts or hardware issues: Use the Device Manager to ensure that all hardware works correctly before you start an upgrade.
• Installation media: Make sure that your DVD-ROM (or CD-ROM) media is not scratched or damaged in any way. Verify that it is genuine Microsoft software and that you have the right type of media for your installation, for example, Vista Full Version License or Upgrade DVD.
Upgrades to Windows Vista can be especially troublesome. You might experience problems connecting to a LAN or the Internet, or some hardware might not work properly. Be sure to access the Microsoft Knowledge Base (MSKB) at http://support.microsoft.com for clues as to why these errors occur.
Note
For a list of specific errors concerning a Windows Vista upgrade, see the following link: http://support.microsoft.com/kb/930743.
Cram Quiz
Answer these questions. The answers follow the last question. If you cannot answer these questions correctly, consider reading this section again until you can.
1. What is the minimum RAM requirement for Windows Vista?
![]() A. 2GB
A. 2GB
![]() B. 256MB
B. 256MB
![]() C. 512MB
C. 512MB
![]() D. 768MB
D. 768MB
2. Which file contains information regarding errors during a Windows Vista installation?
![]() A. Setuperr.log
A. Setuperr.log
![]() B. Setupact.log
B. Setupact.log
![]() C. Event Viewer
C. Event Viewer
![]() D. Unattend.xml
D. Unattend.xml
3. Where can you go to find out if your current operating system can be upgraded to Windows Vista?
![]() A. MSKB
A. MSKB
![]() B. Windows Vista Upgrade Advisor
B. Windows Vista Upgrade Advisor
![]() C. HAL
C. HAL
![]() D. Belarc Advisor
D. Belarc Advisor
4. Which versions of Vista have media center functionality? (Select the best two answers.)
![]() A. Home Basic
A. Home Basic
![]() B. Home Premium
B. Home Premium
![]() C. Business
C. Business
![]() D. Ultimate
D. Ultimate
5. What is the hard drive requirement for Windows Vista?
![]() A. 15GB free space
A. 15GB free space
![]() B. 15GB partition
B. 15GB partition
![]() C. 20GB free space
C. 20GB free space
![]() D. 25GB partition
D. 25GB partition
6. Where can you go to find out if your computer’s components are compatible with Windows Vista? (Select the best two answers.)
![]() A. Vista Compatibility Center
A. Vista Compatibility Center
![]() B. MSKB
B. MSKB
![]() C. Vista Logo’d Products List
C. Vista Logo’d Products List
![]() D. msinfo32.exe
D. msinfo32.exe
7. To avoid SID conflicts when disk imaging, which program should you use in Windows Vista?
![]() A. Sysprep
A. Sysprep
![]() B. Setup Manager
B. Setup Manager
![]() C. SIM
C. SIM
![]() D. Windows Deployment Services
D. Windows Deployment Services
8. Which of the following are possible ways to install Windows Vista? Select all that apply.
![]() A. From DVD
A. From DVD
![]() B. From CD
B. From CD
![]() C. Over the network
C. Over the network
![]() D. Using Norton Ghost
D. Using Norton Ghost
Cram Quiz Answers
1. C. The minimum RAM requirement for Windows Vista is 512MB. Microsoft recommends 1GB of RAM for Home Premium, Business, and Ultimate.
2. A. Setuperr.log contains information regarding errors during installation. Setupact.log contains information regarding actions during installation. The Event Viewer is an application, not a file, and might not contain installation details. Unattend.xml is the answer file generated by Windows SIM for unattended installations.
3. B. The Windows Vista Upgrade Advisor can tell you if your current operating system can be upgraded to Vista. This, and other tools like it, are located at www.microsoft.com, not at the MSKB (http://support.microsoft.com). The HAL is a file in Windows; it stands for hardware abstraction layer. Belarc Advisor is a third-party offering that analyzes your computer but does not determine whether it can be upgraded.
4. B and D. Home Premium and Ultimate include media center functionality; the others do not.
5. A. Vista requires 15GB of free space within a 20GB partition.
6. A and C. To find out if your computer’s hardware is compatible with Vista, go to the Vista Compatibility Center or the Vista Logo’d Products List.
7. A. Sysprep can modify unattended installations so that every computer gets a unique SID (and other unique information). Windows SIM (System Image Manager) creates the answer files for unattended installations. Setup Manager (setupmgr.exe) is the program that Windows XP/2000 uses to create answer files. Windows Deployment Services is run on Windows Server 2008/2003 and is used to deploy operating systems across the network.
8. A, B, C, and D. Windows Vista can be installed from DVD, CD-ROM (though not recommended), over the network, and by using programs such as Norton Ghost.
Installing and Upgrading to Windows XP
Although Windows XP was released 8 years ago (as of the publishing of this book), you can still see plenty of copies of it in the field and might need to install it as well, or upgrade older Windows 2000 Professional computers to XP. The A+ exam objectives still touch on Windows 2000 Pro, which while a decade old, still exists in some dark technological corners of the universe. For the most part however, the information in this chapter refers to Windows XP. Windows 2000 works essentially the same way unless otherwise noted, for example when it comes to minimum hardware requirements.
Before you can install or upgrade to Windows XP, you first need to decide which edition of XP you’ll be using. Then, you should check the computer to make sure it is compatible with Windows XP. Next, you need to decide on an installation method: from CD, floppy to CD, as an image, or over the network.
Windows XP Versions
There are several editions of Windows XP. They include
• Windows XP Home: Designed for home users, this edition has limited networking and security capabilities.
• Windows XP Professional: This is the most common version of XP that you will see in the field. The A+ exams focus mostly on this edition. The XP Pro edition expands on the Home edition by offering the capability to connect to domains, make Remote Desktop connections, utilize the Encrypting File System (EFS), and support two physical CPUs. It is designed for power users, business people, and developers. There is a 64-bit version of this as well.
• Windows XP Media Center: This edition was developed for people concerned with audio and video. The Windows Media Center is part of the GUI that displays well on a TV and can be controlled remotely. It is also designed to playback videos and music. Normally, the Media Center edition is found preinstalled on computers that have been purchased from an OEM (original equipment manufacturer).
• Windows XP Tablet PC: This edition was designed for and can only be purchased with a tablet PC. The tablet PC is similar to a laptop but the screen can usually swivel, flip over, and be written on (hence the name tablet). These devices come with a pen-like device known as a stylus for tapping (a tablet PC’s version of clicking) and writing on the screen.
ExamAlert
Know the differences between the Windows XP Home, Professional, Media Center, and Tablet PC editions.
Note
There is also Windows XP Starter, sold in technologically underdeveloped countries, and N and K editions (sold in Europe and Asia respectively), which omit Windows Media Player. These are not covered on the A+ exam.
Windows XP Minimum Requirements and Compatibility
When you decided which version of XP you want to use, and before installing that operating system, you should learn as much as you can about the computer you plan to install to. Components in a computer should meet Windows XP’s minimum requirements and should be listed on Microsoft’s website as compatible with XP. Table 7.4 shows the minimum hardware requirements for Windows XP Professional and Windows 2000 Professional.
Table 7.4 Windows XP and 2000 Minimum Requirements

ExamAlert
Memorize the minimum requirements for Windows XP Professional and 2000.
Note
Windows XP Media Center edition has higher minimum requirements than XP Professional, including a 1.6GHz CPU, 256MB RAM, and a hardware-accelerated graphics card that can utilize DirectX 9.0.
Note
It is rare that you will install Windows 2000 Professional; however, you might still see questions about its minimum requirements on the A+ objectives.
Various websites and system analysis tools can verify that a system’s hardware will be compatible with Windows XP. If you check a computer that already has an operating system installed, use the following tools:
• Windows XP Logo’d Products List (formerly the HCL): http://winqual.microsoft.com/HCL/Default.aspx?m=x.
• System Information: The Windows System Information tool can be accessed by opening the Run prompt and typing msinfo32.exe. This takes the place of winmsd, but winmsd can still be run on Window XP and 2000 in addition to msinfo32.exe.
• Belarc Advisor: Currently a free download, this program can be found at http://www.belarc.com/free_download.html.
Windows XP Installation Methods
Following are several types of installation methods for Windows XP:
• Local installation from CD-ROM: Attended local installations by CD are the most common. Make sure that the CD-ROM drive is listed first in the BIOS boot order so that you can boot from it. Soon after starting the computer, you usually need to press a key on the keyboard to start the installation from the CD.
• Booting from floppy disk and CD-ROM: It is possible that a computer’s BIOS cannot boot to CD or the CD-ROM drive is not bootable. If either of these is the case, you need to boot off of the Windows Startup disks that will start the installation, install the CD-ROM drivers, and enable you to continue the installation from CD-ROM. If you install Windows XP, these disks (usually six of them) are available from http://support.microsoft.com/kb/310994. Note that there are different sets of floppy disks for Windows XP Home and XP Professional and for the specific service pack that is packaged as part of the CD. Make sure to download the correct version. If you install Windows 2000 Professional, the purchased package comes with a CD and four boot disks in the case that the computer’s CD-ROM is not bootable. These disks can also be created by accessing the CD and going to the folder called bootdisk. From here, simply double-click makeboot.exe, and the program will guide you through the process of making the disks. To create disks from the CD on an older version of Windows, use makebt32.exe.
Note
If you can’t find the boot disks that you need, you could search for it on the Internet; for example www.bootdisk.com has an image file for just about every boot disk you can imagine!
• Network installation: You can install Windows over the network in a variety of ways. To automate the process, Windows XP can be installed from a server, for example by using the Remote Installation Services (RIS) program, which can be installed on Windows Server 2003 and Windows 2000 Server. This program works along with Windows XP/2000’s Setup Manager program that creates the automated answer files like unattend.txt. These files are text-based, unlike Windows Vista’s unattend.xml. For more information on how this works, the differences between Vista and XP, and how to combine XP and Vista deployment technologies, see the following link: http://technet.microsoft.com/en-us/library/cc765993.aspx. Like Windows Vista, Windows XP also uses the Sysprep utility to prepare unique systems for installation over the network. It is provided on the CD-ROM at SUPPORTTOOLS in a cabinet file called DEPLOY.CAB. The most recent version of Sysprep for Windows XP can also be downloaded from the Microsoft website as part of the Windows XP Service Pack 2 Deployment Tools. See the following link for more information: http://support.microsoft.com/kb/838080.
• Disk image: Windows XP (and actually any operating system) can also be installed as a disk image using programs such as Acronis True Image or Norton Ghost. When cloning a disk image, both computers need to be identical or as close to identical as possible.
• Installing from a recovery disc: Like Windows Vista, Windows XP computers that have the operating system preinstalled use a recovery disc (CD), hidden partition, or both. This disc and/or partition contains a factory image of Windows. The purpose of this is to give users the ability to return their computer back to the state when it was first received.
Installing Windows XP
After you decide on the version of XP you’d like to use, and have verified compatibility of hardware, it’s time to install. This section covers the steps involved for a clean, local installation of Windows XP Professional off of the CD-ROM.
Step 1. Boot the computer from the CD-ROM. When doing so
1. Make sure the CD drive is configured as the first boot device in the system BIOS.
2. Insert the Windows XP CD-ROM into the system’s CD drive. (If the drive won’t open while in the BIOS, insert the disc immediately after saving the BIOS.)
3. Save the BIOS and restart the system.
4. The CD should boot automatically and start the installation if the drive is blank, but if you are prompted to boot from the CD, press any key. There is only a small window of time for this, approximately 5 seconds. This prompt is a protective measure; if you get the prompt, it means that there is data of some sort on the drive. When you press a key, it begins the text portion of the Windows XP installation.
Step 2. (Optional) Install drivers for mass storage devices. Early during the installation process, the bottom of the screen says Press F6 if you need to install a third party SCSI or RAID driver, as shown in Figure 7.7. This displays only for a short time. If you have such drivers, press F6, and you will be prompted to insert the CD-ROM or floppy disk that came with the device. Usually, installations are done to Ultra ATA or SATA hard disks, so pressing F6 is not necessary. A similar prompt at the bottom of the screen is shown next: Press F2 to Run Automated System Recovery (ASR). This is not necessary during an installation but can be used to repair an operating system that has failed.
Figure 7.7 F6 prompt for optional SCSI/RAID drivers

Step 3. Start the Install and accept the end-user license agreement (EULA). When done loading initial files, XP asks you if you want to install, repair, or quit. Press Enter to install. The next screen requires that you press F8 to agree to the EULA. You will also note that in case you make a mistake, you can press F3 at any time to quit the installation.
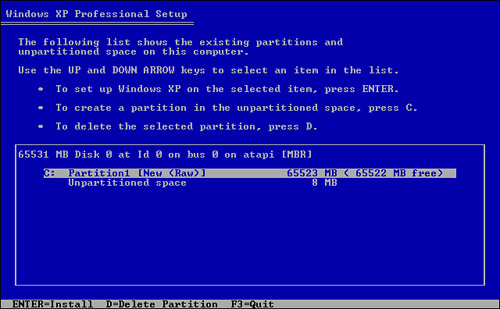
Step 4. Partition the drive. If you install to a new hard drive, this screen should show Unpartitioned Space. From here you can create one or more partitions (by pressing C), install to a preexisting partition, or just install to the unpartitioned space, which creates one large partition on the drive automatically, as shown in Figure 7.8. Either way, highlight the partition (or unpartitioned space) that you want to install to and press Enter.
Figure 7.8 Partition screen with one partition
Step 5. Format the drive. At this point you have the option to format the partition as NTFS or FAT. NTFS is recommended and has a maximum partition size of 2TB during installation. (Hard drives are currently getting close to this number!) If you format the partition as FAT, and it is 4GB or less, it will be formatted as FAT16. If it is above 4GB, it will be formatted as FAT32, with a maximum partition size during setup of 32GB. You also have the option for a quick format; choose this option if it is a new drive or was formatted previously. If there were data files on the drive when you started the install, select the full format option. Once you press Enter, Windows automatically formats the partition, copies files to the partition, and reboots into the Graphical User Interface (GUI) portion of the installation. Sit back and relax as Windows works its magic.
Step 6. Set up regional settings. This includes the language, currency, and so on.
Step 7. Enter your name and organization. The name becomes an administrative account username.
Step 8. Enter the Product key.
Step 9. Enter a computer name and password. The computer name should be a unique name on your network and should not be the same as any other unique names (usernames, network names, domain names, and so on). Enter a secure password (more on password security in Chapter 15, “Security,”) and type it again to confirm.
Step 10. Enter dialing information. This is only if the computer has a modem installed.
Step 11. Enter the date, time, time zone, and check mark Daylight Savings time if applicable. At this point, XP continues to copy files that might take a minute.
Step 12. Configure networking settings. From here you can select Typical, in which case Windows attempts to auto-configure the network adapter, or Custom, in which you can enter the settings manually.
Step 13. Select workgroup or domain. From here you can join (or create a new) workgroup, or join a domain if you possess the proper credentials and have configured TCP/IP properly in step 12. At this point, Windows continues to copy files and configures the operating system. After several minutes or more it restarts and then auto-configures the video display.
Step 14. Answer final questions. When you hear the dulcet tones of XP, you see a window that says Welcome to Windows. From here Windows checks for Internet connectivity, inquires as to how you want to connect to the Internet, asks you to register (optional), and asks you to define the users that will be accessing the computer by name. (For the primary user, you can use the same name you used in step 7). After this, the Windows desktop should appear.
Step 15. Activation of Windows. You have 30 days to activate Windows over the Internet or by telephone.
ExamAlert
Know the steps involved when installing Windows XP.
Note
There is a short video covering the installation of Windows XP on my website: http://www.davidlprowse.com.
Upgrading to Windows XP
Upgrades are done in essentially the same manner as clean installs. The difference is that all the settings, applications, and data remain in the system partition if the upgrade is successful. However, before starting the upgrade, you should first check to see if your computer (and operating system) is compatible and if it will survive the process. You can use the following utilities and websites to do this:
• Upgrade Advisor: You can run the Upgrade Advisor from the Windows XP CD. Click Check System Compatibility from the Welcome to Windows XP menu; then click Check My System Automatically. (note that this upgrade advisor is no longer available for download from the Microsoft website.) After the analysis is complete, the Upgrade Analyzer displays any incompatible hardware or software it finds.
• Windows XP Logo’d Products List: Formerly known as the Hardware Compatibility List or HCL, this is available at http://winqual.microsoft.com/HCL/Default.aspx?m=x.
Verifying and Troubleshooting Windows XP Installations
When you complete the clean installation or upgrade, test it. For example, attempt to navigate through Windows, access administrative functions, connect to the Internet, and so on. After you confirm that Windows is working normally, update the system. As of the publishing of this book, the latest service pack (SP) for Windows XP is SP3; however, some companies might still use SP2, so check your documentation, policies, and procedures to confirm. It is possible that the service pack was included on your installation media, but if not, download it and install it before going any further. Then, download any other updates that are necessary utilizing the Windows Update feature. More information about service packs and updates can be found in Chapter 9, “Maintaining Windows.”
As mentioned previously, installations don’t always go as planned. If an installation fails, first verify that your computer has met the minimum hardware requirements and that it doesn’t have any hardware that will conflict with Windows XP. Also make sure that you have enough free disk space and that the installation media isn’t damaged.
Now, let’s talk about Windows XP log files. These files can be used to review what went wrong with an installation. In Windows XP, most of these files are plain text and are stored in the %systemroot% folder of the operating system. The %systemroot% folder is a variable that indicates the folder where the operating system was installed. In most cases this will be C:Windows (C:Winnt for Windows 2000). Table 7.5 describes the most important log files you need to know for the exam and their location within the operating system.
Table 7.5 Windows XP Installation Log Files
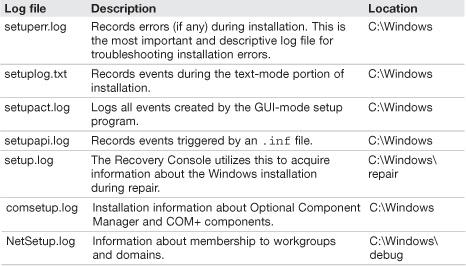
If the system won’t start, you can still view these files. However, this depends on the type of installation and how far the installation got. Attempt to boot to the Recovery Console from a Windows XP or 2000 CD and view the log files from there. For more information about the Recovery Console, see Chapter 10, “Troubleshooting Windows.”
Cram Quiz
Answer these questions. The answers follow the last question. If you cannot answer these questions correctly, consider reading this section again until you can.
1. What is the minimum CPU requirement for Windows XP?
![]() A. 133MHz
A. 133MHz
![]() B. 266MHz
B. 266MHz
![]() C. 800MHz
C. 800MHz
![]() D. 1GHz
D. 1GHz
2. Which log file records errors during the installation of Windows XP?
![]() A. setuperr.log
A. setuperr.log
![]() B. setuplog.txt
B. setuplog.txt
![]() C. setup.log
C. setup.log
![]() D. setupact.log
D. setupact.log
3. Which key should be pressed if you want to install a driver for a mass storage device during the Windows XP installation?
![]() A. F2
A. F2
![]() B. F3
B. F3
![]() C. F6
C. F6
![]() D. F8
D. F8
4. What program creates answer files in Windows XP?
![]() A. Windows SIM
A. Windows SIM
![]() B. Sysprep
B. Sysprep
![]() C. RIS
C. RIS
![]() D. Setup Manager
D. Setup Manager
5. How much free disk space do you need to install Windows XP?
![]() A. 2GB
A. 2GB
![]() B. 1.5GB
B. 1.5GB
![]() C. 650MB
C. 650MB
![]() D. 1GB
D. 1GB
Cram Quiz Answers
1. B. Windows XP requires a minimum 233MHz CPU. 133MHz is the requirement for Windows 2000 Professional. For Windows Vista 800MHz is the minimum requirement, and 1GHz is the recommended requirement for the CPU.
2. A. Setuperr.log records errors that occurred during installation. Setuplog.txt records events during the text portion of the installation. Setupact.log records events during the GUI portion of the installation. Setup.log is used by the Recovery Console during repair.
3. C. There is a short time period during the beginning of the XP installation in which you can press F6 to install mass storage drivers. F2 invokes the Automatic System Recovery (ASR), F3 quits the installation, and F8 agrees to the EULA (license).
4. D. Setup Manager (setupmgr.exe) is the tool that creates answer files such as unattend.txt in Windows XP. Windows SIM (System Image Manager) is used in Vista. Sysprep helps create unique installations over the network and works with the answer file. RIS or Remote Installation Services is the server component that initiates over the network installs.
5. B. Windows XP requires 1.5GB of free space within a 2GB partition and 650MB is the required space by Windows 2000 Professional.
Additional Reading and Resources
Additional A+ resources: http://www.davidlprowse.com/aplus
Windows Vista Compatibility Center: http://www.microsoft.com/windows/compatibility/
Windows Vista Logo’d Products List: http://winqual.microsoft.com/HCL/Default.aspx?m=v
Belarc Advisor: http://www.belarc.com/free_download.html.
PC Diagnostic tools: http://www.pc-diagnostics.com
#1-TuffTEST: http://www.tufftest.com/
PC Check: http://www.eurosoft-uk.com
Microsoft TechNet: Resources for IT Professionals: http://technet.microsoft.com
Windows Vista Upgrade Advisor: http://www.microsoft.com/windows/windows-vista/get/upgrade-advisor.aspx.
List of all log files within all phases of the Windows Vista installation: http://support.microsoft.com/kb/927521.
List of specific errors concerning a Windows Vista upgrade: http://support.microsoft.com/kb/930743
Windows XP Logo’d Products List (formerly the HCL): http://winqual.microsoft.com/HCL/Default.aspx?m=x.
Windows XP Boot Disks: http://support.microsoft.com/kb/310994
Bootdisks and Essential Utilities: www.bootdisk.com
Comparison of Windows XP and Vista deployment technologies: http://technet.microsoft.com/en-us/library/cc765993.aspx
Updated Sysprep tool: http://support.microsoft.com/kb/838080