Much of the time, it's easy to use a digital camera in the field — just point and start shooting. Of course, the more you understand about how photography works and the impact of digital technology, the better a photographer you'll be. And, once you understand your camera and its capabilities, the better your photographs will be.
But, you need to be prepared. If you've thought in advance about the field conditions you are likely to meet, you are more likely to bring back great photographs. You can help yourself prepare mentally, as explained in Chapter 1, by understanding the basic principles of photography and how digital cameras work.
Another one of the most important parts of being prepared is making sure that your camera is set up the way it will work best for you, regardless of circumstance. The goal of this chapter is to help you prepare for field conditions, with an emphasis on setting up your digital camera.
Every digital camera model uses batteries that must be recharged from time to time. Depending on your model, recharging is accomplished in one of several ways, including
Replacing the batteries with new ones (for example, when the camera runs on AA size batteries that may be rechargeable or not).
Plugging the camera into an adapter that connects to regular electrical current.
Removing the batteries from the camera and charging them in an external device.
Note
Some cameras, such as the Nikon D70, in an emergency can accept batteries other than those they ship with. However, you should check your product documentation carefully before inserting any batteries other than those that shipped with the camera.
Generally, it's fairly quick to recharge a camera or its batteries (no more than a hour or two at most). In addition, a single charge usually lasts a long time. Exactly how long the battery charge lasts depends on many factors, including
The kind of batteries
The camera model
The condition of the batteries
Temperature (batteries do not perform as well in low temperature conditions)
How the camera is used
The main variables that impact a battery's charge life are common sense:
Using the zoom lens consumes power.
Using the flash consumes power.
Storing larger-sized and higher-quality images uses more power than smaller images.
Using an LCD viewfinder consumes more power than an optical viewfinder.
Using your LCD viewfinder to review images consumes power.
Extensively and repeatedly using autofocusing places demands on the batteries.
Using slow shutter speeds consumes more power than fast shutter speeds.
When all is said and done, you should be able to get between 400 and 1,000 images per battery charge, assuming the batteries are in good condition and charged up to start with. Your actual mileage may vary, as they say, and some photographers seem to be able to take more than the top end of this range on a single charge, but you shouldn't count on getting more photos than this per battery charge.
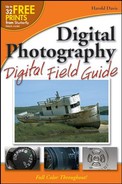
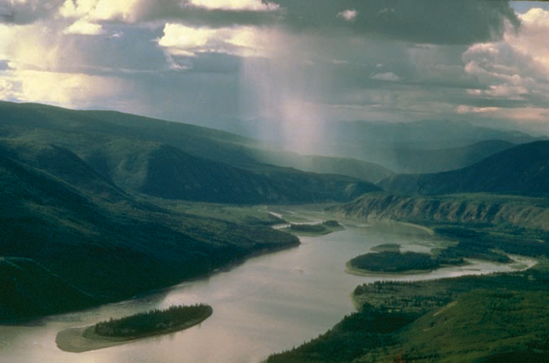
If you have access to normal electrical power for recharging if you are away from home, you shouldn't have any problems — provided you take care to fully charge your batteries before heading out on a shoot. But if you are in a location without electrical power for a substantial length of time — such as the wilderness or some exotic location — then you need to consider strategies for recharging in the field (figure 2.1).
The first, and easiest, line of defense is to take more than one set of batteries. If each battery pack is fully charged, simply load the next set when your first set of batteries runs low.
Tip
When you are working in cold conditions, for example photographing winter in the mountains or a ski event, make sure to keep an extra set of batteries handy and warm. The best way to keep the extra batteries warm is to put them inside your jacket or parka in an inner pocket where they are close to your body.

Figure 2.1. To effectively use a digital camera in remote locations like this one, you need to plan a strategy for recharging your batteries.
Planning is key. If there is a chance that multiple sets of batteries won't power you through your trip, prepare for that possibility in advance. You can
Plan your trip to only periodically visit locations that have power, even if this means extra travel.
Minimize the power draw of the camera by avoiding use of the LCD and other power-eating actions mentioned in the earlier list.
Depending on the weight restrictions of your trip (for example, you can pack heavier gear on a river raft trip down the Grand Canyon than you can on a backpacking trip to remote areas of Alaska) and the type of rechargeable battery your camera uses, you can bring along a solar-powered recharger.
Note
You can find many types of solar-powered battery rechargers by searching the Internet. Before using this kind of equipment in the field, you should check with your digital camera manufacturer to make sure a solar charger won't damage the batteries. Also, you should test the solar-powered recharger in conditions that are similar to those you will encounter in the field, if possible.
Tip
Rechargeable batteries deteriorate over time. Some batteries loose power just sitting around (NiMH) and others have a finite number of times they can be recharged (lithium-ion), and they also have an age-based life of between two and three years from manufacture if they are used or not. Part of good digital camera maintenance is replacing the batteries your camera uses every year or so.
Before you head out on a field trip (whether that is a trek to the wilderness or a visit to a neighboring garden), you should define certain basic camera settings that are not likely to change. You should make these settings based on your personal situation and preferences. The specifics of the menus and menu items used for these configuration options will vary depending on your camera make and model. But no matter what camera you are using, you can (and for the most part should) set
With these basic options set, the camera will function in a predictable manner, so you know you will be able to shoot quickly when necessary. Even when you don't need to take a quick shot, having basic parameters set up will allow you to shoot more and adjust less.
If you've already used your camera, you've probably already set these things. But you should check them before you proceed to the field to make sure all is in order.
It's a great idea to take some practice pictures before starting out on a trip. Get the kinks out while you are still at home. After all, the best way to become a good photographer is to practice.
You may want to have the specific kind of photography you are going to be doing in mind. For example, if you plan to photograph a garden, you should be clear about how to set your camera to take close-ups. That way, if you see the flower shown in figure 2.2 briefly lit, you will be ready to take the picture.

Figure 2.2. If you've got your camera set the way you want, you can take advantage of the moment (the light on this poppy faded a moment after the picture was taken).
Note
You'll find more information about photography under a variety of field conditions in Chapter 6.
As part of the setup options in the main menu for most digital cameras, you can set the brightness level of the LCD screen. Generally, cameras have at least two settings: Normal and Bright. If you don't change the setting, the Normal setting is used as the default.
The Bright setting for an LCD, though certainly brighter, uses more power than the Normal setting; but you can see the LCD more easily in high light conditions, such as those one is likely to encounter outdoors. However, if the light will be very bright, such as in figure 2.3, you should use the optical viewfinder because the LCD may simply not be usable in high light conditions.
Tip
If you have a choice in your camera between an optical viewfinder and an LCD screen, and have gotten used to the LCD because of its accuracy, you should familiarize yourself with the optical finder (and understand how to compensate for its inaccuracies) before taking your camera into high light conditions.
Depending on the digital camera, you can either focus manually or choose between two autofocus modes. Different camera manufacturers use different terminology, but essentially the first method locks the focus when you depress the shutter release partway. In contrast, the second method continuously focuses as long as the shutter release is partially depressed. (This second method is sometimes called tracking.)
A single-lock mode when you partially depress the shutter release is the best setting for most situations (it also uses less battery power than continuously focusing).
Note
With some cameras, single-lock mode some cameras prevent you from taking a picture unless the camera can focus — which may prevent you from exposing when you want to.
Continuous autofocus makes sense only in situations in which you are photographing a rapidly moving subject, for example, young children at play (see figure 2.4) or a sporting event.

Most digital cameras allow you to choose between JPEG and RAW formats for saving your photos. In addition, many cameras allow you to save images in both formats simultaneously.
RAW means that the bits of information in your photograph have not been compressed, adjusted, or enhanced. It's up to you to tweak the RAW negatives in a program such as Photoshop or Photoshop Elements.
JPEG stands for Joint Photographic Experts Group who devised the format. It is said to be a lossy format, meaning that as you add compression of the image, you lose information that can never be recovered.
The bottom line is that if you are just taking a snapshot to use with e-mail or on the Web, JPEG is the better choice. Because JPEG images are compressed, the file size for each image is smaller, so you can fit more of them on your camera's memory card.
However, if you are serious about the quality of your digital photographs, and want to use them in demanding applications, you should make sure to save images in RAW format. In particular, if a photo depends on precise delineation of textures to make a graphic impact, such as in figure 2.5, you will need the greater level of tonal detail that RAW provides.

Figure 2.5. Camera RAW provides a greater level of tonal detail that is needed for photos with subtle patterns.
Nothing in life is as simple as it ought to be, and there is a wrinkle involving the RAW format: Each camera manufacturer has created their own proprietary version of RAW (some of these variations are shown in Table 2.1).
Note
You should think of RAW and digital raw capture as general terms that describe a number of proprietary formats (specific to each camera manufacturer) that all have a lot in common.
If you save a photograph in one of the RAW formats, you will need to adjust it later in your computer using a program such as Photoshop or Photoshop Elements.
Note
For more information about image editing software, see Chapter 7.
With most digital cameras, you have a great deal of choice about the quality of image that the camera creates. In digital photography terms, when the image is encoded as a JPEG file, image quality refers to how compressed the image is; the less compressed the image — and the larger the resulting image file — the higher the quality is said to be.
Tip
Image quality is related to image format choice, which is discussed later in the chapter.
Table 2.1. Proprietary Versions of RAW
Manufacturer | RAW Name |
|---|---|
Canon | CRW file, CR2 file |
Minolta | MRW file |
Nikon | NEF file |
Olympus | ORW file |
Memory Cards
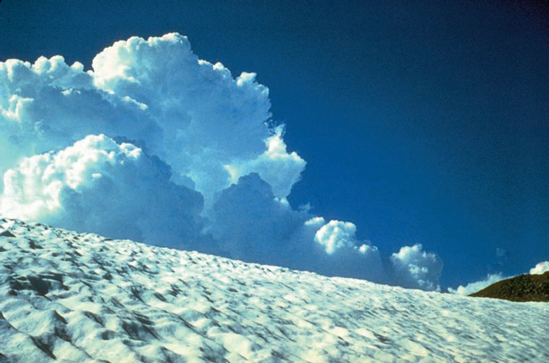
Before you used your digital camera the first time, you should have inserted and formatted a memory card of some kind. The most common digital camera memory device is a card called CompactFlash (or CF for short), shown here.
You should follow the instructions in your camera manual for inserting a memory card. Once you insert the card, formatting may be necessary. Because formatting erases any photos that are on a memory card, most digital camera manufacturers provide a two-step confirmation process to prevent you from erasing important images.
Choosing a level of image quality is largely a matter of personal choice and depends on what you will use the photographs for. It might sound logical to take all your pictures with the highest possible image quality, but the downside to this choice is that the higher the quality of the image, the larger the file size of the saved image. Larger file sizes mean fewer images saved on a given memory card.
If all you want to do is post your images on the Web (perhaps you maintain a Web site or a photo blog), there is no reason to choose a very high level of image quality. On the other hand, if you think your photos may be used for a large, high-resolution print, then certainly you should go for the highest possible quality your camera supports.
Most digital cameras allow you to choose from three JPEG modes, with compression ratios ranging from 1:16 (this is sometimes called basic quality) to 1:4 (or high quality). Many cameras have two settings for images: The size of the file and the amount of compression. The highest quality JPEG images will have a large size and little compression. Basic quality is suitable for use on the Web, but not for more demanding applications such as the creation of large high-quality prints.
Even though your camera came with a memory card, you will, no doubt, want to get an additional card or larger capacity card at some point. So, this section covers some of the details you should know before choosing a new card.
The number of photos a memory card stores depends on three variables:
The size of the memory card.
The format (or formats) selected for saving images.
The resolution (size) that the camera is capable of capturing (for example, 3000 ? 2000 pixels).
Table 2.2 shows fairly typical image capacity for a 512MB memory card.
Note
Double the number of photos for a card with 1 gigabyte of memory, and cut the number in half for a card with 256 megabytes.
Memory cards are the film of the digital age — the photos that you take are stored on a memory card just as they used to be stored on film. So it is important when planning your outings to make sure to have enough memory for your trip. There's nothing more disconcerting than running out of memory just before you see the photo opportunity of a lifetime.
An advantage of digital photography, of course, is that you can make room on your memory cards in the field by deleting rejects. (Be careful not to reject your photos unless you are sure the image is something you do not want to keep!) But still, there's no reason not to load up on plenty of memory — particularly as the price of memory cards keeps coming down.
Tip
If you don't want to carry lots of memory cards because of the conditions of your field work, you can download pictures onto a laptop computer to clear them from your memory card.
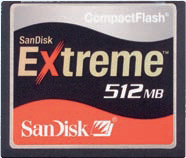
If you stop to think about it, a digital camera is essentially a special-purpose electronic computer with a lens on its front. This means (among other things) that your digital camera is extraordinarily vulnerable to weather such as rain and snow, and other conditions such as dust and sandstorms.
You wouldn't think of taking a normal computer out into bad weather conditions; but if you don't take your digital camera into at least some challenging conditions, you will miss many good photo opportunities (figure 2.6).
There's a balancing act here: On the one hand you don't want to needlessly risk your expensive digital camera, but on the other hand too much caution may make your field photographs less exciting. Bad weather can be good weather for the digital field photographer because bad weather can make for exciting, moody, and expressive photos. For example, a photograph of an oncoming storm can convey a sense of nature's grandeur and power in the way that a blue sky cannot (see figure 2.7).
It's important to have a good, padded waterproof case or bag for your equipment if you are bringing your camera into challenging field conditions.
Figure 2.6. Weather conditions like this sandstorm can make for great photos but are tough on cameras.
A technique that professionals use in challenging weather conditions is to keep the camera covered until the instant before they are ready to take the picture. That way the camera is exposed to weather for the shortest possible time.
Another good idea is to buy—or improvise—a cover for your digital camera. This can be as simple as a plastic bag or a shower cap, or it can be bought specially for the purpose of providing water- and grit-protection for your camera. In any case, before you set off to take pictures outdoors, you should be sure that the camera cover is really weatherproof (water resistant). You need to also make sure that the cover is easy to get off and on in a hurry.
Companies including Lowepro, Tamrac, and Tenba make good camera bags that are effectively resistant to a variety of adverse weather conditions.
Note
Weather resistant is not the same as waterproof. The only truly waterproof camera housings are made for scuba divers — and these are too awkward to use in normal conditions.
You shouldn't let nasty weather stop you from taking great pictures, but it is also reasonable to be concerned about your expensive digital photography gear. Think through the precautions you should take to deal with challenging weather before the difficult conditions are upon you.
Being legally and ethically able to take a picture is different from being able to use a photo. As a photographer, you should understand
What pictures you can (and cannot) take.
What uses of your pictures require releases.
What a release should say.
How to obtain a release.
Generally speaking, as long as you are in a public area, such as a road, sidewalk, or public park, you are legally allowed to take pictures of anything you see. But being allowed to take a picture does not necessarily give you the right to publish a picture, particularly if you get paid for it. In addition, there are even some restrictions on your right to take pictures. For example, you may run into trouble taking pictures of military installations, even from a public road.
It's important to be respectful of people you are interested in photographing. If at all feasible, ask permission before taking someone's photo (you'll be amazed at how often people agree to it), and remember that you cannot sell a picture of a person without explicit permission from that individual. This explicit permission usually takes the form of a release, also called a model release.
Any recognizable photograph of a person requires the explicit permission of the person (or the parent or guardian of a child) before the photograph can be published. Publication includes posting to your Web site or photo blog, so it's safest to just get a release if you think you might need one.
The requirement of getting permission before an image can be published extends beyond people to their recognizable personal and real property. In other words, you can't publish a photograph of someone's house, or car complete with license plate, without written permission (meaning a signed release).
Theoretically, the First Amendment to the U.S. Constitution creates an exception to the need for a release: You may be able to take a picture of a public figure, such as a celebrity, and publish it without permission. Do yourself a favor and consult with a lawyer before trying this trick.
Professional photographers know that it is easier to get a release on the spot. If you have to reconstruct contact information after the fact by tracking someone down and then getting him or her to sign a release, your photo may never get released. So serious photographers carry blank releases, and get their subjects to sign them every time they take a photo of a person.
A release need not be very complex. It should be dated, and provide a name and contact information for the subject. The subject (or parent or guardian if under 21) should sign it. Here's the text of a simple standard release:
"For value received, I consent to the publication of my photograph used by [Digital Photographer's Name] whether or not with my name or any text, captions, illustrations whatsoever, and I release him or her from any liability for such use in any and all media."
If you are serious about your digital photography, and think there is even a chance that you may want to publish your photographs, you should include some release forms as part of your field kit.
If you've read the sample bit of release text in the previous section, you may have wondered what "value received" meant. Because usually you are not paying someone to take his or her picture, the value received is your efforts in taking the picture. This text reflects the fact that most people like having their picture taken (see figure 2.8).
Note
Offering to send someone a copy of his or her photo is often an effective way to get them to sign a release.
If you approach your subjects with respect, 99 times out of 100 they will sign a release. So just ask!
