
If digital photography is about capturing time in a two-dimensional frame, the tool used for this capture is light. Reduced to its barest minimum, photography takes place when an exposure occurs. To make an exposure means to capture what the cameras sees, and the camera uses light to see. Without light, there is no photograph.
This means that the photographer needs to learn about light, observe light, and learn to light photos.
A possible objection, if you are thinking of nature photography, is that the lighting is not yours but rather chances of weather, position, time of day, and so on. Essentially it is something you can't control. This may be true, but the photographer should learn how to manipulate these elements to take the best possible advantage of existing light. To achieve this goal, the first step is to become a careful observer of light.
If you learn to observe light, and manipulate it when necessary to benefit your pictures, your photographs will improve—and you'll have more fun photographing. This chapter teaches you the basic vocabulary to understand how your pictures are lit, provides you with some photographic techniques to make better use of the light that is available, and shows you how to improve the existing light using flash.
For the most part, the field photographer uses available light. Available light is"available" because it is there, as contrasted with the artificial light supplied by a photographer and usually used for studio photography. Another word used to describe available light is natural light.
Note
To say that field photographers only use available light is a generalization. Field photographers also use flashes (discussed later in this chapter), and, in some cases, still-life studio lighting techniques to enhance natural light.
One great advantage of available light is that you can readily see its effects on your subject. After you're used to observing light, you should be able to predict to a great extent how it will influence the way your finished photographs come out.
Here are some of the most important things you should look for when you are observing light:
The source of most outdoor light is, of course, the sun. The sun illuminates your subject from a particular direction, and you should learn to identify that direction. However, sunlight also behaves in some complex ways:
Sunlight provides general light in a scene. This is called ambient light, as opposed to reflective light, which is the light falling directly on a subject.
Sunlight bounces off multiple surfaces and objects, and illuminates portions of your pictures indirectly (but brighter than the ambient light level).
The best description of the direction of light is the way it falls on a subject relative to the camera's position. There are three basic light directions:
In a photograph that uses front lighting, the most important light source falls on the part of the subject facing the camera. Typically, the light is shining from a source behind the photographer onto a subject such as a landscape or a group of people (figure 4.1).
If you have ever taken a picture in a front-lighting situation, you may remember that your subjects were probably staring into the sun. Front lighting minimizes shadows, and makes landscapes appear flat and single-dimensional, so it is not the best kind of lighting for most landscapes. On the other hand, front lighting works well for photos of people and animals in which you want to see the entire picture clearly.
Note
Generally, you want pictures of animals to be evenly lit, so front lighting works well for animal photography. However, if you want to create a photographic portrait of a person that is more expressive than a mug shot, front lighting may not entirely be the ticket.
Side lighting creates shadows, emphasizing the volume and shape of a subject, and exaggerating the three-dimensionality of textures.
In a nutshell, these effects taken together mean that side lighting makes subjects look very three-dimensional. Therefore, side-lit photographs of landscapes (generally taken in the early morning or late afternoon) can have a powerful impact (figure 4.2).


Unlike photographs that use front lighting, exposing a side-lit photograph is tricky. Side lighting causes shadows. Most side-lit photographs contain both shadowed and brightly lit areas. It's unlikely that you can expose a side-lit photograph in a way that preserves the mid-range tonalities of both the light and dark areas. This means that you'll have to decide whether you want to expose the picture to preserve the details in either the lighter areas or darker areas. To make this decision, you need to pre-visualize what the photograph is going to look like exposed for the dark areas as opposed to the brighter areas.
Tip
If you aren't sure of the best exposure, you can simply try taking a photo both ways, exposing it first for the dark areas of a side-lit situation, and next for the bright areas. You can decide later after downloading the photos which exposure works best.
How shadows are used in field photography often separates good work from the pedestrian. Shadows can be used to great graphic effect, and can have an emotional impact. So consider carefully what the presence of shadows in your side-lit photograph is conveying, both emotionally and in terms of the graphic composition.
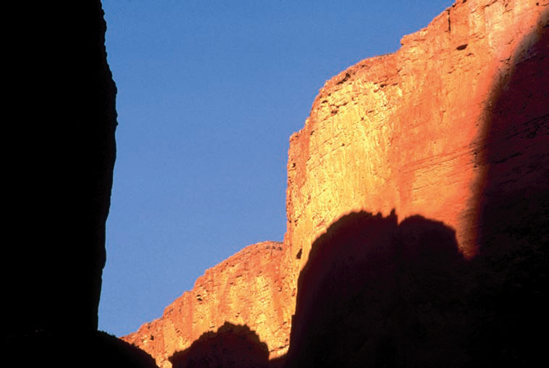
In the context of early morning or late afternoon side-lit landscapes, the common decision — which is mostly for the best — is to let the shadows go very dark (or even black) and expose for the sunny areas of the photograph, like in the photograph of the cliff side-lit by afternoon sun shown in figure 4.3.
Note
Provided your camera is set to an automatic exposure mode, and you don't have the camera primarily pointed at the dark areas of the subject, figure 4.3 illustrates what will happen most of the time even if you don't intervene.
Backlighting occurs when you are photographing directly into the light source, so that the subject of your photograph is lit from behind. In other words, the subject is between you and the source of the light. With backlighting you are photographing directly into the light source.
It's very rare to find photographs that are solely backlit, but situations that involve some measure of backlighting produce glowing clouds, halos, and patterns of light, and even a silhouette of the backlit subject.
For example, the photograph of Mt. Banner in the Sierra Nevada Mountains, shown in figure 4.4, is both side lit and backlit. The cloud in the photograph appears to glow because it is partially lit from behind by the setting sun.

Partial backlighting often creates interesting and moody photographs. For example, the photograph of raindrops on the leaves of an exotic Japanese maple shown in figure 4.5 is lit from the front, side, and back. You can best see the backlighting in the lower left of the photo. The contrast of the bright and dark backlighting with the soft lighting on the wet leaves creates an interesting effect.

The character of light essentially means how hard or soft the light appears. The sun on a cloudless day produces hard light, as does the direct flash on a camera. Soft, or diffuse, light occurs on cloudy or rainy days when the cloud cover acts like a giant diffuser.
With hard lighting, there are very dark shadows and a great contrast in exposure values between the light and dark areas of a photograph (figure 4.6).
On the other hand, soft and diffuse light causes no shadows. Images tend to be low in contrast, and have relatively little tonal range. This means it's easy to expose soft-light images because one exposure is usually appropriate for the entire range of lights and darks in the photograph.
Soft light is great for close-ups and bringing out colors, like in this photo of a bright orange flower in the rain (figure 4.7).
Tip
In some situations you can diffuse harsh light in the field with techniques such as putting translucent fabric between the light source and the subject, and by using a reflective material to bounce light into the shadowy areas of a subject.


Figure 4.7. Soft lighting brings out saturated colors, as in this photo of a blooming flower (genus Clivia).
Light intensity simply refers to the strength of the light. The stronger the light, the greater its intensity. Conversely, the lower the level of light emanating from a light source, the weaker the light's intensity.
It's easy for most photographers to gauge the intensity of light. You squint at the source of high-intensity light, and strain hard to discern details and colors in low-intensity light conditions.
A light source of too great an intensity may produce images with washed-out details in bright areas (and the image as a whole may be overly bright).
On the other hand, colors in very low intensity light may all merge into a dark grey or black. To create field photographs with a low intensity light source, you may need to add supplemental lighting (such as a flash). If you don't (or can't) increase the intensity of the light source, you will almost certainly have to use a tripod to avoid fuzzy pictures caused by camera movement.
A property of light that all photographers should be aware of is its color. In terms of physics, light is measured using its temperature on the Kelvin scale. From the viewpoint of human perception, light varies from warm (or reddish cast) along the scale to cool (bluish).
Note
For more on the Kelvin scale, see Chapter 2.
The color of light does not impact just the light source. Objects are lit because they reflect a light source. The apparent color of an object depends on the color of the light that shines upon it. As the color of a light source changes, the color of the things lit by that source change as well. So you need to be aware of the color of the light source and how the light source changes the way the things look in your photographs.
If the light source shift is substantial, the resulting photograph may look odd or unnatural. For example, the shifting color of the light source caused the water in the lakes in figure 4.8 to look a bit purple — not a very natural color, but not a displeasing effect either.

If shifting color values of the light source cause strong color shifts in the objects that appear in your photograph, you must decide if you like the effect. If not, you can use your digital camera's white balance control to take pictures that appear neutral even though the color balance of the light source has changed.
Note
If you are using a Camera RAW format for your images, the color balance can easily be adjusted in an image editing program such as Photoshop Elements or Photoshop.
Note
Another approach for dealing with color shifts is to use an external corrective filter.
One of the most important things to observe about light is how it changes.
Natural light changes all the time. It changes as sunlight changes in the course of a day. It changes as the wind blows clouds and trees. In the mountains particularly, light changes as clouds form, grow, and pass from the scene.
Light also changes as you shift your position. Walk ten feet in any direction, and the light has changed from what it was. And, as a result, the photograph will look different.
Changes in light can also occur over a long period of time, such as from season to season. The light on a subject from the same position at the same time of day is vastly different in midsummer than it is in the depth of winter because both the angle of the sun (it is lower in the winter than the summer) and the color temperature of the sun have changed. A favorite photographic location may (or may not) be as beautiful in one season as another — but the way it is lit will certainly be different.
Tip
On days with general overall cloud cover, light does not tend to change quickly.
As a field photographer, you need to pay attention to shifting light. Is the lighting of your subject better if you change your position? Will shifting sun or clouds make the lighting better (or worse)? Is the light changing so fast that you should quickly take your photograph?
Anyone can observe how light changes, and how it shifts when you change position. You don't even need your camera. You just have to spend time watching the pattern of the light change.
Note
It's hard to find time in the hustle and bustle of modern life to simply kick back and watch wind, weather, and changing light. But if you really want to take first-rate pictures, the time you spend in this way will pay dividends.
Shadows are an extremely important component of many field photographs. For example, the shadows in the photograph of a cliff wall at the bottom of the Grand Canyon, shown in figure 4.9, are the whole point of the photograph.
Table 4.1 shows the rules of shadows.
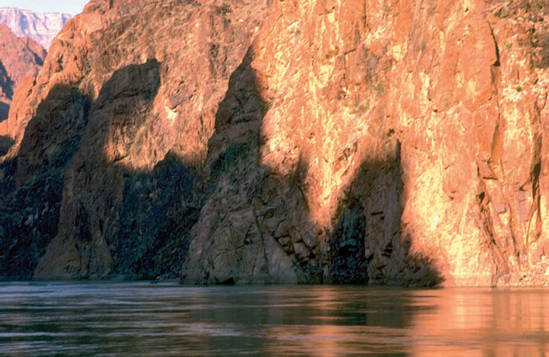
Table 4.1. The Rules of Shadows
Situation/Condition | Impact on Shadows |
|---|---|
Shadows become stronger and blacker | |
Light loses intensity | Shadows become weaker and muted |
Sunlight in winter, oblique angle of the sun | Long, low shadows |
Sun at noon, directly overhead | No shadows |
Deep valleys or canyons | Dark shadows in morning and afternoon |
Front lighting (the light is behind the photographer and straight on the subject) | Shadows stretch behind the objects in the photograph |
Side lighting (the light is from the side) | Shadows form in the direction away from the light source; best opportunity for interesting shadows in photographs |
Backlighting (light is from behind the subject) | A backlit, silhouetted subject can create interesting and unpredictable shadows |
Many photographs are essentially about the interplay of shadows and light, so it's very important to understand the rules of shadows.
Ambient light is the overall light in a situation, not the light specifically reflected by an object, or directed toward that object. It's quite possible that you will make the decision about what exposure settings to use based on non-ambient light—the light specifically falling on an important part of the subject. But the ambient light is important to the general characteristics of a photograph. If there's a lot of ambient light, you'll be able to capture details in shadow areas, as in figure 4.10.
Still confused? Think of it this way: Ample ambient light does not equal ample light because not all light is ambient. It is the background light in a scene.
Generally, high levels of ambient light resolve some of the technical problems of field photography. You can use a fast shutter speed and still have reasonably high depth of field. Also, scenes with high ambient light tend to be more evenly lit, and present very few exposure conundrums.

Sunlight is the miracle that makes our world — and most field photography — possible.
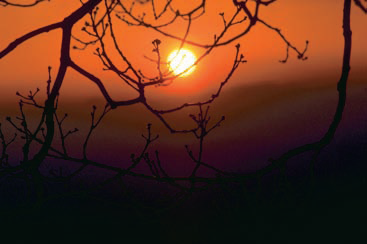
There's very little in the way of field photography that doesn't involve the sun. The sun itself is a popular subject for photography, when it rises or sets as a great orange or red ball (figure 4.11) and sets the world on fire with colorful, reflective side lighting (figure 4.12). Photographers generally agree that an hour before sunset and an hour after sunset provide light with a unique, warm tone, often referred to as the"golden hour." These late afternoon, sunset, and twilight times also present photographic challenges due to lower levels of ambient light and stark contrast between shadow and light areas.
Tip
To make photographs of sunsets rise above the bland, try to include interesting foreground subject matter along with the sunset.

Essentially, it's easy to understand sunlight as a light source. The closer to sunrise or sunset you are, the redder and more oblique the sun is as a light source. (Oblique means side lighting from a low angle.) In this situation, shadows grow long and dark, and photography poses technical difficulty.
Conversely, the closer the sun is to high noon and directly overhead, the bluer on the Kelvin scale the light becomes, and the fewer the shadows. (There are no shadows at all at noon when the sun is directly overhead.) Scenes become flat and unmemorable, but technical challenges are lessened because of the comparatively high levels of ambient light.
It's fairly simple to understand sunlight, but what a myriad variety of light the sun produces!
Incandescent light is created with ordinary household light bulbs. It is warm, rich, and red, and can be flattering to the objects it lights.
Fluorescent light is created using fixtures that pass low-voltage electricity through tubes containing argon gas under low pressure, mercury, and a coating of phosphor powder. Fluorescent light is coolish, blue, and (for the most part) unflattering. Fluorescent light is also remarkable because it comes in many varieties (many different color temperatures). Because of the way fluorescent light is generated, even a single fluorescent tube can vary tremendously from moment to moment in the color of its light.
Tip
Because fluorescent color temperature fluctuates so wildly, both from tube to tube, and even from a single fluorescent fixture over time, if you'd like to create photographs with neutral colors, make sure that any pictures you take are balancing correctly under specific fluorescent conditions, and reset the white balance as necessary.
When working indoors, carefully consider whether you need to reset your camera's white balance to make objects appear neutrally colored. It may be more interesting to leave your camera at its daylight white balance settings. For example, part of what makes the photograph of a spiral stairway shown in figure 4.13 interesting is the greenish tinge created by using a normal white balance with the ambient fluorescent light.
Your digital camera comes with an integrated electronic flash. In theory, the flash is balanced to have the same color temperature as middle-of-the-day daylight.
On-camera flash, though having many uses in the field—ranging from lighting a subject that would otherwise be too dark to photograph, to lightening shadow areas in a photograph—can come across as very harsh because of its intensity as a single pinpoint source.
In the days of film, one of the objections to flash that many photographers had was that they couldn't see the results of using the flash until they processed their film. This meant that photographers had to learn to pre-visualize the results of using flash—or wait for the results and possibly learn that their photograph hadn't worked.

With your digital camera, this is not quite as much of a problem because you can get instant feedback using your camera's LCD display. If the flash hasn't worked the way you wanted, you can adjust it and try again.
Note
Reviewing photographs in the camera's LCD display isn't perfect. The display tends to be quite small, and can be very hard to see in strong daylight. But it should provide enough visual information so you can see whether or not you need to adjust your settings.
Unless you tell your digital camera not to use flash, the camera will probably do so automatically in conditions that its controller deems necessary.
In some situations, you definitely don't want to use your flash, but your camera doesn't necessarily know this. For example, you might be photographing a flower in fairly low light conditions with the camera mounted on a tripod. If you don't want to use the flash, you need to either take the camera out of automatic mode and set the exposure yourself, or use the override controls to tell the camera not to use its flash.
Flash is used in two primary ways:
Fill flash, in which a picture that has non-flash light sources is improved in its dark areas through use of a flash, primarily for lightening shadows in daylight photos.
Direct flash, in which the flash is the direct and primary light source, for example when you want to photograph a person or thing that is in the dark.
The idea of using a flash to fill an area of a photograph is that some, but not all, of the photograph is already reasonably lit due to ambient or reflective light. But some key area or areas of the photograph aren't bright enough. The fill flash is used to brighten critical areas of the photo.
For example, in the photograph of the camellia in the rain shown in figure 4.14, there was plenty of shadowed ambient light, but the camellia itself was in shadow. Fill flash helped to turn this into an attractive image by making the flower brighter than its surroundings.

Note
You can also use reflectors, which are metallic or white sheets or boards, to bounce light into a scene or illuminate a subject that is part of a scene.
Tip
Depending on the fill flash situation, you may need to review the photograph taken with the flash and use your camera's controls to adjust the level of flash output if the subject appears too bright or too dark.
Direct flash is used in the field in low light conditions, and often when photographing people.
The red-eye effect occurs when a direct flash bounces off the back of the retina in the subject's eye. The effect gives the subject a rather demonic red glow in the eye.
Note
For more on red eye correction, see Chapter 7.
You can minimize red-eye by setting your camera to use its flash in an anti-red-eye mode. You can easily remove any remaining red-eye during the digital retouching process.
Note
For more on the digital retouching process, see Chapter 7.
When photographing indoors, a flash is often required to get a good image (see figure 4.15). This is especially true for capturing motion such as a rambunctious child or an excited pet. However, you can get some interesting and moody portraits using only window or incandescent light (but don't try this with a squirming toddler!).