In This Chapter
If a tree falls in the forest, and no one hears it, has the tree really fallen? The digital photography version of this classic chestnut is that taking your photographs is only the first part of the process. You also have to show your photographs to others — or it's as though you had never taken the photographs in the first place.
There are three major steps involved in the process of digital photography: taking the picture, post-processing the photograph using software on your computer, and displaying the photograph to others, either digitally using the Internet or by making a print.
The bad news is that digital photographs are rarely as good as they can be without digital enhancement and retouching using software intended for this purpose — using this software can be thought of as using a digital darkroom. This is also the good news: As a digital photographer you have the panoply of tools available in your digital darkroom to retouch and enhance your digital photos.
This chapter explains the postproduction steps that are important to digital photographers: editing, organizing, and sharing photographs.
Digital darkroom is a catch-all term that describes a wide range of software used for postproduction processing of digital photographs. The two major uses of digital darkroom software are
Note
You can also create composite images by combining images in the digital darkroom.
The organization of digital darkroom software roughly corresponds to these two purposes. Some software is primarily based around organizing albums of digital photographs while providing some tools for retouching these photographs. In contrast, the primary purpose of more hardcore (and expensive) image manipulation software is to provide mechanisms for creating any imagery that your imagination can visualize, as well as retouching tools.
Note
The improved File Browser introduced with the CS version of Photoshop is a great organizational tool, but it's not the main reason people use Photoshop.
Table 7.1 provides a high-level comparison of some of the leading digital darkroom software products.
Software such as Google's Picasa (shown in figure 7.1) and Nikon's PictureProject (shown in figure 7.2) work by organizing the pictures on your computer into albums. Within each album you can select a photograph and then apply tools to fix minor problems.
Table 7.1. Image Manipulation Software


Figure 7.2. PictureProject downloads and organizes photos from your digital camera (bundled with many Nikon cameras).
After you've selected a photograph in Picasa, you can fix and adjust the photo with the simple tools shown in figure 7.3 that
Crop
Straighten
Fix red eye
Adjust contrast
Adjust color
Add lighting effects
Tip
If you're feeling, well, lucky, you can click the I'm Feeling Lucky button and let Picasa do its thing — adjust your photo automatically.
Photographs cataloged in PictureProject can be adjusted (as shown in figure 7.4) for
Brightness
Color
Sharpness
Straightness
In addition, PictureProject can also rotate and crop images as well as fix red eye. It also has an Auto Enhance mode.
Table 7.2 shows what software packages are most suitable for certain tasks involving digital photographs.


Table 7.2. Suitability to Task of Digital Photography Software
Note
Most computers running current operating systems will recognize your computer as a drive and allow you to download image files.
Photoshop Elements, and the fabulous Photoshop, are probably the most popular digital manipulation programs.
Photoshop Elements provides a Photo Browser, also called the Organizer window, to help organize your photographs into collections. You can also open photographs in the Photoshop Elements Editor window, shown in figure 7.5, for the purpose of retouching and manipulating your images after you've cataloged them using the Organizer (or you can open an image directly by choosing Open from the File menu).
You can easily start Photoshop by opening a single image. Photoshop is focused on manipulating and retouching single images — although, of course, you can have multiple images open in Photoshop at one time. You can also use the Photoshop File Browser to organize photos.
Note
You can use the Photoshop File Browser to view information stored with each file, including exposure and camera information. Notes or captions can also be added to each file.
To open an image in Photoshop, choose File
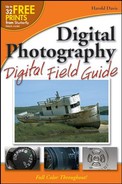
If you are already viewing images in the File Browser, you can open an image just by clicking on the desired image. The RAW converter allows most attributes of an image to be corrected or changed depending upon the software used. Photoshop has abbreviated settings as shown. However, Nikon Capture and applications such as Bibble can control many aspects of each RAW image.
Note
Photoshop CS2 has a stand-alone browsing and organizational tool called the Bridge. It can find photos on your computer and access them for enhancement in Photoshop.

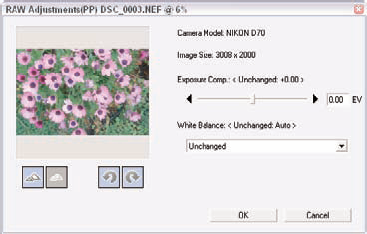
With the image open for editing in Photoshop, you'll have an immense set of powerful image manipulation tools at your beck and call (figure 7.7).
There are almost an infinite variety of postproduction filters you can apply to digital photographs using Photoshop or a similar program.
Adobe Photoshop is the premier software used for postproduction manipulation of digital photographs, but it is a relatively expensive software product and not the only game in town. A less-expensive option is Adobe Photoshop Elements. It provides mostof the photographic filters available in Photoshop. And products such as Corel's PhotoPaint also provide comparable photographic filters, although the filters are often named differently than the ones in Photoshop.
Before applying a filter to a digital photograph using an image manipulation program such as Photoshop, you should make sure you are not working on the original photographic file. In Photoshop, you can create a copy for working purposes by selecting Duplicate from the Image menu.
You can also choose to save the file in another format. For example, photographers often save JPEG files, which are lossy, as TIFF files, which are not.
Every photographer should know about filters that can be applied to digital photographs as part of the postproduction process. Some of the most useful filters in Photoshop are
Photo filter
Shadow/Highlight filter
Adjustment Layers
Instead of applying the Photo filter to the image itself, you can apply the filter using an adjustment layer. This layer sits on top of the image so you can decide whether you like the effect or not. To add a Photo filter adjustment layer to your image, open the Layers palette and click the Create New Fill or Adjustment Layer button, and then choose Photo filter from the pop-up menu. In both Photoshop and Photoshop Elements, you can also choose Layer

Ink Outlines filter
Unsharp Mask filter
Wind filter
Liquify filter
Photoshop also provides a huge range of filters that are primarily intended for artistic (as opposed to photographic) effects. Only postproduction filters meant to enhance photographs while leaving them still looking like photographs are included here. In other words, no watercolor filters.
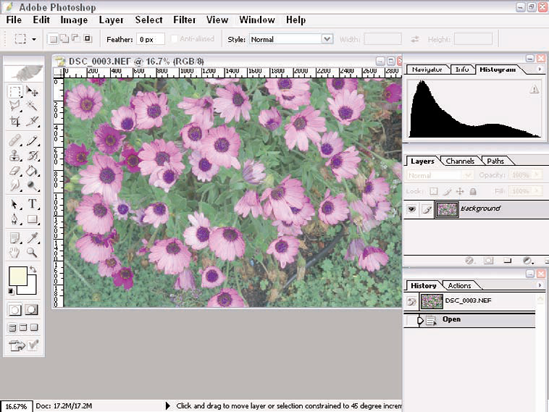
The Photoshop Photo filter, which actually consists of some 20 different color effects that can be applied to an image, works like an optical colored filter and applies a single color of your choosing to an image (see figure 7.8 for the original image and figure 7.9 for the image with the Photo Filter applied).

Figure 7.9. The same image after the Photoshop Photo filter has been applied (notice the color shift).
To access the Photo Filter dialog box, choose Image
The Shadow/Highlight filter lets you bring out detail in shadow areas that are underexposed (too dark). At the other end of the spectrum, the Shadow/Highlight filter also brings out details in overexposed (washed-out) areas of a digital photograph.
For example, the photograph shown in figure 7.10 is too dark in its background areas.
When the Shadow/Highlight filter is applied, the photograph appears properly exposed. Detail is brought out in the dark areas, without the light areas becoming overexposed (figure 7.11).

To access the Shadow/Highlight filter in Photoshop, choose Image
In the Shadow/Highlight dialog box there are two sliders. One adjusts shadows and the other adjusts highlights. These sliders are very sensitive: Small increments and decrements make for big adjustments. So play with them to make sure you get what you want.
The Ink Outlines filter finds the edges of objects within the area you specify (the entire photograph or aselected area). In other words, the filter is looking for pixel differentiation between lights and darks. So the filter will work best with images that have high contrast (otherwise it has a hard time finding edges).
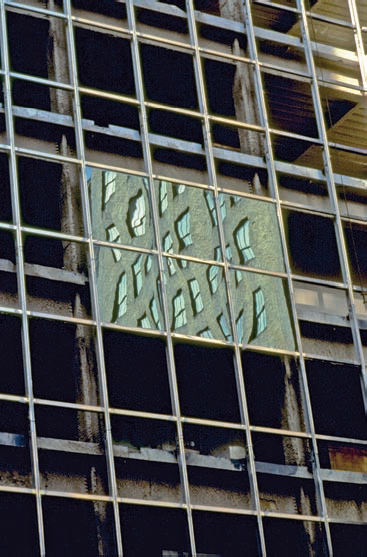
Figure 7.11. Applying the Shadow/Highlight filter brings out detail in the underexposed areas of this photo.
After the filter identifies the edges, it darkens the edge pixels, creating an outline effect.
Figure 7.12 shows a high-contrast image with the Ink Outlines filter applied to outline the edges in the image.
To apply the Ink Outlines filter in Photoshop or Photoshop Elements, choose Filter

The peculiarly named Unsharp Mask filter is the best filter for sharpening digital photographs.
Note
In pre-digital darkroom terms, a mask is a copy of an original negative. To achieve the effect of apparentsharpening, the mask is sandwiched with the original negative. The pre-digital darkroom mask was called unsharp because it was slightly out of focus (or fuzzy). The benefit of applying an out-of-focus mask was thatit would build up the density, or apparent sharpness, of dark areas of the original image without showing up as an added element, and without impacting the light areas in the print.
The Unsharp Mask filter controls the amount of color difference between adjacent pixels, making digital photographs appear sharper.
To apply the Unsharp Mask filter, choose Filter
Note
In the Unsharp Mask dialog box, set the Radius to 1, the Threshold to 0, and play with the Amount percentage. I find that an Amount percentage setting between 130% and 200% usually works best.
Tip
You don't have to sharpen an entire photo. You can use the selection tools in Photoshop or Photoshop Elements to select a specific area to sharpen.
As a general rule, avoid too much sharpening, as this will make your image look strange (unless, of course, this is what you're after).
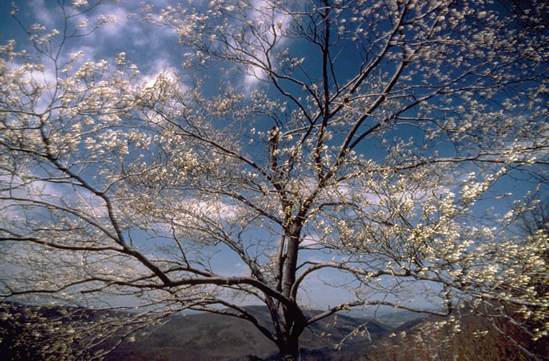
The Wind filter helps make images dramatic by adding an amount of ersatz wind to the image. For example, figure 7.13 shows a beautiful flowering tree in the spring.
Using the Wind filter to apply motion to the background of the photo adds considerable drama (figure 7.14).
To apply Wind to a photograph, choose Filter
The Liquify filter, as you'd probably suppose, is often used to add a watery effect — like that of waves in motion — to increase the drama of photographs of oceans, waterfalls, or lakes. But sometimes the Liquify filter is most fun when used to experiment on unlikely subjects, such as portraits or the fantastic jungle plant shown in figure 7.15.
To use the Liquify filter, choose Filter


In the Photoshop Elements Editor and Photoshop CS2, select the Red Eye Removal tool from the Tools palette, and click on the eye; the red will be replaced.
In Photoshop CS, you can use the Color Replacement tool to correct red eye. Here's how:
Select the Zoom tool and click on the image to zoom in on the eye area.
Select the Color Replacement tool from the Tools palette. The Color Replacement tool looks like a paintbrush with a little red eye next to it.
Use the Options bar at the top of the window to set the following options: Set Mode to Color, Sampling to Once, Limits to Discontiguous, and Tolerance to 30%. Also select the Anti-aliased option.
At the left side of the Options bar, click the current brush to select a brush diameter. Make sure the diameter is smaller than the pupils you are going to correct.
Click on the Foreground Color Swatch in the Toolbox to select a color to replace the red. Black is usually a good choice.
In the image, click once on the red color that you want to replace. This tells Photoshop what color should be replaced.
Click and drag the brush over the red-eye area until the pupils are fixed.
In both Photoshop Elements and Photoshop, remove any dust and scratches by choosing Filter
In both programs, select the Healing Brush tool from the Tools palette and apply it to minor imperfections in your photographs such as discolorations.
In the Photoshop Elements Editor, you can adjust contrast, tone, and color levels in one fell swoop by choosing Enhance
In Photoshop, you can make similar adjustments by choosing Image
Note
If you want to adjust tone by hand in Photoshop, choose Image
With an image open in Photoshop Elements or Photoshop, you may want to adjust either the shadows or the highlights. Shadows are adjusted to bring out details that would otherwise be too dark, and highlights are adjusted if bright areas are too light for details to show up.
To adjust shadows and highlights in Photoshop Elements, choose Enhance
Use the sliders in the Shadows/Highlights dialog box to lighten shadows, darken highlights, and to adjust mid-tone contrast.
Tip
If the Preview box is checked, you can see the impact your changes make on your photo as you move the adjustment sliders.
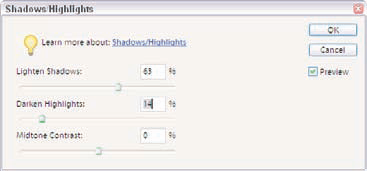
Photo collages and photo sandwiches, also called composites — putting together two or more images — have been possible since the very early days of chemical photography. These (and other) photo manipulation techniques have been notoriously used to rewrite history — for example, erasing purged soviet politicians from historical photos.
Image manipulation to rewrite history, for artistic effect, to improve photographs, or simply for fun is so much easier with digital photography and digital darkroom software.
For example, take the picture of rubber ducks in a bathtub shown in figure 7.17.

This photograph might really be fun if the ducks appeared to be sailing under a real cloudy sky. If you have a photograph of the sky in your library of digital images, it's easy to put it into the duck photograph in Photoshop using these steps:
With your image open, open the Layers palette and make sure the image is on a regular layer, not the Background layer. If the layer is contained in the Background layer, convert it by selecting Layer
Select the Magic Wand tool and select the background area. The Tolerance setting in the Options bar should be set pretty high; try a setting of 50 in order to select more of the background area. If you need to, use the other selection tools such as the Lasso or Rectangular Marquee tool, to finish selecting the background.
Press Delete on the keyboard or select Edit
Clear to remove the selected background area. The area will now be transparent (shown in Photoshop by a checked background).Open the image containing the sky.
Copy the sky image and paste it into the duck document. Using the Layers palette, drag the layer containing the sky image onto the image window containing the ducks. You will now have two layers in the duck document: the duck layer and the sky layer.
Make sure the duck layer is listed above the sky layer in the Layers palette. This puts the sky layer behind the duck layer in the stacking order. If the layers are not in the correct order, you can simply drag the duck layer up to position it above the sky layer.
With the sky layer selected in the Layers palette, use the Move tool to position the sky behind the ducks by clicking and dragging the area into position with the tool.
The result: a fun image of ducks on an ocean under a variable sky, shown in figure 7.18.

Digital photographs are graphics files. Two kinds of graphics files, JPEGs and GIFs, are widely viewable on the Web. The JPEG format is more suitable for photographs. JPEG files are normally saved with a .jpg file extension.
When you are preparing photographs for use on the Web — or for distribution as e-mail attachments — you should bear in mind that the larger the file size, the longer it will take for the photo to load in a browser or e-mail program. The actual load time depends on the speed of the Internet connection of the person loading your photograph. But you don't want to make anyone wait too long, so you need to keep your file sizes small, usually to 50K or less.
This process is the opposite of making a fine print from your photograph. Generally, the larger the file size, the better the print. But you simply can't have files that are too big downloading from the Web because they take time to load into a Web page.
To save a photograph for the Web, open the image in Photoshop Elements Editor or Photoshop and choose File
In the Save For Web dialog box, choose JPEG as the file type. Make sure the Constrain Proportions box is checked, and enter a width dimension in pixels appropriate in size for display on a Web page — say, 300 pixels wide. The constrain proportions option means that the height dimension automatically adjusts to the corresponding width without changing the ratio of the dimensions.

Figure 7.19. Use the Save For Web dialog box in Photoshop and Photoshop Elements to prepare photographs for display on the Web.
The size of the image and its approximate download time on a dial-up connection will now be displayed in the right-hand pane of the Save For Web dialog box, so that you can verify that the resulting file is small enough.
You can now move the Quality slider to change the resolution of the image. The higher the quality, the larger the file. As you move the slider, you can compare the original image (in the left-hand pane) with the image prepared for the Web (the right-hand pane).
When you are satisfied with your image's quality and size, click OK. You will next be prompted to provide a filename and location on your computer for the photograph you are saving for the Web.
Tip
If you are using a push-button Web publication system, like the one provided by Picasa that lets you publish your photos directly to a blog, the software auto-matically sizes and saves your images for you.
There are many different issues involved in publishing photographs on the Web. If you are using a program like Dreamweaver or FrontPage to design and publish your Web pages, most of the details will be taken care of for you.
If you are managing your own Web site, then your Web host will likely provide a program for you to use to upload files to the Web server. If you prefer (and are using a Windows PC), you can use an FTP program such as WS_FTP from Ipswitch Software, shown in figure 7.20, to manage uploading your photographs to your Web server.
If you are manually coding the addition of a photograph to a Web page, such as a blog entry that you create yourself, you will need to use an HTML <img> tag to include the photograph. The src attribute of the <img> tag provides the location of the photograph.
For example, the HTML tag
<img src="http://www.digitalfieldguide.
com/images/boats.jpg" alt="Pt. Reyes tug
 boat">
includes the referenced photograph in the Movable Type blog shown in figure 7.21.
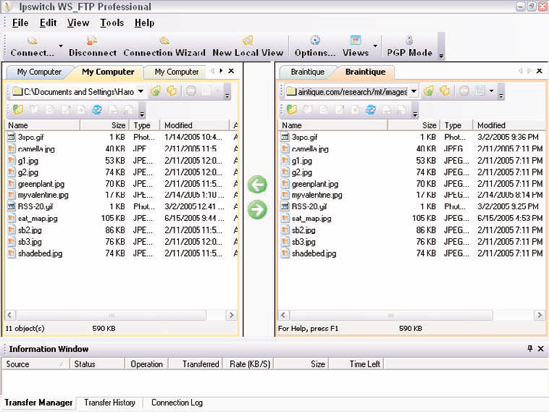

Figure 7.21. You can use HTML tags to include photographs in Web pages, such as the one shown by this blog.
Quite a few hosted blogging services provide an easy mechanism for including photographs in your blogs. You don't need to know any HTML to use them, and these services mostly are free (for basic service).
Note
One way or another, if you sign up for a hosted blogging service that allows you to post photographs, or a photo-sharing service, you are likely to end up paying something: either a subscription fee for the service, or through purchasing upgrades to a standard (minimal) free service.
For example, Google's Blogger service allows easy posting of photographs to the blogs created by members. You can even post your digital photographs directly from Picasa: with a photograph selected in the tray, click the Blogger button. Besides Google's Blogger, you may want to check out these hosted blogging services that allow you to easily publish your digital photos:
LiveJournal (
www.livejournal.com) is an online personal publishing service built on open source software that allows interaction between users.TypePad (
www.typepad.com) is from Six Apart, the creators of Movable Type blog hosting software.
Services that allow you to easily post and share photographs include
Flickr (
www.flickr.com) posts to almost any blog and allows viewers to annotate and tag photographs. Flickr is free, and it is the best photo sharing service in my opinion.HeyPix (
www.heypix.com) provides online photo sharing, organization, and retouching, with the ability to upload photos to most blogs.
Tip
You can upload a photo directly to Kodak Gallery from Photoshop Elements on your Windows computer by choosing Share
Assuming you've saved your photograph for the Web, sending the photograph by attaching the JPEG file to an e-mail message is easy.
For example, in Outlook or Outlook Express, click Create Mail to compose a new e-mail message. In the New Message window, choose Insert
Next, from the Insert Attachment dialog box, locate and select the photographic file you want to attach to the e-mail. Click Attach to attach the file.
When you are through composing your new e-mail message, click Send. The photograph will be sent as an attachment. Depending upon how your recipient's e-mail program reads the e-mail, your photograph will either appear in the body of the e-mail, or will be marked as an attachment to be separately opened by the recipient.
Note
You can e-mail photographs directly out of Photoshop Elements by choosing Share
Arguably, it's less important to print photos than it used to be. Instead, they are attached to e-mail, published on the Web as part of a blog, or shared via a service such as Flickr.
That said, there's nothing like a photo print for immediacy. Somehow, having a picture of my beautiful wife in her wedding gown in a photo blog doesn't remind me of that special day — and my special wife — in the same way that a framed print does.
If you want to turn your digital photographs into prints, you have three options:
In general, it's cheaper per print to use a commercial service, whether online or at a retailer such as Wal-Mart. However, printing in the privacy of your own home is more immediate and likely to be more convenient. Feedback from your printer is instantaneous: If the image didn't come out as well as you expected, you can take remedial action to correct the problem right away.
If you use a printer at home, you can
Upload your photographs to your computer, work on them using digital darkroom software, and then print them on a connected printer (usually by USB cable).
Insert the memory card from your digital camera directly in the printer to make your prints.
If you have a printer that came bundled with your digital camera, it most likely makes prints no bigger than 4×6 inches and possibly even prints up to 81/2×11 inches in bordered or borderless format. It also probably works using thermal dye technology.
Thermal dye printers transfer dye from a ribbon to a plastic coating on special paper. The dye ribbon has sections of cyan, yellow, magenta, and a clear overcoat. The printer applies each color in turn, moving the paper back and forth for each dye section and finishing with the overcoat, which protects the print.
There's nothing wrong with thermal dye technology. When you move up to a more advanced class of photo printer, it will probably also use this technology — and be able to make larger prints, up to 11×17 inches.
Many amateur photo printers allow you to print from a computer connected to the printer, or by inserting the memory card containing your photos into the printer.
Advanced amateurs don't want to print directly from memory cards because they want to be able to optimize their photos using digital darkroom software. They want to save the optimized photographs, and print from software like Photoshop or Photoshop Elements. So, when you move up to a better photo printer, do not expect to be able to print from your camera's memory card with great results.
Note
Photo printers aimed at advanced amateurs or professional digital photographers likely do feature a wire line or wireless network connection. This makes it convenient to use the printer across your home network without having to cable the printer directly to an individual computer.
You can order prints online from a commercial service and have the prints mailed to you. Hybrid services let you order prints online and choose to have the prints mailed or pick them up from a bricks-and-mortar store. Finally, some commercial services don't have an online presence: You order your prints in person, and come back in an hour or so.
If you order prints through an online service, you should expect to register at the online service's site (join the service), and then upload your photos using the software provided by the service.
Tip
You can upload photographs for printing directly from software like Picasa and Photoshop Elements from your Windows computer.
If you bring your digital photos into a printing service, you will most likely interact with a kiosk rather than a person. You should expect to insert the memory card from your digital camera into the kiosk, and then follow the prompts to select which images to print and what sizes to make.
Prices for prints vary greatly, with a 4-×-6-inch print going for between $0.10 and $0.30 at the time of this writing. You should look for discounts for printing in quantity and check around for specials offered to new customers.
Here are some of the leading commercial photo printing services:
Costco (
www.costco.com): hybrid online and bricks-and-mortar service (paid Costco membership required)Kodak Easy Share Gallery (
www.kodakgallery.com): formerly Ofoto, online servicePhotoworks (
www.photoworks.com): formerly, Seattle Filmworks, online serviceRitz/Wolf Camera (
www.ritzpix.com): hybrid online and bricks-and-mortar serviceShutterfly (
www.shutterfly.com): online serviceSnapfish (
www.snapfish.com): online serviceWal-Mart (
www.walmart.com): hybrid online and bricks-and-mortar service
Tip
Most online services offer free prints to new members as an incentive to join. For example, Shutterfly offers readers of this book who sign up for the Shutterfly service 35 free prints.
One fun way to share your digital photos is by creating a slide show. If you are used to creating business presentations in PowerPoint, you can easily create a slide show using PowerPoint software with your digital photographs. You can display this slide show the same way you would any other PowerPoint presentation.
Perhaps you are not interested in creating formal presentations based on your digital photographs. Windows XP provides a screen saver that automatically makes a show out of your digital photographs. You and your friends can sit in front of your computer monitor watching the slide show of your photographs — it's a lot more fun than working!
Note
There's lots more fun to be had. Mac computer owners can use the built-in iPhoto application to produce slide shows. And, those with a DVD writer can use a program to produce DVD discs that will play slide shows on a television equipped with a DVD player.
To create a slide show using PowerPoint, follow these steps:
Open a new presentation.
Choose a blank content layout (this will be a blank page that a slide goes on).
Choose Insert
PictureFrom File to add a digital picture that is saved on your hard drive to the slide show.Choose Slide Show
View Show once your show is created to view your creation.
You can also use PowerPoint's Photo Album feature to better organize the digital images that will go into your slide show. To create a Photo Album in PowerPoint and use the Photo Album to create a slide show of digital photos, choose Insert

It's easy to set up Windows XP to display a screen saver using your digital photos. Follow these steps:
Right-click anywhere on your Windows XP desktop and choose Properties from the pop-up menu. The Display Properties dialog box appears.
Click the Screen Saver tab. The Screen Saver tab of the Display Properties window appears (shown in figure 7.23).
In the Screen Saver drop-down list, choose My Pictures Slideshow.
Click Settings. The Settings dialog box opens.
In the Settings dialog box, provide a folder location for the digital photos you want included in the slide show. The image files in the folder are used for the slide show.
Click OK. The dialog will close. The next time your computer is idle and the screen saver activates, your slide show will start.
