
Understanding exposure
The three elements of exposure
The role of ISO
Understanding apertures
Equivalent exposures
Getting color right with white balance
Getting good close-ups
Composing great photographs
Putting it all together
Digital cameras are great! The computers that are the brains inside these hunky little machines do a magnificent job of properly exposing and focusing photographs for you most of the time. But the key phrase here is "most of the time." When you point and shoot, your digital camera does not always get it right.
You need to know when and how to control your camera manually to make sure that the program inside your camera doesn't make mistakes. (Yes, you can be smarter than your digital camera!)
Understanding when and where your digital camera can go wrong, and how to fix the problem, requires understanding the basic principles of photography, which you learn all about in this chapter.
In addition to good digital cameras doing the wrong thing, there's another reason to learn the basics of photography: Good photography often goes beyond point-and-click. If you want to be the best photographer you can be, the more you understand about the basics, the better!
Properly exposing a photograph is the most difficult technical challenge facing digital photographers. If a photograph is improperly exposed, it doesn't matter how wonderful everything else in the photograph looks: You might as well not have bothered taking the picture.
On the surface, exposure doesn't seem that difficult. You tend to know good exposure when you see it, and you also know when you see an underexposed photograph (too dark) or an overexposed photograph (too light).
In fact, if a scene being photographed has average tonality — a term popularized by Ansel Adams meaning the consistency of the range from dark to light of the different areas of a photograph — consistent lighting, and a stationary subject (figure 3.1), it's pretty easy to get the exposure right.
However, these are a lot of "ifs." In the real world, not all photographs (including some of the ones you probably most want to capture) meet one or more of these criteria because the subject of the photograph:
Uses a wide tonal range (figure 3.2).
Is inconsistently lit (figure 3.3).
Is in motion (figure 3.4).

Figure 3.1. A static image that is average in tonality and consistently lit, like this photograph of a flowering tree in a Japanese-style garden, is easy to expose properly.
Note
The photograph shown in figure 3.3 actually works because it was exposed for the bright landscape, and the window frame was allowed to become very dark.
In these situations, you need to have a good grasp of exposure basics to get the best photograph possible in the field.
There's nothing wrong with using your digital camera in one of its automatic modes. But you should know enough about exposure to ensure that the camera's choice of exposure provides the results you want.
One technique for obtaining a good exposure is called bracketing. Essentially, bracketing an exposure means taking lots of photo- graphs and varying the exposures, usually by changing the camera's aperture. In fact, some digital cameras automatically bracket for you.
Note
Most bracketing takes more than one stop up or down. You also don't have to bracket a full stop; depending on the camera, you could bracket in half step stops.
In some very tricky situations, bracketing exposures makes sense. However, there are some downsides to bracketing:
You take more photos, so your storage media gets filled quickly.
Sorting through the resulting clutter of multiple pictures can be difficult.
Most important of all, spending the time to take many pictures of one subject can be impossible in some situations (when the subject is moving, for example) and takes away some of the joy and spontaneity of photography.

Figure 3.2. This image of a wisteria vine climbing a wall presents an exposure challenge because of its tonal range
Note
You can usually correct problems involving exposure or tonal range using digital darkroom software such as Photoshop Elements or Photoshop. See Chapter 7 for more information.
Proper exposure is ultimately something of a judgment call, and is therefore not something you can expect to always obtain from the automatic capabilities of a digital camera, or even from a light meter.
Essentially, proper exposure means that tonal values, and light and dark, come out the way you want them to. You can expose an image in multiple ways. At the same time, there is a maximum possible range between light and dark that you can capture. To properly expose a given subject (for example, to make sunlight on turning leaves and a running brook appear to sparkle) you must sometimes allow certain other areas to appear too dark, as in figure 3.5. An easy way to achieve this exposure effect with most digital cameras is to partially depress the shutter release to lock exposure settings on the portion of an image you want to expose for (in this case, the sun on a running brook). Then, shift the camera to the composition you want, with the exposure for the brighter areas still locked in place.

Figure 3.3. This photograph presents an exposure challenge because the foreground (window) is dark and the background (landscape) much brighter
The point is really clear in the photograph of New York City's Chrysler building shown in figure 3.6. Exposing the photograph to average the light in the subject would have produced a poor photograph. To create the dramatic image shown in the figure, it was necessary to choose an exposure for the sunlit Chrysler building in the rear of the photo, and let the in-shadow buildings that frame the photo go black.
If I had had a spot meter handy, using it would have helped me to determine an accurate exposure. I didn't have a spot meter with me, but I knew I would need to underexpose the image related to the in-shadow buildings. Using the camera's overall meter reading as a starting place, I used manual exposure controls to successively stop the camera down, shooting a number of images, and choosing the best one.

Figure 3.4. Subjects in motion, like this photo of a merry-go-round, require an instant grasp of the trade-offs of using different exposure combinations
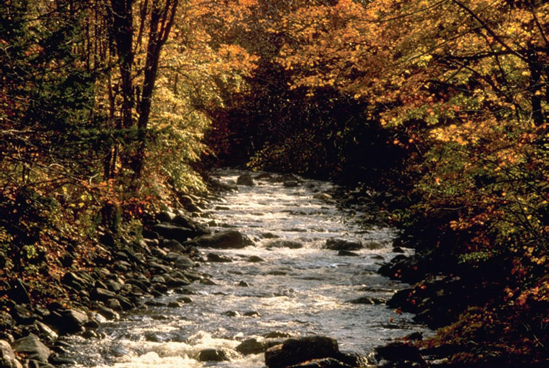
Figure 3.5. To get the effect of sparkling light on the trees and brook, you need to set the exposure to allow parts of the image to appear almost black
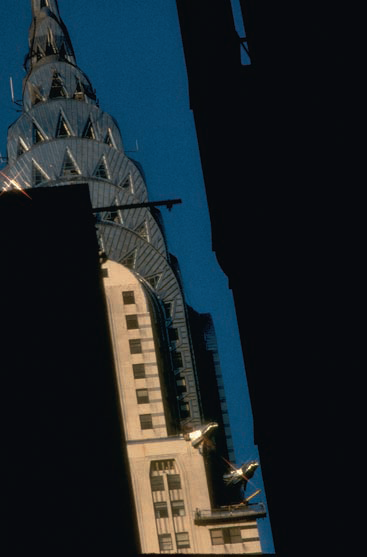
An automatic exposure system would not likely have come up with the settings used to take the picture shown in figure 3.6, which deprecate one portion of the image to benefit the key element of the picture. This shows you how important it is to understand exposure and not rely solely on automatic camera settings while in the field.
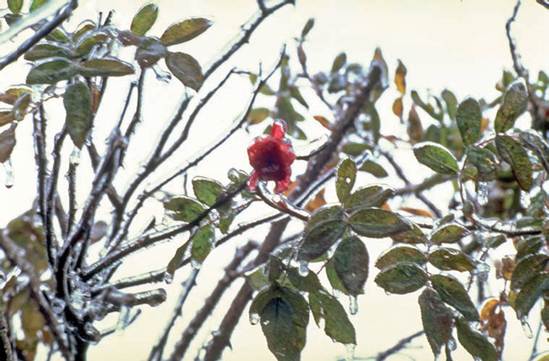
The other side of the exposure coin is that you must sometimes overexpose parts of an image so that the areas you care about come out right. For example, figure 3.7 shows a flower bud embedded in ice by an early spring storm. The photograph had to be exposed to allow the sky to wash out completely, or the flower wrapped in ice (the point of the photograph) would not have been properly exposed.
The three elements that combine to make an exposure are the
Sensitivity of the image capture mechanism (ISO)
Aperture setting for the camera lens
Shutter speed used by the camera
Note
Of course, you can't have an exposure without also having a lit subject to photograph.
ISO(International Standards Organization) refers to the sensitivity of the image capture mechanism. With a traditional camera in the old days, ISO would have meant the speed of the film used (sometimes designated by an ASA number).
The aperture is the size of the opening, or diaphragm, used by the camera lens. A camera lens open as far as possible is said to be wide open.
Shutter speed means how long the camera's shutter remains open while the exposure is being made. Generally, this is a fraction of a second.
Essentially, there's an equation here: ISO + aperture + shutter speed = your photographic exposure. How well or poorly this exposure comes out depends on the light conditions of your subject, and your idea of how the photograph should look. If you don't understand the exposure basics explained in this chapter and leave it up to the camera, then it is the camera's automated software that determines the exposure, not your vision.
If you leave your digital camera on automatic and don't change any of the settings, most likely the camera will use an ISO number of 100 or 200. This number is likely to be the lowest ISO that your camera can use. ISO numbers can be set a great deal higher — depending on the camera model, as high as 3200 in higher-end cameras.
The higher the ISO, the better your camera is at taking pictures in low light conditions. Conversely, the higher the ISO, the greater the noise-to-signal ratio (as an engineer might put it). This means that as the ISO used gets higher, you get more and more bad — or erroneous — pixels in your image. You can think of the noise that these bad pixels generate as being essentially random, and the randomness increases the higher the ISO is set. So the goal is to set the ISO as low as possible, as long as the photograph is viable. You don't want to take a picture of a beautiful mountain landscape in broad daylight using a high ISO; it's not necessary, and will degrade the image. On the other hand, raising the ISO may be the only way to get a picture in low light conditions, particularly if a flash cannot be used.
The ISO used by your camera, if you decide to override the default, is set using a scale. In other words, you can't just pick out an ISO number you'd like to use; you must select a number (or stop) from the scale. Each number on the scale theoretically doubles the sensitivity of the image capture mechanism.
Here's the ISO scale from 50 to 1600 ("slowest" to "fastest"): 50, 100, 200, 400, 800, and 1600.
If your camera provides this ISO range, you can (in theory) select any one of these six ISO settings. Many cameras provide an automatic ISO setting, which raises the ISO as needed to capture an image.
Note
As a practical matter, most of the time you should leave the ISO at 100 or 200.
Tip
You can think of moving up or down by one on the ISO scale as having the same impact on exposure as changing the camera f-stop by one aperture up or down (or halving or doubling the shutter speed). See the section on "Understanding Aperture" for more information.
So, if the good news about raising the ISO is that you can take pictures in lower light conditions, and the bad news is that the signal-to-noise ratio degrades, adding garbage to your pictures, how bad is the degradation?
Image degradation depends on many factors, including the engineering of the image capture mechanism, how many sensors are used, and how they are arranged. It's also a statistical effect, which means that it is not predictable. Even at the same ISO, with camera settings all the same, two frames may vary in their level of degradation.
Bad pixels usually appear as white, cyan, magenta, or yellow, but can be any color.
Tip
If you experience a bad pixel or pixels in exactly the same place in many pictures over time, this is probably a camera defect called having a hot or stuck pixel. (Stuck pixels appear all the time, and hot pixels only appear in pictures taken with a long exposure time.) In either case, if you have a recurring bad pixel, you should have the manufacturer examine and repair the camera (particularly if it is still under warranty).
You tend to get more image degradation at lower light levels than at higher light levels because the software in the camera can better filter out random pixels when it is lighter (when more information is available to be processed by the camera's sensors).
The amount of degradation you get is to some extent random, and depends on many factors, including your camera, the quality of its image capture mechanism and software, and what you are photographing. But roughly speaking, at an ISO of 100 you can expect degradation of less than 1/100 of one percent of the pixels in an image. By the time the ISO has been raised by a factor of 16 to ISO 1600, image degradation can be as high as five percent of the total pixels in an image.
Note
If as much as five percent of the pixels in an image were bad, your photograph would look blotchy most likely, not a result you want.
So if you boost the ISO due to low light conditions, don't expect pixel-perfect images. And remember to reset the ISO so that your pictures of normal subject matter don't show pixel loss.
The aperture of a lens means how large the opening of the lens is. This size is controlled by a mechanism in the lens called a diaphragm (also sometimes called the iris). When the lens is "wide open," its diaphragm is in the fully open position. When a lens is "stopped down," the diaphragm is closed as far as it can be while still being able to take a picture.
Like ISO, the lens aperture is set using a scale containing stop values. The stop values in the scale for lens aperture are called f-stops. The lower the number on the f-stop scale, the wider the lens opens. For example, at its most open ("wide open") a lens might be set to f/2.8, and when fully stopped down, the lens might be set to f/32.
Each stop on the f-stop scale lets in half the light to the photograph being exposed than the previous f-stop. Here's the scale with all the full stops between f/2.8 and f/32: f/2.8, f/4, f/5.6, f/8, f/11, f/16, f/22, and f/32.
Because each stop lets in half the light of the stop before, f/8 lets in 1/8 of the light of f/2.8 (there are three stops between them). By the time you stop down to f/32, the lens is letting in 1/64 of the light of the lens at f/2.8.
Tip
If you think of f-stops as fractions (as they actually are), it will help you internalize the notion that a smaller f-stop number represents a larger actual lens opening.
Unlike ISO, raising (or lowering) the f-stop does not create image degradation. Provided an image is properly exposed (meaning exposed the way you'd like it), the only difference between one f-stop and another is the depth of field produced by using the f-stop.
Note
For more on depth of field, see Chapter 1.
If you close the aperture to get more depth of field, something else has to change to compensate. If you are unwilling to raise ISO due to image degradation, that something has to be lowering the shutter speed. But it can be difficult to lower the shutter speed if you are photographing a subject that involves motion.
Controlling the aperture (the f-stop) of your photograph impacts both the depth of field of the photograph and (because it impacts exposure time) how motion will appear. So you need to make a decision about how you want depth of field and motion to appear in your photograph — or allow this decision to be made by one of the semi- automatic modes in your digital camera.
It's possible — and sometimes necessary — to set the lens aperture along with the shutter speed.
Note
Shutter speeds are explained in detail later in the chapter.
Depending on your camera model, it will almost certainly have an aperture-priority mode. In aperture-priority mode, you set the aperture and the camera picks the corresponding shutter speed. (A related mode is shutter-priority mode in which you pick the shutter speed, and the camera selects the proper f-stop.)
Note
You may find that different camera manufacturers call these modes by slightly different names, even though they have the same functionality. Check your camera's manual to determine the aperture modes available and what they are called.
The other aperture modes that are available depend on your camera model. Besides aperture priority, in which the camera picks the shutter speed, and fully manual modes, most digital cameras have a programmed aperture multi-mode available. In programmed aperture multi-mode, the camera shows you the possible aperture and shutter speed combinations that its computer has determined will produce an optimal exposure. You can usually use this mode to automatically bracket exposures, which is explained later in the chapter. This mode can also be used to intentionally underexpose or overexpose an image by a specified percentage without having to concern yourself with f-stops.
Note
Almost all cameras also have a fully automatic mode in which the camera does all the work, and the photographer can't fine- tune exposure settings.
Note
The correct exposure is always the one that the photographer deems is right after reviewing the picture that was taken. Underexposure and overexposure from the camera-eye view are theoretical concepts based on a programmatic model of proper exposure. The camera's idea of correct exposure may not produce the best photograph, or one that is exposed the way you'd like it to be.
The choice of aperture has two primary implications. It determines
Depth of field, or how much of the image besides the area focused on appears sharp.
Choice of shutter speed, which impacts how motion is rendered in your photograph, and whether camera shake will be a significant problem.
Lenses are made of optical glass arranged in a complex series. Most lenses perform better — meaning render images with more crispness, and render colors more attractively — at some f-stops than at others. In addition, although lenses are made using modern manufacturing processes with every attempt at standardization, the fact of life is that different pieces of glass vary. So even lenses with identical labeling from the same manufacturer are not all the same.
You will not learn from camera manufacturers which are the best-performing f-stops from an optical viewpoint on a given lens. The only way to find out which f-stops provide the best results is to take lots and lots of pictures, keeping track of the f-stop used for each. Over time, you will get to know the idiosyncrasies of your lens.
Generally the best-performing f-stops on a lens occur in the middle of the range of f-stops the lens provides, usually f/5.6, f/8, and f/11. But the performance difference between the best and worst f-stops can be very slight, so other factors, such as depth of field, and rendering of motion, often determine the choice of f-stop.
The range of shutter speeds you'll find on your digital camera vary according to the model. It's typical for an advanced amateur camera with an LCD Viewer such as a Canon PowerShot or a Nikon COOLPIX to have a shutter speed range from 1/4 of a second (longest exposure) to 1/2000 of a second (shortest exposure). A digital SLR such as the Nikon D70 is likely to have a range from 30 seconds (longest exposure) to 1/8000 of a second (shortest exposure).
Most digital cameras also allow you to take bulb exposures in which you manually keep the shutter open as long as you'd like. With a bulb exposure, you can have exposures as long as several hours, although this isn't done too often because there's usually no need for it, and exposures longer than a few minutes require a great deal of patience.
Using a time exposure, it is possible to take photographs in extremely low light conditions. For example, the photograph of ice skaters in a rink by moonlight shown in figure 3.8 was exposed manually for about 15 seconds.
If you want as much of your photograph as possible to appear sharp, then you need to choose a small f-stop such as f/16 or even lower. In this case, a slow shutter speed will probably be needed. If the camera shakes when a picture is taken at a slow shutter speed, then the whole photograph will look blurry (and having high depth of field does you no good — it is a little like worrying about mosquitoes when a bear is charging right at you). So photographs where things in both the foreground and background appear sharp, and that use a high depth of field, are usually taken with the camera on a tripod, as was the picture shown in figure 3.9.
Note
Camera shake is always a possibility at shutter speeds of 1/125 of a second and longer and almost always occurs at shutter speeds longer than 1/30 of a second.
How slow a shutter speed you can use depends on your native ability in this arena, and the position you need to assume to take the photograph. If you have to hold a camera high over your head, obviously it will shake more than if you are able to crouch and brace yourself.
The longer the focal length of a lens on a camera, the more camera shake is a problem, and the faster the shutter speed you need to avoid it.


Figure 3.9. This photo shows foreground and background both relatively in focus; it was exposed at f/22 using a tripod
A wonderful effect in the field is to capture motion in a photograph by creating the illusion of stopping motion. This works particularly well with water, but you can apply it to moving trees, grass, clouds, and so on. When you look at flowing water normally, you see the water actually flowing past. But if you use a long exposure, like in the photograph shown in figure 3.10, the water in the stream is apparently solidified as it flows across the picture.
The point of the example in figure 3.10 is that if you require a long time exposure for special reasons — for example, because you want to freeze water in motion — then you need to choose a small aperture such as f/32 that enables a long exposure.
Note
It's often easiest to approach this from the opposite direction. Using the camera in shutter-preferred mode, you select the (slow) shutter speed you'd like. The camera will then select the corresponding (wide) aperture.
Generally, besides the optical peculiarities of specific lenses, and the impact of aperture on depth of field, the other reason for choosing an aperture has to do with its impact on exposure time (shutter speed). You may need to choose a small aperture to get a long exposure time, as in the previous example.
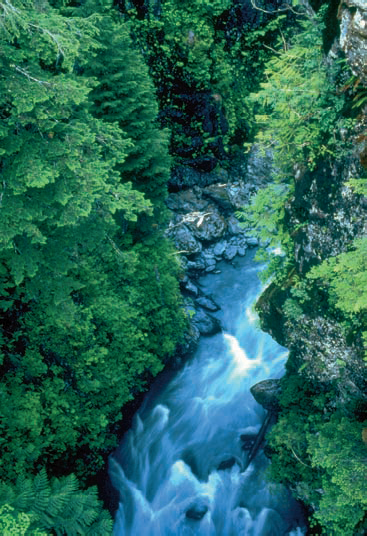
Figure 3.10. The flowing water in this photograph of a stream appears "solidified" due to a long exposure time
Conversely, if you want to stop motion, or to negate the effects of camera shake when you aren't using a tripod, you need to use a fast shutter speed. Very often, you will need to open the lens up, choosing a large aperture such as f/2.8, to use a fast shutter speed.
Note
Using a shutter-preferred mode, you can pick your shutter speed, and the camera will choose the correct corresponding aperture.
Tip
A shutter speed of 1/500 or 1/1000 of a second will stop (meaning freeze) almost all motion.
A middle ground is used to create an effect showing partially stopped motion that also appears very natural. For example, the photograph of the waterfall in figure 3.11 shows the water "naturally," pretty much as it would appear to a human observer at the scene of the Columbia Gorge. This water is apparently frozen in mid-tumble. It's not "frozen" so precisely that motion is stopped (there is some blurring caused by the water), but at the same time the water is not "solidified" the way it would be for a time exposure.
The photograph shown in figure 3.11 was exposed at 1/125 of a second, which was chosen to partially stop the motion of the water. For this photograph to be properly exposed, a shutter speed of 1/125 of a second meant using an f-stop of f/8.
Tip
A shutter speed of 1/60 or 1/125 of a second usually creates the effect of partially stopped motion.
Table 3.1 should give you a general idea of how different ranges of shutter speeds render motion.
Photography has been called the art of freezing time. Time is frozen by pairing a shutter speed with an aperture. Choosing a combination aperture and shutter speed that produces an effect to match your vision for your photograph is one of the most basic tools available to the photographer.
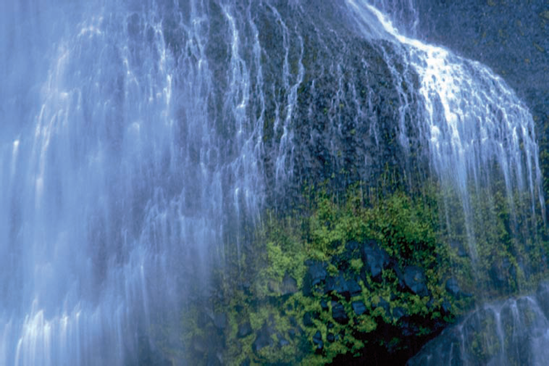
Figure 3.11. Due to a moderate exposure time — not too fast, and not too slow — this waterfall appears just about as it would to an on-the-spot observer
Table 3.1. Shutter Speeds and Motion
Shutter Speed Range (in Fractions of a Second) | Impact on Motion |
|---|---|
1/500–1/1000 | Freezes most motion |
1/30–1/125 | Partially stops motion, produces an apparently natural rendering |
Slower than 1/30 (longer exposures) | Almost certain camera shake will produce blurry images unless you use a tripod |
Slower than 1/2 (longer exposures) | Motion is "solidified" (the longer the exposure the more solid it appears) |
The opposite side of the coin of aperture-preferred exposure modes in a digital camera is to use a shutter-preferred semiautomatic mode.
In a shutter-preferred mode, you pick the shutter speed, and the camera assigns the corresponding f-stop for the camera's idea of the proper exposure.
For example, to create the image shown in figure 3.12 — which shows crisp, still leaves on the water, but also slight tails for leaves in motion — you can put the camera on a tripod and select a shutter speed of 1/4 of a second.

You've probably got the idea by now that at a given ISO, there is a range of equivalent exposures that provide a "correct" exposure for a given subject. Each item in this range of equivalent exposures consists of an f-stop paired with a shutter speed.
Note
Correct exposure means the desired exposure — because theoretically there is no such thing as a correct exposure, only the exposure that makes your photograph turn out the way you want. If you leave your camera in its automatic, point-and-shoot mode, the camera determines the correct exposure. If you override the camera's measurements and control the exposure yourself (for example, to underexpose an image to favor one area), the underexposure is the correct exposure — provided the photograph turns out the way you want it to.
There is no difference in the exposure created by any of the f-stop and shutter speed exposure equivalencies. The differences in the final image is due to the optical qualities of your lens at different openings, differing levels of depth of field, and the impact of differing shutter speeds on the depiction of motion.
The digital photographer who is in creative control chooses one exposure equivalency, with or without the help of camera auto- mation. This exposure equivalency best embodies the vision of the photographer. An example will probably help you to get a better feeling for the concept of exposure equivalences.
Suppose you are in the process of taking a picture outside on a very sunny day. A natural exposure in these kinds of conditions might be 1/250 of a second and f/8. Tables 3.2 and 3.3 show the equivalent exposures as you move to faster, such as to stop motion, or slower shutter speeds, for example to get higher depth of field.
There's not a whole lot of apparent difference between the exposure equivalents of 1/125 of a second and f/11, 1/250 of a second and f/8, and 1/500 of a second and f/5.6 (although f/11 does provide more depth of field than f/5.6, and 1/500 stops motion and eliminates camera shake more completely than 1/125).
But at either end of the ranges shown in Tables 3.2 and 3.3, the impact of the choice from among the equivalent exposures becomes glaringly obvious. At 1/2000 of a second and f/2.8, depth of field is extremely shallow, and motion is frozen. On the other hand, at 1/15 of a second and f/32, there is tremendous depth of field, motion appears somewhat blurred, and camera shake is a significant problem (you should probably count on using a tripod).
White balance is a wonderful tool for getting colors right with a digital camera. Film photography has no facility that compares with the ability to set and adjust white balance in the camera.
The color of light is measured in Kelvin degrees. The lower the Kelvin numbers, the warmer (or redder) the light appears, and the higher the Kelvin number the cooler (or bluer) the light appears. Table 3.4 shows the Kelvin degrees for a number of common kinds of lighting conditions that photographers might encounter.
In the bad old days of film, a given kind of film was rated for a specific number on the Kelvin scale. For example, daylight film was rated for 5,000°K.
If you took a picture with film rated for one kind of light in another kind of light, the colors would be far from expectations. For example, using daylight film rated for 5,000°K, a photograph taken under 3,000°K incandescent light would look orange, a photograph taken in 10,000°K shade would look blue, and a photograph taken in 20,000°K fluorescent would look green.
Note
There's a great range in the possible Kelvin numbers for fluorescent light (although it is usually closer to 10,000°K than 20,000°K).
White balance is a digital technique for correcting images to make them appear neutral no matter what the lighting conditions.
Tip
You can experiment with changing the white balance settings in your camera for creative purposes, in addition to the primary use of white balance for achieving neutrality.
Table 3.4. Kelvin Degrees for Common Kinds of Light
Kelvin Scale | |
|---|---|
Lowest threshold of visible light | ∼750°K |
Sunlight at sunrise | 1,800°K |
Candlelight | 1,800°K |
Incandescent lighting | 3,000°K |
Normal daylight | 5,000–5,500°K |
Flash | 5,400°K |
Cloudy daylight | ∼6,000°K |
Daytime shade (can be surprisingly cool) | As high as 10,000°K |
Fluorescent lighting (varies tremendously, even with a single light source) | 10,000-20,000°K |
Northern sky (above the Arctic Circle, around the summer equinox, midnight, camera pointed north) | 28,000°K+ |
Generally, with a digital camera, there are three modes for setting white balance:
Automatic
User-selected mode
Manual (also called custom)
In automatic mode, the camera does its best to figure out the kind of light conditions, and to assign an appropriate white balance setting.
In user-selected mode, you pick one of a number of settings that tells the camera about the lighting conditions; it can then use the most appropriate white balance. If you know you are going to be taking pictures in a specific lighting condition, such as under incandescent lights, you should choose this white balance setting rather than relying on the camera's ability to automatically detect the kind of light.
Typical settings include
Incandescent
Fluorescent
Direct sunlight
Flash
Cloudy
Shade
White balance is determined manually by pointing the camera at a reference object, usually a white or grey card, in the lighting conditions you encounter. With the reference object filling the camera, you can use the menus specific to your digital camera (check your camera's manual) to obtain a white balance.
Note
Depending on the digital camera model, you can also save and recall a white balance setting. With some cameras, you can also obtain a white balance setting using another photograph taken by the same camera.
For example, suppose you are photographing far north in Alaska above the Arctic Circle in midsummer with the light coming from the northern sky. These are conditions that, with a standard white balance setting, produce blue-green images. You may want your pictures to appear with this off-color as a special effect (or so that everyone looking at the picture knows you were in the field and off the beaten track); but if you want your photographs to appear with neutral color balance, like the photograph of Alaska in figure 3.13, you should obtain a manual white balance setting for the lighting situation.

You may use a special macro lens to take close-up photographs, magnificationfilters placed in front of your camera lens, or simply the zoom lens that came with your digital camera. Whatever lens you use, getting good close-up photographs undoubtedly involves some special considerations.
Close-up means just that — close. At close range, defects show. The rule is this: Even if you don't see a flaw when you are composing a picture, it will be very apparent in the final picture. The closer you get, the more apparent.
For example, the image shown in figure 3.14 looked like an attractive photo of saturated flowers in the rain.
One look at this picture on the computer shows the dead buds and other imperfections. If you intend to take a picture of dead buds, that's fine. But usually these imperfections creep into close-ups without the photographer being aware of them.
The moral is to scrutinize imagery extremely carefully. You'll rarely see a close-up that seems perfect to you without taking some remedial action. For example, when preparing for the image in 3.15, I intervened to arrange the curled leaf on top. Although some imperfections still show, there are far fewer than if I had relied solely on nature.
The closer you get to a subject, the less depth of field you have. This means that the in-focus plane is shallower, and that the parallelism of the camera plane to the plane of the subject is more important with close-ups than with distant landscapes. After all, what does a divergence of a couple of degrees matter when you are photographing the Matterhorn? No one will ever see the difference in the final photograph. However, minute changes of angle make a huge difference when the camera is close to the subject.


The best way to deal with the shallow depth of field inherent in close-ups (besides stopping down the lens to the aperture with the greatest feasible depth of field) is to locate the most important plane in the photograph, and then make sure the camera is parallel to that plane.
For example, in figure 3.16, the leaves of the exotic geranium go in every direction. But it's clear that the central leaf is most important to the photograph, so the camera's geometry was aligned with the plane represented by that leaf.
Part of careful observation of a close-up subject is noticing the light that falls upon it. Harsh lighting, often the result of a sunny cloudless day that might seem perfect to a snapshot photographer, often produces close-ups that are too full of light and dark contrast. Overcast, foggy, and misty days produce the best light for close-ups, light that heavily saturates the colors in the close-up. So get out your digital camera and raincoat on those slightly misty days — or move to the moors!

Many digital cameras provide facilities or modes specifically intended for use with close-up (or macro) photography.
For example, the Nikon D70 has a Close-up mode in which the camera automatically exposes and focuses for an image in which the main central subject stands out.
Note
If you are creating a close-up image that does not meet the criteria discussed in this chapter — for example, the crucial area of the photograph is off to one side — then you should probably not use the Close-up mode with the D70.
Other cameras have close-up, or macro, modes with a somewhat different purpose. In these cameras, such as the Canon PowerShot series, the Macro Mode is engaged to enable the camera to focus closer.
With a camera such as a Canon PowerShot, you can tell that you need to engage its Macro Mode when, as you get closer to a subject, you are no longer able to get the image in sharp focus. Simply engage the Macro Mode to implement a closer range of focusing.
Tip
You need to disengage from Macro Mode to focus on objects at a normal distance again.
You may find that the autofocus facility in your camera behaves erratically when you are photographing close, particularly when shiny, reflective surfaces such as glass or metal are involved. Depending on the quality of the LCD Viewer your camera provides, you may be able to tell that there is a focus problem when you review the image. You'll certainly be able to see a focus problem when you download your photograph to your computer — but, of course, that may be a little late to fix the problem.
You'll know your camera is having difficulty focusing if, with the camera held still in one place or mounted on a tripod, you hear the autofocus mechanism continually activating and going back and forth, or if the camera locks and refuses to take the shot because it cannot focus. What is happening is that the beam the camera uses to triangulate and fix its focus is being sent back in a way that fools the camera (figure 3.17). You will need to focus manually.
Focusing problems happen with close-ups more often than you may think. If you detect a focusing problem, you should manually focus, making sure to focus on the most important area of your photograph.
Photographic composition means the visual organization of your photographs. Composition is a huge subject in itself, closely related to visual and graphic design. Entire books have been written about it.
Composition is very important. To some degree, exposure is an issue of craft — a photograph is either correctly exposed, or it is not. Composition is where the art of photography comes in. Composition is about how you see the world and render it into a two-dimensional photograph that is interesting, informative, or compelling to look at.
You won't learn everything there is to know about composition here. Some of the ability to compose a photograph is probably innate, and a great deal of photographic composition is learned. You learn it by taking a great many pictures, and seeing how you (and other people) respond to the pictures you have taken. As you learn photographic composition, try to use each photograph as a learning experience. Note what worked and what didn't.
Here are some ideas to help you get started with photographic composition.
To start with, you should train yourself to pre-visualize what a photograph will look like. A photograph is a static, two-dimensional rendering not like the real-world dynamic scene you experience that is full of sight, sound, motions, and smells that will never be rendered in the photograph. Surprisingly few photographers make this translation successfully in their heads before they take a picture. Successful translation of the complex multi-dimensional real world to a photograph uses skill in knowing in advance how the subject translates into two dimensions. A useful exercise for teaching yourself to do this is to look at a three-dimensional subject. Next, lock into your memory what you think the photo of the subject will look like. Then take the photo. Finally, compare your memory of the projected photo with the actual photo. You'll be surprised at the difference—but over time, with practice, you can learn to improve this perception.
Ultimately, plan to please yourself. It never works to plan a photographic composition around what you think someone else will like because you can never really tell what anyone else will like anyway.
Make sure to wander around a subject so that you find the best and angle and view for your photograph. Don't assume that what you see first will be the best view for photographing something. If at all possible, take your time looking before you photograph. Make sure you don't accidentally include something in your photograph that shouldn't be there.
Decide what is important about your photograph. Zero in on the important elements, and try to eliminate distractions. For example, a horizon line that is angled rather than straight is a particular distraction for people when they look at a photograph, so try to avoid this in your photographs.
If the subject you are photographing has minor flaws or is improperly lit, try to correct the problem before you take the picture.
Patterns can be extremely interesting compositionally. For example, the pattern of leaves shown in figure 3.18 is attractive because of its motion, color, and symmetry.
Beware of creating boring compositions. The world's full of enough mediocrity; there's no reason your photographs should be conventional. Photographs with the most important part of the subject dead-smack in the middle tend to be dull. Ditto for horizon lines running right through the middle of a photograph.
Presenting the unexpected in a composition, like the rocks above the clouds in figure 3.19, can lead to more interesting and intriguing photographs.


This chapter explained exposure, apertures, shutter speeds, and composition. In other words, all the basics you need to understand how to take a photograph from a conceptual viewpoint. This is a great deal of information, but how do you put it all together under field conditions to take great photographs?
The key ingredient is to be yourself. Your photographs are a reflection of your personality and how you see. Don't try to force them to reflect someone else's vision.
You should try to internalize the key points of exposure explained in this chapter. With some knowledge, you choose whether to rely on your camera's automatic features or to override the automatic settings when they don't provide the results you'd like to see. Regardless, the knowledge you gain from understanding some basic photography concepts will make outings with your camera much more fun and rewarding.