
Chapter at a Glance

Creating the container for a database is easy. But an empty database is no more useful than an empty document or worksheet. It is only when you fill a database with data in tables (known as populating a database) that it starts to serve a purpose. As you add forms, queries, and reports, it becomes a useful tool. If you customize it by adding a startup page and organizing the various objects into categories and groups, it moves into the realm of being a database application.
Not every database has to be refined to the point that it can be classified as an application. Databases that only you or a few experienced database users will work with can remain fairly simple. But if you expect someone without database knowledge to enter data or generate their own reports, spending a little extra time in the beginning to create a solid foundation will save a lot of work later. Otherwise, you’ll find yourself continually repairing damaged files or walking people through seemingly easy tasks.
Microsoft Access 2010 takes a lot of the difficult and mundane work out of creating and customizing a database by providing database applications in the form of templates that you modify and populate with your own information. Access 2010 also provides templates for common elements that you might want to plug into a database. These application parts consist of sets of objects—a table and related forms, queries, or reports—that together provide a complete, functioning part of a database. All you have to do is fill in your data. If none of the templates meet your needs, you can create tables manually.
In this chapter, you’ll create a database from a template and create a table manually. Then you’ll adjust the display of a data table to fit your needs. By the end of this chapter, you’ll have a database containing a few tables and you’ll understand a bit about how the tables in the databases you will use for the exercises in the remaining chapters of the book were created.
Note
Practice Files You don’t need any practice files to complete the exercises in this chapter. For more information about practice file requirements, see Using the Practice Files at the beginning of this book.
A few years ago (the distant past, in computer time), creating a database structure involved first analyzing your needs and then laying out the database design on paper. You would decide what information you needed to track and how to store it in the database. Creating the database structure could be a lot of work, and after you created it and entered data, making changes could be difficult. Templates have changed this process, and committing yourself to a particular database structure is no longer the big decision it once was.
A template is a pattern that you use to create a specific type of database. Access 2010 comes with templates for several databases typically used in business and education, and when you are connected to the Internet, many more are available from the Microsoft Office Online Web site at office.microsoft.com. By using pre-packaged templates, you can create a database application in far less time than it used to take to sketch the design on paper, because someone has already done the design work for you.
Using an Access template might not produce exactly the database application you want, but it can quickly create something that you can customize to fit your needs. However, you can customize a database only if you know how to manipulate its basic building blocks: tables, forms, queries, and reports. Due to the complexity of these templates, you probably shouldn’t try to modify them until you’re comfortable working with database objects in Design view and Layout view. By the time you finish this book, you will know enough to be able to confidently work with the sophisticated pre-packaged application templates that come with Access.
In this exercise, you’ll create a database application based on the Tasks template. This template is typical of those provided with Microsoft Access 2010, in that it looks nice and demonstrates a lot of the neat things you can do in a database.
Note
SET UP You don’t need any practice files to complete this exercise. Close any open databases, and then with the New page of the Backstage view displayed, follow the steps.
In the Available Templates area, click Sample Templates.
Access displays a list of the templates that shipped with the program and are installed on your computer.
Click the Tasks template icon.
In the right pane, you can assign a name to the database and browse to the location where you want to store the database.
In the File Name box, type MyTasks.
Tip
Naming conventions for Access database files follow those for Windows files. File names cannot contain the following characters: / : * ? “ < > |. By default, file name extensions are hidden, and you shouldn’t type the extension in the File Name box. (The extension for an Access 2010 database file is .accdb. For information about this file format, which was introduced with Access 2007, search for accdb in Access Help.)
 Click the adjacent Browse button, and then in the File
New Database dialog box, navigate to the folder that
contains the practice files for this book.
Click the adjacent Browse button, and then in the File
New Database dialog box, navigate to the folder that
contains the practice files for this book.You use the same navigational techniques in this dialog box that you would use in any Open or Save dialog box.
With Microsoft Access 2007 Databases selected in the Save as type box, click OK.
The path to the specified folder is displayed below the File Name box.
Tip
By default, Access creates new databases in your Documents folder. You can change the location when you create each database, as you did here, or you can change the default save folder. To specify a different default folder, click the File tab to display the Backstage view, click Options, and then on the General page of the Access Options dialog box, under Creating Databases, click the Browse button to the right of Default Database Folder. In the Default Database Path dialog box, browse to the folder you want to be the default, and then click OK in each of the open dialog boxes.
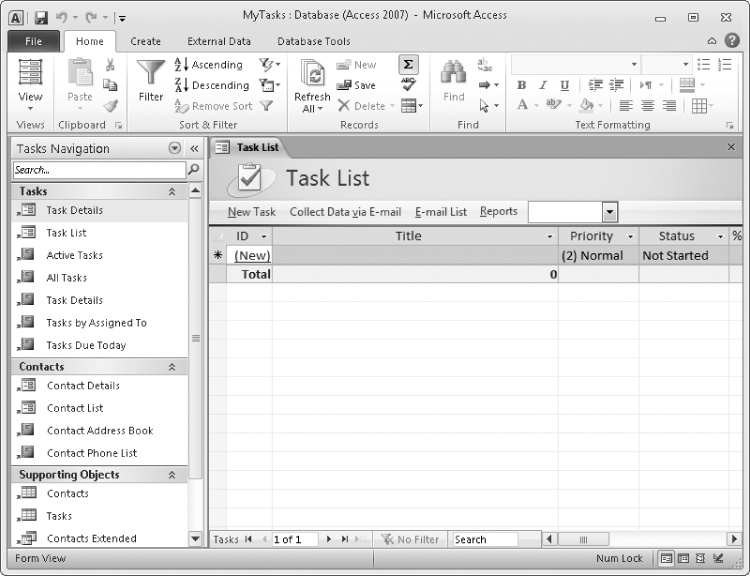
Access briefly displays a progress bar, and then the new database opens, with the Task List form displayed in Layout view.
 If the Navigation pane is
closed, click the Shutter Bar Open button
at the right end of its title bar to open it. Then if any of the groups
are collapsed, click their chevrons to open them.
If the Navigation pane is
closed, click the Shutter Bar Open button
at the right end of its title bar to open it. Then if any of the groups
are collapsed, click their chevrons to open them.The Navigation pane displays a custom Tasks Navigation category.
Note
Troubleshooting The appearance of buttons and groups on the ribbon changes depending on the width of the program window. For information about changing the appearance of the ribbon to match our screen images, see Modifying the Display of the Ribbon at the beginning of this book.
In the Navigation pane, click the Tasks Navigation title bar, and then in the category and group list, click Object Type to list all the objects in this database.
In the Tables group, double-click Contacts.
The empty Contacts table is displayed. You could now start entering data in this table.
Right-click the Contacts tab, and click Close All.
 On the Create tab of
the ribbon, in the Templates group, click
the Application Parts button.
On the Create tab of
the ribbon, in the Templates group, click
the Application Parts button.The Application Parts gallery appears.
You can add various types of forms and several sets of related tables and other database objects to this or any other database. These ready-made objects give you a jump start on creating a fully functional database application.
Click away from the gallery to close it.
Continue exploring the objects that are part of the MyTasks database on your own.


Suppose you need to store different types of information for different types of people. For example, you might want to maintain information about employees, customers, and suppliers. In addition to the standard information—such as names, addresses, and phone numbers—you might want to track these other kinds of information:
Employee identification numbers, hire dates, marital status, deductions, and pay rates
Customer orders and account status
Supplier contacts, current order status, and discounts
You could start with a template, add fields for all the different items of information to a single Contacts table, and then fill in only the relevant fields for each type of contact. However, cramming all this information into one table would soon get pretty messy. It’s better to create a new database based on the Blank Database template and then manually create separate tables for each type of contact: employee, customer, and supplier.
When you create a new blank database or insert a new table into an existing database, the table is displayed on a tabbed page in Datasheet view with one empty row that is ready to receive data. Because the active object is a table, Access adds the Table Tools contextual tabs to the ribbon so that you can work with the table.

If you close the table at this point, it will disappear, because it contains no data and it has no structure. The simplest way to make the table part of the database is to create at least one record by entering data, which simultaneously defines the table’s structure.
Tip
You can also define the structure of the table without entering data. For information about table structure, see Refining Table Structure later in this chapter. For information about Access 2010 features not covered in this book, refer to Microsoft Access 2010 Step by Step by Joyce Cox and Joan Lambert (Microsoft Press, 2010).
Obviously, to create a record, you need to know how to enter information in Datasheet view.

Every table has an empty row that is ready to receive a new record, as indicated by the New icon (the asterisk) in the record selector at the left end of the row. By default, the first field in each new table is an ID field designed to contain an entry that will uniquely identify the record. Also by default, this field is designated as the table’s primary key. No two records in this table can have the same value in this primary key field. Behind the scenes, the data type of this field is set to AutoNumber, so Access will enter a sequential number in this field for you.
Tip
As you’ll see in a later exercise, the primary key field does not have to be the default AutoNumber type. If you need to you create your own primary key field, then anything meaningful and unique will work.
Note
See Also For information about data types, see Refining Table Structure later in this chapter.
The first field you need to be concerned about is the active field labeled Click To Add. You enter the first item of information for the new record in the first cell in this field, and then press the Tab or Enter key to move to the first cell in the field to the right. Access then assigns the value 1 to the ID field, assigns the name Field1 to the second field, and moves the Click To Add label to the third field. The icon in the record selector at the left end of the record changes to two dots and a pencil to indicate that this record has not yet been saved, and the New icon moves to the record selector of the next row.
When creating a new table in Datasheet view, you need to save the first record after entering the first item of data. If you don’t, Access increments the ID value for each field you add to that record. For example, if you add seven fields, Access assigns the value 7 to the ID field of the first record. To avoid this problem, you simply click the icon in the record selector after you enter your first value in the first record. This saves the record with the value 1 assigned to the ID field, and subsequent records will be numbered sequentially.
Having entered the first item of data and saved the record, you continue entering items of information in consecutive cells and pressing Tab or Enter. When you finish entering the last item for the first record, you click anywhere in the row below to tell Access that the record is complete.
After you complete the first record of a new table, you will probably want to change the default field names to something more meaningful. To rename a field, you simply double-click its field name and then type the name you want.
At any time while you are entering data in a new table, you can save the table by clicking the Save button on the Quick Access Toolbar and naming the table. If you try to close the table without explicitly saving it, Access prompts you to save the table. If you click No, Access discards the table and any data you have entered.
After you have saved the table for the first time, Access automatically saves each record when you move away from it. You don’t have to worry about losing your changes, but you do have to remember that most data entries can be undone only by editing the record.
Databases almost always contain more than one table. You can create additional empty tables by clicking the Table button in the Tables group on the Create tab of the ribbon. If you need to create a table that is similar in structure to an existing one, you can copy and paste the existing table to create a new one. When you paste the table, Access gives you the option of naming the table and of specifying whether you want the new table to have the existing table’s structure or both its structure and its data.
For some kinds of tables, Access provides Quick Start fields that you can use to add common sets of fields or kinds of fields to a table. The Quick Start options take the work out of defining these fields and can be very useful when you know exactly what type of field you need.
In this exercise, you’ll create a blank database, enter information into the first record of its default table, assign field names, add another record, and save and close the table. Then you’ll copy that table to create a second one. Finally, you’ll create a new table and experiment with Quick Start fields.
Note
SET UP You don’t need any practice files to complete this exercise. Close any open databases, and then with the New page of the Backstage view displayed, follow the steps.
In the center pane of the New page, in the Available Templates area, click Blank Database.
- In the right pane, click the File Name box, and type MyTables. Then click the Browse button, navigate to your Chapter26 practice file folder, and click OK.
In the right pane, click the Create button.
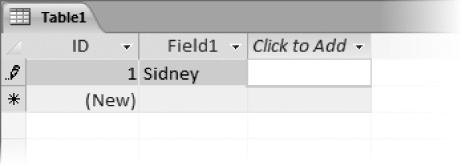
Access creates the blank database in the specified location, opens the database, and displays a new blank table named Table1.
With the empty field below Click to Add selected, type Scott, and then press Tab to move to the next field.
The icon in the record selector changes to indicate that this record has not yet been saved. The value 1 appears in the ID field, the name of the second column changes to Field1, and the Click To Add label moves to the third column.
Click the icon in the record selector to save the record before you move on.
Click the cell under Click to Add, and type the following information into the next seven cells, pressing Tab after each entry:
Gode 612 E. 2nd Pocatello ID 73204 USA 208 555-0161 As the cursor moves to the next cell, the name of the field in which you just entered data changes to Field followed by a sequential number.
Tip
Don’t be concerned if your screen does not look exactly like ours. In this graphic, we’ve scrolled the page and adjusted the widths of the columns so that you can see all the fields. For information about adjusting columns, see Manipulating Table Columns and Rows later in this chapter.
Double-click the ID field name (not the ID value in Field5), and then type CustomerID to rename it.
Repeat step 7 for the other fields, changing the field names to the following:
Field1
FirstName
Field4
City
Field7
Country
Field2
LastName
Field5
State
Field8
Phone
Field3
Street
Field6
ZIP
The table now has intuitive field names.
Add another record containing the following field values to the table, pressing Tab to move from field to field:
When Access asks whether you want to save the design of the table, click Yes.
In the Table Name box, type Customers, and then click OK.
Access closes the table, which is now listed in the Tables group on the Navigation bar.
Tip
You can rename a table by right-clicking it in the Navigation pane and then clicking Rename. You can delete a table by right-clicking it, clicking Delete, and then confirming the deletion in the message box that appears. (You can also delete a table by selecting it in the Navigation bar and then clicking the Delete button in the Records group on the Home tab or pressing the Delete key.)
In the Navigation pane, click the Customers table to select it.

 On the Home tab, in
the Clipboard group, click the Copy button. Then click the Paste button.
On the Home tab, in
the Clipboard group, click the Copy button. Then click the Paste button.In the Table Name box, type Employees. In the Paste Options area, click Structure Only to capture the fields from the Customers table but none of the customer information. Then click OK.
The new Employees table appears in the Navigation pane.
Double-click Employees to open it in Datasheet view so that you can view its fields. Then close the table again.
 On the Create tab,
in the Tables group, click the Table button.
On the Create tab,
in the Tables group, click the Table button.Access creates a new table containing an ID field and a Click To Add field placeholder.
 With the Click to
Add field active, on the Fields contextual tab, in the Add
& Delete group, click the More
Fields button.
With the Click to
Add field active, on the Fields contextual tab, in the Add
& Delete group, click the More
Fields button.If necessary scroll to the bottom of the gallery, and then under Quick Start, click Name.
Access inserts ready-made LastName and FirstName fields.
Repeat steps 18 and 19 to add the Address fields from the Quick Start list.
Access inserts ready-made Address, City, State Province, ZIP Postal, and Country Region fields.
Close the table, saving it with the name Shippers when prompted.


In Chapter 25, we showed you how to quickly adjust the width of table columns to efficiently display their data. In addition to adjusting column width, sometimes you might want to rearrange a table’s fields to get a better view of the data. For example, if you want to look up a phone number but the names and phone numbers are several fields apart, you will have to scroll the page to get the information you need. You might want to rearrange or hide a few fields to be able to simultaneously see the ones you are interested in.
You can manipulate the columns and rows of an Access table without affecting the underlying data in any way. You can size rows and size, hide, move, and freeze columns. You can save your table formatting so that the table will look the same the next time you open it, or you can discard your changes without saving them.
In this exercise, you’ll open a table and manipulate its columns and rows.
Note
SET UP You need the MyTables database you worked with in the preceding exercise to complete this exercise. Open the MyTables database, and then follow the steps.
In the Navigation pane, double-click the Customers table to open it in Datasheet view.
In the field name row, point to the right border of the Street field name, and when the pointer changes to a double-headed arrow, drag to the right until you can see all of the street addresses.
Double-click the right border of any column that seems too wide or too narrow to adjust the column to fit its contents.
This technique is particularly useful in a large table where you can’t easily determine the length of a field’s longest entry.
Point to the border between any two record selectors, and drag downward.
When you release the mouse button, Access increases the height of all rows in the table.
 On the Home tab, in
the Records group, click the More button, and then click Row Height.
On the Home tab, in
the Records group, click the More button, and then click Row Height.In the Row Height dialog box, select the Standard Height check box, and then click OK.
Access resets the height of the rows to the default setting.
Click anywhere in the FirstName field. Then in the Records group, click the More button, and click Hide Fields.
The FirstName field disappears, and the fields to its right shift to the left.
To restore the hidden field, in the Records group, click the More button, and then click Unhide Fields.
In the Unhide Columns dialog box, select the FirstName check box, and then click Close.
Access redisplays the FirstName field.
If you can see all of the fields in the table, for the purposes of this exercise, adjust the size of the program window until some of the fields are no longer visible.
Point to the CustomerID field name, hold down the mouse button, and drag through the FirstName and LastName field names. With the three columns selected, click the More button in the Records group, and then click Freeze Fields.
Scroll the page to the right until the Phone field is adjacent to the LastName field.
The first three columns remain in view as you scroll.
In the Records group, click More, and then click Unfreeze All Fields to restore the fields to their normal condition.
Click the Phone field name to select that field. Then drag the field to the left, releasing the mouse button when the thick black line appears to the right of the LastName field.
Close the Customers table, clicking Yes to save the changes you have made to the column widths and order. If you see a warning that this action will clear the Clipboard, click Yes.


Although you can create the structure of a database in Datasheet view, some structural refinements can be carried out only in Design view. When you are familiar with tables, you might even want to create your tables from scratch in Design view, where you have more control over the fields. You can open a new table in Design view by clicking the Table Design button in the Tables group on the Create tab.
When you open an existing table in Design view, the tabbed page shows the underlying structure of the table.

This page has two parts. The top part consists of the following:
Selector You can click the shaded box at the left end of a row to select the entire field. You can then insert a row above the selected one, delete the row (thereby deleting the field), or drag the row up or down to reposition its field in the table.
The selector also identifies the primary key field of the table by displaying the Primary Key icon (a key with a right-pointing arrow).
Tip
If you don’t want a table to have a primary key (for example, if none of the fields will contain a unique value for every record), select the field designated as the primary key, and on the Design contextual tab, in the Tools group, click the Primary Key button to toggle it off. If you want to designate a different field as the primary key, select the new field, and click the Primary Key button to toggle it on. (You don’t have to remove the primary key from the current field first; it will happen automatically.)
Field Name column This column contains the names you specified when you created the table. You can edit the names by using regular text-editing techniques. You can add a new field by typing its name in the first empty cell in this column.
Data Type column This column specifies the type of data that the field can contain. By default, the ID field in a new table is assigned the AutoNumber data type, and all other fields are assigned the Text data type. With the exception of fields with the OLE Object and Attachment data types, you can change the type of any field by clicking its Data Type entry, clicking the arrow that appears, and clicking a new data type in the list.
Description column This column contains an optional description of the field.

The Field Properties area at the bottom of the design page displays the properties of the field selected in the top part. Different properties are associated with different data types. They can determine such things as the number of characters allowed in a field, the value inserted if the user doesn’t type an entry, and whether an entry is required. Properties can also assess whether an entry is valid and can force the user to select from a list of values rather than typing them (with the risk of errors).
All fields, no matter what their data type, can be assigned a Caption property that will appear in the place of the field name in tables or in other database objects. For example, you might want to use captions to display the names of fields with spaces, such as First Name for the FirstName field.
Note
See Also For a comprehensive list of data types and properties, search on data types in Access Help.
In this exercise, you’ll open a table in Design view, add and delete fields, change a data type, set field sizes, and add a caption.
Note
SET UP You need the MyTables database you worked with in the preceding exercise to complete this exercise. Open the MyTables database, and then follow the steps.
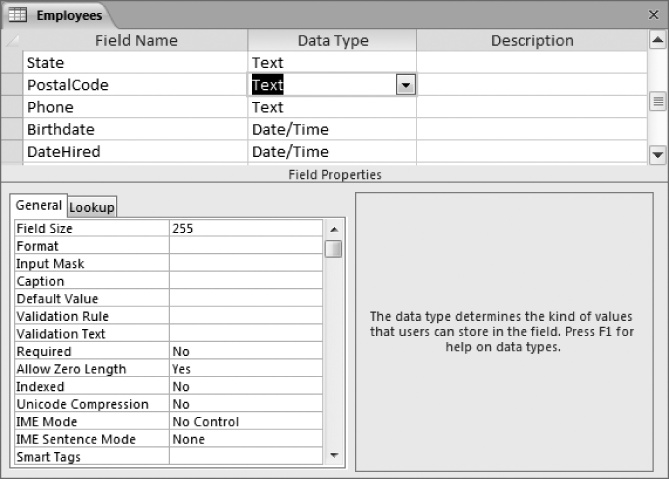
In the Navigation pane, right-click the Employees table, and then click Design View.
Access opens the table with its structure displayed. Because you created this table by copying the Customers table, you need to make some structural changes.
With CustomerID highlighted in the Field Name column, type EmployeeID, and then press the Tab key twice.
 Click the Country
field’s selector, and then on the Design contextual tab, in the Tools group, click the Delete
Rows button.
Click the Country
field’s selector, and then on the Design contextual tab, in the Tools group, click the Delete
Rows button.In the empty row below the Phone field, click the Field Name cell, and type Birthdate. Then click the Data Type cell.
Access assigns the default Text data type to the new field.
Click the arrow at the right end of the Data Type cell, and in the list, click Date/Time.
Repeat steps 5 and 6 to add another Date/Time field named DateHired.
Select the ZIP field name, change it to PostalCode, and then change its data type to Text.
Tip
If you use only five-digit ZIP codes, the Number data type is fine. But setting it to Text allows you to enter ZIP+4 codes or the letter-number postal codes used in Canada and other countries.
The properties in the Field Properties area at the bottom of the design page change to those that are appropriate for this type of field.
In the box to the right of Field Size, double-click 255, and type 10.
You are specifying that this field can contain no more than 10 characters.
Change the Field Size property of the following fields as shown:
FirstName
50
City
50
Phone
30
LastName
50
State
20
Tip
Sometimes changing the field properties of a table that already contains data can produce unanticipated results. If you make a change to a field property that might cause data to be lost (for example, if you make the Field Size property smaller than one of the field’s existing values), Access warns you of this problem when you attempt to save the table.
Click the State field. Then in the Field Properties area, click the Caption box, and type State or Region.
The Field Name remains State, but in Datasheet view, the column heading will be State or Region.
 On the Design tab,
in the Views group, click the View button to switch to Datasheet
view.
On the Design tab,
in the Views group, click the View button to switch to Datasheet
view.Access tells you that you must save the table before leaving Design view.
In the message box, click Yes to save the table.
 With the table displayed in Datasheet view, click
the LastName field name. Then on the
Fields contextual tab, in the Add & Delete group, click the Text button.
With the table displayed in Datasheet view, click
the LastName field name. Then on the
Fields contextual tab, in the Add & Delete group, click the Text button.A new field called Field1 that has the Text data type is inserted to the right of the LastName field.
With Field1 selected, type Title, and press Enter.
 Click the Title
field name. Then in the Properties group,
in the Field Size box, click 255 to select it, type 50, and press Enter.
Click the Title
field name. Then in the Properties group,
in the Field Size box, click 255 to select it, type 50, and press Enter.Type the following information in the first record:
FirstName
Karen
LastName
Berg
Title
Owner
The Employees table is now ready for you to start entering data.


In Access, a relationship is an association between common fields in two tables. You can use this association to link the primary key field in one table to a field that contains the same information in another table. The field in the other table is called the foreign key. For example, if customer accounts are assigned to specific sales employees, you can establish a relationship by linking the primary key EmployeeID field in the Employees table with the foreign key EmployeeID field in the Customers table. Each customer account is assigned to only one employee, but each employee can manage many customer accounts, so this type of relationship—the most common—is known as a one-to-many relationship.
Similarly, if every order is associated with a customer, you can establish a relationship by linking the primary key CustomerID field in the Customers table and foreign key CustomerID field in the Orders table. Each order is placed by only one customer, but each customer can place many orders. So again, this is a one-to-many relationship.
Less common relationships include:
One-to-one In this type of relationship, each record in one table can have one and only one related record in the other table. This type of relationship isn’t commonly used because it is easier to put all the fields in one table. However, you might use two related tables instead of one to break up a table with many fields, or to track information that applies to only some of the records in the first table.
Many-to-many This type of relationship is really two one-to-many relationships tied together through a third table. You might see this relationship in a database that contains Products, Orders, and Order Details tables. The Products table has one record for each product, and each product has a unique ProductID. The Orders table has one record for each order placed, and each record in it has a unique OrderID. However, the Orders table doesn’t specify which products were included in each order; that information is in the Order Details table—the table in the middle that ties the other two tables together. Products and Orders each have a one-to-many relationship with Order Details. Products and Orders therefore have a many-to-many relationship with each other. In plain language, this means that every product can appear in many orders, and every order can include many products.
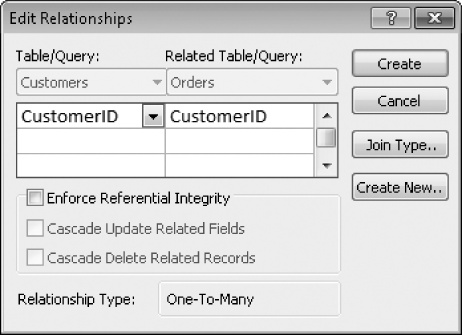
The most common way of creating a relationship between two tables is to add the tables to the Relationships page displayed when you click the Relationships button in the Relationships group on the Database Tools tab. You then drag a field in one table to the common field in the other table and complete the relationship definition in the Edit Relationships dialog box. In this dialog box, you are given the opportunity to impose a restriction called referential integrity on the data, which means that an entry will not be allowed in one table unless it already exists in the other table.
After you have created a relationship, you can delete it by deleting the line connecting the tables on the Relationships page. You can clear all the boxes from the page by clicking the Clear Layout button in the Tools group on the Relationship Tools Design contextual tab.
Tip
The coverage of relationships in this topic is deliberately simple. However, relationships are what make relational databases tick, and Access provides a number of fairly complex mechanisms to ensure the integrity of the data on either end of the relationship. For a good overview, search for Guide to table relationships in Access Help
In this exercise, you’ll create relationships between one table and two other tables. Then you’ll test the referential integrity of one of the relationships.
Note
SET UP You need the MyTables database you worked with in the preceding exercise to complete this exercise. Open the MyTables database, and then follow the steps.
- On the Create tab,
in the Tables group, click the Table button to create a new table.
 On the Quick Access Toolbar, click the Save button, name the table Orders, and click OK.
To the right of Click to Add, click the arrow, and in the data type list, click Number. Repeat this step to create a second field with the Number data type.
Double-click Field1, and type CustomerID. Then double-click Field2, and type EmployeeID.
Each order in the Orders table will be placed by one customer and will be handled by one employee. Let’s create relationships between the Orders table and the Customers and Employees tables so that we don’t create records for orders from customers who don’t exist or that seem to have been handled by employees who don’t exist.
Close the Orders table.
 On the Database
Tools tab, in the Relationships group, click the Relationships button.
On the Database
Tools tab, in the Relationships group, click the Relationships button.The Show Table dialog box opens so that you can indicate the tables for which you want to create a relationship.
With Customers selected on the Tables page, click Add. Then double-click Orders, and click Close.
Access displays the Relationships page and adds a Relationship Tools contextual tab to the ribbon.
In the Customers field list, click CustomerID, and drag it down and over CustomerID in the Orders field list, releasing the mouse button when two little boxes, one containing a plus sign, appear below the pointer.
Select the Enforce Referential Integrity check box, and then click Create.
Access creates the link between the primary key in the Customers table and the foreign key in the Orders table, and a line now connects the two field lists on the Relationships page.
 On the Design
contextual tab, in the Relationships
group, click the Show Table button. Then in the Show Table dialog
box, double-click the Employees table,
and click Close.
On the Design
contextual tab, in the Relationships
group, click the Show Table button. Then in the Show Table dialog
box, double-click the Employees table,
and click Close.Access adds a box listing all the fields in the Employees table to the Relationships page.
On the page, drag the title bars of the three field lists to arrange them so that they are side by side and equidistant.
In the Employees field list, click the EmployeeID field, and drag it down and over the EmployeeID field in the Orders field list. Then in the Edit Relationships dialog box, select the Enforce Referential Integrity check box, and click Create.
After Access draws the relationship line between the primary key and the foreign key, close the Relationships page, clicking Yes to save its layout.
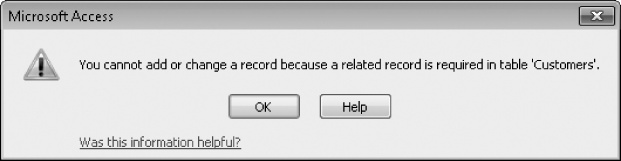
Open the Orders table. Then in the CustomerID field of the first record, type 11, and click below the record to complete it.
Access displays a message box telling you that you cannot add the new record to the table.
Click OK. Then change the value to 1, and click below the record to complete it.
This time, Access accepts the value because there is a record with the value 1 in the primary key CustomerID field of the Customers table.


Access 2010 includes templates to help you create databases and application parts to help you add related tables and other database objects.
Rather than storing all information in one table, you can create different tables for each type of information, such as customers, orders, and suppliers.
You can create a simple table structure by entering data and naming fields in Datasheet view. You can also set the data type and certain properties.
You can manipulate or hide columns and rows without affecting the data.
In Design view, you can modify any table, whether you created it manually or as part of a template.
Data types and properties determine what data can be entered in a field, and how the data will look on the screen. Caution: changing some properties might affect the data.
You can create a relationship between the primary key field of one table and the foreign key field of another so that you can combine information from both tables.