
Chapter at a Glance

Microsoft Access 2010 is part of Microsoft Office 2010, so the basic interface—such as the Quick Access Toolbar, the ribbon, the Backstage view, and dialog boxes—should be familiar if you have used other Office 2010 programs. However, Access has more dimensions than many of those programs, so it might seem more complex until you become familiar with it.
Tip
If you are upgrading from an earlier version of Access, you should refer to the introduction in Microsoft Access Step by Step, by Joyce Cox and Joan Lambert (Microsoft Press, 2010), to learn about differences between earlier versions and Access 2010.
Throughout this book, you’ll be working with databases that contain information about the employees, products, suppliers, and customers of a fictional company. As you complete the exercises in this book, you will develop an assortment of tables, forms, queries, and reports, which are called database objects. These objects can be used to enter, edit, and manipulate the information in a database in many ways.
In this chapter, you’ll explore the Access program window and learn about the concepts and structure of data storage in Access, including types of databases, types of database objects, and relationships between objects. You’ll look at objects in a working database, learning about interesting features of Access as well as functionality that you’ll explore in more depth in later chapters.
Note
Practice Files Before you can complete the exercises in this chapter, you need to copy the book’s practice files to your computer. The practice file you’ll use to complete the exercises in this chapter is in the Chapter25 practice file folder. A complete list of practice files is provided in Using the Practice Files at the beginning of this book.
As with all programs in Office 2010, the most common way to start Access is from the Start menu displayed when you click the Start button at the left end of the Windows Taskbar. When you start Access without opening a database, the program window opens in the Backstage view, with the New page active. In the Backstage view, commands related to managing Access and Access databases (rather than their objects) are organized as buttons and pages, which you display by clicking the page tabs in the left pane. You can display the Backstage view at any time by clicking the colored File tab in the upper-left corner of the program window.
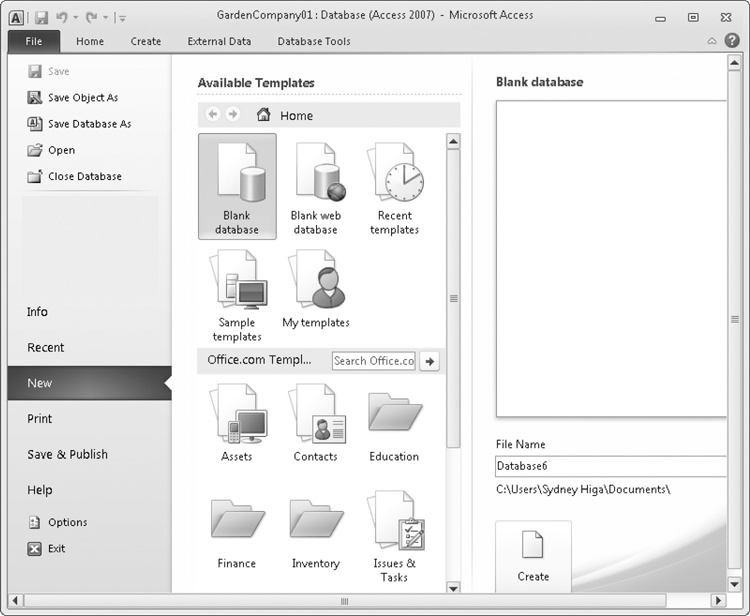
From the New page of the Backstage view, you can create a blank database; or you can create a new database based on a template that comes with Access, on a template downloaded from the Office.com Web site, or on a custom template saved on your computer or on your network. From the Backstage view, you can also open a database you worked in recently, or navigate to any database on your computer and open it.
When you create or open a database, it is displayed in the program window.

Note
Troubleshooting The appearance of buttons and groups on the ribbon changes depending on the width of the program window. For information about changing the appearance of the ribbon to match our screen images, see Modifying the Display of the Ribbon at the beginning of this book.
The database interface is designed to closely reflect the way people generally work with a database or database object. For those of you who are not familiar with this interface, which was first introduced with Microsoft Office Access 2007, here is a quick survey of the program window elements:
 The title bar displays the name of the
active database. The designation (Access 2007)
after the database name indicates that the database is in the .accdb
format introduced with Access 2007. At the left end of the title bar is
the Access icon, which you click to display
commands to move, size, and close the program window. The Minimize, Restore
Down/Maximize, and Close buttons at the right end of the title bar serve
the same functions as in all Windows programs.
The title bar displays the name of the
active database. The designation (Access 2007)
after the database name indicates that the database is in the .accdb
format introduced with Access 2007. At the left end of the title bar is
the Access icon, which you click to display
commands to move, size, and close the program window. The Minimize, Restore
Down/Maximize, and Close buttons at the right end of the title bar serve
the same functions as in all Windows programs.By default, the Quick Access Toolbar appears to the right of the Access icon at the left end of the title bar, and displays the Save, Undo, and Redo buttons. You can change the location of the Quick Access Toolbar and customize it to include any command that you use frequently.
Tip
If you create and work with complicated databases, you might achieve greater efficiency if you add the commands you use frequently to the Quick Access Toolbar and display it below the ribbon, directly above the workspace. For information about Access 2010 features not covered in this book, refer to Microsoft Access 2010 Step by Step by Joyce Cox and Joan Lambert (Microsoft Press 2010).
Below the title bar is the ribbon. All the commands for working with your Access database content are available from this central location so that you can work efficiently with the program.
Across the top of the ribbon is a set of tabs. Clicking the File tab displays the Backstage view. Clicking any other tab displays a set of related commands represented by buttons and lists. The Home tab is active by default.
On each tab, commands are organized into named groups. Depending on your screen resolution and the size of the program window, the commands in a group might be displayed as labeled buttons, as unlabeled icons, or as one or more large buttons that you click to display the commands within the group.
If a button label isn’t visible, you can display the command name and its keyboard shortcut (if it has one) in a ScreenTip by pointing to the button.
Some buttons include an integrated or separate arrow. If a button and its arrow are integrated, clicking the button will display options for refining the action of the button. If the button and its arrow are separate, clicking the button will carry out the default action indicated by the button’s current icon. You can change the default action by clicking the arrow and then clicking the action you want.
 Related but less common commands are not
represented as buttons in a group. Instead they are available in a
dialog box or task pane, which you display by clicking the dialog box launcher located in the
lower-right corner of the group.
Related but less common commands are not
represented as buttons in a group. Instead they are available in a
dialog box or task pane, which you display by clicking the dialog box launcher located in the
lower-right corner of the group.

 To the right of the ribbon tab names, below the
Minimize/Maximize/Close buttons, is the Minimize The Ribbon button. Clicking this
button hides the commands but leaves the tab names visible. You can then
click any tab name to temporarily display its commands. Clicking
anywhere other than the ribbon hides the commands again. When the full
ribbon is temporarily visible, you can click the button at its right
end, shaped like a pushpin, to make the display permanent. When the full
ribbon is hidden, you can click the Expand
The Ribbon button to permanently redisplay it.
To the right of the ribbon tab names, below the
Minimize/Maximize/Close buttons, is the Minimize The Ribbon button. Clicking this
button hides the commands but leaves the tab names visible. You can then
click any tab name to temporarily display its commands. Clicking
anywhere other than the ribbon hides the commands again. When the full
ribbon is temporarily visible, you can click the button at its right
end, shaped like a pushpin, to make the display permanent. When the full
ribbon is hidden, you can click the Expand
The Ribbon button to permanently redisplay it. Clicking the Access Help
button at the right end of the ribbon displays the Access Help window,
in which you can use standard techniques to find information.
Clicking the Access Help
button at the right end of the ribbon displays the Access Help window,
in which you can use standard techniques to find information.Note
See Also For information about the Help system, see Getting Help at the beginning of this book.


 On the left side of the program window, the
Navigation pane displays lists of
database objects. By default, it displays all the objects in the
database by type of object, but you can filter the list by clicking the
pane’s title bar and then clicking the category or group of
objects you want to display. You can collapse and expand the groups in
the list by clicking the chevrons in the section bars. If the Navigation
pane is in your way, you can click the Shutter Bar Open/Close button in its upper-right corner to
minimize it. To redisplay the Navigation pane, click the Shutter Bar Open/Close button again.
You can drag the right border of the pane to the left or right to make
it wider or narrower.
On the left side of the program window, the
Navigation pane displays lists of
database objects. By default, it displays all the objects in the
database by type of object, but you can filter the list by clicking the
pane’s title bar and then clicking the category or group of
objects you want to display. You can collapse and expand the groups in
the list by clicking the chevrons in the section bars. If the Navigation
pane is in your way, you can click the Shutter Bar Open/Close button in its upper-right corner to
minimize it. To redisplay the Navigation pane, click the Shutter Bar Open/Close button again.
You can drag the right border of the pane to the left or right to make
it wider or narrower.Across the bottom of the program window, the status bar displays information about the current database and provides access to certain program functions. You can control the contents of the status bar by right-clicking it to display the Customize Status Bar menu, on which you can click any item to display or hide it.
At the right end of the status bar, the View Shortcuts toolbar provides buttons for quickly switching the view of the active database object.
The goal of all these interface features is to make working with a database as intuitive as possible. Commands for tasks you perform often are readily available, and even those you might use infrequently are easy to find.
In this exercise, you’ll take a tour of the command structure in the Access 2010 program window.
Note
SET UP You need the GardenCompany01_start database located in your Chapter25 practice file folder to complete this exercise, but don’t open it yet. Just follow the steps.
On the Start menu, click All Programs, click Microsoft Office, and then click Microsoft Access 2010.
Access starts and displays the program window in the Backstage view. From this view, you manage your Access database files, but you don’t work with the content of databases. For example, you can create a database, but not a database object. We’ll talk about the tasks you can perform in the Backstage view in other chapters of this book.
In the left pane of the Backstage view, click Open. Then in the Open dialog box, navigate to your Chapter25 practice file folder, and double-click the GardenCompany01_start database.
The database opens in the program window. A security warning appears below the ribbon.
In the security warning bar, click Enable Content.
Important
Be sure to read the sidebar Enabling Macros and Other Database Content later in this chapter to learn about Access security options.
Let’s save the database so that you can explore it without fear of overwriting the original practice file.
Click the File tab to display the Backstage view, click Save Database As, and then in the Save As dialog box, save the database in your Chapter25 practice file folder with the name GardenCompany01.
Tip
In this book, we assume you will save files in your practice file folders, but you can save them wherever you want. When we refer to your practice file folders in the instructions, simply substitute the save location you chose.
In the program window, the title bar tells you that you can work with this database in Access 2007 as well as Access 2010. On the left, the Navigation pane displays a list of all the objects in this database. Spanning the top of the window, the ribbon includes five tabs: File, Home, Create, External Data, and Database Tools. The Home tab is active by default. Because no database object is currently open, none of the buttons on the Home tab are available.
Tip
Databases created with Access 2010 use the file storage format introduced with Access 2007, and their files have the .accdb extension. You can open database files created in earlier versions of Access (which have an .mdb extension) in Access 2010. You can then either work with and save them in the old format or work with and save them in the new format. If you convert them, you can no longer open them in versions prior to Access 2007. For more information about the ACCDB format, search for accdb in Access Help.
In the Navigation pane title bar, click All Access Objects, and then under Filter By Group in the menu, click Tables.
The Navigation pane now lists only the tables in the database.
In the Navigation pane, under Tables, double-click Categories.
The Categories table opens on a tabbed page. Because a table is displayed, two Table Tools contextual tabs (Fields and Table) appear on the ribbon. These contextual tabs are displayed only when you are working with a table.
Buttons representing commands related to working with database content are organized on the Home tab in six groups: Views, Clipboard, Sort & Filter, Records, Find, and Text Formatting. Only the buttons for commands that can be performed on the currently selected database object—in this case, a table—are active.
- On the Home tab,
click the Text Formatting dialog box launcher.
In the Datasheet Formatting dialog box, click Cancel.
Click the Create tab.
Buttons representing commands related to creating database objects are organized on this tab in six groups: Templates, Tables, Queries, Forms, Reports, and Macros & Code.
Double-clicking the active tab hides the ribbon and provides more space for the current database object.
Click the External Data tab.
The ribbon temporarily drops down, with the External Data tab active. Buttons representing commands related to moving information between a database and other sources are organized on this tab in four groups: Import & Link, Export, Collect Data, and Web Linked Lists.
Tip
To make the graphics in this book readable, we are working in a program window that is smaller than full-screen. As a result, the Collect Data and Web Linked Lists groups are represented in this graphic as buttons. For more information, see Modifying the Display of the Ribbon at the beginning of this book.
Click anywhere in the open table.
Double-click the Database Tools tab.
Double-clicking a tab permanently displays the ribbon and activates that tab. Buttons representing commands related to managing, analyzing, and ensuring data reliability are organized on the Database Tools tab in six groups: Tools, Macro, Relationships, Analyze, Move Data, and Add-Ins.
 To the right of the Categories table page tab, click the Close button to close the table without closing
the database.
To the right of the Categories table page tab, click the Close button to close the table without closing
the database.Clicking this button closes the active object.
Click the File tab to display the Backstage view, and then click Close Database.
When you close a database without exiting Access, the New page of the Backstage view is displayed so that you can open another database or create a new one.
Note that if you don’t close the active database before opening another one, Access prompts you to save your changes and closes the active database for you. You cannot have two databases open simultaneously in a single instance of Access. If you want to have two databases open at the same time, you must start a new instance of Access.


Enabling Macros and Other Database Content
Some databases contain Microsoft Visual Basic for Applications (VBA) macros that can run code on your computer. In most cases, the code is there to perform a database-related task, but hackers can also use macros to spread a virus to your computer.
When you open a database that is not stored in a trusted location or signed by a trusted publisher, Access displays a security warning below the ribbon.

While the security warning is displayed, the macros in the database are disabled. You can enable macros in three ways:
By enabling the macros in the database for use in the current database session.
By adding the database publisher to the list of trusted publishers. This option is available only if the publisher’s digital signature is attached to the database. Access will then automatically enable macro content in any database that is also signed by that publisher.
By placing the database in a trusted location. Access automatically enables macro content in any database saved in that location. The trusted locations you specify within Access are not also trusted by other Office programs.
To enable macros for the current database session only:
In the Security Warning area, click Enable Content.
To add the publisher of a digitally signed database to the trusted publishers list:
In the Security Warning area, click Some Active Content Has Been Disabled. Click For More Details.
On the Information About <Database Name> page, click the Enable Content button, and then click Advanced Options.
In the Microsoft Office Security Options dialog box, click Trust All From Publisher, and then click OK.
Note that the Trust All From Publisher option is available only if the database is digitally signed.
To add the location of a database to the trusted locations list:
Display the Backstage view, and then click Options.
In the left pane of the Access Options dialog box, click Trust Center, and then click Trust Center Settings.
In the left pane of the Trust Center, click Trusted Locations.
On the Trusted Locations page, click Add New Location.
In the Microsoft Office Trusted Location dialog box, click Browse.
In the Browse dialog box, browse to the folder containing the current database, and then click OK.
In the Microsoft Office Trusted Location dialog box, select the Subfolders Of This Location Are Also Trusted check box if you want to do so, and then click OK in each of the open dialog boxes.
If you prefer, you can change the way Access handles macros in all databases:
Display the Trust Center, and then in the left pane, click Macro Settings.
Select the option for the way you want Access to handle macros:
Disable All Macros Without Notification If a database contains macros, Access disables them and doesn’t display the security warning to give you the option of enabling them.
Disable All Macros With Notification Access disables all macros and displays the security warning.
Disable All Macros Except Digitally Signed Macros Access automatically enables digitally signed macros.
Enable All Macros Access enables all macros (not recommended).
Click OK to close the Trust Center, and then click OK to close the Access Options dialog box.
Simple database programs, such as the Database component of Microsoft Works, can store information in only one table. These simple databases are often called flat file databases, or just flat databases. More complex database programs, such as Access, can store information in multiple related tables, thereby creating what are referred to as relational databases. If the information in a relational database is organized correctly, you can treat these multiple tables as a single storage area and pull information electronically from different tables in whatever order meets your needs.
A table is just one of the object types you work with in Access. Other object types include forms, queries, reports, macros, and modules.
Of all these object types, only one—the table—is used to store information. The rest are used to enter, manage, manipulate, analyze, retrieve, or display the information stored in a table—in other words, to make the information as accessible and therefore as useful as possible.
Over the years, Microsoft has put a lot of effort into making Access not only one of the most powerful consumer database programs available, but also one of the easiest to learn and use. Because Access is part of Office 2010, you can use many of the same techniques you use with Microsoft Word and Microsoft Excel. For example, you can use familiar commands, buttons, and keyboard shortcuts to open and edit the information in Access tables. And you can easily share information between Access and Word, Excel, or other Office programs.
In its most basic form, a database is the electronic equivalent of an organized list of information. Typically, this information has a common subject or purpose, such as the list of employees shown in the following table.
|
ID |
Last name |
First name |
Title |
Hire date |
|---|---|---|---|---|
|
1 |
Anderson |
Nancy |
Sales Rep |
May 1, 2003 |
|
2 |
Carpenter |
Chase |
Sales Manager |
Aug 14, 2001 |
|
3 |
Emanuel |
Michael |
Sales Rep |
Apr 1, 1999 |
|
4 |
Furse |
Karen |
Buyer |
May 3, 2004 |
This list is arranged in a table of columns and rows. Each column represents a field—a specific type of information about an employee: last name, first name, hire date, and so on. Each row represents a record—all the information about a specific employee.
If a database did nothing more than store information in a table, it would be no more useful than a paper list. But because the database stores information in an electronic format, you can manipulate the information in powerful ways to extend its utility.
For example, suppose you want to find the phone number of a person who lives in your city. You can look up this information in the telephone book, because its information is organized for this purpose. If you want to find the phone number of someone who lives further away, you can go to the public library, which probably has a telephone book for each major city in the country. However, if you want to find the phone numbers of all the people in the country with your last name, or if you want to find the phone number of your grandmother’s neighbor, these printed phone books won’t do you much good, because they aren’t organized in a way that makes that information easy to find.
When the information published in a phone book is stored in a database, it takes up far less space, it costs less to reproduce and distribute, and, if the database is designed correctly, the information can be retrieved in many ways. The real power of a database isn’t in its ability to store information; it is in your ability to quickly retrieve exactly the information you want from the database.
Tables are the core database objects. Their purpose is to store information. The purpose of every other database object is to interact in some manner with one or more tables. An Access database can contain thousands of tables, and the number of records each table can contain is limited more by the space available on your hard disk than by anything else.
Tip
For detailed information about Access specifications, such as the maximum size of a data-base or the maximum number of records in a table, search for “Access 2010 specifications” (including the quotation marks) in Access help.
Every Access object has two or more views. For tables, the two most common views are Datasheet view, in which you can see and modify the table’s data, and Design view, in which you can see and modify the table’s structure. To open a table in Datasheet view, either double-click its name in the Navigation pane, or right-click its name and then click Open. To open a table in Design view, right-click its name and then click Design View. When a table is open in Datasheet view, clicking the View button in the Views group on the Home tab switches to Design view; when it is open in Design view, clicking the button switches to Datasheet view. To switch to either of the two remaining table views (PivotTable view or PivotChart view), you click the View arrow and then click the view you want in the list. You can also switch the view by clicking one of the buttons on the View Shortcuts toolbar in the lower-right corner of the program window.
When you view a table in Datasheet view, you see the table’s data in columns (fields) and rows (records). The first row contains column headings (field names). In this format, the table is often simply referred to as a datasheet.

If two tables have one or more field names in common, you can embed the datasheet from one table in another. By using an embedded datasheet, called a subdatasheet, you can see the information in more than one table at the same time. For example, you might want to embed an Orders datasheet in a Customers table so that you can see the orders each customer has placed.
In this exercise, you’ll open existing database tables and explore the table structure in different views.
Note
SET UP You need the GardenCompany01 database you worked with in the preceding exercise to complete this exercise. Open the GardenCompany01 database, ensure that tables are listed in the Navigation pane, and then follow the steps.
- In the Navigation
pane, double-click Products. Then at the
right end of the Navigation pane title
bar, click the Shutter Bar Close button
so that you can see more of the table’s fields.
The Products table is displayed in Datasheet view.
In the row of field names at the top of the table, point to the right border of the Product Name field name, and when the pointer changes to a double-headed arrow, double-click the border.
Access adjusts the width of the field to accommodate its longest entry. Notice that Product 1, Magic Lily, and Product 2, Autumn crocus, are assigned to the Bulbs category.
Double-click the right border of the Category field name to adjust that field’s width.
- In the Navigation
pane, click the Shutter Bar Open button,
and then double-click Categories.
Tip
From now on, open the Navigation pane whenever you need to work with a different object, but feel free to close it if you want to see more of the data.
The Categories table opens on a new tabbed page in Datasheet view. The Categories page is active, but the Products page is still open and available if you need it.
 At the left end of the record for the Bulbs category, click the Expand button.
The Bulbs category expands to reveal a subdatasheet containing all the records from the Products table that are assigned to the Bulbs category. This is possible because a relationship has been established between the two tables.
Note
See Also For information about relationships, see Creating Relationships Between Tables in Chapter 26.
 To the left of the record for the Bulbs category, click the Collapse button to hide the
subdatasheet.
To the left of the record for the Bulbs category, click the Collapse button to hide the
subdatasheet.- Click the Close
button at the right end of the tab bar (not the Close button in the upper-right corner of
the program window) to close the Categories table.
Close the Products table, and when Access asks whether you want to save your changes to this table, click Yes.
In steps 2 and 3, you changed the look of the table by changing the widths of columns. If you want those changes to be in effect the next time you open the table, you must save them.
In the Navigation pane, double-click the Orders table.
 On the record navigation bar, click the Next Record button
several times.
On the record navigation bar, click the Next Record button
several times.The selection moves down the OrderID field, because that field is active.
Click the record navigation bar, select the current record number, type 40, and then press the Enter key.
The selection moves directly to record 40.
 On the View
Shortcuts toolbar, click the Design
View button.
On the View
Shortcuts toolbar, click the Design
View button.The Orders table structure is displayed in Design view, and the Table Tools Design contextual tab appears on the ribbon.
Note
See Also For information about table structure, see Refining Table Structure in Chapter 26.


Note
CLEAN UP Close the Orders table. Retain the GardenCompany01 database for use in later exercises.
Tabbed Pages vs. Overlapping Windows
By default, Access 2010 displays database objects on tabbed pages in the program window. If you prefer to display each object in a separate window rather than on a separate page, you can do so.
To switch to overlapping windows:
Click the File tab to display the Backstage view, and then click Options.
The Access Options dialog box opens.
Display the Current Database page, and then in the Application Options area, under Document Window Options, click Overlapping Windows.
Click OK.
A message tells you that you must close and reopen the current database to put this change into effect.
Click OK. Then close and reopen the database.
When database objects are displayed on tabbed pages, a Close button appears at the right end of the tab bar. When objects are displayed in overlapping windows, the window of each object has its own set of Minimize, Restore Down/Maximize, and Close buttons at the right end of its title bar.

You can move object windows by dragging their title bars, and you can size them by dragging their frames. You can also arrange windows by using the options available when you click the Switch Windows button in the Window group. (This group is added to the Home tab when you select Overlapping Windows in the Access Options dialog box.)
Access tables are dense lists of raw information. Working directly with tables in a database you create for your own use might be quite simple for you, but it might be overwhelming for people who don’t know much about databases. To make it easier to enter, display, and print information, you can design forms.
A form acts as a friendly interface for a table. Through a form, you can display and edit the records of the underlying table, or create new records. Most forms provide an interface to only one table, but if you want to use one form to interact with multiple tables that are related through one or more common fields, you can embed subforms within a main form.
Forms are essentially collections of controls that either accept information or display information. You can create forms by using a wizard, or you can create them from scratch by manually selecting and placing the controls. Access provides the types of controls that are standard in Windows dialog boxes, such as labels, text boxes, option buttons, and check boxes. With a little ingenuity, you can create forms that look and work much like the dialog boxes in all Windows programs.
As with tables, you can display forms in several views. The following are the three most common views:
Form A view in which you display and enter data.
Layout A view in which you can work with the elements of the form to refine the way it looks and behaves while also being able to see the data from the underlying table.
Design A view that gives you more precise control over the look, placement, and behavior of elements of the form but that hides the underlying data.
Note
See Also For more information about forms, see Chapter 27.
In this exercise, you’ll explore forms, subforms, and the available form controls.
Note
SET UP You need the GardenCompany01 database you worked with in the preceding exercise to complete this exercise. Open the GardenCompany01 database, and then follow the steps.
In the Navigation pane, click the title bar to display the category list, and then under Filter By Group, click Forms.
This group includes all the forms that have been saved as part of this database.
In the Navigation pane, double-click Products.
The Products form opens on a tabbed page.
Click the arrow adjacent to the Supplier box.
Access displays a list of all the company’s suppliers.
In the Navigation pane, double-click Categories.
The Categories form opens on its own tabbed page. This form includes a main form and a subform. The main form displays information from the Categories table, and the subform, which looks like a datasheet, displays information for the current record from the Products table.
- On the record navigation bar, click the Next Record button a few
times to display the next few records.
Notice that the subform changes with each click to display the products in each category.
 On the Home tab, in
the Views group, click the View button.
On the Home tab, in
the Views group, click the View button.For forms, clicking the View button switches between Form view and Layout view.
In the Views group, click the View arrow, and then click Design View.
Access displays the Customers form in Design view, and adds three Form Design Tools contextual tabs (Design, Arrange, and Format) to the ribbon. The contextual tabs are available only when you are working on the design of the form in either Layout view or Design view.
Switch between Form view, Layout view, and Design view, noticing the differences in the program window.
On the Design contextual tab, in the Controls group, display the Controls gallery.
Depending on the size of your program window, you might have to click the Controls button or the More button to display this gallery.
Click away from the gallery to close it.
Right-click the tab of the Customers form, and then click Close All.


You can locate specific information stored in a table, or in multiple tables, by creating a query that specifies the criteria you want to match. Queries can be quite simple. For example, you might want a list of all products in a specific category that cost less than $10. Queries can also be quite complex. For example, you might want to locate all out-of-state customers who have purchased gloves within the last three months. For the first example, you might be able to sort and filter the data in the Products table fairly quickly to come up with a list. For the second example, sorting and filtering would be very tedious. It would be far simpler to create a query that extracts all records in the Customers table with billing addresses that are not in your state and whose customer IDs map to records that appear in the Orders table within the last three months and that include item IDs mapping to records classified as gloves in the Products table.
You can create queries by using a Query wizard, and you can also create them from scratch. The most common type is the select query, which extracts matching records from one or more tables. Less common are queries that perform specific types of actions.
Processing a query, commonly referred to as running a query or querying the database, displays a datasheet containing the records that match your search criteria. You can use the query results as the basis for further analysis, create other Access objects (such as reports) from the results, or export the results in another format, such as an Excel spreadsheet.
If you create a query that you are likely to want to run more than once, you can save it. It then becomes part of the database and appears in the list when you display the Queries group in the Navigation pane. To run the query at any time, you simply double-click it in the Navigation pane. Each time you run the query, Access evaluates the records in the specified table or tables and displays the current subset of records that match the criteria defined in the query.
Don’t worry if this all sounds a bit complicated at the moment. When you approach queries logically, they soon begin to make perfect sense.
In this exercise, you’ll explore two existing queries.
Note
SET UP You need the GardenCompany01 database you worked with in the preceding exercise to complete this exercise. Open the GardenCompany01 database, and then follow the steps.
In the Navigation pane, display the Queries group.
The group includes all the queries that have been saved as part of this database.
In the Navigation pane, right-click the Delete Discontinued Products query, and then click Object Properties.
Access displays the properties of the query, including a description of its purpose.
In the Delete Discontinued Products Properties dialog box, click Cancel.
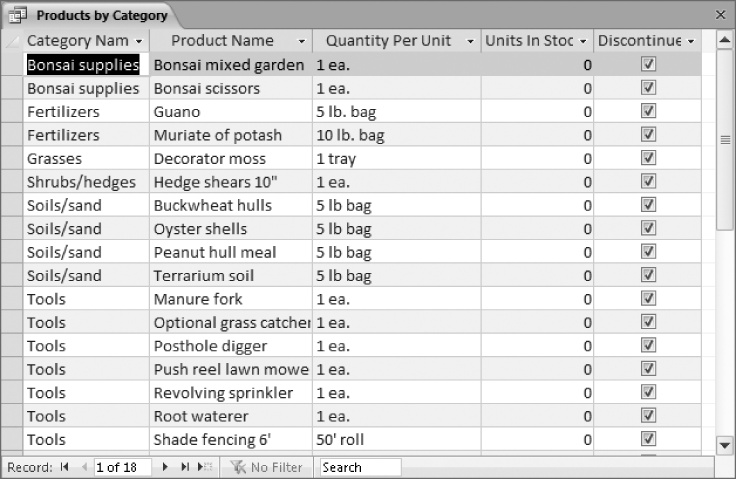
Right-click the Products By Category query, and then click Open.
The record navigation bar indicates that 171 records are displayed; the Products table actually contains 189 records. To find out why 18 of the records are missing, you need to look at this query in Design view.
- On the View
Shortcuts toolbar, click the Design
View
button.
Access displays the query in the Query Designer, and the Query Tools Design contextual tab appears on the ribbon.
Two boxes in the top pane of the Query Designer list the fields in the tables this query is designed to work with. The line between the boxes indicates that before the query was created, a relationship was established between the two tables based on the fact that the CategoryID field is present in both of them. The relationship enables this query to draw information from both tables.
Note
See Also For more information about relationships, see Creating Relationships Between Tables in Chapter 26.
The query is defined in the design grid in the bottom pane of the Query Designer. Each column of the grid refers to one field from one of the tables above. Notice that <> Yes (not equal to Yes) is entered in the Criteria row for the Discontinued field. This query finds all the records that don’t have a value of Yes in that field (in other words, all the records that have not been discontinued).
 As an experiment, in the Criteria row of the Discontinued field, replace <> with =. Then on the Design contextual tab, in the Results group, click the Run button.
This time, the query finds all the records that have been discontinued. The 18 discontinued products account for the difference between the number of records in the Products table and the number of records displayed by the original query.
Close the Products By Category query. When a message asks whether you want to save your changes to the query, click No.


You can display the information recorded in your tables in nicely formatted, easily accessible reports, either on your computer screen or on paper. A report can include items of information selected from multiple tables and queries, values calculated from information in the database, and formatting elements such as headers, footers, titles, and headings.
You can look at reports in four views:
Report view In this view, you can scroll through the information in the report without being distracted by the page breaks that will be inserted when it is printed.
Print Preview In this view, you see your report exactly as it will look when printed.
Layout view This view displays the data in the report (similar to Print Preview) but enables you to edit the layout.
Design view In this view, you can manipulate the design of a report in the same way that you manipulate a form.
In this exercise, you’ll preview a report as it will appear when printed. You’ll also examine another report in Design view.
Note
SET UP You need the GardenCompany01 database you worked with in the preceding exercise to complete this exercise. Open the GardenCompany01 database, and then follow the steps.
In the Navigation pane, display the Reports group.
The group includes all the reports that have been created and saved as part of this database.
In the Navigation pane, right-click Customer Labels, and then click Print Preview.
Note
Troubleshooting If a message tells you that some data may not be displayed because of column widths and spacing, for the purposes of this exercise, simply press OK to continue.
The Customer Labels report opens, displaying a full page of labels in a view that is much like Print Preview in other Office programs. The ribbon now displays only the Print Preview tab.
Move the pointer over the report, where it changes to a magnifying glass. Then with the pointer over the middle label at the top of the report, click the mouse button.
The zoom percentage changes to 100%, as indicated on the Zoom Level button in the lower-right corner of the window. You can click this button to switch back and forth between the current and previous zoom levels.
If the report is too small to read in Print Preview, you can adjust the zoom percentage by clicking the Zoom In button (the plus sign) at the right end of the Zoom slider in the lower-right corner of the window, or by dragging the Zoom slider. You can also click the Zoom arrow in the Zoom group on the Print Preview tab and then click a specific percentage.
In the Navigation pane, right-click the Sales By Category report, and then click Print Preview.
Use any method to zoom the page to 100 percent.
 On the page navigation bar in the lower-left corner
of the page, click the Last
Page button.
On the page navigation bar in the lower-left corner
of the page, click the Last
Page button.This report generates nine pages of information by combining data from the Categories table and the Products table.
 Click the Previous
Page button a few times to view a few
more pages of the report.
Click the Previous
Page button a few times to view a few
more pages of the report.- On the View
Shortcuts toolbar, click the Design
View button.


Access switches to Design view and displays four Report Design Tools contextual tabs (Design, Arrange, Format, and Page Setup) on the ribbon. In this view, the report looks similar to a form.

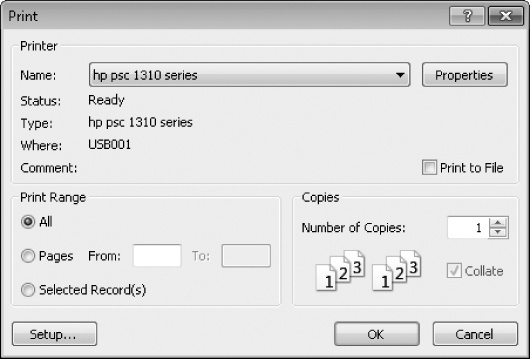
Because Access is a Windows application, it interacts with your printer through standard Windows dialog boxes and drivers. This means that any printer that you can use from other programs can be used from Access, and any special features of that printer, such as color printing or duplex printing, are available in Access.
The commands for printing database objects are available from the Print page of the Backstage view. From this page, you can do the following:
In this exercise, you’ll explore the printing options for a table and a form.
Note
SET UP You need the GardenCompany01 database you worked with in the preceding exercise to complete this exercise. Open the GardenCompany01 database, and then follow the steps.
In the Navigation pane, display the All Access Objects category.
In the Tables group, double-click the Employees table to open it in Datasheet view.
This table contains information about nine employees. Some of the columns are too narrow to display all their data, and even with the program window maximized, depending on your screen resolution, some of the fields might not fit on the screen.
Adjust the widths of all the columns so that all the values in the fields are visible.
Access will not print data that is not visible.
Click the File tab to display the Backstage view.
In the left pane, click Print.
In the right pane, click Print Preview.
The first page of the Employees table is displayed in Print Preview.
-
 On the navigation bar at the bottom of the window,
click the Next Page button. Then click
the First Page button to move back to page 1.
On the navigation bar at the bottom of the window,
click the Next Page button. Then click
the First Page button to move back to page 1.If you print this datasheet with the current settings, it will print as two short, vertically oriented pages.
 On the Print Preview
tab, in the Page Layout group, click the
Landscape button. Then click the
Next Page button.
On the Print Preview
tab, in the Page Layout group, click the
Landscape button. Then click the
Next Page button.In Landscape orientation, the datasheet still fits on two pages, with only one field on the second page.
 In the Page Size
group, click the Margins button, and then
click Narrow.
In the Page Size
group, click the Margins button, and then
click Narrow.On the page navigation bar, the buttons are now gray, indicating that the Employee list fits on one page.
 Click Cancel to
close the Print dialog box, and then in
the Close Preview group, click the
Close Print Preview button.
Click Cancel to
close the Print dialog box, and then in
the Close Preview group, click the
Close Print Preview button.In the Navigation pane, under Reports, double-click Alphabetical List of Products.
Display the Backstage view, click Print, and then click Print Preview.
Access displays a preview of the information that will be printed.
 On the Print Preview
tab, in the Zoom group, click the Two Pages button.
On the Print Preview
tab, in the Zoom group, click the Two Pages button.Access displays the first two pages in the report side by side.
 On the View
Shortcuts toolbar, click the Report
View button to return to that view.
On the View
Shortcuts toolbar, click the Report
View button to return to that view.


The basic Access interface objects work much the same as in other Office or Windows programs.
A database is the computer equivalent of an organized list of information.
Tables are the core database objects. Access data is organized in tables made up of columns and rows, called fields and records.
In a relational database, tables can be related based on common fields, enabling the retrieval of information from more than one table at the same time.
The purpose of the other database objects—forms, reports, queries, macros, and modules—is to interact with one or more tables.
Every Access object has two or more views. For example, you view data in a table in Datasheet view and define how the data is structured in Design view.
If you want to print a database object, be sure the information you need is visible on the screen before you print.